
Subscribe to Our Youtube Channel
Related Manuals for Planmeca Proline EC Panoramic


Summary of Contents for Planmeca Proline EC Panoramic
- Page 1 Planmeca Proline EC panoramic USER'S MANUAL Publication number 688043 Version 20 Published 2005-08...
-
Page 3: Table Of Contents
SYMBOLS ........................2 WARNINGS AND PRECAUTIONS ................3 CHECKLIST - BEFORE USING THE UNIT ..............4 PM PROLINE EC PANORAMIC X-RAY - MAIN PARTS ..........5 CONTROL PANEL - KEYS AND DISPLAYS ..............8 PREPARATIONS FOR THE EXPOSURE ...............13 Switching the unit on ........................13 Loading the cassette ........................ - Page 4 IEC364 - equipment is used according to the operating instructions Planmeca pursues a policy of continual product development. Although every effort is made to produce up-to-date product documentation this publication should not be re- garded as an infallible guide to current specifications. We reserve the right to make changes without prior notice.
-
Page 5: Introduction
The unit is allowed to be used only under super- vision of a dental/health care professional. This manual describes how to operate the Planmeca Proline EC Panoramic X-ray unit. Please read these instructions thoroughly before using the unit. Planmeca Proline EC panoramic X-ray fulfills the 0537 requirements of Directive 93/42/EEC. -
Page 6: Symbols
Type B equipment (Standard IEC 601-1). Alternating current (Standard IEC-417). Attention, consult accompanying documents (Standard IEC 601-1). X-ray device. Electrostatic sensitive device (Standard IEC 60417). Separate collection for electrical and electronic equipment according Directive 2002/96/EC (WEEE). 2 Planmeca Proline EC Panoramic X-ray User's manual... -
Page 7: Warnings And Precautions
EMC informa- tion provided in the accompanying docu- ments. NOTE Portable and mobile RF communications equipment can affect Planmeca Proline EC X- ray unit. CAUTION The remote exposure control, Autoprint and Admark film marking systems are connected to the X-ray units Planet connectors. -
Page 8: Checklist - Before Using The Unit
Make sure that the film and screen are the right type for the technique you plan to use. • Make sure that the intensifying screen is free of dust and is not scratched or damaged. • Never leave the cassette open. 4 Planmeca Proline EC Panoramic X-ray User's manual... -
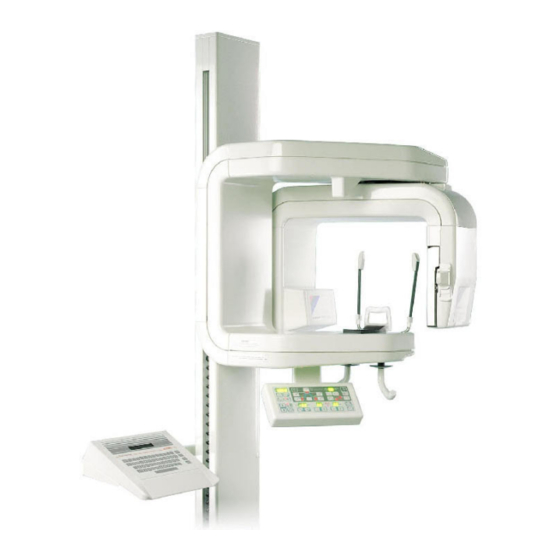
Page 9: Pm Proline Ec Panoramic X-Ray - Main Parts
PM PROLINE EC PANORAMIC X-RAY - MAIN PARTS 5 PM PROLINE EC PANORAMIC X-RAY - MAIN PARTS General view of the X-ray Column Rotating assembly Vertical carriage Cephalostat CM (PAN/CEPH X-ray unit) Remote exposure switch Admark film marking system (optional) - Page 10 PM PROLINE EC PANORAMIC X-RAY - MAIN PARTS Remote exposure switch Exposure button When you take an exposure you must press and hold down the exposure button for the whole duration of the exposure. If you remove your finger from the exposure...
- Page 11 PM PROLINE EC PANORAMIC X-RAY - MAIN PARTS Patient supports Chin rest Chin support Disposable bite piece Emergency stop button The emergency stop button is located on the side of the control panel. Press the button to stop the vertical carriage movement in an emergency.
-
Page 12: Control Panel - Keys And Displays
Milliampere setting keys and display Exposure warning indicator Kilovolt setting keys and display Program key Focal trough positioning/Positioning light keys and display Child mode selection key Temple support key Height adjusting keys 8 Planmeca Proline EC Panoramic X-ray User's manual... - Page 13 Cassette carriage in ready position NOTE The automatic closing of the temple supports can be switched off, refer to section “11.4 Au- tomatic closing of the temple supports” on page 33. Planmeca Proline EC Panoramic X-ray User's manual...
- Page 14 Kilovolt (kV) setting keys and display The kilovolt setting minus (-) key decreases the kilovolt value and the plus (+) key increases it. The maximum value is 80 kV and the minimum value is 60 kV. 10 Planmeca Proline EC Panoramic X-ray User's manual...
- Page 15 Press the key a third time, or wait five seconds, and the current time will reappear. If you wish to set the clock see sec- tion “11.3 Setting the clock” on page 32. Planmeca Proline EC Panoramic X-ray User's manual...
- Page 16 P key again. PAN/CEPHMODEL: In the cephalometric mode the exposure time is changed with these keys, refer to the PM 2002 EC Cephalostat CM User’s manual. 12 Planmeca Proline EC Panoramic X-ray User's manual...
-
Page 17: Preparations For The Exposure
40. 7.2 Loading the cassette Press the return key to move the cassette carriage to the loading position if it is not already in that position. Cassette carriage in loading position Planmeca Proline EC Panoramic X-ray User's manual... - Page 18 Make sure that the latches click into their posi- AUTOPRINT tions. CAUTION ! THIS DEVICE CONTAINS FIBRE OPTICS. HANDLE WITH CARE AUTOPRINT CAUTION ! THIS DEVICE CONTAINS FIBRE OPTICS. HANDLE WITH CARE 14 Planmeca Proline EC Panoramic X-ray User's manual...
-
Page 19: Preparing The Patient
The indicator light will come on. Press any of these keys to switch the radiation off. The kV and mA values will clear from the displays which indicates that the radiation has been switched off. Planmeca Proline EC Panoramic X-ray User's manual... - Page 20 “exposure” (18 seconds) to demonstrate the movement of the unit. The rotating unit will move through one exposure cycle. To switch the radiation on again repeat the keying sequence you used to switch the radiation off. 16 Planmeca Proline EC Panoramic X-ray User's manual...
-
Page 21: Panoramic Exposure
Select the correct exposure values for the patient being X-rayed according to the values in the following table. If you are using a different film screen combina- tion you may have to adjust the exposure values. Planmeca Proline EC Panoramic X-ray User's manual... - Page 22 This will help to stretch and straighten the patient’s cervical vertebrae. 18 Planmeca Proline EC Panoramic X-ray User's manual...
- Page 23 Make sure that the patient is looking straight ahead as the light may appear to be correctly positioned but the Midsagittal plane light patient’s head could be turned slightly to one side. Planmeca Proline EC Panoramic X-ray User's manual...
- Page 24 Focal trough light Press the ready key to drive the unit to the ready posi- READY tion. The indicator light will come on. PRET Cassette carriage in ready position 20 Planmeca Proline EC Panoramic X-ray User's manual...
- Page 25 This is not necessary if the cassette carriage is set to return to the loading position auto- matically. Remove the cassette from the cassette carriage and process the film. Planmeca Proline EC Panoramic X-ray User's manual...
-
Page 26: Temporomandibular Joint Exposure (P10)
This procedure will produce open and closed views of the left and right temporomandibular joints with the Planmeca Proline EC panoramic X-ray unit. Temporomandibular joint exposure Note that this is a double exposure and the rotating assembly will travel through two exposure cycles. -
Page 27: First Exposure - Jaw Closed
Guide the patient towards the unit so that they are fac- ing the chin support. Explain to the patient that you will take a double exposure and that the unit will rotate twice. Planmeca Proline EC Panoramic X-ray User's manual... - Page 28 Make sure the 5° patient’s back is straight. Frankfort plane 24 Planmeca Proline EC Panoramic X-ray User's manual...
- Page 29 105 mm -12 mm 110 mm -16 mm Press either of the focal trough positioning keys to readjust the position of the patient according to the measurements given in the table. Readjust patient position Planmeca Proline EC Panoramic X-ray User's manual...
-
Page 30: Second Exposure - Jaw Open
Press and hold down the exposure button on the remote control for the duration of the second expo- sure. When the rotating assembly has completed the second exposure cycle the temple supports will auto- 26 Planmeca Proline EC Panoramic X-ray User's manual... -
Page 31: Exiting The Tmj Exposure Mode
Remove the cassette from the unit and process the film. 9.3 Exiting the TMJ exposure mode When you want to enter the panoramic exposure mode, press and hold down the panoramic mode selection key until you have heard two audible signals. Planmeca Proline EC Panoramic X-ray User's manual... -
Page 32: Sinus Program (P20)
Based on Kodak Ektavision film and Kodak Ektavision screen PATIENT kV VALUE mA VALUE Child 10 and over Adult female or small male Adult male Large adult male a. Use the CHILD MODE. 28 Planmeca Proline EC Panoramic X-ray User's manual... - Page 33 Make sure light that the patient is looking straight ahead as the light may appear to be correctly positioned but the patient’s head could be turned slightly to one side. Planmeca Proline EC Panoramic X-ray User's manual...
- Page 34 This is not necessary if the cassette carriage is set to return to the loading position auto- matically. Remove the cassette from the unit and process the film. 30 Planmeca Proline EC Panoramic X-ray User's manual...
-
Page 35: Additional Functions
The automatic cassette carriage return function is now activated. To switch the automatic cassette carriage return off repeat the above keying sequence. The indicator lights will go out. Planmeca Proline EC Panoramic X-ray User's manual... -
Page 36: Setting The Clock
PRET The clock will start to run when the ready key is pressed, with seconds cleared. Use this to synchro- nize the clock and a time signal. 32 Planmeca Proline EC Panoramic X-ray User's manual... -
Page 37: Automatic Closing Of The Temple Supports
The up arrow will increase the tone and the down arrow key will decrease it. Press the ready key to accept the new tone and exit READY the signal adjusting mode. PRET Planmeca Proline EC Panoramic X-ray User's manual... -
Page 38: Recalling Previous Exposure Settings
Note that before using the quick exposure settings you must first store the parameters values in the memory. PAN/CEPH MODEL: There are three memory locations also for the cepha- lometric mode. 34 Planmeca Proline EC Panoramic X-ray User's manual... - Page 39 NOTE The quick exposure setting programming and selection can be interrupted by pressing any other key than auto, P or memory location keys. Planmeca Proline EC Panoramic X-ray User's manual...
-
Page 40: Automatic Exposure Control (Aec) (Optional)
- C: dark exposure. The letter indicating the selected density is shown on the exposure time display. NOTE If the optical density is not selected the last time selected density is used 36 Planmeca Proline EC Panoramic X-ray User's manual... - Page 41 Take an another exposure. The AEC function should now adjust the exposure values down- wards. If the verifying of the AEC function was not successful, the calibration must be carried out again, contact your Planmeca dealer. Planmeca Proline EC Panoramic X-ray User's manual...
- Page 42 3 mA and 6 kV or 2 mA and 2 kV. Exiting the AEC mode Exit the AEC mode by pressing and holding down the auto key until the indicator light goes off. 38 Planmeca Proline EC Panoramic X-ray User's manual...
-
Page 43: Panoramic Scale
13 PANORAMIC SCALE The PLANMECA PANORAMIC SCALE is for measur- ing vertical features that appear on panoramic radio- graphs taken with a PLANMECA X-ray units. The scale is useful when carrying out dental procedures such as: - root canal therapy; the scale can be used to take... -
Page 44: Troubleshooting
The X-ray unit is busy, wait until the previous func- tion is completed. 14.2Error codes The Planmeca X-ray incorporates a self-checking fea- ture that continually monitors the operation of the unit. If there is a malfunction the unit will immediately stop and an error code will appear on the console display. - Page 45 Take an exposure with values 60 kV and 4 mA and an exposure with values 80 kV and 12 mA. If the error is after this present, please contact your service technician. Planmeca Proline EC Panoramic X-ray User's manual...
- Page 46 If the error is still present, please contact your service technician. Er 61 Processor communication error. Turn off the unit first for 30 seconds, try again without the patient. If the error is still present, please contact your service technician. 42 Planmeca Proline EC Panoramic X-ray User's manual...
- Page 47 Keyboard processor stack overflow. Turn off the unit first for 30 seconds. If the error is still present, please contact your service technician. Er 99 Error code generation error. Turn off the unit first for 30 seconds. If the error is still present, please contact your service technician. Planmeca Proline EC Panoramic X-ray User's manual...
-
Page 48: Cooling Time
PLANMECA service technician once a year or after every 10,000 exposures if this is sooner. Please refer to the Planmeca Proline EC Pan- oramic X-ray technical manual for complete servicing information. -
Page 49: Disposal Of The Unit
The risks involved and the necessary precautions must be taken into account when handling waste products. Disposal of Planmeca Proline EC Panoramic x-ray unit X = action, (X) = action in cases where processing is available Hazardous Waste... -
Page 50: Technical Specifications
8A at 230V~, 15A at 100V~ Fusing 8FF 500 VAC at 180 - 240 V~ 16FF 500 VAC at 100 -132 V~ Maximum continuous heat dissipation < 250W Electrical classification Class Type 46 Planmeca Proline EC Panoramic X-ray User's manual... - Page 51 Storage -10°C to +50°C (film-based X-ray) 0°C to +50°C (Dimax3 digital X-ray system) Humidity 25% - 75% Manufacturer PLANMECA Oy, Asentajankatu 6, 00880 Helsinki, FINLAND phone: +358 20 7795 500 OPTIMUM SPACE REQUIREMENTS: X-RAY Planmeca Proline EC panoramic X- 1535mm...
-
Page 52: User's Statement For Planmeca Proline Ec Panoramic X-Ray
USER’S STATEMENT FOR PLANMECA PROLINE EC PANORAMIC X-RAY 19 USER’S STATEMENT FOR PLANMECA PROLINE EC PANORAMIC X-RAY Radiation leakage technique factors The maximum-rated peak tube potential is 80 kVp and the maximum rated continuous tube current is 12mA for the maximum-rated peak tube voltage. - Page 53 USER’S STATEMENT FOR PLANMECA PROLINE EC PANORAMIC X-RAY DEFINITION OF MEASUREMENT CRITERIA Exposure time The beginning and end points of the exposure time are defined at 70% of the peak radia- tion waveform measured with a calibrated X-ray monitor. Peak tube potential Is defined as the measured high voltage mean value measured with a calibrated non-inva- sive kVp meter.
- Page 54 USER’S STATEMENT FOR PLANMECA PROLINE EC PANORAMIC X-RAY Anode heating/cooling curve of the X-ray tube TIME (min.) Single load rating of X-ray tube EXPOSURE TIME (s) Target material of the X-ray tube Tungsten anode Reference axis to which the target angle and the focal spot characteristics of the X-ray tube refer 90°...
- Page 55 USER’S STATEMENT FOR PLANMECA PROLINE EC PANORAMIC X-RAY Target angle with respect to the reference axis 5° Filtration in terms of quality equivalent filtration of the X-ray tube Inherent filtration at least 0.8 Al/50 kV according to IEC 522/1976 Emission & filament characteristics of the X-ray tube...
- Page 56 USER’S STATEMENT FOR PLANMECA PROLINE EC PANORAMIC X-RAY X-ray tube assembly heating/cooling curve Heating curves Cooling curve Maximum continuous heat dissipation of the x-ray tube assembly 6 kJ/min. 52 Planmeca Proline EC Panoramic X-ray User's manual...
- Page 57 USER’S STATEMENT FOR PLANMECA PROLINE EC PANORAMIC X-RAY Reference axis to which the target angle and the focal spot characteristics of the tube head assembly refer 7° 90° Target angle with respect to the reference axis 5° Dimensions of the tube head assembly...
- Page 58 USER’S STATEMENT FOR PLANMECA PROLINE EC PANORAMIC X-RAY Indication of focal spot Tube head Focal spot indication 54 Planmeca Proline EC Panoramic X-ray User's manual...
- Page 60 PLANMECA OY Asentajankatu 6, 00880 Helsinki, Finland, tel. +358 20 7795 500 fax +358 20 7795 555, e-mail: sales@planmeca.com, www.planmeca.com...
Need help?
Do you have a question about the Proline EC Panoramic and is the answer not in the manual?
Questions and answers