Cisco 1120 Installation Manual
Secure access control server
Hide thumbs
Also See for 1120:
- Hardware installation (98 pages) ,
- Quick start manual (10 pages) ,
- Installation manual (6 pages)
Table of Contents
Advertisement
Installation Guide for the Cisco 1120
Secure Access Control Server 4.2
License and Warranty
April 2009
Americas Headquarters
Cisco Systems, Inc.
170 West Tasman Drive
San Jose, CA 95134-1706
USA
http://www.cisco.com
Tel: 408 526-4000
800 553-NETS (6387)
Fax: 408 527-0883
Text Part Number: OL-19455-01
Advertisement
Table of Contents
Troubleshooting

Related Manuals for Cisco 1120


Summary of Contents for Cisco 1120
- Page 1 Installation Guide for the Cisco 1120 Secure Access Control Server 4.2 License and Warranty April 2009 Americas Headquarters Cisco Systems, Inc. 170 West Tasman Drive San Jose, CA 95134-1706 http://www.cisco.com Tel: 408 526-4000 800 553-NETS (6387) Fax: 408 527-0883 Text Part Number: OL-19455-01...
- Page 2 You can determine whether your equipment is causing interference by turning it off. If the interference stops, it was probably caused by the Cisco equipment or one of its peripheral devices. If the equipment causes interference to radio or television reception, try to correct the interference by using one or more of the following measures: •...
- Page 3 Overvoltage Protection (OVP) 1-11 Overtemperature Protection (OTP) 1-11 Regulatory Compliance 1-11 Preparing for Installation C H A P T E R Safety Guidelines General Precautions Safety with Equipment Installation Guide for the Cisco 1120 Secure Access Control Server 4.2 OL-19455-01...
-
Page 4: Table Of Contents
2-15 Precautions for Products with Modems, Telecommunications, or Local Area Network Options 2-15 Installing and Configuring the Cisco 1120 Secure Access Control Server 4.2 C H A P T E R Rack-Mounting Configuration Guidelines Mounting the CSACS 1120 Series Appliance in a 4-Post Rack... - Page 5 Shutting Down the CSACS 1120 from a Serial Console Logging Off the CSACS 1120 from a Serial Console Rebooting the CSACS 1120 from a Serial Console Determining the Status of CSACS 1120 System and Services from a Serial Console Tracing Routes Stopping ACS Services from a Serial Console...
- Page 6 Applying an Upgrade to an Appliance 5-18 Migrating from ACS for Windows to ACS SE 5-19 Migrating ACS SE on the ACS 1111 or ACS 1112 or ACS 1113 Platform to CSACS 1120 5-21 Site Log Windows Service Advisement Services That are Run...
- Page 7 C-15 tracert C-16 unlock guiadmin C-16 upgrade C-17 Troubleshooting Troubleshooting Overview Problem Solving Troubleshooting the Power and Cooling Systems Environmental Reporting Features Troubleshooting Adapter Cards, Cables, and Connections Installation Guide for the Cisco 1120 Secure Access Control Server 4.2 OL-19455-01...
- Page 8 General Exterior Cleaning and Inspection Appliance Cables and Connectors Adapter Cards Cooling Temperature Humidity Altitude Electrostatic Discharge Electromagnetic and Radio Frequency Interference Magnetism Power Source Interruptions N D E X Installation Guide for the Cisco 1120 Secure Access Control Server 4.2 OL-19455-01...
- Page 9 Preface This guide describes how to install and initially configure the Cisco 1120 Secure Access Control Server (CSACS 1120), and includes upgrade, and migration information for the Cisco 1111, Cisco 1112, and Cisco 1113 platforms. It also details administrative functions that you can perform from the command line interface.
- Page 10 Included in the warnings are translations in several languages. For detailed information about compliance guidelines and translated safety warnings, see Regulatory Compliance and Safety Information for the Cisco 1120 Secure Access Control Server 4.2. Installation Guide for the Cisco 1120 Secure Access Control Server 4.2...
- Page 11 üblichen Verfahren zur Vorbeugung vor Unfällen vertraut. Suchen Sie mit der am Ende jeder Warnung angegebenen Anweisungsnummer nach der jeweiligen Übersetzung in den übersetzten Sicherheitshinweisen, die zusammen mit diesem Gerät ausgeliefert wurden. BEWAHREN SIE DIESE HINWEISE GUT AUF. Installation Guide for the Cisco 1120 Secure Access Control Server 4.2 OL-19455-01...
- Page 12 Använd det nummer som finns i slutet av varje varning för att hitta dess översättning i de översatta säkerhetsvarningar som medföljer denna anordning. SPARA DESSA ANVISNINGAR Installation Guide for the Cisco 1120 Secure Access Control Server 4.2 OL-19455-01...
- Page 13 Preface Installation Guide for the Cisco 1120 Secure Access Control Server 4.2 xiii OL-19455-01...
- Page 14 Brug erklæringsnummeret efter hver advarsel for at finde oversættelsen i de oversatte advarsler, der fulgte med denne enhed. GEM DISSE ANVISNINGER Installation Guide for the Cisco 1120 Secure Access Control Server 4.2 OL-19455-01...
- Page 15 Preface Installation Guide for the Cisco 1120 Secure Access Control Server 4.2 OL-19455-01...
- Page 16 Preface Documentation Updates Table 1 Updates to Installation Guide for the Cisco 1120 Secure Access Control Server 4.2 Date Description 12/10/2009 • Added a note in LEDs Added a note in Front-Panel LEDs • 12/07/2009 Updated the table Front-Panel LEDs •...
- Page 17 4.2/regulatory/compliance/RCSI_42.html Regulatory Compliance and Safety Shipped with the product. • Information for the Cisco 1120 Secure On Cisco.com: • Access Control Server 4.2 http://www.cisco.com/en/US/docs/net_mgmt/ cisco_secure_access_control_server_for_solution_engine/ 4.2/regulatory/compliance/ACS1120_RCSI_42.html Installation Guide for the Cisco 1120 Secure Access Control Server 4.2 xvii OL-19455-01...
- Page 18 Obtaining Documentation and Submitting a Service Request For information on obtaining documentation, submitting a service request, and gathering additional information, see the monthly What’s New in Cisco Product Documentation, which also lists all new and revised Cisco technical documentation, at: http://www.cisco.com/en/US/docs/general/whatsnew/whatsnew.html...
- Page 19 You use CSACS 1120 to control who can access the network, to authorize what types of network services are available for particular users or groups of users, and to keep an accounting record of all user actions in the network.
- Page 20 1120 Series appliance. This section contains: Specifications for the CSACS 1120 Series Appliance, page 1-3 • Product Serial Number Location, page 1-4 • Cisco Product Identification Tool, page 1-4 • Installation Guide for the Cisco 1120 Secure Access Control Server 4.2 OL-19455-01...
- Page 21 Cisco 1120 Secure Access Control System Front View CSACS1120 The CSACS 1120 Series appliance is configured for AC-input power and has a single auto-ranging AC-input power supply, mounted in a standard 19-inch (48.3 cm), 4-post equipment rack (using the rack-mount brackets provided). The CSACS 1120 features include: Microprocessor—Intel Core 2 Duo 2.13-GHz processor with an 800-MHz front side bus (FSB) and...
- Page 22 The CSACS 1120 appliance is normally shipped with a rack-mount hardware kit which includes • either brackets or rails that allow the CSACS 1120 to be positioned in a 4-post equipment rack. For more information, see Chapter 3, “Installing the Cisco 1120 Secure Access Control System Hardware.”...
- Page 23 You can access the CPI tool at: http://tools.cisco.com/Support/CPI/index.do To access the CPI tool, you require a Cisco.com user ID and password. If you have a valid service contract but do not have a user ID or password, you can register at: http://tools.cisco.com/RPF/register/register.do...
- Page 24 Hard disk drive activity LED Power button NIC 1 LED Appliance power LED NIC 2 LED LEDs Table 1-1 describes the LEDs located on the front-panel of the CSACS 1120 Series appliance. Table 1-1 Front-Panel LEDs Color State Description Appliance power...
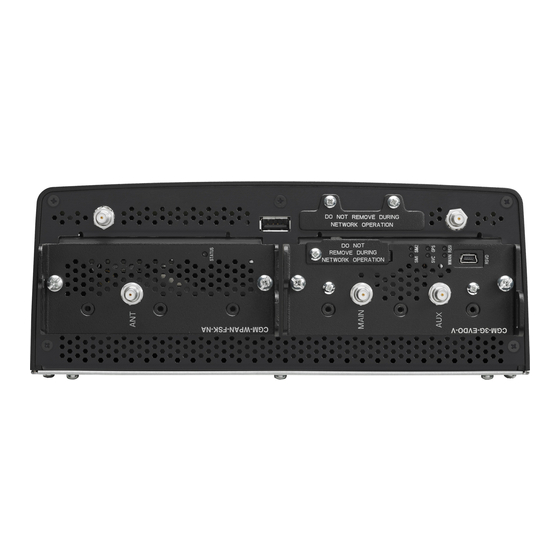
- Page 25 ACS must use only the NIC 1 port on the appliance. Using NIC 2 may lead to software Note configuration problems. LEDs The back panel of the CSACS 1120 Series appliance contains LEDs that indicate the connection activity and speed of the NIC ports. Figure 1-6 shows these LEDs.
- Page 26 10-Mb/s connection (if left LED is on or blinking) Amber Solid 1000-Mb/s connection Green Solid 100-Mb/s (or 1-Gb/s) connection Input/Output Ports and Connectors The back panel of the CSACS 1120 Series appliance supports the following types of I/O connectors: Ethernet • Serial • Video monitor • Keyboard •...
- Page 27 The CSACS 1120 Series appliance has one standard serial (console) port. Use the configuration or setup utility program to change the port address assignments. The configuration or setup utility program is located in the CSACS 1120 Series appliance ROM and can Note be accessed through the serial (console) port.
- Page 28 Ground Environmental Monitoring The CSACS 1120 Series appliance has protection circuits that monitor and detect overcurrent, overvoltage, and overtemperature conditions inside the appliance. If the power supply shuts down, or latches off, an AC cycle switches off for 15 seconds and switches on for 1 second to reset the power supply.
- Page 29 Regulatory Compliance For regulatory compliance and safety information, see Regulatory Compliance and Safety Information for the Cisco 1120 Secure Access Control Server 4.2. This document is available online at Cisco.com: For more information, see Obtaining Documentation and Submitting a Service Request, page -xv.
- Page 30 Chapter 1 Cisco 1120 Secure Access Control Server Overview Regulatory Compliance Installation Guide for the Cisco 1120 Secure Access Control Server 4.2 1-12 OL-19455-01...
- Page 31 2-15 Note Read the Regulatory Compliance and Safety Information for the Cisco 1120 Secure Access Control Server 4.2 and the Site Preparation and Safety Guide that came with your CSACS 1120 Series appliance before you begin the installation. Safety Guidelines...
- Page 32 General Precautions Observe the following general precautions for using and working with your appliance: Observe and follow service markings. Do not service any Cisco product except as explained in your • appliance documentation. Opening or removing covers that are marked with the triangular symbol with a lightning bolt may expose you to electrical shock.
-
Page 33: Safety With Electricity
Before working on a chassis or working near power supplies, unplug the power cord on AC units; Warning disconnect the power at the circuit breaker on DC units. Statement 12 Installation Guide for the Cisco 1120 Secure Access Control Server 4.2 OL-19455-01... - Page 34 • • Never touch uninsulated telephone wires or terminals unless the telephone line is disconnected at the network interface. • Use caution when installing or modifying telephone lines. Installation Guide for the Cisco 1120 Secure Access Control Server 4.2 OL-19455-01...
-
Page 35: Preventing Electrostatic Discharge Damage
1 and 10 Mohm. Lifting Guidelines The CSACS 1120 Series appliance weighs between 15 lb (9.071 kg) and 33 lb (14.96 kg) depending on what hardware options are installed in the appliance. The appliance is not intended to be moved frequently. -
Page 36: Site Planning
Typically, you should have prepared the installation site beforehand. As part of your preparation, obtain a floor plan of the site and the equipment rack where the CSACS 1120 Series appliance will be housed. Determine the location of any existing appliances and their interconnections, including communications and power. -
Page 37: Site Environment
Enclosed Rack (Do Not Use) Figure 2-1a shows a freestanding, enclosed rack with two mounting posts in the front. The CSACS 1120 Series appliance should not be installed in this type of enclosed rack, because the appliance requires an unobstructed flow of cooling air to maintain acceptable operating temperatures for its internal components. -
Page 38: Airflow Guidelines
Temperature and Humidity Guidelines Table 2-1 lists the operating and non-operating environmental site requirements for the CSACS 1120 Series appliance. The appliance normally operates within the ranges listed; however, a temperature measurement approaching a minimum or maximum parameter indicates a potential problem. Maintain normal operation by anticipating and correcting environmental anomalies before they approach critical values by properly planning and preparing your site before you install the appliance. -
Page 39: Power Considerations
— Power Considerations You configure the CSACS 1120 Series appliance with AC-input power only. Ensure that all power connections conform to the rules and regulations in the National Electrical Codes (NECs), as well as local codes. When planning power connections to your appliance, the following precautions and recommendations must be followed: •... -
Page 40: Unpacking And Checking The Contents Of Your Shipment
Perform the installation. Unpacking and Checking the Contents of Your Shipment The shipping package for the CSACS 1120 Series appliance is designed to reduce the possibility of product damage associated with routine material handling experienced during shipment. To reduce the potential for damage to the product, transport the appliance in its original Cisco packaging. -
Page 41: Cisco Information Packet And Warranty
The rack-mount kit does not include a 2-post equipment rack. Cisco Information Packet and Warranty The Cisco Information Packet provides warranty, service, and support information. To access and download the Cisco Information Packet and your warranty and license agreements from Cisco.com: Launch your Internet browser and go to: Step 1 http://www.cisco.com/univercd/cc/td/doc/es_inpck/cetrans.htm... -
Page 42: Required Tools And Equipment
Using the wrong-sized screws for your threaded rack holes can damage the rack. You need the following tools and equipment to install the CSACS 1120 Series appliance in a 4-post rack: Warning Only trained and qualified personnel should be allowed to install, replace, or service this equipment. -
Page 43: Installation Checklist
Make a copy of this checklist and mark the entries as you complete each task. When the checklist is completed, include a copy of it for each CSACS 1120 Series appliance in your site log (see... -
Page 44: Creating A Site Log
– Ethernet and Console Port Considerations There are two network interface connectors (NIC 1 and NIC 2) on the rear panel of the CSACS 1120 Series appliance. Both ports use UTP cable. Cisco recommends Category 5 UTP cable. The maximum segment distance is 328 feet (100 meters). -
Page 45: Nic 1 And Nic 2 (Rj-45) Ethernet Connections
Console Port Connections The console port on the CSACS 1120 Series appliance includes an EIA/TIA-232 asynchronous serial (DB-9) connector. This serial console connector (port) allows you to access the appliance locally by connecting a terminal—either a PC running terminal-emulation software or an ASCII terminal—to the console port. - Page 46 Chapter 2 Preparing for Installation Precautions for Products with Modems, Telecommunications, or Local Area Network Options Installation Guide for the Cisco 1120 Secure Access Control Server 4.2 2-16 OL-19455-01...
-
Page 47: Installing And Configuring The Cisco 1120 Secure Access Control Server
Rack-Mounting Configuration Guidelines Each CSACS 1120 Series appliance has a set of rack handles (installed at the factory). You will use these handles later when you install the appliance in a 4-post rack. You can front (flush) mount or mid-mount the appliance in a 19-inch (48.3-cm) equipment rack that conforms to the 4-post rack specification (the... -
Page 48: Rack-Mounting Configuration Guidelines
Installing and Configuring the Cisco 1120 Secure Access Control Server 4.2 Rack-Mounting Configuration Guidelines You must leave clearance in the front and rear of the CSACS 1120 Series appliance, to allow cooling air Caution to be drawn in through the front and circulated through the appliance and out the rear of the appliance. -
Page 49: Mounting The Csacs 1120 Series Appliance In A 4-Post Rack
Installing the Appliance into the Slide Rails • 4-Post Rack-Mount Hardware Kit Figure 3-1 shows the rails and release levers that you need to install the CSACS 1120 Series appliance in a 4-post rack. Figure 3-1 Release Levers on the Slide Rail Hardware... -
Page 50: Installing The Slide Rails Into A Rack With Square Holes
Chapter 3 Installing and Configuring the Cisco 1120 Secure Access Control Server 4.2 Mounting the CSACS 1120 Series Appliance in a 4-Post Rack • For racks with round holes, you use rack screws, rather than the multi-pin adapters. Rack screws are not included in the installation kit. - Page 51 Chapter 3 Installing and Configuring the Cisco 1120 Secure Access Control Server 4.2 Mounting the CSACS 1120 Series Appliance in a 4-Post Rack Figure 3-2 Locking the Adapter into Place When the multi-pin adapter is fully seated in the bracket, close the swivel lock, as shown in the...
- Page 52 Chapter 3 Installing and Configuring the Cisco 1120 Secure Access Control Server 4.2 Mounting the CSACS 1120 Series Appliance in a 4-Post Rack Figure 3-3 Mounting Position Marks on a Rack 1 RU 1 RU 1 RU 1 RU Step 2...
-
Page 53: Installing The Slide Rails Into A Rack With Round Holes
Chapter 3 Installing and Configuring the Cisco 1120 Secure Access Control Server 4.2 Mounting the CSACS 1120 Series Appliance in a 4-Post Rack Figure 3-5 Correct and Incorrect Adapter Pin Insertion Correct Incorrect Incorrect The following table describes some of the correct and incorrect ways to insert the adapter pins into the... -
Page 54: Installing The Appliance Into The Slide Rails
Chapter 3 Installing and Configuring the Cisco 1120 Secure Access Control Server 4.2 Mounting the CSACS 1120 Series Appliance in a 4-Post Rack If you mount the slide rail, in holes that are not vertically aligned from front to back, you could damage Caution the slide rail and your mounting may not be secure. -
Page 55: Connecting Cables
Press and hold the left and right slide extension release levers, and slowly slide the component and the slide rails into the fully retracted position. Connecting Cables This section describes how to connect your CSACS 1120 Series appliance to the network and the appliance console. This section includes: Connecting the Network Interface •... -
Page 56: Connecting To The Ac Power Source
This section describes how to connect the CSACS 1120 Series appliance NIC port. The RJ-45 port supports standard straight-through and crossover Category 5 unshielded twisted-pair (UTP) cables. Cisco does not supply Category 5 UTP cables; these cables are available commercially. To connect the cable to the appliance NIC port: Verify that the appliance is turned off. -
Page 57: Connecting The Console
This section describes how to connect a keyboard and video monitor to the CSACS 1120 Series appliance. The CSACS 1120 supports two PS/2 connector ports which can be used to connect a keyboard and video monitor directly to the appliance. -
Page 58: Cable Management
All CSACS 1120 Series appliance cables should be properly dressed so as not to interfere with each other or other pieces of equipment. Use local practices to ensure that the cables attached to your appliance are properly dressed. -
Page 59: Power-Up Procedure
Powering Up the CSACS 1120 Series Appliance Power-Up Procedure To power up the CSACS 1120 Series appliance and verify its initialization and self-test, follow this procedure. When the procedure is completed, the appliance is ready to be configured. Review the information in Safety Guidelines, page 2-1. -
Page 60: Removing Or Replacing The Csacs 1120 Series Appliance
Chapter 3 Installing and Configuring the Cisco 1120 Secure Access Control Server 4.2 Removing or Replacing the CSACS 1120 Series Appliance • Hard disk activity, green: On when appliance software has booted up and the appliance is operational. – Off when appliance has not yet booted or an error condition has been detected in the –... -
Page 61: Replacing A Csacs 1120 Series Appliance
Step 1 Attach a DB-9 to RJ-45 adapter (provided) to the serial port of the console. Attach a DB-9 to RJ-45 adapter (provided) to the serial port of the CSACS 1120. For the location of the serial port, see Figure 1-5. -
Page 62: Configuring Csacs 1120
Set your terminal emulation communication software to operate with the following settings: Note CSACS 1120 works with only a baud rate of 9600. CSACS 1120 does not support a baud rate of 115200 which other appliances use. Baud = 9600 •... - Page 63 To configure CSACS 1120: Step 1 Establish a serial console connection to the CSACS 1120. If CSACS 1120 is not configured (that is, it is new or has been re-imaged), the system displays Note the system information, including the software version.
- Page 64 Chapter 3 Installing and Configuring the Cisco 1120 Secure Access Control Server 4.2 Initial Configuration If this information does not appear and only the prompt appears, you must reboot the appliance Note login and then log in. Step 3 At the prompt, enter , and press Enter.
- Page 65 Enter. Use Static IP Address [Yes]: To set or change the IP address of your CSACS 1120, it must be connected to a working Note Ethernet connection. Note A static IP address must be assigned to your CSACS 1120. You can set the IP address directly...
- Page 66 (separate each by a single space), and press Enter. Note If you do not intend to use a DNS server, enter the IP address of the CSACS 1120 at the ] prompt. If you do not configure the CSACS 1120 to use a DNS Servers xx.xx.xx.xx...
-
Page 67: Verifying The Initial Configuration
Chapter 3 Installing and Configuring the Cisco 1120 Secure Access Control Server 4.2 Initial Configuration Step 18 To set the time and date of the CSACS 1120, at the prompt, enter Change Date & Time Setting [N]: , and press Enter. -
Page 68: Setting Up A Gui Administrator Account
However, before the designated GUI administrator user can use this account, you must unlock it by entering the unlock guiadmin command. You can also set up an additional GUI administrator account that can access the CSACS 1120. To set up an initial web GUI account: Step 1 Log in as the CLI administrator. -
Page 69: Next Steps
The next step is to log in using the GUI administrator account and use a browser and the web interface to fully configure the CSACS 1120 to provide the AAA services that you want from this installation. The HTML address is in the following format: http://<ip address>:2002, where ip address is the address that you assign during configuration. - Page 70 Chapter 3 Installing and Configuring the Cisco 1120 Secure Access Control Server 4.2 Next Steps Installation Guide for the Cisco 1120 Secure Access Control Server 4.2 3-24 OL-19455-01...
-
Page 71: Chapter 4 Administering The Cisco 1120 Secure Access Control Server
Administering the Cisco 1120 Secure Access Control Server This section describes the major CSACS 1120 system administration tasks that you can perform using the CLI in the serial console connection. For all other configuration and administration tasks, that is, those performed from the ACS web interface, see the User Guide for Cisco Secure Access Control Server 4.2. -
Page 72: Logging In To The Csacs 1120 From A Serial Console
Shutting Down the CSACS 1120 from a Serial Console You can use the serial console to shut down the CSACS 1120. Powering off the CSACS 1120 by using only the power switch may cause the loss or corruption of data. Caution To use the serial console to shut down the: Log in to the CSACS 1120. -
Page 73: Rebooting The Csacs 1120 From A Serial Console
Serial Console You can use the serial console connection to obtain system and service status information. You typically perform status determination in the CSACS 1120 web interface. For more information, see Note “Determining the Status of Cisco Secure ACS Services” in the User Guide for Cisco Secure Access Control Server 4.2. -
Page 74: Tracing Routes
Trace complete Stopping ACS Services from a Serial Console You typically stop ACS services in the web interface. Note You can stop any of the ACS services from the serial console. The CSACS 1120 services include: CSAdmin • CSAgent •... -
Page 75: Starting Acs Services From A Serial Console
CSTacacs To list the services and their status, you can use the show command. For more information, see Determining the Status of CSACS 1120 System and Services from a Serial Console. Installation Guide for the Cisco 1120 Secure Access Control Server 4.2... -
Page 76: Restarting Acs Services From A Serial Console
• To list the services and their status, you can use the show command. For more information, see Determining the Status of CSACS 1120 System and Services from a Serial Console. Installation Guide for the Cisco 1120 Secure Access Control Server 4.2... -
Page 77: Getting Command Help From The Serial Console
[service name] is running Getting Command Help from the Serial Console To obtain a list and description of commands on the CSACS 1120 from the serial console: Log in to the CSACS 1120. For more information, see Logging In to the CSACS 1120 from a Serial Step 1 Console. -
Page 78: Working With System Data
This section explains basic data-manipulation tasks performed from a serial console connected to the CSACS 1120: Obtaining Support Logs from the Serial Console • Exporting Logs • Exporting a List of Groups • Exporting a List of Users • Installation Guide for the Cisco 1120 Secure Access Control Server 4.2 OL-19455-01... -
Page 79: Obtaining Support Logs From The Serial Console
(from 1 to 9999), and press Enter. At the prompt, enter the FTP server hostname or IP Step 5 Enter FTP Server Hostname or IP Address: address, and press Enter. Installation Guide for the Cisco 1120 Secure Access Control Server 4.2 OL-19455-01... -
Page 80: Exporting Logs
Enter, the system displays the names of the log files available for export. Performing this procedure stops and restarts all services, and will interrupt use of the ACS. Caution Installation Guide for the Cisco 1120 Secure Access Control Server 4.2 4-10 OL-19455-01... -
Page 81: Exporting A List Of Groups
FTP server password, and press Enter. Enter FTP Server Password: Result: ACS exports the group list file to the specified location. When this is completed the console displays: Installation Guide for the Cisco 1120 Secure Access Control Server 4.2 4-11 OL-19455-01... -
Page 82: Exporting A List Of Users
Result: ACS exports the file of the list of users to the specified location, When this is completed the console displays: Transferring ‘users.txt’ completed The system prompt reappears. Installation Guide for the Cisco 1120 Secure Access Control Server 4.2 4-12 OL-19455-01... -
Page 83: Backing Up Acs Data From The Serial Console
Step 8 Encrypt Backup file? <Y or N>: it, and press Enter. This procedure interrupts the use of ACS for AAA services. Caution Installation Guide for the Cisco 1120 Secure Access Control Server 4.2 4-13 OL-19455-01... -
Page 84: Restoring Acs Data From The Serial Console
You can enter the following parameters after the command or in response to subsequent prompts: [server] [username] [filepath] At the prompt, enter the FTP server IP address or Step 3 Enter FTP Server Hostname or IP Address: hostname, and press Enter. Installation Guide for the Cisco 1120 Secure Access Control Server 4.2 4-14 OL-19455-01... -
Page 85: Enabling Rdbms Synchronization
RDBMS Sycnchronisation supports the manipulation and updation of ACS internal database objects. You can Create, Read, Update, and Delete all data items that RDBMS Synchronization can access. This section details the procedure for invoking RDBMS Synchronization on the CSACS 1120. For more information about RDBMS Synchronization, see http://www.cisco.com/en/US/docs/net_mgmt/cisco_secure_access_control_server_for_windows/... - Page 86 DBConnectionPool: Destructor Complete SL:Disconnect Complete CSACS 1120 fetches the CSV file from the database, reads the action codes in the file, and performs the RDBMS Sycnchronisation operations specified in the file. Installation Guide for the Cisco 1120 Secure Access Control Server 4.2...
-
Page 87: Enabling Remote Invocation For Csdbsync Functionality
Reconfiguring CSACS 1120 System Parameters Enabling Remote Invocation for CSDBSync Functionality CSDBSync supports the configuring of ACS on the CSACS 1120, via remote systems. The CSDBSync service reads each record from the accountActions file and updates the ACS internal database according to the action code specified in the record. -
Page 88: Resetting The Csacs 1120 Cli Administrator Name
Resetting the CSACS 1120 Administrator Password. The CLI administrator login does not provide access to the CSACS 1120 using the web GUI. You must Note set up an initial web GUI password using the add guiadmin command. For information on setting up an... -
Page 89: Resetting The Gui Administrator Login And Password
Resetting the CSACS 1120 Administrator Password. After initial installation of the CSACS 1120, the only password that exists is the CLI administrator password. This password allows access only through a serial console login and CLI commands. To enable an initial administrator account that can access ACS through the web GUI, you must set up a GUI administration account using the add guiadmin command. -
Page 90: Resetting The Csacs 1120 Database Password
Reconfiguring the IP address may cause other network devices to fail to recognize the CSACS 1120. Reconfiguring the IP address causes services to restart. AAA services to users will be interrupted. Caution To set or change the IP address of your CSACS 1120, the CSACS 1120 must be connected to a working Note Ethernet connection. -
Page 91: Setting The System Time And Date Manually
• Assign a network time protocol (NTP) server with which the system synchronizes its date and time. • To set the CSACS 1120 system time and date by using an NTP, see Setting the System Time and Date with NTP. -
Page 92: Setting The System Time And Date With Ntp
Assign a NTP server with which the system synchronizes its date and time. (You can configure • backup NTP servers if you desire.) To set the CSACS 1120 system time and date manually, see Setting the System Time and Date Manually. -
Page 93: Setting The System Timeout
At the prompt, enter the timeout period in minutes followed by a single Enter timeout <minutes>: space, and press Enter. Result: The system sets the new timeout period. Installation Guide for the Cisco 1120 Secure Access Control Server 4.2 4-23 OL-19455-01... -
Page 94: Setting The Csacs 1120 System Domain
Reconfiguring CSACS 1120 System Parameters Setting the CSACS 1120 System Domain You can set the system DNS domain from the serial console. To set the CSACS 1120 system domain: Log in to the CSACS 1120. For more information, see Logging In to the CSACS 1120 from a Serial Step 1 Console. -
Page 95: Patch Rollback
Use this procedure to uninstall one or more patches and to roll back ACS to the version that existed before the patch installation. To roll back an ACS system patch: Step 1 Connect a console to the CSACS 1120 console port. For the location of the console port, see Figure 1-2. At the system prompt, enter... -
Page 96: Recovery Management
This recovery procedure entails replacing the administrator login credentials with a new account name and password. To reset the administrator login credentials: Connect a console to the CSACS 1120 console port. For the location of the console port, see Figure 1-3. -
Page 97: Re-Imaging The Csacs 1120 Hard Drive
Use the CSACS 1120 Recovery CD-ROM to re-image the appliance if necessary. Caution Performing this procedure destroys all data stored on the CSACS 1120. To re-image your CSACS 1120: Connect a console to the CSACS 1120 console port. For the location of the console port, see Figure 1-3. Step 1 Put the Recovery CD in the CSACS 1120 CD-ROM drive. - Page 98 This operation will completely erase the hard drive. Press ‘Y’ to confirm, any other key to cancel: __ The next step erases the CSACS 1120 hard drive. You will permanently lose all system data that you Caution have not backed up.
-
Page 99: Chapter 5 Upgrading And Migrating To Cisco 1120 Secure Access Control Server
• Migrating from ACS for Windows to ACS SE • Migrating ACS SE on the ACS 1111 or ACS 1112 or ACS 1113 Platform to CSACS 1120 Upgrade Scenarios CSACS 1120 supports the following upgrade scenarios: ACS 3.x to ACS 3.3.x—You can upgrade ACS 3.2.x or 3.3.x (ACS 3.2.1, 3.2.2, 3.2.3, 3.3.1, 3.3.2) •... -
Page 100: Migration Scenarios
Depending on the ACS version from which you upgrade, you can take different paths for upgrading to CSACS 1120. You only can upgrade to ACS 4.2 from ACS version 3.2.x, 3.3.x, 3.3.3 or 4.0, if you have first upgraded to ACS 4.1. - Page 101 RNsol331.html ACS SE 4.1.1.24 to ACS 4.2 Back up your ACS 4.1.1.24 configuration. Use the ACS 4.2 Recovery DVD to re-image the CSACS 1120 with the 4.2 version. ACS 4.2 is installed. Restore the 4.1.1.24 configuration. For instructions on upgrading to ACS 4.1.1.24, see the latest version of the Release Notes for Cisco Secure Access Control Server Solution Engine 4.1.1.24 at:...
- Page 102 ACS SE 4.1.1.24 to ACS 4.2 Back up your 4.1.1.24 configuration. Use the ACS 4.2 Recovery DVD to re-image the CSACS 1120 with the 4.2 version. ACS SE 4.2 is installed. Restore the 4.1.1.24 configuration. For instructions on upgrading to ACS 4.2, see the latest version of the Release Notes for Cisco Secure Access Control Server Solution Engine 4.2 at:...
- Page 103 ACS SE 4.1.1.24 to ACS 4.2 Back up your 4.1.1.24 configuration. Use the ACS 4.2 Recovery DVD to re-image the CSACS 1120 with the 4.2 version. ACS 4.2 is installed. Restore the 4.1.1.24 configuration. For instructions on upgrading to ACS 4.2, see the latest version of the Release Notes for Cisco Secure Access Control Server Solution Engine 4.2 at:...
-
Page 104: Upgrade Procedure
Click Administration Control. The Administration Control page opens. Click Add Administrator. The Add Administrator page opens. Add a new administrator and grant all administrative privileges to the administrator. Installation Guide for the Cisco 1120 Secure Access Control Server 4.2 OL-19455-01... - Page 105 Enter the hostname or the IP address of the distribution server and click Install. The web interface starts. Log in to the web interface. Choose System Configuration > Appliance Upgrade Status. The Appliance Upgrade page opens, as shown in Figure 5-2. Installation Guide for the Cisco 1120 Secure Access Control Server 4.2 OL-19455-01...
- Page 106 Enter the IP address of the distribution server and click Connect. The Appliance Upgrade Form page opens, as shown in Figure 5-4. This page lists the current version number of the appliance-management software. Installation Guide for the Cisco 1120 Secure Access Control Server 4.2 OL-19455-01...
- Page 107 Figure 5-5 Appliance Upgrade Page Click Apply Upgrade. The upgrade utility applies the management software upgrade. This process takes several minutes. The system reboots several times. Note Installation Guide for the Cisco 1120 Secure Access Control Server 4.2 OL-19455-01...
- Page 108 Use this backup to restore the data after you recover the ACS SE 4.1 base image. Note Use the Recovery DVD for your CSACS 1120 hardware version. If your CSACS 1120 is a: Step 8 Perform an initial configuration of the CSACS 1120. For more information, see...
-
Page 109: Reimaging The Csacs 1120 With The Acs 4.2 Recovery Dvd
This section describes the procedure of reimaging the appliance using the ACS 4.2 Recovery DVD. To re-image the appliance: Obtain the ACS 4.2 Recovery DVD. Step 1 Insert the ACS 4.2 Recovery DVD into the DVD drive and reboot the CSACS 1120. Step 2 Result: The console displays: ACS Appliance Recovery Options... -
Page 110: Appliance Upgrade And Patches Procedure
Phase Three—Apply the upgrade to the appliance. Before the upgrade files are applied to the • appliance, ACS verifies the digital signature on the files to ensure their authenticity and to verify that they are not corrupt. Installation Guide for the Cisco 1120 Secure Access Control Server 4.2 5-12 OL-19455-01... -
Page 111: Distribution Server Requirements
TCP port 8080 should not be in use on the distribution server. The upgrade process requires • exclusive control of port 8080. We recommend that no other web server runs on the distribution server. Installation Guide for the Cisco 1120 Secure Access Control Server 4.2 5-13 OL-19455-01... -
Page 112: Upgrading An Appliance
For a list of supported browsers, see the latest version of the Release Notes for Cisco Secure ACS Release 4.2. The most recent revision to the Release Notes is posted on Cisco.com. -
Page 113: Transferring An Upgrade Package To An Appliance
Appliance. ACS applies the upgrade and runs using the upgraded software. If you want the Cisco Security Agent to protect the appliance, enable it. For detailed steps, see the latest Step 8 version of the User Guide for Cisco Secure Access Control Server 4.2. - Page 114 Examine the Software Install table to confirm that the version, name, and condition of the upgrade is Step 11 satisfactory, and click Download Now. Installation Guide for the Cisco 1120 Secure Access Control Server 4.2 5-16 OL-19455-01...
- Page 115 If you want to apply the upgrade, perform the steps in Applying an Upgrade to an Appliance. Alternatively, you can use the upgrade command by using the serial console. Installation Guide for the Cisco 1120 Secure Access Control Server 4.2 5-17 OL-19455-01...
-
Page 116: Applying An Upgrade To An Appliance
You might receive a warning message that an upgrade package is not verified. Before applying an Caution upgrade or patch, ACS attempts to verify that the upgrade or patch is certified by Cisco. Some valid upgrade packages might not pass this verification, such as patches distributed for an urgent fix. Do not apply an upgrade package if you have unresolved concerns about the validity of the upgrade package. -
Page 117: Migrating From Acs For Windows To Acs Se
Migrating from ACS for Windows to ACS SE Migrating from Cisco Secure ACS for Windows Server (ACS for Windows) to ACS SE uses the backup and restore features of ACS. Backup files produced by ACS for Windows are compatible with ACS SE, provided that both are using the same version of ACS software. - Page 118 In the web interface for ACS 4.2, use the ACS Restore feature to restore the database. For more Step 5 information about restoring databases, see the latest version of the User Guide for Cisco Secure ACS 4.2. The ACS SE contains the original configuration of the ACS for Windows version from which you migrated.
-
Page 119: Migrating Acs Se On The Acs 1111 Or Acs 1112 Or Acs 1113 Platform To Csacs 1120
Upgrading and Migrating to Cisco 1120 Secure Access Control Server Migrating ACS SE on the ACS 1111 or ACS 1112 or ACS 1113 Platform to CSACS 1120 Migrating ACS SE on the ACS 1111 or ACS 1112 or ACS 1113... - Page 120 Chapter 5 Upgrading and Migrating to Cisco 1120 Secure Access Control Server Migrating ACS SE on the ACS 1111 or ACS 1112 or ACS 1113 Platform to CSACS 1120 Installation Guide for the Cisco 1120 Secure Access Control Server 4.2...
-
Page 121: Site Log
Make copies of the sample, or design your own site log to meet the needs of your site and equipment. Table A-1 Site Log Date Description of Action Performed or Symptom Observed Initials Installation Guide for the Cisco 1120 Secure Access Control Server 4.2 OL-19455-01... - Page 122 Appendix A Site Log Table A-1 Site Log Date Description of Action Performed or Symptom Observed Initials Installation Guide for the Cisco 1120 Secure Access Control Server 4.2 OL-19455-01...
-
Page 123: Windows Service Advisement
A P P E N D I X Windows Service Advisement The operating system for the CSACS 1120 is a customized and minimized version of the Windows 2003 operating system. The CSACS 1120 removes all extraneous services, blocks all unused ports, and otherwise prevents all other access to the ACS server system, thereby dramatically increasing the security posture of ACS. -
Page 124: Services That Are Not Run
Provides systems management information to and from drivers. Instrumentation Driver Extensions Services that are Not Run Table B-2 lists the operating system services that are not run on the CSACS 1120. Table B-2 Disabled Operating System Services in CSACS 1120 Service Name Description Alerter Notifies selected users and computers of administrative alerts. - Page 125 Creates a connection to a remote network whenever a program Manager references a remote DNS or NetBIOS name or address. Remote Access Connection Manager Creates a network connection. Installation Guide for the Cisco 1120 Secure Access Control Server 4.2 OL-19455-01...
- Page 126 — Workstation Provides network connections and communications. Windows Installer Installs, repairs, and removes software according to instructions contained in the .msi files. Windows Time Sets the computer clock. Installation Guide for the Cisco 1120 Secure Access Control Server 4.2 OL-19455-01...
-
Page 127: Command Reference
• A string is defined as a non-quoted set of characters. • Do not confuse the CSACS 1120 CLI with the IOS CLI. Though they are similar, they are not identical. Note Command Privileges Access to CLI commands on the CSACS 1120 is limited to those who physically connect via the console port and who possess the proper administrative credentials. -
Page 128: Checking Command Syntax
To add a GUI account that a remote user can use to access the ACS web GUI, use the add guiadmin command: add guiadmin [ admin ] [ password ] Installation Guide for the Cisco 1120 Secure Access Control Server 4.2 OL-19455-01... -
Page 129: Download
During initial installation, you are prompted to set up a GUI administration account that remote users can use to access and configure the CSACS 1120. The add guiadmin command is provided to set up additional web GUI accounts, and also to set up a new web GUI account if the initial web GUI account that you set up, does not work. -
Page 130: Exit
FTP root for the server to which the group list will be sent. Usage Guidelines If you do not enter the parameters, the system prompts you for the information. Installation Guide for the Cisco 1120 Secure Access Control Server 4.2 OL-19455-01... -
Page 131: Exportlogs
FTP root for the server to which the users list will be sent. Usage Guidelines If you do not enter the parameters, the system prompts you for the information. Installation Guide for the Cisco 1120 Secure Access Control Server 4.2 OL-19455-01... -
Page 132: Help
The lock guiadmin command is provided to lock web GUI accounts that have been unlocked. Example The following command locks a GUI administrator account joeadmin with the password joltinjoe: lock guiadmin joeadmin joltinjoe Installation Guide for the Cisco 1120 Secure Access Control Server 4.2 OL-19455-01... -
Page 133: Ping
Syntax Description This command has no arguments or keywords. Example The following command uses the predefined NTP synchronization server to synchronize CSACS 1120 time to the NTP server time: ntpsync ping To send ICMP echo_request packets for diagnosing basic network connectivity, uses the ping command:... -
Page 134: Reboot
AAA services are temporarily halted while this command executes. Syntax Description This command has no arguments or keywords. Example The following command causes a soft reboot of the CSACS 1120: reboot Installation Guide for the Cisco 1120 Secure Access Control Server 4.2 OL-19455-01... -
Page 135: Restart
If you do not enter the parameters, the system prompts you for the information. Also, you will be prompted to enter a decrypt password, to restore the user or group database, and the ACS system configuration. Installation Guide for the Cisco 1120 Secure Access Control Server 4.2 OL-19455-01... -
Page 136: Rollback
[ administratorname ] Syntax Description administratornameName of system administrator. Usage Guidelines Use the set admin command to reset the name of the CSACS 1120 administrator. For more information, Resetting the CSACS 1120 Administrator Password. Example This command sets the administrator name to john: set admin john Installation Guide for the Cisco 1120 Secure Access Control Server 4.2... -
Page 137: Set Dbpassword
Appendix C Command Reference Commands set dbpassword To set the CSACS 1120 database password, use the set dbpassword command. Subsequent prompts take you through the process. set dbpassword Syntax Description This command has no arguments or keywords. Usage Guidelines Use the set dbpassword command to begin resetting the database password. Subsequent prompts take you through the process. -
Page 138: Set Ip
The following command initiates the password setting procedure: set password set time To set the CSACS 1120 time zone, NTP server, date, or time, use the set time command: set time Syntax Description This command has no arguments or keywords. -
Page 139: Show
Setting the System Time and Date Manually. You can also use the set time command to enable an NTP server to synchronize the CSACS 1120. You can configure one or more NTP servers by separating each NTP IP address entry with a space. For more... -
Page 140: Shutdown
Note AAA services. When you stop the CSAgent service, not only does the CSACS 1120 stop CSAgent, but it also changes Note the startup type to manual. This action has the effect of keeping it stopped; even after reboot. Likewise, starting CSAgent resets the startup type to automatic. -
Page 141: Support
FTP server on the machine host, as diagdir\diag.cab where the user will be prompted for the password to the account on the FTP server: sammy support -d3 -u ftp://host\diagdir\diag.cab sammy Installation Guide for the Cisco 1120 Secure Access Control Server 4.2 C-15 OL-19455-01... -
Page 142: Tracert
During initial installation, the setup script prompts the installer to set up a GUI administrator account that remote users can use to access and configure the CSACS 1120. This account cannot be used until you unlock it by issuing the unlock guiadmin command. -
Page 143: Upgrade
CSACS 1120. Ensure that you have stopped the CSAgent prior to executing the upgrade command. Note Example The following initiates the second stage of an upgrade: upgrade Installation Guide for the Cisco 1120 Secure Access Control Server 4.2 C-17 OL-19455-01... - Page 144 Appendix C Command Reference Commands Installation Guide for the Cisco 1120 Secure Access Control Server 4.2 C-18 OL-19455-01...
-
Page 145: Troubleshooting
A P P E N D I X Troubleshooting The CSACS 1120 Series appliance undergoes extensive testing before it leaves the factory. If you encounter problems, use the information in this appendix to help isolate problems or to eliminate the appliance as the source of the problem. -
Page 146: Problem Solving
The key to problem solving is to isolate the problem to a specific location by comparing what the CSACS 1120 Series appliance is doing with what it should be doing. In other words, when troubleshooting, define the specific symptoms, identify all potential problems that could be causing the symptoms, and then systematically eliminate each potential problem (from most likely to least likely) until the symptoms disappear. -
Page 147: Troubleshooting The Power And Cooling Systems
• When the CSACS 1120 Series appliance is connected to the power source, is the appliance power LED on the front-panel on? If not, check the AC power cord connection; if the power LED is still off, the problem might be due to a power supply failure. -
Page 148: Troubleshooting Adapter Cards, Cables, And Connections
Cisco Information Packet publication that is shipped with your appliance or contact your customer service representative. If you are using the console port with a terminal, and the CSACS 1120 Series appliance boots but • the console screen is frozen: Check the external console connection. -
Page 149: Reading The Leds
Reading the LEDs • The CSACS 1120 Series appliance powers on and boots only when an adapter card is removed. Check the adapter card. For warranty information, refer to the Cisco Information Packet publication that is shipped with your appliance or contact your customer service representative. -
Page 150: Nic Leds
Network connection Amber Blinking Transmit/receive activity Right (2) — 10-Mb/s connection (if left LED is on or blinking) Amber Solid 1000-Mb/s connection Green Solid 100-Mb/s (or 1-Gb/s) connection Installation Guide for the Cisco 1120 Secure Access Control Server 4.2 OL-19455-01... -
Page 151: Product Serial Number Location
You can access the CPI tool from Cisco.com at: http://tools.cisco.com/Support/CPI/index.do Access to the CPI tool on the Cisco Support website requires a Cisco.com user ID and password. If you have a valid service contract but do not have a user ID or password, you can register at: Installation Guide for the Cisco 1120 Secure Access Control Server 4.2... - Page 152 Appendix D Troubleshooting Product Serial Number Location http://tools.cisco.com/RPF/register/register.do Installation Guide for the Cisco 1120 Secure Access Control Server 4.2 OL-19455-01...
-
Page 153: Maintaining The Cisco 1120 Secure Access Control Server
Maintaining the Cisco 1120 Secure Access Control Server The CSACS 1120 Series appliance is configured to order and is ready for installation when it leaves the factory. After you install and configure your appliance, you may have to perform specific maintenance procedures and operations to ensure that the appliance is operating properly. -
Page 154: General Exterior Cleaning And Inspection
Also, as a further deterrent to corrosion, the appliance should not be used in extreme temperatures, as explained in the Temperature, page E-3 section. Installation Guide for the Cisco 1120 Secure Access Control Server 4.2 OL-19455-01... -
Page 155: Cooling
However, if an appliance is located in an unusually humid location, a dehumidifier can be used to maintain the humidity within an acceptable range. Installation Guide for the Cisco 1120 Secure Access Control Server 4.2 OL-19455-01... -
Page 156: Altitude
Ensure that the screws on all peripheral cable connectors are securely fastened to their • corresponding connectors on the back of the appliance. • Always use shielded cables with metal connector shells for attaching peripherals to the appliance. Installation Guide for the Cisco 1120 Secure Access Control Server 4.2 OL-19455-01... -
Page 157: Magnetism
If a blackout occurs—even a temporary one—while the appliance is turned on, turn off the appliance immediately and disconnect it from the electrical outlet. Leaving the appliance on may cause problems when the power is restored. Installation Guide for the Cisco 1120 Secure Access Control Server 4.2 OL-19455-01... - Page 158 Appendix E Maintaining the Cisco 1120 Secure Access Control Server Maintaining Your Site Environment Installation Guide for the Cisco 1120 Secure Access Control Server 4.2 OL-19455-01...
-
Page 159: I N D E X
1-ix 2-15 troubleshooting considerations power console port back panel 1-7, 3-9 connections 2-15 backup command serial console port, pinouts serial 1-10 conventions cable command line interface connecting Installation Guide for the Cisco 1120 Secure Access Control Server 4.2 IN-1 OL-19455-01... - Page 160 See EMI GUI Administrator electrostatic discharge adding 4-19 See ESD guidelines airflow preventing effects of lifting environment rack installation maintaining safety site temperature maintenance environmental features specifications (table) Installation Guide for the Cisco 1120 Secure Access Control Server 4.2 IN-2 OL-19455-01...
- Page 161 LEDs checking 3-13 front panel NIC 1 and NIC 2 organization of this document 1-ix lifting guidelines overcurrent location protection 1-10 serial number 1-4, D-7 overtemperature Installation Guide for the Cisco 1120 Secure Access Control Server 4.2 IN-3 OL-19455-01...
- Page 162 NIC 1 and NIC 2 general precautions problem solving See troubleshooting procedure safety method of guidelines power up 3-13 SELV circuits (warning) protection serial overcurrent 1-10 console port overtemperature 1-11 Installation Guide for the Cisco 1120 Secure Access Control Server 4.2 IN-4 OL-19455-01...
- Page 163 Windows, migrating from 5-19 Windows services temperature maintenance guidelines temperature and humidity guidelines time and date, setting 4-21 Time and Date, setting with NTP 4-22 timeout, setting manually 4-21 Installation Guide for the Cisco 1120 Secure Access Control Server 4.2 IN-5 OL-19455-01...
- Page 164 Index Installation Guide for the Cisco 1120 Secure Access Control Server 4.2 IN-6 OL-19455-01...
Need help?
Do you have a question about the 1120 and is the answer not in the manual?
Questions and answers