
Related Manuals for CPI CLS Advance


Summary of Contents for CPI CLS Advance
- Page 1 Operators' Manual CLS Advance Coin Recycler Crane Payment Innovations | Coin House | New Coin Street, Royton | Oldham OL2 6JZ | UK info@cranepi.com | www.cranepi.com | Phone: +44 161 678 0111...
-
Page 2: Table Of Contents
CLS Advance Table of contents Interfaces On-off switch Status illumination Revision Protocol Coin input funnel Centrifuge & coin transport belt About ... Coin validator About this manual Coin sorting spiral 3.1.1 Text conventions 5.10 Coin payout unit 3.1.2 Additional useful technical documentation 5.10.1... - Page 3 CLS Advance Operation Technical characteristics Switching the CLS on/off Device data Opening and closing the CLS lid Reliability figures 9.2.1 Failure rates Opening and closing the coin acceptance unit 9.2.2 Replacement intervals Opening and closing the coin payout unit Interfaces Removing and reinstalling a coin hopper 9.3.1...
- Page 4 CLS Advance List of figures List of figures Fig. 1: CLS front – Functional elements Fig. 37: Front hopper bail handles tilted correctly (towards the lid) Fig. 2: CLS rear – Functional elements Fig. 38: Hopper filling via coin input funnel Fig.
-
Page 5: Revision Protocol
Added how to remove coin input funnel insert • 8.3 " Removing and reinserting funnel insert" _1-5 • 8.4 "Cleaning the CLS" _1-6 Update to CLS Advance Update to fast payput information and label • 5.2 Product label _1-7 • 5.10.2 Fast payout •... -
Page 6: About
• Information and direction for use 1 2 3 ... Requests to perform an action are numbered in another typeface. CPI Buxtehude provides two software kits for integrating the CLS (www.cranepi.com, NRI Support): • CLS API (Application Programming Interface) for an easy high-level integration [Fig. -
Page 7: Safety Instructions
Switch the device off before cleaning the coin recycler or removing and reinstalling components. The CLS may only be cleaned and serviced/maintained by qualified technicians or CPI-trained and authorized personnel. Contact Crane Payment Innovations in Buxtehude if you want to modify the device beyond the scope of the modifications or attachments described here. -
Page 8: Design & Function
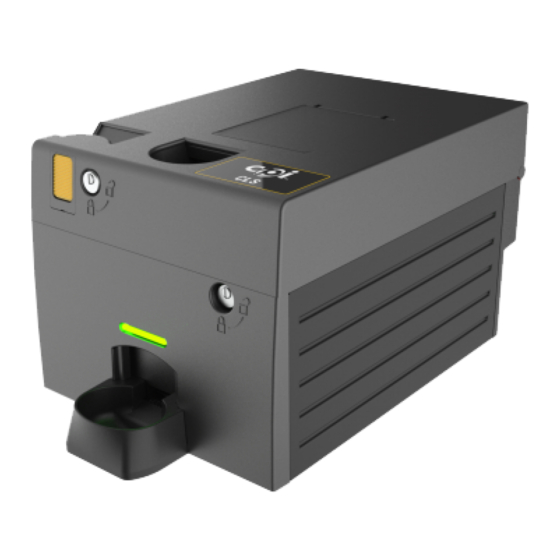
CLS Advance Design & Function Design & Function This chapter describes • the main parts the CLS consists of, and • all functional elements required for the operation of the coin recycler. Overview 5.1.1 Front view 1 Replenishment flap – for future applications 2 Status illumination –... -
Page 9: Modular Layer Structure
CLS Advance Design & Function 5.1.3 Modular layer structure • Lid including: – Coin input funnel – Operating elements as lock, push-button, pull handle • 2-layer coin acceptance unit (key-locked, accessed by authorized personnel only) including: – Centrifuge – Coin transport belt –... -
Page 10: Lid
CLS Advance Design & Function 5.1.3.1 1 Coin transport belt 1 Dust tray 2 Trash flap 2 Trip lever for device open switch 5.1.3.3 Lower coin acceptance unit Fig. 5: CLS with upper acceptance unit opened showing upper acceptance unit from the bottom and lower ac- Fig. -
Page 11: Coin Payout Unit
CLS Advance Design & Function 1 Coin return chute 2 Coin sorting chutes 1–8 5.1.3.4 Coin payout unit 3 Device open switch 4 Color code for coin hopper postions (blue-labeled hopper fits in hopper position with blue label) 6 Payout disc, coin hopper... -
Page 12: Product Label
(cf. Chap. "5.2.1 Model number decoding", p. 12) 7 Configuration number and version (bundle file of several configurations) 8 Rated voltage and current consumption Fig. 7: Product label 9 Product name CLS ADVANCE MODEL NUMBER DECODING 5.2.1 Model number decoding 0000000000/0000/000 MS14... -
Page 13: Configuration Number Decoding
CLS Advance Design & Function CLS ADVANCE CONFIGURATION NUMBER DECODING 5.2.2 Configuration number decoding 0000000000/0000/000 MS14 M616 CLS-FRM-141002-0009 CLS-ADV/FLST0A-EUR00-C1-1 CLS-CFG-EUR00-F0S00A-0004 CLS-CFG-EUR00-F0S00A-0004 CLS-CFG-XXXxx-XXSXXA-xxxx Revision = caliber programming Programming – = not applied Further function – = no extra Further hardware extras –... -
Page 14: Status Illumination
CLS Advance Design & Function Status illumination The upper illumination [Fig. 9/1] informs about the operating state of the CLS, the lower [Fig. 9/2] indicates that the coin return conveyor is transporting coins to the return tray: Illumination Lighting/Flashing Meaning... -
Page 15: Centrifuge & Coin Transport Belt
CLS Advance Design & Function Centrifuge & coin transport belt The centrifugal [Fig. 11/1] force arranges the dropped coins one after another on the turning conveyor belt [Fig. 11/2] so that their properties can be checked. Coin validator In the coin validator [Fig. 11/3] the coins pass sensors checking the coins. There they generate individual measurement values. -
Page 16: Payout Configuration & Capacity
CLS Advance Design & Function tray is full of coins, the upper status illumination will flash red. No further coin should be inserted until the coin return tray has been emptied. 5.10.1 Payout configuration & capacity €1 The payout configuration and capacity depends on the currency and coin denomi- nations programmed in the system. -
Page 17: Coin Rejector Pin
CLS Advance Design & Function 5.11 Coin rejector pin Coins with measured values beyond the programmed acceptance band are extracted by means of the coin rejector pin [Fig. 15/1] coming up and deflecting these coins to the return belt [Fig. 15/2] transporting them to the coin return tray [Fig. -
Page 18: Top Key Lock, Push-Button & Pull Handle
CLS Advance Design & Function 5.13 Top key lock, push-button & pull handle To keep your cash under lock and key the CLS lid is closed in normal operation. In case of jamming the authorized attendant possessing the key may open the CLS lid by unlocking the top key lock [Fig. -
Page 19: Coin Path & Sensor Monitoring
CLS Advance Design & Function 5.15 Coin path & Sensor monitoring The following figures show the coin path through the CLS. 5.15.1 Coin input funnel 1 3-height photoelectric sensors starting CLS when detecting coins in the input funnel Do not drop more than 50 €1-sized coins at once in order that all coins can be accepted properly and do not have to be rejected or cause a coin jam, which in the worst case can damage the CLS. -
Page 20: Coin Validator And Sorting Spiral
CLS Advance Design & Function 5.15.2 Coin validator and sort- ing spiral 1 Lever measures coin diameter 2 Coil measures coin material properties, detects coin type, signals accepted coin (with valid measured values) and increases appropriate hopper counter 3 Sensors... -
Page 21: Fig. 20: Sorting Spiral Providing Sorting Control Sensors Detecting Coins Falling Into The Hoppers
CLS Advance Design & Function 1 Sorting control in front of each coin gap (capacitive sensor) detects position of accepted (green) coin with valid measured values Fig. 20: Sorting spiral providing sorting control sensors detecting coins falling into the hoppers... -
Page 22: Coin Hoppers And Coin Return Tray
CLS Advance Design & Function 5.15.3 Coin hoppers and coin return tray 1 Coin ejector lever stressed by the coins ejects coins to be dispensed out of the hopper 2 Payout control (photoelectric sensor) detects coins to be paid out when falling on the return belt and decreases coin counter per... -
Page 23: Getting Started
CLS Advance Getting started Getting started Fixing the CLS against theft and unwanted shifting We recommend you fix the CLS to its installation location. For this, in the For all installation work on the coin recycler please observe the following... -
Page 24: Putting The Cls Into Service
Fig. 24: Detail: Interfaces, on-off switch and upper status illumination funnel (cf. Chap. "8.1 Filling the coin hoppers", p. 31) For an easy integration of the CLS CPI Buxtehude provides two software kits (www.cranepi.com, NRI Support): • CLS API (Application Programming Interface) for an easy high-level integration •... -
Page 25: Fig. 25: Switching Cls On/Off
CLS Advance Operation Operation This chapter describes how to operate the coin recycler: • Switching the CLS on/off • Opening and closing the CLS lid • Opening and closing the coin acceptance unit • Opening and closing the coin payout unit •... -
Page 26: Fig. 26: Top Key Lock, Push-Button And Pull Handle
CLS Advance Operation Opening and closing the CLS lid Though the CLS stops running when the lid is opened, you should always wait until a transaction has been finished before you open the lid to not affect the coin counters. -
Page 27: Fig. 28: Bayonet Mount Properly Closed
CLS Advance Operation Opening and closing the coin acceptance unit The coin acceptance unit consists of an upper and a lower layer. The upper layer can be opened using a bayonet mount to eliminate a jam for instance The bayonet mount indication is green [Fig. 28/1] when it is properly closed. -
Page 28: Fig. 30: Disconnecting Bayonet Mount
CLS Advance Operation Fig. 30: Disconnecting bayonet mount Fig. 31: Bayonet mount disconnected Fig. 32: Open acceptance unit OM_CLS_-_EN_2-0... -
Page 29: Fig. 33: Bottom Key Lock And Pull Handle
CLS Advance Operation Opening and closing the coin payout unit The coin payout unit can be opened and closed using the key for the lower lock [Fig. 33/1] to eliminate coin jamming, for instance, or to service the CLS: Hand over the key to open the payout unit only to personnel allowed to access the cash. -
Page 30: Fig. 35: Removing A Hopper
CLS Advance Operation Removing and reinstalling a coin hopper We recommend you empty the hoppers before removing them. Otherwise hopper coins tend to fall out of the hopper which could affect the hopper coin counters and even damage the CLS. - Page 31 CLS Advance Service Service This chapter describes how to service the coin recycler: • Filling the coin hoppers • Emptying the coin hoppers • Cleaning the CLS • Eliminating coin jam-up Filling the coin hoppers In order that the coin hoppers can be filled and all coins will be registered/counted in filling mode you need the product-dependent software installed on the control unit computer connected.
-
Page 32: Fig. 38: Hopper Filling Via Coin Input Funnel
CLS Advance Service 8.1.2 Filling the hoppers via coin input funnel To fill the hoppers Start filling mode and filling cycle in the product-dependent software on the control unit computer. Drop programmed coins to be filled into the coin input funnel [Fig. 38/1]. -
Page 33: Fig. 40: Raising Coin Return Tray
CLS Advance Service Emptying the coin hoppers In order that the coin hoppers can be emptied you need the product-dependent software installed on the control unit computer connected, in order that all coin counters will be decreased. We recommend that you empty the hoppers via the coin return conveyor. Emptying the hoppers directly may result in incorrect coin counters and audits. - Page 34 CLS Advance Service 8.2.2 Emptying the hoppers manually Due to the locks on the front of the CLS, the both front coin hoppers can only be removed after having removed the neighbor hoppers. Open payout unit (cf. Chap. "7.4 Opening and closing the coin payout unit", p. 29) Carefully pull out the hopper to be emptied.
-
Page 35: Fig. 42: Loosening And Removing Funnel Insert
CLS Advance Service Removing and reinserting funnel insert Cleaning the coin input funnel requires the input funnel insert to be removed: Open the CLS lid (cf. Chap. "7.2 Opening and closing the CLS lid", p. 26) Carefully fold down the dust tray and clean it if necessary (cf. -
Page 36: Fig. 44: Surfaces To Be Cleaned, If Necessary Remove Funnel Insert
CLS Advance Service Cleaning the CLS This section describes the cleaning work that should be done by the operator as required depend- ing on the installation site: • Cleaning the housing and outer parts of the CLS • Emptying and cleaning the dust tray Please contact your service technician for further cleaning routines. -
Page 37: Fig. 45: Lifting The Clip And Folding Down The Dust Tray For Cleaning
CLS Advance Service 8.4.2 Emptying the dust tray Open the CLS lid (cf. Chap. "7.2 Opening and closing the CLS lid", p. 26) Lift the clip [Fig. 45] and carefully fold down and unhinge the tray [Fig. 46]. Make sure that dust or foreign objects do not fall into the CLS when emptying and cleaning the dust tray. -
Page 38: Fig. 47: In Case Of A Coin Jam: Green Coins Into The Hoppers, Red Coins To Be Taken Out Of The System
CLS Advance Service Eliminating coin jam-up In case of hard coin jams the CLS sends an error message and shuts down. Coins can either jam in the acceptance unit on the sorting spiral or in a coin hopper. 8.5.1 Eliminating coin jam in acceptance unit... -
Page 39: Fig. 48: Pulling Coin(S) Jammed (Red) Out Of The Payout Slot
CLS Advance Service 8.5.2 Eliminating hopper coin jam The coin hoppers detect, if the coins can no longer be transported due to a jam. In this case they change the rotational direction of the motor, so that the coins are split up on the payout disc and can be paid out again when rechanging the rotational direction. -
Page 40: Fig. 50: Removing Hopper Bowl And Payout Disk
CLS Advance Service If that does not work as expected: Remove the hopper bowl by pressing the locking latch on both sides and detach the bowl [Fig. 50]. Extract the payout disc [Fig. 50] and keep it in safe place for reassembly. - Page 41 CLS Advance Technical characteristics Technical characteristics Mechanical environmental conditions Class Comment Operation 3M2 Building without strong vibration This chapter contains Transport Any truck and trailer or carriage by rail/air (in original packaging) • all relevant CLS data Storage Sensible vibrations & shocks due to machines •...
- Page 42 Due to a high-frequent use of coins with specific properties, 5 Chassis ground such as very sharp and thin edges or rims of polygonal coins, the lifetime figures can vary. Replace part every ... coin cycles CLS Advance part MCBIF* Replacement(s) per lifetime (please contact service partner)
- Page 43 Technical characteristics Power supply requirements We recommend you use the CPI power supply (order no. 42733) to connect the CLS. In case you prefer an alternative unit plase make sure, that the CLS has to be connected through an appropriate power supply guaranteeing the CLS is grounded to the mains and meeting the following requirements: •...
- Page 44 CLS Advance Technical characteristics Installation & service dimensions Are you interested in a 3D solid model in Step format? No problem: Download at www.cranepi.com, NRI Support OM_CLS_-_EN_2-0...
- Page 45 CLS Advance Technical characteristics Notes on environmental protection The CLS has been developed environmentally and recycling-friendly. This means that crucial criteria such as long life, choice of material and its labeling, emissions, packaging, ease of disassembly and recyclability have been taken into account. This saves resources and relieves the strain on the environment.
-
Page 46: Fig. 52: Detail: Upper And Lower Status Illumination
CLS Advance Troubleshooting Troubleshooting This chapter describes how to locate an error either using the • Top and bottom illuminations [Fig. 52/1, 2] or • Detailed status and error messages transmitted to the control software 10.1 Quick troubleshooting using status illumination... - Page 47 CLS Advance Troubleshooting 10.2 Status & error messages 10.2.2 Troubleshooting tables The following tables list the error codes transmitted by the The CLS transmits detailed status and error messages to the control software. • CLS control unit The messages report on events of interest that happen while the CLS is operating. Errors can be •...
- Page 48 CLS Advance Troubleshooting Error code Description/Cause Category Remedy/hints By whom Error code Description/Cause Category Remedy/hints By whom Hopper communication Critical • Make sure that the hopper is in- • Attendant possess- Hopper communication Critical • Make sure that the hopper is in- •...
- Page 49 CLS Advance Troubleshooting Error code Description/Cause Category Remedy/hints By whom Error code Description/Cause Category Remedy/hints By whom Coin validator FW upgrade: Attention FW file failure, contact service Service Coin input funnel is in boot Critical Firmware failure, contact service Service...
- Page 50 CLS Advance Troubleshooting Error code Description/Cause Category Remedy/hints By whom Error code Description/Cause Category Remedy/hints By whom Hopper count match. Num- Info Hopper 2 configuration Attention Configuration file failure, contact Service 0x8224 bundle version mismatch service ber of hoppers identified are...
- Page 51 CLS Advance Troubleshooting Error code Description/Cause Category Remedy/hints By whom Error code Description/Cause Category Remedy/hints By whom Lack of change. CLS control Attention Refill hopper Attendant possessing Finish hopper 4 firmware Info (cf. Chap. "8.1 Filling the 0x84CB unit wants the hopper 3 to coin hoppers", p.
- Page 52 CLS Advance Troubleshooting Error code Description/Cause Category Remedy/hints By whom Error code Description/Cause Category Remedy/hints By whom Hopper 6 replied with BUSY Info Begin hopper 7 firmware Info 0x87C9 update ACK 0x8667 status code after sending hopper a command Upload hopper 7 firmware...
- Page 53 CLS Advance Troubleshooting Error code Description/Cause Category Remedy/hints By whom Error code Description/Cause Category Remedy/hints By whom Coin return tray is raised Attention Bring return tray into correct operat- Attendant Coin validator sent ACK for Info 0x8AD1 and not in correct position to ing position command "prepare sector"...
- Page 54 CLS Advance Troubleshooting Error code Description/Cause Category Remedy/hints By whom Error code Description/Cause Category Remedy/hints By whom Main PCB sent ACK for com- Info Coin input funnel master Info 0x91D3 0x8E6C mand "copy buffer to flash" inhibit set 0x8E6D Coin input funnel was reset Info 10.2.2.2...
- Page 55 CLS Advance Troubleshooting Error code Description/Cause Category Remedy/hints By whom Error code Description/Cause Category Remedy/hints By whom Configuration data block check- Critical • Configuration failure, • Service 0x7yzz Number of coins [zz] of coin Info sum error contact service y = 0..F type 0..15 sorted...
- Page 56 CLS Advance Troubleshooting Error code Description/Cause Category Remedy/hints By whom Error code Description/Cause Category Remedy/hints By whom Coin not accepted as normal Info If unintended, configuration Service 0x8yA0 Accepted coin has not reached Info 0x8y83 coin acceptance band inhibited failure, contact service y = 0..F...
- Page 57 CLS Advance Troubleshooting Error code Description/Cause Category Remedy/hints By whom Error code Description/Cause Category Remedy/hints By whom Coin was rejected as validator Info • Insert coin again • Customer Coin counters corrected follow- Info 0xFEF9 0xC09F misses coin to be rejected ing an unwanted reset •...
- Page 58 CLS Advance Index Index Close Input funnel Coin acceptance unit 26 Capacity 41 Bar code 12 Bayonet mount 27 Description 14 Bayonet mount, open acceptance unit 10 Coin payout unit 29 Figure 8 Belt Lid 26 Insert 35 Coin centrifuge...
- Page 59 CLS Advance Index Validator 15 Environmental Height Arm, description 20 Conditions 41 CLS 42 Damages in transit 23 Arm, figure 10 Protection 45 Figure 44 Date of manufacture 12 Arm, raise 27 Error Coin-in – coin-out 42 Depth, CLS 42...
- Page 60 CLS Advance Index Installation 24 Lamps, operating status Measures 42 Operating Anti-theft 23 Description 14 Figure 44 Conditions 41 Coin hoppers 30 Figure 8 Model number 12 Instructions, additional 6 Dimensions 44 Troubleshooting 46 Decoding 12 Temperature 41 Environment 23...
- Page 61 CLS Advance Index Power Sensors Springs, open CLS Consumption 41 Coin hoppers 22 Description 29 Raise validator arm 27 Interface Coin input funnel 19 Figure 11 Rated voltage 12 Description 41 Coin return tray 22 Status Reach range, ADA 42...
- Page 62 CLS Advance Index Transport belt Acceptance unit Warning 6 Description 15 Web site, CranePI/NRI support 6 Figure 10 Weight, CLS 42 Payout unit Width, CLS 42 Description 15 Figure 44 Figure 11 www.cranepi.de 6 Trash flap 10 Trip lever, device open switch 10...
Need help?
Do you have a question about the CLS Advance and is the answer not in the manual?
Questions and answers