Arjohuntleigh FLOWTRON UNIVERSAL Service Manual
Hide thumbs
Also See for FLOWTRON UNIVERSAL:
- Instructions for use manual (33 pages) ,
- User manual (36 pages)
Table of Contents
Advertisement
Advertisement
Table of Contents

Subscribe to Our Youtube Channel
Related Manuals for Arjohuntleigh FLOWTRON UNIVERSAL


Summary of Contents for Arjohuntleigh FLOWTRON UNIVERSAL
- Page 1 ® FLOWTRON UNIVERSAL Service Manual...
- Page 3 Flowtron Universal Service Manual Service Bulletins Incorporated Date Bulletin Content incorporated SERB008 Cleaning Instructions Sep 2009 SERB022 Manifold Repair Sep 2009 SERB023 Software Upgrade to V3.00 Sep 2009 SERB028 Flowtron Universal LCD Replacement Sep 2009 SERB030 Software Upgrade to V3.01...
- Page 4 Flowtron Universal Service Manual Ammendment Record Issue 2 Page ii SER0009 Sep 2009...
-
Page 5: Table Of Contents
Flowtron Universal Service Manual CONTENTS CHAPTER 1 Introduction ........1 About This Manual . - Page 6 Flowtron Universal Service Manual Insulation Resistance Test ....... . . 15 Dielectric Strength Test (Flash Test) .
- Page 7 Flowtron Universal Service Manual Replacing the Membrane Label by removing the Control PCB Ass’y from the Top Case Ass’y . 37 Replacing the Membrane Label without removing the Control PCB Assembly ..39 Removing the Run Button .
- Page 8 Flowtron Universal Service Manual Issue 2 Page vi SER0009 Sep 2009...
-
Page 9: Chapter 1 Introduction
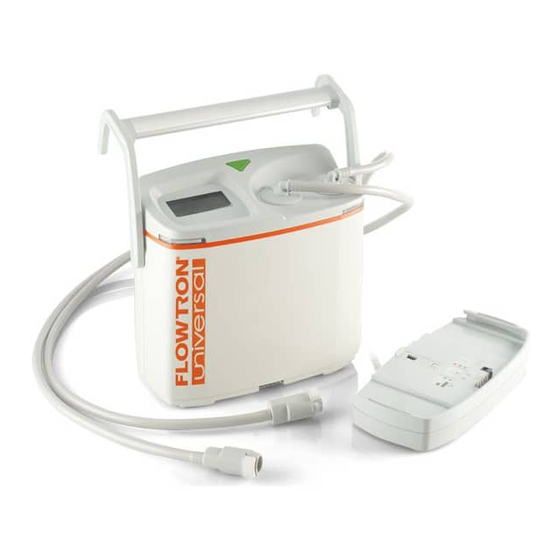
ArjoHuntleigh strongly recommend that their equipment is only serviced by trained personnel and provide courses for customers who wish to become licensed to service their own equipment. In no event will ArjoHuntleigh be responsible for any service performed by customers or third parties. - Page 10 Introduction Flowtron Universal Service Manual The system comprises a pump that can be used in conjunction with a pair of ArjoHuntleigh single-patient- use compression garments. The pump provides intermittent cycles of compressed air to the two connected compression garments, which are inflated alternately. The pump can be used with a number of different ArjoHuntleigh single- patient-use compression garments, including: •...
-
Page 11: Schematics
20 seconds, or else the real time clock will lose its time and date settings. If the time and date settings are lost, they have to be reloaded from a PC-based service tool, so the procedure should only be carried out in a ArjoHuntleigh service environment. Schematics Refer to Figure 8 for the Pneumatic/Control Schematic of the pump. -
Page 12: System Operation
Introduction Flowtron Universal Service Manual System Operation Plug the pump into an electrical outlet, and switch on. The pump will first go through a self-test routine (Refer to Figure 2). Figure 2 - LCD Display - Running Diagnostic At the end of the self-test routine, the pump will “beep” and go into Standby mode, where it will remain until required for use (Refer to Figure 3). - Page 13 Flowtron Universal Service Manual Introduction To start the therapy, press the green Run button on the top of the pump, and keep it depressed until the pump “beeps”. The green LEDs on the front of the pump will illuminate and therapy will begin.
- Page 14 Introduction Flowtron Universal Service Manual 4.11 To change the language displayed on the pump: 4.11.1 Press the function button adjacent to “Options” 4.11.2 Use the arrow buttons to highlight the “Language” change option. 4.11.3 Press the button to continue. 4.11.4 Use the arrow buttons to scroll through the available languages.
- Page 15 Flowtron Universal Service Manual Introduction Membrane LCD Display Label Alarm LED Alarm LED Control Run/Standby Run/Standby LED Electronics Buzzer Pressure Garment Transducer Sleeve Exhaust to Quick Atmosphere Connect Recognition Sense Coil Hose Set Garment Sleeve Quick Connect Compressor Recognition Motor...
- Page 16 Introduction Flowtron Universal Service Manual Control PCB Assembly Membrane Label Hose Set Assemblies Connector Recognition LCD Display + Sense Coils Membrane Label LCD Display Connector Rechargeable Battery Motor and (if fitted) Manifold Assembly Ribbon Cable Fuses Power Supply PCB Assembly...
-
Page 17: Chapter 2 Troubleshooting
TROUBLESHOOTING Troubleshooting Table The Flowtron Universal pump features an audible and visual alarm. If a problem occurs, the system will sense the fault and briefly flash a message on the LCD display on the top of the pump. If the same fault continues for 10 successive inflations (up to 10 minutes), the audible alarm will sound, the red alarm lights on the front of the pump flash and a message will appear on the LCD display until corrective action is completed. - Page 18 Troubleshooting Flowtron Universal Service Manual Table 2 - Troubleshooting Table Fault Possible Cause Remedy “LO” (Low Garment Hose disconnected at garment. Check the hose connections at Pressure the garment end. Alarm) Loose fitting garment. Rewrap snugly. Garment leak. Check garment and replace if necessary.
-
Page 19: Maintenance
Flowtron Universal Service Manual Maintenance CHAPTER 3 MAINTENANCE WARNING: BEFORE DISMANTLING THE PUMP UNIT, MAKE SURE THE UNIT HAS BEEN ISOLATED FROM THE MAINS/POWER SUPPLY BY REMOVING THE MAINS/POWER PLUG FROM THE WALL SOCKET. WARNING: A POTENTIAL ELECTRICAL SHOCK HAZARD EXISTS ON THE POWER SUPPLY PCB ASSEMBLY WHEN THE CASE IS OPENED, EVEN WITH THE PUMP SWITCHED OFF. -
Page 20: Cleaning Instructions
Maintenance Flowtron Universal Service Manual Cleaning Instructions If the pump is to be cleaned by spraying cleaning solutions directly onto it, the following (Refer to Figure 10) instructions must be observed: Lay the pump down on its rear case, so that the cleaning solution will not collect on the top cover assembly adjacent to the two hose set assemblies. -
Page 21: Maintenance Checks
Flowtron Universal Service Manual Maintenance Maintenance Checks If any parts are found to be damaged they must be replaced in accordance with Chapter 5, Pump Repair. Visually inspect the following for damage, wear and potential faults: • Outer casing: Check for damage and security. - Page 22 Maintenance Flowtron Universal Service Manual Chap 3 Issue 2 Page 4 SER0009 Sep 2009...
-
Page 23: Chapter 4 Testing
Flowtron Universal Service Manual Testing CHAPTER 4 TESTING Initialising the Pump Make sure that NO garments are connected to either pump hose set assembly. Plug the pump into an electrical outlet, and switch on. The pump will first go through a self-test routine (Refer to Figure 11). - Page 24 Testing Flowtron Universal Service Manual 2.3.2 Figure 14 shows a foot garment and a single-chamber calf or thigh/calf garment connected to the pump. Figure 14 - Foot and Single-Chamber Calf or Thigh/Calf Garments Connected 2.3.3 Figure 15 shows a foot garment connected to one hose set assembly, and no garment connected to the other.
-
Page 25: Checking The Basic Pump Operation
Flowtron Universal Service Manual Testing Checking the Basic Pump Operation Initialise the pump (Refer to Page 1, Section 1). Connect a garment to each pump hose set assembly. Make sure the connection and garment types are confirmed correctly on the display (Refer to Table 3). - Page 26 Testing Flowtron Universal Service Manual 3.6.2 Reconnect the garment to the hose set assembly, and check that within two complete pump cycles, the pump automatically senses the garment and resumes normal operation. 3.6.3 Disconnect the garment again, as detailed in Para 3.6.1., and leave disconnected.
-
Page 27: Location Of The Soft-Function Buttons On The Pump Membrane Label
Flowtron Universal Service Manual Testing “Hidden” Service Button Run Button LCD Display “Normal” User Buttons Membrane Label Figure 19 - Soft Function Buttons on the Membrane Label Location of the Soft-Function Buttons on the Pump Membrane Label Refer to Figure 19 for the position of the following four soft-function buttons on the membrane label: A three-button keypad below the LCD display. -
Page 28: Preparation Of The Calibration Test Equipment
Testing Flowtron Universal Service Manual 5.2.2 Press the Up icon to scroll up. To select the highlighted option on the LCD (the relevant text is shown inverted i.e. white text on a black background), press the Select button below the LCD display. -
Page 29: Checking The Calibration Of The Pressure Transducer
Flowtron Universal Service Manual Testing Garment Connector Right Hose Set Assembly Left Hose Set Assembly Note: The Test Equipment must be connected to the Right Hose Set Assembly. The Left Hose Set Assembly is not used. Figure 21 - Calibration Test Equipment for the Pressure Transducer... - Page 30 Testing Flowtron Universal Service Manual Make sure that no calibration test equipment or other garments are connected to either pump hose set assembly. Initialise the pump (Refer to Page 1, Section 1). Connect the right hose set assembly on the pump to the garment connector on the test equipment (Refer to Figure 21).
- Page 31 Flowtron Universal Service Manual Testing 7.8.2.1 End this test, by scrolling down the list of options to Exit, and select it using button. 7.8.2.2 Carry out the procedure to re-calibrate the pressure transducer (Refer to Page 10, Section 8). 7.8.2.3 Repeat this procedure to check the calibration of the pressure transducer (Refer to Page 7, Section 7).
-
Page 32: Re-Calibrating The Pressure Transducer
Testing Flowtron Universal Service Manual Re-calibrating the Pressure Transducer Note: This procedure is carried out without opening the pump case. Prepare the calibration test equipment (Refer to Page 6, Section 6). Make sure that no calibration test equipment or other garments are connected to either pump hose set assembly. - Page 33 Flowtron Universal Service Manual Testing 8.10 To start the test, scroll down the list of options to Run Compressor, and select it using the button. The compressor will start running at output level “5”, indicated by the (5) on the LCD display, and the Output Pressure shown on the LCD display should rise and then stabilize (Refer to Figure 27).
-
Page 34: Recalibrating The Pump Hose Set Assemblies
Testing Flowtron Universal Service Manual Recalibrating the Pump Hose Set Assemblies Initialise the pump (Refer to Page 1, Section 1). Make sure that no garments are connected to either pump hose set assembly. Press the “hidden” Service button on the membrane panel to access the service screen on the LCD display (Refer to Page 5, Section 4). - Page 35 Flowtron Universal Service Manual Testing Test Probe Make sure the mains/power cordset connector is pushed securely into the pump Screw Case IEC Cover Earth/Ground Access Point Rear Case of Pump Mains/Power Cordset Note: Insert the end of the test probe through the test hole in the rear case.
-
Page 36: Electrical Safety Testing
This test checks the earth/ground wire continuity between the earth pin on the mains/power plug and the earth terminal on the PSU PCB. On the Flowtron Universal, the earth/ground wire is connected to a special earth/ground test pad on the PSU PCB assembly (Refer to Figure 31). A voltage is established between this earth/ground test pad and the earth/ground pin of the pump's mains/power cordset, and the resistance is checked. -
Page 37: Insulation Resistance Test
Flowtron Universal Service Manual Testing 10.4 Connect the other end of the test equipment to the earth/ground pin on the pump's mains/power cordset. 10.5 A 25A (nominal) current is passed for 10 seconds between the earth/ground test pad on the control PCB assembly and the earth/ground pin of the mains/power cordset. - Page 38 Testing Flowtron Universal Service Manual Chap 4 Issue 2 Page 16 SER0009 Sep 2009...
-
Page 39: Chapter 5 Pump Repair
WALL OUTLET. General This chapter details repair procedures for the Flowtron Universal pump. All repairs should be carried out by ArjoHuntleigh approved service personnel. CAUTION: Do NOT remove the hose set assemblies from the pump unless it is part of the particular repair procedure. - Page 40 Pump Repair Flowtron Universal Service Manual Table 6 - Repair to Testing Requirements Basic Garment Recalibrate Reset Electrical Components / Assemblies Pump Recognition Hose Service Safety Operation Test Sets Tests Mains/Power Cordset Case Inlet Filter Felt Hose Set Assembly Rear Case...
-
Page 41: Pump Labels
Flowtron Universal Service Manual Pump Repair Pump Labels Note: The labels must be stuck on in the correct order. Stick the serial number label (Fig 32, Item 10) onto the rear case. Make sure the orientation of the text on the serial number label is correct (Refer to Figure 32). - Page 42 Pump Repair Flowtron Universal Service Manual Figure 33 - Replacing the Mains/Power Cordset and Inlet Filter Felt Table 8 - Mains/Power Cordset and Inlet Filter Felt Parts List Item Part Number Description Refer to Table 9 Mains/Power IEC Cordset 507374...
- Page 43 Flowtron Universal Service Manual Pump Repair Table 9 - Main/Power Cordset version part numbers Cable Part No./Description Product Model No. (old Model No.) 507001 (AC600/UK) 507003 (AC600/US) 507004DE (AC600/DE) 507004DK (AC600/DK) 507004ES (AC600/ES) 507004FR (AC600/FR) 507004IT (AC600/IT) 507004NL (AC600/NL) 507009AU...
-
Page 44: Removing The Case Iec Cover
Pump Repair Flowtron Universal Service Manual Removing the Case IEC Cover WARNING: BEFORE REMOVING THE CASE IEC COVER, MAKE SURE THE PUMP UNIT HAS BEEN ISOLATED FROM THE MAINS/POWER SUPPLY BY REMOVING THE MAINS/POWER PLUG FROM THE WALL SOCKET. Lay the pump face down on a flat surface. -
Page 45: Replacing The Inlet Filter Felt
Flowtron Universal Service Manual Pump Repair Replacing the Inlet Filter Felt Remove the case IEC cover (Refer to Page 6, Section 3). Remove the inlet filter felt (Fig 33, Item 20) from the back of the case IEC cover (Fig 33, Item 30), and discard. - Page 46 Pump Repair Flowtron Universal Service Manual Figure 34 - Replacing the Hose Sets Table 10 - Hose Set Parts List Item Part Number Description 507500 Hose Set Assembly, Spares Item FAS045 Screw, M3 x 10mm Pan Head Chap 5 Issue 2...
-
Page 47: Removing The Hose Set Assembly
Flowtron Universal Service Manual Pump Repair Removing the Hose Set Assembly WARNING: BEFORE REPLACING THE HOSE SET ASSEMBLY, MAKE SURE THE PUMP UNIT HAS BEEN ISOLATED FROM THE MAINS/POWER SUPPLY BY REMOVING THE MAINS/POWER PLUG FROM THE WALL SOCKET. CAUTION: The elbow retaining cover on the hose set assembly is not designed to be removed from the pump more than a couple of times. -
Page 48: Installing The Hose Set Assembly
Pump Repair Flowtron Universal Service Manual Carefully lift the elbow retaining cover and elbow connector out of the pump case to reveal the cable connection between the elbow retaining cover and the pump. Disconnect the hose set cable connector from the 6-way connector on the control board assembly in the pump (Refer to Figure 37), and remove the hose set assembly from the pump. - Page 49 Flowtron Universal Service Manual Pump Repair Elbow Retaining Cover Control Board Connector Insert excess hose set cable this side of control Elbow Connector Hose Set Cable Connector board connector to prevent damage by the lugs on elbow retaining cover Pump Case...
- Page 50 Table 11 - Rear Case, Front Case, Top Case and Handle Parts List Item Part Number Description 507302 Rear Case 507396 Front Case, Printed Flowtron Universal 507421 Top Case Assy, with Window & Membrane Label, Spares Item FAS223 Screw, 3 dia x 10 Pan Head 507419 Handle and Hook Assembly, Spares Item...
-
Page 51: Removing The Rear Case From The Pump
Flowtron Universal Service Manual Pump Repair Removing the Rear Case from the Pump Note: It is not necessary to remove the hose set assemblies from the pump in order to remove the rear case from the pump. 10.1 Remove the mains/power cordset from the pump (Refer to Page 7, Section 6). - Page 52 Figure 40 - Separating the Top Case Assembly from the Front Case Table 12 - Top Case and Front Case Parts List Item Part Number Description 507396 Front Case, Printed Flowtron Universal 507421 Top Case Assy, with Window & Membrane Label, Spares Item 507306 Case Style Gasket 631073 Tube, 100mm long (Compressor - Motor &...
-
Page 53: Separating The Top Case Assembly From The Front Case
Flowtron Universal Service Manual Pump Repair Separating the Top Case Assembly from the Front Case CAUTION: Do NOT remove the hose set assemblies from the pump (Refer to Page 9, Section 8) unless the top case assembly or the control PCB assembly is being replaced (the motor and manifold assembly can be replaced without removing the hose set assemblies). -
Page 54: Installing The Top Case Assembly Onto The Front Case
Pump Repair Flowtron Universal Service Manual Installing the Top Case Assembly onto the Front Case 15.1 Install the case style gasket (Fig 40, Item 30) fully onto the top case assembly (Fig 40, Item 20). 15.2 Place the top case assembly by the top of the front case (Fig 40, Item 10). The inside surface of the front case and the five holes in the top case assembly must both be uppermost. -
Page 55: Replacing The Mains/Power Fuses On The Power Supply Pcb Assembly
Flowtron Universal Service Manual Pump Repair Replacing the Mains/Power Fuses on the Power Supply PCB Assembly WARNING: MAKE SURE THE REPLACEMENT FUSES ARE THE CORRECT TYPE AND RATING, OR THE ELECTRICAL SAFETY OF THE PUMP MAY BE IMPAIRED. Note: Always replace both fuses even if only one has “blown”. - Page 56 Pump Repair Flowtron Universal Service Manual Side View Stepper Motor Connector Transducer Outlet Rechargeable Battery (if fitted) Con 9 (Stepper Motor) LEDs Elbow Connector on Transducer O-Ring Hose Set Assembly Figure 43 - Replacing the Motor and Manifold Assembly Table 14 - Motor and Manifold Assembly Parts List...
-
Page 57: Removing The Motor And Manifold Assembly
The pump exhibits any of the problems detailed in Refer to Page 20, Section 19.4. 19.2 Flowtron Universal Pump Part Numbers affected: 507001 Flowtron Universal Pump, UK / Saudi Arabia 507003 Flowtron Universal Pump, USA / Canada 507004DE Flowtron Universal Pump, Germany... - Page 58 Pump Repair Flowtron Universal Service Manual 19.4 Reason for the repair As the rotor turns inside the motor and manifold assembly (in the pump), the rotor rubs against the module assembly, creating plastic dust. This dust can accumulate inside the motor and manifold assembly in two critical areas: •...
- Page 59 Flowtron Universal Service Manual Pump Repair Torx T8 Screw (3 off) Stepper Motor Stepper Motor Mounting Bracket Spring Mount Spring (4 off) Support Pillars (3 off) Bush Stator Figure 44 - Replacing the Motor and Manifold Sub-Assemblies Table 15 - Motor and Manifold Sub-Assemblies...
- Page 60 Pump Repair Flowtron Universal Service Manual 19.15 Carefully lift the pinned rotor assembly off the spring mount (refer to Figure 45). Note: Make sure you do not lose any of the four springs. 19.16 Discard the old pinned rotor assembly and old module and stator sub-assembly.
- Page 61 Flowtron Universal Service Manual Pump Repair 19.24.2 Press the two parts firmly together, so that the pin on the drive shaft engages in the slot in the drive dog. The stepper motor mounting bracket should then rest on top of the three support pillars on the module and stator sub-assembly.
- Page 62 Pump Repair Flowtron Universal Service Manual Transducer Tube Motor and Manifold Assembly Transducer Outlet Transducer Control PCB Assembly Figure 47 - Installing the New Longer Transducer Tube Table 16 - Long Transducer Tube Parts List Item Part Number Description 507494 Silicone Tube, 1.5 mm ID, 3.5 mm OD, 160 mm Long...
-
Page 63: Installing The Motor And Manifold Assembly
Flowtron Universal Service Manual Pump Repair Installing the Motor and Manifold Assembly 20.1 If the hose set assemblies were not removed, make sure that the O-ring is correctly installed on each hose set elbow connector (Refer to Figure 43). 20.2 Make sure the two LEDs (adjacent to the transducer) are vertical on the control PCB assembly, and have not been knocked or moved during the removal procedure (Refer to Figure 43). - Page 64 Pump Repair Flowtron Universal Service Manual Battery may not be fitted Con 10 (Membrane Cable) Membrane Cable Figure 48 - Replacing the Control PCB and Run Button Table 17 - Control PCB and Run Button Parts List Item Part Number...
-
Page 65: Pcb Part Numbers
Flowtron Universal Service Manual Pump Repair PCB Part Numbers 22.1 The software for the new control board has been up-issued to V6.0026 or higher to run on the new control PCB assembly. This new software version includes all available languages which can be selected from the options menu. - Page 66 Pump Repair Flowtron Universal Service Manual Control PCB Assembly Run Switch Run Button + Button Return Spring Top Case Assembly Figure 49 - Installing the Control PCB Assembly Chap 5 Issue 2 Page 28 SER0009 Sep 2009...
-
Page 67: Removing The Control Printed Circuit Board (Pcb) Assembly
Flowtron Universal Service Manual Pump Repair Removing the Control Printed Circuit Board (PCB) Assembly CAUTION: Electrostatic discharge can seriously damage the control PCB assembly. Adequate earthing/grounding precautions must be taken when handling it. 24.1 Remove the hose set assemblies (Refer to Page 9, Section 8). - Page 68 Pump Repair Flowtron Universal Service Manual Battery Pack Connector Rear view of Battery Pack Connector showing position of Connector Support Strip (Item 30) Figure 50 - Replacing the Power Supply PCB Assembly Table 19 - Power Supply PCB Assembly Parts List...
-
Page 69: Removing The Power Supply Pcb (Printed Circuit Board) Assembly
Flowtron Universal Service Manual Pump Repair Removing the Power Supply PCB (Printed Circuit Board) Assembly WARNING: DO NOT CONNECT THE MAINS/POWER CORDSET TO THE POWER SUPPLY PCB ASSEMBLY, AND SWITCH ON THE MAINS/POWER SUPPLY, WHEN THE REAR CASE IS REMOVED FROM THE PUMP. VOLTAGES IN... - Page 70 Pump Repair Flowtron Universal Service Manual May not Control PCB Assembly be fitted LCD Sub-Assembly on underside of Control PCB Assembly Figure 51 - Removing the LCD Sub-Assembly Screws from the Control PCB Assembly Table 20 - LCD Sub-Assembly Parts List...
-
Page 71: Removing The Lcd Sub-Assembly
Flowtron Universal Service Manual Pump Repair Removing the LCD Sub-Assembly Removing the Control PCB Assembly from the Top Case Assembly 28.1 Remove the complete control PCB assembly (including the LCD sub-assembly) from the top case assembly, as follows (refer to Chapter 5, Page 29, Section 24): 28.1.1... -
Page 72: Installing The Lcd Sub-Assembly
Pump Repair Flowtron Universal Service Manual LCD Cable Total Travel = less than 2mm Locking Plate Locking Plate Closed and Connector Locking Plate Open and LCD Cable Secured Body LCD Cable Released Figure 53 - ZIF (Zero Insertion Force) Socket 28.5... -
Page 73: Installing The Control Pcb Assembly Into The Top Case Assembly
Flowtron Universal Service Manual Pump Repair 29.1.5 Raise the LCD sub-assembly by 15-20mm (so that it is at a similar height to the control PCB assembly) and support it in this position. This will make it easier to connect the short LCD cable to the ZIF socket on the control PCB assembly. - Page 74 Pump Repair Flowtron Universal Service Manual Membrane Cable Slot for Membrane Cable Top Case Assembly Figure 54 - Replacing the Membrane Label when the Control PCB Assembly has been removed from the Top Case Assembly Table 22 - Top Case Membrane Label Parts List...
-
Page 75: Replacing The Membrane Label By Removing The Control Pcb Ass'y From The Top Case Ass'y
Flowtron Universal Service Manual Pump Repair Replacing the Membrane Label by removing the Control PCB Ass’y from the Top Case Ass’y If the pump is being dis-assembled to replace the LCD sub-assembly, then carry out the following procedure to replace the membrane label. - Page 76 Pump Repair Flowtron Universal Service Manual Cutout in Control Membrane Cable May not Control PCB PCB Assembly be fitted Assembly Membrane Connector Top Case Assembly Figure 55 - Connecting the Membrane Cable to the Membrane Connector on the Control PCB...
-
Page 77: Replacing The Membrane Label Without Removing The Control Pcb Assembly
Flowtron Universal Service Manual Pump Repair Replacing the Membrane Label without removing the Control PCB Assembly If the LCD sub-assembly is NOT being replaced, then carry out the following procedure to replace the membrane label. The hoseset assemblies can remain connected to the pump. -
Page 78: Removing The Run Button
Pump Repair Flowtron Universal Service Manual Removing the Run Button 32.1 Remove the control PCB assembly from the pump (Refer to Page 27, Section 22). 32.2 Remove the button return spring (Fig 48, Item 60) and the Run button (Fig 48, Item 50) from the top case assembly (Fig 48, Item 20). -
Page 79: Replacing The Battery On The Control Pcb Assembly (If Fitted)
PC-based service tool, so this procedure should only be carried out in a ArjoHuntleigh service environment. Note: In the following procedure, do not disconnect the 2-pin battery cable connector from the control PCB assembly until instructed to do so. - Page 80 Pump Repair Flowtron Universal Service Manual Con 6 Con 7 (Compressor) (Compressor) Air Inlet Filter Location Unused Location Spigot “A” Hole Spigot “B” Figure 58 - Replacing the Compressor Assembly and Compressor Filter Table 25 - Compressor Assembly and Compressor Filter Parts List...
-
Page 81: Removing The Compressor Assembly And Mounting Bracket
Flowtron Universal Service Manual Pump Repair Removing the Compressor Assembly and Mounting Bracket 36.1 Remove the rear case from the pump (Refer to Page 13, Section 10). 36.2 Lay the front case down with the inside surface pointing upwards. 36.3 Disconnect the large diameter tube (Fig 58, Item 50) from the compressor assembly. - Page 82 Pump Repair Flowtron Universal Service Manual Figure 59 - Removing the Compressor Assembly from the Mounting Bracket Table 26 - Compressor Assembly and Mounting Bracket Parts List Item Part Number Description 509051 Compressor Assembly, Series 6, 5.5V 50/60Hz 507316 Compressor Mounting Bracket...
-
Page 83: Removing The Compressor Assembly From The Mounting Bracket
Flowtron Universal Service Manual Pump Repair Removing the Compressor Assembly from the Mounting Bracket 38.1 Remove the compressor assembly and mounting bracket from the pump (Refer to Page 43, Section 36). 38.2 Lay the compressor assembly (Fig 59, Item 10) and mounting bracket (Fig 59, Item 20) down with the mounting bracket on top (Refer to Figure 60). - Page 84 Pump Repair Flowtron Universal Service Manual 39.4 At the other end of the compressor assembly, do the following (Refer to Figure 60): 39.4.1 Hold the compressor assembly, and push the mounting bracket in towards the centre of the compressor assembly.
-
Page 85: Replacing The Rear Case
Flowtron Universal Service Manual Pump Repair Replacing the Rear Case 40.1 Remove the mains/power cordset from the pump (Refer to Page 7, Section 6). 40.2 Remove the handle and hook assembly, and the rear case, from the pump (Refer to Page 13, Section 12). - Page 86 Battery Pack Connector Slot Figure 63 - Replacing the Front Case Table 28 - Front Case Parts List Item Part Number Description 507396 Front Case, Printed Flowtron Universal BP027 Compressor Support Rubber BP042 Ferrite Magnet 507386 Magnet Mounting Pad 507410...
-
Page 87: Replacing The Front Case
Flowtron Universal Service Manual Pump Repair Replacing the Front Case 41.1 Separate the top case assembly from the front case (Refer to Page 15, Section 14). 41.2 Remove the power supply PCB assembly, compressor assembly and mounting bracket from the pump (Refer to Page 31, Section 26). - Page 88 Pump Repair Flowtron Universal Service Manual Chap 5 Issue 2 Page 50 SER0009 Sep 2009...
-
Page 89: Updating The Software
® running Microsoft Windows . This Laptop or PC must have the ArjoHuntleigh Serial Communications Pack software installed in order to communicate with the pump. To install the Serial Communications Pack, refer to Chapter 6, Page 9, Section 3. Issue 2... -
Page 90: Installing The Communicator Software
Item Test Equipment Part Number ArjoHuntleigh Communicator Software, Issue 03 or higher SERS001-03 Make sure that any other programs running on the PC have been closed. Load the Communicator software CD ROM (Table 30, Item 10) into the PC. The Communicator software should start to auto-install. - Page 91 Flowtron Universal Service Manual Updating the software After the Initialisation dialog box has been displayed, the Close Other Applications dialog box will be displayed (refer to Figure 65). Figure 65 - Communicator Software Installation - Close Other Applications Make sure that any other applications running on the PC have been closed, and then click OK.
- Page 92 Updating the software Flowtron Universal Service Manual 2.10 The default option is already ticked, which will put a shortcut on the PC desktop. Click OK and the Choose Program Group dialog box will be displayed (refer to Figure 68). Figure 68 - Communicator Software Installation - Choose Program Group 2.11...
- Page 93 Flowtron Universal Service Manual Updating the software 2.13 At the end of the installation, the Installation Complete dialog box will then be displayed to indicate that the Communicator software has been successfully installed (refer to Figure 70). Figure 70 - Communicator Software Installation - Complete Click OK and the Setup Message is then displayed (refer to Figure 71).
- Page 94 Updating the software Flowtron Universal Service Manual 2.16 Click OK, and the Open File dialog box is displayed (refer to Figure 73). Figure 73 - Communicator Software Installation - Locating Communicator Files on the CD ROM 2.17 Click on the down arrow on the right side of the Look in box at the top of the dialog box, and “browse”...
- Page 95 Flowtron Universal Service Manual Updating the software 2.19 Click on the Installation.cfg file, and click Open. The relevant files will be copied to complete the Communicator software installation process. Note: While the files are copied, a Communicator Command & Configuration Files dialog box is displayed (refer to Figure 75).
- Page 96 Updating the software Flowtron Universal Service Manual Figure 76 - Communicator Software - Application Startup Screen Figure 77 - Communicator Software - No Command List Loaded - Serial Communicator Chap 6 Issue 2 Page 8 SER0009 Sep 2009...
-
Page 97: Connecting The Pump To A Laptop / Desktop Pc
Item Description Part Number Serial Communications Pack (with Data Cable) 507104 ® ® Laptop / Desktop PC with serial port, running Microsoft Windows ArjoHuntleigh Communicator Software, Version 03 or higher SERS001-03 Issue 2 Chap 6 Sep 2009 SER0009 Page 9... - Page 98 Updating the software Flowtron Universal Service Manual Figure 79 - Communicator Software - Flowtron Universal Commands with Screen Maximised Figure 80 - Communicator Software - Communication Error Chap 6 Issue 2 Page 10 SER0009 Sep 2009...
-
Page 99: Launching The Communicator Software
Communicator software has not been installed correctly. Click Connection, then click Flowtron Universal (refer to Figure 82). The menu of Flowtron Universal Commands is then displayed (refer to Figure 79). Before starting any test procedure using the Communicator software, always click the middle button at the top right of the dialog box to maximise the screen (refer to Figure 79). -
Page 100: Executing Commands On The Command Menu
5.1.2 The screen is “maximised” to view the Tx Rx box (refer to Figure 79). The Flowtron Universal Commands menu is comprised of two columns (refer to Figure 79): 5.2.1 The Code column. This is the 3-digit command code sent to the pump. -
Page 101: Communication Error When Executing Commands
Flowtron Universal Service Manual Updating the software Communication Error when Executing Commands If there is no immediate response from the pump when you send a command, then it means that there could have been a communication error between the PC and the pump: 6.1.1... - Page 102 Updating the software Flowtron Universal Service Manual Table 31 - Power-Up Self-Test Sequence Elapsed Time Duration Step Sounder LCD Screen (approx.) (approx.) 0 sec 23 sec Silent (Start) 23 sec 7 sec Double “beep” (Software Version) 30 sec Waiting to start...
-
Page 103: Initialising The Pump
Chapter 6 “Updating the software”, Page 12, “Executing Commands on the Command Menu”): 8.5.1 The pump must be left in Standby. 8.5.2 Scroll through the menu of Flowtron Universal Commands on the Communicator software on the PC, to the section heading VERSIONS. 8.5.3 Send the command 801 - Read_Software_Version to the pump. - Page 104 Updating the software Flowtron Universal Service Manual Click here to maximise Software file Click here to Click here to the screen to view the selected for browse for enable Bank 0 TxRx box Bank 0 software file Click here to...
-
Page 105: Checking The Version Of The Pump Software
10.1 Load the V3.01 Flowtron Universal pump software onto the PC, as follows: 10.1.1 The software for the Flowtron Universal pump is contained in the following three files which must be downloaded to the pump using the Communicator software: •... - Page 106 Updating the software Flowtron Universal Service Manual 10.6.2 Make sure that Bank 3 to Bank 7 are not enabled. The text will be “greyed-out” and the boxes on the right of Bank 3 to Bank 7 will be blank. 10.6.3 Select the FlowtronUniversal_V3-01.H00 software file for Bank 0, as follows:...
- Page 107 10.8 On the dialog box, under Download Option, click Load with Flash Loader to start the software download of the V3.01 Flowtron Universal software to the pump. 10.8.1 If the Flash Loader Fail dialog box (refer to Figure 87) is displayed when you click Load with Flash Loader, click OK: 10.8.1.1...
- Page 108 Updating the software Flowtron Universal Service Manual Chap 6 Issue 2 Page 20 SER0009 Sep 2009...
-
Page 109: Technical Specification
Flowtron Universal Service Manual Technical Specification CHAPTER 7 TECHNICAL SPECIFICATION PUMP Model: Flowtron Universal Part Numbers: 507001 UK/KSA 507003 USA/Canada 507004DE Germany 507004DK Denmark/Sweden 507004ES Spain 507004FR France 507004IT Italy 507004NL Dutch/Belgium 507009AU Australia/NZ 507009CN China 507009JP Japan 507009ZA South Africa/India... -
Page 110: Accessories
Technical Specification Flowtron Universal Service Manual SYMBOLS Standby. Note: Unit Do not dispose of Alternating Current Double Insulated is not isolated from in the domestic mains supply. refuse Refer to Refer to the User Direct Current accompanying Manual documents Dangerous voltage... -
Page 111: Chapter 8 Parts List
507009CN Flowtron Universal Pump, China (previously AC600/CN) 507009JP Flowtron Universal Pump, Japan (previously AC600/JP) 507009ZA Flowtron Universal Pump, South Africa/India (previously AC600/ZA) 507EUR Flowtron Universal Pump, refer to Table 9 . Issue 2 Chap 8 Sep 2009 SER0009 Page 1... - Page 112 Parts List Flowtron Universal Service Manual Part Number Description Fig - Item 507UNI Flowtron Universal Pump, refer to Table 9 . Top Case Assembly 507421 Top Case Assy, with Window & Membrane Label, Spares 39-30 Item 40-20 43-30 48-20 507061 •...
- Page 113 Flowtron Universal Service Manual Parts List Part Number Description Fig - Item 507316 • • Compressor Mounting Bracket 58-20 59-20 507380 • • Compressor Bracket Grommet 59-30 507317 • • Compressor Bump Stop 59-40 509307 • • Anti-vibration (AV) Mount, Series 6...
- Page 114 Parts List Flowtron Universal Service Manual Chap 8 Issue 2 Page 4 SER0009 Sep 2009...
-
Page 115: Service Contact Details
Flowtron Universal Service Manual Service Contact Details CHAPTER 9 SERVICE CONTACT DETAILS AUSTRALIA GERMANY SPAIN ArjoHuntleigh Pty Ltd ArjoHuntleigh GmbH ArjoHuntleigh Ibérica S.L. PO Box 330 Peter-Sander-Strasse 10 Carratera de Rubi, 88, Hamilton Hill DE-55252 MAINZ-KASTEL planta-A1 Western Australia 6963...
Need help?
Do you have a question about the FLOWTRON UNIVERSAL and is the answer not in the manual?
Questions and answers