
Related Manuals for EDAN SE-601 Series


Summary of Contents for EDAN SE-601 Series
- Page 1 EDAN INSTRUMENTS, INC Manual Ver: 1.3 Release Date: Oct. 2009 Part Number: MS1R-110286-1.3...
- Page 2 This manual will help you understand the operation and maintenance of the product better. It is reminded that the product shall be used strictly complying with this manual. User’s operation failing to comply with this manual may result in malfunction or accident for which EDAN INSTRUMENTS, INC. (hereinafter called EDAN) can not be held liable.
- Page 3 WARNING A WARNING label advises against certain actions or situations that could result in personal injury or death. CAUTION A CAUTION label advises against actions or situations that could damage equipment, produce inaccurate data, or invalidate a procedure. NOTE: A NOTE provides useful information regarding a function or a procedure. Revision History Date ECO# / ECR#...
-
Page 4: Table Of Contents
Table of Contents Chapter 1 Safety Guidance ......................1 1.1 Intended Use ........................... 1 1.2 Warnings and Cautions ......................1 1.2.1 Safety Warnings ....................... 1 1.2.2 Battery Care Warnings ..................... 3 1.2.3 General Cautions......................3 1.2.4 Cleaning & Disinfection Cautions ................... 4 1.3 List of Symbols........................ - Page 5 7.5.2 Transmitting ECG Data Through the Net Port............... 47 7.6 Copy Printing........................48 7.7 ECG Reports......................... 48 7.7.1 ECG Reports in the Auto Mode ..................48 7.7.1.1 Examples of 6×2+1rhy .................... 48 7.7.1.2 Example of 3×4+1rhy....................50 7.7.2 ECG Reports in the Rhythm Mode ................51 7.7.3 ECG Reports in the Manual Mode.................
- Page 6 9.6 Display & Sound Setup ......................83 9.6.1 Setting Brightness (Only for SE-601B) ................. 84 9.6.2 Selecting Display Colors (Only for SE-601C)............... 84 9.6.3 Selecting Antialising (Only for SE-601B/C)..............85 9.6.4 Key Volume........................85 9.6.5 Hint Volume ........................85 9.6.6 QRS Volume........................85 9.6.7 Notification Volume .......................
- Page 7 Chapter 15 Warranty & Service Policy..................107 15.1 Warranty..........................107 15.2 Service Policy ........................107 Appendix 1 Technical Specifications ..................109 A1.1 Safety Specifications ....................... 109 A1.2 Environment Specifications..................... 110 A1.3 Physical Specifications ....................110 A1.4 Power Supply Specifications ................... 110 A1.5 Performance Specifications .....................
-
Page 8: Chapter 1 Safety Guidance
SE-601 Series Electrocardiograph User Manual Chapter 1 Safety Guidance This chapter provides important safety information related to the use of SE-601. 1.1 Intended Use The intended use of SE-601 is to acquire ECG signals from adult and pediatric patients through body surface ECG electrodes. - Page 9 SE-601 Series Electrocardiograph User Manual voltage equipment which may generate sparks. 9. This equipment is not designed for internal use or direct cardiac application. 10. Only the patient cable and other accessories supplied by the manufacturer can be used. Or else, the performance and electric shock protection can not be guaranteed.
-
Page 10: Battery Care Warnings
SE-601 Series Electrocardiograph User Manual 1.2.2 Battery Care Warnings WARNING 1. Improper operation may cause the battery to be hot, ignited or exploded, and it may lead to the decrease of the battery capacity. It is necessary to read the user manual carefully and pay more attention to warning messages. -
Page 11: Cleaning & Disinfection Cautions
SE-601 Series Electrocardiograph User Manual 5. The following safety checks should be performed at least every 24 months by a qualified person who has adequate training, knowledge, and practical experience to perform these tests. a) Inspect the equipment and accessories for mechanical and functional damage. -
Page 12: List Of Symbols
SE-601 Series Electrocardiograph User Manual 1.3 List of Symbols External output External input Equipment or part of CF type with defibrillator proof Attention – general warning (see accompanying document) Potential equalization Mains Supply Battery indicator Battery recharging indicator Delete key... - Page 13 SE-601 Series Electrocardiograph User Manual Power On/Off key MODE key RESET key 1mV/COPY key START/STOP key Tab key Recycle Part Number Serial Number Manufacturer Date of Manufacture The symbol indicates that the device complies with the European Council Directive 93/42/EEC concerning medical devices.
- Page 14 SE-601 Series Electrocardiograph User Manual The symbol indicates that the device should be sent to the special agencies according to local regulations for separate collection after its useful life and that this unit was put on the market after 13 August 2005.
-
Page 15: Chapter 2 Introduction
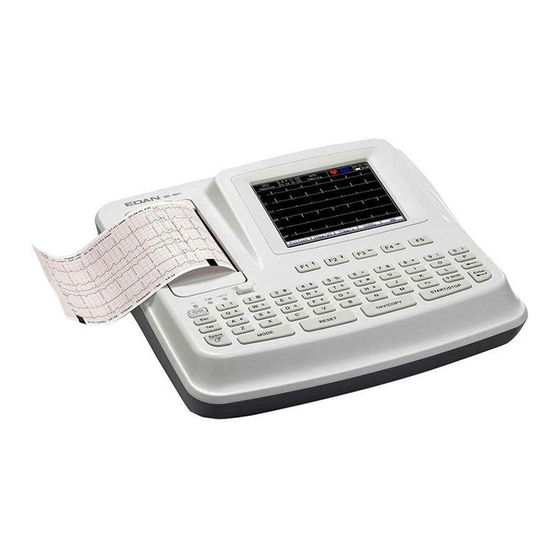
SE-601 Series Electrocardiograph User Manual Chapter 2 Introduction The 6-channel electrocardiograph gathers ECG signals of 12 leads simultaneously. It displays the operation menu, ECG parameters as well as electrocardiograms. The 6-channel ECG waves can be viewed on the LCD screen and printed out by using a high-quality thermal recorder. -
Page 16: Keyboard And Keys
SE-601 Series Electrocardiograph User Manual LCD Screen Recorder Indicators From left to right on Keyboard the top panel: A, B, C. Figure 2-2 SE-601B / SE-601C Indicator Symbol Name Explanation Mains supply When the device is powered by the mains supply, indicator this indicator is lit. -
Page 17: Rear Panel
SE-601 Series Electrocardiograph User Manual Name Explanation Selecting menu functions on the screen (Pressing F1, F2, F3 or F4 Function Key can move the cursor) 1 indicates that the device is powered by the mains supply Indicator 2 indicates that the device is powered by the battery... -
Page 18: Right Panel
SE-601 Series Electrocardiograph User Manual Name Explanation Potential equalization conductor provides a connection between the unit and the potential equalization bus bar Potential Equalization of the electrical installation. Conductor Handle Part for people to hold AC SOURCE: alternating current supply socket Mains Supply Socket 2.4 Right Panel... - Page 19 SE-601 Series Electrocardiograph User Manual : Applied part of type CF with defibrillator proof : Attention – see accompanying document Definitions of corresponding pins: Signal Signal Signal C2 / V2 F / LL C3 / V3 C1 / V1 or NC...
- Page 20 SE-601 Series Electrocardiograph User Manual Definitions of corresponding pins: Signal Signal ECG Signal (input) ECG Signal (output) 4) USB Socket 1 / USB Socket 2 (Optional) : Only the USB equipment recommended by the manufacturer can WARNING be connected to the USB interface.
-
Page 21: Bottom Panel
SE-601 Series Electrocardiograph User Manual 2.5 Bottom Panel Figure 2-6 SE-601 A / SE-601B / SE-601C Bottom Panel Name Explanation Speaker Hole Path for sound from speaker (Only for SE-601B/C) Battery Compartment Compartment for lithium battery Heat Emission Hole Path for internal heat emission... -
Page 22: Function Features
SE-601 Series Electrocardiograph User Manual and specification must be used. 4. Only when the device is off can the battery be installed or removed. Note: If the battery has not been used for two months or more, you should recharge it before using it again. -
Page 23: Chapter 3 About Se-601 Application
SE-601 Series Electrocardiograph User Manual Chapter 3 About SE-601 Application The following sections provide an overview of the main operations and functions in the SE-601 application. 3.1 Selecting Menu Functions To select Patient, press the function key F1 below Patient. -
Page 24: Entering Data
SE-601 Series Electrocardiograph User Manual 3.2 Entering Data 1. When the main interface1 is displayed, press the function key F1 below Patient to open the Patient Information window. 2. Press Tab or Shift + Tab to move the cursor to the Name textbox. -
Page 25: Selecting An Option From A List
SE-601 Series Electrocardiograph User Manual 3.3 Selecting an Option from a List For SE-601B/C 1. Press Tab or Shift + Tab to move the cursor to the Work Mode item. 2. Press F1 or F2 to select MANU, AUTO, RHTY or R-R. - Page 26 SE-601 Series Electrocardiograph User Manual Figure 3-1 SE-601B / SE-601C Main Interface1 Figure 3-2 SE-601B / SE-601C Main Interface2 Figure 3-3 SE-601A Main Interface1 - 19 -...
- Page 27 SE-601 Series Electrocardiograph User Manual Figure 3-4 SE-601A Main Interface2 Name Explanation Name Patient Name: within 12 characters (for SE-601B/C) within 10 characters (for SE-601A) Patient ID: within 10 characters Including Lead Off, No Paper, Paper Error, Battery Weak, Modu Error, Demo, Sampling, Analyzing,...
- Page 28 SE-601 Series Electrocardiograph User Manual ECG waveform Display ECG waveform Press the function key F5 below to return to the main interface1 Press the function key F2 below File to open the File File Manage interface. For details, please refer to Chapter 8, “Managing Files”.
-
Page 29: About The System Setup Interface
SE-601 Series Electrocardiograph User Manual pressing the function key F5 can switch the gain. To Select the Next Patient Function When the main interface2 is displayed, press the function key F1 below Setup to open the System Setup interface. Press F1, F2, F3, F4, Tab or Shift + Tab to move the cursor to Pat. Question on the System Setup interface, and then press Enter to open the Patient Question interface. -
Page 30: About The File Manage Interface
SE-601 Series Electrocardiograph User Manual Item Option Figure 3-9 SE-601B / SE-601C Work Mode Setup Interface Figure 3-10 SE-601A Work Mode Setup Interface For SE-601B/C 1. On the Work Mode Setup interface, press Tab or Shift + Tab to move the cursor among different setup menus. - Page 31 SE-601 Series Electrocardiograph User Manual and then press the function key F4 below Select to select the file and display the File Manage interface3. For SE-601B/C, press Esc to return to the File Manage interface1. For SE-601A, press Esc or the function key F5 below to return to the File Manage interface1.
- Page 32 SE-601 Series Electrocardiograph User Manual Figure 3-13 SE-601B / SE-601C File Manage Interface3 Figure 3-14 SE-601A File Manage Interface1 Figure 3-15 SE-601A File Manage Interface2 Figure 3-16 SE-601A File Manage Interface3 Name Explanation Press the function key F1 below to highlight a file.
- Page 33 SE-601 Series Electrocardiograph User Manual Press the function key F5 below to display the File Manage interface2. Del All Press the function key F1 below Del All to delete all the files. AllToUSB Press the function key F2 below AllToUSB to copy all the files into the ECGDATA folder of the U disk.
-
Page 34: Chapter 4 Operation Preparations
SE-601 Series Electrocardiograph User Manual Chapter 4 Operation Preparations CAUTION Before use, the equipment, patient cable and electrodes should be checked. Replace them if there is any evident defectiveness or aging which may impair the safety or the performance, and make sure that the equipment is in proper working condition. -
Page 35: Loading/Replacing Recorder Paper
SE-601 Series Electrocardiograph User Manual is weak, please recharge the battery first. When the battery is fully charged, the electrocardiograph can work normally about 6 hours, and print about 280 ECG reports of 3×4+1rhy in the AUTO mode. Please refer to the maintenance section for how to recharge the battery. When the battery is being recharged, the electrocardiograph can be powered by the mains supply. - Page 36 SE-601 Series Electrocardiograph User Manual Loading/Replacing Process of Folded Paper: 1. Press the casing button downwards with one hand and pull the casing upwards with the other hand to open the recorder. 2. Remove remainder paper from the paper tray if necessary.
-
Page 37: Preparing The Patient
SE-601 Series Electrocardiograph User Manual 6. To select Paper Marker. 1) When the 6-channel electrocardiograph is powered by the mains supply or a built-in rechargeable lithium battery, press on the keyboard to turn on the unit. 2) After the main interface1 is displayed, press the function key F5 below open the main interface2. -
Page 38: Connecting The Patient Cable To The Electrocardiograph And Electrodes
SE-601 Series Electrocardiograph User Manual baseline drift, ensuring high-quality ECG waves. There is natural resistance on the skin surface due to dry, dead epidermal cells, oils and dirt. To Prepare the Skin 1 Shave hair from electrode sites, if necessary. Excessive hair prevents a good connection. -
Page 39: Reusable Electrodes
SE-601 Series Electrocardiograph User Manual given in Table 4-1 too. Table 4-1 Electrode Connectors and Their Identifiers and Color Codes European American Identifier Color code Identifier Color code Electrode Connectors Right arm White Left arm Yellow Black N or RF... - Page 40 SE-601 Series Electrocardiograph User Manual C3: Fifth rib between C2 and C4 C4: Fifth intercostal space on the left midclavicular line C5: Left anterior axillary line at the horizontal level of C4 C6: Left midaxillary line at the horizontal level of C4 Chest Electrode Connection: Ensure that the electrodes are clean;...
-
Page 41: Disposable Electrodes
SE-601 Series Electrocardiograph User Manual 4.5.2 Disposable Electrodes Disposable Electrode: Alligator Clip: Disposable electrodes must be used together with alligator clips. The electrodes’ positions on the body surface are shown in the following table and figures. American European Electrode Placement... - Page 42 SE-601 Series Electrocardiograph User Manual Disposable Electrode Connection Align all lead wires of the patient cable to avoid twisting, and connect the alligator clips to the lead wires. Clean the electrode areas on the body surface with 75% alcohol. 10) Attach the disposable electrodes to the electrode positions on the body surface.
-
Page 43: Inspection Before Power-On
SE-601 Series Electrocardiograph User Manual 4.6 Inspection Before Power-On In order to avoid safety hazards and get good ECG records, the following inspection procedure is recommended before power-on and operation. 1) Environment: ♦ Make sure that there is no electromagnetic interference source around the equipment, especially large medical electrical equipment such as electrosurgical equipment, radiological equipment, magnetic resonance imaging equipment etc. -
Page 44: Chapter 5 Switching On The Electrocardiograph
SE-601 Series Electrocardiograph User Manual Chapter Switching Electrocardiograph ♦ When the mains supply is used, connect the power cord, and the mains supply indicator ) is lit. Then press on the keyboard to turn on the unit. The equipment information such as the device name, the version number will be displayed on the LCD screen after self-test. -
Page 45: Chapter 6 Entering Patient Information
SE-601 Series Electrocardiograph User Manual Chapter 6 Entering Patient Information After the electrocardiograph is switched on, the main interface1 appears. 6.1 Entering Patient ID 1. By default, the system generates the patient ID automatically. The range of the patient ID is 0 ~ 1999, 999, 999. -
Page 46: Entering Other Information
SE-601 Series Electrocardiograph User Manual ID when you press the START/STOP key. 6.2 Entering Other Information When the main interface1 is displayed, press the function key F1 below Patient to open the Patient Information window. 1. Press Tab or Shift + Tab to move the cursor to a textbox. -
Page 47: Chapter 7 Printing Ecg Reports
SE-601 Series Electrocardiograph User Manual Chapter 7 Printing ECG Reports There are four modes to print ECG reports. In the AUTO mode, the lead groups are switched automatically according to the lead sequence during the printing course. After the ECG signals of one lead group are printed within a certain time, the system switches to print ECG signals of another lead group automatically. - Page 48 SE-601 Series Electrocardiograph User Manual Sequence item, and then press F3 or F4 to select a recording sequence. For details of the recording sequence, please see Section 9.1.6, “Specifying Recording Sequence”. 5) If you set Sample Mode to 6×2 adjust, press Tab or Shift + Tab to move the cursor to the Sample Time textbox, and then enter the sampling time within 10-24s.
-
Page 49: Manual Mode
SE-601 Series Electrocardiograph User Manual SE-601B / SE-601C Lead Setup Interface SE-601A Lead Setup Interface After setup, press Esc or the function key F5 below to exit the System Setup interface. 3. Press the START/STOP key to print an ECG report. It will stop automatically after printing a complete ECG report of 12 leads. - Page 50 SE-601 Series Electrocardiograph User Manual SE-601B / SE-601C Work Mode Setup Interface SE-601A Work Mode Setup Interface 4) On the System Setup interface, press F1, F2, F3, F4, Tab or Shift + Tab to move the cursor. When the cursor is on Lead, press Enter to open the Lead Setup interface.
-
Page 51: Rhythm Mode
SE-601 Series Electrocardiograph User Manual interface. 3. Press the START/STOP key to print an ECG report. 4. Press the START/STOP key to stop printing the report. 7.3 Rhythm Mode Operation Method: 1. When the main interface1 is displayed, press the MODE key to select the RHYT mode. -
Page 52: R-R Mode
SE-601 Series Electrocardiograph User Manual 5) For SE-601B/C, press Tab or Shift + Tab to move the cursor to the Rhythm Lead1/2/3 item, and then press F1 or F2 to select a lead. For SE-601A, press F1, F2, Tab or Shift + Tab to move the cursor to the Rhythm Lead1/2/3 item, and then press F3 or F4 to select a lead. - Page 53 SE-601 Series Electrocardiograph User Manual R-R. 2) Press Enter to confirm. SE-601B / SE-601C Work Mode Setup Interface SE-601A Work Mode Setup Interface 3) On the System Setup interface, press F1, F2, F3, F4, Tab or Shift + Tab to move the cursor.
-
Page 54: Transmitting Ecg Data To The Pc
SE-601 Series Electrocardiograph User Manual SE-601A Lead Setup Interface After setup, press Esc or the function key F5 below to exit the System Setup interface. 2. When the main interface1 is displayed, press F2 to switch the gain. Press F4 to set the EMG filter and the Lowpass filter. -
Page 55: Copy Printing
SE-601 Series Electrocardiograph User Manual 3. Log into the Smart ECG Viewer software. 4. In the AUTO or RHYT mode, ECG data will be transmitted through the net port automatically after an ECG report is printed out. 7.6 Copy Printing In the AUTO mode, pressing the 1mV/Copy key can print the ECG report which was printed out last time. - Page 56 SE-601 Series Electrocardiograph User Manual The above figures (a) and (b) show the ECG reports in the AUTO mode. Template is set to On, and Auto Style is set to 6×2+1rhy. Figure (a) shows: ID: 0000004322 (Patient ID) 10-10-2008 16:00:43 (Current Date & Current Time)
-
Page 57: Example Of 3×4+1Rhy
SE-601 Series Electrocardiograph User Manual of lead V6 / The maximum absolute value of the amplitude of S and S’ wave from the average beat of lead V2. Diagnosis Information: Diagnosis information shows the auto diagnosis result. Average Template: Average template shows the average value of 10s sampled ECG signals of every lead. -
Page 58: Ecg Reports In The Rhythm Mode
SE-601 Series Electrocardiograph User Manual 7.7.2 ECG Reports in the Rhythm Mode The above figure shows the ECG report in the RHYT mode, and Rhythm Style is set to Three Lead. The figure shows: ID: 0000004322 (Patient ID) 10-10-2008 16:04:52 (Current Date & Current Time) -
Page 59: Ecg Reports In The R-R Mode
SE-601 Series Electrocardiograph User Manual channel. The above figure shows: ID: 0000004322(Patient ID) 08-06-2005 07:27:03 (Current Date & Current Time) Gender: Male, Age: 25 years, Height: 167cm, Weight: 68kg, BP: 121/89mmHg (1mV calibration mark) І, II, Ш, aVR, aVL, aVF, V1, V2, V3, V4, V5, V6 (12 standard Leads) ECG waveform of 12 standard leads 0.15~100Hz (0.15Hz DFT Filter, 100Hz Lowpass Filter) - Page 60 SE-601 Series Electrocardiograph User Manual The above figures (a) and (b) show the ECG reports in the R-R mode. Figure (a) shows: Current Date & Current Time Patient Information (Name, ID, Gender, Age, Height, Weight, BP, Ward NO, Race, Medications, Technician)
-
Page 61: Ecg Reports Printed By The Usb Printer
SE-601 Series Electrocardiograph User Manual 7.7.5 ECG Reports Printed by the USB Printer - 54 -... - Page 62 SE-601 Series Electrocardiograph User Manual As the above figure shows, the ECG report printed by the USB printer includes: ID, Paper Speed, Gain, Date and Time; Name, BP, Age, Gender, Weight, Height, Race, Medications, Ward No, Technician; Heart Rate, P duration, PR interval, QRS duration, QT/QTC interval, P/QRS/T axis, RV5/SV1 amplitude, RV5+SV1 amplitude, RV6/SV2 amplitude;...
-
Page 63: Chapter 8 Managing Files
SE-601 Series Electrocardiograph User Manual Chapter 8 Managing Files If you want to save the ECG data in the electrocardiograph, you should set the Save Option item to On. The default value is On. Then the ECG data in the AUTO or RHYT mode will be saved on the File Manage interface automatically. - Page 64 SE-601 Series Electrocardiograph User Manual Figure 8-1 SE-601B / SE-601C File Manage Interface1 Figure 8-2 SE-601B / SE-601C File Manage Interface2 Figure 8-3 SE-601B / SE-601C File Manage Interface3 Figure 8-4 SE-601A File Manage Interface1 - 57 -...
-
Page 65: Storage Upgrade Function
SE-601 Series Electrocardiograph User Manual Figure 8-5 SE-601A File Manage Interface2 Figure 8-6 SE-601A File Manage Interface3 On the File Manage interface, files can be printed, transmitted or deleted. If there is no file on the File Manage interface, the following dialog box will pop up when you press function keys. -
Page 66: Transmitting Files Through The Serial Port
SE-601 Series Electrocardiograph User Manual CAUTION It is forbidden to connect or disconnect a U disk or a USB printer during the transmission course. 8.2.1 Transmitting Files Through the Serial Port 1. Connect the RS232 socket of the PC to the RS232 socket of the electrocardiograph with an RS232 cable. -
Page 67: Transmitting Files Through The Net Port
SE-601 Series Electrocardiograph User Manual 1) When the main interface1 is displayed, press the function key F5 below to open the main interface2. 2) Press the function key F1 below Setup to open the System Setup interface. 3) Press F1, F2, F3, F4, Tab or Shift + Tab to move the cursor. When the cursor is on Transmission, press Enter to open the Transmission Setup interface. - Page 68 SE-601 Series Electrocardiograph User Manual 1) When the main interface1 is displayed, press the function key F5 below to open the main interface2. 2) Press the function key F1 below Setup to open the System Setup interface. 3) Press F1, F2, F3, F4, Tab or Shift + Tab to move the cursor. When the cursor is on Transmission, press Enter to open the Transmission Setup interface.
-
Page 69: Copying Files Between Se-601 And The U Disk
SE-601 Series Electrocardiograph User Manual On the Transmission Setup interface, select Ethernet. Set the REMOTE IP item to the local IP of Smart ECG Viewer. Set the first three sections of the Local IP and Gateway items to the first three sections of the local IP of Smart ECG Viewer. The last section of the LOCAL IP item can be set at random, but it can’t be the same as the last section of the local IP of Smart... - Page 70 SE-601 Series Electrocardiograph User Manual the main interface2. 2) Press the function key F2 below File to open the File Manage interface1. Press the function key F5 below to display the File Manage interface2. 3) Press the function key F2 below AllToUSB to copy files from SE-601 to the ECGDATA folder of the U disk.
-
Page 71: Editing Patient Information
SE-601 Series Electrocardiograph User Manual Notes: 1. If necessary, you can press Esc to cancel the operation during the copying course. 2. Please insert the U disk or the SD card reader that the manufacturer recommends. 3. Only the U disk with the capacity of 1GB or below is supported. Please set the format to FAT when formatting the U disk. -
Page 72: Deleting Files
SE-601 Series Electrocardiograph User Manual 4. Press Enter to confirm, or press Tab or Shift + Tab to move the cursor to the OK button, and then press Enter to confirm. 5. Press Esc to cancel the operation, or press Tab or Shift + Tab to move the cursor to the Cancel button, and then press Enter to cancel the operation. -
Page 73: Previewing A File (Only For Se-601B/C)
SE-601 Series Electrocardiograph User Manual 8.6 Previewing a File (Only for SE-601B/C) When the main interface1 is displayed, press the function key F5 below to open the main interface2. Press the function key F2 below File to open the File Manage interface1. - Page 74 SE-601 Series Electrocardiograph User Manual If you want to view the measure information of the selected file, press the function key F3 below Measure to open the measure preview interface, as the following figure shows. Figure 8-10 Measure Preview Interface...
-
Page 75: File Printing
SE-601 Series Electrocardiograph User Manual 8.7 File Printing 1. When the main interface1 is displayed, press the function key F5 below to open the main interface2. 2. Press the function key F2 below File to open the File Manage interface1. -
Page 76: Chapter 9 System Setup
SE-601 Series Electrocardiograph User Manual Chapter 9 System Setup After you turn on the device, the main interface1 pops up. Press the function key F5 below to open the main interface2. Then press the function key F1 below Setup to open the System Setup interface. -
Page 77: Specifying Work Mode
SE-601 Series Electrocardiograph User Manual Figure 9-3 SE-601B / SE-601C Work Mode Setup Interface Figure 9-4 SE-601A Work Mode Setup Interface After setup, press Enter to confirm. Then the System Setup interface appears. For SE-601A, if you press Esc to exit the Work Mode Setup interface after setup, a hint will pop up to prompt you to save these modifications. -
Page 78: Specifying Rhythm Style
SE-601 Series Electrocardiograph User Manual Work Mode Setup interface, and then press F1 or F2 to select 3 channel or 6 channel. For SE-601A, press F1, F2, Tab or Shift + Tab to move the cursor to the Manual Style item on the Work Mode Setup interface, and then press F3 or F4 to select 3 channel or 6 channel. -
Page 79: Specifying Sampling Mode
SE-601 Series Electrocardiograph User Manual When Auto Style is set to 6×2 adjust, ECG waves of 12 leads are printed in 2 groups of 6. 6×2 adjust means that the printing time can be adjusted according to Sample Time, which is different from the above styles. -
Page 80: Inputting Sampling Time
SE-601 Series Electrocardiograph User Manual When Record Sequence is set to Sequential, the lead group is printed one by one in a certain sequence. The start time of a lead group is just the end time of the previous lead group, as the following figure shows. -
Page 81: Setting Ac Filter
SE-601 Series Electrocardiograph User Manual Figure 9-5 SE-601B / SE-601C Filter Setup Interface Figure 9-6 SE-601A Filter Setup Interface After setup, press Enter to confirm. Then the System Setup interface appears. For SE-601A, if you press Esc to exit the Filter Setup interface after setup, a hint will pop up to prompt you to save these modifications. -
Page 82: Setting Lowpass Filter
SE-601 Series Electrocardiograph User Manual Filter Setup interface. Press F3 or F4 to select an option. DFT Filter greatly reduces the baseline fluctuations without affecting the ECG signals. The purpose of this filter is to keep the ECG signals on the baseline of the printout. The setting value is the low limit of the frequency range, including 0.05Hz, 0.15Hz, 0.25Hz, 0.32Hz, 0.5Hz, and... -
Page 83: Specifying Recording Device
SE-601 Series Electrocardiograph User Manual For SE-601A, if you press Esc to exit the Record Setup interface after setup, a hint will pop up to prompt you to save these modifications. Note: The Patient Info, Template, Measure, Minnesota Code, Analysis, and Position Marker items are valid only in the AUTO mode. - Page 84 SE-601 Series Electrocardiograph User Manual 1) In the AUTO or RHYT mode, the device rolls back the recorder paper to the start point of each page at the beginning of the printing course, and it advances the paper to the next paper marker at the end of the printing course.
-
Page 85: Selecting Patient Information
SE-601 Series Electrocardiograph User Manual Note: The style of the loaded thermal paper should consist with the set paper style; otherwise the advance of the paper may be blocked. When Paper Marker is set to No, 1) The device does not roll back the recorder paper to the start point of each page at the beginning of the printing course, and it does not advance the paper to the next paper marker at the end of the printing course. -
Page 86: Setting Speed
SE-601 Series Electrocardiograph User Manual 9.3.4 Setting Speed For SE-601B/C, press Tab or Shift + Tab to move the cursor to the Speed item on the Record Setup interface, and then press F1 or F2 to select an option. For SE-601A, press F1, F2, Tab or Shift + Tab to move the cursor to the Speed item on the Record Setup interface, and then press F3 or F4 to select an option. -
Page 87: Selecting Minnesota Code
SE-601 Series Electrocardiograph User Manual In the AUTO mode, when Measure is set to On, the measure information will be printed in the ECG reports. In the AUTO mode, when Measure is set to Off, there will be no measure information in the ECG reports. -
Page 88: Lead Setup
SE-601 Series Electrocardiograph User Manual 9.4 Lead Setup Press F1, F2, F3, F4, Tab or Shift + Tab to move the cursor to Lead on the System Setup interface, and then press Enter to open the Lead Setup interface. On the Lead Setup interface, you can set Rhythm Lead1/2/3 and Lead Sequence. -
Page 89: Setting Lead Sequence
SE-601 Series Electrocardiograph User Manual set to Three Lead, 20s waveform of three rhythm leads selected respectively in the Rhythm Lead1/2/3 item will be printed in the ECG reports. In the R-R mode, the R-R analysis report of the rhythm lead selected in the Rhythm Lead1 item will be printed. -
Page 90: Display & Sound Setup
SE-601 Series Electrocardiograph User Manual To Specify Transmission Mode For SE-601B/C, press Tab or Shift + Tab to move the cursor to the Transmission Mode item, and then press F1 or F2 to select Off, Ethernet or UART. For SE-601A, press F1, F2, Tab or Shift + Tab to move the cursor to the Transmission Mode item, and then press F3 or F4 to select Off, Ethernet or UART. -
Page 91: Setting Brightness (Only For Se-601B)
SE-601 Series Electrocardiograph User Manual On the Display&Sound Setup interface, you can set Brightness, Display Colors, Antialising, Key Volume, Hint Volume, QRS Volume and Notify Volume. Figure 9-13 SE-601B Display & Sound Setup Interface Figure 9-14 SE-601C Display & Sound Setup Interface Figure 9-15 SE-601A Sound Setup Interface After setup, press Enter to confirm. -
Page 92: Selecting Antialising (Only For Se-601B/C)
SE-601 Series Electrocardiograph User Manual 9.6.3 Selecting Antialising (Only for SE-601B/C) Press Tab or Shift + Tab to move the cursor to the Antialising item on the Display&Sound Setup interface, and then press F1 or F2 to select Off or On. -
Page 93: Notification Volume
SE-601 Series Electrocardiograph User Manual 9.6.7 Notification Volume After a complete ECG wave is printed, the electrocardiograph gives a short sound. When Notification Volume is set to Off, there is no notification sound. For SE-601B/C, press Tab or Shift + Tab to move the cursor to the Notification Volume item on the Display&Sound Setup interface, and then press F1 or F2 to select an option. -
Page 94: Selecting Id Hint
SE-601 Series Electrocardiograph User Manual Question interface, and then press F1 or F2 to select a mode. For SE-601A, press F1, F2, Tab or Shift + Tab to move the cursor to the ID Mode item on the Patient Question interface, and then press F3 or F4 to select a mode. -
Page 95: Specifying Bp Unit
SE-601 Series Electrocardiograph User Manual 9.7.5 Specifying BP Unit For SE-601B/C, press Tab or Shift + Tab to move the cursor to the BP Unit item on the Patient Question interface, and then press F1 or F2 to select mmHg or kpa. -
Page 96: Setting Prompt
SE-601 Series Electrocardiograph User Manual the auto style, speed and gain which are shown on the bottom of the interface. When Next Patient is set to Off, in the AUTO mode, the system will not display the main interface3 after a complete ECG report is printed. -
Page 97: Setting Current Date/Current Time
SE-601 Series Electrocardiograph User Manual Figure 9-21 SE-601A Date&Time Setup Interface After setup, press Enter to confirm. Then the System Setup interface appears. For SE-601A, if you press Esc to exit the Date&Time Setup interface after setup, a hint will pop up to prompt you to save these modifications. -
Page 98: Setting Power-Off Time
SE-601 Series Electrocardiograph User Manual 12 times. 9.8.5 Setting Power-Off Time Press Tab or Shift + Tab to move the cursor to the Power Off textbox on the Date&Time Setup interface, and then input the power-off time manually. When Power Off is set to 000 Minutes, this function will not be effective. -
Page 99: Choosing A Language
SE-601 Series Electrocardiograph User Manual After setup, press Enter to confirm. Then the System Setup interface appears. For SE-601A, if you press Esc to exit the More Setup interface after setup, a hint will pop up to prompt you to save these modifications. -
Page 100: Restoring Default Settings
SE-601 Series Electrocardiograph User Manual 9.9.5 Restoring Default Settings For SE-601B/C, press Tab or Shift + Tab to move the cursor to the Default item on the More Setup interface, and then press F1 or F2 to select No or Yes. -
Page 101: Setting Extern Input/Extern Output
SE-601 Series Electrocardiograph User Manual Prompt Reviewed By Period Interval Period Duration Power Off LCD Off Save Option 9.9.6 Setting Extern Input/Extern Output For SE-601B/C, press Tab or Shift + Tab to move the cursor to the Extern Input or Extern Output item on the More Setup interface, and then press F1 or F2 to select Off or On. -
Page 102: Chapter 10 Switching Off The Electrocardiograph
SE-601 Series Electrocardiograph User Manual Chapter Switching Electrocardiograph When the built-in battery is used, press the key for 1 second or more to display the hint System is shutting down… on the screen. Then the device will be off a few seconds later. -
Page 103: Chapter 11 Hint Information
SE-601 Series Electrocardiograph User Manual Chapter 11 Hint Information Hint information and the corresponding causes provided by the electrocardiograph are listed in Table 11-1. Table 11-1 Hint Information and Causes Hint Information Causes Lead off Electrodes fall off the patient or the patient cable fall off the unit. -
Page 104: Chapter 12 Troubleshooting
SE-601 Series Electrocardiograph User Manual Chapter 12 Troubleshooting 1. Operating Problems Q1: I was trying to select a file from the file list on the File Manage interface, but the file was in the middle of the long list. Is there any way to make the selection faster? A1: Actually, the system provides a method for fast moving: pressing Shift + F1 or Shift + F2 can move the cursor up or down in the file list very fast. - Page 105 SE-601 Series Electrocardiograph User Manual 2. Printing Problems Q1: I was encountered with paper-jam, what was I supposed to do? A1: If it happened for the first time, it might be the result of an inappropriate placement of the paper. In this case, please open the paper casing, pull the paper out of the paper tray, tear the pages with rumples, and then put the paper in the paper tray again, adjust the position of the paper carefully and close the casing.
- Page 106 SE-601 Series Electrocardiograph User Manual Q4: I want to print the hospital name in the report, but I can’t find the place to enter it, where is A4: Please open the More Setup interface, and move the cursor to the Institution textbox, and then input the hospital name.
- Page 107 SE-601 Series Electrocardiograph User Manual Q2: I was doing the examination when the machine suddenly gave out a sound and displayed the hint Lead Off. What should I do? A2: The corresponding leads are not connected well. Please find out which lead is off by checking the Lead Name area on the main interface (please refer to Section 3.4, “About the Main...
-
Page 108: Chapter 13 Cleaning, Care And Maintenance
SE-601 Series Electrocardiograph User Manual Chapter 13 Cleaning, Care and Maintenance 13.1 Cleaning CAUTION Turn off the power before cleaning and disinfection. The mains supply must be switched off if it is in use. 13.1.1 Cleaning the Main Unit and the Patient Cable The surfaces of the main unit and the patient cable can be wiped with a clean soft cloth damped in soapy water or non-caustic neutral detergent. -
Page 109: Care And Maintenance
SE-601 Series Electrocardiograph User Manual CAUTION Do not use chloric disinfectant such as chloride, sodium hypochlorite etc. 13.3 Care and Maintenance 13.3.1 Recharge and Replacement of Battery 1) Capacity Identification Current capacity of the rechargeable battery can be identified according to the battery symbol in the top right corner of the LCD screen. -
Page 110: Maintenance Of Main Unit, Patient Cable And Electrodes
SE-601 Series Electrocardiograph User Manual to illegible ECG reports and block the advance of the paper. Storage Requirements: ♦ Recorder paper should be stored in a dry, dark and cool area, avoiding excessive temperature, humidity and sunshine. ♦ Do not put the recorder paper under fluorescence for a long time. - Page 111 SE-601 Series Electrocardiograph User Manual 1) Main Unit ♦ Avoid excessive temperature, sunshine, humidity and dirt. ♦ Put the dustproof coat on the main unit after use and prevent shaking it violently when moving it to another place. ♦ Prevent any liquid from seeping into the equipment; otherwise the safety and the performance of the electrocardiograph can not be guaranteed.
-
Page 112: Chapter 14 Accessories
SE-601 Series Electrocardiograph User Manual Chapter 14 Accessories 14.1 Standard Accessories : Only the patient cable and other accessories supplied by the WARNING manufacturer can be used. Or else, the performance and electric shock protection can not be guaranteed. Table 14-1 Standard Accessory List... -
Page 113: Optional Accessories
SE-601 Series Electrocardiograph User Manual 14.2 Optional Accessories Table 14-2 Optional Accessory List Accessory Part Number MS1R-107581-A0 (Snap Style) ECG Cable (European) MS1R-107583-A0 (Grabber Style) MS1R-107582-A0 (Snap Style) ECG Cable (American) MS1R-107584-A0 (Grabber Style) M15R-040168 Pediatric Chest Electrodes M15R-040169 Pediatric Limb Electrodes... -
Page 114: Chapter 15 Warranty & Service Policy
EDAN will, at its discretion, repair or replace the defective part(s) free of charge. EDAN will not provide a substitute product for use when the defective product is being repaired. - Page 115 SE-601 Series Electrocardiograph User Manual Contact information: If you have any question about maintenance, technical specifications or malfunctions of devices, contact your local distributor. Alternatively, you can send an email to EDAN service department at: support@edan.com.cn. - 108 -...
-
Page 116: Appendix 1 Technical Specifications
SE-601 Series Electrocardiograph User Manual Appendix 1 Technical Specifications A1.1 Safety Specifications IEC 60601-1: 1988+A1+A2, EN 60601-1:1990+A1+A2, Comply with: IEC/EN60601-1-2: 2001+A1, IEC/EN60601-2-25, ANSI/AAMI EC11, IEC/EN 60601-2-51 Anti-electric-shock type: Class І with internal power supply Anti-electric-shock degree: Type CF Degree of protection against... -
Page 117: A1.2 Environment Specifications
SE-601 Series Electrocardiograph User Manual A1.2 Environment Specifications Transport & Storage Working (-4ºF) ~ +55 (+131ºF) Temperature: +5ºC (+41ºF) ~ +40ºC (+104ºF) ℃ ℃ 25%~93% 25%~80% Relative Humidity: Non-Condensing Non-Condensing Atmospheric Pressure: 700hPa ~1060hPa 860hPa ~1060hPa A1.3 Physical Specifications Dimensions 310mm×322mm×101mm (12.2in×12.7in×3.98in) -
Page 118: A1.5 Performance Specifications
SE-601 Series Electrocardiograph User Manual A1.5 Performance Specifications Recording Recorder: Thermal dot-matrix recorder 8 dots per mm / 200 dots per inch (amplitude axes) Printing Density 40 dots per mm / 1000 dots per inch (time axes, @ 25 mm/s) Folded thermal paper: 110mm×140mm×144pages... - Page 119 SE-601 Series Electrocardiograph User Manual AC Filter: On/Off DFT Filter: 0.05Hz / 0.15Hz / 0.25Hz / 0.32Hz / 0.5Hz / 0.67Hz Filter EMG Filter: 25Hz/35Hz/45Hz/OFF LOWPASS Filter:150Hz/100Hz/75Hz CMRR ≥115dB Sampling Frequency 1000 Hz Pacemaker Detection Amplitude ±2 to ±700 mV Width 0.1 to 2.0 ms...
-
Page 120: Appendix 2 Emc Information
SE-601 Series Electrocardiograph User Manual Appendix 2 EMC Information Guidance and manufacture’s declaration – electromagnetic emissions- for all EQUIPMENT and SYSTEMS Guidance and manufacture’s declaration – electromagnetic emission The SE-601 Electrocardiograph is intended for use in the electromagnetic environment specified below. The customer or the user of the SE-601 Electrocardiograph should assure that it is used in such an environment. - Page 121 SE-601 Series Electrocardiograph User Manual Guidance and manufacture’s declaration – electromagnetic immunity – for all EQUIPMENT and SYSTEMS Guidance and manufacture’s declaration – electromagnetic immunity The SE-601 Electrocardiograph is intended for use in the electromagnetic environment specified below. The customer or the user of SE-601 Electrocardiograph should assure that it is used in such an environment.
- Page 122 SE-601 Series Electrocardiograph User Manual Guidance and manufacture’s declaration – electromagnetic immunity – for EQUIPMENT and SYSTEMS that are not LIFE-SUPPORTING Guidance and manufacture’s declaration – electromagnetic immunity The SE-601 Electrocardiograph is intended for use in the electromagnetic environment specified below. The customer or the user of SE-601 Electrocardiograph should assure that it is used in such an environment.
- Page 123 SE-601 Series Electrocardiograph User Manual performance is observed, additional measures may be necessary, such as reorienting or relocating the SE-601 Electrocardiograph. Over the frequency range 150 kHz to 80 MHz, field strengths should be less than 3 V/m. Recommended separation distances between portable and mobile RF communications equipment and the EQUIPMENT or SYSTEM –...
-
Page 124: Appendix 3 Abbreviation
SE-601 Series Electrocardiograph User Manual Appendix 3 Abbreviation Abbr English Liquid Crystal Display Blood Pressure Electrocardiogram/Electrocardiograph Heart Rate Left Foot Augmented Lead Left Arm Augmented Lead Right Arm Augmented Lead Left Arm Left Leg Right Arm Right Leg Identification Alternating Current... - Page 125 EDAN INSTRUMENTS, INC. 3/F-B, Nanshan Medical Equipment Park, Nanhai Rd 1019#, Shekou, Nanshan Shenzhen, 518067 P.R. CHINA TEL: +86-755-26882220 FAX: +86-755-26882223 EC REPRESENTATIVE Shanghai International Holding Corp. GmbH (Europe) Eiffestrasse 80, D-20537 Hamburg Germany TEL: +49-40-2513175 FAX: +49-40-255726 E-mail: antonjin@yahoo.com.cn...
Need help?
Do you have a question about the SE-601 Series and is the answer not in the manual?
Questions and answers