Table of Contents
Advertisement
Quick Links
Advertisement
Table of Contents
Troubleshooting

Related Manuals for Zeiss CLARUS 500


Summary of Contents for Zeiss CLARUS 500
- Page 1 CLARUS® 500 Instructions for Use...
- Page 2 ©2019 , Carl Zeiss Meditec, Dublin, CA Trademarks All Zeiss products mentioned herein are either registered trade- marks or trademarks of Carl Zeiss Meditec, Inc. in the United States and/or other countries. Windows, Windows Media, Windows Server, and Microsoft are either registered trademarks or trademarks of Microsoft Corpo- ration in the United States and/or other countries.
-
Page 3: Table Of Contents
Instructions for Use Table of Contents CLARUS® 500 Table of Contents Safety and Certifications ................ 9 Compliance........................... 9 1.1.1 Laser Safety and Compliance ...................... 9 1.1.2 Optical Safety ............................ 9 1.1.3 RoHS Compliance .......................... 9 1.1.4 Electrical Safety .......................... 9 Symbols and Labels ...................... 10 Warnings, Cautions, and Notes .................. 12 1.3.1 Definitions............................ 12 1.3.2... - Page 4 Table of Contents Instructions for Use CLARUS® 500 Software Installation ...................... 38 3.2.1 Installing Review Software....................... 38 3.2.2 Upgrading Instrument and Review Software.................. 42 Installation Troubleshooting.................... 43 Daily Startup .................... 45 Turn on the Instrument ...................... 45 Logging In .......................... 46 Configuration ..................... 47 About User Roles ........................ 47 Opening Settings ........................ 47 Setting All Options ...................... 48 Managing Data........................ 49...
- Page 5 Instructions for Use Table of Contents CLARUS® 500 7.2.2 Selecting the Patient........................ 100 Preparing the Patient ....................... 100 7.3.1 Dilating the Patient’s Eyes (Optional) ..................... 101 7.3.2 Lifting the Patient's Eyelid (Optional) ..................... 101 7.3.3 Positioning the Patient ........................ 102 7.3.4 Aligning and Focusing on the Patient's Eye.................. 104 Acquire Images......................... 107 7.4.1 About Acquisition Options...................... 107...
- Page 6 Table of Contents Instructions for Use CLARUS® 500 Cleaning the PC Screen..................... 153 Troubleshooting.................. 155 Safety During Troubleshooting.................. 155 System Startup Errors....................... 156 Error Messages ......................... 156 Information Messages ...................... 158 Image Quality Troubleshooting .................. 160 Specifications ................... 163 10.1 Electrical Specifications .................... 163 10.2 Instrument Specifications .................... 163 10.2.1 At-Instrument Computer Specifications .................. 163 10.3...
- Page 7 Instructions for Use Table of Contents CLARUS® 500 Glossary .................... 179 Index ...................... 181 2660021171806 Rev. A 2019-01 7 / 192...
- Page 8 Empty page, for your notes...
-
Page 9: Safety And Certifications
1 Safety and Certifications CLARUS® 500 1.1 Compliance 1 Safety and Certifications 1.1 Compliance CLARUS® 500 from ZEISS is compliant with ISO 10940:2009 and ISO 15004-1:2006. 1.1.1 Laser Safety and Compliance 1.1.2 Optical Safety CLARUS® 500 is compliant with the following optical safety standards: •... -
Page 10: Symbols And Labels
1 Safety and Certifications Instructions for Use 1.2 Symbols and Labels CLARUS® 500 1.2 Symbols and Labels Symbol Meaning Warning Caution Note Electricity Must follow Instructions for Use Power On (computer) Power Off (computer) Protective Earth Fuse Direct Current Type B Applied Parts Manufacturer 10 / 192 2660021171806 Rev. - Page 11 Instructions for Use 1 Safety and Certifications CLARUS® 500 1.2 Symbols and Labels Symbol Meaning Authorized European Community Representative Serial Number Catalog Number/Part Number Model Number Certification mark of CSA – Nationally Recognized Testing Laboratory for US and Canada Disposal of the Product within the E.U. Do not dispose via domestic waste disposal system or communal waste disposal facility.
-
Page 12: Warnings, Cautions, And Notes
These are actions that can be taken to prevent the hazard. 1.3.2 Warnings Opening the device covers WARNING! may result in injury. Only ZEISS authorized service technicians may remove device covers. Tipping the device WARNING! may result in injury. Do not allow the patient to lean on the table or use it as a support to stand up. - Page 13 Use only the accessories, transducers, and cables specified or provided by ZEISS. Adding peripheral equipment or replacing parts WARNING! may result in noncompliance with the safety requirements of IEC 60601-1.
- Page 14 Use only accessories authorized by ZEISS. In the U.S., call 800–341–6968. Outside the U.S., contact your local Zeiss distributor. You can find the ZEISS contact partner for your country on our website: www.zeiss.com. Class 3B laser radiation WARNING! when open.
-
Page 15: Cautions
Read the user documentation. Follow directions carefully. Do not make upgrades, or carry out repairs or modifications, without specific guidance and instruction from ZEISS or an authorized ZEISS represenative. Improper cleaning CAUTION! may result in inadequately disinfected equipment. - Page 16 Attempting to decommission your system CAUTION! may result in damaged equipment and danger to personnel. Never attempt to decommission a ZEISS system or instrument. Only ZEISS approved representatives are qualified to safely decommission your system. Contact your ZEISS approved representatives to set up an appointment for system or instrument decommissioning.
-
Page 17: Notes
Otherwise, degradation of the performance of this equipment could result. The Zeiss Instrument is intended for use in a professional CAUTION! healthcare facility environment. Using the instrument in any other environment may void the warranty and compromises the safety of the patient and/or operator. -
Page 18: Report Serious Accidents
Installing or putting the device into service without regard to WARNING! EMC information provided may void your ZEISS instrument warranty, result in damage to the instrument and/or compromise safety for patients and operators. This instrument has special EMC precaution requirements and needs to be installed and put into service according to the EMC information provided herein. -
Page 19: Electromagnetic Emissions
Instructions for Use 1 Safety and Certifications CLARUS® 500 1.6 Electromagnetic Compatibility (EMC) 1.6.1 Electromagnetic Emissions The Zeiss Instrument complies with the following emission require- ments: Phenomenon Standard Conducted and radiated RF Group 1 emissions CISPR 11 Class A Harmonic distortion... -
Page 20: Wireless Communications
1 Safety and Certifications Instructions for Use 1.7 Wireless Communications CLARUS® 500 UT is the a.c. mains voltage prior to application of the test level. 1.7 Wireless Communications Test Band (MHz) Service Modulation Maximum Distance (m) Immunity Frequency Power (W) Test Level (V/ (MHz) 380 - 390... -
Page 21: Introduction
Instructions for Use 2 Introduction CLARUS® 500 2.1 Scope 2 Introduction 2.1 Scope 2.1.1 Intended Use / Indications for Use The CLARUS® 500 ophthalmic camera is indicated to capture, display, annotate and store images to aid in the diagnosis and monitoring of diseases and disorders occurring in the retina, ocular surface and visible adnexa. -
Page 22: Doctor Profile
2 Introduction Instructions for Use 2.3 Intended Audience CLARUS® 500 • Medical Assistants • Clinical Researchers 2.3.2.2 Required Skills Operators are expected to have the following skills: • Knowledge of how to capture fundus images • Experience managing patients • Experience with the Microsoft Windows operating system and applications based on it 2.3.3 Doctor Profile 2.3.3.1 Intended Demographic... -
Page 23: User Documentation
• My documents > Documents 2.5 Questions and Comments If you have questions or comments about this user documentation or the device, contact your ZEISS representative. 2.6 System Overview 2.6.1 System Description CLARUS® 500 is a non-contact, high-resolution imaging device for in vivo imaging of the human eye. - Page 24 2 Introduction Instructions for Use 2.6 System Overview CLARUS® 500 • True color reflectance imaging • Fundus autofluorescence with green or blue excitation (FAF-G and FAF-B) • Stereo imaging • External eye imaging 2.6.1.1 Principles of Operation Using a monochromatic camera, a broad line of illumination scans across the retina.
-
Page 25: Hardware Overview
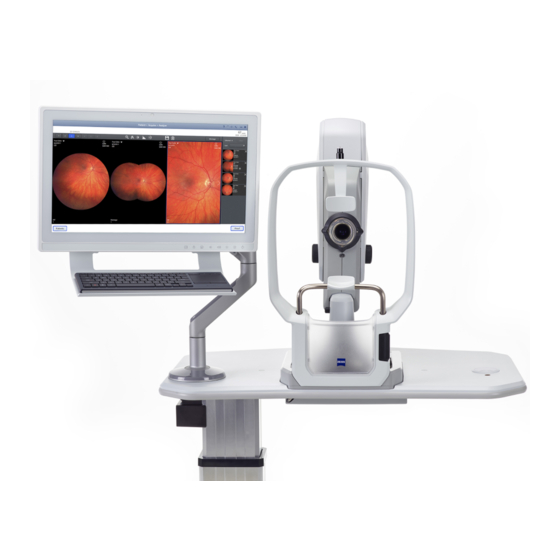
Instructions for Use 2 Introduction CLARUS® 500 2.6 System Overview 2.6.2 Hardware Overview The CLARUS® 500 is connected to the All-in-One PC using cables mounted under the table. The operator controls the instrument and software using the instrument joystick, the All-in-One PC touch- screen, wireless keyboard and touchpad. - Page 26 2 Introduction Instructions for Use 2.6 System Overview CLARUS® 500 2.6.2.1.1 USB Locations Figure 2: USB Port Locations (6 total) Number Type Quantity Location USB 2.0 Side USB 3.0 Bottom 26 / 192 2660021171806 Rev. A 2019-01...
- Page 27 Instructions for Use 2 Introduction CLARUS® 500 2.6 System Overview 2.6.2.2 Patient View Figure 3: Patient View Forehead rest Helps keep the patient's head steady and in place Front lens Aperture for image acquisition Chin rest Positions the patient's head at the correct height Chin rest Manually raises and lowers the chin rest...
- Page 28 2 Introduction Instructions for Use 2.6 System Overview CLARUS® 500 2.6.2.3 Operator Controls Figure 4: Operator Controls Focus knob Manually adjusts the focus Friction knob Tightens or loosens the swivel movement of the acquisition head Joystick Moves the acquisition head side-to-side and forward and back (The joystick button triggers image capture) Cross-table lock...
-
Page 29: Software Overview
Instructions for Use 2 Introduction CLARUS® 500 2.6 System Overview 2.6.2.4 External Fixation Target Figure 5: Installing the External Fixation Target External Fixation Used when patient cannot see the internal Target fixation target External Fixation Mount for the external fixation target Target Mount Patient Support Support for the headrest and chinrest... - Page 30 2 Introduction Instructions for Use 2.6 System Overview CLARUS® 500 Pos. Symbol Explanation Opens notification volume control Opens the Settings to configure the instrument and set your preferences Minimizes the application on the computer's desktop Allows you to log off or shut down 2.6.3.2 Patient Window Use the Patient window to find, edit, and add patient records.
- Page 31 Instructions for Use 2 Introduction CLARUS® 500 2.6 System Overview Pos. Name Explanation Analyze Opens the Analyze window allowing you to analyze scans and prepare reports History Lists the selected patient's scans from prior visits Lists patient records available on the local database Today Lists patient records for the patients scheduled today 2.6.3.3 Acquire Window...
- Page 32 2 Introduction Instructions for Use 2.6 System Overview CLARUS® 500 Pos. Name Explanation Capture bin Displays thumbnails of images that have already been captured, along with the capture settings Analyze Opens the Analyze window Focus Displays the current focus and allows for manual focus adjustments. Auto determines the best focus setting automatically.
- Page 33 Instructions for Use 2 Introduction CLARUS® 500 2.6 System Overview Figure 9: Analyze Window - Proof Pos. Name Explanation Patient data Displays information about the currently selected patient Favorite Flags selected thumbnails with a yellow start for easy identifiication Laterality filter Allows you to filter the thumbnails to show one or both eyes Date filters Allows you to filter the thumbnails to show only those taken between...
- Page 34 2 Introduction Instructions for Use 2.6 System Overview CLARUS® 500 2.6.3.5 Analyze Window - Review Figure 10: Analyze Window - Review Pos. Name Explanation Patient data Provides information about the selected patient Number of viewports Controls how many viewports are in the main display area Show / Hide metadata Shows or hides the image information in the corners Zoom...
-
Page 35: Networking Overview
Instructions for Use 2 Introduction CLARUS® 500 2.6 System Overview Pos. Name Explanation Viewport Allows you to see the selected images. Patients Returns to the Patient window 2.6.4 Networking Overview CLARUS® 500 can run as a standalone instrument storing patient and exam data locally, or it can be connected to a network server or EMR system to share data and worklists in a central location. - Page 36 Empty page, for your notes...
-
Page 37: Installation
• not connected to a power strip • the device's ventilation openings are not blocked • the device is not exposed to water or other liquids Do not modify the instrument or use cables not provided by ZEISS. 2660021171806 Rev. A 2019-01 37 / 192... -
Page 38: Software Installation
3 Installation Instructions for Use 3.2 Software Installation CLARUS® 500 The CLARUS® 500 instrument arrives on a pallet with three boxes that contain all parts and accessories needed to assemble the instrument and table. 3.2 Software Installation The CLARUS® 500 system ships with software installed on your instrument. - Page 39 Instructions for Use 3 Installation CLARUS® 500 3.2 Software Installation When installing review software on a review station running NOTE Windows 10, make sure you set the resolution to 1280 x 1024 before opening the review software. If you do not set the screen resolution properly, the screens can appear distorted.
- Page 40 3 Installation Instructions for Use 3.2 Software Installation CLARUS® 500 7. If you want to choose a different destination folder for the review software, click Change... and browse to the desired folder. 8. Click Next. 9. If this review software will use Remote Destop Services, check Remote Desktop services will be used.
- Page 41 Instructions for Use 3 Installation CLARUS® 500 3.2 Software Installation 10. Click Next. 11. Click Install. 12. If your system prompts you to confirm changes on the computer, click Yes. ð Review software installation begins. Installation takes several mintues to complete. 13.
-
Page 42: Upgrading Instrument And Review Software
3 Installation Instructions for Use 3.2 Software Installation CLARUS® 500 ð Installation completes and the configuration wizard opens. 14. If the review station is running Windows 10, set the screen resolution to 1280 x 1024. For more information about the configuration wizard, refer to: Setting All Options [} 48]. -
Page 43: Installation Troubleshooting
"C: binaries required \Program for the CLARUS Files\CZM Review Software. \CLARUS" and "C: If required files \ProgramDat have been a\Carl Zeiss quarantined, the Meditec CLARUS® 500 \Review" Review appli- folders from cation will fail to on-access launch properly. and on- demand scanning. - Page 44 Empty page, for your notes...
-
Page 45: Daily Startup
NOTE take the device out of service. Contact your ZEISS representative. If a non-critical test fails or a warning appears, the device can still be used. Contact your ZEISS representative. (See Mainte- nance.) To turn on the instrument: Action 1. Turn on the instrument. -
Page 46: Logging In
4 Daily Startup Instructions for Use 4.2 Logging In CLARUS® 500 4.2 Logging In After the system boots up and runs a series of system checks, the login screen opens. The login screen also appears when a user logs out. Passwords are case-sensitive. -
Page 47: Configuration
Instructions for Use 5 Configuration CLARUS® 500 5.1 About User Roles 5 Configuration 5.1 About User Roles Not all users have access to all features. The table below list some of the key differences for different types of users. Operator Doctor Adminis- trator Acquire scans... -
Page 48: Setting All Options
5 Configuration Instructions for Use 5.3 Setting All Options CLARUS® 500 Setting Description System Information Instrument and software information General Settings • Your institution information • Duration for displaying alerts • Local date, time, and language • Teleservice • On-screen keyboard •... -
Page 49: Managing Data
Instructions for Use 5 Configuration CLARUS® 500 5.4 Managing Data ð The initial settings wizard opens and steps you through settings. 5.4 Managing Data 5.4.1 Manage Patient Records When patient records are imported from an EMR, they are recon- ciled with local records as follows: •... - Page 50 5 Configuration Instructions for Use 5.4 Managing Data CLARUS® 500 2. Type the patient's first and last name. 3. Select the patient's gender. 4. Select the patient's date of birth. 5. (Optional) Type the patient's Refractive Error information. 6. (Optional) Select the patient's Eye Color (optional). 7.
- Page 51 Instructions for Use 5 Configuration CLARUS® 500 5.4 Managing Data 4. Select the duplicate patient record(s). You can merge up to 20 patient records. 5. To see the details of selected patient records side by side with the original record, select Compare. 6.
- Page 52 5 Configuration Instructions for Use 5.4 Managing Data CLARUS® 500 2. Select Tests. ð A list of the tests assigned to the patient opens. 3. Select the incorrectly saved test and click Reassign. ð The Reassign page opens. 4. In the search field, type the name, ID number, or DOB of the patient the test data belongs to and click the search icon.
- Page 53 Instructions for Use 5 Configuration CLARUS® 500 5.4 Managing Data 5. Select the correct patient and click 2660021167882 Rev. A.pdf. ð A confirmation opens. 6. Type a reason for resassigning the test. 7. Click Reassign. 5.4.1.4 Deleting a Patient Record Only Administrators can complete this task.
- Page 54 5 Configuration Instructions for Use 5.4 Managing Data CLARUS® 500 ð A confirmation opens. 2. Click Delete. 5.4.1.5 Manually Correcting Laterality You can change the laterality of an image after it is saved using the Review or Proof screen. Laterality change feature does not work under the following condi- tions: •...
- Page 55 Instructions for Use 5 Configuration CLARUS® 500 5.4 Managing Data ü The thumbnail changes laterality. Result To correct laterality manually in Review: þ Review is open. Prerequisite 4. Select the image you want to change. 5. Click on the current laterality indicator in the preview panel. ð...
- Page 56 5 Configuration Instructions for Use 5.4 Managing Data CLARUS® 500 3. Click Import. 4. Click Import... and navigate to the file stored on the external removable media device. 5. Click Select. ð A confirmation informs you when the import completes. 6.
- Page 57 Instructions for Use 5 Configuration CLARUS® 500 5.4 Managing Data • Export all of a patient's data; select Settings > Specific Settings > Export. • Set automatic export (Configuring Export Settings [} 59]) To export data: þ Settings are open (Opening Settings [} 47]). Prerequisite Action 1.
- Page 58 5 Configuration Instructions for Use 5.4 Managing Data CLARUS® 500 8. Navigate to the folder you want to use for export and click Select. ð A progress bar appears until export is complete. 9. Click OK. ð The data exports and a confirmation opens. 10.
- Page 59 Instructions for Use 5 Configuration CLARUS® 500 5.4 Managing Data 3. Under File import, set Auto import files to On. 4. Click Browse... and navigate to the folder to use for automatic importing. 5. Click Select. ü The folder path appears next to the Browse..button and Result files stored in that location will be automatically imported.
- Page 60 3. Set the frequency of automatic exports: To set automatic export when a user logs off, click Session. To set automatic export when a user shuts down the ZEISS application, click Shutdown. 4. If you use and EMR system, select the type (FORUM/PACS or DICOM).
-
Page 61: Manage Users
Instructions for Use 5 Configuration CLARUS® 500 5.4 Managing Data Setting ZEISS Default Adjustment Levels Brightness -100 to 100 Contrast -100 - 100 Gamma 1.00 0 to 5 Sharpness 0 to 100 Saturation -100 to 100 To configure scan default settings: þ... - Page 62 5 Configuration Instructions for Use 5.4 Managing Data CLARUS® 500 5.4.2.1 About User Roles Not all users have access to all features. The table below list some of the key differences for different types of users. Operator Doctor Adminis- trator Acquire scans Review scans Select, edit and annotate scans...
- Page 63 Instructions for Use 5 Configuration CLARUS® 500 5.4 Managing Data 2. Click Add User. 3. Type the information for the new user and select the user's role. 4. Click Add User. ü The new user can now log in. Result 5.4.2.3 Deleting a User Only Administrators can complete this task.
- Page 64 5 Configuration Instructions for Use 5.4 Managing Data CLARUS® 500 2. Select the Login name for the user you want to delete. 3. Click Delete User. ü The user's Login is now disabled. Result 5.4.2.4 Changing a User's Password Only Administrators can complete this task. NOTE For valid password format, see: (Password Requirements [} 65]) To change a user's password:...
- Page 65 Instructions for Use 5 Configuration CLARUS® 500 5.4 Managing Data 3. For New password, type a new password for the user. 4. For Repeat new password, retype the new password. ü The new password for the user is now active. Result 5.4.2.5 Changing Your Own Password For valid password format, see: (Password Requirements [} 65])
-
Page 66: Manage Backups
5 Configuration Instructions for Use 5.4 Managing Data CLARUS® 500 • Must be at least seven characters long. • Must contain at least three of the following: – English uppercase characters (A through Z) – English lowercase characters (a through z) –... - Page 67 Instructions for Use 5 Configuration CLARUS® 500 5.4 Managing Data 5. Navigate to the folder where you want to store the backups and click Select. ü Each time the system shuts down a backup will be saved in Result the selected folder. 5.4.3.2 Backing Up Data Manually To back up data manually: þ...
-
Page 68: Log Files
5 Configuration Instructions for Use 5.4 Managing Data CLARUS® 500 5.4.3.3 Restoring Data from a Backup Only Administrators can complete this task. NOTE If the CLARUS® 500 has automatic backups enabled or if there is a saved manual backup, you can restore the system with the data from the backup file. -
Page 69: Data Storage
(starting with the oldest file). The default folder for the audit log files is C:\ProgramData\Carl Zeiss Meditec\...\Logs. Save (export) audit log files regularly NOTE to ensure events of consequence can be tracked should you encounter a data error. -
Page 70: Mapping Networked Drives
To map a networked drive: þ Settings are open (Opening Settings [} 47]). Prerequisite þ You know the path of the drive you want to map in the format: \\<servername>\<foldername>\<subfoldername>. For example: \\Server_x543\ZEISS\Exported_Files Action 1. Select Networking. 70 / 192 2660021171806 Rev. A 2019-01... -
Page 71: Connecting To A Lan
Instructions for Use 5 Configuration CLARUS® 500 5.5 Managing Connections 2. Under Network Drive Configuration, click Map..3. Type the path and select the Drive letter. 4. To save the login credentials, type a User name and Password for the server. 5. -
Page 72: Managing Licenses
5 Configuration Instructions for Use 5.6 Managing Licenses CLARUS® 500 2. To automatically assign an IP address to the instrument, set DHCP to Enabled. For a network with static IP addresses, set DHCP to Disabled and enter the relevant network infor- mation. -
Page 73: Activating Licenses Online
5.6.2 Activating Licenses Offline If the Review Station is not connected to the internet, you can activate the license offline. Using this method you exchange a Request (XML file) for a Response (XML file) with your ZEISS representative. 5.6.2.1 Requesting Licenses Offline When you request a license, you create an XML license request file and send it to your ZEISS representative. - Page 74 7. From a computer connected to the internet, send the XML file to your ZEISS representative. 5.6.2.2 Activating Licenses Offline To activate a license offline: þ You sent the request file for this license to your ZEISS represen- Prerequisite tative. þ Your ZEISS representative returned a response file for this license.
-
Page 75: Returning Product Licenses
Instructions for Use 5 Configuration CLARUS® 500 5.6 Managing Licenses 3. For Offline License Activation, click Import Response file. 4. Navigate to the flash drive or network folder where the response file is located. 5. Select the response file and click Activate. ü... - Page 76 5.6.3.2 Returning Licenses Offline If the Review Station is not connected to the internet, you can activate the license offline. Using this method you exchange a Request (XML file) for a Response (XML file) with your ZEISS representative. 5.6.3.2.1 Requesting License Return When you deactivate a license, you create an XML file and send it to your ZEISS representative.
-
Page 77: Repairing Product Licenses
Instructions for Use 5 Configuration CLARUS® 500 5.6 Managing Licenses Action 1. Login to the CLARUS® 500 software on the Review Station as an Administrator. 2. Select Settings > Licenses. 3. For Offline License Return, click Import. 4. Navigate to the flash drive or network folder where the response file is located. -
Page 78: Configuring Local Settings
5 Configuration Instructions for Use 5.7 Configuring Local Settings CLARUS® 500 4. Scroll down to the bottom of the page. 5. For Online License Repair, type the activation ID. 6. Click Repair. ü The active license is properly restored. Result 5.7 Configuring Local Settings Local settings include information about your clinic such as address, local language and local time zone. -
Page 79: Configuring Report Settings
Instructions for Use 5 Configuration CLARUS® 500 5.8 Configuring Report Settings 7. To display the onscreen keyboard, slide On-Screen Keyboard to Enabled. 8. For Patient Management, select Name or ID as patient data identifier. 9. Select the method for patient ID assignment. If you select CLARUS®... -
Page 80: Configuring Acquisition Settings
5 Configuration Instructions for Use 5.9 Configuring Acquisition Settings CLARUS® 500 3. To enable a signature field on reports, slide Signature field on reports to Show. 4. To add a logo to reports, click Browse... next to Report logo and navigate to the logo file and select it. 5. -
Page 81: System Administration
Instructions for Use 5 Configuration CLARUS® 500 5.11 System Administration 2. Under Alert History, click Clear. ð The alerts are removed. 5.11 System Administration Only Administrators can complete this task. NOTE This section contains detailed configuration information for system administrators. Only system administrators should make changes to these settings. -
Page 82: Networking
5 Configuration Instructions for Use 5.11 System Administration CLARUS® 500 Zeiss instruments initially have three user names and passwords. Initial passwords are shown in the table below. Change these passwords before using the instrument. User Name Type Password Purpose Administrator... -
Page 83: Configuring Enhanced Security
Instructions for Use 5 Configuration CLARUS® 500 5.11 System Administration Service Database outbound 18082 Database inbound/outbound (open port visible externally) 3346 Peer to Peer broadcast inbound/outbound 54183 Distributed Data Service inbound/outbound 54187 Table 9: External Network Ports 5.11.3.2.3 Required External Network Ports for EMR and FORUM Service DICOM outbound 11119... - Page 84 To remove Enhanced Security, log in as ZeissAdmin and run the “Remove Enhanced Security.CMD” script located on the desktop. 5.11.4.1 Disabling Enhanced Security Settings When you received the CLARUS 500, enhanced security settings are turned on. These settings are not required for the instrument to operate properly.
- Page 85 Instructions for Use 5 Configuration CLARUS® 500 5.11 System Administration Action 1. Location the following command on the Windows desktop: Apply Enhanced Security.CMD. 2. Double-click Apply Enhanced Security.CMD. ð All enhanced security settings are enabled. 5.11.4.3 Enhanced Security Windows Firewall Rules Enhanced security disables the following Windows firewall rules: Disabled Firewall Rules AllJoyn Router (TCP-In)
- Page 86 5 Configuration Instructions for Use 5.11 System Administration CLARUS® 500 5.11.4.4 Enhanced Security Services Enhanced security disables the following services: Disabled Security Services AllJoyn Router Service Application Layer Gateway Service Bluetooth Handsfree Service Bluetooth Support Service BranchCache Connected Devices Platform Service Connected User Experiences and Telenetry Downloaded Maps Manager Function Discovery Resource Publication...
- Page 87 Instructions for Use 5 Configuration CLARUS® 500 5.11 System Administration Policy Setting Accounts: Guest account status Disabled Accounts: Limit local account use of blank passwords to console logon only Enabled Accounts: Rename administrator account ZeissAdmin Accounts: Rename guest account Not Used Act as part of the operating system No One Adjust memory quotas for a process...
- Page 88 5 Configuration Instructions for Use 5.11 System Administration CLARUS® 500 Policy Setting Audit Policy: Logon-Logoff: Logoff Success Audit Policy: Logon-Logoff: Logon Success and Failure Audit Policy: Logon-Logoff: Special Logon Success Audit Policy: Object Access: Removable Storage Success and Failure Audit Policy: Policy Change: Audit Policy Change Success and Failure Audit Policy: Policy Change: Authentication Policy Change...
- Page 89 Instructions for Use 5 Configuration CLARUS® 500 5.11 System Administration Policy Setting Configure Solicited Remote Assistance Enabled Maximum ticket time (units) Hours Maximum ticket time (value) Method for sending email invitations Simple MAPI Permit remote control of this computer Allow helpers to remotely control the computer Enabled...
- Page 90 5 Configuration Instructions for Use 5.11 System Administration CLARUS® 500 Policy Setting Domain member: Digitally encrypt secure channel data (when possible) Enabled Domain member: Digitally sign secure channel data (when possible) Enabled Domain member: Disable machine account password changes Disabled Domain member: Maximum machine account password age 30 day(s) Domain member: Require strong (Windows 2000 or later) session key...
- Page 91 Instructions for Use 5 Configuration CLARUS® 500 5.11 System Administration Policy Setting Interactive logon: Require Domain Controller authentication to unlock Disabled workstation Interactive logon: Require smart card Disabled Interactive logon: Smart card removal behavior No Action Load and unload device drivers Administrators Lock pages in memory No One...
- Page 92 5 Configuration Instructions for Use 5.11 System Administration CLARUS® 500 Policy Setting MSS: (EnableICMPRedirect) Allow ICMP redirects to override OSPF generated Disabled routes MSS: (NoNameReleaseOnDemand) Allow the computer to ignore NetBIOS name Enabled release requests except from WINS servers Network access: Allow anonymous SID/Name translation Disabled Network access: Do not allow anonymous enumeration of SAM accounts Enabled...
- Page 93 Instructions for Use 5 Configuration CLARUS® 500 5.11 System Administration Policy Setting Network security: Minimum session security for NTLM SSP based (including Require NTLMv2 secure RPC) servers session security, Require 128-bit encryption No auto-restart with logged on users for scheduled automatic updates installa- Enabled tions Notify antivirus programs when opening attachments...
- Page 94 5 Configuration Instructions for Use 5.11 System Administration CLARUS® 500 Policy Setting Shutdown: Clear virtual memory pagefile Disabled Sign-in last interactive user automatically after a system-initiated restart Disabled Specify the maximum log file size (KB) (Application Log) Enabled Maximum Log Size (KB) 32768 Specify the maximum log file size (KB) (Security Log) Enabled...
- Page 95 Instructions for Use 5 Configuration CLARUS® 500 5.11 System Administration Policy Setting Turn on convenience PIN sign-in Disabled Turn on PowerShell Script Block Logging Enabled Log script block invocation start / stop events: TRUE Untrusted Font Blocking Enabled Mitigation Options Block untrusted fonts and log events...
- Page 96 5 Configuration Instructions for Use 5.11 System Administration CLARUS® 500 Policy Setting Windows Firewall: Domain: Logging: Size limit (KB) 16384 KB Windows Firewall: Domain: Outbound connections Allow Windows Firewall: Private: Display a notification Windows Firewall: Private: Inbound connections Enabled Inbound Connections Block Windows Firewall: Private: Logging: Log dropped packets Windows Firewall: Private: Logging: Log successful connections...
-
Page 97: About User Roles
Instructions for Use 6 About User Roles CLARUS® 500 6 About User Roles Not all users have access to all features. The table below list some of the key differences for different types of users. Operator Doctor Adminis- trator Acquire scans Review scans Select, edit and annotate scans... - Page 98 Empty page, for your notes...
-
Page 99: Operation
Instructions for Use 7 Operation CLARUS® 500 7.1 Safety During Operation 7 Operation Third-party software updates and installations can slow the NOTE system and impact software performance. Anti-virus software an other applications perform periodic update installations automatically, which use system resources that impact the performance of other software. -
Page 100: Selecting The Patient
7 Operation Instructions for Use 7.3 Preparing the Patient CLARUS® 500 7.2.2 Selecting the Patient Finding a patient's name can vary depending on the systems you use. • If you use an EMR system: – The patient's name might be listed under Today –... -
Page 101: Dilating The Patient's Eyes (Optional)
Instructions for Use 7 Operation CLARUS® 500 7.3 Preparing the Patient 7.3.1 Dilating the Patient’s Eyes (Optional) The minimum pupil size for the CLARUS® 500 is 2.5 mm, which is typically achieved without dilation. 7.3.2 Lifting the Patient's Eyelid (Optional) Because the patient's eye is very close to the acquisition head, you might need to re-position the computer screen or reach around the instrument to lift a patient's eyelid. -
Page 102: Positioning The Patient
7 Operation Instructions for Use 7.3 Preparing the Patient CLARUS® 500 2. Rest your hand against the back of the forehead rest and lift the patient's eyelid. 7.3.3 Positioning the Patient Pinch hazard for hands and fingers. CAUTION! Keep operator and patient hands and fingers away from crosstable during alignment and image capture. - Page 103 Instructions for Use 7 Operation CLARUS® 500 7.3 Preparing the Patient ð Lean forward slightly, grasping the table handles if needed for stability. ð Rest their chin in the chin rest. ð Rest their forehead against the forehead rest. 5. Adjust the chin rest up or down as needed until align the patient's canthus to the canthus marker on the patient support.
-
Page 104: Aligning And Focusing On The Patient's Eye
7 Operation Instructions for Use 7.3 Preparing the Patient CLARUS® 500 6. Swing the acquisition head left to align with the patient's right eye or right to align with the patient's left eye. 7.3.4 Aligning and Focusing on the Patient's Eye In addition to the preview image, two images of the iris help to align the eye. - Page 105 Instructions for Use 7 Operation CLARUS® 500 7.3 Preparing the Patient 3. If the patient's pupil is smaller than the transparent band, change the setting to Non-Myd or dilate the patient's pupil (Dilating the Patient’s Eyes (Optional) [} 101]). 4. Slide the instrument front to back and side-to-side until the patient's pupil is centered on the yellow cross hairs on the bottom iris image.
- Page 106 7 Operation Instructions for Use 7.3 Preparing the Patient CLARUS® 500 5. Ensure that the image is in focus. If needed, manually focus the image (Manually Focusing the Image [} 122]). 6. Make fine adjustments as needed to eliminate any shadows showing in the IR preview window.
-
Page 107: Acquire Images
Instructions for Use 7 Operation CLARUS® 500 7.4 Acquire Images 7.4 Acquire Images 7.4.1 About Acquisition Options 7.4.1.1 Field of View Options Pos. Description Example Widefield (WF) Single image, 133° wide by 133° high 2660021171806 Rev. A 2019-01 107 / 192... - Page 108 7 Operation Instructions for Use 7.4 Acquire Images CLARUS® 500 Pos. Description Example Ultra-widefield (UWF) Two image montage, 200° wide by 133° high Auto Montage Four image montage, 200° wide by 200° high Montage Up to six images montaged in an operator-selected configuration 7.4.1.2 Scan Types Example images shown below are taken from scans acquired...
- Page 109 Instructions for Use 7 Operation CLARUS® 500 7.4 Acquire Images Figure 11: Scan Types 2660021171806 Rev. A 2019-01 109 / 192...
- Page 110 7 Operation Instructions for Use 7.4 Acquire Images CLARUS® 500 Pos. Description Explanation Example Color Color High resolution, color images of the fundus appear similar in color to direct observation (ophthalmoscopy). You can also view a monochrome image of each composite color (red, green, and blue).
- Page 111 Instructions for Use 7 Operation CLARUS® 500 7.4 Acquire Images Pos. Description Explanation Example FAF-Green Fundus autofluores- cence with green excitation. The eye is illuminated with light at a wavelength that stimulates the natural fluorescence of lipofuscin. A monochrome image is generated.
- Page 112 7 Operation Instructions for Use 7.4 Acquire Images CLARUS® 500 7.4.1.3.1 Internal Fixation Target Preset Positions Scan Type Location( Description Widefield (WF) Central Ultra widefield Temporal Nasal AutoMontage Temporal Superior Nasal Inferior Table 14: Preset Internal Fixation Targets for Scans 7.4.1.3.2 Tips to Help Patients Find Fixation Targets Some patients have difficutly seeing the internal fixation target.
-
Page 113: Capturing A Widefield Image
Instructions for Use 7 Operation CLARUS® 500 7.4 Acquire Images 4. For temporal fixation targets, swivel the acquisition head slightly towards the center. 5. Increase the duration of fixation target blinks (Configuring Acquisition Settings [} 80]). 6. Have the patient follow the fixation target from the center position to the side: –... -
Page 114: Capturing An Ultra-Widefield Image (2-Image Montage)
7 Operation Instructions for Use 7.4 Acquire Images CLARUS® 500 • Use the external fixation target: Using the External Fixation Target [} 123] To capture a WF image: þ The device is prepared. (See Preparing the Device [} 99].) Prerequisite þ The patient is prepared. (See Preparing the Patient [} 100].) Action 1. -
Page 115: Capturing An Automontage Image (4-Image Montage)
Instructions for Use 7 Operation CLARUS® 500 7.4 Acquire Images 3. For Pupil Size, select Myd if the patient's pupil is dilated and Non-Myd if the patient's pupil is not dilated. 4. Instruct the patient to look inside the imaging aperture, focus on the green fixation target and blink naturally. - Page 116 7 Operation Instructions for Use 7.4 Acquire Images CLARUS® 500 þ The patient is prepared. (See Preparing the Patient [} 100].) Action 1. Under Scans, select AutoMontage. 2. Select the Scan Type (Color, IR, FAF-Green, or FAF-Blue). For more information about Scan Types, refer to: Scan Types [} 108].
-
Page 117: Capturing A Montage Image (2-6 Image Custom Montage)
Instructions for Use 7 Operation CLARUS® 500 7.4 Acquire Images 7.4.5 Capturing a Montage Image (2-6 Image Custom Montage) Figure 18: Custom Montage Example When you capture a custom Montage image, CLARUS® 500 takes a series of widefield images and stitches them together. You can decided how many images to include in the montage. -
Page 118: Capturing A Stereo Image
7 Operation Instructions for Use 7.4 Acquire Images CLARUS® 500 If the patient cannot see the fixation target, refer to: Tips to NOTE Help Patients Find Fixation Targets [} 112]. 6. The instrument automatically focuses the image. To manually adjust focus, refer to: Manually Focusing the Image [} 122]. 7. - Page 119 Instructions for Use 7 Operation CLARUS® 500 7.4 Acquire Images 5. Instruct the patient to look inside the imaging aperture, focus on the green fixation target and blink naturally. If the patient cannot see the fixation target, refer to: Tips to NOTE Help Patients Find Fixation Targets [} 112].
-
Page 120: Capturing An External Eye Image
7 Operation Instructions for Use 7.4 Acquire Images CLARUS® 500 ð A preview of the captured image appears for several seconds and is added to the selection bin. 10. Ask the patient to relax while the you review the scan. 7.4.7 Capturing an External Eye Image Capturing external eye images allows you to store a photograph of the eye along with the retinal images. -
Page 121: Blinking The Fixation Target
Instructions for Use 7 Operation CLARUS® 500 7.4 Acquire Images Action 1. Under Scans, check External. 2. Straighten the acquisition head until the eye is directly in front of it. 3. Move the instrument all the way back. 4. Slowly move the instrument forward until the patient's eye appears in the Preview screen as you want it to appear in the image. -
Page 122: Manually Focusing The Image
7 Operation Instructions for Use 7.4 Acquire Images CLARUS® 500 7.4.9 Manually Focusing the Image To focus the image manually: þ You reached the focus step in a Scan Acquisition task. Prerequisite þ You want to manually focus the image. Action 1. -
Page 123: Using The External Fixation Target
Instructions for Use 7 Operation CLARUS® 500 7.4 Acquire Images To manually position the internal fixation target: þ A patient is being prepared for Scan Acquisition and you Prerequisite want to change or set the internal fixation target. This callout image has two screenshots-- one for USA;... -
Page 124: Checking Scan Quality
2. Ensure that the image is illuminated uniformly. 3. Ensure that there are few to no artifacts that cast shadows on the image. ü If image quality is degraded, contact ZEISS customer service Result (https://www.zeiss.com/). 7.4.13 Deleting or Replacing an Image To delete or replace an image: þ... -
Page 125: Analyze Images
Instructions for Use 7 Operation CLARUS® 500 7.5 Analyze Images 2. Click on the X (1) to delete the image. ð A confirmation opens. 3. To delete and recapture the image, click Delete & Recapture. 4. To delete the image, click Delete. 7.5 Analyze Images There are two Analyze modes: Proof and Review. -
Page 126: Review
7 Operation Instructions for Use 7.5 Analyze Images CLARUS® 500 7.5.2 Review Review shows the images selected in Proof. Review allows you annotate and edite scans, save them and print a report. Figure 19: Analyze > Review Screen 7.5.3 Opening the Analyze Window You can analyze that patient's images by clicking Analyze. - Page 127 Instructions for Use 7 Operation CLARUS® 500 7.5 Analyze Images Tip: Double-click on an image to open a larger view of the image. To sort and select images: þ The selected patient has saved scans. Prerequisite þ The Review screen is open (Opening the Analyze Window [} 126]).
-
Page 128: Editing Scanned Images
7 Operation Instructions for Use 7.5 Analyze Images CLARUS® 500 13. Once all scans for review are in the selection bin (2), click Review (12). 7.5.5 Editing Scanned Images To edit images, select one or more images in the viewport and use the editing toolbar. - Page 129 Instructions for Use 7 Operation CLARUS® 500 7.5 Analyze Images 3. To view 3 images at a time in the view panel, click viewport 3. 4. To view 4 images at a time in the view panel, click viewport 4. 5.
- Page 130 7 Operation Instructions for Use 7.5 Analyze Images CLARUS® 500 6. To view 9 images at a time in the view panel, click viewport 9. 7. To view 16 images at a time in the view panel, click viewport To scroll throught the next set of images, click the scroll icon 7.5.5.2 Viewing Separate Color Channels of a Full Color Image When analyzing a true color image, you can also view each color channel individually.
- Page 131 Instructions for Use 7 Operation CLARUS® 500 7.5 Analyze Images • Color • Red • Green • Blue þ True color image(s) exist in the patient record (Scan Types Prerequisite [} 108]) þ True color image(s) are selected for review (Sorting and Selecting Images [} 126]) þ...
- Page 132 7 Operation Instructions for Use 7.5 Analyze Images CLARUS® 500 4. To view the blue channel image, click Color > Blue. ð The blue channel image opens. 7.5.5.3 Zooming In or Out To zoom in or out: þ The Analyze window is open (Opening the Analyze Window Prerequisite [} 126]).
- Page 133 Instructions for Use 7 Operation CLARUS® 500 7.5 Analyze Images 3. Zoom and pan the image until you see the area of the image you want to save. 4. Close the zoom adjustment panel. 7.5.5.4 Annotating Images Most annotations must be inside the image or field of view to save them on an image.
- Page 134 7 Operation Instructions for Use 7.5 Analyze Images CLARUS® 500 Symbol Name Explanation Delete Removes the selected annotation(s) Hide All Hides all annotations 7.5.5.4.1 Selecting the Annotation Tool You can draw any length arrow or multiple arrows on the image to identify something specific on the image.
- Page 135 Instructions for Use 7 Operation CLARUS® 500 7.5 Analyze Images 3. Type your text annotation. 4. If you want an arrow to appear with the text, click Show Arrow. 5. Click OK. 6. Close the annotations panel. ü The text annotation appears on the image. Result 7.5.5.4.3 Adding Arrows to Images You can draw any length arrow or multiple arrows on the image to...
- Page 136 7 Operation Instructions for Use 7.5 Analyze Images CLARUS® 500 3. Touch or click on the appropriate starting point and drag to the area you want the arrow to point. 4. Close the annotations panel. ü The arrow appears on the image. Result 7.5.5.4.4 Adding Measurements to Images When you draw caliper lines on an image, the review software...
- Page 137 Instructions for Use 7 Operation CLARUS® 500 7.5 Analyze Images 3. Close the annotations panel. ü When you finish drawing the caliper line, the review Result software calculates its length. 7.5.5.4.5 Circling an Area of an Image To circle an area of an image: þ...
- Page 138 7 Operation Instructions for Use 7.5 Analyze Images CLARUS® 500 3. Close the annotations panel. ü When you finish drawing the circle, the review software Result calculates the area. 7.5.5.4.6 Drawing a Freehand Shape in an Image The Freehand tool allows you to draw any shapes around findings you want to emphasize.
- Page 139 Instructions for Use 7 Operation CLARUS® 500 7.5 Analyze Images ð When you connect to the starting point, the review software calculates the area of your shape. 3. Close the annotations panel. 7.5.5.4.7 Copying and Pasting Annotations Copy Annotation registers the images to each other in order NOTE to copy to the appropriate location.
- Page 140 7 Operation Instructions for Use 7.5 Analyze Images CLARUS® 500 1. Click on the copy icon. ð The copy & paste annotations panel opens showing thumb- Action nails of the selected images. The thumbnails in the panel are in the same configuration as the larger images in Preview.
- Page 141 Instructions for Use 7 Operation CLARUS® 500 7.5 Analyze Images 4. Click Copy. ð The annotations appear on both images. 5. Close the annotations panel. 7.5.5.4.8 Hiding Annotations in an Image Hide All temporarily hides all annotations on the image allowing you to see the original image only.
- Page 142 7 Operation Instructions for Use 7.5 Analyze Images CLARUS® 500 ð The selected image is outlined in blue. Action 2. Check Hide All. ð Annotations are temporarily hidden from view. 3. To view the annotations again, uncheck Hide All. 4. Close the annotations panel. 7.5.5.4.9 Deleting Annotations You can select any annotation from the image or select multiple annotations and delete them together.
- Page 143 Instructions for Use 7 Operation CLARUS® 500 7.5 Analyze Images 7.5.5.5 Adjusting Image Brightness Tip: You can set defaults for image brightness, contrast, gamma, sharpness and saturation. Refer to: To adjust image brightness: þ The Analyze window is open (Opening the Analyze Window Prerequisite [} 126]).
-
Page 144: Manually Creating A Montage
7 Operation Instructions for Use 7.5 Analyze Images CLARUS® 500 7.5.6 Manually Creating a Montage You can select from two to six images of the same eye to create a montage image. To create a montage manually: þ The Analyze > Review screen is open. Prerequisite þ... -
Page 145: Viewing Stereo Images
Instructions for Use 7 Operation CLARUS® 500 7.5 Analyze Images 7.5.7 Viewing Stereo Images Stereo image pairs can be viewed in stereo mode. When you view image pairs in stereo mode, viewports are linked, so that pan and zoom apply to both images. When Stereo Mode is selected, all non-stereo images are filtered out of the selection bin and only 2-up and 4-up viewing options are available for viewing the selected Stereo pairs. -
Page 146: Creating A Report
7 Operation Instructions for Use 7.6 Shutdown CLARUS® 500 4. To save a copy of the image with the editing and annotations, click Save as Copy. ð The new copy appears in the selection bin. 7.5.9 Creating a Report For information about configuring reports, refer to: Configure Reports [} 79]. -
Page 147: Logging Off
Instructions for Use 7 Operation CLARUS® 500 7.6 Shutdown 7.6.1 Logging Off To log off: Action 1. Select the X in the upper right corner. 2. Select Log off. 7.6.2 Shutting Down Do not use the power switch to shut down the system CAUTION! or you could interrupt automatic archiving or interrupt operating system updates. - Page 148 7 Operation Instructions for Use 7.6 Shutdown CLARUS® 500 ð Shutdown also turns off the CLARUS® 500 acquisition head. 148 / 192 2660021171806 Rev. A 2019-01...
-
Page 149: Cleaning And Disinfection
Instructions for Use 8 Cleaning and Disinfection CLARUS® 500 8.1 Safety During Cleaning 8 Cleaning and Disinfection 8.1 Safety During Cleaning Cleaning lenses too frequently CAUTION! can damage optic surfaces. Clean optics only when necessary. Keep the protective cover on the instrument when not in use. 8.2 Cleaning Agents Cleaning Agent Distilled water, 70% isopropyl... -
Page 150: Removing Severe Contamination
8 Cleaning and Disinfection Instructions for Use 8.3 Cleaning the Front Lens CLARUS® 500 2. If dust remains, start in the center of the lens surface and wipe in widening circles with the felt end of the LensPen, applying gentle pressure. 3. -
Page 151: Cleaning The Front Window Lens
Instructions for Use 8 Cleaning and Disinfection CLARUS® 500 8.4 Cleaning the Front Window Lens Figure 22: Residual Bright Spots after Cleaning 8.4 Cleaning the Front Window Lens 8.4.1 Cleaning Heavy Contamination Fingerprints, oil, or water spots should be cleaned immediately. Skin acids attack coatings and glass, and can leave permanent stains. -
Page 152: Wipe Cleaning Method
8 Cleaning and Disinfection Instructions for Use 8.4 Cleaning the Front Window Lens CLARUS® 500 Edges on mounted optics NOTE are often hard to reach. Wrap a lens tissue around a swab. Soak the covered swab in acetone. Brush around the edge of the lens and then across the middle using a continuous figure-eight stroke. -
Page 153: Cleaning The Chinrest And Forehead Support
Instructions for Use 8 Cleaning and Disinfection CLARUS® 500 8.5 Cleaning the Chinrest and Forehead Support 8.5 Cleaning the Chinrest and Forehead Support Do not spray cleaner directly on the chin rest or forhead NOTE support. Action Before each use, wipe the chinrest and forehead support with a non-acetone based spray or disinfectant wipe. - Page 154 Empty page, for your notes...
-
Page 155: Troubleshooting
Read the user documentation. Follow directions carefully. Do not make upgrades, or carry out repairs or modifications, without specific guidance and instruction from ZEISS or an authorized ZEISS represenative. Using a non-approved or incorrectly connected device CAUTION! could invalidate the system safety approval. -
Page 156: System Startup Errors
9 Troubleshooting Instructions for Use 9.2 System Startup Errors CLARUS® 500 9.2 System Startup Errors Message / Fault Cause Resolution Last shutdown was System was shut Always shut not executed down incorrectly by down the system correctly, Do not use turning off power to using the the power switch to... - Page 157 Instructions for Use 9 Troubleshooting CLARUS® 500 9.3 Error Messages Message / Fault Cause Solutions Network data validation exception System Malfunction Call for Service occurred while exporting the exam. Network exception occurred while System Malfunction Call for Service exporting the exam. Number of exams that failed to be System Malfunction Call for Service...
-
Page 158: Information Messages
System Malfunction Call for Service error and must be rebooted before acquiring additional scans. All work has been saved. If this problem persists, please contact ZEISS customer support. Continue in review mode or Reboot. Mapper not found error occurred System Malfunction Call for Service while importing exam data. - Page 159 Instructions for Use 9 Troubleshooting CLARUS® 500 9.4 Information Messages Message / Fault Cause Solutions Failed to save the log file. Indicates that the log file did Re-save the log file. not save successfully Exporting exams in progress... Indicates the progress of an exported exam.
-
Page 160: Image Quality Troubleshooting
9 Troubleshooting Instructions for Use 9.5 Image Quality Troubleshooting CLARUS® 500 Message / Fault Cause Solutions You have created a montage When attempting to select Click Save or Discard. image. Do you wish to save or something else, informs that discard this image? you created a montage image, but did not save it. - Page 161 Instructions for Use 9 Troubleshooting CLARUS® 500 9.5 Image Quality Troubleshooting Fault Cause Solution Edges Not Focused The irregular shape of the Adjust the fixation patient's eye. target until the area of interest in in the center of the image. Manually adjust the focus optimize image clarity.
- Page 162 Empty page, for your notes...
-
Page 163: Specifications
Instructions for Use 10 Specifications CLARUS® 500 10.1 Electrical Specifications 10 Specifications 10.1 Electrical Specifications Parameter Value External Power Supply 100 - 240 V~, 50 / 60 Hz, 4 A max Fuse T 4.0 A, L 250 V Electrical Class per IEC 60601-1 Class I 10.2 Instrument Specifications Parameter... -
Page 164: Dimensions And Weight
10 Specifications Instructions for Use 10.3 Dimensions and Weight CLARUS® 500 10.3 Dimensions and Weight Parameters Value Dimensions (W x D x H) 362 mm by 546 mm by 676 mm Instrument Table Dimensions (W x 916 mm by 615 mm by 711 - 925 D x H) Acquisition Device Weight 20.9 kg... -
Page 165: Laser Classification
Instructions for Use 10 Specifications CLARUS® 500 10.6 Laser Classification Parameter Value Resolution (zones defined in ISO 10940): • 60 lp/mm at central field (0°) • Center • 40 lp/mm at 23° FOV • Middle • 25 lp/mm at 45° FOV •... - Page 166 Empty page, for your notes...
-
Page 167: Legal Notices
End User Software License Agreement (the “EULA”), which you must accept in order to use the Software. The EULA is a legal contract between You and Carl Zeiss Meditec, Inc., which governs Your use of the Software. If you do not agree with the terms and conditions of the EULA and do not agree to be bound by the EULA, do not use the Software. - Page 168 Empty page, for your notes...
-
Page 169: Accessories And User Replaceable Spare Parts
Use only accessories authorized by ZEISS. In the U.S., call 800–341–6968. Outside the U.S., contact your local Zeiss distributor. You can find the ZEISS contact partner for your country on our website: www.zeiss.com. The procedure for returning defective parts from Interna- NOTE tional operations differs somewhat from that for U.S. -
Page 170: Accessory Kit Parts List (Replaceable Parts)
12 Accessories and User Replaceable Spare Parts Instructions for Use 12.2 Accessory Kit Parts List (Replaceable Parts) CLARUS® 500 12.2 Accessory Kit Parts List (Replaceable Parts) Image Part Number Quantity Description 2660021166733 DUST COVER CLARUS 2660100007672 LENS CLEANER 2660100007673 LENS WIPES 2660021121819 CABLE NETWORK CAT5E SNAGLESS BOOT... -
Page 171: Additional Replaceable Parts
Instructions for Use 12 Accessories and User Replaceable Spare Parts CLARUS® 500 12.3 Additional Replaceable Parts Image Part Number Quantity Description 2660021147390 WIRELESS MOUSE Image Not Available 2660021168669 ASSEMBLED WEIGHT LABEL 12.3 Additional Replaceable Parts Part Number Description 2660021167501 Accessory bag 2660021167244 Fixation Device (External) 3197519005000... -
Page 172: Returning Defective Parts
Authorization must be obtained from Carl Zeiss Meditec before equipment is returned for repair. A Return Material Authorization (RMA) number is required on each return shipment to Carl Zeiss Meditec. The procedure for obtaining an RMA number varies, depending on your area of operation. -
Page 173: Decommissioning
Attempting to decommission your system CAUTION! may result in damaged equipment and danger to personnel. Never attempt to decommission a ZEISS system or device. Only ZEISS approved field service representatives are qualified to safely decommission your system. Contact your ZEISS Representative to set up an appointment for system/device decommissioning. - Page 174 Empty page, for your notes...
-
Page 175: Packaging And Transport
CAUTION! could result in damage, loss, or non-compliance within the country of transit. Allow only change to Zeiss approved representative to prepare the instrument and associated components for transport. Allow only ZEISS-approved personnel to transport the instrument and associated components. - Page 176 Empty page, for your notes...
-
Page 177: Disposal
For more information about the disposal of the device, please contact the ZEISS contact partner in your country. If you want to sell the device or its components: Inform the purchaser that they must dispose of the device according to the regulations valid at that time. - Page 178 Empty page, for your notes...
- Page 179 Instructions for Use Glossary CLARUS® 500 Glossary DHCP FAF-Green a client/server protocol that automatically Fundus autofluorescence with green provides an Internet Protocol (IP) host with excitation its IP address and other related configu- ration information such as the subnet mask FORUM and default gateway.
- Page 180 Glossary Instructions for Use CLARUS® 500 scanning, faxing, word processing, optical character recognition, image manipulation, a networking protocol for clock synchro- desktop publishing, and page-layout appli- nization between computer systems over cations. packet-switched, variable-latency data networks. PACS a medical imaging technology used for storing, retrieving, presenting and sharing images produced by various medical hardware modalities, such as X-ray, CT...
- Page 181 Instructions for Use Index CLARUS® 500 Index Numerical Add New .......... 62 Change Password ........ 64 1-Up, 2-Up, 3-Up, 4-Up 8-Up, 9-Up or 16-Up ... Delete ............. 63 128 Advanced Button......... 30 Alerts Clearing History ........ 80 Accessing the User Manual ...... 23 Setting Display Time........
- Page 182 Index Instructions for Use CLARUS® 500 Auto Numbers.......... 34 Screen Lock .......... 81 Patients........ 32, 33, 35 Auto Button.......... 122 Print Report .......... 34 Auto Montage Proof ............ 34 Capturing.......... 115 Review............ 33 Autoflourescence Rotate............. 34 (see FAF) .......... 24 Saturation ..........
- Page 183 Instructions for Use Index CLARUS® 500 Use in Healthcare Facility ...... 17 Time zone .......... 78 Central Fixation Target....... 111 Connecting Wireless Printers...... 69 Change Contrast Laterality.......... 54 Adjusting .......... 143 Change Password ........ 64, 65 Setting Default Level ....... 60 Chin Rest ...........
- Page 184 Index Instructions for Use CLARUS® 500 DICOM File Formats .......... 59 Automatic Export........ 59 Exporting Scans ........... 56 Ports ............ 83 Extension Cord Warning ...... 15 Dimensions,. Instrument ...... 164 External Eye Image Disposal Capturing.......... 120 Batteries ........ 175, 177 External Fixation Electronics ........
- Page 185 Instructions for Use Index CLARUS® 500 Adjustment Knob........ 28 IEC 60825-1 .......... 9 Automatic or Manual ...... 122 Image Focus Button .......... 32 Analyze.......... 125 Forehead Rest.......... 103 Auto Montage, Capture ...... 115 Forehead Support Definition.......... 108 Identification........... 27 Delete or Replace........ 124 Forehead Support, Cleaning.......
- Page 186 Index Instructions for Use CLARUS® 500 Tipping Warning ........ 13 License Agreement ........ 167 Instrument positioning....... 103 Licenses, Review Station ...... 72 Intended Demographic Activate .......... 73 Doctors........... 22 Repair ............. 77 Operators .......... 21 Return............. 75 Patients........... 21 Returning.......... 75 Intented Use ..........
- Page 187 Instructions for Use Index CLARUS® 500 OU Filter ............ 33 Overview Name, Patient, Identifier ...... 79 Acquire Window ........ 31 Nasal Fixation Target ......... 111 Analyze window ........ 32 Network Hardware.......... 25 Cable, Replace ........ 170 Network .......... 35 LAN ............ 71 Patient Window ........
- Page 188 Index Instructions for Use CLARUS® 500 Adding a Patient Record ...... 49 Exporting .......... 56 Analyze........... 33 Proof Button.......... 34 Button .......... 32, 33 Proof Window Intended Demographic ...... 21 Overview .......... 32 Managing EMR records...... 49 Proper Procedures Optional dilation of the eyes .... 101 Caution...........
- Page 189 Instructions for Use Index CLARUS® 500 RoHS ............. 9 Images.......... 126 Rotate Button .......... 34 Selecting a Patient ........ 100 Rotate Image.......... 143 Sensor ............ 165 Rotate Scan .......... 34 Settings ............ 30 Data Backups.......... 66 Enable Multi-Component Names..... 79 Exporting Data........
- Page 190 Index Instructions for Use CLARUS® 500 Symbols and Labels ........ 10 Environment Requirements .... 164 System Transport Caution........ 16 Date / Time Settings........ 78 Tray, Keyboard .......... 25 Shutdown .......... 146 Troubleshooting ........ 155 Startup............ 45 True Color Images ........ 24 Turning off the Instrument......
- Page 191 Instructions for Use Index CLARUS® 500 Network Connections ...... 35 Patient Safety.......... 14 Peripherals .......... 13 Power Cord.......... 14 Printer Connection ........ 37 Stacked Equipment ......... 13 Unauthorized Parts ......... 14 Unqualified Personnel ...... 14 Weight, Instrument and Table .... 164 Widefield Image Capturing..........
- Page 192 Carl Zeiss Meditec, Inc Carl Zeiss Meditec AG 2660021171806 Rev. A 2019-01 CLARUS® 500 5160 Hacienda Drive Goeschwitzer Strasse 51-52 Instructions for Use Dublin, CA 94568 07745 Jena Specifications subject to change Germany without notice Toll Free: 1-800-341-6968 Fax: + 49 (0) 7364 -20 4823 Phone: 1–925–557–4100...
Need help?
Do you have a question about the CLARUS 500 and is the answer not in the manual?
Questions and answers
Hi, I had captured patient images but patient ID is not correct. I want to transfer images from Patient "X" into Patient "Z". As there is an option for Ziess OCT by the name Move. Same option is not available in Clarus 500 and I can see three options: "Test, Merge and export" . I tried to merge and test but does not work for me, error shows select exam, Please could you tell me how to fix it?
If the "Move" option is not available, you can transfer images from Patient "X" to Patient "Z" by merging the patient records. Follow these steps:
1. In the Patient window, select Patient "X" and click the down arrow.
2. Select "Merge."
3. Type the name or ID of Patient "Z" in the search field and click "Search."
4. Select Patient "Z" from the search results.
5. (Optional) Select "Compare" to view both records side by side.
6. Select "Merge."
7. Enter a reason for the merge and click "Merge" again.
The exam data from Patient "X" will be added to Patient "Z"'s record.
This answer is automatically generated
Hello, how can I transfer a patients images to another patients file?
The Zeiss CLARUS 500 allows reassigning an image scan if it was inadvertently assigned to the wrong patient. However, the provided context does not explicitly describe the exact steps for transferring patient images to another patient’s file.
To ensure proper data management, follow the instructions for merging patient records or reassigning images as described in the manual. If further assistance is needed, contacting Zeiss customer service is recommended.
This answer is automatically generated
Can't acquire images. I have the patient added, but it won't let me select the "ACQUIRE" tab. It isn't "active" or doing anything. I am logged in as a doctor and not using the admin account.