Table of Contents
Advertisement
Quick Links
Download this manual
See also:
User Manual
User's Manual
B820n/B840dn
Setup Instructions
This manual contains cautions on how to use this product safely. Before you
use this product, please make sure that you read this manual.
Please use the product with this manual at your side.
Chapter 1 Setting Up ······················· 11
Chapter 2 Basic Operation ················ 51
Chapter 3 Maintenance ····················· 99
Chapter 4 Troubleshooting ·············· 111
Appendix ······································· 133
Index ············································ 141
Oki Contact Details ························· 143
Advertisement
Table of Contents

Related Manuals for Oki B820N


Summary of Contents for Oki B820N
-
Page 1: Setup Instructions
Chapter 4 Troubleshooting ·············· 111 Appendix ······································· 133 Index ············································ 141 Oki Contact Details ························· 143 This manual contains cautions on how to use this product safely. Before you use this product, please make sure that you read this manual. -
Page 2: Safety Instructions
Do not throw the toner Do not make power cord, Oki Data does not cartridge into fire; dust printer cable or ground wire guarantee the operations explosion may cause burn connections not instructed of the printer if it is injury. -
Page 3: Manual Composition
How to Read This Manual Symbols The following symbols are used in this manual. • B840dn → B840 • B820n → B820 • Multi-purpose tray → MPT, MP tray • Second tray unit → Tray 2 • Third tray unit → Tray 3 •... - Page 4 As an ENERGY STAR Program Participant, the manufacturer has determined that this product meets the ENERGY STAR guidelines for energy efficiency. This product complies with the requirements of the Council Directives 2004/108/EC (EMC), 2006/95/EC (LVD),1999/5/EC (R&TTE) and 2009/125/ EC (EuP), as amended where applicable, on the approximation of the laws of the member states relating to Electromagnetic Compatibility, Low Voltage, Radio &...
-
Page 5: About This Manual
3. This manual has been created with due care, however, in the unlikely event that you notice something that is unclear, incorrect, or omitted, please contact the store at which you purchased the product. 4. Please understand that notwithstanding point 3, Oki Data accepts no responsibility for the contents of this manual in terms of the effect on the operation of the machine. - Page 6 If it gets into the eyes, flush with large amounts of water for at least 15 minutes keeping eyelids open. Seek medical attention. Spillages should be treated with cold water and soap to help reduce risk of staining skin or clothing. ANUFACTURER Oki Data Corporation, 4-11-22 Shibaura, Minato-ku, Tokyo 108-8551, Japan NVIRONMENTAL INFORMATION...
-
Page 7: Table Of Contents
Checking the Product ··············· 12 B840dn PS Printer Driver System Requirements ····················· 47 Installation Requirements ········ 13 B840dn PCL/B820n PCL Printer Driver Operating Environment ······················ 13 System Requirements ····················· 47 Installation Warnings and Cautions ······ 13 Installation Space ····························· 13 Options ····································... - Page 8 ························ 112 Index ································ 141 Canceling printing from a computer ··· 112 When Paper Jams ·················· 114 Oki Contact Details ············ 143 Paper jams in the front cover area (error codes:372, 380, 390, 391, 400) ·············································115 Paper jams at the paper exit (error code: 382) ·························...
-
Page 9: The Content Of User's Manual
The Content of User's Manual (Advanced) 1 Printing with various kinds of paper 2 Convenient Printing Functions 3 Use various ways to print 4 Printing neatly 5 How to use the control panel 6 Useful Utilities (Windows) 7 Useful Utilities (Macintosh) 8 Regarding Networks 9 Troubleshooting Appendix... - Page 10 [Memo]...
-
Page 11: Chapter 1 Setting
Set Print Media …………………………………………………………………………………………17 Turning On the Printer ………………………………………………………………………………18 Turning Off the Printer ………………………………………………………………………………20 Options ………………………………………………………………………………………………………21 Second Tray Unit …………………………………………………………………………………21 Duplex Unit (B820n) …………………………………………………………………………23 Additional Memory ………………………………………………………………………………25 SD Memory Card …………………………………………………………………………………28 Printing a Menu Map …………………………………………………………………………………32 Printing Network Information ……………………………………………………………………33 Connecting a Cable ……………………………………………………………………………………34... -
Page 12: Checking The Product
□ Cassette Cover □ Vent Louver □ (B840dn) (B820n) • No printer cables are supplied with the printer. Separately purchase a printer cable suitable for your computer. Note! • The image drum is already installed inside the printer. • Toner cartridge is packed under the pads. -
Page 13: Installation Requirements
Installation Requirements Operating Environment • Install the printer in a place meeting the following temperature and humidity requirements: Temperature : 10 to 32℃ Humidity : 20 to 80% RH (relative humidity) Maximum Wet-bulb Temperature : 25℃ • Be careful not to allow dew condensation to occur. •... -
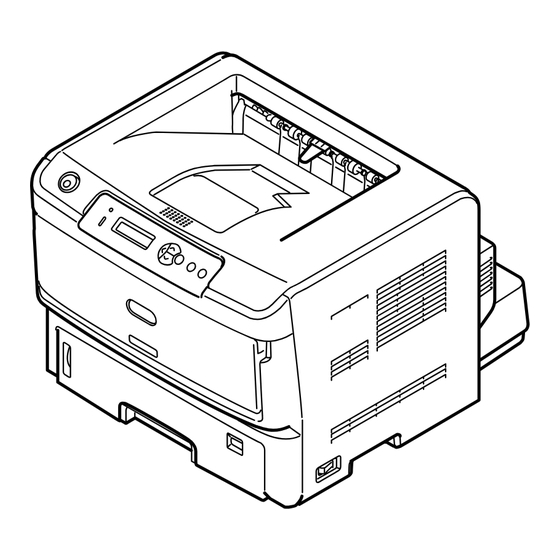
Page 14: Names Of Components Of The Printer
Names of Components of the Printer Front (B840dn) Operator Panel OPEN Button Face-down Stacker Paper Supporter Multi-purpose Tray Power Switch Inside Rear Top Cover LED Head Face-up Stacker Fuser Unit Image Drum Toner Cartridge Power Switch Duplex Unit Air Vents Duplex Unit Cover (Rear Cover) Indicator of... -
Page 15: Installing The Printer
Installing the Printer Before connecting the power cord, follow the steps ❶ Note! Press the left OPEN button on the top of described in this section. the printer. Remove the protective material. Top Cover OPEN Button ❶ Remove the protective tape, Instruction Sheet, the desiccant, the paper and etc on the front part of the printer. - Page 16 ❹ ❼ Remove the tape from the protective sheet, and pull Turn the toner cartridge lock lever until it is out the protective sheet in the direction of the arrow. turned end in the direction of the arrow. Protective Sheet ❽...
-
Page 17: Set Print Media
Set Print Media ❶ ❺ Pull out the paper cassette (the tray 1). Be sure the paper guides and the paper are properly aligned. • The paper cassette stops at a predetermined Memo position when pulled out of the printer. •... -
Page 18: Turning On The Printer
• The maximum power consumption of the printer is 1,200 watts. Ensure that the power supply is sufficient. • When the printer is used with a UPS (an uninterruptible power system) or inverter, Oki Data does not guarantee the operations of the printer. Do not use UPSs or inverters. -
Page 19: Connect The Power Cord
Connect the power cord. Press the ON (|) side of the power switch. ❶ Be sure the OFF (O) side of the power switch is pressed. ❷ Plug the power cord into the printer. When the printer is ready to perform printing, the operator panel displays 'ONLINE'. -
Page 20: Turning Off The Printer
Turning Off the Printer Before turning off the printer, be sure to shut When not using the printer for a long down it by using the following procedure. period By pressing the OFF (O) side of the power switch Note! suddenly to turn off the printer, the printer may be Such as during consecutive holidays or travel, damaged, being caused to inoperable. -
Page 21: Options
B840dn can be installed with up to two second tray units, using them as its second/third trays. B820n can be installed with only one second tray. • A second tray unit may be shown as a tray 2. -
Page 22: Windows Vista/Windows Server
Installing a Printer Driver (page In Windows Server 2003, select [Start] – 36). [Printers and Faxes]. ❷ • Administrator privileges on your computer are Right-click [OKI B840 (PCL)] or the [OKI Note! required. B820] icon and select [Printer properties]. • [Extended Feeder Units] in the Mac OS X PCL printer driver is always set to [Available]. ❸... -
Page 23: Duplex Unit (B820N)
Duplex Unit (B820n) The printer needs a duplex unit to print both sides of paper. B840dn has as standard a duplex unit installed. Note! Model Number: N21302A ❷ Press the off (O) side of the power Be sure that the both latches on the... - Page 24 ❷ Right-click the [OKI B820] icon and Check the duplex unit is properly select [Printer properties]. installed. ❸ Checkmark [Duplex Option Unit] under [Available Options] on the [Device ❶ Print a menu map. Options] tab and click [OK]. Refer to "Printing a Menu Map"...
-
Page 25: Additional Memory
"COLLATE FAIL" in making collated sets of copies, install additional memory. Additional Memory • Be sure to use Oki Data original genuine additional memory. Oki Data does not guarantee the operations of the Note! printer if non Oki Data genuine additional memory is used for the printer. - Page 26 Attach additional memory. Attach the side cover. ❶ ❶ Before putting the additional memory out Close the Door and slide to the direction of its bag, eliminate static electricity from of the arrow. it by contacting the bag with metal. Door ❷...
- Page 27 Windows PostScript Printer Driver menu map header information. ❶ Select [Start]-[Control Panel]-[Printers and Other Hardware]-[Printers and Faxes]. And Right-click the OKI B840 (PS) icon and select [Properties]. ❷ Select an appropriate value for [Memory Configuration] under [Installable Options] on the [Device Settings] tab and click [OK]. Mac OS X PostScript Printer Driver • In Mac OS X, select [OKI B840] under [Print & Scan] and click [Options & Supplies]. Select the [Drivers] tab, If [Total Memory] is not properly displayed, turn off Note! the power and reinstall the memory. select an appropriate value for [Memory Configuration] and click [OK]. Options...
-
Page 28: Sd Memory Card
When performing secure printing, encrypted secure printing, print job storage or buffer printing, or when the printer displays [COLLATE FAIL] in making collated sets of copies, use an SD memory card. Be sure to use an Oki Data original genuine SD memory card. Oki Data does not guarantee the operations of the printer Note! if non Oki Data genuine one is used for the printer. - Page 29 Attach an SD memory card. Attach the side cover. ❶ ❶ Slide the metal plate door in the direction Close the door, and slide the metal plate of the arrow to open it. door in the direction of the arrow. Door Door ❷...
-
Page 30: Windows Vista/Windows Server
[Printers]. In Windows XP, select [Start]-[Control Panel]-[Printers and Other Hardware]- [Printers and Faxes]. In Windows Server 2003, Select [Start]- [Printers and Faxes]. ❷ Right-click the [OKI B840 (PS)] icon and select [Properties]. ❸ The SD memory card capacity in the header Set to [Installed] from [SD Memory Memo information may differ from that shown in the Card] of [Installable Options] on [Device above example. -
Page 31: Windows Vista/Windows Server
In Windows Server 2003, select [Start]- [Printers and Faxes]. ❷ Click [Print & Scan]. Select the printer, ❷ click [Options & Supplies] and select the Right-click the [OKI B840 (PCL)] icon and [Driver] tab. select [Printer properties]. ❸ ❸ Checkmark [SD Memory Card] and click Select [Get Printer Settings] on the [OK]. -
Page 32: Printing A Menu Map
[INFORMATION MENU]. ❹ Press the ENTER button to display [PRINT MENU MAP/EXECUTE]. ❺ Press the ENTER button. The printer starts printing a menu map. <Example of Menu Map from B820n> Printing a Menu Map... -
Page 33: Printing Network Information
Printing Network Information You can check network-related information. <Example> MAC Address ❶ Load A4 paper in a tray. ❷ Be sure that the display shows [ONLINE]. ❸ Press the button more than once to display [INFORMATION MENU], and press the ENTER button. -
Page 34: Connecting A Cable
Connecting a Cable <Setting an IP Address> Turn off the printer (O). For a connection via a network, set the IP address, subnet mask and gateway address of the printer. Connect a cable. ❶ Turn on the printer. For a Network Connection ❶... - Page 35 For a USB Connection ❻ The first byte of the IP address blinks. Press button more than once to ❶ Prepare a USB cable. display the value you want to set. No printer cables are supplied with the printer. Note! Separately prepare a USB-2.0 cable.
-
Page 36: Installing A Printer Driver
Suitable for printing documents including a PostScript font or EPS data. Suitable for normal printing. B820n Type Description Suitable for normal printing. Printer Driver Installation Windows (B840dn or B820n) Network Connection Page 37 USB Cable Connection Page 40... -
Page 37: Setting Up On Windows With A Network Connection
To choose manually a driver to install; install a shared printer; or Windows : Windows 7 Home Premium Edition use OKI LPR Utility for printing: select [Custom Printer: : B840dn Installation(Printer)], and follow the instructions on your screen. - Page 38 ❼ ❾ Click [Restart search] to restart the device search. Click [Finish]. The installation finishes. To add the unchecked driver to the commonly When the device is displayed, select it and click used printer, select the driver you want to set. [Next]. When an optional second tray unit has been installed before the driver installation, click [Open Properties Screen] and change settings for the tray. Click [Yes] when a dialog box prompting you to Note! restart the computer appears. The computer...
- Page 39 ⓫ Right-click the OKI B840 icon and choose any of the menu items to verify that all installed drivers appear in the sub-menu under it. In Windows 8.1/Server 2012 R2/Windows 8/ Server 2012/Windows 7/Windows Vista/Windows Server 2008/Windows XP/Windows Server 2003, verify that the icon representing each driver is displayed.
-
Page 40: Usb Connection
Setting Up on Windows with a USB Connection ❼ Select [Easy Installation (Local)] under Use a USB-2.0 interface cable not longer than 5 m Memo (2 m or less is recommended). [Driver Installation]. • While the printer performs printing, do not unplug Note! or plug its USB cable. • Do not plug the printer’s USB cable shortly after unplugging it. Wait five seconds or more between unplugging and plugging the USB cable. - Page 41 In Windows XP/Windows Server 2003, click [Start] and select [Printers and Faxes]. ⓭ Right-click the OKI B840 icon and choose any of the menu items to verify that all installed drivers appear in the sub-menu under it. Setting Up on Windows with a USB Connection...
-
Page 42: Setting Up On Mac Os X With A Network Connection
Setting Up a Network Connection Determine a way of printing. There are two ways of printing under Mac OS X -- Bonjour and TCP/IP. Firstly, determine which of them to use. B840dn and B820n Usable Drivers Product Way of Printing Bonjour ○... -
Page 43: For Those Using Mac Os
Turn on the printer (|). Install a printer driver. ❶ Disable anti-virus software. ❷ Insert Software DVD-ROM into your computer. ❸ Open the [Drivers] folder and double- click the folder of the printer driver you will add. ❹ Double-click [Installer for OSX.pkg] in the The printer displays [ONLINE] on the operator [Driver] folder. - Page 44 Select the printer, and click [Add] when the [Print Using] menu shows a correct model name. • The printer name is [OKI-B840 (OKI-B820 Memo for B820n)] + [the last six alphanumeric characters of the MAC address] for a ❷ Bonjour connection. Click [Print & Scan].
- Page 45 ❽ ❹ Verify that the added printer name is Click [IP]. properly shown for [Kind] and close the [Print & Scan] window. The printer name is not properly shown Note! when the PS printer driver does not read an associated PPD file. In such a case, remove and readd the printer.
- Page 46 (When using a PCL driver) ❼ Verify that the added printer name is shown in Printer List and exit [Print & Scan] . Setting Up on Mac OS X with a Network Connection...
-
Page 47: Setting Up On Mac Os X With A Usb Connection
❹ Double-click [Installer for OSX.pkg] in the • MicrolinePS Utility does not run on Mac OS X. [Drivers] folder. B840dn PCL/B820n PCL Printer Driver System Requirements USB interface-installed model of computer that runs Mac OS X 10.6.8 to 10.9 ❺... - Page 48 ❸ ❻ Click [Print & Scan]. Select the name of your printer for which USB is shown in [Kind] and when [Print Using] menu shows a correct model name, click [Add]. ❹ Click [+]. ❼ Verify that the added printer name is shown in Printer List.
-
Page 49: Options
Options When your computer has no printer drivers installed for the printer, install a printer driver, referring to Installing a Memo Printer Driver (page 36). For Those Using Windows ❸ After an SD memory card or a second tray unit Configure your printer driver. - Page 50 For Those Using Macintosh For Those Using Mac OS X Using the following steps, configure options (second and third trays, additional memory and an SD memory card) that have been installed with an IP Print or Bonjour connection or after installation of your printer driver.
-
Page 51: Chapter 2 Basic Operation
Chapter 2 Basic Operation Operator Panel …………………………………………………………………………………………52 Loading Paper ……………………………………………………………………………………………53 Available Paper …………………………………………………………………………………………54 Paper type, Size and Media weight ……………………………………………………54 How to Keep Paper ……………………………………………………………………………………56 Deciding a Feed Tray …………………………………………………………………………………57 Paper Settings ……………………………………………………………………………………………58 Printing ………………………………………………………………………………………………………61 Main Functions …………………………………………………………………………………………68 Description of Functions ……………………………………………………………………………69 Functions of Windows PS Printer Driver ……………………………………………69 Functions of Windows PCL Printer Driver …………………………………………70 Functions of Mac OS X PS Printer Driver ……………………………………………71... -
Page 52: Operator Panel
Operator Panel EADY NTER ANCEL TTENTION Name Description Name Description ❶ ❺ Display Shows printer statuses and MENU selection Enters a menu mode. contents when errors occur. Scrolls forward or backward a button displayed content of the menu during the menu mode. Pressing the button for 2 seconds or more allows you to scroll forward or backward multiple contents. -
Page 53: Loading Paper
Loading Paper Procedure of loading paper Check whether it is available paper or not. (page Check a tray to load paper. (page Set paper size on the operator panel. (page Set media weight on the operator panel. (page Set a media type on the operator panel. (page Tray1/Tray2/Tray3 MP Tray... -
Page 54: Available Paper
Available Paper To print with high quality, a paper which meets the requirements of materials, weight and coating for the surface has to be used. To exercise the performance of the machine, use paper recommended by our company. A gratifying result may not be obtained in other sheets. In case of printing other than a recommended paper, a test for print quality and paper direction is required to confirm there is no problem. -
Page 55: Plain Paper
Plain Paper Postcards Use a paper meeting the following condition. Use a postcard meeting the following condition. • Postcards made by papers for the electronic photo • Paper ream weight between 60 200g/m (Ream weight ~ printer or papers for dry system PPC. 172kg) ~... -
Page 56: How To Keep Paper
How to Keep Paper If paper is kept in the wrong way, paper may Label Paper absorb moisture or change in color and warping Use a label paper meeting the following condition. may occur. Such papers affect print quality or feed •... -
Page 57: Deciding A Feed Tray
Deciding a Feed Tray Feed tray and output condition differ depending on paper type, size and weight. Confirm a method meet- ing all conditions with the following procedure. Refer to "Available Paper" (page 54) as for paper specifications. Confirms a feed tray from paper type, size and weight. Paper that can be loaded in Tray1, Tray2, Tray3* Paper size A3, A4, A5, B4, B5, Legal 14, Legal... -
Page 58: Paper Settings
Paper Settings Perform paper settings for the printer. • Print quality may decline or the fuser unit may be damaged unless the values of media weight are correctly set. Note! • The setting item or setting value differs depending on the type or weight of the paper. Confirm setting values of media weight from paper types and weight. -
Page 59: Media Type
Set paper size, media weight and <For Multi-purpose Tray> As the factory default, the paper size of the media type. multi-purpose tray is set to [A4 Landscape feeding]. When printing on paper other than Setting paper size A4, you need to change the paper size of <For Tray1, Tray2, and Tray3>... -
Page 60: Setting Media Type
• The setting of "Tray1 Media weight" can be set Setting media weight Memo in [Media Weight] of the printer driver. When Here the setting procedure when printing on plain setting by the printer driver, the setting of the printer driver takes priority. paper (ream weight 90kg paper) from Tray1 (set •... -
Page 61: Printing
Printing There are 4 Feed trays of Tray1, Tray2 (option), Tray3 (option) (B840dn only), and Multi-purpose tray. Plain paper is printed from any trays. Postcards, envelopes, and labels are printed from the multi-purpose tray. Manual feed printing is available from the multi-purpose tray. Multi-purpose Tray Tray1 Tray2... - Page 62 ❹ Set the paper size dial to the loaded (2) Set the paper guide and paper stopper to the paper size to hold the paper firmly. paper size. Paper Guide Paper Size Dial ❺ Return the paper cassette to the printer. Paper Stopper Metal Plate The rear side of the paper cassette is stored by moving the lock lever and pushing the rear side into the front.
- Page 63 ❸ Place paper on the tray and adjust the • Use paper kept in an appropriate temperature and Note! humidity. Do not use curling or waving paper caused manual guide to the paper width. by humidity. (Creases may occur on the paper.) •...
- Page 64 In case of Face up (output being the print side up) Select an output condition of the Paper is outputted to the face-up stacker and paper. piled in the opposite order of printing. There are two places for the output destination The weight is 80g/m (ream weight 70kg) including face-down stacker and face-up stacker.
-
Page 65: Start Printing
❺ Select [Tray1] in [Paper Source] of the Select [Paper Size] and [Paper [Paper/Quality] tab. Source] in the printer driver and start printing. This is an example for the printing that images are printed by a plain paper of B5 size in Tray1, using [Word Pad] for Windows, and [Text Edit] for Mac OS X. - Page 66 ❼ For Those Using Windows PCL Printer Click [OK]. Driver User ❽ Click [OK] or [Print] in the "Print" screen ❶ and start to print. Select [Page Setup] of the [File] menu. ❷ Select [B5] in [Size], and [Portrait] or [Landscape] in [Orientation].
- Page 67 • I f setting details are not displayed in the print Memo dialog box for Mac OS X 10.7 to 10.9, click [Show Details] at the bottom of the dialog box. • I f the print option is not displayed in the print dialog box for Mac OS X 10.6.8, click the disclosure triangle next to the [Printer] drop-down list. For Those Using Mac OS X PCL Printer Driver ❶ Select [Page Setup] in the [File] menu. ❷ Select [B5] in [Paper Size] and an appropriate orientation for [Orientation], and click [OK]. ❸ Select [Print] in the [File] menu. ❹ Select [Tray 1] in [Paper Source] on the [Setup] panel. ❺...
-
Page 68: Main Functions
Main Functions There are the following useful functions. For more information, refer to the advanced guide. ● Duplex Print ● Multiple-page printing ● Printing by changing size ● Stamp printing ● Collate ● Toner Saving SAMPLE Main Functions... -
Page 69: Description Of Functions
Description of Functions B840dn has two kinds of printer drivers which are PS and PCL, and B820 has one kind of printer driver which is PCL. Each printer driver has different functions. For the detailed procedure, refer to the User's Manual (Advanced ). -
Page 70: Functions Of Windows Pcl Printer Driver
Functions of Windows PCL Printer Driver [Setup] tab Item Description Media Specifies paper size, weight, and paper ① ① feed method. Finishing Mode Specifies multiple-page printing. ② Orientation Specifies print orientation on paper. ③ ② ⑧ 2-Sided Printing Specifies it when you want to use duplex ④... -
Page 71: Functions Of Mac Os X Ps Printer Driver
Functions of Mac OS X PS Printer Driver [Job Option] Function Panel Item Description Quality Specifies print quality. ① Collate Check the checkbox when you want to ② print by copy unit. Toner Saving Check the checkbox when you want to ③... - Page 72 [Layout] Panel Item Description Pages per Sheet Selects the number of pages you want ① to print in a sheet. Layout Direction Specifies a layout when printing ② multiple pages in a sheet. ① Border Specifies a boarder when printing ③...
-
Page 73: Functions Of Mac Os X Pcl Printer Driver
Functions of Mac OS X PCL Printer Driver [Layout] Panel Item Description Copies Specifies the number of copies. ① ① ② Pages Specifies pages to print. ② ③ ④ Paper Size Specifies a paper size and media. ③ ⑤ Orientation Specifies the printing direction. - Page 74 [Setup] Panel Item Description Paper Source Specifies the paper feed method or ① other settings. Duplex Specifies when performing duplex ② ① printing. About Displays the version of the printer ③ ② driver. Default Resets the settings in the panel to ④...
-
Page 75: User Menu
- : Do not show the message. Category Item Value Function / Notes B840dn B820n PRINT JOBS ENCRYPTED JOB NOT FOUND Use it in printing the encrypted authentication print job △ △ (Encrypted Job) stored in SD. - Page 76 Sets the number of copies. ○ ○ DUPLEX Specifies Duplex Print. ○ △ For B820n, duplex unit is installed to display the item. BINDING LONG EDGE Specifies Binding in Duplex Printing. ○ △ "ON" is selected in "USER MENU" - "PRINT MENU" - SHORT EDGE "DUPLEX".
- Page 77 Category Item Value Function / Notes B840dn B820n PRINT MENU EDIT SIZE CASSETTE SIZE Setup the drawing size if the specified size by the ○ ○ specified command from a host is not available. ※2 Selects the "CASSETTE SIZE", and set the chosen cassette A4 SEF size as the drawing size.
- Page 78 Category Item Value Function / Notes B840dn B820n MEDIA MENU TRAY1 CASSETTE SIZE Sets the paper size for a tray 1. ○ ○ PAPERSIZE CUSTOM TRAY1 X SIZE 5.8INCH Set up the paper Width for a tray1 ○ ○ · "MEDIA MENU" - "TRAY1 PAPERSIZE"-"CUSTOM"...
- Page 79 Category Item Value Function / Notes B840dn B820n MEDIA MENU TRAY2 X SIZE 148MILLIMETER Sets the paper Width for a tray 2 △ △ · "MEDIA MENU" - "TRAY2 PAPERSIZE"-"CUSTOM" (MILLIMETER) · "MEDIA MENU" - "UNIT OF MEASURE"-"MILLIMETER" 210MILLIMETER ※4 ※3...
- Page 80 Category Item Value Function / Notes B840dn B820n MEDIA MENU TRAY3 Y SIZE 7.2INCH Sets the paper length for a tray3 △ · "MEDIA MENU" - "TRAY2 PAPERSIZE"-"CUSTOM" (INCH) · "MEDIA MENU" - "UNIT OF MEASURE"-"INCH" 11.7INCH ※5 ※3 17.0INCH...
- Page 81 Category Item Value Function / Notes B840dn B820n MEDIA MENU MPT PAPERSIZE 16K(195MM) Sets the paper weight for MPT. ○ ○ L E F 16K(197MM) L E F CUSTOM COM-9 ENVELOPE COM-10 ENVELOPE MONARCH ENV DL ENVELOPE C6 ENVELOPE C5 ENVELOPE...
- Page 82 Category Item Value Function / Notes B840dn B820n SYS CONFIG POW SAVE TIME 1 MIN Sets time to wait for moving to Power Save mode. ○ ○ MENU 2 MIN 3 MIN 4 MIN 5 MIN 10 MIN 15 MIN...
- Page 83 Category Item Value Function / Notes B840dn B820n SYS CONFIG TIMEOUT LOCAL 0 SEC Time of open of each port after end of job(The network is ○ ○ excluded. ) MENU 5 SEC It increases /decreases in the step of 5.
- Page 84 Category Item Value Function / Notes B840dn B820n A4 PRINT 78 COLUMN Sets in PCL the number of characters for A4 paper Auto ○ ○ EMULATION WIDTH 80 COLUMN ※6 WHITE PAGE Sets whether to eject or not a page without any data to ○...
- Page 85 Category Item Value Function / Notes B840dn B820n SYMBOL SET PC-8 Sets a symbol set. ○ ○ EMULATION PC-8 Dan/Nor PC-850 Legal ISO-2 IRV ISO-4 UK ISO-6 ASC ISO-10 S/F ISO-11 Swe ISO-14 JASC ISO-15 Ita ISO-16 Por ISO-17 Spa...
- Page 86 Category Item Value Function / Notes B840dn B820n SYMBOL SET Serbo Croat2 ○ ○ EMULATION Ukrainian Bulgarian PC-1004 Win 3.1 Blt PC-775 Serbo Croat1 PC-858 Roman-9 ISO L9 LETTER O STYLE ENABLE Specifies the style that replaces φ(9B)and ¥ (9D) with ○...
- Page 87 Category Item Value Function / Notes B840dn B820n FX EMULATION SYMBOL SET PC Set2 D/N Specifies a symbol set. ○ ○ Roman-8 ISO L1 PC-8 PC-8 Dan/Nor PC-850 Legal ISO-2 IRV ISO-4 UK ISO-6 ASC ISO-10 S/F ISO-11 Swe ISO-14 JASC...
- Page 88 Category Item Value Function / Notes B840dn B820n FX EMULATION SYMBOL SET Greek-437 ○ ○ Greek-437 Cy Greek-737 Greek-928 Serbo Croat2 Ukrainian Bulgarian PC-1004 Win 3.1 Blt PC-775 Serbo Croat1 PC-858 Roman-9 ISO L9 LETTER O STYLE ENABLE Specifies the style that replacesφ(9B) and ¥ (9D) ○...
- Page 89 Category Item Value Function / Notes B840dn B820n PARALLEL I-PRIME 3 MICRO SEC Sets time to enable/disable the I-PRIME signal. ○ ○ MENU 50 MICRO SEC DISABLE OFFLINE ENABLE Sets Enable/Disable of a function that keeps receive- ○ possible state without changing an I/F signal even though...
- Page 90 Category Item Value Function / Notes B840dn B820n NETWORK SNMP ENABLE Sets SNMP of FTP. ○ ○ "ENABLE" is selected in "TCP/IP" or "NETWARE". MENU DISABLE NETWORK NORMAL NORMAL: When NORMAL is selected, it can work ○ ○ effectively even when it is connected to HUB...
- Page 91 Category Item Value Function / Notes B840dn B820n SYS ADJUST DUPLEX Y 0.00MILLIMETER At the time of back page printing of Duplex, adjusts the position ○ ○ of a whole print image in the direction paper runs, that is MENU ADJUST +0.25MILLIMETER...
- Page 92 Category Item Value Function / Notes B840dn B820n MAINTENANCE BG SETTING When the paper has a slight stains, adjust the settings. ○ ○ MENU USAGE MENU TRAY 1 PAGE nnnnnn Displays the total number of pages printed from Tray 1.
-
Page 93: Print Statistics
PRINT STATISTICS Sets whether to print the statistics result and remove the counter used during the printing, etc. Make settings on the operation panel of printer. Method of change ❶ Turn off the printer ( ○ ). ❷ Push Button and Power Switch ON(|). After displayed [PRINT STATISTICS], detach from the button. -
Page 94: Admin Menu
ADMIN MENU Each item in User Menu can be set as ENABLE/DISABLE, etc. Disabled items are not displayed in User Menu. Only the administrator can use this function. Memo Disabled items are also printed during the MENU MAP print. Make settings on the operation panel of printer. Method of change ❶... - Page 95 Category Item Value Function / Notes OP MENU NETWORK ENABLE Sets VALID/INVALID of NETWORK MENU category. MENU DISABLE MEMORY MENU ENABLE Sets VALID/INVALID of MEMORY MENU category. DISABLE SYS ADJUST ENABLE Sets VALID/INVALID of SYSTEM ADJUSTMENT MENU category. MENU DISABLE MAINTENANCE ENABLE Sets VALID/INVALID of MAINTENANCE MENU category.
- Page 96 Sets the proportion relative to overall SD size by 1%. COMMON/ lll%(B840dn) Default value for B840dn is 20%(PCL)/ 50%(COMMON)/ 30%(PS), and 20%(PCL)/79%(COMMON)/1%(PS) for B820n. This item appears only when SD is installed. Format for the specified partition. Operates the menu, and then restart the printer.
- Page 97 Category Item Value Function / Notes PS MENU L1 TRAY TYPE1 The tray selection number of level 1 operator for TYPE1 setting from 1 TYPE2 is valid and from 0 for TYPE2 setting. Only B840dn. SIDM MENU SIDM MANUAL Sets # specified in MANUAL by MANUAL-1 ID No.FX/PPR Emu in CSF control command.
- Page 98 [Memo]...
-
Page 99: Chapter 3 Maintenance
Chapter 3 Maintenance Replacing the Toner Cartridge …………………………………………………………………100 Toner Cartridge Replacement Indications …………………………………………100 Types of Toner Cartridges and Numbers of Pages that Can be Printed with Them ……………………………………………101 Replacing the Toner Cartridge ……………………………………………………………102 Replacing the Image Drum ………………………………………………………………………104 Image drum replacement standard……………………………………………………105 Replace the image drum ……………………………………………………………………105 Cleaning the Printer …………………………………………………………………………………108 Cleaning the surface of the printer ……………………………………………………108... -
Page 100: Replacing The Toner
Replacing the Toner Cartridge • Do not throw the toner • Keep the toner cartridge • Do not use electric cartridge into fire; from flame; it ignites vacuum cleaners to toner flies and burn and burn injury may vacuum off spilled injury may result. -
Page 101: Types Of Toner Cartridges And Numbers Of Pages That Can Be Printed With Them
Even during the warranty period, Oki Data with charge deals with troubles that may arise with use of a non genuine Oki Data original consumable (although not all non genuine Oki Data original consumables cause a trouble when used for the product, note this enough in use of them). -
Page 102: Replacing The Toner Cartridge
Replacing the Toner Cartridge Install a new toner cartridge. ❶ Open the top cover and remove the Unpack the new toner cartridge. toner cartridge. ❷ Hold the toner cartridge at both ends to gently shake it for several times. ❶ Rotate the blue release lever in the direction of the arrow until it stops. - Page 103 Lightly wipe the whole LED head with a soft cloth or soft tissue paper. Do not use solvents, such as methyl alcohol or Note! thinners. They damage the LED head. LED head Close the top cover. When "CHECK IMAGE DRUM/543:TONER SENSOR Note! ERROR"...
-
Page 104: Replacing The Image Drum
Replacing the Image Drum • Do not throw the toner • Keep the toner cartridge • Do not use electric cartridge or toner into from flame; it ignites vacuum cleaners to fire; toner flies and and burn injury may vacuum off spilled burn injury may result. -
Page 105: Image Drum Replacement Standard
[IMAGE DRUM LIFE] is displayed, depending on the condition of usage. • Use genuine Oki Data original consumables to ensure optimum performance of the product. • When using a non genuine Oki Data original consumable, the product may not deliver its optimum performance, and print quality may decline. - Page 106 Prepare a new image drum. Install the new toner cartridge to the drum. • Do not tilt the image drum; toner may spill. You can install a used toner cartridge. It is recommended a Note! Note! • The image drum (the green tube) is very delicate. new toner cartridge used under the following conditions.
- Page 107 Install the image drum to the printer. Align both guide posts of the drum with their guide grooves on the printer, and gently put the drum into the printer. Guide Post Guide Post Guide Grooves Close the top cover. When "CHECK IMAGE DRUM / 543:TONER SENSOR Note! ERROR"...
-
Page 108: Cleaning The Printer
Cleaning the Printer Cleaning the surface of the printer Cleaning the feed rollers Cleaning the surface of the printer. Clean the feed rollers when paper jams fre�uently occur. Wipe the surface of the printer When Using Tray 1, Tray 2 (Option) or Tray with a cloth wrung out with water 3 (Option) or neutral detergent. -
Page 109: The Printer
When Using Multi-purpose Tray Wipe the separator roller for the paper cassette with a cloth Turn off the printer (O). wrung out with water. • Use nothing except water. Refer to Turning Off the Printer (page 20) to turn off Memo Note! •... - Page 110 [Memo]...
-
Page 111: Chapter 4 Troubleshooting
Chapter 4 Troubleshooting Canceling Printing ……………………………………………………………………………………112 Canceling printing from the operator panel ………………………………………112 Canceling printing from a computer …………………………………………………112 When Paper Jams ………………………………………………………………………………………114 Paper jams in the front cover area (error codes:372, 380, 390, 391, 400) ……………………………………………115 Paper jams at the paper exit (error code: 382) ………………………………116 Paper jams inside the printer (error codes: 381, 382, 383, 385 and 389) ………………………………………116 Paper jams in the duplex unit (error codes: 370, 371 and 373) ……119... -
Page 112: Canceling Printing
Canceling printing from a computer For those using Windows ■ ■ Canceling printing using a printer icon Canceling printing using the OKI LPR Utility ❶ ❶ Select [Start] - [Devices and Printers] and Select [Start] - [All Programs] - [Okidata] - [OKI LPR Utility] - [OKI LPR Utility]. - Page 113 For those using Mac OS X ❶ Select [Apple menu] - [System Preferences]. ❷ Click [Print & Scan]. ❸ Double-click the printer name. ❹ Click on the job you want to delete and click [x]. Canceling Printing...
-
Page 114: When Paper Jams
When Paper Jams Never disassemble the printer. Disassembly of the printer may cause serious problems, such as smoke emission, and could result in an electric shock. When a paper jams in the printer, an error code and either the [PAPER JAM] or [PAPER SIZE ERROR] message appear on the second line of the operator panel. -
Page 115: Paper Jams In The Front Cover Area
Paper jams in the front cover area When you can not see the top edge of the jammed paper (error codes:372, 380, 390, 391, 400) ❶ Open the multi-purpose tray. Front cover Multi-purpose Tray ❹ Close the front cover. ❷ Push the blue handle, located in the center, upward and open the front cover. -
Page 116: Paper Jams At The Paper Exit (Error Code: 382)
Paper jams at the paper exit Paper jams inside the printer (error code: 382) (error codes: 381, 382, 383, 385 and 389) ❶ ❶ Press the OPEN button to open the top cover. Press the OPEN button to open the top cover. - Page 117 ❹ Cover the toner cartridge with black paper. When you can see neither of the top edge nor bottom edge of the jammed Top Cover paper Toner Cartridge Move the jammed paper in the direction of the arrow and then pull it out slowly. Black Paper Paper ❺...
- Page 118 ❻ When the jammed paper winds Pull the (two) blue jam release levers forward. around the transfer roller Push (one blue) lock lever in the direction of the arrow. Fuser Unit Lock Lever (Blue) Fuser Unit Jam Release Lever (Blue) ❼...
-
Page 119: Paper Jams In The Duplex Unit (Error Codes: 370, 371 And 373)
❹ Paper jams in the duplex unit Keep the duplex unit lifted and pull the jammed paper, check the duplex unit for (error codes: 370, 371 and 373) remaining jammed paper. ❶ Pinch and lift the jam release lever of the duplex unit to open the duplex unit cover. -
Page 120: Paper Jams In Tray2/Tray3 (Error Codes: 392, 393)
❹ Paper jams in tray2/tray3 When a paper jam occurs, turn the blue dial in the direction of the arrow, and slowly pull (error codes: 392, 393) out the jammed paper. ❶ Pull out the paper cassette of tray2/tray3. Blue Dial Remove the jammed paper. -
Page 121: Unable To Print
Contact the network administrator. and the computer. The printer state in the OKI LPR Utility shows Select the printer using the OKI LPR Utility and remove the [Pause]. checkmark from [Pause] in the [Remote Print] menu. (User’s Manual - Advanced) - Page 122 Printing speed is slow. Printing process is performed in the computer Use a computer with faster processing speed. as well. [High Quality] is selected for [Quality] or [Print Specify [Normal] for [Quality] or [Print Quality] in the printer Quality] in the printer driver. driver.
-
Page 123: Print Quality Problems
Print Quality Problems Vertical white lines appear on printed pages. The LED head is dirty. Wipe the LED head with soft tissue paper. (Page 108) The toner is low. Take a shock to toner cartridge. If it cannot clear the problem, replace the toner cartridge. - Page 124 Printed images area partially faded. White spots and lines appear in solid printing. The paper is too moist or drying. Use paper stored in proper temperature and humidity conditions. (Page The setting of [PAPER BLACK SET] is Change the value of [PAPER BLACK SET] in [MAINTENANCE incorrect.
- Page 125 The whole area of postcards and envelopes is lightly stained when printed. The periphery of characters gets stained when rubbed. Toner may lightly stain (fogging) to This is not a malfunction of the printer. the whole area of postcards and envelopes.
-
Page 126: Paper Feed Problems
Paper Feed Problems Paper jams frequently. Multiple sheets of paper are fed at a time. Paper is fed at an angle. The printer is tilted. Place the printer on a stable flat surface. (Page Paper is too thin or too thick. Use paper suitable for the printer. -
Page 127: Displaying Error Messages
List of messages with error codes ○ : The message is displayed. — : The message is not displayed. Error code Message Cause/Remedy B840dn B820n COVER OPEN The top cover is open. Close it. ○ ○ COVER OPEN The front cover is open. Close it. - Page 128 Error code Message Cause/Remedy B840dn B820n PAPER JAM Paper has jammed. Remove the jammed paper. (Page ○ ○ 114) PAPER JAM Paper has jammed. Remove the jammed paper. (Page ○ ○ 114) PAPER JAM Paper has jammed. Remove the jammed paper.
- Page 129 POSITION toner cartridge lever (rotation) position. (Page 102) NON GENUINE TONER The toner cartridge is not a genuine OKI product. Install a ○ ○ proper toner cartridge. TONER REGIONAL MISMATCH The toner cartridge is not a genuine OKI product. Install a ○...
-
Page 130: List Of Messages Displayed In English
No toner cartridge is installed. Install a toner cartridge. ○ ○ (Page 102) TONER REGIONAL MISMATCH The toner cartridge is not a genuine OKI product. Install a ○ ○ proper toner cartridge. NON GENUINE TONER The toner cartridge is not a genuine OKI product. Install a ○... - Page 131 Message Cause/Remedy B840dn B820n FILE ERASING A secret file is being deleted. ○ ○ FILE SYSTEM USE FAILED A file system error has occurred. ○ ○ The set of letters "nn" is a number and represents error details. Pressing the ON LINE button to clear this message.
-
Page 132: Restrictions On Windows
On Internet Explorer, open [Pop-up Blocker Settings] from the [Tools] menu blocked. and type the printer’s IP address under [Address of Web site to allow] to add. ※ For further information, visit the OKI Data web site (http://www.okiprintingsolutions.com). Restrictions on Windows 7/Windows Vista/Windows Server 2008 R2/Windows Server 2008 Applicable utilities... -
Page 133: Appendix
Appendix List of Consumables and Options ……………………………………………………………134 Specifications ……………………………………………………………………………………………135 Key Specifications ………………………………………………………………………………135 Outline Size (Approximate Value) ………………………………………………………137 Software License Agreement ……………………………………………………………………138 IMPORTANT …………………………………………………………………………………………138... -
Page 134: List Of Consumables And Options
Warranty doesn’t apply if the troubles arise with use of a non genuine Oki Data original consumable. You need to pay for repairs even during the warranty period. (Although not all non genuine Oki Data original consumables cause a trouble when used for the product.) -
Page 135: Specifications
Specifications Key Specifications B840dn-N21301B Printing method Dry electrophotographic recording method with LED (Light-emitting diode) Resolution 1200×1200/600×600 dot/inch Printing color Black PowerPC RAM capacity 128MB(Max 640MB) Supported OS Windows 8.1/Windows Server 2012 R2/Windows 8/Windows Server 2012/Windows 7/Windows Server 2008 R2/Windows Vista/Windows Server 2008/Windows XP/Windows Server 2003, Mac OS X 10.6.8 10.9 ~... - Page 136 B820n-N21300B Printing method Dry electrophotographic recording method with LED (Light-emitting diode) Resolution 600×600 / 600×1200 / 600×2400 dot/inch Printing color Black PowerPC RAM capacity 128MB(Max. 640MB) Supported OS Windows 8.1/Windows Server 2012 R2/Windows 8/Windows Server 2012/Windows 7/Windows Server 2008 R2/Windows Vista/Windows Server 2008/Windows XP/Windows Server 2003, Mac OS X 10.6.8 10.9...
-
Page 137: Outline Size (Approximate Value)
Outline Size (Approximate Value) Top View 485mm 491mm Side View 928mm 297mm 450mm 181mm 373mm 445mm 263mm 595mm When installed with the second/third tray unit (optional) 644mm 522mm 671mm 149mm 149mm 595mm The Second/Third Tray Unit (Optional) Specifications... -
Page 138: Software License Agreement
Software License Agreement IMPORTANT If you do not agree to the terms of this Software License Agreement, you may not use this software. Please read this Agreement carefully before using the software and accompanying documentation contained in the DVD-ROM as mentioned below (hereinafter "Licensed Software"). By installing the Licensed Software, you are indicating your acceptance of these terms and conditions and this Agreement is deemed effective between Licensor and you (hereinafter "Licensee"). - Page 139 "Software" in this section is deemed to be the Licensed Software defined in this Agreement. * Use of Adobe Reader Adobe Reader contained in this DVD-ROM is distributed by Oki Data Corporation under the license between Oki Data Corporation and Adobe Systems Incorporated. By accepting the software license agreement contained in Adobe Reader, Licensee will be granted to use of Adobe Reader by Adobe Systems Incorporated.
- Page 140 [Memo]...
-
Page 141: Index
Index... - Page 142 Index ADMIN MENU ............94 Replacing Image Drum .............104 Bonjour ............. 42, 43, 50 Size ..............137 Sleep mode ............82 Specifications ............135 Canceling ............112 System Requirements ..........36 Consumables ............134 Toner Cartridge ........15, 100, 101, 134 Duplex Print ............119 Troubleshooting ............111 Error ............
-
Page 143: Oki Contact Details
Oki Contact Details... - Page 144 8 Antares Place Mairangi Bay, Auckland 0632, New Zealand Tel:(64) 9 477 0500 Fax:(64) 9 477 0549 http://www.comworth.co.nz Oki Data(S) P Ltd. Malaysia Rep Office Suite 21.03, 21st Floor Menara IGB, Mid Valley City, Lingkaran Syed Pura 59200, Kuala Lumpur, Malaysia...
- Page 145 Oki Data Corporation 4-11-22 Shibaura, Minato-ku,Tokyo 108-8551, Japan www.okiprintingsolutions.com 44824401EE Rev3...
Need help?
Do you have a question about the B820N and is the answer not in the manual?
Questions and answers