Table of Contents

Related Manuals for Matrox Extio 3 Series


Summary of Contents for Matrox Extio 3 Series
- Page 1 ENGLISH ® ™ Matrox Extio 3 Series N3408 Transmitter card • N3408 Transmitter unit • N3408 Receiver unit N3208 Transmitter card • N3208 Transmitter unit • N3208 Receiver unit User Guide 20266-301-0340 2022.10.05 www.matrox.com/video...
-
Page 2: Table Of Contents
Make adjustments when necessary .......................25 File structure and syntax for Swanctl.json ....................26 File structure for the VPN configuration file (strongswan.zip) ............26 Installing your Extio 3 transmitter card ..............28 Before you begin ............................28 Step-by-step installation ........................29 Matrox Extio 3 Series – User Guide... - Page 3 Obtaining the Matrox Extio 3 firmware updater package ..............47 Updating your Matrox Extio 3 firmware (Networked-LAN mode) ..........48 Updating your Matrox Extio 3 firmware (Networked-Internet / WAN with Site-to-Site VPN and Networked-Internet with IPSec VPN modes) ..................52 Updating your Matrox Extio 3 firmware (Point-to-Point mode) ............52 Setting up Point-to-Point mode ................
- Page 4 Aggregator mode ...........................68 Touch-screen monitors ..........................71 Setting up networked mode (Internet with IPSec VPN) ........74 Before you begin ............................74 Installing Matrox Extio Central Manager software ................75 Accessing the OSD (On-Screen Display) ....................76 Using the OSD (On-Screen Display) ....................76 Sources ..............................77 Receiver information ..........................79...
- Page 5 The “connections” section ........................108 The “secrets” sections ..........................111 Customer support ....................112 Matrox web ............................112 Technical support ..........................112 View your warranty information ......................112 View the third party software notices ....................112 Register your Matrox product ......................113 Matrox Extio 3 Series – User Guide...
-
Page 6: Matrox Safety Information
Always turn off your computer, unplug it, and then wait for it to cool before removing the cover of your computer to touch any of its internal parts or to install your Matrox card. Allow hot surfaces to cool before touching your Matrox unit. -
Page 7: If A Power Supply (Internal Or External) Was Included With Your Product
Only use power supplies originally supplied with the product or use a replacement that’s approved by Matrox. Don’t use the power supply if it appears to be defective or has a damaged chassis. Any AC-powered product must be connected to a grounded outlet installed by a licensed ... -
Page 8: Repair
Don’t attempt to open or repair a power supply unit (if one was supplied). Don’t attempt to open or repair your Matrox product. If there’s a fault with your Matrox product, review your Matrox warranty for more information. Matrox Extio 3 Series – User Guide... -
Page 9: Overview
WAN with Site-to-Site VPN)”, page Manager software”, page * The hardware supplied with your Matrox product may vary depending on the SKU or part number of your product. For more information, contact your Matrox representative. Matrox Extio 3 Series – User Guide... -
Page 10: Hardware Required (Sold Separately)
* Shielded DisplayPort™ 1.2 cable is required for 4K60 resolutions. † To purchase a multi-mode fiber optic transceiver (part number XTO3-SFPMM) or single-mode fiber optic transceiver (part number XTO3-SFPSM) for your Matrox product, contact your Matrox representative. ‡ Not recommended for 4K60 resolutions. -
Page 11: Mounting Kits
For information on how to use and configure Extio Central Manager software, see the Matrox Extio Central Manager User Guide. Be sure to check for any last-minute release notes included with your product. Also, check the Matrox web site (www.matrox.com/video) for the latest Matrox software, technical support, and product information. -
Page 12: Getting Started
“Connecting your Extio 3 devices”, page Validate your setup – see “Description of LEDs”, page Update your firmware – see “Updating your Extio 3 firmware”, page Validate your network discovery – see “Validating network discovery”, page 12 Matrox Extio 3 Series – User Guide... - Page 13 Manager software”, page Configure your Extio devices through Extio Central Manager software – For more information on using Extio Central Manager software, see the Matrox Extio Central Manager User Guide. Log into your receiver and switch to different transmitters (OSD) –...
- Page 14 Networked-Enable Internet / WAN with Site-to-Site VPN Select the screen. operation mode Set a value for Network congestion control Transmitter Settings Streaming The values are , and High 14 Matrox Extio 3 Series – User Guide...
- Page 15 Windows host configuration. Do the following to operate your Extio 3 units over internet with IPSec VPN: Install your card – see “Installing your Extio 3 transmitter card”, page Matrox Extio 3 Series – User Guide 15...
-
Page 16: Link Redundancy
For more Transmitter discovery information on using the Extio Central Manager software, see the Matrox Extio Central Manager User Guide. Log into your receiver and switch to different transmitters (OSD) – see “Using the OSD (On-Screen Display)”, page... - Page 17 From the OSD login screen, click the button found at the bottom. Keyboard settings Select the keyboard language from the drop-down list. Keyboard Enter text in the field to verify your selection if necessary. Test keyboard Click Close Matrox Extio 3 Series – User Guide 17...
-
Page 18: Changing The Osd Language
Matrox Extio Central Manager software ( option in the Default OSD language settings page). To change to your preferred language: From the OSD login screen, click the button found at Language and Keyboard settings the bottom. 18 Matrox Extio 3 Series – User Guide... -
Page 19: Using Osd Command Shortcuts
Language Click Close Note: The language you change to will override the default language set in Matrox Extio Central Manager. When you make the change, it takes effect immediately (there is no need to reboot or restart the device). Only the last change made is retained. You cannot have user-specific language settings. For example, once you log out, the next user to log in will see the OSD interface in the language you changed it to. -
Page 20: Vpn Configuration
Generate the VPN configuration file (network administrator) Matrox Extio 3 uses Strongswan 5.8.4 IPsec VPN in tunnel mode. The network administrator must do the following: Generate a swanctl file for Strongswan 5.8.4. in the JSON format (2.1) and name it . -
Page 21: Import The Vpn Configuration File And Connect To Vpn (Remote User)
A new screen appears showing with IPSec VPN the details of the VPN (for example, : Not configured; Configuration Connection Disconnected) and the option to import the file. Import file from USB Strongswan.zip Matrox Extio 3 Series – User Guide 21... - Page 22 “Configuration successfully imported from mass storage. VPN configuration successfully applied on the device.”. Click on the confirmation screen. The buttons are Close Get logs VPN connect enabled at the bottom of the screen. 22 Matrox Extio 3 Series – User Guide...
- Page 23 Advanced VPN set up you need to contact your network administrator who will proceed to the next step of the configuration, which is detecting and configuring the devices from the Extio Central Manager software. Matrox Extio 3 Series – User Guide 23...
-
Page 24: Configure The Units (Network Administrator)
The following settings need to be done on the receiver and transmitter units. On the receiver: Fast switch should be enabled (in Extio Central Manager Connection broker corresponding row/column of the transmitter/receiver 24 Matrox Extio 3 Series – User Guide... -
Page 25: Troubleshoot
You must reboot the device for the change to become effective. Using the displayed in the OSD tab, the device local address can Physical address (MAC) Receiver be changed from the router. Matrox Extio 3 Series – User Guide 25... -
Page 26: File Structure And Syntax For Swanctl.json
--> Optional, copied recursively to /etc/swanctl/private strongswan.zip/pubkey/ --> Optional, copied recursively to /etc/swanctl/pubkeys strongswan.zip/pkcs12/ --> Optional, copied recursively to /etc/swanctl/pkcs12 The zip file can also have the following structure: strongswan.zip/<folder>/swanctl.json strongswan.zip/<folder>/... 26 Matrox Extio 3 Series – User Guide... - Page 27 (i.e. PKCS#12 generated by "openssl pkcs12 -twopass" are not supported). Certificates in the X.509 format and private keys format must all be PEM or DER encoded. Supported private key formats are RSA, ECDSA, and PKCS#8. Matrox Extio 3 Series – User Guide 27...
-
Page 28: Installing Your Extio 3 Transmitter Card
Installing your Extio 3 transmitter card This section describes how to install your Matrox Extio 3 transmitter card. If your Matrox card is already installed in your system, skip to “Connecting your Extio 3 devices”, page 31. For information specific to your system, like how to remove its cover, see your system manual. -
Page 29: Step-By-Step Installation
Secure the bracket of your Matrox card to the frame of your system. Your Matrox card is now installed. If you’re installing more than one card, see “Installing multiple cards”, page 30. Before restarting your system, connect your devices (see the “Connection setup”... -
Page 30: Installing Multiple Cards
To avoid damaging your cards, always insert your card as straight as possible into the slot. Don’t rock the card from side to side. If you meet resistance, don’t force the card into the slot. 30 Matrox Extio 3 Series – User Guide... -
Page 31: Connecting Your Extio 3 Devices
This section describes the connectors available on your Matrox Extio 3 devices. Before you begin To avoid possible problems that could damage your monitors or prevent you from using your Matrox product, read the following guidelines before connecting your Matrox graphics hardware. - Page 32 DisplayPort 1.2 connector labeled . You can connect only one (1) 4K monitor to your device. * For more information on supported resolutions and video signals, see “Product information”, page 32 Matrox Extio 3 Series – User Guide...
-
Page 33: Extio N3408 Or N3208 Transmitter Card
Description of supported connections Connector Description Connect your mini DisplayPort to DisplayPort cable to your Matrox Mini DisplayPort card. Connect the other end of the cable to your host system. Connect one end of your USB cable to the USB connector on your Mini USB transmitter card. -
Page 34: Extio N3408 Transmitter Or Receiver Unit
Host Connections DisplayPort 1.1 DisplayPort 1.1 DisplayPort 1.1 DisplayPort 1.2 Video In Line Out 12V d.c. 5A (DisplayPort 1.1) power Video In LAN1 USB 2.0 (DisplayPort 1.2) (RJ45) LAN2 LAN2 (RJ45) (LC-LC) 34 Matrox Extio 3 Series – User Guide... - Page 35 Connect a digital monitor to this connector. Video Out Connect your headphones to this connector. This connector Headphone supports a 3.5 mm stereo jack. While headphones are connected, the connector remains enabled. Line Out Matrox Extio 3 Series – User Guide 35...
-
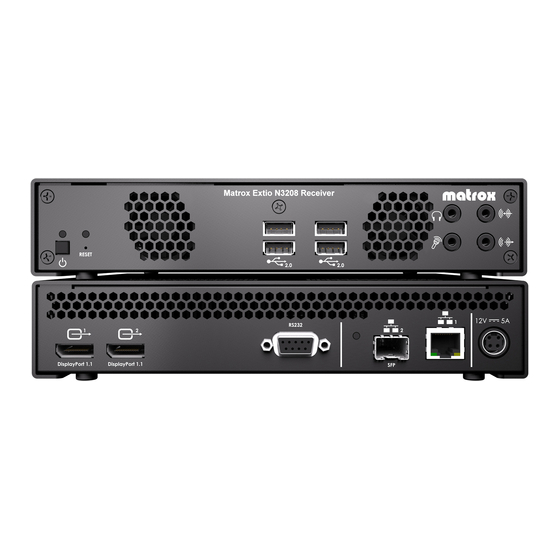
Page 36: Extio N3208 Transmitter Or Receiver Unit
USB connectors on a transmitter device. Extio N3208 transmitter or receiver unit Extio N3208 transmitter unit (Front) Video Out USB 2.0 (DisplayPort 1.1) 36 Matrox Extio 3 Series – User Guide... - Page 37 Line In Line Out USB 2.0 Microphone Extio N3208 receiver unit (Back) RS232 DisplayPort 1.1 DisplayPort 1.1 Video Out RS232 12V d.c. 5A (DisplayPort 1.1) power LAN2 LAN1 (RJ45) (RJ45) LAN2 LC-LC Matrox Extio 3 Series – User Guide 37...
- Page 38 USB 2.0 Manager Transmitter settings More options Local console), only keyboard and mouse can be connected to the front USB connectors on a transmitter device. 38 Matrox Extio 3 Series – User Guide...
-
Page 39: Installing The Sfp Module
A properly installed SFP module is securely locked in its housing. Forcing the SFP module out of its housing without unlocking it may damage your SFP module, the housing, or your Matrox product. Matrox Extio 3 Series – User Guide 39... - Page 40 To remove the SFP module: Pull the latch handle down to unlock the SFP module from its housing. Grasp the SFP module by the side walls and carefully pull the module out of the housing. 40 Matrox Extio 3 Series – User Guide...
-
Page 41: Setting Up Link Redundancy
Make sure your Extio 3 units are all on the same subnet. Connect each Extio 3 transmitter and receiver unit to a managed network switch pair. Make sure to connect to network switch 1 and connect to network switch 2. LAN1 LAN2 Matrox Extio 3 Series – User Guide 41... -
Page 42: Enabling Link Redundancy
click , and then enable the option. For more Network Enable link redundancy information, see your Matrox Extio Central Manager User Guide. Point-to-Point mode – In the OSD, click , and then enable the More options Enable option (see “Input and output information”, page... -
Page 43: Description Of Leds
LED is still fast blink red, contact your Red (fast blink) vendor for technical support (see “Customer support”, page 112). For more information on rebooting your Extio 3 device, “Rebooting or resetting your Extio 3 device”, page Matrox Extio 3 Series – User Guide 43... - Page 44 Also, make sure your system isn’t in power saving mode (see “Connecting Black (no LED) — your Extio 3 devices”, page 31). For more information, contact your vendor (see “Customer support”, page 112). 44 Matrox Extio 3 Series – User Guide...
-
Page 45: Network Leds
(Left LED) (Right LED) No LED (black) No activity detected. Transmitting at 1 Gbps. Green (solid) — — Green (fast blink) Network activity detected. — Amber (solid) — Transmitting at 100 Mbps. Matrox Extio 3 Series – User Guide 45... - Page 46 Error establishing communication. Verify all network connections, then reboot your Extio 3 devices. For more information on rebooting Red (solid) your Extio 3 device, see “Rebooting or resetting your Extio 3 device”, page 46 Matrox Extio 3 Series – User Guide...
-
Page 47: Updating Your Extio 3 Firmware
Updating your Extio 3 firmware The Matrox Extio 3 Firmware enables you to update the firmware of your Matrox Extio 3 products. Note: Your Matrox Extio 3 product may ship with an older firmware version. Before using your Extio 3 product, you must update the firmware version installed on your devices to use the version of your deployed release. -
Page 48: Updating Your Matrox Extio 3 Firmware (Networked-Lan Mode)
Updating your Matrox Extio 3 firmware (Networked-LAN mode) Note: If you’re using Networked-LAN mode, make sure the version of your firmware package matches the version of the Matrox Extio Central Manager software package installed on your controller system. Download and extract the firmware package Download the latest firmware package and extract the files to a local folder on your system (for example, C:\Extio3FirmwareUpdate). - Page 49 Authenticate the devices found If you provided a password for your Extio 3 Series devices, you may be prompted to authenticate the devices found. If you’re prompted, enter your credentials for the Extio 3 Series devices found: Local user – Enter your user name and password.
- Page 50 This certificate file must contain the following elements: A certificate to identify the device. This certificate will be used by the 802.1X authentication server to authenticate the device. The private key associated with the device certificate. 50 Matrox Extio 3 Series – User Guide...
- Page 51 When the certificate is deployed properly, in the page of the receiver’s More options settings in the Matrox Extio Central Manager application, the section System logging displays where you can set your preferred level of information to be included in the log files.
-
Page 52: Updating Your Matrox Extio 3 Firmware (Networked-Internet / Wan With Site-To-Site Vpn And Networked-Internet With Ipsec Vpn Modes)
Extio 3 transmitter unit. On certain systems, the Group Policy Object (GPO) may prevent the Updaterfromhost.exe file from installing the USB mass storage device. To allow the installation of this Matrox device, you may need to apply an exception to your GPO rules (for example, by adding USBSTOR\DiskMatrox__Virtual_Storage_1.00). - Page 53 Make sure the devices you want to update are listed in the program window. Devices that require an update are listed with a green status bar. Click to update your devices. Wait while the devices are being updated (up to 20 Update minutes). Matrox Extio 3 Series – User Guide 53...
-
Page 54: Setting Up Point-To-Point Mode
Setting up Point-to-Point mode Matrox Extio 3 transmitters and receivers can be configured as point-to-point extenders. In Point-to-Point mode, Extio 3 transmitter and receiver devices are directly linked to each other using copper or fiber optic cable. Before you begin ... -
Page 55: Accessing The Osd (On-Screen Display)
Click this to wake up your transmitter if it turns off. Refresh connection Click this if the connection between your receiver and transmitter devices is lost. Wait while your connection is refreshed. Close Click this to close the OSD. Matrox Extio 3 Series – User Guide 55... -
Page 56: Sources
Provides information (such as the model, serial number, firmware package version, and the minimum, current, and maximum internal temperature) on your Extio 3 device, and provides the connection status and IP address of the device (connected through 56 Matrox Extio 3 Series – User Guide... -
Page 57: Receiver Settings And Information
Optimize video mode Enable this to make sure the video parameters and EDID of compatibility with monitors your monitors are optimized for maximum compatibility with your device. This option is enabled by default. Matrox Extio 3 Series – User Guide 57... - Page 58 Assign a keyboard shortcut for accessing the on-screen display (OSD). More options Enable local console on the Select this to allow connecting monitor, keyboard, and mouse transmitter to the front USB of your transmitter device. 58 Matrox Extio 3 Series – User Guide...
- Page 59 USB mass storage list as the location where you want to save the log files. inventory Click . The zip files of the logs are created in the root folder of the USB device. Matrox Extio 3 Series – User Guide 59...
- Page 60 USB mass storage list as the location where you want to save the log files. inventory Click . The zip files of the information are created in the root folder of the USB device. 60 Matrox Extio 3 Series – User Guide...
-
Page 61: Setting Up Networked Mode (Lan Or Internet / Wan With Site-To-Site Vpn)
Setting up networked mode (LAN or Internet / WAN with Site-to-Site VPN) Your Matrox Extio 3 product is an IP KVM extender. In networked mode, the Extio 3 transmitter and receiver devices operate over an IP network. In Networked-LAN mode, Extio 3 devices operate over a copper-based or fiber-based Gigabit Ethernet network. -
Page 62: Validating Network Discovery
Extio 3 devices. Supported operating systems Matrox Extio Central Manager supports the following operating systems: Windows® Server® 2022, Windows® Server® 2019, Windows® 11 (64-bit), Windows® 10 (64-bit), and Windows® 7 (64-bit). 62 Matrox Extio 3 Series – User Guide... -
Page 63: Accessing The Osd (On-Screen Display)
Configuring Extio Central Manager software Before you can access and use the OSD, your Extio Central Manager software must be configured. For information on how to use and configure Extio Central Manager software, see the Matrox Extio Central Manager User Guide. -
Page 64: Using The Osd (On-Screen Display)
Click this to discover devices outside of the receiver’s subnet or unicast network. Disconnect Click this to disconnect from a transmitter. Connect Click this to connect to a new transmitter. Close Click this to close the OSD. 64 Matrox Extio 3 Series – User Guide... -
Page 65: Sources
) you want to switch to. Sources Click Connect Note: You can also use the assigned keyboard shortcut that displays in the list to Sources switch to the transmitter or aggregated layout. Matrox Extio 3 Series – User Guide 65... - Page 66 Provides information (such as the model, serial number, firmware package version, and the minimum, current, and maximum internal temperature) on your Extio 3 device and the connection status and IP address of the device (connected through LAN1 LAN2 66 Matrox Extio 3 Series – User Guide...
-
Page 67: Receiver Information
These can be changed in the Extio Central Manager. Inputs and outputs View the connection information of the devices ( , and ) connected to the Monitor Microphone Line In selected transmitter. Matrox Extio 3 Series – User Guide 67... -
Page 68: Aggregator Mode
(for Line In Line In example, from the transmitter on monitor 1, 2, 3, or 4), or if you want Line In Line to follow the mouse position. 68 Matrox Extio 3 Series – User Guide... - Page 69 Operating system - Certain limitations may occur. For more information on operating system compatibility with aggregator mode, see the Matrox Extio 3 Series Release Notes. Switching between dynamic sources You can change the dynamic source as frequently as you like.
- Page 70 Extio Central Manager software. For more information on keyboard shortcuts, see your Matrox Extio Central Manager User Guide. In the search box, type the source and input name if you know it, and press [Enter] to filter.
-
Page 71: Touch-Screen Monitors
Log into the receiver. If new digitizer USB devices are found, or if a new digitizer USB device is inserted while the receiver is already in operation, the OSD appears with a prompt asking if you would like to start performing the touch-screen matching configuration. Matrox Extio 3 Series – User Guide 71... - Page 72 USB device is changed to a different USB port. In this case, you have to do the matching procedure again. Note: The matching procedure can also be done at any time by using the Touch screen button in the section under monitor identification Monitors Receiver Settings 72 Matrox Extio 3 Series – User Guide...
- Page 73 If the touch screen doesn’t work properly after monitor identification, you have to go to the Control panel of the operating system and set up through Tablet PC Settings. Matrox Extio 3 Series – User Guide 73...
-
Page 74: Setting Up Networked Mode (Internet With Ipsec Vpn)
Setting up networked mode (Internet with IPSec VPN) Your Matrox Extio 3 over Internet allows multiple users, from different locations, to securely access and control the same system and collaborate on the same tasks. In Networked-Internet with IPSec VPN mode, an Extio 3 device is ensured a safe connection via an IPSec VPN client that allows the communication to be private and offers multi-factor authentication. -
Page 75: Installing Matrox Extio Central Manager Software
Windows® Server® 2019, Windows® 11 (64-bit), Windows® 10 (64-bit), and Windows® 7 (64-bit). Obtaining Matrox Extio Central Manager software To obtain the latest Extio Central Manager software, contact your Matrox representative. Matrox makes the latest Extio Central Manager software available on the Matrox web site (www.matrox.com/extio3/software). -
Page 76: Accessing The Osd (On-Screen Display)
Configuring Extio Central Manager software Before you can access and use the OSD, your Extio Central Manager software must be configured. For information on how to use and configure Extio Central Manager software, see the Matrox Extio Central Manager User Guide. -
Page 77: Sources
Sources be set between your Extio transmitter and receiver devices. For more information, see your Matrox Extio Central Manager User Guide. To view information on a transmitter, select a transmitter under Sources Matrox Extio 3 Series – User Guide 77... - Page 78 Provides information (such as the model, serial number, firmware package version, and the minimum, current, and maximum internal temperature) on your Extio 3 device and the connection status and IP address of the device (connected through LAN1 LAN2 78 Matrox Extio 3 Series – User Guide...
-
Page 79: Receiver Information
(for example, 1, 2, 3, or 4) in your monitor layout. The default keyboard shortcuts are shown. These can be changed in the Extio Central Manager. Matrox Extio 3 Series – User Guide 79... -
Page 80: Vpn Information
Extio 3 device and the connection status and IP address of the device (connected through LAN1 LAN2 VPN information View and modify the settings for your VPN. 80 Matrox Extio 3 Series – User Guide... -
Page 81: Aggregator Mode In Networked-Internet With Ipsec Vpn
The user operations in aggregator mode are similar whether the user is connected in Networked-LAN, Networked-Internet / WAN with Site-to-Site VPN, or Networked-Internet with IPSec VPN mode. For more information, see “Aggregator mode”, page Matrox Extio 3 Series – User Guide 81... -
Page 82: Rebooting Or Resetting Your Extio 3 Device
From the Extio Central Manager main interface, select your device then click the button to reboot your device. Reboot For more information on Extio Central Manager software, see your Extio Central Manager user guide. 82 Matrox Extio 3 Series – User Guide... -
Page 83: Hardware Reboot Or Configuration Reset
Hardware reboot – Press and hold the button on your device with the tip of a Reset paper clip for less than 2 seconds (until the LED turns slow blinking green) to reboot your device. Matrox Extio 3 Series – User Guide 83... - Page 84 Configuration reset – Press and hold the button on your device with the tip of a Reset paper clip for 4-5 seconds (until the LED turns fast blinking green) to reboot your device and restore the default settings. 84 Matrox Extio 3 Series – User Guide...
-
Page 85: Changing The Operation Mode Of Your Devices
Networked-LAN or Networked-Internet / WAN with Site-to-Site VPN mode to Networked-Internet with IPSec VPN mode, or vice versa), you need to do the following: Disconnect the network cables from your Matrox transmitter device and receiver device (see “Connecting your Extio 3 devices”, page 31). - Page 86 Replace the copper cables with fiber optic cables. Switch the power on. 86 Matrox Extio 3 Series – User Guide...
-
Page 87: Troubleshooting
If your problem persists, contact Matrox. For more information, see “Customer support”, page 112. Common problems and solutions This section addresses specific problems to your Matrox product that could prevent you from using your system or product. Problem After changing operation mode, Extio 3 device doesn’t work Cause Your Extio device may be trying to use settings that no longer exist. - Page 88 Your video output is unstable, or you may be using a fixed frequency monitor. Solution Point-to-Point mode only – In the OSD, click . Make sure the Settings Monitors Stabilize option is enabled. display output 88 Matrox Extio 3 Series – User Guide...
- Page 89 Update the transmitter and/or the receiver so that both have the same firmware version. Solution Matrox recommends that you connect each appliance to a DHCP network and run the firmware updater tool to see if your units require a firmware update. If you don’t have a...
-
Page 90: Product Information
IEC/CAN/CSA-C22.2/ANSI/UL 62368-1 et IEC/CAN/CSA-C22.2/ANSI/UL 60950-1. * DisplayPort version 1.2 is supported on connector labeled only. † Only when using a multi-mode SFP module. 90 Matrox Extio 3 Series – User Guide... - Page 91 850 µm laser compliant to 21CFR, Subpart J, Class 1 Class A: CE, FCC, ICES-3, KC, RCM, VCCI Regulatory compliance * For more information, see the Local console section in your Matrox Extio Central Manager User Guide. † DisplayPort version 1.2 is supported on connector labeled only.
-
Page 92: Product Dimensions
Class A: CE, FCC, ICES-3, KC, RCM, VCCI Regulatory compliance * DisplayPort version 1.2 is supported on connector labeled only. † Additional display resolutions may be available. For more information, contact your Matrox representative. ‡ Only when using a multi-mode SFP module. Product dimensions Extio N3408/N3208... -
Page 93: Maximum Distance (Point-To-Point Mode)
Site-to-Site VPN, network conditions vary according to region. For an optimal user experience, we recommend a ping time of less than 20ms and +/- 10% worst case jitter. For more information, contact your Matrox representative. † Only use the power supply originally supplied by Matrox with your Matrox Extio 3 Series product. -
Page 94: Environmental
Fiber optic transceiver SFP (Small Form Factor Pluggable) modules When optical SFP modules are used, Extio 3 products are certified for safety only when operated with SFP modules purchased through Matrox, with the part number XTO3-SFPMM for multi-mode, or part number XTO3-SFPSM for single-mode SFP modules. Battery Non-replaceable battery: To dispose of your product, see www.matrox.com/environment/weee. - Page 95 Diameter (max): 20mm Battery type: CR2032 Pile non remplaçable: Pour se défaire du produit, voir www.matrox.com/environment/weee. Attention: Il y a risque d’explosion si la pile est remplacée part un type incorrect. Cet appareil ne contient aucune pièce que l’utilisateur puisse réparer.
-
Page 96: Appendix A - Providing Adequate Airflow To Your Extio 3 Device
(for example, by operating your device inside a desk cabinet). Monitor your ambient temperatures – Make sure the ambient temperature doesn’t exceed the maximum recommended temperatures. For more information on supported operating temperatures, see “Environmental”, page 96 Matrox Extio 3 Series – User Guide... -
Page 97: Appendix B - Firewall Requirements
UPnP: Microsoft SSDP for discovery of 1900 UPnP devices Note: ICMP must be enabled (ping). * Minimum requirements. Firmware updater The following are the firewall requirements for a system running the Matrox Firmware Updater. Network Port Type Inbound Outbound Functionality 20,21 —... -
Page 98: Extio 3 Devices
Transmitter unit: USB IP Transmitter unit: Audio back channel 6804 - 6816 — control Receiver unit: Audio back channel 6804 - 6816 — control 8884 — Receiver unit: Control channel 98 Matrox Extio 3 Series – User Guide... -
Page 99: Accessing Your Windows Firewall Settings
Network & Internet Ethernet Windows Firewall Windows 7 – Click Control Panel Network and Internet Network and Sharing . (* Depending on your configuration, these steps may be unnecessary.) Center Matrox Extio 3 Series – User Guide 99... -
Page 100: Adding Rules To Your Windows Firewall Settings
. Configure the new rule with the following settings: Actions New Rule – Select Rule type Custom – Select Program All programs – Under , select Protocol and Ports Protocol type ICMPv4 100 Matrox Extio 3 Series – User Guide... - Page 101 Profile Domain Private Public – Enter the name for your rule (such as Extio 3 – ICMPv4 rule). Name For more information on configuring your Windows firewall, see your network administrator. Matrox Extio 3 Series – User Guide 101...
-
Page 102: Appendix C - Mounting Your Devices
Appendix C – Mounting your devices This section provides guidelines for mounting your Extio N3408 or N3208 device. Mounting guidelines for rack mount kit To prevent damage to your Matrox hardware, read the following guidelines before mounting your Matrox hardware: ... -
Page 103: Mounting Guidelines For Under Desk Mount Kit
For more information, see the “Product information” section of your user guide. Once your unit is mounted, you can connect your system, monitors, and devices to your Matrox unit. Mounting your Extio 3 device using an under desk mount kit You can mount your Extio 3 devices under a desk or to a similar flat surface using the two (2) mounting brackets included in your kit. - Page 104 Measure distance Use four (4) screws (2 per bracket; not included) to attach your brackets to the desk. 104 Matrox Extio 3 Series – User Guide...
-
Page 105: Appendix D - Configuring Your Audio Settings
Line In Analog audio, Line Audio originates from the connector of the transmitter unit Line In In 3 connector of the transmitter. providing the video stream for monitor on the receiver unit. Matrox Extio 3 Series – User Guide 105... -
Page 106: Receiver Input
The signal is then sent to a transmitter connector, the signal of the Line Out following the destination option connector is sent to the Line Out chosen (see “Receiver audio connector of the transmitter unit. destination”, page 107). 106 Matrox Extio 3 Series – User Guide... -
Page 107: Receiver Audio Destination
Microphone Line In Monitor 4 sent to the connector of the Line Out sent to the connector of the Line Out transmitter unit that provides the transmitter. video stream to monitor 4 Matrox Extio 3 Series – User Guide 107... -
Page 108: Appendix E - File Structure For Swanctl.json
The “connections” section can contain several "local" and "remote" sub-sections, in which case each one must be followed by a suffix as follows: "connections" : { "<connection-name>" : { "local<suffix1>" : { "param" : "value", "local<suffix2>" : { "param" : "value", 108 Matrox Extio 3 Series – User Guide... - Page 109 The suffix can be omitted when there is only one local or emote sub-section: "connections" : { "<connection-name>" : { "local" : { "param" : "value", "remote" : { "param" : "value", Matrox Extio 3 Series – User Guide 109...
- Page 110 The “children” sub-section Matrox supports only one CHILD_SA description, whose name is forced to "child", so the "children" sub-section must not contain a <child> sub-section as in the usual swanctl.conf syntax like this: "connections.<conn>.children.<child>.params...", it should rather look like this: "connections.<conn>.children.params".
-
Page 111: The "Secrets" Sections
"secrets" : { "<secret-type>" : { "file" : "<FILE>" "secret" : "<SECRET>" Where <FILE> is the name of a private key or pkcs12 file in its respective sub-folder contained in the zip package. Matrox Extio 3 Series – User Guide 111... -
Page 112: Customer Support
Matrox values your business and offers professional support for your Matrox product. If your product was purchased through a Matrox dealer, contact your dealer for product support. This is the quickest and most effective method of technical assistance. Your dealer is familiar with your complete system. -
Page 113: Register Your Matrox Product
Register your Matrox product Please register online (www.matrox.com/en/video/apps/registration) to be eligible for customer support, new product announcements, and information on special offers and upcoming events. Matrox Extio 3 Series – User Guide 113... - Page 114 FCC Compliance Statement Remark for the Matrox hardware products supported by this guide This equipment has been tested and found to comply with the limits for a Class A digital device, pursuant to Part 15 of the FCC Rules. These limits are designed to provide reasonable protection against harmful interference when the equipment is operated in a commercial environment.
- Page 115 Bitte wenden Sie sich an der Matrox-Website (www.matrox.com/environment/en/weee) für Recycling-Informationen. (Italiano) Informazioni per gli utenti europei – Direttiva sui rifiuti di apparecchiature elettriche ed elettroniche (RAEE) Si prega di riferirsi al sito Web Matrox (www.matrox.com/environment/en/weee) per le informazioni di riciclaggio.
- Page 116 FRANCE Avertissement sur l’épilepsie À lire avant toute utilisation d’un jeu vidéo par vous-même ou votre enfant Certaines personnes sont susceptibles de faire des crises d’épilepsie ou d’avoir des pertes de conscience à la vue de certains types de lumières clignotantes ou d’éléments fréquents dans notre environnement quotidien.
- Page 117 Copyright 2022 Matrox Graphics Inc. • (English) All rights reserved. • (Français) Tous droits réservés. • (Deutsch) Alle Rechte vorbehalten. • (Italiano) Tutti i diritti riservati. • (Español) Reservados todos los derechos. Trademarks • Marques déposées • Warenzeichen • Marchi registrati •...
- Page 118 ® Wibu-Systems ............WIBU Wowza Media Systems, LLC ........Wowza™ Copyright © 1996-2020 VideoLAN. This logo or a modified version may be used or modified by anyone to refer to the VideoLAN project or any product developed by the VideoLAN team, but does not indicate endorsement by the project. HTML5 Logo by World Wide Web Consortium (W3C).
- Page 119 However, no responsibility is assumed by Matrox Graphics Inc. for its use, for its reproduction and/or distribution, in whole or in part;...
- Page 120 Matrox Graphics Inc. 1055 Saint Regis Boulevard video@matrox.com Dorval, Quebec, Canada H9P 2T4 www.matrox.com/video (514) 822-6000...
Need help?
Do you have a question about the Extio 3 Series and is the answer not in the manual?
Questions and answers