Table of Contents
Advertisement
Available languages
Available languages
Quick Links
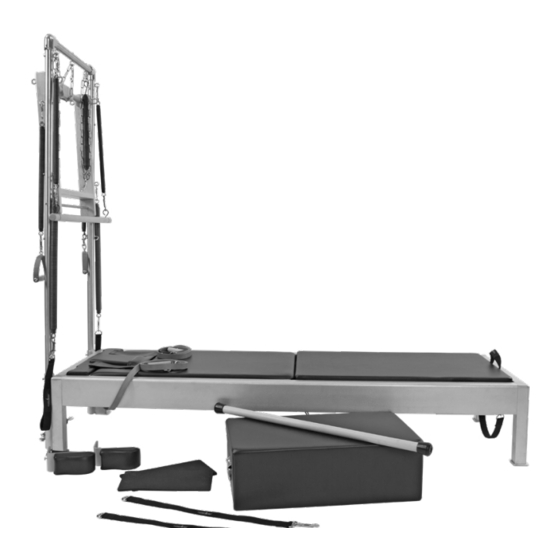
The Contrology® Reformer with Tower
THIS IS A MEDICAL DEVICE
Statement of Intended Use
The Contrology™ Reformer device is intended by the manufacturer to be used by people for the purposes of physiotherapy,
rehabilitation, the prevention, treatment and relief of injuries, supportive, functional therapy for a disability or for general strengthening
and improving the mobility of the human body. Should injury occur during usage, report to the manufacturer and competent
authority of the Member State in which the user and/or patient is established.
Instructions in document subject to change. Please consult separate instructions for most current version.
Visit pilates.com/patent for complete and current information on Balanced Body product patents.
Balanced Body, Inc.
5909 88th St,
Sacramento, CA 95828 USA
Contact Us
1-800-PILATES | +1-916-388-2838
pilates.com | info@pilates.com
17639 | 2021-11
EC
Balanced Body, In
Sacramento, CA
001-916-388-2838
Advertisement
Table of Contents

Related Manuals for Balanced Body Contrology Reformer


Summary of Contents for Balanced Body Contrology Reformer
- Page 1 Member State in which the user and/or patient is established. Instructions in document subject to change. Please consult separate instructions for most current version. Visit pilates.com/patent for complete and current information on Balanced Body product patents. Balanced Body, In...
- Page 2 Leather Handles with straight wood 16154 Note: The shoulder rests can be installed in two positions. (pair) Contrology Reformer Springs 16228 One position is wider and more comfortable for broad shoulders. Contrology Springbar 16100 Swapping the left and right shoulder rests will change between standard and wide configuration.
- Page 3 ATTACH THE SPRINGS TO THE UNDERSIDE The Gear Block, used by all Reformer lengths, at the foot end is OF THE CARRIAGE installed on the left side rail of the gear positions as shown in Figure 8. The Gear Block has two settings, short and long. Figure Attach one spring to one 8 shows the short position, when spring bar is in the middle or slot in the bracket on the...
- Page 4 INSTALL THE OPTIONAL JUMPBOARD (86”/218cm and 89”/226cm models only) Correct installation of the jumpboard is very important. Lay the footbar flat down on the Reformer. Install the jumpboard down into the installed bracket on the inside of the foot end of the Reformer.
- Page 5 TOWER PARTS LIST INSTALL THE TOWER 1. Remove the Tower tubes with Push Through Bar from the box. DESCRIPTION PART NO. Do not cut the tie between the Push Through Bar and the tubes or else it can swing when lifting and hit you or someone else.
- Page 6 7. Attach the Storage Chain (shortest chain) to the middle eye Double Quick Link Harness Snaps bolt on the top cross tube using the Quick Link. Closed hooks both ends 8. Attach the Safety Chains, one to each of the outer eye bolts on the top cross tube using the Quick Links.
- Page 7 INSTALLING YOUR SITTING BOX SPACERS: 4. Lay the footbar flat on the inside of the frame as shown in Figure 19. If using the wooden gear stopper, remove this so the 1. Find the (2) foam spacers, see Figure 21 for what they look like. footbar can lay lower in the frame.
-
Page 8: Cleaning And Maintenance
A mild soap and water solution may also be used. » Be sure to dry thoroughly. » For heavier soiling please call Balanced Body Technical Support. » Wheel tracks and wheels should be cleaned regularly with a cloth to ensure that tracks smoothly and quietly. -
Page 9: Parts Included
How to Install your Wire Stops on your Contrology Springs PARTS INCLUDED: DESCRIPTION PART NO. Wire Stop 17922 10-24 Set Screw 17931 3/32” Allen Wrench 17930 Start to thread a provided set screw into each wire stop, install the set screw into the wire stop so about 1/4 of the set screw sticks out. (Note they might be already in the wire stops, if they are, ensure they are not going into the middle opening of the wire stop) Go to the top mounted spring attached to your machine, See... -
Page 10: All Equipment
If the hook shows a lot of wear, discontinue using the spring to the quality of the equipment. This guide was created to help immediately and call Balanced Body to replace spring or snap. you use and maintain your equipment for optimum safety. Please See Figure 2. - Page 11 If you notice wear on the slider knob Disconnect the springs and clean the entire length of the tracks pins, please call Balanced Body to replace. Using the PTB in this with a soft cloth and Balanced Body Cleaner, mild soap with condition could cause injury.
- Page 12 Only trained, experienced users should use the PTB. A spotter should always maintain control of the bar with one hand. Figure 8. If your chair is a Balanced Body If the user should lose control of the bar, the spotter can maintain Split-step Pedal Chair (Combo Chair), control of it.
-
Page 13: Replacement Parts
Date and description of each repair, including name and www.pilates.com contact information for person or company performing 5909 88th Street, Sacramento, CA 95828 USA the repair. Click here for Balanced Body Patent Data. MAINTENANCE SCHEDULE ASSEMBLY AND MAINTENANCE PODCASTS All Equipment Wk. Mo. -
Page 14: Safety And Maintenance
Contrology® Reformer with Tower at all times. » Contact Balanced Body for other upholstery and re-upholstery » If you feel pain, dizziness, or shortness of breath, stop options. Replacement upholstery is available from Balanced exercising immediately. - Page 15 Inspect all clips for signs of wear - check the snaps, openings, and clips. Make sure the closure works correctly. Contrology Reformer and Tower (Combo Unit) Replace immediately if there’s an issue. NOTE: Refer to 1. Reformer Combo Unit Reset Figure B at the end of this document.
- Page 16 Crep 3. During a session a. Reformer i. When the footbar is up, make sure the support is fully against the inside of the frame. Figure A ii. Straps and handles should be inside the frame or on the eyelets (aka eyebolts or hooks) at all times. iii.
- Page 17 Contrology Reformer with Tower Exercises THE ROLL UP, SKILL LEVEL: FOUNDATION Reps: 3-5 Apparatus Set Up: Mat; Footbardown, Shoulder blocks removed. Springs released. Insert mat and caster cover pad Additional Equipment Recommended: Maple Pole Precautions: Back issues, forward flexion issues Starting Position »...
- Page 18 THE SINGLE LEG CIRCLE, SKILL LEVEL: FOUNDATION Reps: 5 circles in each direction Apparatus Set-Up: Mat Footbar down, Shoulder blocks removed. Springs released. Insert mat and caster cover pad Precautions: Hip issues Starting Position » Lie on the mat » Arms are either - overhead, under the handles, or by the side palms down »...
- Page 19 THE ELEPHANT, SKILL LEVEL: FOUNDATION Reps: 8-10 Apparatus Set-Up: Reformer Foot bar: Up Shoulder Block: In place. Springs: 2 Insert mat and caster cover pad: Removed Additional Equipment Recommended: None Precautions: Hip issues, Inversion Issues, Low Blood Pressure Starting Position »...
- Page 20 STANDING CHEST EXPANSION, SKILL LEVEL: FOUNDATION Reps: 2-3 sets Apparatus Set-Up: Cadillac Footbar: N/A Shoulder Block: N/A Springs: N/A Insert mat and caster cover pad: N/A Additional Set-Up: Roll Back Bar attached to outside hooks Precautions: None Skills needed to perform exercise: Up Stretch Combo, Elephant with One Leg, Swan—Mat, Pull-Up—Wunda Chair, holding starting position on 1 spring Starting Position...
- Page 21 THE TEASER PREP WITH THE PUSH THROUGH BAR, SKILL LEVEL: INTERMEDIATE Reps 2 - 3 Sets Apparatus Set-Up: Cadillac Foot bar: Down Shoulder Block: Removed Springs: Disengaged Insert mat and caster cover pad: Inserted Additional Set-Up: Push Through Bar attached to the upper spring Precautions: Shoulder issues, neck issues Skills needed to perform the basic exercise: Assisted Teaser on the Mat, The Teaser on the Mat...
- Page 22 THE PUSH THROUGH, SKILL LEVEL: FOUNDATION Reps: 3 Apparatus Set-Up: Cadillac Footbar: Down Shoulder Block: Removed Springs: Disengaged Insert mat and caster cover pad: Inserted Additional Set-Up: Push Through Bar attached to the upper spring Precautions: Shoulder issues, neck issues Skills needed to perform the basic exercise: The roll-up, the roll back Starting Position...
- Page 23 En caso de que se produzcan lesiones durante su uso, reporte al fabricante y a la autoridad competente del Estado miembro en el que está establecido el usuario y / o paciente. Para obtener instrucciones impresas, comuníquese con Balanced Body. Balanced Body, In...
- Page 24 REFORMER: LISTA DE PIEZAS 2. Para asegurar las hombreras, girar los pernos en el sentido de las agujas del reloj hasta que queden apretado. Ver la figura 2. Si se aprietan demasiado, puede resultar difícil su extracción. NÚMERO DE DESCRIPCIÓN CANTIDAD Los pernos deben quedar apretados, pero no demasiado.
- Page 25 ENGANCHE DE LOS MUELLES A LA ZONA INFERIOR Todos los aparatos Reformer emplean topes de mecanismo, DEL CARRO están ubicados en el extremo de los pies, en el carril izquierdo del sistema de posicionamiento, tal como se muestra en la figura Enganchar un muelle en una 8.
- Page 26 INSTALACIÓN DE LA PLATAFORMA JUMPBOARD (OPCIONAL) (Sólo en los modelos de 218 cm/86 in y de 226 cm/89 in) Es muy importante la correcta instalación de la plataforma Jumpboard. Colocar la barra de pies en posición horizontal sobre el Reformer. Instalar la plataforma Jumpboard horizontalmente y hacia abajo en el soporte fijado en el interior del extremo para los pies del Reformer.
- Page 27 LISTA DE PIEZAS DE LA TORRE INSTALACIÓN DE LA TORRE 1. Sacar de la caja los tubos de la torre junto con la barra de NÚMERO DE DESCRIPCIÓN CANTIDAD empuje. No cortar la atadura entre la barra de empuje y los REFERENCIA tubos, ya que podrían oscilar al levantarlos y resultar peligroso.
- Page 28 7. Enganchar la cadena de almacenamiento (la más corta) Mosquetones Enganche rápido dobles al perno de anilla central, emplazado en el tubo transversal Ganchos cerrados en ambos extremos superior, utilizando el eslabón rápido. 8. Enganchar las cadenas de seguridad en cada uno de los 1 gancho abierto (izquierda) y 1 gancho cerrado (derecha) pernos de anilla exteriores del tubo transversal superior, utilizando los eslabones rápidos.
- Page 29 INSTALACIÓN DE LOS ESPACIADORES DE LA CAJA DE 4. Apoyar la barra de pies en la parte interior del bastidor, como ASIENTO: se muestra en la figura 19. Si se utiliza el tope de madera del mecanismo, hay que retirarlo para que la barra de pies quede 1.
-
Page 30: Limpieza Y Mantenimiento
Balanced Body ofrece la solución desinfectante EN CASO DE DAÑOS POR FLETE Balanced Body Clean™ . El uso de cualquier otra solución Si hay daños con su carga, asegúrese de guardar todo el material (especialmente aquellas que contienen aceites esenciales) de embalaje. -
Page 31: Partes Incluidas
Cómo instalar los topes para cable en los resortes de su Contrology PARTES INCLUIDAS: DESCRIPCIÓN CANT. Tope para cable 17922 Tornillo de presión 17931 Llave Allen 3/32” 17930 Para empezar, enrosque uno de los tornillos de presión suministrados en cada tope para cable, coloque el tornillo de fijación en el tope para cable de modo que el tornillo sobresalga 1/4 aproximadamente. - Page 32 Todos los resortes de Balanced Body deben ser reemplazados por lo menos cada dos CÁNCAMOS, TUERCAS Y TORNILLOS años. Ciertos entornos y usos pueden acortar la vida útil de los resortes y es posible que deba reemplazarlos con mayor frecuencia.
- Page 33 Desconecte los resortes y limpie toda la longitud de los rieles con Lubricación. Nunca rocíe silicona cerca o dentro de las ruedas un paño suave y con Balanced Body Cleaner, un jabón suave con agua o un limpiador comercial suave como Fantastik® o 409®. No - esto puede remover el lubricante de los rodamientos y utilice limpiadores abrasivos o almohadillas, ya que pueden dañar...
- Page 34 Cactus Springtree. Si los pasadores no permanecen en los orifi cios de los tubos, es necesario cambiar las perillas. Llame a Balanced Body para Figura 8: Arandela de fi bra obtener piezas de repuesto.
-
Page 35: Programa De Mantenimiento
Balanced Body para obtener piezas de repuesto. Clic aquí para obtener datos de patentes de Balanced Body. Clic aquí para obtener datos de patentes de Balanced Body. REGISTRO DE INSPECCIÓN Y MANTENIMIENTO DEL... -
Page 36: Seguridad Y Mantenimiento
DEL, COMO LA BARRA DE PIES, EL SOPORTE, LAS RUEDAS O LOS RIELES. Si tiene algún problema o pregunta, póngase en contacto con el servicio de soporte técnico de Balanced Body. Si lubrica o engrasa estos componentes, es posible que no se bloqueen correctamente y se vuelvan inseguros. - Page 37 «A» al final de este documento. ii. Reformer: girar el muelle cada tres meses; mover los dos Contrology Reformer y torre (unidad combinada) muelles interiores hacia el exterior para conseguir un 1. Restablecimiento de la unidad Reformer combinada desgaste uniforme.
- Page 38 Retorcimiento h. Marco i. Comprobar los cáncamos del marco del Reformer (enganches de las correas de los pies, enganches inferiores de la PTB y todos los enganches de la torre). NOTA: si es posible girar un cáncamo con la mano, significa que está Figura A demasiado flojo.
- Page 39 Reformer Contrology con torre para ejercicios RODAMIENTO HACIA DELANTE, NIVEL DE DIFICULTAD: PRINCIPIANTE Repeticiones: 3-5. Configuración del aparato: alfombrilla, barra de pies bajada, hombreras retiradas. Muelles liberados. Insertar la alfombrilla y la cubierta de las ruedas. Equipo adicional recomendado: bastón de arce. Precauciones: problemas de espalda, problemas de flexión hacia delante.
- Page 40 CÍRCULO CON UNA SOLA PIEZA, NIVEL DE DIFICUL- TAD: PRINCIPIANTE Repeticiones: 5 círculos en cada dirección. Configuración del aparato: alfombrilla de barra de pies bajada, hombreras retiradas. Muelles liberados. Insertar la alfombrilla y la cubierta de las ruedas. Precauciones: Problemas de cadera. Posición inicial »...
- Page 41 EL ELEFANTE, NIVEL DE DIFICULTAD: PRINCIPIANTE Repeticiones: 8-10. Configuración del aparato: Reformer. Barra de pies: arriba. Hombreras: en su lugar. Muelles: 2. Alfombrilla y cubierta de las ruedas: retiradas. Equipo adicional recomendado: ninguno. Precauciones: problemas de cadera, problemas de inversión, presión arterial baja.
- Page 42 EXPANSIÓN DEL PECHO DE PIE, NIVEL DE DIFICULTAD: PRINCIPIANTE Repeticiones: 2-3 series. Configuración del aparato: Cadillac. Barra de pies: n/a. Hombreras: n/a. Muelles: n/a. Instalación de alfombrilla y cubierta de ruedas: n/a. Configuración adicional: barra de retroceso fijada a los ganchos exteriores.
- Page 43 PRÁCTICA DEL TEASER CON LA BARRA DE EMPUJE, NIVEL DE DIFICULTAD: INTERMEDIO Repeticiones: 2 - 3 series. Configuración del aparato: Cadillac. Barra de pies: Abajo. Hombreras: retiradas. Muelles: desmontados. Instalación de alfombrilla y de la cubierta de las ruedas: insertadas. Configuración adicional: barra de empuje unida al muelle.
- Page 44 EL EMPUJE, EL NIVEL DE DIFICULTAD: PRINCIPIANTE Repeticiones: 3. Configuración del aparato: Cadillac. Barra de pies: abajo. Hombreras: retiradas. Muelles: desenganchados. Alfombrilla y cubierta de las ruedas: insertadas. Configuración adicional: barra de empuje unida al muelle superior. Precauciones: problemas de hombros, problemas de cuello. Habilidades necesarias para realizar el ejercicio básico: rodamiento hacia delante y hacia atrás.
- Page 45 In caso di infortuni durante l’utilizzo, rapporto al produttore e all’autorità competente dello Stato membro in cui è stabilito l’utilizzatore e / o il paz iente. Per le istruzioni stampate contatta Balanced Body. Balanced Body, In...
- Page 46 Maniglie in pelle con legno liscio 16154 (coppia) Una posizione è più ampia e più comoda, adatta a spalle più Molle del Contrology Reformer 16228 grandi. Lo scambio dell poggiaspalle sinistro con quello destro cambierà la configurazione da normale ad ampia.
- Page 47 COLLEGAMENTO DELLE MOLLE AL LATO INFERIORE Il blocco dell’ingranaggio, utilizzato da tutte le lunghezze dei DEL CARRELLO Reformer, presente sull’estremità dei piedi, è installato sul binario del lato sinistro delle posizioni dell’ingranaggio, come mostrato in Collegare una molla a uno fig.
- Page 48 INSTALLAZIONE DELLA JUMPBOARD OPZIONALE (solo per i modelli da 218 cm e da 226 cm) La corretta installazione della jumpboard è molto importante. Distendere la barra per i piedi sul Reformer. Installare la jumpboard in basso nella staffa installata sul lato interno dell’estremità dei piedi del Reformer.
- Page 49 ELENCO COMPONENTI TOWER INSTALLAZIONE DELLA TOWER 1. Rimuovere i tubi della Tower con la barra push-through dallo COD. DESCRIZIONE QTÀ scatolo. Non tagliare la fascetta che unisce la barra push- COMPONENTE through e i tubi, altrimenti la prima potrebbe oscillare quando viene sollevata colpire qualcuno.
- Page 50 7. Attaccare la Storage Chain (la catena più corta) alla vite ad Double Quick Link Harness Snaps anello centrale sul tubo trasversale superiore utilizzando il Closed hooks both ends Quick Link. 8. Attaccare le catene di sicurezza, una a ciascuna delle viti 1 open hook (left) and 1 closed hook (right) ad anello esterne sul tubo trasversale superiore utilizzando i Quick Links.
- Page 51 NSTALLAZIONE DEI DISTANZIATORI PER LA SITTING BOX: 4. Distendere la barra per i piedi all’interno del telaio, come mostrato in fig. 19. Se si utilizza il fermo in legno per la 1. Trovare i (2) distanziatori in schiuma, facendo riferimento alla scanalatura, sarà...
-
Page 52: Pulizia E Manutenzione
L'attrezzatura è rivestita con BeautyGard®, in grado di offrire protezione antibatterica. Se si desidera maggiore disinfezione, DANNI DURANTE IL TRASPORTO Balanced Body offre la soluzione Balanced Body Clean™ In caso di danni durante il trasporto, assicurarsi di (particolarmente quelle contenenti oli essenziali), che potrebbe... - Page 53 Come installare i fermacavi sulle molle Contrology PARTI INCLUSE: DESCRIZIONE Fermacavi 17922 Vite di fissaggio 10-24 17931 Chiave a brugola 3/32” 17930 Inizia con l’infilare una delle viti di fissaggio fornite in ogni fermacavi e poi installa la vite di fissaggio nel fermacavi in modo che circa 1/4 della vite rimanga fuori.
- Page 54 Pilates. Per oltre 35 anni, Balanced Body ha introdotto innovazioni in Moschettoni fatto di sicurezza nelle attrezzature di Pilates. Molti dei nostri Controllare che i moschettoni non presentino usura, con...
- Page 55 Sganciare le molle e pulire le guide su tutta la lunghezza con un panno morbido e il Cleaner Balanced Body, acqua e sapone Spruzzare direttamente una piccola quantità di silicone asciutto neutro o un detergente comune tipo: Fantastik®...
- Page 56 Se non serrano nei fori dei tubi, è valutate l’upgrading al modello necessario sostituire il meccanismo di tiraggio della manopola. Cactus Springtree). Contattare Balanced Body per richiedere i pezzi di ricambio. Barra push-through (PTB) con regolazione punta a T. Per gli Figura 8: Rondella in fi bra esercizi con le molle fi ssate in basso, se la testa del cliente è...
-
Page 57: Programma Di Manutenzione
1. una descrizione della macchina, compreso il numero di serie, la data, il luogo di acquisto e il produttore. Tutte queste Fare clic qui per i dati sui brevetti di Balanced Body. Fare clic qui per i dati sui brevetti di Balanced Body. -
Page 58: Sicurezza E Manutenzione
» In caso di sensazione di dolore, vertigini o mancanza di respiro, auto oppure effettuare la riparazione in loco. interrompere immediatamente l’esercizio. » Contattare Balanced Body per altre opzioni relative ai » Non restare in piedi sul poggiapiedi. rivestimenti e alle riparazioni. È disponibile un rivestimento sostitutivo Balanced Body »... - Page 59 Migliori pratiche di Pilates classico in studio e norme di sicurezza. General Studio Norme di sicurezza generali in studio ix. Le molle per le braccia devono essere collegate ai ganci 1. Mantenere i percorsi liberi da attrezzi e accessori. più in basso o sulle molle dei ganci per braccia estese sull’esterno della torre.
- Page 60 g. Carrello Crep i. Ispezionare le viti della barra poggiatesta e gli attacchi. Sostituirli in caso di segni di usura. h. Telaio Figura A i. Controllare che i golfari del telaio del Reformer (cinghia per i piedi, collegamenti inferiori barra PTB e tutti i collegamenti NOTA: questa non è...
- Page 61 Esercizi Contrology Reformer con Tower ROLL UP LIVELLO DI ABILITÀ: BASE Ripetizioni: da 3 a 5 Configurazione dell’attrezzo: Mat, barra per i piedi in basso, blocchi per le spalle rimossi. Molle allentate. Inserire il mat e il cuscinetto di copertura dei caster.
- Page 62 CERCHIO A GAMBA SINGOLA LIVELLO DI ABILITÀ: BASE Ripetizioni: 5 movimenti circolari in ciascuna direzione Configurazione dell’attrezzo: Mat, barra per i piedi in basso, blocchi per le spalle rimossi. Molle allentate. Inserire il mat e il cuscinetto di copertura dei caster. Precauzioni: problemi alle anche Posizione iniziale »...
- Page 63 L’ELEFANTE LIVELLO DI ABILITÀ: BASE Ripetizioni: da 8 a 10 Configurazione dell’attrezzo: Reformer Barra per i piedi: blocco per le spalle superiore: in posizione. Molle: 2 Inserimento materassino e imbottitura di copertura dei caster: rimossa Attrezzatura aggiuntiva consigliata: nessuna Precauzioni: problemi alle anche, problemi d’inversione, pressione sanguigna bassa Posizione iniziale »...
- Page 64 ESPANSIONE TORACICA IN PIEDI LIVELLO DI ABILITÀ: BASE Ripetizioni: da 2 a 3 serie Configurazione dell’attrezzo: Cadillac Barra per i piedi: N/A Blocco per le spalle: N/A Molle: N/A Configurazione aggiuntiva: barra roll-back attaccata agli uncini esterni Precauzioni: nessuna Abilità necessarie per eseguire l’esercizio: combinazione di allungamento verso l’alto, elefante a gamba singola, cigno su Mat, trazioni su Wunda Chair, tenere la posizione iniziale su 1 molla Posizione iniziale...
- Page 65 TEASER PREP CON BARRA PUSH-THROUGH LIVELLO DI ABILITÀ: INTERMEDIO Ripetizioni: 2-3 serie Configurazione dell’attrezzo: Cadillac Barra per i piedi: in basso Blocco per le spalle: Rimosso Molle: disimpegnate Materassino d’inserimento e cuscinetto di copertura del caster: inserito Configurazione aggiuntiva: barra push-through agganciata alla molla superiore Precauzioni: problemi alle spalle e al collo Abilità...
- Page 66 PUSH THROUGH LIVELLO DI ABILITÀ: BASE Ripetizioni: 3 Configurazione dell’attrezzo:: Cadillac Barra per i piedi: in basso Blocco per le spalle: rimosso Molle: allentate Materassino d’inserimento e cuscinetto di copertura del caster: inserito Configurazione aggiuntiva: barra push-through attaccata alla molla superiore Precauzioni: problemi alle spalle e al collo Abilità...
- Page 67 Si une blessure se produit au cours de l’utilisation, signalér au fabricant et à l’autorité compétente de l’État membre dans lequel l’utilisateur et / ou le patient est établi. Pour obtenir des instructions imprimées, contactez Balanced Body. Balanced Body, In...
- Page 68 LISTE DES PIÈCES DU REFORMER 2. Verrouiller les appuis épaules en serrant la poignée dans le sens horaire. Voir Figure 2. Les poignées doivent être bloquées, mais pas trop serrées, pour pouvoir enlever les DESCRIPTION RÉF. PIÈCE QUANTITÉ appuis épaules facilement. Cadre du reformer Chariot Appuis épaules (paire)
- Page 69 FIXER LES RESSORTS SOUS LE CHARIOT Le Gear Block, utilisé sur tous les Reformer, est installé sur le rail gauche des encoches, comme illustré dans la figure 8. Le Gear Block Fixez un ressort dans un peut être placé en position courte ou longue. La figure 8 montre la trou de la barre de support position courte, lorsque la Springbar est au milieu ou en position sous le chariot, comme...
- Page 70 INSTALLER LE JUMPBOARD FACULTATIF (modèles 86” de 218 cm et 89” de 226 cm seulement) Il est très important que le jumpboard soit correctement installé. Posez la Footbar à plat sur le Reformer. Installez le jumpboard sur le support installé à l’intérieur de la base du Reformer. Le côté rembourré...
- Page 71 LISTE DE PIÈCES DE LA TOUR INSTALLER LA TOUR 1. . Retirez les tubes de la tour et la Push Through Bar de leur DESCRIPTION RÉF. PIÈCE QUANTITÉ boîte. Ne coupez pas le serre-câble entre la Push Through Bar et les tubes pour éviter qu’elle ne bascule lorsque vous la soulevez et ne blesse quelqu’un.
- Page 72 7. Attachez la chaîne de stockage (la plus courte) sur l’anneau Mousquetons Mousquetons doubles du milieu sur le tube transversal supérieur, à l’aide du Crochets fermés des deux côtés mousqueton. 8. Attachez les chaînes de sécurité, une à chaque anneau 1 crochet ouvert (gauche) et 1 crochet fermé...
- Page 73 INSTALLER LES ENTRETOISES DE SITTING BOX: 4. Posez la footbar à plat à l’intérieur du cadre, comme illustré dans la figure 19. Si vous utilisez le Gear Block en bois, retirez-le 1. Trouvez les (2) entretoises en mousse, comme illustré en pour que la footbar puisse s’enfoncer plus bas dans le cadre.
-
Page 74: Nettoyage Et Entretien
Si un niveau EN CAS DE DOMMAGES CONSTATÉS LORS DE LA plus important de désinfection est recherché, Balanced Body propose Balanced Body Clean™ . L'utilisation de solutions (en LIVRAISON particulier celles contenant des huiles essentielles) raccourcira Si vous constatez des dommages lors de la livraison, assurez- la durée de vie de certains des accessoires et elle n'est pas... -
Page 75: Liste Des Pièces Fournies
Comment installer les butées de fil sur votre Contrology Springs LISTE DES PIÈCES FOURNIES : DESCRIPTION CODE PRODUIT QUANTITÉ Butée de fil 17922 10-24 Vis de fixation 17931 Clé Allen de 3/32” 17930 Commencez par visser une vis de fixation dans chaque butée de fil, de manière à... -
Page 76: La Sécurité Avant Tout
: un guide pour un bon entretien et une utilisation sûre de votre équi- pement Pilates. Mousquetons Depuis plus de 35 ans, Balanced Body introduit des innovations en Contrôlez l’état d’usure des mousquetons (mensuellement). Tout matière de sécurité dans les équipements Pilates. Beaucoup de nos d’abord, vérifi ez que le mousqueton fonctionne correctement. - Page 77 Déconnectez les ressorts et nettoyez les rails avec un chiffon l’intérieur des roues - cela pourrait éliminer le lubrifi ant des doux et un nettoyant Balanced Body, du savon doux et de l’eau roulements et endommager les roulements. Vous pouvez acheter ou un nettoyant du commerce doux comme Fantastik®...
- Page 78 Balanced de sécurité. Pour les exercices Body propose une solution de désinfection à ressorts inférieurs, la sangle Balanced Body CleanTM . L’utilisation ou la chaîne de sécurité doit de toute autre solution (en particulier toujours fi xer la barre.
- Page 79 Les broches des curseurs ne doivent pas sortir des trous. Si une étape les broches ne restent pas dans les trous du tube, les boutons de traction doivent être remplacés ; appelez Balanced Body pour obtenir des pièces de rechange. PIÈCES DE RECHANGE Pour commander des pièces de rechange ou si vous avez des...
-
Page 80: Sécurité Et Entretien
QU’IL S’AGISSE DU REPOSE-PIED, DU CHARIOT, DES ROUES OU DES RAILS. Si vous avez des problèmes ou des questions, veuillez contacter le service de soutien technique de Balanced Body. En ajoutant du lubrifiant ou de la graisse, les composants peuvent ne pas s’enclencher correctement et rendre la machine dangereuse. - Page 81 A à la fin du présent document. ii. Reformer - Interchangez le ressort tous les trimestres : Contrology Reformer avec Tower (unité combinée) déplacez les 2 ressorts intérieurs vers l’extérieur pour une 1. Réinitialisation de l’unité combinée du Reformer usure uniforme.
- Page 82 g. Chariot i. Inspectez les vis et les attaches de l’appui-tête. Remplacez toute pièce présentant un signe d’usure. Cadre Figure A i. Vérifiez les boulons à œil du cadre du reformer (fixations de sangle des pieds, fixations de la barre de poussée inférieures NOTER : Ceci n’est pas un ressort de Contrology mais le virage et toutes les fixations de la tour).
- Page 83 Reformer Contrology avec exercices sur la tour ROLL UP, NIVEAU DE BASE Répétitions : 3 à 5 Configuration de l’appareil : Tapis, Footbar abaissée, appuis épaules retirés. Ressorts dégagés. Tapis et Protection de poulies de tapis insérés Équipement supplémentaire recommandé : Pole barre en érable Précautions : problèmes de dos, problèmes de flexion en avant Position de départ »...
- Page 84 SINGLE LEG CIRCLE, NIVEAU DE BASE Répétitions : 5 cercles dans chaque direction Configuration de l’appareil : Tapis, Footbar abaissée, appuis épaules retirés. Ressorts dégagés. Tapis et Protection de poulies de tapis insérés. Précautions : problèmes de hanches Position de départ »...
- Page 85 THE ELEPHANT, NIVEAU DE BASE Répétitions : 8 à 10 Configuration de l’appareil : Reformer Footbar : relevée, appuis épaules : en place, ressorts : 2 Tapis et protection de poulies de tapis : retirés Équipement supplémentaire recommandé : aucun Précautions : problèmes de hanche, problèmes d’inversion, hypotension Position de départ...
- Page 86 STANDING CHEST EXPANSION, NIVEAU DE BASE Répétitions : 2 à 3 séries Configuration de l’appareil : Cadillac Footbar : N/D, appuis épaules : N/D, ressorts : N/D Tapis et Protection de poulies de tapis : N/D Configuration supplémentaire : Roll Back Bar fixée aux crochets extérieurs Précautions : aucune Compétences requises pour réaliser l’exercice : Up stretch...
- Page 87 THE TEASER PREP AVEC PUSH THROUGH BAR NIVEAU INTERMÉDIAIRE Répétitions : 2 à 3 séries Configuration de l’appareil : Cadillac Foot bar : abaissée, appuis épaules : retirés, ressorts : dégagés, Tapis et protection de poulies de tapis insérés Configuration supplémentaire : Push Through Bar fixée au ressort supérieur Précautions : problèmes d’épaules, problèmes de nuque Compétences requises pour réaliser l’exercice : Assisted Teaser...
- Page 88 THE PUSH THROUGH, SKILL LEVEL: FOUNDATION Reps: 3 Apparatus Set-Up: Cadillac Footbar: Down Shoulder Block: Removed Springs: Disengaged Insert mat and caster cover pad: Inserted Additional Set-Up: Push Through Bar attached to the upper spring Precautions: Shoulder issues, neck issues Skills needed to perform the basic exercise: The roll-up, the roll back Starting Position...
- Page 89 Behinderung oder zur allgemeinen Stärkung und Verbesserung der Mobilität des menschlichen Körpers vorgesehen. Sollten bei der Anwendung Verletzungen auftreten, bericht und der zuständigen Behörde des Mitgliedstaats gemeldet, in dem der Benutzer und / oder Patient ansässig ist. Für gedruckte Anweisungen wenden Sie sich an Balanced Body. Balanced Body, In Sacramento, CA...
- Page 90 REFORMER-TEILELISTE 2. Sichern Sie die Schulterstütze, indem Sie den Bolzen im Uhrzeigersinn drehen, bis er fest sitzt. Siehe Abbildung 2. Wenn Sie sie zu fest anziehen, lässt sie sich nur schwer BESCHREIBUNG TEILENUMMER ANZA entfernen. Sie sollten fest, aber nicht zu fest angezogen sein.. Reformerrahmen Schlittenbaugruppe Schultermontage (Paar)
- Page 91 BEFESTIGEN SIE DIE FEDERN AN DER UNTERSEITE Der Zahnradblock, der bei Reformern aller Längen verwendet DES SCHLITTENS wird, wird am Fußende an der linken Seitenschiene mit den Zahnradeinstellungen angebracht, wie in Abbildung 8 gezeigt. Befestigen Sie eine Der Zahnradblock hat zwei Einstellungen, kurz und lang. Feder an einem Schlitz Abbildung 8 zeigt die kurze Position, wenn sich der Federstab in in der Halterung an der...
- Page 92 DIE INSTALLATION DES OPTIONALEN SPRUNGBRETTS (Gilt nur für die Modelle mit 86 Zoll / 218 cm bzw. 89 Zoll / 226 cm Länge) Der korrekte Einbau des Sprungbretts ist sehr wichtig. Legen Sie den Fußbügel flach auf den Reformer. Bringen Sie das Sprungbrett in der installierten Halterung an der Innenseite des Fußendes des Reformers an.
- Page 93 TURM-TEILELISTE DIE INSTALLATION DES TURMES 1. Nehmen Sie die Turmrohre mit der Durchsteckstange aus dem BESCHREIBUNG TEILENUMMER ANZAHL Karton heraus. Schneiden Sie die Verbindung zwischen der Durchsteckstange und den Rohren nicht durch, sonst kann sie beim Anheben schwingen und Sie oder andere Personen Turm-Baugruppe treffen.
- Page 94 7. Befestigen Sie die Lagerungskette (die kürzeste Kette) mit Doppel-Aps Schnellverschluss ness Sn dem Schnellverschluss an der mittleren Ringschraube am Geschlossene Haken an beiden Enden oberen Querrohr. 8. Befestigen Sie die Sicherheitsketten mit Hilfe der Ein offener Haken (links) und ein geschlossener Haken (rechts) Schnellverschllüsse an jeweils einer der äußeren Ringschrauben am oberen Querrohr.
- Page 95 DIE INSTALLATION DER ABSTANDSHALTER IHRES 4. Legen Sie den Fußbügel flach auf die Innenseite des SITZKASTENS: Rahmens, wie in Abbildung 19 gezeigt. Wenn Sie den hölzernen Zahnradstopper verwenden, entfernen Sie diesen, 1. Suchen Sie die zwei (2) Schaumstoffabstandshalter. Wie sie damit der Fußbügel tiefer im Rahmen liegen kann.
-
Page 96: Reinigung Und Instandhaltung
Eine milde Lösung aus Seife und Wasser kann FRAGEN? ebenfalls verwendet werden. Bitte rufen Sie die technische Betreuung von Balanced Body » Achten Sie auf eine gründliche Trocknung. unter 1-800-PILATES an » Bei stärkeren Verschmutzungen, wenden Sie sich bitte an die (USA) oder +1-916-388-2838 (international). -
Page 97: Enthaltene Teile
So installieren Sie Ihre Drahtstopper an Ihren Contrology-Federn ENTHALTENE TEILE: BESCHREIBUNG Drahtstopper 17922 10-24 Stellschraube 17931 3/32” Inbusschlüssel 17930 Beginnen Sie mit dem Anziehen der mitgelieferten Stellschraube in jeden Drahtstopper. Ziehen Sie die Stellschraube so an, dass etwa 1/4 der Stellschraube aus dem Drahtstopper herausragt. (Beachten Sie, dass die Stellschrauben möglicherweise bereits in den Drahtstoppern angezogen sind. - Page 98 Wenn der Haken große Abnutzung aufweist, stellen Sie die späteren Nachschlagen auf. Bitte rufen Sie uns an, wenn Sie Benutzung der Feder sofort ein und rufen Sie Balanced Body an, Das Nichtbeachten dieser Anweisungen kann zu um die Feder oder Schnappverbindung zu ersetzen. Siehe Abb. 2.
- Page 99 Schmierung. Niemals Silikon nahe den Rollen oder in die Die Federn aushaken und die Schienen der gesamten Länge nach mit einem weichen Tuch und Balanced Body Cleaner oder einem Rollen sprühen – dies könnte das Schmiermittel aus den milden handelsüblichen Reinigungsmittel wie Fantastik® oder 409®...
- Page 100 Stiften der Schieber feststellen, kontaktieren Sie bitte telefonisch Die Verwendung der 4. Seite Balanced Body, um Ersatz anzufordern. Die Verwendung der PTS der PTS zusammen mit dem in diesem Zustand kann zu Verletzungen führen. Sicherheitsgurt wird dringend empfohlen, um Verletzungen zu Wöchentliche Wartung der Push-Through-Stange mit Schiebern.
- Page 101 Bohrungen fallen. Wenn die Stifte nicht in den Rohrbohrungen bleiben, müssen die Zugknöpfe ausgetauscht Wenn Sie Ersatzteile bestellen möchten oder Fragen haben, werden. Wenden Sie sich für Ersatzteile an Balanced Body. erreichen Sie uns telefonisch wie folgt: USA und Kanada: 1-800-PILATES (1-800-745-2837) GERÄTEPRÜFUNG UND WARTUNGSPROTOKOLL...
-
Page 102: Wartung
ROLLEN ODER SCHIENEN DÜRFEN NICHT GEFETTET ODER GESCHMIERT WERDEN. Bei Problemen oder Fragen kontaktieren Sie bitte den technischen Support von Balanced Body. Die Zugabe von Fett oder Schmiermittel kann zur Folge haben, dass die Komponenten nicht mehr sicher einrasten und unsicher werden. - Page 103 Auf Abnutzung, Knicke, Unebenheiten, Ablösung und Rost prüfen. Alle Teile, die Anzeichen einer Abnutzung aufweisen, sind sofort zu ersetzen (siehe Abbildung A am Ende dieses Contrology Reformer und Tower (Combo-Einheit) Dokuments). 1. Die Reformer Combo-Einheit auf die Standardeinstellung Reformer – Wechseln Sie die Federn in vierteljährlichen zurücksetzen...
- Page 104 Knickstelle g. Schlitten i. Überprüfen Sie die Kopfstützenschrauben und -befestigungen. Ersetzen Sie sie, falls sie Anzeichen von Verschleiß aufweisen. Abbildung A h. Rahmen i. Überprüfen Sie die Ringschrauben am Reformer-Rahmen NOTIZ: das ist keine Contrology Feder spring aber der Knick wird (Fußriemenbefestigungen, untere PTS-Befestigungen ähnlich aussehen.
- Page 105 „Contrology“-Reformer mit Turmübungen DER ROLL-UP – SCHWIERIGKEITSGRAD: GRUNDLAGE Wiederholungen: 3 bis 5 Geräteeinrichtung: Matte; Fußbügel nach unten, Schulterblöcke entfernen. Federn gelöst. Matte und Abdeckpolster einlegen Zusätzliche empfohlene Ausrüstung: Ahornholz-Stange Vorsichtsmaßnahmen: Bei Rückenproblemen, Problemen mit der Vorwärtsbeugung Ausgangsposition » Auf der Matte liegend beginnen »...
- Page 106 DER EINBEINIGE KREIS – SCHWIERIGKEITSGRAD: GRUNDLAGE Wiederholungen: Fünf Kreise in jede Richtung Geräteeinrichtung: Matte; Fußbügel nach unten, Schulterblöcke entfernen. Federn gelöst. Matte und Abdeckpolster einlegen Vorsichtsmaßnah Ausgangsposition » Legen Sie sich auf die Matte. » Die Arme befinden sich entweder über dem Kopf, unter den Griffen oder an der Seite, mit den Handflächen nach unten.
- Page 107 DER ELEFANT – SCHWIERIGKEITSGRAD: GRUNDLAGE WIEDERHOLUNGEN: 8 BIS 10 Geräteeinrichtung: Reformer Fußbügel: Hoch Schulterblock: Installiert. Federn: 2 Matteneinlage und Abdeckpolster: Entfernt Zusätzliche empfohlene Ausrüstung: Keine Vorsichtsmaßnahmen: Hüftprobleme, Inversionsprobleme, niedriger Blutdruck Ausgangsposition » Legen Sie die Hände auf den Fußbügel. Daumen und Zeigefinger liegen auf derselben Seite der Stange.
- Page 108 BRUSTKORBDEHNUNG IM STEHEN – SCHWIERIGKEITSGRAD: GRUNDLAGE Wiederholungen: 2 bis 3 Sätze Geräteeinrichtung: Cadillac Fußbügel: K.A. Schulterblock: K.A. Federn: K.A. Matteneinlage und Laufradabdeckungspolster: K.A. Zusätzliche Einstellungsarbeiten: Der Rückrollbügel wird an den Außenhaken befestigt. Ausgangsposition » Stellen Sie sich mit dem Gesicht zum Turm in etwas mehr als einer Armlänge Entfernung auf.
- Page 109 DER ANREISSER: VORBEREITUNG MIT DER DURCHDRÜCKSTANGE – SCHWIERIGKEITSGRAD: FORTGESCHRITTENE WIEDERHOLUNGEN: 2 BIS 3 SÄTZE Geräteeinrichtung: Cadillac Fußbügel: Schulterblock: Entfernt Federn: Entkoppelt Matte und Laufradabdeckungspolstereinlagen: Eingesetzt Zusätzliche Einstellungsarbeiten: Durchdrückstange an der oberen Feder befestigt Vorsichtsmaßnahmen: Schulterprobleme, Nackenprobleme Zur Durchführung der Grundübung erforderliche Fähigkeiten: Anreißer mit Unterstützung auf der auf der Matte Ausgangsposition »...
- Page 110 DER DURCHDRÜCKER – SCHWIERIGKEITSGRAD: GRUNDLAGE Wiederholungen: 3 Geräteeinrichtung: Cadillac Fußbügel: Nach unten Schulterblock: Entfernt Federn: Ausgerastet Matte und Laufradabdeckungspolstereinlage: Eingesetzt Zusätzliche Einstellungsarbeiten: Durchdrückstange an der oberen Feder befestigt Vorsichtsmaßnahmen: Schulterprobleme, Nackenprobleme Zur Durchführung der Grundübung erforderliche Fähigkeiten: Vorwärtsrolle, Rückwärtsrolle Ausgangsposition »...
Need help?
Do you have a question about the Contrology Reformer and is the answer not in the manual?
Questions and answers