Advertisement
Quick Links
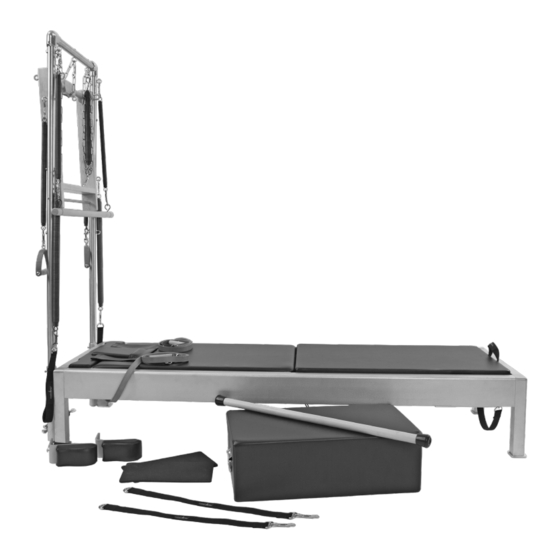
Assembling the Contrology® Classical Reformer
with Tower
THIS IS A MEDICAL DEVICE
Figure A: Contrology Reformer with Tower
Balanced Body, Inc.
5909 88th St,
Sacramento, CA 95828 USA
Balanced Bod
Sacramento,
001-916-388-2
Contact Us
1-800-PILATES | +1-916-388-2838
pilates.com | info@pilates.com
17638-B | 2021-09
E
Advertisement

Related Manuals for Balanced Body Contrology Classical Reformer with Tower


Summary of Contents for Balanced Body Contrology Classical Reformer with Tower
- Page 1 Assembling the Contrology® Classical Reformer with Tower THIS IS A MEDICAL DEVICE Figure A: Contrology Reformer with Tower Balanced Bod Sacramento, 001-916-388-2 Contact Us Balanced Body, Inc. 1-800-PILATES | +1-916-388-2838 5909 88th St, pilates.com | info@pilates.com Sacramento, CA 95828 USA 17638-B | 2021-09...
- Page 2 STATEMENT OF INTENDED USE DECLARACIÓN DE USO PREVISTO The Contrology® Classical Reformer with Tower device is intended El dispositivo Contrology® Classical Reformer with Tower está by the manufacturer to be used by people for the purposes of diseñado con fines de fisioterapia, rehabilitación, prevención, physiotherapy, rehabilitation, the prevention, treatment and relief tratamiento y alivio de lesiones, terapia de apoyo y funcional para of injuries, supportive, functional therapy for a disability or for...
- Page 3 REFORMER PARTS LIST 2. Secure the shoulder rest by turning the post clockwise until tight. See Figure 2. Overtightening these will make them difficult to remove. They should be snug but not too tight. DESCRIPTION PART NO. Reformer Frame Carriage Assembly Shoulder Assembly (pair) 17976 Mat Conversion...
- Page 4 ATTACH THE SPRINGS TO THE UNDERSIDE OF THE The Gear Block, used by all Reformer lengths, at the foot end is CARRIAGE installed on the left side rail of the gear positions as shown in Figure 8. The Gear Block has two settings, short and long. Figure Attach one spring to one 8 shows the short position, when spring bar is in the middle or slot in the bracket on the...
- Page 5 INSTALL THE OPTIONAL JUMPBOARD (86”/218cm and 89”/226cm models only) Correct installation of the jumpboard is very important. Lay the footbar flat down on the Reformer. Install the jumpboard down into the installed bracket on the inside of the foot end of the Reformer.
- Page 6 TOWER PARTS LIST 3. Use the provided (4) 1/4”-20 x 5/8” long screws, to secure the tubes to the brackets. It may be necessary to slightly lift the tube to align the holes. Start all the screws by hand before DESCRIPTION PART NO.
- Page 7 HOW TO INSTALL YOUR WIRE STOPS ON YOUR CONTROLOGY SPRINGS PARTS INCLUDED: DESCRIPTION PART NO. Wire Stop 17922 10-24 Set Screw 17931 3/32” Allen Wrench 17930 Start to thread a provided set screw into each wire stop, install the set screw into the wire stop so about 1/4 of the set screw sticks out. (Note they might be already in the wire stops, if they are, ensure Figure 6 they are not going into the middle opening of the wire stop)
- Page 8 INSTALLING THE MAT CONVERSION CONVERT BACK TO A REFORMER 1. Remove all springs that are attached to the spring bar. Remove the Mat Conversion, flip the footbar back into position 2. Remove the shoulder pads and brackets from the carriage. and ensure the kickstand is secure, remove the Mat Caster cover, roll the carriage to home position and attach at least one spring 3.
- Page 9 A mild soap and water solution may also be used. » Be sure to dry thoroughly. » For heavier soiling please call Balanced Body Technical Support. » Wheel tracks and wheels should be cleaned regularly with a cloth to ensure that tracks smoothly and quietly.
- Page 10 ATTENZIONE: questo macchinario è potenzialmente pericoloso Para obtener más información sobre el uso y la seguridad, o e Balanced Body Inc. non si assume la responsabilità in caso para ver las traducciones completas del manual (GUIA DEL di utilizzo o di utilizzo improprio. Se non siete ben informati USUARIO #17639), visite https://contrology.pilates.com/sup-...
Need help?
Do you have a question about the Contrology Classical Reformer with Tower and is the answer not in the manual?
Questions and answers