Table of Contents
Advertisement
Advertisement
Table of Contents

Related Manuals for Ametek mocon Dansensor CheckMate3


Summary of Contents for Ametek mocon Dansensor CheckMate3
- Page 1 User Guide P/N 300042-I 05/2019...
- Page 2 This blank page has been inserted to enable double sided printing of the document!
- Page 3 ® Dansensor CheckMate 3 User Guide User Guide Published by: MOCON Europe A/S Rønnedevej 18 4100 Ringsted, Denmark Tel +45 57 66 00 88 info.dk.mocon@ametek.com www.dansensor.com P/N 300042-I 05/2019...
- Page 4 ® User Guide Dansensor CheckMate 3 P/N 300042-I 05/2019...
-
Page 5: Table Of Contents
® Dansensor CheckMate 3 User Guide Table of contents 1. Introduction..........7 Register your product . - Page 6 ® User Guide Dansensor CheckMate 3 Cleaning and Maintenance ........28 General .
- Page 7 ® Dansensor CheckMate 3 User Guide 4. Technical Information........51 Technical specifications .
- Page 8 ® User Guide Dansensor CheckMate 3 P/N 300042-I 05/2019...
-
Page 9: Introduction
® Dansensor CheckMate 3 User Guide 1. Introduction Register your product Thank you for purchasing a Dansensor® product, we hope that the product will fullfill your needs. In order to learn more about our customers and the markets we serve, we kindly ask you to fill out the product registration form available on-line at www.dansensor.com/register In return we can offer to send important product information to you. -
Page 10: Notes, Cautions And Warnings
® User Guide Dansensor CheckMate 3 Notes, cautions and warnings! Throughout the manual notes, cautions, and warnings are indicated with various icons and written in bold like the example below: CAUTION! Always replace a fuse with one of the same size and rating. Explanation NOTE! The operator should observe and/or act according to the information in order to obtain the best possible function of the equipment. -
Page 11: Safety Instructions
® Dansensor CheckMate 3 User Guide Safety Instructions Personnel operating and maintaining the device must be familiar with all aspects of its operation and be proficient in maintenance. Such personnel should review the following precautions to promote safety awareness. General Always refer to the manual before operating or maintaining the equipment. -
Page 12: Checkmate 3 Overview
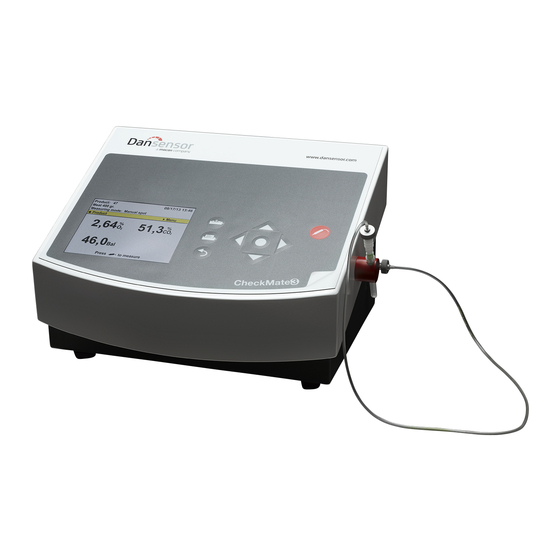
® User Guide Dansensor CheckMate 3 Dansensor® CheckMate 3 Overview Dansensor® CheckMate 3 is based on an all-in-one concept which together with state-of- the-art sensor technology ensures fail-safe tests and documentation. With full self- diagnostics, Dansensor® CheckMate 3 detects most common operator faults and offers an efficient automatic report function. - Page 13 ® Dansensor CheckMate 3 User Guide 11 12 Main switch Gas outlet 24VDC Power supply connection USB A port for connection of barcode reader, memory key and keyboard USB B port for PC communication (for future use) ...
-
Page 14: Setting Up
® User Guide Dansensor CheckMate 3 Setting up 1. Place the device on a level and stable surface. 2. Connect the supplied needle set to the measuring gas inlet (labelled ) on the right side of the device as shown below, then place the needle in the holder NOTE! It is not possible to fit the needle set without a filter on the measuring gas inlet. -
Page 15: Connection Of Additional Equipment
® Dansensor CheckMate 3 User Guide Connection of additional equipment Barcode reader It is possible to connect a barcode scanner to CheckMate 3. The barcode scanner must be a USB type and we recommend using a “Datalogic Heron D130” barcode scanner. ... - Page 16 ® User Guide Dansensor CheckMate 3 P/N 300042-I 05/2019...
-
Page 17: Operation And Maintenance
® Dansensor CheckMate 3 User Guide 2. Operation and Maintenance Modes The device can be in one of 5 modes: Switched off Power supply disconnected. Standby mode Display shows the Standby screen. User has been logged off (if login is required). -
Page 18: Login
® User Guide Dansensor CheckMate 3 Login Different levels of login can be set up: No login At start-up the device will automatically run the self-test and warm- up period and when finished it changes to show the measuring screen and will be ready for measuring. User login At start-up the display will show the list of users. -
Page 19: Logging Off
® Dansensor CheckMate 3 User Guide Logging off To log off press the key from the measuring screen. When device is switched into Standby or Sleep mode either automatically or when manually selected from the “Main menu”, current user will be logged off. Daily Start-Up At the start of the working day the device will normally be in one of the following modes: •... -
Page 20: Measuring
® User Guide Dansensor CheckMate 3 Measuring Getting the best measurement performance There are a number of factors to take into consideration when measuring O and CO gasses. The following guidelines should help you to obtain the best possible measurement accuracy and performance from the CheckMate 3 device. -
Page 21: Explanation Of The "Response Time (T 95 )
® Dansensor CheckMate 3 User Guide Explanation of the “Response time (T )” NOTE! Only valid for devices with an electrochemical (EC) O sensor. According to the specifications the Electro-chemical (EC) O sensor has a Response time (T ) of 9 sec. This means that when performing consecutive measurements in areas with large differences in the O concentrations, the device will as a minimum reach 95% of the “true”... -
Page 22: Offset Calibration
® User Guide Dansensor CheckMate 3 offset calibration NOTE! Only valid for devices with an Electro-chemical (EC) O sensor. An electrochemical (EC) sensor is a wearing part as the chemistry inside wears proportionally to the amount of O seen during its lifetime. We therefore recommend that you perform daily offset (20.9%) calibrations before starting measurements. -
Page 23: The Measuring Screen
® Dansensor CheckMate 3 User Guide The Measuring screen Product: 47 08/17/06 13:46 Meat 400 gr. Measuring mode: Manual spot Product Menu 2,49 25,1 72,4 Press to measure Upper section The upper section of the measuring screen displays the current date and time, currently selected product number, product name and product measuring mode. -
Page 24: Measuring Modes
® User Guide Dansensor CheckMate 3 Measuring modes Four different measuring modes are available: Manual spot Press key to start the measuring. The measuring stops automatically after the set-up product measuring time. Auto spot The measuring starts automatically when the measured gas is different from 20.9% O +/- 1.5%. -
Page 25: Selecting A Product For Measuring
® Dansensor CheckMate 3 User Guide Selecting a product for measuring 1. From the measuring screen press the key to bring up the Last used products screen. Last used products Total no. of products: 10 Find product 47: Meat 400 gr. 100: Ham 200gr. - Page 26 ® User Guide Dansensor CheckMate 3 6. Selecting one of the Product..methods (ex. Product name) brings up an appropriate touch screen keyboard for keying in the product data. Enter product name "Sausage " Ins Del OK 7. Key in the product name (ex. Sausage) and confirm by pressing the OK key. The Matching products screen will appear showing a list of all products a name starting with Sausage.
-
Page 27: Performing A Measurement
® Dansensor CheckMate 3 User Guide Performing a measurement 1. Make sure that the device is in Ready mode - see "Modes" on page 2. Select appropriate product - see "Selecting a product for measuring" on page 3. Place a septum on the product/package to be measured/analysed. - Page 28 ® User Guide Dansensor CheckMate 3 9. When measuring finishes (or in case of periodic measuring, after each measuring) the recent result is shown on the screen Product: 47 08/17/06 13:46 Meat 400 gr. Measuring mode: Manual spot Product Menu 2,49 25,1...
-
Page 29: Daily Shut-Down
® Dansensor CheckMate 3 User Guide 13. When finished the needle should be removed from the product package and placed in the needle holder on the side of device. Daily Shut-down At the end of the working day you have various options to shut the device down: Switch device off Simply switch off the main switch on the backside of the device. -
Page 30: Cleaning And Maintenance
® User Guide Dansensor CheckMate 3 Cleaning and Maintenance General Performing cleaning and maintenance regularly reduces the chances of equipment failure. CAUTION! Personnel performing any maintenance or cleaning must familiarize "Safety Instructions" on page 9 themselves with the before attempting any of these procedures. -
Page 31: Replacing Printer Paper
® Dansensor CheckMate 3 User Guide The needle may sometimes touch the product being measured or the needle may suck fluid from the packaging from which the measurement is taken. If this happens, it will be necessary to replace both the needle and the filter. ... - Page 32 ® User Guide Dansensor CheckMate 3 P/N 300042-I 05/2019...
-
Page 33: Menus And Settings
® Dansensor CheckMate 3 User Guide 3. Menus and Settings General When device is switched on (after power off ) it is locked in User access level. In User access level the operator has access to a limited number of functions only and is not allowed to perform parameter set-up. - Page 34 ® User Guide Dansensor CheckMate 3 Export / Import* Export of product log data, export/import of products, users and device settings. Requires connection of a USB memory key. "Export/Import" on page 49 for details. Standby Log off and switch the device into Standby mode. "Standby"...
-
Page 35: Product Menu
® Dansensor CheckMate 3 User Guide Product menu Selecting Product menu from the Main menu will display a menu with available product options. Product menu Products: 10 Total no. of products: 10 Meat Mix 1000gr. Edit product 9999: Junk food New product Meat 400gr. -
Page 36: New Product
® User Guide Dansensor CheckMate 3 Customer fields Select whether or not keying in of customer data before and/ or after the measurement is required. Note data must be entered after the measurement if required. In these cases Note required. Press will be displayed in the bottom of the measuring screen. -
Page 37: Delete Product
® Dansensor CheckMate 3 User Guide Delete product Unused products can be deleted. When deleting a product both the product and the product’s logged data are deleted. The action must be confirmed before deletion is performed. View collected data This function enables the operator to display logged data for any of the existing products. (Selecting Data log from the main menu displays logged data for the currently selected product only.) Delete collected data... -
Page 38: Data Log
® User Guide Dansensor CheckMate 3 Data log Selecting Data log from the Main menu will display a screen with a list of all the logged data for the currently selected product. Measuments which have been interrupted or marked as invalid are displayed on a red background. -
Page 39: General Setup
® Dansensor CheckMate 3 User Guide General setup Selecting General setup from the Main menu will display a menu with available set-up parameters. 13:46 General setup 08/17/06 Data log setup Network setup ... Custom fields setup ... User setup ... Formats/Units/Time... -
Page 40: Data Log Setup
® User Guide Dansensor CheckMate 3 Select whether or not the DST (Dynamic Sample Time) function should be enabled - see "Dynamic Sample Time (DST)" on page 18 for details. NOTE! Do not disable DST function on the device without consulting an authorised Dansensor Service Point. - Page 41 ® Dansensor CheckMate 3 User Guide Print each measurement Printer will print a header and subsequently each logged measurement will be printed automatically line by line Function deactivated Mark measurement After each measurement performed in either Auto spot as invalid or Manual spot mode you will be asked if you want to mark measurement as invalid.
-
Page 42: Serial Data Dump Specification
® User Guide Dansensor CheckMate 3 Serial data dump specification Each measurement is on one line terminated with a Carriage Return + Line Feed characters (ASCII 0x0D, 0x0A). The line consists of data separated by semicolons (";"). Last parameter is also followed by a semicolon. - Page 43 ® Dansensor CheckMate 3 User Guide Serial data dump specification Start Column Length ** Type Description Note pos.* Numeric O2 [%] Fixed decimal point, eg. "020.9465" Numeric CO2 [%] Fixed decimal point, eg. "020.9465" Numeric Balance [%] Fixed decimal point, eg. "020.9465" Numeric (Not used) Fixed decimal point, eg.
-
Page 44: Network Setup
® User Guide Dansensor CheckMate 3 Network setup Selecting Network setup ... from the General setup menu will display a screen showing the network set-up parameters. 13:46 Network setup 08/17/06 DHCP IP address XX.XX.XX.XX S ubnet mask XXX.XXX.XXX.X Default gateway XXX.XX.X.X This is where you make the device’s network (LAN) settings. -
Page 45: User Setup
® Dansensor CheckMate 3 User Guide User setup Selecting User setup... from the General setup menu will display a screen showing the User setup parameters. 13:46 User setup 08/17/06 Show users Edit user New user Delete user User log in: Log in with ID: From here the user database is maintained. -
Page 46: Formats/Units/Time
® User Guide Dansensor CheckMate 3 Formats/Units/Time Selecting Format/Units/Time... from the General setup menu will display a screen showing the various setup parameters for output formats and units. Formats/Units/Time Time 14:52:33 Date 08/17/06 Date format MM/DD/YY Time format Pressure unit mbar Temperature unit °C... -
Page 47: Access Level
® Dansensor CheckMate 3 User Guide Access level When device is switched on (after power off ) it is locked in User access level. In User access level you have only access to a limited number of functions and is not allowed to perform parameter set-up. -
Page 48: Calibration
® User Guide Dansensor CheckMate 3 Calibration NOTE! Apart from the below described “Offset (20,9%) calibration” all calibration procedures must be carried out by Service Technicians only, as calibration requires for special skills and the access to certified calibration gasses. Invalid calibration compromises measurement results. - Page 49 ® Dansensor CheckMate 3 User Guide 6. The appearing Calibration menu holds a list of the 13:46 Calibration 08/17/06 various sensors in the device. Calibrate For each sensor there is a table showing the appropriate O sensor (EC) Response Pressure Calibration calibration parameters.
- Page 50 ® User Guide Dansensor CheckMate 3 11. The calibration will be executed. 13:46 Information 08/17/06 Please wait Calibrating 12. When calibration has finished, the pump stops and the 13:46 Calibration 08/17/06 display will return to the sensor menu. Select sensor and press to begin calibration Note that the fields for the 20,9460% gas now have been O sensor (EC)
-
Page 51: Export/Import
® Dansensor CheckMate 3 User Guide Export/Import Selecting Export/Import from the Main menu will display a screen listing the various functions for exporting and importing of data. 13:46 Export / Import 08/17/06 Export data collection of current product Export all data collections Export all products port all products... -
Page 52: Sleep
® User Guide Dansensor CheckMate 3 Sleep Selecting Sleep from the Main menu will force the device into Sleep mode. Sleep 13:46 08/17/06 "Modes" on page 15 for details. Language Selecting Language from the Main menu will display a screen listing the available languages. Select language English standard Nederlands... -
Page 53: Technical Information
® Dansensor CheckMate 3 User Guide 4. Technical Information Technical specifications Electrical connections Mains 100-240V AC, 50-60 Hz Power consumption Zirconia O sensor:max 40W Electrochemical O sensor:max 30W Mechanical data Analyzer size 180 x 315 x 220 mm (H x W x D) Analyzer weight 3,7 kg Box of one analyzer... -
Page 54: Gas Connection
® User Guide Dansensor CheckMate 3 Gas connection Gas inlet Sample hose: Length 60 cm, Ø0,5mm Sample type/connector: Needle 0,8x40mm SmartPen 0,8x9mm Filter/Water trap: 0,2 μ Gas outlet Connection for hose (inner diameter Ø 3mm) Basic specifications Warm-up time Operational after 10 min. (60 minutes to full specifications) Measuring ranges 0-100 % O... -
Page 55: Zirconia O 2 Sensor
® Dansensor CheckMate 3 User Guide Zirconia O sensor Measure time Min. 3 sec. (incl. 1 sec. measure delay time) Sample volume Min. 1,35 ml (with a 3 sec measuring time and a flow of 27 ml/min) Typical sample volume 2,83 ml ( with a 5 sec measuring time and a flow of 34 ml/min) Reference gas... -
Page 56: Accuracy Specification (Excl. Calibration)
® User Guide Dansensor CheckMate 3 Accuracy specification (excl. calibration) Zirconia sensor resolution 0,1 % absolute in range above 10 % 0,01 % absolute in range above 1 % 0,001 % absolute in range below 1 % Zirconia sensor accuracy ±0,01 % absolute in range below 1 % ±1 % relative in range above 1 % Electrochemical sensor resolution... -
Page 57: Specification Conditions
® Dansensor CheckMate 3 User Guide Specification conditions Ambient temperature +23 °C Ambient pressure 1013 hPa Measurement gas temperature +23 °C Measurement gas flow 34 ml/min NOTE! All gas concentrations are specified in volume percent. Conformity WEEE RoHS ... -
Page 58: Consumable Parts And Options
® User Guide Dansensor CheckMate 3 Consumable parts and options Ordering items When ordering any of the below listed items please state carefully the item number, the item specification and the number of items wanted and send the order to your spare parts dealer. Available User Guides All user guides are available on: CD, User guides, CheckMate 3 cpl. - Page 59 ® Dansensor CheckMate 3 User Guide P/N 300042-I 05/2019...
- Page 60 ® User Guide Dansensor CheckMate 3 P/N 300042-I 05/2019...
- Page 61 This blank page has been inserted to enable double sided printing of the document!
- Page 62 MOCON Europe A/S Rønnedevej 18 4100 Ringsted, Denmark Tel +45 57 66 00 88 info. dk.mocon ametek .com www.dansensor.com...
Need help?
Do you have a question about the mocon Dansensor CheckMate3 and is the answer not in the manual?
Questions and answers