Table of Contents
Advertisement
Quick Links
Advertisement
Table of Contents

Related Manuals for Kanardia Nesis III


Summary of Contents for Kanardia Nesis III
- Page 1 User’s Manual © Kanardia d.o.o. April 2022 Release for software version 3.9...
- Page 3 In short, the license gives you right to copy, reproduce and modify this document if: • you cite Kanardia d.o.o. as the author of the original work, • you distribute the resulting work only under the same or similar license to this one.
- Page 4 Nesis III User’s Manual WEEE Statement Disposal of Waste Electrical and Electronic Equipment. This electrical item cannot be disposed of in normal waste. Check with your local authority for kerbside collection, or recycle them at a recycling centre. Third Party Licensing Nesis software is using the Qt Library published by The Qt Company.
-
Page 5: Table Of Contents
Nesis III User’s Manual CONTENTS Contents 1 Introduction 1.1 Icons Used Trough the Manual ....11 1.2 Warnings ......11 1.3 Cautions . - Page 6 Nesis III User’s Manual CONTENTS 3.10.2 Video ......38 3.11 Screen Elements ......38 3.11.1 Airspeed Indicator .
- Page 7 Nesis III User’s Manual CONTENTS 4.6 Adjusting Fuel Level ......63 4.7 Setting Pitch Correction ..... . 63 5 Flarm and ADS-B Receivers 5.1 Directional and Non-Directional Traffic .
- Page 8 Nesis III User’s Manual CONTENTS 8 User Options 8.0.1 Password ......84 8.1 Logbook ....... 85 8.2 Routes .
- Page 9 Nesis III User’s Manual CONTENTS 9 Service Options 9.1 Password ......108 9.2 Icons .
- Page 10 Nesis III User’s Manual CONTENTS 13 Maps 13.1 Layers ....... . 122 13.2 Vector Maps .
-
Page 11: Introduction
Nesis III User’s Manual 1. Introduction Introduction First of all we would like to thank you for purchasing our product. Nesis is a complex instrument and we strongly recommend reading the manual before using Nesis. The introduction chapter contains some general information about the instrument and principles of the operation. -
Page 12: Cautions
Nesis III User’s Manual 1.3 Cautions • Carefully compare Nesis navigational information with other available navigational sources. In the case of any discrepancies, resolve them before proceeding with the navigation. • The navigational data used in Nesis comes from various public domain and open data sources. - Page 13 Nesis III User’s Manual 1.3 Cautions • Nesis does not have any serviceable parts. Repairs must be done only by authorized service centers. An unauthorized repair could void warranty. • Due to high complexity of the system, the pilot must accept that pro- viding self-test capability for all possible system failures is not practical.
-
Page 14: System Overview
Nesis III User’s Manual 2. System Overview System Overview Components in the Nesis System The Nesis System consists of several electronic components, which work closely together to bring flight, engine and fuel information onto graphical display. The system consists of various components, some of these are required and some are optional. -
Page 15: Optional Can Bus Components Or Accessories
Nesis III User’s Manual 2.1 Components in the Nesis System Engine monitoring (called DAQU) is required to read the engine, fuel and aircraft related sensors and to put the obtained information on the CAN bus. It has three digital channels (Z1, Y1 and Y2), twenty analog channels (A, B, C, D) and a spe- cial manifold pressure connector (A13). - Page 16 Nesis III User’s Manual 2.1 Components in the Nesis System Electronic Compass (called MAGU) is a stand alone unit which measures magnetic field vector. It serves as a gyro stabilized compass and provides true and magnetic heading with high accuracy. It features an intelligent calibration algorithm, where only one known magnetic direction is needed to calibrate it.
-
Page 17: Optional Can Bus Displays
Nesis III User’s Manual 2.1 Components in the Nesis System Dimu is a dimming device. Its only job is to adjust LCD brightness of all devices connected to the CAN bus with a simple rotation of the knob. It also provides analogue output for third-party devices. -
Page 18: Display Operation
Nesis III User’s Manual 3. Display Operation A small slave display (called EMSIS) comes in two forms. The first fits into 80 mm standard aviation opening, the second is larger with 3.5 inch diagonal and has more complex shape. They both can be viewed as small EFIS displays. -
Page 19: Display Overview
Nesis III User’s Manual 3.1 Display Overview Display Overview The Nesis command panel is organized according to Figure 1. It uses three push buttons and one push knob for manipulation. It has an USB port for software, map and data updates. Most of the actions can be also done using the touch screen. -
Page 20: Touch Screen
Nesis III User’s Manual 3.1 Display Overview ○ The User button. Both, short and long push are user configurable. By default it shows the list of nearest airports and when autopilot is detected, it starts the autopilot actions. ○ A short push on the Screen-switching button is used to switch to the next screen. -
Page 21: Turning On/Off
Nesis III User’s Manual 3.2 Turning ON/OFF Turning ON/OFF Nesis is connected to an avionics power bus which has a mechanical switch between the bus and the battery. Thus it is automatically turned ON and therefore it does not have an ON/OFF button. - Page 22 Nesis III User’s Manual 3.4 Status Bar Figure 2: Typical start-up sequence. Figure 3: Illustration of the Status bar. ○ Bearing and distance to the next navigation point. (Only when naviga- tion is active.) ○ Estimated time of arrival to the next navigation point. Below is name of the navigation point.
- Page 23 Nesis III User’s Manual 3.4 Status Bar ○ Various status symbols. More details are given next. Various symbols can appear on the symbol section of the status bar. GPS Symbols These symbols show health of the GPS receiver and reception of the GPS satellites.
-
Page 24: Gdl90 Devices
Nesis III User’s Manual 3.5 Screens When a connection was not established, no sysmbol will apear. This means that either device is not present or it is not working or Nesis does not commu- nicate properly with the device (wrong baud rate, parity, wrong connection, etc.) -
Page 25: Classic Screen
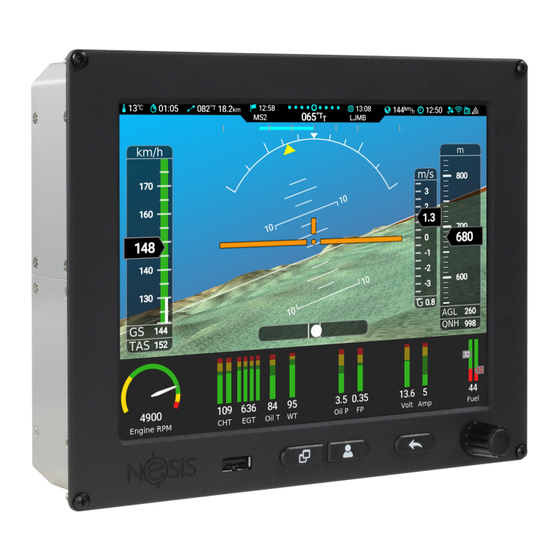
Nesis III User’s Manual 3.6 Classic Screen Figure 4: Typical four screens: 1 – Classic Screen, 2 – Navigation Screen, 3 – Engine Screen, 4 – Modern Screen. A generic solution will be shown next. Your solution may be slightly or even significantly different. - Page 26 Nesis III User’s Manual 3.6 Classic Screen Figure 5: Illustration of the classic flight information screen. ○ The airspeed indicator displays IAS (indicated airspeed) and TAS (true airspeed). The indicator background can display white, green, yellow arc, V limit, recommended approach speed and other important speed limits.
-
Page 27: Navigation Screen
Nesis III User’s Manual 3.7 Navigation Screen combination allows optimal setting of power level. Gyroplanes and he- licopters have rotors and in this case engine RPM is usually combined with rotor RPM. See also section 3.11.4 on page 42. ○... - Page 28 Nesis III User’s Manual 3.7 Navigation Screen Figure 6: Illustration of the navigation screen. ○ A large compass rose over the map gives directional awareness. A track- ing projection line with time arcs defines future position of the aircraft in minutes. This tells predicted position assuming that current ground speed and tracking remain the same.
-
Page 29: Moving The Map Around
Nesis III User’s Manual 3.7 Navigation Screen ○ Two nearest airfields information is shown: name of the airfield, distance and bearing. Green dot tells that airfield can be safely reached in a glide mode above minimum safe altitude, yellow dot tells it may be reached, but not above minimum altitude and orange dot tells it can’t be safely... - Page 30 Nesis III User’s Manual 3.7 Navigation Screen Figure 7: Illustration of the navigation screen in the pan mode. Figure 8: Example of OFM details. very good coverage with a lot of details. Where-ever such details are available, they are included in the Nesis. Figure 8 illustrates two examples.
-
Page 31: Weather Overlay
Nesis III User’s Manual 3.8 Weather Overlay ○ Holding. ○ Traffic circuit. ○ Runway and airfield details with taxiways and platforms. Weather Overlay When Nesis is equipped with a WiFi module and it has a live access to the Internet (EU only) or when it is equipped with an ADSB receiver supporting GDL90 protocol (US only) a weather overlay is shown over the base map. -
Page 32: Map Layers And Details
Figure 10: Approach map overlay example for the LJPZ airfield. The application is accessible from our web site for Windows, Mac and Linux systems. Visit www.kanardia.eu and select Support|Software. Furthermore, you may also try special online version of the app that runs in a web browser (Chrome, Firefox, etc.) Select the APPS|Approacher section... -
Page 33: Ofm Details
Nesis III User’s Manual 3.8 Weather Overlay Figure 11: The Map layers window. This window allows for quick access to various map options. Raster charts This option toggles the visibility of the raster chart layer. When raster charts are not present, the command is ignored. -
Page 34: Airspace Filter
Nesis III User’s Manual 3.8 Weather Overlay Figure 12: The Map layers window. OFM Transit This option toggles transit routes defined in the OFM database. The transit routes are typically used to define a way trough TMA into CTR or into CTR holding. -
Page 35: Engine Screen
Nesis III User’s Manual 3.9 Engine Screen Figure 13: Dialog showing settings for the Airspace Filter window. Hide zones above During flight, all zones, which bottom is more then speci- fied distance above current flight altitude, will be hidden. This changes dynamically with the current aircraft altitude and with time. -
Page 36: Modern Screen
Nesis III User’s Manual 3.10 Modern Screen Figure 14: Illustration of the engine screen. ○ Single arc used to oil temperature. ○ Single arc with two needles for CHT and four horizontal bars for EGT. ○ Roll and pitch trim indicators together with flap indicator. - Page 37 Nesis III User’s Manual 3.10 Modern Screen Figure 15: Illustration of the modern screen. ○ Status bar. Please refer to section 3.4 on page 21 for more details. ○ Airspeed tape. Indicated airspeed is shown in a form of moving tape.
-
Page 38: Modern Screen With Moving Map
Nesis III User’s Manual 3.11 Screen Elements ○ Relative wind indication. Wind direction and speed are shown below ○ Flap indication and trim indications. ○ Slip indication. ○ Engine power section in the shape of round arc. Status lights on the left are shown in the case of Rotax iS or ULPower engines only. -
Page 39: Airspeed Indicator
Nesis III User’s Manual 3.11 Screen Elements Figure 16: A moving map variant of modern screen. Figure 17: Video example over most of the screen. 3.11.1 Airspeed Indicator The airspeed indicator is used to display indicated and true airspeed. Indi- cated airspeed (IAS) is obtained from differential pressure sensor. - Page 40 Nesis III User’s Manual 3.11 Screen Elements has several markings as you can see on Figure 18. Figure 18: An airspeed indicator example optimized for an aeroplane using two step landing flaps. The markings on the figure have the following meanings: ○...
-
Page 41: Small Attitude Indicator
Nesis III User’s Manual 3.11 Screen Elements ○ (velocity never exceeded) – red-line mark indicates the maximum demonstrated safe airspeed that the aircraft must not exceed under any circumstances. ○ Units used for the indicated and true airspeed. ○ (yellow triangle) – landing reference speed, which is the recom- mended speed used on landings. -
Page 42: Altitude Indicator
Nesis III User’s Manual 3.11 Screen Elements value on the scale. The white triangle on the scale identifies zero roll. Two short dashes identify 10 and 20 roll. Larger dash is used for 30 roll, next short dash for 45 and final longer dash for 60 . -
Page 43: Gyroplane Engine Rpm, Rotor Rpm, Manifold And Prerotation Indicator
Nesis III User’s Manual 3.11 Screen Elements Figure 20: The altitude indicator with the scale given in feet. through a throttle in the intake manifold of an engine. It is a measure of the amount of airflow through the engine. Hence it is also a measure of the power capacity in the engine. - Page 44 Nesis III User’s Manual 3.11 Screen Elements Figure 21: The combination of RPM and manifold pressure indicator. Figure 22: Four in one: the combination of engine RPM, rotor RPM, manifold pressure and prerotation helper lamp. Prerotation lamp is used during rotor prerotation process as a part of takeoff procedure.
-
Page 45: Helicopter Rotor And Engine Rpm Indicator
Nesis III User’s Manual 3.11 Screen Elements Once gyroplane is airborne, the lamp does not show anymore. 3.11.6 Helicopter Rotor and Engine RPM Indicator Piston engine powered helicopters have engines directly connected to the ro- tor (using some transmission, of course). So rotor RPM is directly related to engine RPM. -
Page 46: Fuel Computer Monitor
Nesis III User’s Manual 3.11 Screen Elements Figure 24: Illustration of the mini engine monitor. 3.11.8 Fuel Computer Monitor The fuel computer monitor provides the fuel related information like fuel quantity, economy, range and endurance. Figure 25 shows an example of such information. -
Page 47: Oat, Flight Time, Fuel
Nesis III User’s Manual 3.11 Screen Elements • The endurance is a derived value based on the available fuel quantity, average fuel consumption (depends on the fuel computer mode) and endurance reserve. It represents the engine time left assuming average fuel consumption. -
Page 48: Special Markings On Engine Parameters
Nesis III User’s Manual 3.11 Screen Elements compass. Figure 27 shows an example. Figure 27: Illustration of the direction indicator. The indicator also shows heading bug. The bus is active only when a route or a direct to waypoint was activated. -
Page 49: Flight Time Activities
Nesis III User’s Manual 4. Flight Time Activities Figure 28: Round pressure indicator, with special markings shown on needles. Please note that availability of these special markings strongly depends on a sensor type, DAQU channel type in on channel function type. Usually only a sub-set of above mentioned conditions can be detected. -
Page 50: Qnh
Nesis III User’s Manual 4.2 QNH Figure 29: Main menu for the Modern Screen. Route Opens a window for route selection and manipulation. See section 4.5 for more details. Pitch Allows for pitch correction. This option is available only when AHRS is visible on the screen. -
Page 51: Initial Qnh Setting
Nesis III User’s Manual 4.3 Radio Standby Figure 30: Setting the QNH value. the knob until the altimeter is close to zero 4.2.2 Initial QNH Setting When QNH is not known but the airfield elevation is known, the QNH can be approximated by setting the altimeter to the airfield elevation. -
Page 52: Selecting A Waypoint
Nesis III User’s Manual 4.4 Selecting a Waypoint Selecting a Waypoint Nesis maintains separate lists of airfields, navigation aids , VFR reporting points and user points. Thus selection of a waypoint is a two step process. In the first waypoint type is selected – Figure 32 left. In the second step actual waypoint is selected, Figure right. -
Page 53: Creating A Marker
Nesis III User’s Manual 4.4 Selecting a Waypoint Displays only VFR reporting points from the database. NavAid Displays only VORs, NDBs, TACANs, etc. from the database. User Displays only user specified waypoints and markers. Displays all items from all databases together. -
Page 54: Route
Nesis III User’s Manual 4.5 Route Figure 33: An example of the details window for LJMB airfield. Frequencies section lists frequencies associated with the waypoint, when available. When radio is connected with Nesis, a selection of frequency will transfer it into the radio. The selected frequency will be set as a standby frequency. -
Page 55: Activating A Route
Nesis III User’s Manual 4.5 Route Figure 34: An example of interpreted METAR report. • When there is no active route, Nesis opens the route selection/activation window. See Figure 35 left. The window allows creation of a route, importing a route from USB stick or selection of one of existing routes from a list. -
Page 56: Creating A New Route - Nesis Without Touch Screen
Nesis III User’s Manual 4.5 Route Figure 35: Route selection and activation window (left) and route manipula- tion window (right). Figure 36: List of possible actions on the Route selection. 4.5.2 Creating a New Route – Nesis Without Touch Screen A route consists of a takeoff and landing airfield. - Page 57 Nesis III User’s Manual 4.5 Route In order to create above mentioned route, follow the steps: • Select the New option from Figure 35 left. • Nesis asks you for the departing (takeoff) airfield. Search for LJCL and select it.
-
Page 58: Creating A New Route - Nesis With Touch Screen
Nesis III User’s Manual 4.5 Route Notice the Summary item. The total distance, estimated time needed for the route and estimated fuel consumption are shown. The time estimate is based on the typical aircraft cruising speed. See section 8.3.3 on page 89. - Page 59 Nesis III User’s Manual 4.5 Route Figure 38: Example of route planning with touch screen. • Observe the route path. Move the map if necessary. The path crosses Wiener Neustadt CTR area. Touch the path near by and drag it over the FINKENHAUS reporting point.
-
Page 60: Importing A Route
Nesis III User’s Manual 4.5 Route • A list of route waypoints is displayed on the right. A touch on a waypoint name allows you to select a different waypoint, which will replace the existing one. • A swipe over waypoint name to the left or to the right will remove the waypoint from the route. -
Page 61: Deleting A Route
Nesis III User’s Manual 4.5 Route Figure 39: Example of METAR information along the route. • Insert the stick into Nesis and select the Import command. See Figure 35 left. • Select the route file from the USB stick. This will only copy the route into Nesis but it will not make it active. -
Page 62: Editing A Route
Nesis III User’s Manual 4.5 Route from the main menu and then select the Rename command. Use the on-screen keyboard or the knob to enter a new name. 4.5.7 Editing a Route This command allows editing an existing route. New waypoints can be added or modified. -
Page 63: Adjusting Fuel Level
Nesis III User’s Manual 4.6 Adjusting Fuel Level • Select one of remaining route waypoints in direct to mode. Nesis will navigate directly to this waypoint and once the waypoint is reached, it will resume with route navigation. • Select one of the remaining route legs. Nesis will select this leg as a new active leg. -
Page 64: Flarm And Ads-B Receivers
SUPPORT section for manuals and firmware updates. • Update device with the latest firmware (software). Devices must be updated every year or they will stop working. Kanardia has nothing to do with this unusual demand. • Devices are sometimes shipped with obsolete firmware. Update the device with the latest firmware version before installation. -
Page 65: Directional And Non-Directional Traffic
Nesis III User’s Manual 5.1 Directional and Non-Directional Traffic • When a mode S transponder is installed in an aircraft, it does not nec- essary mean that it also transmits ADS-B out signal. • Intruding traffic with C-mode or even S-mode transponder without ADS-B out signal are all non-directional targets. -
Page 66: Traffic On The Moving Map
Nesis III User’s Manual 5.2 Traffic on the Moving Map • The transponder reply comes from an aircraft, which is NOT equipped with ADS-B out. These are majority of small aircraft. This reply does not include position, speed, direction. It has only altitude (C-mode) and squawk. -
Page 67: Warning
Nesis III User’s Manual 5.3 Warning Figure 42: Traffic symbols on a map. Vertical difference is in hundreds of feet, as three digits are used. When Nesis is set to show altitude in feet, then the vertical difference will be shown in hundreds of feet. - Page 68 Nesis III User’s Manual 5.3 Warning this message and it shows a large warning window on any screen as long as such messages persist. We would like to emphasize that all decision making is done by the device. Figure 43 illustrates an example.
-
Page 69: Settings
Nesis III User’s Manual 5.4 Settings Figure 44: Left: Alert for an airplane, 330 meters away, slightly from right, 400 feet above and 10 - 30 above the horizon. Right: Alert for a balloon, 190 meters away, direction is not known, 300 feet above and 10 - 30 above the horizon. -
Page 70: Info
Nesis III User’s Manual 5.4 Settings ADS-B settings allows configuration of some ADS-B specific settings. Note, not all devices support this. Range settings allows configuration of some range based variables. Note, not all devices support this. Errors & Warnings option appears only when the device detects an internal error or warning. -
Page 71: General Settings
Nesis III User’s Manual 5.4 Settings Region defines the region for which was device configured. Flarm horizontal tells horizontal limit to detect Flarm based signals. Please note that this is a theoretical limit. De facto limit can be significantly lower. -
Page 72: Ads-B Settings
Nesis III User’s Manual 5.4 Settings • The Random option shall be avoided. It will generate a different address on every device restart. 5.4.3 ADS-B Settings These settings group is related with transponder and ADS-B settings. Ac- cording to our experiences, only Power Flarm accepts these settings properly. -
Page 73: Range Settings
Nesis III User’s Manual 5.5 Errors N/D calibration sets antenna calibration value. A higher value makes non- directional targets appear closer — it compensates for low antenna gain and/or a long cable. N/D target beep enables/disables beep sound on the device for non-directio- nal targets. -
Page 74: New Traffic' Messages
Nesis III User’s Manual 5.5 Errors Figure 46: Left: a part of the main map screen, which shows the Flarm device status rectangle. Right: Flarm Error and Warning window. On top errors and warnings are displayed and the Acknowledge command at the bottom. -
Page 75: Engines With Ecu
Nesis III User’s Manual 6. Engines with ECU ‘‘New Traffic’’ message gives four options: Disable – do notthing, Text & Voice gives a textual and audial indication of new traffic, Text only shows only text and Voice only plays only audial message. -
Page 76: Status Details
Nesis III User’s Manual 6.1 Rotax iS 6.1.1 Status details The status details are accessible from the alarms icon on the options screen. Select the Alarms icon and then the Rotax iS status... option. Figure 49 shows an example. Alternatively, a touch on the status area opens the same window. -
Page 77: Ulpower Engines
Nesis III User’s Manual 6.2 ULPower Engines ECO mode has only two states: inactive and active. The active state means that the engine operates in the ECO mode. Device faults Normaly No errors detected message is shown. In the case of ECU/engine failure, one or more messages can appear here. -
Page 78: Logbook
Nesis III User’s Manual 7. Logbook Logbook Nesis automatically keeps a log of flights and stores them in a logbook. It keeps recording as long as Nesis is powered on. When logs are requested, it extracts takeoff and landing events and combines them in flights. An example is given on Figure 52. -
Page 79: Show Details
Nesis III User’s Manual 7.1 Show Details Figure 53: A logbook options example. Show Details The Show Details option, opens a window with more details about selected flight. Figure 54 gives an example. Figure 54: An example of flight details. - Page 80 Nesis III User’s Manual 7.1 Show Details Flight section gives details and some statistics about a flight. Takeoff time when takeoff conditions were detected. Landing time when landing conditions were detected. Duration total flight duration. Distance distance traveled. This is not point-to-point distance. This is a distance of the path projected to the ground traveled during the flight.
-
Page 81: Copy Flight To Usb
Nesis III User’s Manual 7.2 Copy Flight to USB Copy Flight to USB The Copy flight to USB option creates two files on the USB stick for the selected flight. One file has .kml extension and the other has .tab extension. - Page 82 Nesis III User’s Manual 7.2 Copy Flight to USB Figure 56: A detail of flight opened in Google Earth. Vertical profile is visible here. is stopped. The Tab file format is a plain text format, where each row represents one record and parameters in the record are separated by a tab character.
-
Page 83: Copy Logbook To Usb
Nesis III User’s Manual 7.3 Copy Logbook to USB as the separator and English (USA) as the language. This makes sure that decimal values are properly imported. 6. The result of the import is then shown on Figure 58. Some column widths were adjusted and some cells were hidden. -
Page 84: User Options
Nesis III User’s Manual 8. User Options Figure 58: An example of flight details upon successful import. User Options Nesis options are split into two parts: user options and service options. User options are always accessible, while service options require special unique password. -
Page 85: Logbook
Nesis III User’s Manual 8.1 Logbook Figure 59: An example of logbook opened in Firefox browser. All pilots and Complete History were selected. A touch-and-go event is shown in row 1. Logbook Select the Logbook icon in order to access the logbook. Logbook activities are covered in section 7 starting on page 78. -
Page 86: User
Nesis III User’s Manual 8.3 Settings Figure 60: Illustration of the user options screen. Figure 61: Main settings options. 8.3.1 User The user item leads to some user specific options and it is also used to assign actions to buttons and knobs, Figure 62. - Page 87 Nesis III User’s Manual 8.3 Settings Figure 62: User options. In the case of partial translations, the missing translations will appear in English language. Time zone Specify the difference between local time and UTC time. Spec- ify zero in order to show the UTC time everywhere. In majority of cases the difference is given in whole hours.
-
Page 88: Units
Nesis III User’s Manual 8.3 Settings External long When connected, it is typically used to re-activate autopilot. The following actions can be assigned to each of the buttons mentioned before. Note that some actions require additional equipment to be connected to the CAN bus to be operational. -
Page 89: Range & Fuel
Nesis III User’s Manual 8.3 Settings Figure 63: Unit selection window example. Physical quantity Available units Altitude feet, meters Climb rate ft/min, m/s Distance NM, km, mi(les) Airspeed kts, km/h, mph Windspeed kts, km/h, m/s hPa, inHg Pressure bar, psi... -
Page 90: Screen
Nesis III User’s Manual 8.3 Settings Figure 64: Parameters related to the range in fuel calculations. Fuel consumption represents average cruise fuel consumption of aircraft. This value will be then used in the fuel computer for the endurance and range calculation. See also the Fuel computer mode section. -
Page 91: Map
Nesis III User’s Manual 8.3 Settings Figure 65: Parameters related to the Nesis screens. • magnetic directions – all directions are related to magnetic North. Mode This option tells which value to shown on the top of each screen. • Track taken from the GPS receiver or •... -
Page 92: Logger
Nesis III User’s Manual 8.3 Settings Figure 66: Parameters related to the Nesis maps. Terrain color defines the terrain elevation color ramp used in terrain ren- dering. Tail size is used to show your past flight path in real time on the map. The option defines how long this tail shall be in terms of time. -
Page 93: Maintenance
Nesis III User’s Manual 8.3 Settings Figure 67: Logger and logbook specific parameters. Takeoff speed is the threshold speed, which must be exceeded. As soon it is exceeded (with a small delay) Nesis treats the aircraft as airborne. This speed shall be larger than wind gusts to prevent false logs. -
Page 94: Engine Shut Down
Nesis III User’s Manual 8.3 Settings Figure 68: Left: Maintenance options. Right: Maintenance warning. Next check at specifies engine hours when maintenance check shall be per- formed. Warn before is used to define how many hours before the check the warning starts to appear on the startup window. -
Page 95: Glide
Nesis III User’s Manual 8.3 Settings (a) Parameters (b) Countdown. Figure 69: Engine shut down example. Speed threshold This limit shall be set below flying speed. It is used to- gether with the RPM threshold to determine when to start the count- down. -
Page 96: Pilots
Nesis III User’s Manual 8.4 Pilots Pilots When several people are flying an aircraft, pilots and instructors can specified. When more that one pilot is given, Nesis ask for its name on the startup and when at least one instructor is given, Nesis also asks for an instructor. Pilot and instructor names are automatically recorded, when takeoff conditions are detected and they will show in the logbook. -
Page 97: Alarms
Nesis III User’s Manual 8.5 Alarms Deleting a name from a list will also delete name from logbook. A flight, made by this pilot will be still in the logbook, but “–” will appear instead of the name. Activating a Pilot On Nesis start, a chance is given to select a pilot or an instructor from the list. -
Page 98: Editing An Alarm
Nesis III User’s Manual 8.5 Alarms • Text Only Alarms are alarms that produce no audio output. They only display a text warning message. • Disabled are alarms that will never show up. A special (topmost) option on Figure 71 allows a quick mute of all alarms. -
Page 99: Brightness
Nesis III User’s Manual 8.6 Brightness Alarm text Edit or enter a new text to be shown on the screen. Voice file Select the voice file to be played when alarm is on. Voice will be played only if Voice option is selected for mode. -
Page 100: Compass
Nesis III User’s Manual 8.8 Compass Compass The Compass icon opens a window for the calibration of optional electronic compass device called MAGU. The window is opened only when Magu was detected on the CAN bus. Due to complexity of MAGU installation and calibration the details are ex- plained in the MAGU Manual. -
Page 101: Import
Nesis III User’s Manual 8.10 Waypoints Figure 75: An example of user waypoint details window. Name Name of the waypoint. Description Longer description of the waypoint. Type Type of the waypoint. When one of the airfield types is specified, this waypoint will also appear in the airfield list. -
Page 102: Transfer
Figure 76 shows available options. Copy copies a file with kus, ras, nam or with lic extension from an USB memory stick. All these files are in Kanardia specific format. A new window appears asking for intended copy action, Figure 77. Vector maps have kus extension, raster maps use ras for the maps and lic for licenses and approach maps expect nam extension. - Page 103 Nesis III User’s Manual 8.11 Maps Figure 76: Map options window. Note that some options are available only when Nesis is connected to the Internet. Figure 77: Type of file to search for. Download is used to copy a file form the Internet and it is only shown when WiFi connection is available.
-
Page 104: When Copy Fails
Nesis III User’s Manual 8.12 Update like USA.kus can’t be downloaded and a copy procedure must be used instead. Please also note these files are quite large and transfer fees from your GSM provider may occur. Map info lists map files loaded into Nesis, Figure 79. It does not list any system map files. -
Page 105: Wireless
Nesis III User’s Manual 8.13 Wireless Figure 79: An example of raster file list. Red cross means that file is correctly copied but valid licence file is missing. Green check means that correct license file is also present. 8.13 Wireless The Wireless icon opens a window where parameters for wireless connection are given. - Page 106 Nesis III User’s Manual 8.14 Info Figure 80: An example of info window with the system details. Serial tells serial number of Nesis. Screen defines the screen pixels resolution. Config defines the configuration file used to define the number and look of Nesis screens.
-
Page 107: Service
Nesis III User’s Manual 8.15 Service • 2D fix is shown when a position is known, but precision is limited. • 3D fix is shown when a position is known and enough satellites are visible for a good fix. • 3D+SBAS is shown when a position is also augmented with SBAS system –... -
Page 108: Service Options
Nesis III User’s Manual 9. Service Options Service option icons are briefly explained in separate section 9, while the detailed explanation is given in the Installation manual. Service Options Most of Service options are covered in depth by other manuals, particularly in the Nesis Installation Manual. - Page 109 Nesis III User’s Manual 9.2 Icons Settings opens a window, where access to further settings like flap positions, trim sensitivitym, properller pitch, special recorders, video input, serial ports, backup and restore, etc.. Layout is used to start screen editing (limited to engine part on Modern screens) and to define various screen options.
-
Page 110: Software Update
10.1 Versioning Kanardia is using semantic versioning MAJOR.MINOR.PATCH. A version labeled as 3.2.5 means major version 3, minor revision 2 and patch (fix) 5. A MAJOR version increase means that it may break compatibility with exist- ing version. -
Page 111: Downloading Updates
Nesis and all CAN bus devices connected to Nesis back to Kanardia. 10.3.1 Downloading Updates The latest (actual) software can be found on the Kanardia web page www. kanardia.eu. Follow these steps: ○ Open the home page and select Nesis icon on the top. This leads to Nesis specific page. - Page 112 4. Click on the Content settings to open them in a new window. 5. Click on the Pop-ups and redirects. 6. Under Allow section, click on the Add button. 7. Enter www.kanardia.eu and press Save. Safari solution: 1. Click on the Safari menu and select Preferences.
-
Page 113: Copying Update File To The Usb Stick
Nesis III User’s Manual 10.3 Updating with USB Stick 10.3.2 Copying Update File to the USB Stick The downloaded file must be copied to the USB stick. We recommend copying it to the root folder. Important: Once file was copied, please make sure that the USB stick is safely removed from PC. -
Page 114: Direct Update Mode (Emergency Mode)
Nesis III User’s Manual 10.4 Direct Update Mode (Emergency Mode) The update process will automatically perform the following steps: • The update file integrity is verified. In the case of Update file checksum ERROR message, it usually means that the file was corrupted and it must be downloaded again. -
Page 115: Updating With Usb Stick
3. updating databases from the USB stick. 11.1.1 Downloading Updates The latest (actual) software can be found on the Kanardia web page www. kanardia.eu. Follow these steps: 1. Open the home page and select Support menu from the top and then select the Database option. -
Page 116: Performing The Update
Nesis III User’s Manual 11.2 Update with WiFi 11.1.3 Performing the Update Once the file is on the USB stick follow the steps below: 1. Insert the USB stick with the update file into Nesis USB port. 2. Select Options from the main menu and then select the Map icon 3. -
Page 117: Intended Use
Nesis III User’s Manual 12.1 Intended Use 12.1 Intended Use The autopilot is designed to help a pilot in stable, controllable flight conditions during cruising. If such conditions are met, the autopilot can be engaged to take some relief from the pilot, who can perhaps focus a bit more on ATC communication or to do some navigation task. -
Page 118: Autopilot Status Window
Nesis III User’s Manual 12.4 Autopilot Status Window Amigo Nesis Panel Aileron Joyu Servo Stick Elevator Magu Servo Compass Figure 85: Main units of the autopilot system. Some units are optional. Each Seru unit is controlling one aircraft control surface. In two axis autopilot system, one Seru unit is linked to the aircraft aileron which is controlling the roll angle and therefore controlling the heading of the aircraft. -
Page 119: Autopilot Setup
Nesis III User’s Manual 12.5 Autopilot Setup 12.5 Autopilot Setup For autopilot installation and setup please check separate document: Au- topilot Installation Manual. In this section only autopilot operations are de- scribed. 12.6 Setting User Button User button shall be configured to provide a quick access to autopilot func- tions. -
Page 120: Track
Nesis III User’s Manual 12.8 Operation Figure 87: An example of the autopilot menu. Figure 88: Illustration of the track input window. 12.8.1 Track In order to fly some desired track course the Track action is selected from the menu. A window with track direction input is shown on Figure 88. The default value of the input window is always current track. -
Page 121: Altitude
Nesis III User’s Manual 12.8 Operation A long touch on the compass rose sets the heading bug. When autopilot is active, it switches into track mode and it automatically follows new selected direction. 12.8.2 Altitude In order to hold or change desired flying altitude the Altitude action is selected from the autopilot menu. -
Page 122: Disable
Nesis III User’s Manual 13. Maps 12.8.4 Disable The Disable command disengages all servomotors connected to the system. This action is immediate and the user is not asked for any confirmation. The route or direct-to waypoint selection remains unchanged. 12.8.5 Level The Level command is the only autopilot command that activates both servos. - Page 123 Nesis III User’s Manual 13.1 Layers • High resolution terrain is drawn next. Some examples are shown as background on Figures 90b, 6 and 7. (a) Low resolution map – distant view (b) High resolution map – this one is made seen as a globe.
-
Page 124: Vector Maps
Nesis III User’s Manual 13.2 Vector Maps They are drawn in a separate layer. See Figure 92a. • When raster maps are used, they are drawn next. It is important to note, that they hide (overwrite) all layers below, in the part, where raster maps are visible. -
Page 125: Installing A Vector Map
Nesis III User’s Manual 13.2 Vector Maps • Roads, rivers, lakes, railways, populated areas, state borders, etc. are obtained from the OSM project. Only a tiny subset of this always growing project is used. We update this data once per year, usually in summertime. -
Page 126: Raster Maps
Nesis III User’s Manual 13.3 Raster Maps 2. Copy the downloaded files to the USB memory stick. Do not forget to use safe remove option before removing the stick form PC. 3. Start Nesis and insert the USB stick. Switch to the Options page and select the Map icon. -
Page 127: Sectionals
The license file is bound to a Nesis serial number. In order to obtain the license file, please contact support@kanardia.eu and tell us your Nesis serial number. We will charge you a license fee and once this is paid, an email with the license file will be send back to you. -
Page 128: France - Cartabossy
PC. Use geo-referenced TIFF or TIF format. 3. Use “We transfer” web service (it is free) to send us the copy of the file you have downloaded. Use support@kanardia.eu address. Here is the link https://wetransfer.com/. 4. We will convert the file into a format, which is understood by Nesis. -
Page 129: User Charts
4. Send the resulting file to us for georeferencing. Use “We transfer” web service (it is free). Use support@kanardia.eu address. Here is the link https://wetransfer.com/. 5. We will convert the file into a format, which is understood by Nesis. -
Page 130: Installing Approach Maps
Nesis III User’s Manual 13.4 Installing Approach Maps 4. Select the Copy from USB|Raster items and search for the raster file to copy from the USB memory stick. 5. The copy process starts. Fist the file’s signature (integrity) is checked and if all is well, the file is copied. -
Page 131: The Qt Library
1. Use your browser and open https://www.kanardia.eu web page. 2. Select SUPPORT|Software from the menu on the top right side. A list of various software bundles will appear. -
Page 132: Installing Modified Qt Library
Nesis III User’s Manual 14.1 The Qt Library 2. Extract QtLibrarySource.tar.bz2. 3. Enter folder qt5base-5.6.0/. 4. Configure Qt5 with following command and replace {DIR} with the folder, where the toolchain was extracted: # ./configure -opensource -shared -no-static -no-sql-mysql -no-sql-psql \... -
Page 133: Copy Of Qt License Document
Nesis III User’s Manual 14.1 The Qt Library 6. Select the Qt Library from the list. 7. Select the Install Qt Library option. 8. Confirm the decision – select Yes. 9. Nesis will copy the libraries found on the USB stick to the internal flash drive by overwriting any existing libraries. -
Page 134: Limited Conditions
(1) or (2) is not possible (as determined by Kanardia in its sole discretion), (3) refund the purchase price of the product. When a refund is given, the product for which the refund is provided must be returned to Kanardia and becomes Kanardia’s property. - Page 135 No Kanardia reseller, agent, or employee is authorized to make any modification, extension, or addition to this warranty, and if any of the foregoing are made, they are void with respect to Kanardia. Limitation of Liability...
-
Page 136: 15.2 Tso Information
Kanardia products and any failure to maintain the confidentiality of data stored on the product. Under no circumstances will Kanardia be liable for the provision of substitute goods or services.
Need help?
Do you have a question about the Nesis III and is the answer not in the manual?
Questions and answers