
Related Manuals for Kanardia Nesis


Summary of Contents for Kanardia Nesis
- Page 1 Nesis User’s Manual Kanardia September 2011 © Kanardia d.o.o. Nesis User Manual – Version 2.0...
- Page 2 //creativecommons.org/licenses/by-sa/3.0/. In short, the licens gives you right to copy, reproduce and modify this document if: X you cite Aleˇ s Krajnc, Kanardia d.o.o. as the author of the original work and X you distribute the resulting work only under the same or similar license to this one.
-
Page 3: Table Of Contents
1 Introduction 1.1 General Information About Nesis ......1.2 Principles of the Operation ...... - Page 4 6.11 System Preferences ....... . . 6.11.1 Nesis ........
- Page 5 Nesis — User’s Manual CONTENTS 6.14.1 Setup Tanks ....... .
-
Page 6: Introduction
1. Introduction Introduction First of all, we would like to thank you for purchasing our product. Nesis is a complex instrument and we strongly recommend reading the manual before using Nesis. The intro- duction chapter contains some general information about the instrument and principles of the operation. -
Page 7: Principles Of The Operation
1.2 Principles of the Operation Figure 2: Illustration of extended Nesis configuration using CAN bus. Although the secondary Nesis display does not have the Airu unit inside, it is fully functional and behaves almost exactly like the primary Nesis display. -
Page 8: Engine Sensors
Note that the magnetic field sensor is optional and Nesis works well without it. Assuming coordinated flight we calculate the referencing attitude from the gravity vector and heading. -
Page 9: Charts, Flight And Navigation Information
It is important to notice that we cannot guarantee that the information included with Nesis or otherwise provided by Kanardia is current and correct. It is the pilot responsibility to prepare himself for the flight and to collect all required information from reliable sources. -
Page 10: Nesis Basics
After reading you will be familiar with basic Nesis operations. Forthcoming sections reveal the details. Command Panel The Nesis command panel is organized according to figure 3. It uses eight push buttons and one rotating knob to manipulate the user interface. Additionally, it has an USB port used for software, chart and data updates. -
Page 11: Turning On/Off
For the moment, try to remember the position of the OK/Menu and the Cancel/Esc buttons. Turning On/Off The On/Off button is used to turn Nesis on or off. It has no other meaning. The button sends the signal to the electronic circuit. Depending on the current status of the electronics, it executes one of the following actions. - Page 12 4. Use the knob button to pick a pilot from the list, adjust QNH or fuel level. Press the OK button when done. Once the dialog was closed, Nesis is ready to use. You can’t edit the list of pilots here. If you want to add a new pilot, remove or rename an existing one, please refer to section 6.3 on page 36 for more details.
-
Page 13: The Five Major Screens
3. The Five Major Screens The Five Major Screens This section describes the five major screens used in Nesis. The screens are directly accessible by pressing multifunction buttons when no menu labels are visible on the display. Figure 5 illustrates the connections between buttons and screens. -
Page 14: Menu
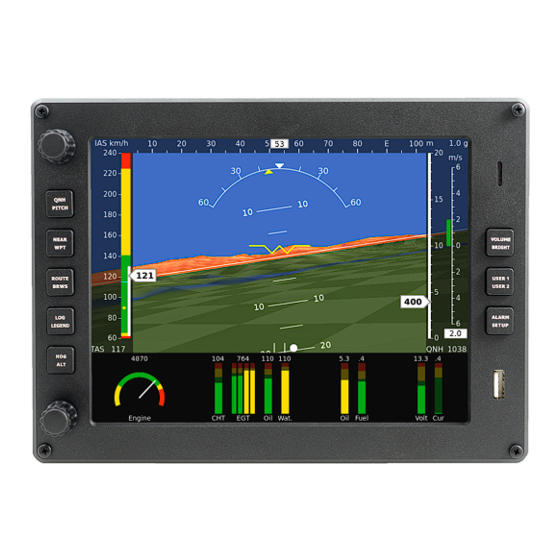
Nesis — User’s Manual 3.1 Classic Flight Information – Screen 1 Figure 6: Illustration of the classic flight information screen. displays current QNH reference pressure (a.k.a. baro-correction). QNH can be set in hPa and inHg units. 4. The moving map indicator is a kind of HSI indicator, which provides basic naviga- tion information. -
Page 15: Moving Map Zoom Level
Selected airfield becomes a new waypoint and Nesis goes into the direct to waypoint mode. See page 23. X The Waypoint button opens a dialog where a waypoint is selected from database. Way- points are filtered according to their type, distance from current position and name. -
Page 16: Menu
Nesis — User’s Manual 3.2 Navigation – Screen 2 Figure 8: Illustration of the navigation screen. 6. The map scale is shown according to the zoom level. It can be used to estimate distances on the map. 7. The bottom bar displays active waypoint, bearing, distance, tracking and time needed to reach the waypoint. -
Page 17: Engine Monitor - Screen 3
Nesis — User’s Manual 3.3 Engine Monitor – Screen 3 Figure 9: Legend. Figure 10: Menu options for the navigation screen. Engine Monitor – Screen 3 The engine monitor screen displays classic indicators of various engine and fuel related pa- rameters. -
Page 18: Menu
X The QNH button opens a dialog where QNH value is set. X The Fuel Level button adjusts current fuel level. This option is available only when no fuel level sensors are connected to the Daqu and Nesis calculates fuel level. Please see note in section 7.10 on page 60. - Page 19 Nesis — User’s Manual 3.4 Modern Flight Information – Screen 4 X synthetic vision, X large moving map (similar to the navigation screen), X check list, X an image, that shows live video image from a compatible USB video camera X guidance screen for taking orthophoto pictures The background image can be configured using the View command.
- Page 20 Nesis — User’s Manual 3.4 Modern Flight Information – Screen 4 Figure 14: Different views of the Modern Flight Information screen: Synthetic vision, moving map, check list and video from the camera. 7. Current QNH setting (baro-correction) is displayed below the altitude and vario scale.
-
Page 21: Menu
Nesis — User’s Manual 3.5 Settings – Screen 5 Figure 15: Modern look of the flight information screen. Artificial horizon is taken for the background. 3.4.1 Menu The menu has the same commands as the menu of the classic screen. There is additional View command used to change the view, see figure 13. -
Page 22: Flight-Time Activities
Figure 17: Setting the QNH. X Turn the knob to set correct QNH reference pressure. Press the OK button to accept the selection. This also closes the dialog. Optionally, you can simply wait and Nesis will accept given value after a few seconds. -
Page 23: List Of Nearest Airports
X Press the ICAO button to show only ICAO airfields (default option). The selected airfield becomes new waypoint and Nesis navigation goes into the direct to mode. Glide mode means that engine is not running and that the airplane is flying at the speed of the best glide. -
Page 24: Selecting A Waypoint
X Name filter is used to filter points according to their name. Only names which match given pattern are listed. In the case of airfields, Nesis searches for the name or ICAO label. Press the OK/Menu button to show menu label and select the Waypoint button to open the dialog shown on figure 19. -
Page 25: Name Filter
X Press Cancel button to keep previous radius and switch back into the waypoint selection mode. Note that large radius makes Nesis a bit less responsive, since it needs to scan among large number of waypoints. Please, also note that the list is able to display only 99 closest way- points. -
Page 26: Type Filter
The Back button sets the coordinate fields back to the initial point. Once the coordinate is known, press the Save button to save this point into the Nesis flash drive. Press Close in order to close the dialog without saving the new user waypoint. -
Page 27: Route Selection
Nesis first tries to activate the starting waypoint in the Route. Direct to is used in this case. However, when Nesis determines that airplane position fits into one of the route legs, the leg mode is activated showing the remaining part of the leg to fly. -
Page 28: Adjusting Fuel Level
Figure 22: Selection of a leg or a waypoint in an existing route. Adjusting Fuel Level This option is available only when no fuel level sensors are connected to Daqu and Nesis calculates remaining fuel from the fuel flow information. -
Page 29: Browsig The Map
X Activate newly planned route. Moving the Map At the first use after Nesis start-up, the map is centered at the airplane position. Later on, the position of the previous browsing is preserved. During browsing, the map orientation is always North up. -
Page 30: Waypoint
Otherwise, a temporary waypoint with cursor coordinates is used. X Route|Save saves the route into Nesis flash drive. It does not activate the route, however. X Route|Activate activates the route. It exits the browse mode and switches back to the flight mode with the newly created route being active. -
Page 31: Direct To
4. Press the Route|Add button to add the cursor to the route. Repeat the last two steps until the route is complete. 5. Finish the route by saving it to the Nesis flash drive. Press the Route|Save button. 6. If you want to activate the route, choose the Route|Activate command. This exits the browse mode, switches to the flight mode and activates the route immediately. -
Page 32: Settings
X The Route Planning icon is used to create, delete and edit the routes. X The Logbook icon is used to view the flight logs. X The User Preferences icon is used to change some parameters, which define Nesis behaviour. -
Page 33: Route Planner
Nesis — User’s Manual 6.1 Route Planner Some user options are not shown on secondary Nesis screen, some options require password entry before proceeding and some options are available only when correct hardware is de- tected. The factory default password is 314, first three most significant digits of number π. The password was introduced in order to prevent unwanted accidental alteratoins of important settings. -
Page 34: Route List Commands
X The New command creates an empty route. A dialog shown on figure 28 appears and it asks for the route name. Keep the input empty and Nesis will generate a route name for you. The name will be a combination of the first and last waypoint on the route. -
Page 35: Logbook
X Take off time. X Landing time. When you fly traffic patterns, Nesis will try to merge the patterns into one record. In this case the take off time will be the time of the first take off and the landing time will be the time of the last landing. -
Page 36: User Preferences
Nesis considers that a flight has started when airspeed is larger than 12 m/s (43.2 km/h) and that a flight has finished when airspeed drops below 12 m/s. Engine is monitored in parallel. -
Page 37: User
X Tracking up shows map aligned to the GPS tracking angle. X Magnetic up shows map aligned to the magnetic heading. Note that compass unit (Magu) is required for this operation. In this Nesis software version, map colors can’t be changed and the Standard option is the only available. 6.3.3 System The system section allows setting LCD brightness and audio volume level. -
Page 38: Units
6.4 Units Units Nesis uses several units for different physical quantities like distance, velocity, mass, volume, etc. They affect the instruments and texts. The table 1 on page 38 shows which units are available. The quantities are grouped according to their function and not to their physical meaning. -
Page 39: First Step
1. Open the Compass Calibration dialog and enter the password. Be careful. When the reference headings are magnetic headings, Nesis HSI map must be set to Magnetic up and when the reference headings are true headings, Nesis HSI map must be set to Heading up. ©... -
Page 40: Second Step
UTC time, internal time is synchronized with the help of dialog shown on figure 33. Press the Use GPS button to synchronize Nesis time with the GPS time. Please note that this command works only when the airplane is not flying and engine is not running The same dialog is used to set the time zone –... -
Page 41: Software Update
Finally, press the Close button to save the changes and close the dialog. Nesis restarts. Software Update The Nesis software is under constant development and if you want to keep your Nesis up to date, you should update your Nesis regularly. This section describes actions required to update the software. -
Page 42: Transferring Files Into Nesis
Nesis automatically hides the packages, which shouldn’t be updated. This means that you usually see less packages than stored in the USB stick. 2. Press the Upgrade button and wait for Nesis to finish copying the files from the USB stick to internal flash drive. -
Page 43: Firmware Update
Otherwise, this command was used to force the system to install an older version of the software. File Transfer Service This dialog is used to copy new files in Nesis. You can copy updates for maps, check lists and translations. ©... -
Page 44: Alarms
Simply press the Copy button to proceed. First files are verified and then copied. After all files are copied, Nesis will restart. Note: When verification of any file fails no file will be copied into Nesis. Figure 37: File transfer service dialog. -
Page 45: System Preferences
6.11.1 Nesis The Nesis section mostly deals with the look of the Nesis on the screen, which instrument layout shall be shown, type of the modern screen and availability of the demonstration mode. Normally, the instruments selection should never be changed, since Nesis comes with the selection tuned for your airplane. -
Page 46: Glide
6.12 Attitude Adjustment do so. Demo option is normally not selected. However, when set to Yes it allows Nesis to go into the demo mode. This also enables a demo icon on the user settings screen. Note, the demo mode requires specially prepared demo files on an USB key. Without such files, demo mode is not operational. -
Page 47: Airplane & Engine
The top control is used to specify the engine type. Currently, this affects the fuel flow calculation only. The Nesis system does not need a fuel flow sensor and still provides pretty accurate fuel consumption. The fuel consumption is calculated using specially prepared ©... -
Page 48: Daqu Parameter Table
Nesis — User’s Manual 6.13 Airplane & Engine Figure 43: Engine monitoring unit channel configuration dialog. mathematical models that are based on the engine type, engine RPM and manifold pressure. The precision of our mathematical model is in the same range as precision of the fuel flow sensors. -
Page 49: Tank Calibration
Nesis — User’s Manual 6.14 Tank Calibration 1. Use the knob to select a channel and press OK to open the channel configuration dialog. See figure 44. (a) Specify the sensor function (what is sensor used for), sensor type (which sensor is used), is sensor isolated (thermocouples only, otherwise ignored), report time inter- val (not used in this version), filter time constant (small values –... -
Page 50: Setup Tanks
Nesis — User’s Manual 6.14 Tank Calibration X Edit tank shapes makes a complete tank shape calibration taking several measure- ments. After measurements are complete, min/max calibration is done automatically. 6.14.1 Setup Tanks After fuel level sensors are connected to some unit (Daqu in this case, but other units are planned in the future), the unit must be linked with tank names. -
Page 51: Edit Tank Shapes
Nesis — User’s Manual 6.14 Tank Calibration 3. Finally, press the Save button to save the results into the corresponding unit where the sensors are attached to. The Close button closes the dialog without saving changes. 6.14.3 Edit Tank Shapes This option can be used for the User tank shape only. -
Page 52: Sensor Offset Correction
Nesis — User’s Manual 6.15 Sensor Offset Correction Press the Close button to exit the dialog without saving. The procedure above determines the tank shape and calibrates the sensor at the same time. Therefore, min/max sensor calibration is not necessary. -
Page 53: Instruments
ISA conditions. When outside temperature is known, Nesis calculates true airspeed (TAS) as well. Although only two values are shown on the indicator, the scale has several markings as you can see on figure 49. -
Page 54: Attitude Indicator
Figure 50 illustrates the attitude indicator combined with the inclinometer (ball) as it is found in Nesis. The following markings are found on the indicator: X The roll scale is used to give a rough estimate about the roll value. The roll arrow in the form of yellow triangle is used to mark current roll value on the scale. -
Page 55: Altitude Indicator
The pressure based altimeter is more precise then the GPS obtained altitude. The absolute pressure sensor used in Nesis has absolute error of less than one hectopascal, which is about 8 m at the sea-level. This precision is maintained over wide temperature range. -
Page 56: Tachometer And Manifold Pressure Indicator
Nesis — User’s Manual 7.5 Tachometer and Manifold Pressure Indicator Figure 52: The metric version of variometer used in Nesis. It can be shown in feet per minute, metres per second or meters per minute, depending on choice of units. See section 6.3 on page 36 for more details. -
Page 57: Gyrocopter Rotor And Engine Rpm Indicator
SI system of units, it is very common in aviation. During research, we were not able to find an aviation manifold pressure indicator with any other unit. Therefore, inHG is the only unit option for the manifold pressure in Nesis. Gyrocopter Rotor and Engine RPM Indicator Gyropocters require indication of rotor RPM. -
Page 58: Heading Indicator With Moving Map
X The red lines limit the RPMs. Heading Indicator with Moving Map Nesis introduces a combination of heading indicator and moving map. Traditionally, a head- ing indicator informs a pilot about the airplane heading. However, in Nesis a pilot can choose between true heading, tracking and magnetic heading. -
Page 59: Mini Engine Monitor
The monitor bars are grouped into temperatures, pressures and RPMs. The temperature group includes EGT, CHT, oil, water (coolant) and carburetor temperatures. The pressure group usually includes oil and fuel pressure. Since Nesis can be put into different configura- tions, the parameters shown in the monitor may vary. -
Page 60: Fuel Computer Monitor
Important: When no fuel level probes are connected to Daqu, Daqu and Nesis provide a software version of the tank where Nesis calculates the available fuel based on the information that is entered before the flight or updated during the flight. - Page 61 7.10 Fuel Computer Monitor frequently compare the fuel level indicated by the fuel computer with the independent external fuel gauges and indicators and update the Nesis fuel level. The fuel level update procedure is described in section 14.5 on page 28.
Need help?
Do you have a question about the Nesis and is the answer not in the manual?
Questions and answers