Table of Contents
Advertisement
Quick Links
Advertisement
Table of Contents

Subscribe to Our Youtube Channel
Related Manuals for Kanardia Nesis III


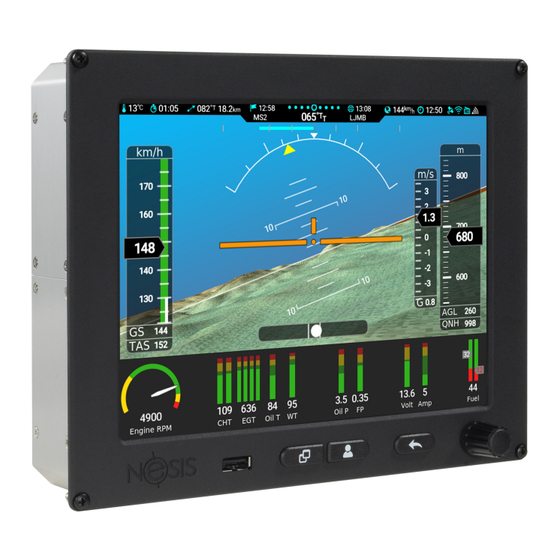
Summary of Contents for Kanardia Nesis III
- Page 1 Installation Manual © Kanardia d.o.o. March 2022 Revision 1.4...
- Page 3 In short, the license gives you right to copy, reproduce and modify this document if: • you cite Kanardia d.o.o. as the author of the original work, • you distribute the resulting work only under the same or similar license to this one.
- Page 4 Nesis III — Installation Manual WEEE Statement Disposal of Waste Electrical and Electronic Equipment. This electrical item cannot be disposed of in normal waste. Check with your local authority for kerbside collection, or recycle them at a recycling centre. Revision History The following table shows the revision history of this document.
- Page 5 Nesis III — Installation Manual © Kanardia 2019-2021...
-
Page 6: Table Of Contents
Nesis III — Installation Manual CONTENTS Contents 1 Introduction 1.1 Icons Used Trough the Manual ....10 1.2 Warnings ......10 1.3 Minimal System . - Page 7 Nesis III — Installation Manual CONTENTS 7 USB 7.1 USB Memory Stick ......32 7.2 WiFi Module ......32 7.3 USB Cable As Charger .
- Page 8 Nesis III — Installation Manual CONTENTS 11 Service Settings 11.1 Layout ....... . 59 11.2 Parameters .
- Page 9 Nesis III — Installation Manual CONTENTS 16 Offset 17 Autopilot 18 Special 19 CAN Devices 19.1 Indu/Digi Layout Change ..... 84 19.2 Enable/Disable Magnetic Heading .
-
Page 10: Introduction
Nesis III — Installation Manual 1. Introduction Introduction First of all we would like to thank you for purchasing our product. Nesis is a complex instrument and we strongly recommend reading manuals before installation. You may be interested in reading: •... -
Page 11: Minimal System
Minimal System Nesis minimal system consists of two components: Nesis III display and DAQU (engine management box). They are sold together as a kit. This manual starts with the installation instructions for the minimal system and then adds separate sections for optional components. -
Page 12: Main Display Dimensions
Cut your instrument panel according to your Nesis display size using cut-out dimensions and cut-out templates. The cut-out drawing can be downloaded from our web page: www.kanardia.eu/support/manuals/, search for the Nesis III Cutout.pdf or for Nesis III Cutout.dxf. Please note that the © Kanardia 2019-2021... - Page 13 Nesis III — Installation Manual 2.3 Cutout 23.4 41.3 16.9 Figure 1: Nesis side view with dimensions. cutout tolerance was already added to the green cutout line. Figure 4 illus- trates the cutout dimension. Some mounting notes: • The display is mounted from front.
- Page 14 Nesis III — Installation Manual 2.3 Cutout 210.3 Figure 2: Back view with dimensions. Figure 3: Nesis top view. is necessary, because some printers or PDF rendering software may slightly adjust the document size, producing wrong cut-out dimensions. If possible, make a cutout with a CNC equipment. You can use the dxf file to program the CNC.
-
Page 15: Mounting Procedure
Nesis III — Installation Manual 2.4 Mounting Procedure Green line is coutout line. A tolerance of 0.4 mm was already added. No extra tolerance is needed. Dashed line represents bezel outer contoure. 211,1 Drill 3.5 mm hole to fit M3 screw. -
Page 16: Fixation With Supplied M3 Nut And Lock Washer
Nesis III — Installation Manual 2.4 Mounting Procedure 2.4.1 Fixation with Supplied M3 nut and Lock Washer This is the most straightforward method of fixation. Figure 5 shows an ex- ample. Figure 5: An example of fixation using supplied M3 nut and lock washer. -
Page 17: Fixation With Threaded Rivet Nut Insert
Nesis III — Installation Manual 2.4 Mounting Procedure Once pressed, the nut shall not turn when Nesis is removed and this makes servicing easier. The hole size needs to be as accurate as possible. It is recommended to do a few tests on a scrap part first. -
Page 18: Fixation With Spacer Stud And Epoxy
Nesis III — Installation Manual 2.4 Mounting Procedure Figure 7: Example of rivnuts inserts. Left: a rivnut before compressing. ○ ○ Right: a compressed rivnut. – instrument panel, – rivnut. 2.4.4 Fixation with Spacer Stud and Epoxy As another alternative, a M3 nut can be epoxied to the back of the instrument panel. -
Page 19: Power Installation
Nesis III — Installation Manual 3. Power Installation ○ ○ Figure 8: Example of spacer stud fixed with epoxy: – spacer stud, ○ – panel surface sanded with 60 grid sandpaper, – spacer stud ○ sanded with dremel tool, coat removed, –... -
Page 20: Circuit Breaker
, which protects against voltage spikes. A coil in relays without this diode may cause spikes that exceed 100 V and they propagate on the system bus. Such spikes may cause permanent damage on Kanardia equipment and other avionics. Backup Battery This backup battery solution works only on 12V systems. - Page 21 Nesis III — Installation Manual 3.3 Backup Battery if there is no voltage on the system bus, backup power is used. UPSU will switch between both sources automatically. UPSU also charges the backup battery when system voltage is high enough (13V or more).
-
Page 22: Gnss Antenna Installation
Nesis III — Installation Manual 4. GNSS Antenna Installation The following table shows approximate elapsed backup times that were ob- tained from 1.2 Ah 12 V battery for some typical configurations. Longer elapsed time can be achieved by using a battery with larger capacity (2 Ah, 2.7 Ah, 3.4 Ah, . - Page 23 Nesis III — Installation Manual 4. GNSS Antenna Installation • The mouning location shall be level, clean and flat. • Try to avoid other transmitting antennas – the location shall be at least 1 m away. • Avoid placing it next to other active GNSS antennas as they may cause interference.
-
Page 24: Gnss Signal Check
Nesis III — Installation Manual 4.1 GNSS Signal Check GNSS Signal Check Nesis can show the GNSS satellite constellation and quality of the reception. This is accessible under the Info icon. 1. Select Options on the main menu. 2. Select the Info icon. -
Page 25: Outside Air Temperature Sensor
Nesis III — Installation Manual 5. Outside Air Temperature Sensor HDOP, VDOP and PDOP values indicate quality of the solution. The mean- ing of the DOP values is given in Table 2. In general, HDOP shall be always be less than 5. - Page 26 Nesis III — Installation Manual 5.2 Connection housing. Default OAT cable length is 1.5 meters, but other lengths are avail- able on request. OAT information is required to calculate the true airspeed from the indicated airspeed and altitude. In order to provide accurate measurements, the OAT probe must be installed...
-
Page 27: Connection
Nesis III — Installation Manual 5.2 Connection Figure 15: Inserting the OAT probe (left), cap is in place, tighten the internal nut, slide the insulation shrink sleeve (right). 4 … 1 1 … 4 Figure 16: Designation of the pins. -
Page 28: Audio Connection
Nesis III — Installation Manual 6.1 Audio Connection Audio connection is used to allow Nesis to send out some audio messages, mostly warnings, which can be then heard in the headset. Video is used to show some video image from an on-board camera on the Nesis screen. -
Page 29: Funke Atr833
Nesis III — Installation Manual 6.1 Audio Connection Trig TY91/TY92 - 25 pin D-SUB Mono 3.5mm Jack SIGNAL Figure 17: Schematic for connecting Nesis audio to Trig TY91/TY92 radio station. 6.1.2 Funke ATR833 Audio output of the Nesis must be connected to the external audio input on Funke ATR833 radio station. -
Page 30: Dittel Krt2
Nesis III — Installation Manual 6.1 Audio Connection The Funke ATR833 radio station must be configured to accept audio from Nesis. Please follow next steps to configure external audio input on Funke ATR833 radio: • press the SET button for at least 5 seconds to enter setup, •... -
Page 31: Video Connection
Nesis III — Installation Manual 6.2 Video Connection • EXT00 - external input always off, • EXT01 - external input always on, • EXT02 - use threshold for enabling external audio - minimum volume, • ... • EXT09 - use threshold for enabling external audio - maximum volume. -
Page 32: Usb Memory Stick
Nesis III — Installation Manual 7.1 USB Memory Stick Figure 20: An example of video input format selection. USB Memory Stick On order to transfer data between the memory stick and Nesis, the memory stick must meet the following requirements: •... -
Page 33: Usb Cable As Charger
Nesis III — Installation Manual 7.3 USB Cable As Charger Figure 21: En example of small WiFi module, called WiPi. 2. From the Options page select Wireless icon. Figure 22a shows an example screen. 3. Select the Add item. A list of detected networks appear. An example is shown on Figure 22b. -
Page 34: Usb Cable As Tethering
The CAN Bus Nesis has two CAN bus ports. The CAN bus is the main communication bus between Kanardia devices. The CAN bus is a very robust vehicle bus. The communication is message based and connected devices communicate without the host computer. See https://en.wikipedia.org/wiki/CAN_bus for more details about the bus. -
Page 35: The Can Topology
120 Ω Figure 24: CAN line/bus topology principle used by Kanardia Most of the Kanardia devices have two CAN bus ports that allow devices to be daisy-chained to each other. Main bus enter in one port and exits in the... -
Page 36: T-Junction
Nesis III — Installation Manual 8.2 The CAN Topology other. Port order is not important – both are equal. Inside device housing there may be more internal modules. In the case of Nesis, there is AIRU module (AD-AHRS-GPS module) and Nesis electronic board module. Both are internally connected to the main CAN bus. -
Page 37: Terminator Plug
Nesis III — Installation Manual 9. Service Port main bus Seru Figure 27: Devices with only one CAN connector require T-junction. 8.2.2 Terminator Plug Nesis usually works together with Daqu and special terminator plugs are not required. But there are some occasions (to run Nesis as a standalone device, for example), when the terminator plug is needed. -
Page 38: Port 1 - Auxiliary Rs-232
Nesis III — Installation Manual 9.2 Port 1 – Auxiliary RS-232 Description External push button input. Terminal RX (RS-232) Terminal TX (RS-232) 12 V output, max 200 mA GND – ground Port 1 auxiliary RX (RS-232) Port 1 auxiliary TX (RS-232) Alarm switch –... -
Page 39: External Push Button
Nesis III — Installation Manual 9.3 External Push Button External Push Button Nesis allows connection of one external push button. The external button has two events: a normal push event(or short press) and a long push event (long press). In most cases an external button is used together with the autopilot system and events are associated with one of the AP commands. -
Page 40: Alarm Switch
Nesis III — Installation Manual 9.4 Alarm Switch Figure 32: External push button configuration. The example shows autopilot settings, but any other functions can be used instead. Alarm Switch The software does not support this function yet. When some device (any CAN bus device) reports an error condition, like some engine parameter outside limits or a sensor failure, an output signal will be raised. -
Page 41: Rs-232 Ports
Nesis III — Installation Manual 10. RS-232 Ports via relay and the circuit must be protected with a flyback diode. (Some relays have this diode already built-in.) When alarm is on, the circut is closed by optocoupler and coil in the relay gets energized. This, in turn, activates the relay switch and closes the load circuit. -
Page 42: Configuration
Nesis III — Installation Manual 10.2 Configuration RS-232 PORT 1 RS-232 RS-232 RS-232 PORT 2 PORT 3 PORT 4 Figure 35: RS-232 ports at the back side of the Nesis. plug. In most cases, only pins 5 and 6 are connected. Pin 1 is used only when you use Nesis as a power source for connected device. - Page 43 Nesis III — Installation Manual 10.2 Configuration Description +12V out – used to power some device. Not used. Not used. RX – receive data. Connect with TX on device. TX – send data. Connect with RX on device. GND – ground.
-
Page 44: Connection Details
NMEA GPS out, 9600 same as above, but at 9600 baud. NMEA GPS out, 19200 same as above, but at 19200 baud. CO Level sensor Use this for Kanardia external CO sensor. Please make sure to set the Internal CO Sensor option to Not present, see section 11.8 for more details. -
Page 45: Tq Krt2 Radio
Nesis III — Installation Manual 10.3 Connection Details 10.3.1 TQ KRT2 Radio Please read the KRT2 Manual before any connection is made to Nesis. The manual can be obtained from https://www.tq-general-aviation.com. Connection to a KRT2 radio is made using a trick. Nesis pretends to be a KRT2RC remote control unit. -
Page 46: Trig Ty91/Ty92 Radio
Nesis III — Installation Manual 10.3 Connection Details if possible. Please refer to the ATR 833 documentation for more details on connections. If ATR 833 and Nesis are both connected to the same airplane ground, then GND line may be omitted (dashed line). - Page 47 Nesis III — Installation Manual 10.3 Connection Details TC90 Controller - 15 pin D-SUB RJ12 - 6 pin Not used 4 ... RX 5 ... TX 6 ... GND Figure 40: Schematic connection for Trig. the open cable ends, which are part of the external memory address adapter (TRT800EMxx).
-
Page 48: Trig Tt21/Tt22 Transponder
Nesis III — Installation Manual 10.3 Connection Details 10.3.5 Trig TT21/TT22 Transponder Please read the TT21/TT22 Installation Manual before any connection is made to Nesis. The manual can be obtained from https://trig-avionics. com/. Open the Support menu and search for the manual. -
Page 49: Power Flarm
Nesis III — Installation Manual 10.3 Connection Details manual requires to connect the RX line as well. It does not say anything about GND lines however. KTX2 - 15 pin D-SUB 2 ... TX RS-232 RJ12 - 6 pin Not used 4 ... -
Page 50: Trx 1500
Nesis III — Installation Manual 10.3 Connection Details • Protocol version for the RJ45 connector – Version 7. • Baud rate of the RJ45 connector – 57600 (or at least 38400). Connection PowerFLARM core has two communication ports at the back side. Port 1 has RJ45 connector and port 2 has D-SUB 9 pin connector. - Page 51 Nesis III — Installation Manual 10.3 Connection Details As TRX 1500 uses only one connector for several ports, the schematics on Figure 45 shows two cables comming out of the main connector. The bottom one connects to Nesis serial port, while to top cable is optional and can be connected to one of optional Flarm displays.
- Page 52 Nesis III — Installation Manual 10.3 Connection Details transponder ICAO address into the ICAO Mode-S address (hex) field. Figure 46: TRX 1500 general settings page. Enter correct transponder ICAO address here. Figure 47 shows typical settings for Port 2, where optional LCD display may be connected.
-
Page 53: Air Traffic At1
Nesis III — Installation Manual 10.3 Connection Details Figure 48: TRX 1500 port 3 settings page. Port is connected to Nesis. something goes wrong, you may return to the settings shown on the Figures 46 to 48. 10.3.9 AIR Traffic AT1 Please read the AIR Traffic Installation Manual before any connection is made to Nesis. - Page 54 Nesis III — Installation Manual 10.3 Connection Details AIR Traffic AT1 - 26 pin D-SUB26 HD 9 ... GND RJ12 - 6 pin 1 ... +12 V 23 ... GND Not used 22 ... Enable EN 4 ... RX 4 ... RXD3 5 ...
-
Page 55: Flarm Eagle
Nesis III — Installation Manual 10.3 Connection Details Figure 50: Home page of the AT1 device. RS-232 data port 3 was not set yet. Nesis requires a few seconds to detect new data rate and detect the format. This procedure is automatic. - Page 56 Nesis III — Installation Manual 10.3 Connection Details Figure 51: Data port 3 settings required for the communication with Nesis. Connection Flarm Eagle has typical Flarm RJ12 six pin connector on front. Pins number- ing is the same as on the Nesis, so connection can be made with a flat cable.
-
Page 57: Uavionix Echouat
Nesis III — Installation Manual 10.3 Connection Details Configuration Flarm Eagle fully supports the Flarm protocol and it can be configured with Nesis. Alternatively, it can be configured via USB port or via micro SD card (depending on the Flarm Eagle model). - Page 58 Nesis III — Installation Manual 10.3 Connection Details Figure 54: Configuration of the echoUAT device. GD 40 consumes about 40 mA at 12V . This is low enough to be powered from Nesis port. Be careful however, as total power capacity of devices powered by Nesis is limited.
-
Page 59: Service Settings
Nesis III — Installation Manual 11. Service Settings to GD 40. When pushed GD-40 comenses a test procedure. GD 40 also drives a relay switch and outputs audio stream. Please refer to the GD 40 manual for more details http://www.fdatasystems.com/s/GD_40_Manual.pdf. -
Page 60: Parameters
Nesis III — Installation Manual 11.2 Parameters Classis middle allows selection of the central element of the classic screen. The following options are available: • AHRS + MAP shows AHRS window on the top and small moving map at the bottom. -
Page 61: Recorder
Nesis III — Installation Manual 11.4 Recorder correctly configured (see section 13.3) and Min-Max position was determined (see section 13.3.2). Flaps may have several fixed positions between fully retracted and fully ex- tended. This window is used to define visual flap stops markings, which are relative to the full flap travel. -
Page 62: Trim Sensitivity
Nesis III — Installation Manual 11.5 Trim Sensitivity Sometime, moststly due to software development purposes, a recorder may be turned on. The record option appear on the top left area of the Modern screen. Only one recorder can be active at the same time. The following recorders are possible. -
Page 63: Video Input
Nesis III — Installation Manual 11.6 Video Input 11.6 Video Input Certain Nesis models have a composite video input connection. Nesis must know the format of this analogue video input. It can be either PAL or NTSC. Only these two formats are supported. Please check which format is used in your camera and set it accordingly. -
Page 64: Restore
Nesis III — Installation Manual 11.10 Restore • UserWpts.bak stores user defined waypoints. • Routes.bak stores routes. • Parameters.bak stores all parameter settings. • Daqu.bak stores a copy of Daqu settings, when Daqu is connected to the CAN bus. • Ini.bak stores a copy of some initialization parameters. -
Page 65: Yaw Misalignment
Nesis III — Installation Manual 12.1 Yaw Misalignment Please make sure that aircraft is level for both, roll and pitch. Make also sure that Nesis is turned on for at least ten minutes – this warms up the internal electronics and stabilizes numerical filters. -
Page 66: Roll And Pitch Adjustment
Nesis III — Installation Manual 12.2 Roll and Pitch Adjustment +Ψ -Ψ Figure 60: Top-down view illustration of possible yaw misalignment: perfect position (left), positive yaw misalignment angle (middle), negative yaw misalignment angle (right). Yaw correction affects the roll and pitch correction as well. Hence it is im- portant to set yaw before roll and pitch adjustments are made. -
Page 67: Engine & Sensors
Nesis III — Installation Manual 13. Engine & Sensors Engine & Sensors This section refers mostly to the engine sensors and other aircraft sensors (trim, flap position, fuel level, rotors,. . . which are connected to Daqu. It is highly recommended to read and understand the Daqu manual before doing changes. - Page 68 Nesis III — Installation Manual 13.1 Engine Model Figure 61: An example window for engine and sensors. Engine FF-Model Generic engine (any engine) ◦ Rotax 582 65 HP ◦ Rotax 912 80 HP ◦ Rotax 912 100 HP ◦ Rotax 914 •...
-
Page 69: Switch Function
Nesis III — Installation Manual 13.2 Switch Function exists. 13.2 Switch Function This option is available only when miniDaqu is connected to the CAN bus. Standard Daqu does not have this possibility. The miniDaqu EMS box has one auxiliary digital port, which is acting as a switch. -
Page 70: Channel Editing
Nesis III — Installation Manual 13.3 Channels Edit Opens the channel editor window, which allows tuning the channel details: function, sensor type, filter, etc. Reset clears all the channel data and set the channel as not used. Min/Max is used to define the sensor limits, required for some functions like trim and flap. - Page 71 Nesis III — Installation Manual 13.3 Channels Report time defines how frequently Daqu sends measurements to the CAN bus. This is defined as a time interval between two measurements being sent. Small value means that measurements are send frequently. Filter defines a low level filtering. This is a low pass filter time constant.
-
Page 72: Min/Max
Nesis III — Installation Manual 13.3 Channels Figure 65: An example of channel A editing. An EGT sensor is connected to the channel. channel, the first assigned function will be reset and the last assigned function will be kept. 13.3.2... -
Page 73: Offset
Nesis III — Installation Manual 14. Tank In typical scenario, aircraft is trimmed full forward and once sensor value is stable, sensor value is copied to Nose. Then it is trimmed fully backward and once sensor value is stable it is copied to Tail. -
Page 74: Linear Shape
Nesis III — Installation Manual 14.1 Fuel Level Sensors Three different approaches are supported to match the tank shape: 1. Linear – linear curve is assumed and only min and max value are needed. 2. User – up to 20 tank points can be given to define the shape. -
Page 75: User Shape
Nesis III — Installation Manual 14.1 Fuel Level Sensors Figure 69: An example of linear fuel tank. 14.1.2 User Shape This is the most complex solution, but also the most precise one. It allows up to 20 calibration points per tank. 20 points are an overkill, 5-8 points are usually more than enough. -
Page 76: Predefined Shapes
Nesis III — Installation Manual 14.1 Fuel Level Sensors (b) First point was added. (a) Starting situation. Figure 70: Editing tank measurement points. 4. Pour more fuel in known steps. 5-20 liter steps are usually fine. Use larger steps for very large tanks. Wait for sensor value to stabilize. Then select the Add point and set the cumulative fuel quantity for this step. - Page 77 Nesis III — Installation Manual 14.1 Fuel Level Sensors (b) User defined tank shape. (a) Final list of points. Figure 71: An example of tank measurement points. Empty/Full procedure is applied. This is similar to the Linear case. This works well, when fuel sensor mounting position do not vary from case to case.
-
Page 78: Simulated Fuel Tank
Nesis III — Installation Manual 14.2 Simulated Fuel Tank 1. Select a predefined shape, 2. Select the Empty/Fuel option. 3. Select the Empty and enter the min (empty) sensor value. 4. Repeat this for the Full and enter the sensor value. -
Page 79: Parameters
Nesis III — Installation Manual 15. Parameters Figure 73: Software tank capacity set to 80 liters. Parameters It is recommended that engine sensors and corresponding Daqu channels are set before parameter specific values are defiend. See section 13 and Daqu or miniDaqu manual. -
Page 80: Parameter Editing
Nesis III — Installation Manual 15.1 Parameter Editing Nesis and Aetos devices benefit from this feature. This may eliminate the need to tune the parameters on other devices. Load predefined loads engine parameters for the currently selected engine model. Engine model shall be defined before this command is used. - Page 81 Nesis III — Installation Manual 15.1 Parameter Editing Filter option defines reaction of on parameter change. The value if given is seconds. A small value means that parameter reacts quickly while a large value does the opposite. Please note that this filter is a second stage filter. The first stage filtering is typically done by Daqu and this filtering works on a top of the first one.
-
Page 82: Offset
Nesis III — Installation Manual 16. Offset Offset Some sensors and counters may require occasional adjustment. The offset window allows adjustment for static and dynamic pressure sensors, CO sensor, fuel flow correction and time counters adjustments. Please make sure that Nesis is running for at least 10 min before any sensor adjustments are made. -
Page 83: Autopilot
Nesis III — Installation Manual 17. Autopilot Fuel flow factor affects software based fuel factor only. It does not affect sensor fuel flow factor. It is used to correct fuel flow indication for the cases where fuel flow is computed from engine RPM and manifold pressure for a known engine. -
Page 84: Can Devices
1. The new LCD layout file for some specific devices is typically obtained from Kanardia customer support as an email attachment. 2. The file is copied to an USB memory stick. -
Page 85: Joyu
Nesis III — Installation Manual 20. Joyu Enable magnetic heading turns magnetic heading on (default). Disable magnetic heading turns magnetic heading off. Use this if Magu calibration was not successful or if Magu does not work properly. Alternatively, Magu can be disconnected from the CAN bus. -
Page 86: Configuration
Nesis III — Installation Manual 20.2 Configuration . . . radio transmition command – connects the PTT pin to GND..AUX command – connects the AUX pin to GND. Motor 1+ . . . moves the motor 1 in the positive direction. - Page 87 Nesis III — Installation Manual 20.2 Configuration Figure 77: Initial, empty Joyu configuration window. Figure 78: Joyu button 1 was assigned to Nesis with serial number 100 with the autopilot menu action. Figure 79: Joyu wheel movement was assigned to Nesis with serial number 100.
-
Page 88: Calibrated Airspeed
Nesis III — Installation Manual 21. Calibrated Airspeed Figure 80: Final situation – three different devices are controlled with one Joyu. Calibrated Airspeed When corrections for the calibrated airspeed are known, they can be entered into the system. Up to seven correction points can be entered. Let’s illustrate this with an example. -
Page 89: Layout Edit
Nesis III — Installation Manual 22. Layout Edit Figure 81: An example of the CAS correction table. Layout Edit Since software version 3.9, the editing of engine box on modern screens is possible. The editor enables the users of Nesis to simply adapt part of the screen to their preference. -
Page 90: Enable Editing
Nesis III — Installation Manual 22.1 Enable Editing • Do the editing on the screen. 22.1 Enable Editing The screen editing is not enabled by default. The main reason for this is to prevent unintentional editing when least needed – during the flight. Select: 1. -
Page 91: Navigation
Nesis III — Installation Manual 22.3 Navigation Figure 84: Main menu with Edit screen option which must be enabled to start editing. 4. stretch (elastic space), 5. vertical bar, 6. spacer. Figure 85: Part of the panel which is editable. -
Page 92: Edit Item
Nesis III — Installation Manual 22.4 Edit Item 22.4 Edit Item To edit an item in layout it must be selected by clicking on the touchscreen or navigating to it with rotating knob. After click the dialog with following actions will be shown as in figure 86a. -
Page 93: New Item
Nesis III — Installation Manual 22.5 New Item 22.5 New Item When adding new item to the selected group the user is presented with dialog as shown in figure 87. The selection dialog differs slightly if you are inserting items into vertical or horizontal group. -
Page 94: Edit Menu
Nesis III — Installation Manual 22.6 Edit Menu Arc Total is similar to Prameter Arc but displays second parameter like engine total time. Fuel Vertical is vertical bar representation of fuel tank level. Fuel Computer is special vertical item for representing endurance, range and fuel flow. -
Page 95: Pitostatic Test
Nesis III — Installation Manual 23.1 Pitostatic Test 23.1 Pitostatic Test Static and dynamic pressure test shall be performed with standard pitostatic testing equipment. Nesis has integrated solid state sensors, which are known to develop slight offset in time. This offset shall be adjusted. -
Page 96: Manifold Pressure
Nesis III — Installation Manual 24. Service 23.2.3 Manifold Pressure Select the Manifold Pressure item from the offset list. Adjust the correction, so that manifold pressure will match the static pressure. Both values are indicated on the screen. Service Nesis and corresponding equipment does not have any serviceble parts. In the case of a device failure, the device shall be sent to the factory for a repair.
Need help?
Do you have a question about the Nesis III and is the answer not in the manual?
Questions and answers