Lightware HDMI-TPS-TX210 User Manual
Hdbaset multimedia extender
Hide thumbs
Also See for HDMI-TPS-TX210:
- User manual (122 pages) ,
- Quick start manual (2 pages) ,
- User manual (159 pages)

Subscribe to Our Youtube Channel
Related Manuals for Lightware HDMI-TPS-TX210


Summary of Contents for Lightware HDMI-TPS-TX210
- Page 1 User’s Manual HDMI-TPS-TX210, HDMI-TPS-TX220 DVI-HDCP-TPS-TX210, DVI-HDCP-TPS-TX220 DP-TPS-TX210, DP-TPS-TX220 SW4-TPS-TX240, SW4-TPS-TX240-Plus HDBaseT Multimedia Extender v3.0 09-06-2020 ...
- Page 2 HDMI-TPS-TX200series–User'sManual Important Safety Instructions Waste Electrical & Electronic Equipment Common Safety Symbols WEEE Class II apparatus construction. Symbol Description This marking shown on the product or its literature, The equipment should be operated only from the power source indicates that it should not be disposed with other indicated on the product.
- Page 3 HDMI-TPS-TX200series–User'sManual Symbol Legend Document Information About Printing Thefollowingsymbolsandmarkingsareusedinthedocument: ThisUser’sManualappliestothefollowingversionsofthementioned Lightware Visual Engineering supports green technologies and software,firmware,andhardware: Eco-friend mentality.Thus, this document is made for digital usage WARNING! Safety-related information which highly primarily.Ifyouneedtoprintoutfewpagesforanyreason,followthe recommended to read and keep in every case!
-
Page 4: Table Of Contents
5.12.1. OpeningtheMiniweb ..............52 4.11.3. RemoteFirmwareUpgradeofConnectedLightwareDevices..29 3. INSTALLATION ................17 5.12.2. TheDefaultStatusPage ............... 53 3.1. Mounting Options ...............18 5. SOFTWARE CONTROL - LIGHTWARE DEVICE CONTROLLER ..30 5.12.3. MiniwebCustomization ..............53 3.1.1. Under-deskDoubleMountingKit ............ 18 5.1. Install and Upgrade ..............31 5.13. Configuration Cloning (Backup Tab) ........54 3.1.2. 1UHighRackShelf ................18 5.2. Running the LDC ................31... - Page 5 HDMI-TPS-TX200series–User'sManual 6.3.4. ConnectionTest................58 7.4. System Commands...............70 7.6.8. ChangingtheInputPortPriority ............. 79 6.3.5. ViewSerialNumber ................. 58 7.4.1. QueryingtheProductName ............70 7.6.9. MutinganInputPort ............... 79 6.3.6. CompileTime ................... 58 7.4.2. SettingtheDeviceLabel ..............70 7.6.10. UnmutinganInputPort ..............79 6.3.7. ViewInstalledBoard ............... 59 7.4.3. QueryingtheSerialNumber ............70 7.6.11. LockinganInputPort ..............79 6.3.8. ViewFirmwareforAllControllers ...........
- Page 6 11.7. Port Numbering ..............115 7.13.4. EmulatinganEDIDonanInputPort ..........91 11.7.1. ForAllModels ................115 7.13.5. EmulatinganEDIDtoAllInputPorts ........... 91 11.7.2. SW4-TPS-TX240 ................115 7.13.6. CopyinganEDIDtotheUserMemory .......... 92 11.7.3. HDMI-TPS-TX210 ................ 115 7.13.7. DeletinganEDIDfromUserMemory ........... 92 11.7.4. HDMI-TPS-TX220 ................ 115 7.13.8. ResettingtheEmulatedEDIDs ............92 11.7.5. DVI-HDCP-TPS-TX210 ..............115 7.14. LW3 Commands - Quick Summary ..........93 11.7.6. DVI-HDCP-TPS-TX220 ..............115 11.7.7. DP-TPS-TX210 ................
-
Page 7: Introduction
1.Introduction HDMI-TPS-TX200series–User'sManual I ntroduction Thank You for choosing Lightware’s HDMI-TPS-TX200 series HDBaseT -compatible device. In the first chapter we would like to introduce the device highlighting the most important features. ç Description ç CompatibleDevices ç BoxContents ç... -
Page 8: Description
TPS extender outputs SW4-TPS-TX240-Plus. 1.4. Optional Accessories HDMI-TPS-TX220 SW4-TPS-TX240-Plus The following not-supplied accessories can be purchased and used with the device; please contact sales@lightware.com. #new Input Transmitter Number of Switcher Transmitter Number of inputs interface inputs with 4 inputs... -
Page 9: Features
1.Introduction HDMI-TPS-TX200series–User'sManual 1.5. Features 1.5.1. Smart Features DIFFERENCE: Belowlistedfeaturesareavailablefromfirmwarepackagev1.2.0. 3D and 4K Support Dark Mode Highbandwidthallowsextensionofresolutionsupto4Kandeven3Dsourcesanddisplaysare supported. TheLEDscanbeunlittohidethedevicewhenitisplacedinalight-sensitiveplace. Signal Transmission up to 170 m Forced Button Lock Video and audio signal transmission (HDMI, Ethernet, RS-232, and Infra-Red over a single CAT5e…CAT7ecable. -
Page 10: Model Comparison
DVI-D Ethernet IRin/out RS-232 GPIO Number of Built-in 12V Smart Advanced Events in Event miniwebsize Features ControlPack Manager limit HDMI-TPS-TX210 10kB HDMI-TPS-TX220 10kB... -
Page 11: Typical Applications
1.Introduction HDMI-TPS-TX200series–User'sManual 1.7. Typical Applications Standalone Application Integrated System Diagram Appliedfirmwarepackage:v1.2.0 | LDCsoftware:v2.2.0... -
Page 12: Product Overview
2.ProductOverview HDMI-TPS-TX200series–User'sManual P roduct Overview The following sections are about the physical structure of the device, input/output ports, connectors, status LEDs and front panel button functions. ç FrontViews ç RearViews ç FrontPanelLEDs ç RearPanelLEDs ç FrontPanelButtons Appliedfirmwarepackage:v1.2.0 | LDCsoftware:v2.2.0... -
Page 13: Front Views
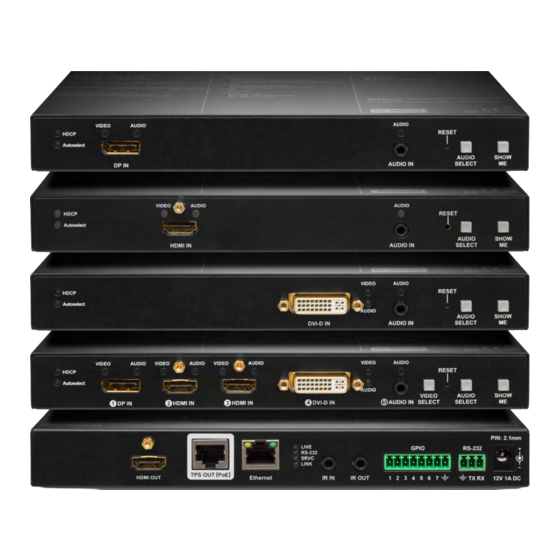
2.ProductOverview HDMI-TPS-TX200series–User'sManual 2.1. Front Views DP-TPS-TX220 8 9 q HDMI-TPS-TX210 SW4-TPS-TX240 and SW4-TPS-TX240-Plus HDMI-TPS-TX220 8 9 q HDCP LED LEDgivesfeedbackabouttheHDCPstatusoftheoutputsignal.See DVI-HDCP-TPS-TX210 the details in the FrontPanelLEDs section. Autoselect LED LED gives feedback about the current Autoselect status. See the... -
Page 14: Rear Views
Maximum CATx cable distances can be found in the Maximum Extension Distances section. Ethernet LockingRJ-45connectorforconfiguringthedeviceusingLightware Device Controller (LDC), or upgrading it using Lightware Device DVI-HDCP-TPS-TX220 Updater (LDU). Any third-party control system can use this port to control the device. Status LEDs TheLEDsgivefeedbackabouttheactualstateofthedevice.Seethe... -
Page 15: Front Panel Leds
2.ProductOverview HDMI-TPS-TX200series–User'sManual 2.3. Front Panel LEDs 2.4. Rear Panel LEDs VIDEO INPUT LEDs LIVE LED The video source is not selected. The device is not powered. blinking Thevideosourceisselectedbutsignalisnotdetected. green blinkingslow The device is powered and operational. green green Thevideosourceisselectedandsignalisdetected. -
Page 16: Front Panel Buttons
2.ProductOverview HDMI-TPS-TX200series–User'sManual 2.5. Front Panel Buttons 2.5.5. Reset to Factory Default Settings Torestorefactorydefaultvalues,dothefollowingsteps: 2.5.1. Video Select Button Step 1. Make sure the device is powered on and operational. DIFFERENCE: OnlyforSW4-TPS-TX240andTX240-Plusmodels:desiredvideoinputcanbe SHOW Step 2. PressandkeeppressedtheShow Mebuttonfor10seconds.After5secondsfront selected by the Video Select button from the front panel. The selection order of the inputs is the VIDEO SELECT panelLEDsstartblinkingbutkeeponpressingthebutton. -
Page 17: Installation
3. Installation HDMI-TPS-TX200series–User'sManual I nstallation The chapter is about the installation of the device and connecting to other appliances, presenting also the mounting options and further assembly steps. ç MountingOptions ç ElectricalConnections ç ConnectingSteps ç PoweringOptions Appliedfirmwarepackage:v1.2.0 | LDCsoftware:v2.2.0... -
Page 18: Mounting Options
3. Installation HDMI-TPS-TX200series–User'sManual 3.1. Mounting Options 3.1.2. 1U High Rack Shelf TomountthetransmitterLightwaresuppliesoptionalaccessoriesfordifferentusage.Therearetwokinds ofmountingkitswithsimilarfixingmethod.Thedevicehastwomountingholeswithinnerthreadonthe bottom side; see the bottom view in the Mechanical Drawings section. Fasten the device by the screws enclosedtotheaccessory: 3.1.1. Under-desk Double Mounting Kit 1U high rack shelf Therackshelgallowsrackmountingforhalf-rack,quarter-rackandpocketsizedunits.1Uhighrackshelf... -
Page 19: Electrical Connections
DP-TPS-TX210/TX220, SW4-TPS-TX240 and TX240-Plus models provide standard 20-pole DisplayPort connector for input. Always use high quality DP cable for connecting DisplayPort devices. 3.2.5. 12V DC Connection Bottom Side The Wiring of TPS and LAN Cables LightwarerecommendstheterminationofLANcablesonthebasisofTIA/EIAT568AorTIA/EIAT568B standards. Pin TIA/EIA T568A Wire color TIA/EIA T568A Wire color white/green... -
Page 20: Connector
3. Installation HDMI-TPS-TX200series–User'sManual 3.2.7. RS-232 Connector 3.2.9. GPIO - General Purpose Input/Output Ports Theextendercontainsa3-polePhoenixconnectorwhichisusedforRS-232serialconnection. TheTPS-TX220series,theSW4-TPS-TX240andTX-240-Plustransmitterscontaina8-polePhoenixconnector withsevenGPIOpins,whichoperatesatTTLdigitalsignallevelsandcanbesettohighorlowlevel(Push-Pull). Thedirectionofthepinscanbeinputoroutput(adjustable).VoltagerangesforGPIOinputsarethefollowing: Pin no. Signal Ground Input voltage [V] Output voltage [V] Max. current [mA] TXdata Logical low level 0-0,8 0-0.5 RXdata Logical high level 2-5 4.5-5 RS-232 connector pin assignments... -
Page 21: Connecting Steps
3. Installation HDMI-TPS-TX200series–User'sManual 3.3. Connecting Steps 3.4. Powering Options Using local PSU:connectthepoweradaptortotheDCinputonthetransmitterfirst,thentotheAC power socket. Using PoE with connecting a transmitter:connecttheTPSOUT(PoE)portofthetransmittertothe TPS+PoEportoftheTPS-PI-1P1powerinjectorbyaCATxcable,andconnecttheTPSinputportof thecompatiblereceivertotheTPSportoftheTPS-PI-1P1byaCATxcable. CATx Connect the the transmitter and a compatible receiver or the matrix input board by a CATx cable Using PoE with connecting a matrix or an input board:connecttheTPSOUT(PoE)portofthe... -
Page 22: Device Concept
4.DeviceConcept HDMI-TPS-TX200series–User'sManual D evice Concept The following chapter describes the features of the device with a few real-life examples. ç TPSExtenderConcept ç PortDiagram ç TPSInterface ç EthernetControlInterface ç AudioInterface ç VideoInterface ç TheAutoselectFeature ç SerialInterface ç InfraredInterface ç... -
Page 23: Tps Extender Concept
The HDMI-TPS-TX200 series transmitters are able to receive digital (DP, HDMI, DVI-D) video signals and analogaudiosignalaswellandtransmitHDBaseT(TPS)signalincludingHDMI/DVIaudio/videosignals, Ethernet,RS-232,andInfraredsignals.Analogaudiosignalscanbereceivedviathe3.5”TRS(jack). ThedevicecanbecontrolledviaEthernet,RS-232orInfraredandisabletocontrolthird-partydevicesviathe RS-232,Ethernet,Infraredinterfaces. The summary of the interfaces OnlyforHDMI-TPS-TX210/TX220,SW4-TPS-TX240andTX240-Plusmodels. OnlyforDP-TPS-TX210/TX220,SW4-TPS-TX240andTX240-Plusmodels. OnlyforDVI-HDCP-TPS-TX210/TX220,SW4-TPS-TX240andTX240-Plusmodels. OnlyforTPS-TX220,SW4-TPS-TX240andTX240-Plusmodels. 4.2. Port Diagram The following diagram introduces the route of the different signal types (including the audio/ video and... -
Page 24: Tps Interface
4.DeviceConcept HDMI-TPS-TX200series–User'sManual 4.3. TPS Interface 4.4. Ethernet Control Interface ThedevicecanbecontrolledoverfrontpanelEthernetstandardRJ45connectorwhichconnectedtoLAN. ThedeviceisbuiltwithTPS(TwistedPairSingle)interfacewhichareusingHDBaseT technology.Itmeans ThisinterfacesupportsbothLW2andLW3protocols.Theinterfacecanbeusedtoremotecontrolthedevice theunittransmitsvideo,audio,Ethernet,RS-232,andInfraredsignalsviaasingleCATxcable. withLightwareDeviceControllerandestablishtheconnectiontoLightwareDeviceUpdatersoftwareand TPS Interface Working Modes performfirmwareupgrade. TheTPSworkingmodebetweenthetransmitterandthereceiverisdeterminedbythemodesetinthem. 4.5. Audio Interface BothdevicesTPSmodesettingstogetherdeterminethefinallyestablishedTPStransmissionmode. 4.5.1. Audio Input Modes ThefollowingTPSmodesaredefinedinthetransmitter: ThedevicecanreceiveembeddeddigitalaudiosignalontheHDMI,DisplayPort,andDVI-Dinputportsand ▪ Auto:TheTPSmodeisdeterminedautomatically. analogaudiosignalontheJackinputports. ▪ HDBaseT:Idealforhighresolutionsignalsupto4K. ▪ Long reach:Idealforbigdistancesupto1080p@60Hzwithextendedcablelengths. Audio Embedding ▪... -
Page 25: Video Interface
DVI-DIN Laptop HDMIIN2 Test „No signal” Display „Off” No Audio/Video INFO: Priorities can be set in Lightware Device Controller software, see related settings in the Audio pattern generator Test pattern transmission Outputs(TPSandHDMI) sections. setting Flowchart of the Autoselect modes Appliedfirmwarepackage:v1.2.0 | LDCsoftware:v2.2.0... -
Page 26: Serial Interface
4.DeviceConcept HDMI-TPS-TX200series–User'sManual 4.8. Serial Interface Control Mode TheincomingdatafromthegivenportisprocessedandinterpretedbytheCPU.Themodeallowstocontrol 4.8.1. Technical Background the transmitter directly. LW2 or LW3 protocol commands are accepted – depending on the current port SerialdatacommunicationcanbeestablishedviathelocalRS-232port(Phoenixconnector)orviatheTPS setting. lines.TheRS-232ports–whichareconnectedtotheCPU–canbeconfiguredseparately(e.g.iftheBaud Command Injection Mode ratesaredifferent,theCPUdoestheconversionautomaticallybetweentheports).TheRS-232portcanbe switchedtoPass-throughmode,Controlmode,orCommandInjectionmode;seethefigurebelow. In this mode, the transmitter works as an RS-232 bidirectional converter.TheTPS signal is converted to RS-232dataandviceversa.TCP/IPportnumbersaredefinedfortheserialports(TPSandlocal)forthis... -
Page 27: Infrared Interface
When'Password:'isdetectedinthestring,SW4 ThisconditionandtheactionissetinEventmanager. sendsamessage:'Admin'. Loginisestablished,Videocodecisreadytouse. First,configuretherecognizerfortheserialcommunication,afterthat,settheeventsintheEventManager (for more details see the Event Manager section). The RS-232 recognizer settings has to be done with LightwareDeviceControllerSoftware(seetheRS-232section)orwithLW3protocolcommands(seethe RS-232Recognizer section). The Concept Settings in the Event manager ThetransmitterandthereceiverareconnectedoverTPS.AnIRdetectorisattachedtotheIRinputportof theTPSreceiverandanIRemitterisconnectedtotheIRoutputportofthetransmitter.Whentheremote ▪ E1. WhenthesignalispresentonO1portoftheUMX-HDMI-140-Plus,itsendsamessage'PING'onP1 controllersendsanIRsignal,thecodewillbepassedthroughtheTPSlineandtheIRemittersendsthesame... - Page 28 ▪ theIRcodeasdescribedintheHowtoLearnanIRCode? section. Capturing ThefingerprintofanIRcode(hashcode)canbestoredandusedasaconditioninEventmanager.Please see further details in the Infra section. INFO: TheprontohexcodewhichislearnedbyaLightwaredeviceislittle-endian format. Sending IR Codes Example IRcodecanbesentby: ▪ LW3 command, see the Sending Pronto Hex Codes in Little-endian Format via IR Port section. The maximumlengthofthecodecanbe765characters/bytes(93burstpairs). ApplyinganAction in Event Manager.Themaximumlengthofthecodecanbe184characters/bytes(21...
-
Page 29: Gpio Interface
▪ For Relay 2:createaneventinEventmanagerwhensignalispresentonInput1(I1)thensetGPIOpins SeemoreinformationaboutthesettingsintheTheBuilt-inMiniweb section. tohighlevelforRelay2closing.AlsocreateanothereventwhensignalisnotpresentonInput1(I1) thensetGPIOpinstolowlevelforRelay2opening. 4.11.3. Remote Firmware Upgrade of Connected Lightware Devices WhenthePCstartstoplaythevideopresentation,thesignalisreceivedovertheVGAinputsoGPIOpins sendsignaltoRelay1toopenwhichresultsturningoffthelights.FurthermoreGPIOpinsalsosendsignal toRelay2tocloseandtheprojectionscreenisrolleddown.Whenthepresentationisended,signalceases ontheVGAinput,soGPIOpinssendsignaltoRelay1toclosewhichresultsturningonthelightsandsends signaltoRelay2toopensoprojectionscreenreturnstoitsenclosure. ThefirmwareoftheLightwareTPSdevicescanbeupgradedindividuallybyLightwareDeviceUpdater(LDU) ATTENTION! Pleasealwayschecktheelectricalparametersofthedeviceswhatyouwanttocontrol.The software. HDMI-TPS-TX200 series transmitters contain a feature which allows having a faster and more... -
Page 30: Software Control - Lightware Device Controller
S oftware Control - Lightware Device Controller The device can be controlled by a computer through Ethernet and RS-232 interfaces by the Lightware Device Controller (LDC). The software can be installed on a Windows PC or macOS. The application and the User’s Manual can be downloaded from www.lightware.com. -
Page 31: Install And Upgrade
5.SoftwareControl-LightwareDeviceController HDMI-TPS-TX200series–User'sManual 5.1. Install and Upgrade Step 2. SetthedesiredupdatesettingintheOptions section. ▪ If you do not want to check for the updates ATTENTION! Pleasenotethattheminimumsystemrequirementis1GBRAM. automatically, uncheck the circle, which contains the INFO: Aftertheinstallation,theWindowsandtheMacapplicationhasthesamelookandfunctionality. greentick. ThistypeoftheinstallerisequalwiththeNormalinstallincaseofWindowsandresultsanupdateable ▪ If you want to postpone the update, a reminder can be version with the same attributes. -
Page 32: Establishing The Connection
5.SoftwareControl-LightwareDeviceController HDMI-TPS-TX200series–User'sManual 5.3. Establishing the Connection Step 3. Select the unit from the discovered Ethernet devices or under Serial devices; when the device is connected throughRS-232click on theQuery button next to the desired serial port to display the Step 1. -
Page 33: Crosspoint Menu
5.SoftwareControl-LightwareDeviceController HDMI-TPS-TX200series–User'sManual 5.4. Crosspoint Menu Port Tiles #crosspoint #switch Thecolorsoftheporttilesandthedisplayediconsrepresentdifferentstatesandinformation: Portname Porticon Link Video Portnumber Signalpresentindicator green:present grey:notpresent Stateindicators State Indicators Followingiconsdisplaydifferentstatesoftheport/signal: #lock #unlock #mute #unmute Icon Icon is grey Icon is black Icon is green Signalisnot... -
Page 34: Port Properties Windows
5.SoftwareControl-LightwareDeviceController HDMI-TPS-TX200series–User'sManual 5.5. Port Properties Windows Available settings: ▪ Setauniquenamefortheport(upto15characters). 5.5.1. Digital Video Inputs Mute/unmuteandlock/unlocktheport. ▪ ClickingontheHDMI,DisplayPort,orDVI-DvideoinputporticonresultsopeningthePort properties window. HDCPsetting(enable/disable). #hdcp ▪ ▪ Open the Frame Detector. ▪ SendandreceiveCECcommandsbytheCEC Tool*–onlyincaseofSW4-TPS-TX240-Plus. Reloadingfactorydefaultsettingsfortheselectedport. ▪ 5.5.2. Digital Audio Inputs ClickingontheHDMI,DisplayPort,orDVI-DaudioinputporticonresultsopeningthePortpropertieswindow. Themostimportantinformationandsettingsareavailablefromthepanel. Port properties window of the DVI-D audio input Certainparametersoftheembeddedaudioinputsignalcanbesetasfollows:... -
Page 35: Analog Audio Input
5.SoftwareControl-LightwareDeviceController HDMI-TPS-TX200series–User'sManual 5.5.3. Analog Audio Input 5.5.4. Audio Outputs (TPS and HDMI) Port properties window of the Analog Audio (Jack) input Certainparametersoftheanalogaudioinputsignalcanbesetasfollows: ▪ Setauniquenamefortheport(upto15characters). Mute/unmutetheport. ▪ ▪ Lock/unlocktheport. ▪ Volume:from0dBto-95.62dB,instep0.375dB(defaultis0dB). Balance:from0to100,instep1(defaultis50=center). ▪ ▪ Gain:-12to6dB,instep3dB(defaultis0dB). ▪ Reloadingfactorydefaultsettingsfortheselectedport. # #analogaudio... -
Page 36: Video Outputs (Tps And Hdmi)
5.SoftwareControl-LightwareDeviceController HDMI-TPS-TX200series–User'sManual 5.5.5. Video Outputs (TPS and HDMI) Available settings: ▪ Setauniquenamefortheport(upto15characters). Mute/unmuteandlock/unlocktheport. ▪ ▪ Autoselect settings:enable/disable,mode,andpriorities.(SeemoredetailsaboutAutoselectfeaturein The Autoselect Feature section). #signaltype ▪ Signal type:Auto/DVI/HDMI-Theoutgoingsignalformatcanbeselectedbyadrop-downmenu.The AutomodemeanstheoutgoingsignaltypeisbasedontheEDIDofthesinkconnectedtothegiven outputport.IfHDMIissupportedbytheEDID,thesignaltypewillbeHDMI,otherwiseDVI. ▪ HDCP mode:Auto/Always-Thetransmitterforcesthesourcesentthesignalwithoutencryptionifthe content allows when Auto mode is selected. -
Page 37: Cec Tool
5.SoftwareControl-LightwareDeviceController HDMI-TPS-TX200series–User'sManual 5.6. CEC Tool Drop-down ContainingthebasicCECcommands,mostofthemaredisplayedonthe command list graphicalinterface,too(ontheleftside).ClickontheSend button to execute TheSW4-TPS-TX240-PlusmodelisabletosendandreceiveConsumerElectronicControl(CEC)commands. sendingthecommand. Thisfeatureisforremotecontrolthesourceorsinkdevice.CECisabi-directionalcommunicationviathe Custom command Thetextfieldisforsendinghexadecimalcommandstothesource.The HDMI cable. #cec textbox maximumallowedlengthis30characters(15bytes).ClickontheSend button toexecutesendingthecommand. OSD string textbox Uniquetextcanbeshownonthesinkdeviceupto14characters.Thesend OSD(On-screendisplay)commandtextboxistheinputfieldofthestring. Alphanumericcharacters,glyphsandspaceareaccepted.ClickontheSend button to execute the command. -
Page 38: Diagnostic Tools
5.SoftwareControl-LightwareDeviceController HDMI-TPS-TX200series–User'sManual 5.7. Diagnostic Tools Table and Chart Views Cablediagnosticscanbedisplayedinadvancedmodesaswell.Twowaysareavailable:table view and chart 5.7.1. Cable Diagnostics view.DatacanbeexportedtoafileonclickingontheExport data button. ThecablediagnosticsisausefultooltodetermineanycablerelatedissuesincaseofTPSconnection.The estimated cable length and the quality of the link are measured periodically and the diagnostic window showsthevaluesinreal-time.Ifthegreenbarshitthefirstlineinthemiddletheyturnintored.Itmeansthe number of the errors – during the extension – is higher than recommended.The link might be alive but... -
Page 39: Framedetector
5.SoftwareControl-LightwareDeviceController HDMI-TPS-TX200series–User'sManual 5.7.2. Frame Detector 5.7.3. No Sync Screen (Test Pattern) The ports can show detailed information about the signal like full size and active video resolution. This featureisagoodtroubleshooterifcompatibilityproblemsoccurduringsysteminstallation.Toaccessthis function, open the port properties window and click on Frame detector button. -
Page 40: Edid Menu
5.SoftwareControl-LightwareDeviceController HDMI-TPS-TX200series–User'sManual 5.8. EDID Menu 5.8.2. EDID Operations AdvancedEDIDManagementcanbeaccessedbyselectingtheEDIDmenu.Therearetwopanels:leftone Changing Emulated EDID containsSourceEDIDs,rightonecontainsDestinationplaceswheretheEDIDscanbeemulatedorcopied. Step 1. Choose the desired EDID list on the source panel and select an EDID. Step 2. PresstheEmulated button on the top of the Destination panel. -
Page 41: Edid Summary Window
5.SoftwareControl-LightwareDeviceController HDMI-TPS-TX200series–User'sManual 5.8.3. EDID Summary Window 5.8.5. Creating an EDID - Easy EDID Creator SelectanEDIDfromSourcepanelandpressInfo button to display EDID summary. Since above mentioned Advanced EDID Editor needs more complex knowledge about EDID,Lightwareintroducedawizard-likeinterfaceforfastandeasyEDIDcreation.With EasyEDIDCreatoritispossibletocreatecustomEDIDsinfoursimplesteps.ByclickingontheCreate button belowSourcepanel,Easy EDID Creator is opened in a new window. For more details about EDID Editor please... -
Page 42: Control Menu
5.SoftwareControl-LightwareDeviceController HDMI-TPS-TX200series–User'sManual 5.9. Control Menu Settings Thefollowingsettingsandfunctionsareavailable: 5.9.1. RS-232 RS-232mode; ▪ Alltheserialsettingsavailableinthismenu,includingtheoperationmodesetting;seemoreinformationin ▪ Baudrate; SerialInterface section. #rs232 #rs-232 #serial ▪ Databits; ATTENTION! TheRS-232Operation modeismirroredontheLocalandLinkserialport.Theothersettings Parity; ▪ canbeadjustedseparatelyonthetwoports. ▪ Stopbits; SeemoredetailsintheRS-232Modes section. Command Injection Inthismode,thetransmitterworksasanRS-232bidirectionalconverter.Tousethismode,enabletheoption andsettheRS-232modetoCommandInjection. #commandinjection Control Protocol The serial command interpreter can accept only one set of commands, therefore, the desired protocol must beset:... - Page 43 5.SoftwareControl-LightwareDeviceController HDMI-TPS-TX200series–User'sManual Message Recognizer Step 2. Setthedelimiter(inhexformat).Inthiscase,thedelimitercharacteris':',whichis'3a'inhexformat. When the delimiter string is detected in the incoming serial data, the serial message is stored in DIFFERENCE: BelowsectionreferstotheSW4-TPS-TX240-plusmodelonly. string(inRxandActiveRxproperty),hex(inRxHexandActiveHexproperty)andhash(inHashand SW4-TPS-TX240-Plusdeviceisabletoanalyze ActiveHashproperty)format.Thesestoredcontentcanbesetasaconditionintheeventmanager. and store the received serial data. For more information see the Serial...
-
Page 44: Gpio
5.SoftwareControl-LightwareDeviceController HDMI-TPS-TX200series–User'sManual 5.9.2. GPIO 5.9.3. Ethernet TheGPIOporthas7pins,whichoperateatTTLdigitalsignallevelsandcanbecontrolledbyLDCorprotocol Two ports are displayed in the Ethernet settings: Local, CPU, and TPS. You can check the status of the commands.SelectaGPIOpinandunderthePortsettingssection;thesettings(pindirectionandinputlevel) Ethernetlinebyeachports:thespeedandtheduplexityoftheconnection. are displayed on the port tiles as well. Thefollowingsettingsareavailableforthelocalport: ▪... -
Page 45: Infra
5.SoftwareControl-LightwareDeviceController HDMI-TPS-TX200series–User'sManual 5.9.4. Infra IR Codes TheusercansetthenameoftheIRcode,thefingerprint(hash),andtherepeattimeoutinms,actionscan ATTENTION! Thedevicehasnobuilt-inInfraredreceiverandtransmitter.Forthecompleteusageattach beorderedtoeachIRcodeaswell. anIRemitterunittotheIROUTandanIRdetectorunittotheIRINconnectors. Infra-Red (IR) receiver and transmitter options can be found on this tab. There are three submenus are Description Function availableunderit:IR codes, Ports, and Clear all IR codes. -
Page 46: Event Manager
5.SoftwareControl-LightwareDeviceController HDMI-TPS-TX200series–User'sManual 5.10. Event Manager The feature means that the device can sense changes on its ports and able to react according to the pre-defined settings. The development idea of the Event manager is based on users’ feedbacks. In many cases internal events (such as... -
Page 47: The Event Editor
5.SoftwareControl-LightwareDeviceController HDMI-TPS-TX200series–User'sManual 5.10.1. The Event Editor 5.10.2. Create or Modify an Event PresstheEdit button in the desired Event line to open the Event editor window. Wizard Mode Thewizardmodeliststhemostcommonconditionsandactions,sothe userdoesnothavetolookforLW3nodesandproperties. Step 1. Click on the Edit button of the desired Event; the Event editor is displayed. -
Page 48: Special Tools And Accessories
5.SoftwareControl-LightwareDeviceController HDMI-TPS-TX200series–User'sManual 5.10.3. Special Tools and Accessories TIPSANDTRICKS: Show advanced expressions option is a useful tool when you look for the path or value ofapropertybutjusttheexpressionisdisplayed.TheoptionisavailableintheEventlistwindoworwhen The Name of the Event Linktoolisused. The name of a port can be changed by typing the new name and clicking the Set button. The following... - Page 49 5.SoftwareControl-LightwareDeviceController HDMI-TPS-TX200series–User'sManual RS-232 Settings Selecttherequiredparameterstosettheaction: Makesurethattheseriallineisestablishedbetweenthetransmitterandtheprojector.CheckthattheRS- ▪ Category:RS-232; 232settingsofthetransmitterissetexactlythesamewhichrequiredfortheprojector:baudrate,databits, ▪ Expression:SendRS-232message; parity,stopbits.Thetransmitterneedstobesetto:Controlprotocol:LW3;andRS-232mode:Pass-through. ▪ Port:P1; SeetherelevantLDCsettingsintheRS-232 section. ▪ Message:PWR0\x0d\x0a Setting the Event YoucancreatetheEventintheWizardinfewsimplesteps: Step 1. Setthecondition. Selecttherequiredparameterstosetthecondition: ▪ Category:Video; ▪ Expression:Signalisdetectedonaport; ▪ Port:O1. Click on the Applybuttontocompletetheprocedure.Whenitisdone,theconditionappearsontheupperside...
-
Page 50: Settings Menu
5.SoftwareControl-LightwareDeviceController HDMI-TPS-TX200series–User'sManual 5.11. Settings Menu 5.11.2. Network IPaddressandDHCPsettingscanbesetonthistab.AlwayspresstheApply settingsbuttontosavechanges. 5.11.1. Status Factorydefaultssettingscanberecalledwithadedicatedbutton. #dhcp #ipaddress #network Network tab in Settings menu Status tab in Settings menu 5.11.3. Front Panel The most important hardware and software related information can be found on this tab: hardware and... -
Page 51: Backup
5.SoftwareControl-LightwareDeviceController HDMI-TPS-TX200series–User'sManual Thefollowingsettingsareavailable: #buttonlock #lockbutton #darkmode ▪ Lock front panel:enable/disablethefrontpanelbuttons.Theenableagaindisablethisoption,orpress theAudioselectandShowmebuttontogetherorsendanLW3commandtothedevice. ▪ Dark mode:allLEDsareswitchedoffafteroneminutedelayifnobuttonsarepressed.Pressingany buttontheLEDswillshowthecurrentstatusagain–withoutperformingthefunctionofthebutton itself. ▪ Enable default function for the buttons:thedefaultfunctioncanbechanged,thus,thebuttonpresscanbe usedasaconditionintheEventmanager. INFO: Locking/unlockingthebuttonsbythefrontpanelbuttonsworkonlywhenthebuttonsaresettothe default function. 5.11.4. Backup Details about this function can be found in the ConfigurationCloning(BackupTab) -
Page 52: The Built-In Miniweb
5.SoftwareControl-LightwareDeviceController HDMI-TPS-TX200series–User'sManual 5.12. The Built-in Miniweb 5.12.1. Opening the Miniweb TheMiniwebisavailableby: DEFINITION: TheminiwebisadedicatedlocationinthememorywhereanHTMLfilecanbeuploadedto. If the <IP_address>/index.htmlpageisopenedinawebbrowserthefileisdisplayed. Openingtheweb browser andtypingtheIP address of the desired device in the address line, ▪ ▪ Launching the LDC, connecting to the device, navigating to Settings/Status and pressing the Open ATTENTION! The... -
Page 53: The Default Status Page
5.SoftwareControl-LightwareDeviceController HDMI-TPS-TX200series–User'sManual 5.12.2. The Default Status Page Customized HTML ThedefaultcontrolpagecanbereplacedintheLDC;navigatetotheSettings/Statuspage.CustomHTMLfile Ifthereisnocontrolpageuploaded,thedefaultstatuspagewillbedisplayed(whichisalsoavailableby canbeuploadedbypressingtheChoose file button. PayattentiontothesizeoftheHTMLfile.Onlyonefileis openingthe<IP_address>/status.html address). allowedandthemaximumfilesizeis10KB(incaseofSW4-TPS-TX240-Plusit's80KB). PresstheResetbuttontoremovethecontrolpage.Thedefaultcontrolpagecanberestoredduringafirmware upgradeprocess,seetheStep3.Checktheupgradeparameters. section. The Factory Default Status Page (status.html) 5.12.3. Miniweb Customization The buttons of Action triggerssectionarelinkedtoActionsofcertainEventsintheEventManager.These buttons are displayed onlyforspecificevents: ▪... -
Page 54: Configuration Cloning (Backup Tab)
5.SoftwareControl-LightwareDeviceController HDMI-TPS-TX200series–User'sManual 5.13. Configuration Cloning (Backup Tab) 5.13.2. Save the Settings of a Device (Backup) Step 1. Applythedesiredsettingsinthetransmitter(portparameters,crosspoint,etc.) Step 2. SelecttheSettings/Backup tab from the menu. Step 3. Writeashortdescription in the text box on the left (optional). Step 4. PresstheCreate a full backupbutton.Youwillbepromptedtosavethefiletothecomputer.Thedefault... -
Page 55: Advanced View Window
5.SoftwareControl-LightwareDeviceController HDMI-TPS-TX200series–User'sManual 5.14. Advanced View Window ThiswindowisthesurfaceoftheLightwareProtocol3(LW3)treewithaterminalwindow.Commandsand specificparameters(whicharenotavailableonthegraphicaluserinterfaceoftheLDC)canberunandset. TheintroductionoftheLW3protocolandthemostimportantcommandscanbefoundintheProgrammers' Referencesection. #advancedview #terminal LW3 protocol help Pushingthebuttonresultsahelpwindowopeningwhichdescribesthemost importantinformationaboutLW3protocolcommandsinHTMLformat. Edit mode Thedefaultappearanceistheread-onlymode.Ifyouwanttomodifythevalues orparameters,ticktheoption.Youwillbepromptedtoconfirmyourselection. Warning mode Ifthisischecked,awarningwindowpopsupwhenyouenableEditmode. Terminal window Commandsandresponseswithtimeanddatearelistedinthiswindow.Sent commandstartswith‘>’character,receivedresponsestartswith‘<’character. The color of each item depends on the type of the command and response. -
Page 56: Lw2 Programmer's Reference
L W2 Programmer' s Reference The device can be controlled through a reduced command set of LW2 protocol commands to ensure the compatibility with other Lightware products. The supported LW2 commands are described in this chapter. ç ProtocolDescription ç InstructionsfortheTerminalApplicationUsage ç... -
Page 57: Protocol Description
6.LW2Programmer'sReference HDMI-TPS-TX200series–User'sManual 6.1. Protocol Description 6.2. Instructions for the Terminal Application Usage TheprotocoldescriptionhereinafterstandsforLightwareprotocol.Thecommandscanbesenttothedevice Terminal Application inRAWformatviatheTCP/IPportno.10001. TheLW2 protocol commands can be appliedto the The receiver accepts commands surrounded by curly brackets - { } - and responds data surrounded by... -
Page 58: General Lw2 Commands
6.LW2Programmer'sReference HDMI-TPS-TX200series–User'sManual 6.3. General LW2 Commands 6.3.4. Connection Test Simpletesttoseeiftheconnectionisestablishedsuccessfully. 6.3.1. View Product Type Command and Response The device responds its name. {PING} Command and Response (PONG!)CrLf {i} Example (I:<PRODUCT_TYPE>)CrLf {ping} Example (PONG!) ... -
Page 59: Viewinstalledboard
6.LW2Programmer'sReference HDMI-TPS-TX200series–User'sManual 6.3.7. View Installed Board 6.3.9. Restart the Device Showsthehardwarenameandrevisionoftheinstalledcard. Thedevicecanberestartedwithoutunpluggingpower. #reboot #restart Command and Response Command and Response {IS} {RST} (SL#•0•<MB_DESC>)CrLf (SL•END)CrLf Example Example {rst} {is} (SL#0SW4-TPS-TX240V12_DAA0) Thedevicereboots;noresponseissentinthiscase. -
Page 60: A/V Port Settings
6.LW2Programmer'sReference HDMI-TPS-TX200series–User'sManual 6.4. A/V Port Settings 6.4.2. Mute Output Mute the <out>output.Theoutputsignalisturnedoff. 6.4.1. Switch an Input to the Output Command and Response #mute #lock #unmute #unlock Switchinganinput<in> to output <out>.FollowingcommandswithA,V,AVparametervaluecantakeeffect inmultiplelayers,accordingtotheirparameters.Dependingon‘A’or‘V’itcanchangeonlytheAudiooronly {#<out>•<layer>} theVideolayer;or‘AV’changesboth. #crosspoint #switch (1MT<out2>•<layer>)CrLf Command and Response Example ... -
Page 61: Unlockoutput
6.LW2Programmer'sReference HDMI-TPS-TX200series–User'sManual 6.4.5. Unlock Output 6.4.7. View Crosspoint Size Unlockinganoutputport.Theconnectiononoutputcanbechanged. Showsthephysicalcrosspointsize. Command and Response Command and Response {+<<out>•<layer>} {getsize•<layer>} (0LO<out2>•<layer>)CrLf (SIZE=<size>•<layer>)CrLf Example Parameters {+<01V} Identifier Parameterdescription Parametervalues (0LO01V) <size> Crosspointsize <number_of_inputs>x<number_of_outputs> O1videooutputportisunlocked. <layer>... -
Page 62: Changeaudioautoselectmode
6.LW2Programmer'sReference HDMI-TPS-TX200series–User'sManual 6.4.9. Change the Audio Autoselect Mode 6.4.11. Change Audio Input Priority Theautoselectmodeoftheaudiooutputscanbechanged. Thesettingsoftheaudioinputprioritycanbechangedasfollows. Command and Response Command and Response {AS_A<out>=<state>;<mode>} {PRIO_A<out>=<in1_prio>;<in2_prio>;<in3_prio>;<in4_prio>;<in5_prio>} (AS_A<out>=<state>;<mode>)CrLf (PRIO_A<out>=<in1_prio>;<in2_prio>;<in3_prio>;<in4_prio>;<in5_prio>)CrLf Parameters Parameters Seetheprevioussection. Seetheprevioussection. Example Example {as_a1=E;P} {as_a1=1;0;2;3;4} ... -
Page 63: Network Configuration
6.LW2Programmer'sReference HDMI-TPS-TX200series–User'sManual 6.6. Network Configuration 6.6.3. Set the Subnet Mask Subnetmaskcanbesetasfollows. 6.6.1. Query the Current IP Status Command and Response IPaddresssettingscanbequeriedasfollows. #dhcp #ipaddress #network {IP_NETMASK=<subnet_mask>} Command and Response (IP_NETMASK=<subnet_mask>)CrLf {IP_STAT=?} Parameters (IP_STAT=<type>;<ip_address>;<subnet_mask>;<gateway_addr>)CrLf SeetheQuerytheCurrentIPStatus section. Parameters Example Identifier Parameterdescription... -
Page 64: Lw2 Commands - Quick Summary
6.LW2Programmer'sReference HDMI-TPS-TX200series–User'sManual 6.7. LW2 Commands – Quick Summary General LW2 Commands ViewProductType UnlockOutput {i} {+<<out>•<layer>} QueryControlProtocol ViewConnectionStateontheOutput {P_?} {VC•<layer>} ViewFirmwarePackageVersion ViewCrosspointSize {f} {getsize•<layer>} Connection Test ChangetheVideoAutoselectMode {PING} {AS_V<out>=<state>;<mode>} ViewSerialNumber ChangetheAudioAutoselectMode ... -
Page 65: Lw3 Programmer's Reference
7.LW3Programmer'sReference HDMI-TPS-TX200series–User'sManual L W3 Programmer' s Reference The device can be controlled through Lightware 3 (LW3) protocol commands to ensure the compatibility with other Lightware products. The supported LW3 commands are described in this chapter. ç Overview ç InstructionsfortheTerminalApplicationUsage ç... -
Page 66: Overview
7.LW3Programmer'sReference HDMI-TPS-TX200series–User'sManual 7.1. Overview 7.3. Protocol Rules TheLightware Protocol #3(LW3) isimplementedinalmostallnewLightwaredevices(matrixswitchers, 7.3.1. LW3 Tree Structure and Command Structure (examples) signal extenders and distribution amplifiers) since 2012.The protocol is ASCII-based and all commands areterminatedwithacarriagereturn(Cr,‘\r’)andlinefeed(Lf,‘\n’)pair.Itisorganizedasatreestructure / thatprovidesoutstandingflexibilityanduser-friendlyhandlingwith‘nodes’,‘properties’and‘methods’.The MEDIA Advanced ViewoftheLightwareDeviceControllersoftwareistheperfecttoolforbrowsingandlearninghow... -
Page 67: Legendforthecontrolcommands
7.LW3Programmer'sReference HDMI-TPS-TX200series–User'sManual 7.3.3. Legend for the Control Commands 7.3.5. Command Types Command and Response – Example GET command GET·/MEDIA/VIDEO/I2.SignalPresent The GETcommandcanbeusedtogetthechildnodes,propertiesandmethodsofaspecificnode.Itcanalso pr·/MEDIA/VIDEO/I2.SignalPresent=<signal_present> beusedtogetthevalueofaproperty.Usethedotcharacter(.)whenaddressingaproperty: GET/.SerialNumber Format Description pr/.SerialNumber=87654321 <in> Input port number GETALL command <out> Output port number The GETALL... -
Page 68: Prefixsummary
7.LW3Programmer'sReference HDMI-TPS-TX200series–User'sManual 7.3.6. Error Messages 7.3.9. Subscription ThereareseveralerrormessagesdefinedintheLW3protocol,allofthemhaveauniqueerrornumber. DEFINITION: Subscribetoanodemeansthattheuserwillgetanotificationifanyofthepropertiesofthe nodeischanged. SET/MEDIA/UART/P1.Baudrate=9 Ausercansubscribetoanynode.Thesenotificationsareasynchronousmessagesandtheyareusefulto pE/MEDIA/UART/P1.Baudrate%E004:Invalidvalue keeptheclientapplicationuptodate,withoutreceivinganyunwantedinformation.Whentheuserdoesnot 7.3.7. Escaping wanttobeinformedaboutthechangesanymore,hecansimplyunsubscribefromthenode. DEFINITION: An escape sequence is a sequence of characters that does not represent itself when used ATTENTION! The subscriptions are handled separately for connections. Hence, if the connection is insideacharacterorstringliteral,butistranslatedintoanothercharacterorasequenceofcharacters. -
Page 69: Signature
7.LW3Programmer'sReference HDMI-TPS-TX200series–User'sManual 7.3.10. Signature DEFINITION: The signature is a four-digit-long hexadecimal value that can be optionally placed before everycommandtokeepacommandandthecorrespondingresponsestogetherasagroup. Eachlineisterminatedwithacarriagereturn(Cr,‘\r’)andlinefeed(Lf,‘\n’)characters.Inseveralcasesthe numberofthelinesintheresponsecannotbedeterminedinadvance,e.g.theclientisintendedwaitingforthe wholeresponseandalsowantstobesure,thatthereceivedlinesbelongtogetherandtothesamecommand. Inthesecases,aspecialfeaturethe‘signature’canbeused.Inthesecases,theresponsetothatparticular commandwillalsobeprecededbythesignature,andthecorrespondinglineswillbebetweenbrackets: 1700#GET/EDID.* {1700 pr/EDID.EdidStatus=D1:E1;D1:E2;D1:E3;D1:E4 m-/EDID:copy m-/EDID:delete m-/EDID:reset m-/EDID:switch ... -
Page 70: System Commands
7.LW3Programmer'sReference HDMI-TPS-TX200series–User'sManual 7.4. System Commands 7.4.4. Querying the Firmware Version Command and Response #firmwareversion 7.4.1. Querying the Product Name GET·/SYS/MB.FirmwareVersion Command and Response #producttype pr·/SYS/MB.FirmwareVersion=<FW_version> GET·/.ProductName Parameters pr·/.ProductName=<Product_name> The <Product_name>isthetypeofthedevice:read-onlyparameterandcannotbemodified. Parameters Example The <Product_name>isthetypeofthedevice:read-onlyparameterandcannotbemodified. GET/SYS/MB.FirmwareVersion Example ... -
Page 71: Video Port Settings
7.LW3Programmer'sReference HDMI-TPS-TX200series–User'sManual 7.5. Video Port Settings The Most Common Received Port Status Responses INFO: VideoportnumberingcanbefoundinthePortNumbering section. 10 10 10 10 7.5.1. Querying the Status of the Input Ports Unlocked, T00AA No emb. unmuted Command and Response #crosspoint #hdcp #portstatus #switch Reserved Reserved... -
Page 72: Querying The Status Of The Output Ports
7.LW3Programmer'sReference HDMI-TPS-TX200series–User'sManual 7.5.2. Querying the Status of the Output Ports 7.5.5. Querying the Video Autoselect Settings Command and Response Command and Response GET·/MEDIA/VIDEO/XP.DestinationPortStatus GET·/MEDIA/VIDEO/XP.DestinationPortAutoselect pr·/MEDIA/VIDEO/XP.DestinationPortStatus=<O1_state>;<O2_state> pr·/MEDIA/VIDEO/XP.DestinationPortAutoselect=<as_state><as_mode> Theresponsecontains5ASCIIcharactersforeachoutputport.Thefirstcharacterindicatesthemute/lock TheresponseshowstheautoselectsettingoftheTPSoutputport(andlocalHDMIifexists). state,thenext2-bytelongHEXcodeshowingthecurrentstateoftheoutputports. #portstatus Parameters Parameters Identifier Parameterdescription Parametervalues Seeintheprevioussection. -
Page 73: Queryingtheinputportpriority
7.LW3Programmer'sReference HDMI-TPS-TX200series–User'sManual 7.5.7. Querying the Input Port Priority 7.5.9. Muting an Input Port Command and Response Command and Response #mute #lock #unmute #unlock GET·/MEDIA/VIDEO/XP.PortPriorityList CALL·/MEDIA/VIDEO/XP:muteSource(<in>) pr·/MEDIA/VIDEO/XP.PortPriorityList=<out1_list>;<out2_list> mO·/MEDIA/VIDEO/XP:muteSource Parameters Example Theresponserepresentsthepriorityforthesourceportsgroupedbydestinations. CALL/MEDIA/VIDEO/XP:muteSource(I1;I3) mO/MEDIA/VIDEO/XP:muteSource Identifier Parameterdescription Parametervalues... -
Page 74: Mutinganoutputport
7.LW3Programmer'sReference HDMI-TPS-TX200series–User'sManual 7.5.13. Muting an Output Port 7.5.17. Querying the Encryption of the Incoming Signal Command and Response Thisisaread-onlypropertyshowingifthesignalisencryptedwithHDCP. CALL·/MEDIA/VIDEO/XP:muteDestination(<out>) Command and Response mO·/MEDIA/VIDEO/XP:muteDestination GET·/MEDIA/VIDEO/<in>.HdcpActive Example pr·/MEDIA/VIDEO/<in>.HdcpActive=<HDCP_state> CALL/MEDIA/VIDEO/XP:muteDestination(O1;O2) Parameters mO/MEDIA/VIDEO/XP:muteDestination Identifier Parameterdescription Parametervalues 7.5.14. Unmuting Output <HDCP_state>... -
Page 75: Changingthehdcpsetting(Inputport)
7.LW3Programmer'sReference HDMI-TPS-TX200series–User'sManual 7.5.19. Changing the HDCP Setting (Input Port) 7.5.22. Test Pattern Generator Command and Response #hdcp Theoutputportscansendaspecialimagetowardsthesinkdevicesfortestingpurposes.Thesettingis availableonoutputportswiththebelow-listedparameters. SET·/MEDIA/VIDEO/<in>.HdcpEnable=<HDCP_setting> ATTENTION! TheModecanbesetindividuallyoneachport,buttheClocksourceandthePatternsettings pw·/MEDIA/VIDEO/<in>.HdcpEnable=<HDCP_setting> arecommonontheTPSandHDMIoutputports(O1andO2). Parameters 7.5.22.1. Test Pattern Generator Mode Setting If the <HDCP_setting> parameter is 0 (or false)theHDCPisdisabledontheport,thus,encryptedcontentwill Command and Response #testpattern #nosyncscreen... -
Page 76: Queryingthehdmimodesetting(Outputport)
7.LW3Programmer'sReference HDMI-TPS-TX200series–User'sManual 7.5.24. Setting the HDMI Mode Setting (Output Port) 7.5.22.3. Test Pattern Command and Response Command and Response SET·/MEDIA/VIDEO/<out>.TpgPattern=<pattern> SET·/MEDIA/VIDEO/<out>.HdmiModeSetting=<HDMI_mode> pw·/MEDIA/VIDEO/<out>.TpgPattern=<pattern> pw·/MEDIA/VIDEO/<out>.HdmiModeSetting=<HDMI_mode> Parameters Parameters Seetheprevioussection. Identifier Parameterdescription Parametervalues <pattern> Selectabletestimage. RED / GREEN / BLUE / BLACK / WHITE / Example RAMP / CHESS / BAR / CYCLE ... -
Page 77: Queryingtheestablishedtpsmode
7.LW3Programmer'sReference HDMI-TPS-TX200series–User'sManual 7.5.27. Querying the Established TPS Mode 7.6. Audio Port Settings ThefinallyestablishedTPSworkingmodebetweenthetransmitterandthereceiverisdeterminedbythe INFO: Audioportnumberingcanbefoundinthe PortNumbering section. settingoftheTPSportsofbothdevices.SeemoreinformationintheTPSInterface section. Below command 7.6.1. Querying the Status of the Input Ports isforqueryingthecurrentlyvalidTPSmodebetweenthedevices. Command and Response #crosspoint #switch Command and Response GET·/MEDIA/AUDIO/XP.SourcePortStatus ... -
Page 78: Queryingthestatusoftheoutputports
7.LW3Programmer'sReference HDMI-TPS-TX200series–User'sManual 7.6.2. Querying the Status of the Output Ports 7.6.5. Querying the Audio Autoselect Settings Command and Response Command and Response GET·/MEDIA/AUDIO/XP.DestinationPortStatus GET·/MEDIA/AUDIO/XP.DestinationPortAutoselect pr·/MEDIA/AUDIO/XP.DestinationPortStatus=<out1_state>;<out2_state> pr·/MEDIA/AUDIO/XP.DestinationPortAutoselect=<as_state><as_mode> Parameters Parameters Theresponsecontains5ASCIIcharactersforeachport.Thefirstcharacterindicatesthemute/lockstate, Identifier Parameterdescription Parametervalues thenext2-bytelongHEXcodeshowingthecurrentstateoftheoutputports.Seethedetailsintheprevious <as_state> The state of the E: the autoselect is enabled. -
Page 79: Changingtheinputportpriority
7.LW3Programmer'sReference HDMI-TPS-TX200series–User'sManual 7.6.7. Querying the Input Port Priority 7.6.9. Muting an Input Port Command and Response Command and Response GET·/MEDIA/AUDIO/XP.PortPriorityList CALL·/MEDIA/AUDIO/XP:muteSource(<in>) pr·/MEDIA/AUDIO/XP.PortPriorityList=<out1_list>;<out2_list> mO·/MEDIA/AUDIO/XP:muteSource Parameters Example Theresponserepresentsthepriorityforthesourceportsgroupedbydestinations. CALL/MEDIA/AUDIO/XP:muteSource(I1;I3) mO/MEDIA/AUDIO/XP:muteSource Identifier Parameterdescription Parametervalues 7.6.10. Unmuting an Input Port <out1_list>... -
Page 80: Muting An Output Port
7.LW3Programmer'sReference HDMI-TPS-TX200series–User'sManual 7.6.13. Muting an Output Port 7.6.17. Analog Audio Input Level Settings Command and Response INFO: Thefollowingcommandsrefertotheanalogaudioinputonly. CALL·/MEDIA/AUDIO/XP:muteDestination(<out>) 7.6.17.1. Querying the Volume (Exact Value) mO·/MEDIA/AUDIO/XP:muteDestination Command and Response Example GET·/MEDIA/AUDIO/<in>.VolumedB CALL/MEDIA/AUDIO/XP:muteDestination(O1;O2) pw·/MEDIA/AUDIO/<in>.VolumedB=<level> mO/MEDIA/AUDIO/XP:muteDestination Parameters 7.6.14. Unmuting Output The response... -
Page 81: Network Configuration
7.LW3Programmer'sReference HDMI-TPS-TX200series–User'sManual 7.6.17.4. Setting the Volume (in Percentage) 7.6.17.7. Querying the Gain Level Command and Response Command and Response SET·/MEDIA/AUDIO/<in>.VolumePercent=<vol_percent> GET·/MEDIA/AUDIO/<in>.Gain pw·/MEDIA/AUDIO/<in>.VolumePercent=<vol_percent> pw·/MEDIA/AUDIO/<in>.Gain=<level> Parameters Parameters The input volume <vol_percent>(attenuation)canbesetbetween0and100%instepof0.01%.Thevalueis Theinputgain<level>canbesetbetween-12and35.25dB;defaultvalueis0. rounded up if necessary to match with the step value. Example Example ... -
Page 82: Querying The Dhcp State
7.LW3Programmer'sReference HDMI-TPS-TX200series–User'sManual 7.7.2. Querying the DHCP State 7.7.5. Querying the Subnet Mask Command and Response #dhcp #ipaddress #network Command and Response GET·/MANAGEMENT/NETWORK.NetworkMask GET·/MANAGEMENT/NETWORK.DhcpEnabled pr·/MANAGEMENT/NETWORK.NetworkMask=<subnet_mask> pw·/MANAGEMENT/NETWORK.DhcpEnabled=<DHCP_state> Example Parameters GET/MANAGEMENT/NETWORK.NetworkMask If the <DHCP_state> parameter is 0 (or false)thedeviceissettoapplyastaticIPaddress.Ifthevalueis1 (or ... -
Page 83: Port Configuration
7.LW3Programmer'sReference HDMI-TPS-TX200series–User'sManual 7.8. RS-232 Port Configuration 7.8.3. Databit Setting Command and Response ATTENTION! BelowlistedcommandscanbeusedtosettheRS-232portparameters.Toquerythecurrent valueofaparameterusetheGETcommand,e.g.:GET /MEDIA/UART/P1.BaudRate. SET·/MEDIA/UART/<port>.DataBits=<data_bits> ATTENTION! TheRS-232Operation modeismirroredontheLocalandLinkserialport.Theothersettings pw·/MEDIA/UART/<port>.DataBits=<data_bits> canbeadjustedseparatelyonthetwoports(P1andP2). Parameters INFO: RS-232portnumberingcanbefoundinthe PortNumbering section. <data_bits> parameter can be 8 or 9. 7.8.1. Protocol Setting Example Command and Response #protocol... -
Page 84: Operationmode
7.LW3Programmer'sReference HDMI-TPS-TX200series–User'sManual 7.8.6. RS-232 Operation Mode 7.9. Infrared Port ATTENTION! TheRS-232Operation modeismirroredontheLocalandLinkserialport. INFO: Infraredinputandoutputportnumberingcanbefoundinthe PortNumbering section. Command and Response #commandinjection 7.9.1. Enable Command Injection Mode SET·/MEDIA/UART/<port>.Rs232Mode=<mode> Command and Response #infra #infrared pw·/MEDIA/UART/<port>.Rs232Mode=<mode> SET·/MEDIA/IR/<port>.CommandInjectionEnable=<CI_set> Parameters pw·/MEDIA/IR/<port>.CommandInjectionEnable=<CI_set> Identifier Parameterdescription Parametervalues... -
Page 85: Sending Pronto Hex Codes In Little-Endian Format Via Ir Port
7.LW3Programmer'sReference HDMI-TPS-TX200series–User'sManual 7.9.3. Sending Pronto Hex Codes in Little-endian Format via IR Port 7.10. Message Sending Capabilities Command and Response 7.10.1. Sending Message via TCP Port CALL·/MEDIA/IR/D1:sendProntoHex(<hex_code>) Thedevicecanbeusedforsendingamessagetoacertain IP:port address. Three different commands allow mO·/MEDIA/IR/D1:sendProntoHex controllingtheconnected(third-party)devices. #message Parameters 7.10.1.1. Command Sending (tcpMessage) The <hex_code>canbemax.765character-longinhexadecimalformat(0-9;A-F;a-f)withoutspacecharacter... -
Page 86: Sending Message Via Udp Port
7.LW3Programmer'sReference HDMI-TPS-TX200series–User'sManual 7.10.1.3. Binary Message Sending (tcpBinary) 7.10.2.2. Text Message Sending (udpText) ThecommandisforsendingabinarymessageinHEXformat. ThecommandisforsendingatextmessageinASCII-format. INFO: EscapingwillnotbeprocessedusingtheudpText command. INFO: EscapingwillnotbeprocessedusingthetcpBinary command. Command and Response Command and Response CALL·/MEDIA/ETHERNET:udpText(<IP_address>:<port_no>=<message>) CALL·/MEDIA/ETHERNET:tcpBinary(<IP_address>:<port_no>=<message>) mO·/MEDIA/ETHERNET:udpText mO·/MEDIA/ETHERNET:tcpBinary Example Example CALL/MEDIA/ETHERNET:udpText(192.168.0.20:5555=pwr_on) ... -
Page 87: Sending Cec Commands
The <text> length can be 14 character and the followings are allowed: letters (A-Z) and (a-z), hyphen (-), mO·/MEDIA/UART/<port>:sendBinaryMessage underscore(_),numbers(0-9),anddot(.). Example Example CALL/MEDIA/UART/P1:sendBinaryMessage(0100000061620000cdcc2c40) SET/MEDIA/CEC/I2.OsdString=Lightware mO/MEDIA/UART/P1:sendBinaryMessage pw/MEDIA/CEC/I2.OsdString=Lightware CALL/MEDIA/CEC/I2:send(set_osd) mO/MEDIA/CEC/I2:send ATTENTION! As a second step, the send(set_osd) methodisnecessarytocalltosendthedesiredstring. -
Page 88: Recognizer
7.LW3Programmer'sReference HDMI-TPS-TX200series–User'sManual 7.11. RS-232 Recognizer 7.10.4.2. Sending a CEC Command in Text Format ATTENTION! The have a successful command processing, the connected device must support and ThistoolisabletorecognizetheincomingRS-232message.Itstorestheincomingserialdatafromthefirst accept CEC commands. bit,untilthepreviouslydefinedstring(delimiter)ortheelapsingtimeoutafterthelastbit.Thelastincoming serialstringissavedindifferentformats(string,hex,andhash). Command and Response 7.11.1. Enable the Recognizer ... -
Page 89: Setting The Timeout
7.LW3Programmer'sReference HDMI-TPS-TX200series–User'sManual 7.11.3. Setting the Timeout 7.11.4.3. Recognized Data Hash GET·/MEDIA/UART/RECOGNIZER.Hash Whenthesettimeiselapsedafterthelastreceivedmessage,thedevicesavesthedata.Itcanbeapplied, whenthereisnospecialoreasilydefineddelimiterstringintheincomingserialdata,butthereisatimegap pr·/MEDIA/UART/RECOGNIZER.Hash= <recognized_hash> betweenthemessages. Parameters SET·/MEDIA/UART/RECOGNIZER.TimeOut=<timeout> <recognized_hash>:fingerprintcode,max.32bit-longrecognizeddatahash. pw·/MEDIA/UART/RECOGNIZER.TimeOut=<timeout> Example Parameters GET/MEDIA/UART/RECOGNIZER.Hash <timeout> is the timeout value in milliseconds. 0 means the timeout is disabled. Minimum value is 10. ... -
Page 90: Setting The Active Timeout
7.LW3Programmer'sReference HDMI-TPS-TX200series–User'sManual 7.12. GPIO Port Configuration 7.11.6.2. Recognized Data in Hex Format GET·/MEDIA/UART/RECOGNIZER.ActiveRxHex INFO: UsetheGETcommandtoqueryaparameter. pr·/MEDIA/UART/RECOGNIZER.ActiveRxHex= <recognized_hex> 7.12.1. Setting the Direction of a GPIO Pin Parameters Command and Response <recognized_hex>:recognizeddatainhexformat. SET·/MEDIA/GPIO/<port>.Direction(<dir>) Example pw·/MEDIA/GPIO/<port>.Direction(<dir>) GET/MEDIA/UART/RECOGNIZER.ActiveRxHex Parameters ... -
Page 91: Edid Management
7.LW3Programmer'sReference HDMI-TPS-TX200series–User'sManual 7.13. EDID Management 7.13.3. Querying the Preferred Resolution of a User EDID Command and Response 7.13.1. Querying the Emulated EDIDs GET·/EDID/U/<loc>.PreferredResolution Command and Response #edid pr·/EDID/D/<loc>.PreferredResolution=<Resolution> GET·/EDID.EdidStatus Example pr·/EDID.EdidStatus(<I1_state>;<I2_state>;...;<In_state>) GET/EDID/U/U2.PreferredResolution Parameters pr/EDID/U/U2.PreferredResolution=1920x1080p60.00Hz TheresponserepresentstheemulatedEDIDontheinputportsgroupedbydestinations.Thestructureofthe... -
Page 92: Copying An Edid To The User Memory
7.LW3Programmer'sReference HDMI-TPS-TX200series–User'sManual 7.13.6. Copying an EDID to the User Memory Command and Response CALL·/EDID:copy(<source>:<user_mem>) mO·/EDID:copy Parameters Identifier Parameterdescription Parametervalues <source> Source EDID memory place: D1-D#: dynamic EDIDs Factory/User/Dynamic. U1-U#:UserEDIDs F1-F#:FactoryEDIDs <user_mem> The destination EDID memory U1-U#:UserEDIDmemorylocation location. -
Page 93: Lw3 Commands - Quick Summary
7.LW3Programmer'sReference HDMI-TPS-TX200series–User'sManual 7.14. LW3 Commands - Quick Summary System Commands UnmutinganInputPort CALL·/MEDIA/VIDEO/XP:unmuteSource(<in>) QueryingtheProductName LockinganInputPort GET·/.ProductName CALL·/MEDIA/VIDEO/XP:lockSource(<in>) SettingtheDeviceLabel UnlockinganInputPort SET·/MANAGEMENT/UID.DeviceLabel=<device_label> CALL·/MEDIA/VIDEO/XP:unlockSource(<in>) QueryingtheSerialNumber MutinganOutputPort GET·/.SerialNumber CALL·/MEDIA/VIDEO/XP:muteDestination(<out>) QueryingtheFirmwareVersion UnmutingOutput GET·/SYS/MB.FirmwareVersion CALL·/MEDIA/VIDEO/XP:unmuteDestination(<out>) ResettingtheDevice LockinganOutputPort ... - Page 94 7.LW3Programmer'sReference HDMI-TPS-TX200series–User'sManual SettingtheHDMIModeSetting(OutputPort) MutinganOutputPort SET·/MEDIA/VIDEO/<out>.HdmiModeSetting=<HDMI_mode> CALL·/MEDIA/AUDIO/XP:muteDestination(<out>) QueryingtheTPSModeoftheTransmitter UnmutingOutput GET·/REMOTE/D1.tpsModeSetting CALL·/MEDIA/AUDIO/XP:unmuteDestination(<out>) SettingtheTPSModeoftheTransmitter LockinganOutputPort SET·/REMOTE/D1.tpsModeSetting=<TPS_mode> CALL·/MEDIA/AUDIO/XP:lockDestination(<out>) QueryingtheEstablishedTPSMode UnlockinganOutputPort GET·/REMOTE/D1.tpsMode CALL·/MEDIA/AUDIO/XP:unlockDestination(<out>) Analog Audio Input Level Settings Audio Port Settings QueryingtheVolume(ExactValue) QueryingtheStatusoftheInputPorts ...
- Page 95 7.LW3Programmer'sReference HDMI-TPS-TX200series–User'sManual SettingaStaticIPAddress Message Sending Capabilities SET·/MANAGEMENT/NETWORK.StaticIpAddress=<IP_address> Sending Message via TCP Port QueryingtheSubnetMask CommandSending(tcpMessage) GET·/MANAGEMENT/NETWORK.NetworkMask CALL·/MEDIA/ETHERNET:tcpMessage(<IP_address>:<port_no>=<message>) SettingaStaticSubnetMask TextMessageSending(tcpText) SET·/MANAGEMENT/NETWORK.StaticNetworkMask=<subnet_mask> CALL·/MEDIA/ETHERNET:tcpText(<IP_address>:<port_no>=<message>) QueryingtheGatewayAddress BinaryMessageSending(tcpBinary) GET·/MANAGEMENT/NETWORK.GatewayAddress CALL·/MEDIA/ETHERNET:tcpBinary(<IP_address>:<port_no>=<message>) SettingaStaticGatewayAddress Sending Message via UDP Port SET·/MANAGEMENT/NETWORK.StaticGatewayAddress=<gateway_address>...
- Page 96 7.LW3Programmer'sReference HDMI-TPS-TX200series–User'sManual RS-232 Recognizer EDID Management EnabletheRecognizer QueryingtheEmulatedEDIDs SET·/MEDIA/UART/<port>.RecognizerEnable=<rec_state> GET·/EDID.EdidStatus SettingtheDelimiterHex QueryingtheValidityofaDynamicEDID SET·/MEDIA/UART/RECOGNIZER.DelimiterHex=<delimiter> GET·/EDID/D/<loc>.Valildity SettingtheTimeout QueryingthePreferredResolutionofaUserEDID SET·/MEDIA/UART/RECOGNIZER.TimeOut=<timeout> GET·/EDID/U/<loc>.PreferredResolution Querying the Last Message EmulatinganEDIDonanInputPort CALL·/EDID:switch(<source>:<destination>) RecognizedDatainStringFormat EmulatinganEDIDtoAllInputPorts GET·/MEDIA/UART/RECOGNIZER.Rx CALL·/EDID:switchAll(<source>) RecognizedDatainHexFormat CopyinganEDIDtotheUserMemory ...
-
Page 97: Firmware Upgrade
8.FirmwareUpgrade HDMI-TPS-TX200series–User'sManual F irmware Upgrade The devices can be upgraded by the Lightware Device Updater v2 (LDU2) software over Ethernet. The software and the firmware pack with the necessary components (*.lfp2 file) are available at www.lightware.com. ç Introduction ç Preparation ç... -
Page 98: Introduction
▪ LFP2 file, Installation in case of macOS X ▪ LDU2 softwareinstalledonyourPCorMac. MounttheDMGfilewithdoubleclickingonitanddragtheLDU2iconovertheApplicationsicontocopythe Both can be downloaded from www.lightware.com/downloads. programintotheApplicationsfolder.IfyouwanttocopyLDU2intoanotherlocationjustdragtheiconover Optionally, you can download the release notesfileinHTMLformat. the desired folder. 8.2.1. About the Firmware Package (LFP2 File) INFO: This type of installer is equal with the Normal installofWindows. -
Page 99: Running The Software
8.3. Running the Software Main Screen When the software is started by the shortcut, the device discovery screen Youhavetwooptions: SEARCH FOR DEVICES appears. Press the Search for devices button to start finding the Lightware ▪ Starting the LDU2bydouble-clickingontheshortcut/programfile,or devices: ▪ Double-clickingonanLFP2 file. -
Page 100: The Upgrading Steps
Whenthediscoveryhascompleted,thedevicesavailableonthenetworkarelistedintheapplication. ATTENTION! While the firmware is being upgraded, the normal operation mode is suspended as the deviceisswitchedtobootloadmode.Signalprocessingisnotperformed.Donotinterruptthefirmware upgrade.Ifanyproblemoccurs,reboottheunitandrestarttheprocess. Keeping the Configuration Settings Bydefault,deviceconfigurationsettingsarerestoredwhenfirmwareupgradeisfinished.Iffactoryresethas beenchosenintheparameterswindow,alldevicesettingswillbeerased.Inthecaseoffactoryreset,you cansavethesettingsofthedeviceintheLightwareDeviceControllersoftwareandrestoreitlater. Thefollowingflowchartdemonstrateshowthisfunctionworksinthebackground. 1. Create a backup Thecurrentconfigurationofthedeviceisbeingsavedintoaconfigurationbackupfileonyour computer. 2. Start the Upgrade Thedevicerebootsandstartsinbootloadmode(firmwareupgrademode). 3. Upgrade TheCPUfirmwareischangedtothenewone. - Page 101 8.FirmwareUpgrade HDMI-TPS-TX200series–User'sManual Step 1. Select the Firmware Package. The Meaning of the Symbols Click on the Select Firmware Package button and navigate to the SELECT FIRMWARE PACKAGE Show Thelogabouttheupgradingprocessofthedevice location where the LFP2 file was saved. When you click on the details can be displayed in a new window.
-
Page 102: If The Upgrade Is Not Succesful
Thedevicemightrebootduringthefirmwareupgradeprocedure. in this case. ▪ Ifthebackupcannotbecreatedforsomereason,youwillgetamessagetocontinuetheprocess withoutbackuporstoptheupgrade.Arootcausecanbethatthedesireddeviceisalreadyinbootload (firmwareupgrade)mode,thus,thenormaloperationmodeissuspendedandbackupcannotbemade. Ifanupgradeisnotsuccesful,theExport log button becomes red. If you press the button, you can ▪ downloadthelogfileasaZIPpackagewhichcanbesenttoLightwareSupportifneeded.Thelogfiles containusefulinformationaboutthecircumstancestofindtherootcause. #bootload Whentheprogressbarreaches100%(Doneisdisplayedatalldevices),theupgradeofalldevicesarefinished successfullyandamessageappears;youcanclosethesoftware. Step 5. Wait until the unit reboots with the new firmware. Oncethefirmwareupgradeprocedureiscompleted,thedeviceisrebootedwiththenewfirmware.Shutting downandrestartingthedeviceisrecommended. Appliedfirmwarepackage:v1.2.0 | LDCsoftware:v2.2.0... -
Page 103: Troubleshooting
9.Troubleshooting HDMI-TPS-TX200series–User'sManual How to Speed Up the Troubleshooting Process Lightware’s technical support team is always working hard to provide the fastest support possible. Our team’s response time is one of the best in the industry and in the toughest of... - Page 104 9.Troubleshooting HDMI-TPS-TX200series–User'sManual The First Step Symptom Root cause Action Refer to CheckfrontpanelLEDsandtakethenecessarystepsaccordingtotheirstates.Formoreinformationabout Not the desired Videooutputissetto Checktestpatternsettingsinthe status,LEDsrefertoFrontPanelLEDs RearPanelLEDs sections. 5.5.4 picture displayed test pattern (no sync properties of the output ports. on the video screen) statically 7.5.22 Legend output...
- Page 105 9.Troubleshooting HDMI-TPS-TX200series–User'sManual Symptom Root cause Action Refer to Network IncorrectIPaddressis UsedynamicIPaddressbyenabling 2.5.4 No LAN set(fixIP) DHCPoption. connection can be 5.11.2 established 7.7.3 Restorethefactorydefaultsettings 2.5.5 (withfixIP). 5.11.5 6.3.11 7.4.6 IPaddressconflict ChecktheIPaddressoftheother devices, too. GPIO Connected device Cable connection Check...
-
Page 106: Technologies
10.Technologies HDMI-TPS-TX200series–User'sManual Technologies The following sections contain descriptions and useful technical information how the devices work in the background. The content is based on experiences and cases we met in the practice. These sections help to understand features and technical standards. -
Page 107: Edid Management
After connecting a source to a display (DVI, HDMI, DP), the source reads out the EDID to determine the resolutionandrefreshrateoftheimagetobetransmitted. Lightware devices provide the Advanced EDID Management function that helps system integration. The built-inEDIDRoutercanstoreandemulatefactorypre-programmed-andUserprogrammableEDIDs.The EDIDoftheattachedmonitorsorprojectorsforeachoutputarestoredinanon-volatilememory.Thisway theEDIDofamonitorisavailablewhenthemonitorisunpluggedorswitchedoff. AnyEDIDcanbeemulatedonanyinput.AnemulatedEDIDcanbecopiedfromtheEDIDrouter’smemory... -
Page 108: Hdcp Management
10.Technologies HDMI-TPS-TX200series–User'sManual 10.2. HDCP Management Not HDCP-compliant Sink 1. Not-HDCPcompliantsinkisconnectedtothematrix.Somesources(e.g.computers)alwayssendHDCP LightwareVisualEngineeringisalegalHDCPadopter.Severalfunctionshavebeendevelopedwhichhelps encryptedsignalsifthereceiverdevicereportsHDCPcompliancy,however,HDCPencryptionisnotrequired tosolveHDCPrelatedproblems.ComplexAVsystemsoftenhavebothHDCPandnon-HDCPcomponents. allthetime(e.g.computerdesktopimage).IfHDCPisenabledinthematrix,theimagewillnotbedisplayed The matrix allows transmitting HDCP encrypted and unencrypted signals.The devices will be still HDCP on the sink. compliant as they will never output an encrypted signal to a non-HDCP compliant display device. If an... -
Page 109: Pixel Accurate Reclocking
HDMI-TPS-TX200series–User'sManual 10.3. Pixel Accurate Reclocking Jitter Signalinstabilityinthetimedomain.Thetimedifferencebetweentwosignaltransitionsshouldbeafixed Signal reclocking is an essential important procedure in digital signal transmission. After passing the value, but noise and other effects cause variations. reclockingcircuit,thesignalbecomesstable,jitter-free,andcanbetransmittedovermoreequipmentlike processors,oreventcontrollers.Withoutreclocking,sparkles,noise,andjaggiesappearontheimage. Lightware’ssophisticatedPixelAccurateReclockingtechnologyfixesmoreproblemsthangeneralTMDS reclocking.Itremovesnotonlyintra-pairskewbutinter-pairskewaswell.ThePixelAccurateReclocking circuiteliminatesthefollowingerrors: Intra-pair skew Skewbetweenthe+and-wireswithinadifferentialwirepair(e.g.Data2-andData2+).It’scausedbydifferent wirelengthsorslightlydifferentwireconstruction(impedancemismatch)inDVIcable.Itresultsinjitter. Noise Electromagneticinterferencebetweenotherelectronicdevicessuchasmobilephones,motors,etc.andthe DVIcablearecoupledontothesignal.Toomuchnoiseresultsinincreasedjitter. -
Page 110: Appendix
11.Appendix HDMI-TPS-TX200series–User'sManual Appendix Specifications, tables, drawings, guides, and further technical details. ç Specifications ç ContentofBackupFile ç MaximumExtensionDistances ç FactoryDefaultSettings ç WiringGuideforRS-232DataTransmission ç FirmwareReleaseNotes ç PortNumbering ç MechanicalDrawings ç FactoryEDIDList ç HashtagKeywordList ç FurtherInformation Appliedfirmwarepackage:v1.2.0 | LDCsoftware:v2.2.0... -
Page 111: Specification
11.Appendix HDMI-TPS-TX200series–User'sManual 11.1. Specifications Enclosure ........1920x1080@60Hz(4:4:4)upto12bits/color Enclosure material ..............1mmsteel Reclocking ............ PixelAccurateReclocking General Dimensions in mm ..........221Wx100.4Dx26H 3D support ..................Yes Compliance ..................CE Dimensions in inch ........... 8.7Wx3.95Dx1.02H DVI-D Input Electrical safety ............EN62368-1:2014 Weight(HDMIandDVI-HDCPseries) ........... 610g Connector type ..........29-poleDVI-I,digitalonly EMC compliance (emission) ......... - Page 112 11.Appendix HDMI-TPS-TX200series–User'sManual ........1920x1080@60Hz(4:4:4)upto12bits/color Analog Audio Input Port Reclocking ............ PixelAccurateReclocking Connector type ..........3.5mmTRS(1/8"jack) Audio formats ........8channelPCM,DolbyTrueHD Audio formats ................2-chPCM ............... DTS-HDMasterAudio7.1 Samplingfrequency ..............48kHz DVI-D Output Maximum input level ....... +0dBu,0.77Vrms,2.19Vpp Connector type ..........29-poleDVI-I,digitalonly Signaltransmission ..........
-
Page 113: Content Of Backup File
11.Appendix HDMI-TPS-TX200series–User'sManual 11.2. Content of Backup File 11.3. Maximum Extension Distances Thebackupfilecontainsnumeroussettingsandparameterssavedfromthedevice.Whenthefileisuploaded Cable lengths ( Auto / Longreach TPS mode) toadevice,thefollowingswillbeoverwritten: #configurationcloning Pixel clock Resolution rate CAT5e AWG24 CAT7 AWG26** CAT7 AWG23 Digital video input ports (HDMI, DP, DVI-D) Videoportname,Audioportname,HDCPsetting,Mute/lockstates,CECsettings 1024x768@60Hz 65MHz... -
Page 114: Factory Default Settings
11.Appendix HDMI-TPS-TX200series–User'sManual 11.4. Factory Default Settings 11.6. Firmware Release Notes Parameter Setting/Value Below list shows the released firmware packages with important Stopbits Parameter Setting/Value notes. Operation mode Pass-through Crosspoint settings (for SW4-TPS-TX240) Commandinjectionstatus Enabled v1.2.0b16 Video I1(DPin) Commandinjectionportno.-Local 8001 Releasedate:2019-08-15 Audio... -
Page 115: Port Numbering
Audio in HDMI2in TPS out DVI-Din DVI-D out Audio in 11.7.7. DP-TPS-TX210 TPS out HDMI out Audio/Video Ports 11.7.3. HDMI-TPS-TX210 Video port no. (LW3) Audio port no. (LW3) Emulated Video port Audio port Port name EDID Till fw From fw Till fw From fw Video port no. -
Page 116: Mechanical Drawings
11.Appendix HDMI-TPS-TX200series–User'sManual 11.8. Mechanical Drawings Bottom View SW4-TPS-TX240canbeseeninthepictures,butthedimensionsarethesameforallmodels.Dimensions are in mm. 178.5 Front View M3 thread M3 thread AUDIO AUDIO AUDIO AUDIO RESET HDCP AUDIO AUDIO Rear View GPIO RS-232 RS-232 TPS OUT PoE TPS OUT PoE HDMI OUT IR OUT 1 2 3... -
Page 117: Factory Edid List
11.Appendix HDMI-TPS-TX200series–User'sManual 11.9. Factory EDID List Legend Mem. Resolution Scan Type Mem. Resolution Scan Type Mem. Resolution Scan Type 640x 480 @60.00 1280x 720 @50.00 F108 2560x 1600 @59.86 848x 480 @60.00 1280x 720 @60.00 F109 3840x 2400 @24.00 800x 600 @60.32... -
Page 118: Hashtag Keyword List
Eventmanager #tpsmode TPS(HDBaseT)modesetting #dhcp #factory Factorydefaultsettings ThiskeywordisplacedattheDHCP(dynamicIPaddress)settingin #firmwareversion Firmware version query thefrontpaneloperation,theLightwareDeviceController(LDC)and #framedetector FramedetectorinLDC theLW3programmer'sreferencesection. #function Function button The following list contains all hashtag keywords placed in the #showme Function button document with a short description belonging to them. The list is in... -
Page 119: Further Information
Lightwareengineerunlessexpresslyagreedbeforehand. 2.2.Usedinanyapplicationotherthanthatforwhichitwasintended. 2.3. Subjected to any mechanical or electrical abuse or accidental damage. 2.4.Anycostsincurredforrepair/replacementofgoodsthatfallinto theabovecategories(2.1.,2.2.,2.3.)willbebornebythecustomerat apre-agreedfigure. 3. All products to be returned to Lightware require a return material authorizationnumber(RMA)priortoshipmentandthisnumbermust beclearlymarkedonthebox.IfanRMAnumberisnotobtainedoris notclearlymarkedonthebox,Lightwarewillrefusetheshipment. 3.1.Thecustomerwillberesponsibleforin-boundandLightwarewill ©2020LightwareVisualEngineering.Allrightsreserved.All beresponsibleforout-boundshippingcosts. trademarks mentioned are the property of their respective owners.
Need help?
Do you have a question about the HDMI-TPS-TX210 and is the answer not in the manual?
Questions and answers