
Related Manuals for Lightware HDMI20-OPTC series


Summary of Contents for Lightware HDMI20-OPTC series
- Page 1 User’s Manual HDMI20-OPTC-TX220-PRO, -RX220-PRO HDMI20-OPTC-TX220-FOX, -RX220-FOX HDMI20-OPTC-TX220-NTQ, -RX220-NTQ HDMI20-OPTC-TX220-PCN, -RX220-PCN Multimode Single Fiber Optical Extender...
- Page 2 HDMI20-OPTC series – User's Manual Important Safety Instructions Waste Electrical & Electronic Equipment Common Safety Symbols WEEE Class I apparatus construction This marking shown on the product or its literature, This equipment must be used with a mains power system with a...
- Page 3 The following symbols and markings are used in the document: All presented functions refer to the indicated products. The descriptions Lightware Visual Engineering supports green technologies and have been made during testing these functions in accordance with the eco-friend mentality. Thus, this document is made for digital usage...
-
Page 4: Table Of Contents
6.2.1. LW3 Tree Structure and Command Structure (examples) ... 42 4.3.5. Remote Menu ................. 26 2. INSTALLATION ...................10 6.2.2. General Rules .................. 42 5. SOFTWARE CONTROL – LIGHTWARE DEVICE CONTROLLER ...27 6.2.3. Command Types................43 2.1. Mounting Options ..............10 6.2.4. Prefix Summary ................43 2.1.1. Truss Mounting - Receiver ............10 5.1. Install and Upgrade ..............27... - Page 5 6.5.4. Changing the Subnet Mask (Static) ..........50 9.4.2. Types of Serial Cables ..............68 6.5.5. Querying the Gateway Address ............. 50 9.4.3. RS-232 Signal Transmission over Lightware Extender Devices .. 68 6.5.6. Changing the Gateway Address (Static) ........50 6.5.7. Querying the DHCP State ............... 51 10.
-
Page 6: Introduction
HDMI20-OPTC-TX220-PRO can fix and lock EDID data on the HDMI connector. Advanced EDID Variant Thank you for choosing Lightware’s HDMI20-OPTC series device. In the first Management forces the required resolution from any video source Model number chapter we would like to introduce the device highlighting the most important and fixes the output format conforming to the system requirements. -
Page 7: Features Of The Device
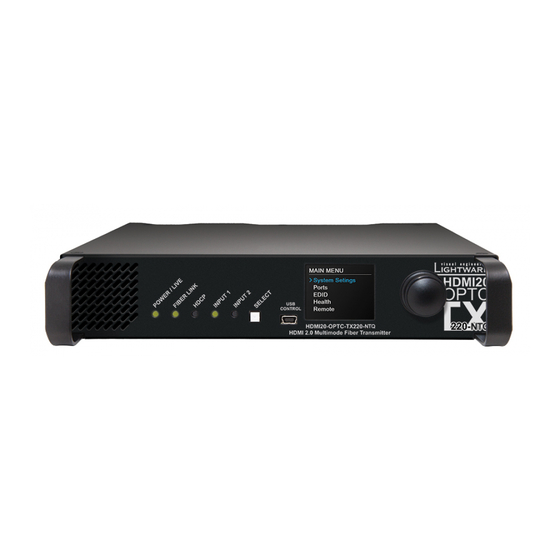
1. Introduction HDMI20-OPTC series – User's Manual 1.6. Features of the Device Graphic Display and Rotary Jog Dial Control Knob 4K Video without Compression Supporting uncompressed 4K UHD resolution at 60Hz Easy setting and menu navigation are assured by the 4:4:4 colorspace. -
Page 8: Model Comparison
1. Introduction HDMI20-OPTC series – User's Manual 1.7. Model Comparison Video Model name Power connector Optical Connector Ethernet port Serial port USB port Port HDMI20-OPTC-TX220-PRO, -RX220-PRO Neutrik opticalCON DUO HDMI20-OPTC-TX220-FOX, -RX220-FOX Standard IEC (C14 type) Fiberfox Neutrik... -
Page 9: Standalone Application
(1..3) and receivers (1..3) are available via LAN. They can be controlled by Lightware Device Controller (LDC) software from the laptop. Optical fiber cable transmits the HDMI, embedded... -
Page 10: Installation
2. Installation HDMI20-OPTC series – User's Manual 2.1. Mounting Options 2.1.2. Standard Rack Installation Rack mounting kit includes all necessary accessories for Extenders can mount in several ways, depending on the application. Standard Rack Installation: The can be mounted into the rack in pairs, receivers can be used standalone. - Page 11 2. Installation HDMI20-OPTC series – User's Manual ATTENTION! Take care of the mounting direction of the screws! Step 4. As a final step, mount the unit in the rack. Front side Tx 1. Tx 2. Threaded hole...
-
Page 12: Connecting Steps
Connect a multimode (MM) fiber cable to the channel B of the receiver. Connect a multimode (MM) fiber cable to the channel A of the transmitter. Optionally connect a compatible Lightware device or a third-party device to the break-out LC connector. It is internally linked to the channel A of Neutrik connector. -
Page 13: Product Overview
Receiver: Function button sets the output conversion mode. See the details in Output Conversion Modes section. USB Port USB mini-B port for local controlling the unit by Lightware Device Controller software. LCD display Transmitter: Display of the front panel menu. -
Page 14: Rear View -Transmitters
3. Product Overview HDMI20-OPTC series – User's Manual 3.2. Rear View -Transmitters HDMI20-OPTC-TX220-PRO RS-232 AC Connector Standard IEC C14 connector accepting 100-240 V, 50 or 60 Hz. A: FIBER OUTPUT GIGABIT GIGABIT ETHERNET 1 ETHERNET 2 AC Connector (PCN) NT POWER CON TRUE 1 connector accepting 100-240 V, 50 or 60 Hz. -
Page 15: Rear View - Receivers
3. Product Overview HDMI20-OPTC series – User's Manual 3.3. Rear View - Receivers HDMI20-OPTC-RX220-PRO Standard IEC C14 connector accepting 100-240 V, 50 or 60 Hz. RS-232 B: FIBER INPUT GIGABIT AC Connector GIGABIT ETHERNET 1 ETHERNET 2 NT powerCON TRUE 1 connector accepting 100-240 V, 50 or 60 Hz. -
Page 16: Electrical Connections
HDMI20-OPTC-220-NTQ extenders supplied with Neutrik opticalCON QUAD connector 3.4.1. Power Connectors (NO4FDW-A type) with four fiber channel. The sealing cover helps to protect against the HDMI20-OPTC series has AC connectors, accepts 100-240 V, 50 or 60 Hz. Two different power connector dust and dirt. type is available:... -
Page 17: Usb Connector
3.5. Multimode Single Fiber Extender Concept HDMI20-OPTC series have standard USB mini-B receptacle. HDMI20-OPTC series devices are a HDMI 2.0-compatible single fiber extender pair. They are able to transmit digital video, embedded audio, RS-232 and Gigabit Ethernet signals via multimode optical cable up to 700m. -
Page 18: Optical Interface
HDMI HDMI The Neutrik opticalCON DUO cable has two fiber channels, named channel A and channel B. Since Lightware fiber extenders use only one fiber for signal transmission, the other fiber can be used by other optical devices. The unused fiber channel is accessible by the break-out connector. -
Page 19: Video And Audio Interface
HDMI20-OPTC series – User's Manual 3.7. Video and Audio Interface 3.7.2. Autoselect Feature Besides manual crosspoint selection you can The HDMI20-OPTC series transmitter can receive signal from two types of sources: New event? choose the Autoselect option on the video ▪ DVI-D ports. -
Page 20: Control Features
HDMI20-OPTC-TX220-Pro 2. The device can be controlled over front panel USB port (mini B-type connector). This interface supports LW3 Projector 3. protocol. The interface can be used to establish a connection to Lightware Device Controller software. MAIN MENU HDMI20 > System Settings... -
Page 21: Serial Interface
In this mode, the extender works as a TCP/IP <-> RS-232 bidirectional converter. The TCP/IP data signal INFO: HDMI20-OPTC series extenders are DTE unit according to their pin-out. For more details about pin is converted to RS-232 data and vice versa. TCP/IP port numbers are defined for the serial ports for this... -
Page 22: Operation
4. Operation HDMI20-OPTC series – User's Manual 4.1. Powering on Status LEDs - Receiver Connect the power cord to the AC input connector; the extender is POWER/LIVE FRONT immediately powered on. After the self-test, the last configuration is... -
Page 23: Function Button - Transmitter
Enable Dynamic (DHCP) IP Address Select button. The device gets a static IP address as a factory default setting. If INFO: Autoselect mode can be set with Lightware Device Controller this setting does not fit to the circumstances during install or usage, software (see... -
Page 24: Front Panel Lcd Menu Operations
4. Operation HDMI20-OPTC series – User's Manual 4.3. Front Panel LCD Menu Operations 4.3.1. System Settings Menu Device Info Submenu In this submenu you can check basic The front panel has a color LCD that shows the most important... -
Page 25: Ports Menu
4. Operation HDMI20-OPTC series – User's Manual 4.3.2. Ports Menu 4.3.3. EDID Menu Video Settings Submenu for Input Ports HDCP ENABLE PORTS ▪ I1: HDCP Enable (Disabled / HDCP 1.4 When entering the menu the available video Advanced EDID Management is available in the front panel LCD >... -
Page 26: Health Menu
4. Operation HDMI20-OPTC series – User's Manual 4.3.4. Health Menu Output 1/A +5V, Output 1/B +5V, Output 2 +5V Submenu ▪ Always on Operation Submenu Always off ▪ The following information is displayed about OPERATION Auto ▪... -
Page 27: Software Control - Lightware Device Controller
The extender can be controlled by a computer through the LAN, RS-232 and settings are available by Only one updateable instance can exist More than one different version USB ports using Lightware Device Controller (LDC). The software can be clicking the Setup button. for all users can be installed for all users installed on a Windows PC or macOS X. -
Page 28: Establishing The Connection
5. Software Control – Using Lightware Device Controller HDMI20-OPTC series – User's Manual 5.3. Establishing the Connection Identifying the Device Step 1. Connect the device to a computer via USB, RS-232 or Ethernet. Clicking icon results the blinking of the LDC screen for 10 seconds. The feature helps to Step 2. -
Page 29: Crosspoint Menu - Hdmi20-Optc-Tx220-Pro
5. Software Control – Using Lightware Device Controller HDMI20-OPTC series – User's Manual 5.4. Crosspoint Menu - HDMI20-OPTC-TX220-PRO Port Tiles The colors of the port tiles and the displayed icons represent different states and information: Video Tab... -
Page 30: Port Properties Window
5. Software Control – Using Lightware Device Controller HDMI20-OPTC series – User's Manual 5.5. Port Properties Window 5.5.2. HDMI Output Port - Transmitter Optical Output Port - Transmitter Click on the local HDMI output port to open the port properties window. The 5.5.1. HDMI Input Port -Transmitter... -
Page 31: Optical Input Port - Receiver
5. Software Control – Using Lightware Device Controller HDMI20-OPTC series – User's Manual 5.5.3. Optical Input Port - Receiver 5.5.4. HDMI Output Port - Receiver Maximum possible: The highest supported level of encryption. ▪ Output 1 conversion mode: No conversion / Convert to YCbCr 4:2:0 / Split A: left, B: right / Split A: right, B: left. -
Page 32: Edid Menu
5. Software Control – Using Lightware Device Controller HDMI20-OPTC series – User's Manual 5.6. EDID Menu 5.6.1. Sources and Destinations The EDID memory consists of four parts: Advanced EDID Management can be accessed by selecting the EDID menu. There are two panels: left one contains Source EDIDs, right one contains Destination slots where the EDIDs can be emulated or copied. -
Page 33: Edid Summary Window
5. Software Control – Using Lightware Device Controller HDMI20-OPTC series – User's Manual 5.6.4. Editing an EDID Importing an EDID Import Previously saved EDID (*.bin, *.dat or *.edid file) can be uploaded to the user memory: Select an EDID from the left panel and press the Edit button to display Advanced EDID Editor window. The editor can read and write all descriptors, which are defined in the standards, including the additional CEA Step 1. -
Page 34: Creating An Edid
HDMI20-OPTC series – User's Manual 5.6.5. Creating an EDID 5.7. Control Menu Since above mentioned Advanced EDID Editor needs more complex knowledge about EDID, Lightware 5.7.1. RS-232 Tab introduced a wizard-like interface for fast and easy EDID creation. With Easy EDID Creator it is possible to create custom EDIDs in four simple steps. -
Page 35: Ethernet Tab
5. Software Control – Using Lightware Device Controller HDMI20-OPTC series – User's Manual 5.7.2. Ethernet Tab 5.8. Event Manager Four ports are displayed in the Ethernet tab: Ethernet (P1, P2), OPT1, and CPU. The Ethernet ports (P1 and The feature means that the device can sense changes on its ports and able to P2) display the status of the Ethernet, speed, and the duplexity of the connection. -
Page 36: The Event Editor
5. Software Control – Using Lightware Device Controller HDMI20-OPTC series – User's Manual 5.8.1. The Event Editor 5.8.2. Create or Modify an Event Press the Edit button in the desired Event line to open the Event editor window. - Page 37 5. Software Control – Using Lightware Device Controller HDMI20-OPTC series – User's Manual Advanced Mode Conditions and actions in wizard mode in the receiver The goal of this mode is the same as of the wizard: set the properties and methods for conditions and actions.
-
Page 38: Special Tools And Accessories
5. Software Control – Using Lightware Device Controller HDMI20-OPTC series – User's Manual 5.8.3. Special Tools and Accessories Import all the Events Step 1. Press the Import button above the Event list. The Name of the Event... -
Page 39: Settings Menu
5. Software Control – Using Lightware Device Controller HDMI20-OPTC series – User's Manual 5.9. Settings Menu 5.9.2. Network Tab IP address and DHCP settings can be set on this tab. Always press the Apply changes button to save changes. -
Page 40: Backup Tab (Configuration Cloning)
Step 1. Select the Settings / Backup tab from the menu. The configuration cloning of Lightware LW3 devices is a simple method that eliminates the need to repeatedly Step 2. Click on the Choose file button on the right panel and browse the desired file. -
Page 41: System
Create and Restore Backups from the Device Memory HDMI20-OPTC series extenders are able to store backups in their own memory and these can be recalled from there so user does not need to save backup files to the local computer. Four slots are available for this purpose. -
Page 42: Lw3 Programmers' Reference
(Cr, ‘\r’) and line feed (Lf, ‘\n’) pair. It is organized as a tree structure that provides outstanding flexibility and user-friendly handling with ‘nodes’, ‘properties’ and ‘methods’. The Advanced View of the Lightware Device Controller software is the perfect tool for browsing and learning how the LW3 protocol can be used in practice. -
Page 43: Command Types
6. LW3 Programmers’ Reference HDMI20-OPTC series – User's Manual 6.2.3. Command Types 6.2.4. Prefix Summary DEFINITION: The prefix is a 2-character long code that describes the type of the response. GET command The following prefixes are defined in the LW3 protocol: The GET command can be used to get the child nodes, properties and methods of a specific node. -
Page 44: Signature
6. LW3 Programmers’ Reference HDMI20-OPTC series – User's Manual 6.2.7. Signature 6.2.9. Notifications about the Changes of the Properties DEFINITION: The signature is a four-digit-long hexadecimal value that can be optionally placed before When the value of a property is changed and the user is subscribed to the node, which the property belongs every command to keep a command and the corresponding responses together as a group. -
Page 45: System Commands
6. LW3 Programmers’ Reference HDMI20-OPTC series – User's Manual 6.3. System Commands 6.3.4. Querying the Firmware Version 6.3.1. Querying the Product Name Command and Response Ý GET•/SYS/MB.FirmwareVersion The name of the product is a read-only parameter and cannot be modified. -
Page 46: Locking Front Panel
6. LW3 Programmers’ Reference HDMI20-OPTC series – User's Manual 6.3.7. Locking Front Panel 6.3.10. Setting the Dark Mode on the Remote Device INFO: This command is available for the transmitter. Command and Response Dark mode on the receiver can be activated by sending a command to the transmitter. -
Page 47: Video Port And Crosspoint Settings
6. LW3 Programmers’ Reference HDMI20-OPTC series – User's Manual 6.4. Video Port and Crosspoint Settings 6.4.5. Locking Input Port 6.4.1. Querying the Crosspoint Setting Command and Response Ý CALL•/MEDIA/VIDEO/XP:lockSource(<in>) Command and Response Ü mO•/MEDIA/VIDEO/XP:lockSource Ý GET•/MEDIA/VIDEO/XP.DestinationConnectionList pr•/MEDIA/VIDEO/XP.DestinationConnectionList=<out1_state>;<out2_state> Example Ü... -
Page 48: Querying The Status Of Source Ports
6. LW3 Programmers’ Reference HDMI20-OPTC series – User's Manual 6.4.8. Querying the Status of Source Ports The Most Common Received Port Status Responses Command and Response Ý GET•/MEDIA/VIDEO/XP.SourcePortStatus T00AA Unlocked, pr•/MEDIA/VIDEO/XP.SourcePortStatus=<in1_state>;<in2_state> Ü No embedded Unmuted Reserved Reserved... -
Page 49: Querying The Status Of Destination Ports
6. LW3 Programmers’ Reference HDMI20-OPTC series – User's Manual 6.4.9. Querying the Status of Destination Ports 6.4.11. Changing the Autoselect Mode Command and Response Command and Response Ý GET•/MEDIA/VIDEO/XP.DestinationPortStatus Ý CALL•/MEDIA/VIDEO/XP:setDestinationPortAutoselect(<out>:<out_set>) pr•/MEDIA/VIDEO/XP.DestinationPortStatus=<out1_state>;<out2_state> Ü Ü mO•/MEDIA/VIDEO/XP.setDestinationPortAutoselect The response contains 5 ASCII characters for each port. The first character indicates the mute/lock state, Parameters the next 2-byte long HEX code showing the current state of the output port. -
Page 50: Setting The Output Conversion Mode Of The Remote Device
6. LW3 Programmers’ Reference HDMI20-OPTC series – User's Manual 6.4.13. Setting the Output Conversion Mode of the Remote Device Command and Response Ý GET•/MANAGEMENT/NETWORK.NetworkMask INFO: This command is available in transmitters. pr•/MANAGEMENT/NETWORK.NetworkMask=<netmask> Ü Output conversion mode on the O1A and O1B ports of the receiver can be also set by sending a command to the transmitter. -
Page 51: Querying The Dhcp State
6. LW3 Programmers’ Reference HDMI20-OPTC series – User's Manual 6.5.7. Querying the DHCP State 6.6. RS-232 Port Configuration Command and Response 6.6.1. Querying the RS-232 Operation Mode Ý GET•/MANAGEMENT/NETWORK.DhcpEnabled Command and Response pw•/MANAGEMENT/NETWORK.DhcpEnabled=<dhcp_state> Ü Ý GET•/MEDIA/UART/P1.Rs232Mode Example pw•/MEDIA/UART/P1.Rs232Mode=<rs232_mode> Ü... -
Page 52: Setting The Databit
6. LW3 Programmers’ Reference HDMI20-OPTC series – User's Manual 6.6.4. Setting the Databit 6.6.7. Enabling Command Injection Mode Command and Response Command and Response SET•/MEDIA/UART/P1.DataBits=<databit> SET•/MEDIA/UART/P1.CommandInjectionEnable=<ci_enable> Ý Ý pw•/MEDIA/UART/P1.DataBits=<databit> pw•/MEDIA/UART/P1.CommandInjectionEnable=<ci_enable> Ü Ü Parameters Parameters <databit>: 8 or 9 <ci_enable>:... -
Page 53: Sending Message Via The Communication Ports
6. LW3 Programmers’ Reference HDMI20-OPTC series – User's Manual 6.7. Sending Message via the Communication Ports Sending Binary Message The command is for sending a binary message in HEX format. 6.7.1. Sending Message via an RS-232 Port Command and Response The RS-232 ports can be used for sending a command message to a device which can be controlled over serial port. -
Page 54: Sending Message Via Udp Port
6. LW3 Programmers’ Reference HDMI20-OPTC series – User's Manual Sending Text Message Escaping in the Message The command is for sending a text message in ASCII-format. When commands need to be separated by <CR><LF> charaters to be recognized by the controlled device, then they need to be escaped. -
Page 55: Edid Management
6. LW3 Programmers’ Reference HDMI20-OPTC series – User's Manual 6.8. EDID Management 6.8.3. Querying the Preferred Resolution of an User EDID 6.8.1. Querying the Emulated EDIDs Command and Response Ý GET•/EDID/U/<user_edid>.PreferredResolution Command and Response pr•/EDID/U/<user_edid>.PreferredResolution=<preferred_resolution> Ü Ý GET•/EDID.EdidStatus Ü pr•/EDID.EdidStatus=<source>:E1;<source>:E2 Parameters <user_edid>... -
Page 56: Copying An Edid To User Memory
6. LW3 Programmers’ Reference HDMI20-OPTC series – User's Manual 6.8.5. Copying an EDID to User Memory 6.8.7. Resetting the Emulated EDIDs Command and Response Command and Response ATTENTION! The (User) EDID memory slot will be overwritten without notification even if it was not empty. -
Page 57: Lw3 Commands - Quick Summary
6. LW3 Programmers’ Reference HDMI20-OPTC series – User's Manual 6.9. LW3 Commands - Quick Summary Video Port and Crosspoint Settings Querying the Crosspoint Setting System Commands Ý GET•/MEDIA/VIDEO/XP.DestinationConnectionList Querying the Product Name Switching Video Input Ý GET•/.ProductName Ý... - Page 58 6. LW3 Programmers’ Reference HDMI20-OPTC series – User's Manual Network Configuration Enabling Command Injection Mode SET•/MEDIA/UART/P1.CommandInjectionEnable=<ci_enable> Querying the IP Address Ý Sending Message via the Communication Ports Ý GET•/MANAGEMENT/NETWORK.IpAddress Changing the IP Address (Static) Sending Message via an RS-232 Port SET•/MANAGEMENT/NETWORK.StaticIpAddress=<IP_address>...
-
Page 59: Firmware Upgrade
From 1.2.0 firmware version, the firmware package format is .lfp2 (LFP2 file) the upgrade can be done with the Lightware Device Updater2 (LDU2) software. To get the latest software and Lightware Device Updater v2 (LDU2) software. -
Page 60: Firmware Upgrading Steps
7. Firmware Upgrade HDMI20-OPTC series – User's Manual Installation for macOS Step 2. Select the firmware package file (*.lfp2). When the file is selected the release note is displayed in the right window. Please read it carefully. -
Page 61: Keeping The Configuration Settings
7. Firmware Upgrade HDMI20-OPTC series – User's Manual 7.5. Keeping the Configuration Settings Step 7. Select the desired devices and press the Start Update button. The upgrade takes about 5 minutes to finish which is independent of the number of the upgraded devices since the upgrades are processed By default, device configuration settings are restored when firmware upgrade is finished. - Page 62 7. Firmware Upgrade HDMI20-OPTC series – User's Manual...
-
Page 63: Troubleshooting
8. Troubleshooting HDMI20-OPTC series – User's Manual At first, check front panel LEDs and take the necessary steps according to their states. For more information about status, LEDs refer to the Front View Rear View -Transmitters sections. - Page 64 Error logs and backup files from the Lightware Device Controller software. ▪ 4.3.5 The more of the above information you can give us the better. Please send these information to the Lightware No LEDs are light Dark mode is enabled...
-
Page 65: Technologies
(dynamic EDID emulation). information about additional Detailed Timings, audio capabilities, For example, the Lightware device can be set up to emulate a sink speaker allocation and HDMI capabilities. It is important to know that device, which is connected to one of the outputs. -
Page 66: Hdcp Management
To avoid unnecessary HDCP encryption, Lightware introduced the HDCP enabling/disabling function: the HDCP capability can be disabled in the Lightware device. If HDCP is disabled, the connected The layout is the same as in the previous case: non-HDCP compliant source will detect that the sink is not HDCP capable, and turn off display device is connected to the extender but the source would send authentication. -
Page 67: Pixel Accurate Reclocking
9. Technologies HDMI20-OPTC series – User's Manual 9.3. Pixel Accurate Reclocking Jitter Signal instability in the time domain. The time difference between two Signal reclocking is an essential important procedure in digital signal signal transitions should be a fixed value, but noise and other effects transmission. -
Page 68: Serial Management
HDMI20-OPTC series – User's Manual 9.4. Serial Management 9.4.3. RS-232 Signal Transmission over Lightware Extender Devices The following examples describe the detailed integration of Lightware devices between different RS-232 pin 9.4.1. General Information assignment units. There are two types of devices in general serial communication:... -
Page 69: Appendix
10. Appendix HDMI20-OPTC series – User's Manual 10.1. Specification General Compliance ................................CE EMI/EMC compliance ..................EN 55035:2017 / EN 55032:2015 RoHS compliance................Yes Safety ............................EN 60065 Class I Cooling..............................Cooling fan Appendix Operating temperature ....................0 to +50˚C (+32 to +122˚F) Storage temperature ....................-40 to +85˚C (-40 to +185˚F) - Page 70 Fiber ................50/125 µm Multimode (OM3 or OM4 recommended) Laser forward wavelengths ................5ch.: 778; 801; 824; 850; 911 nm The below table shows the transmission distances via optical cable between the HDMI20-OPTC series depending on the cable quality and pixel clock frequency.
-
Page 71: Content Of Backup File
10. Appendix HDMI20-OPTC series – User's Manual 10.3. Content of Backup File Transmitter Receiver Transmitter Transmitter Receiver Dark mode delay Dark mode delay HDMI Input (I1, I2) Front panel settings Device label Device label Display brightness Port name... -
Page 72: Factory Edid List
10. Appendix HDMI20-OPTC series – User's Manual Factory Default Settings of the Receiver Factory Default Settings of the Transmitter and the Receiver Receiver Transmitter Receiver Video settings: Optical Input RS-232 Port name OPTIN Port name Local... - Page 73 10. Appendix HDMI20-OPTC series – User's Manual 10.5. Factory EDID List Mem. Resolution Type Mem. Resolution Type 1920 x 1080i @ 50.00 Hz HDMI F113-F117 Reserved Mem. Resolution Type 1920 x 1080i @ 60.05 Hz HDMI F118 Universal HDMI EDID;...
-
Page 74: Mechanical Drawings
10. Appendix HDMI20-OPTC series – User's Manual 10.6. Mechanical Drawings 10.6.2. Receiver 10.6.1. Transmitter The following drawings present the physical dimensions of the receiver. Dimensions are in mm. The following drawings present the physical dimensions of the transmitter. Dimensions are in mm. -
Page 75: Further Information
1.4. Product failures from six (6) months to the end of the warranty period will either be repaired or replaced at the discretion of Lightware. If Lightware chooses to replace the product then the replacement will be warranted for the remainder of the original unit’s warranty period.