Table of Contents
Advertisement
Quick Links
Advertisement
Table of Contents

Related Manuals for Panasonic PV500


Summary of Contents for Panasonic PV500
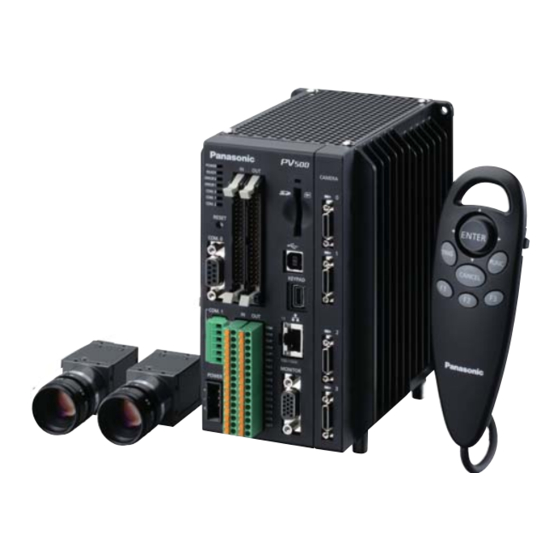
- Page 2 Before Reading This Manual Thank you for purchasing the IMAGECHECKER PV500. This manual describes information on the hardware such as how to install and wire and the software such as how to set the functions. Read this User’s Manual carefully before use.
-
Page 3: Table Of Contents
2.5.2 Connecting Power to XGA Monitor ...... 31 4.7.10 Smart Matching ............ 121 2.5.3 Connecting Power to PV500 ......... 32 4.7.11 Flaw Detection ............. 136 2.6 Supplying Power ............34 4.7.12 Connector (Binary Window) and Connector (Gray Window) ............. 146 4.7.13 Connector (Gray Edge) ........ - Page 4 5.1 Start /Stop RUN Mode ..........314 7.4.5 Communication Test ..........355 5.2 Control in RUN Menu ..........316 7.5 Information Display and Updating of PV500 ..356 5.2.1 Control of “OPERATION” Menu ......316 7.5.1 Displaying PV Information ........356 5.2.2...
- Page 5 10.2 Communication............432 10.2.1 Upload and Download of Setting Data ....432 10.2.2 Reading the Latest Image of PV500 ....433 10.2.3 Uploading Images in Storage Space in PV500 . 433 10.2.4 Downloading images into Test Image Memory of PV500 ..............434 Specifications and List of Product Numbers ..........
-
Page 6: Precautions Before Use
Do not perform a test of insulation resistance or withstand voltage between the power source or input/output signals and the metallic part of connectors or camera cases. · To avoid loss of data by accident, also save the setting data stored in PV500 into a PC or an external storage media. -
Page 7: List Of Menu Options
List of Menu Options Language selecting window (Displayed only at the first startup after delivery) ┳ ━ Japanese/ English/ German/ French /Spanish / Italian/ Language Language selecting Simplified Chinese/ Korean/Traditional Chinese ┃ window ▶ p.36 ┗ Do not show this window at the next start-up. SETUP MENU ┳... - Page 8 ┣ Camera ┳ Camera ━ Type of Camera No.0 - 3 ▶ p.58 ┃ ┗ FLASH Polarity ━ FLASH Polarity 0-3 ▶ p.59 ┣ Color ┳ Color Scheme ▶ p.340 ┃ ┗ Window Transparency (SETUP Menu) ▶ p.341 ┣ Password ▶...
- Page 9 ┳ PC Communication ▶ p.432 TOOL ┣ General ┳ Startup Setting ▶ p.345 ▶ p.346 ┃ ┣ Network ┃ ┣ Calendar ▶ p.348 ┃ ┣ Language ▶ p.348 ┃ ┗ Initialize ▶ p.349 ┣ SD Property ▶ p.350 ┣ Eject SD Card ▶...
-
Page 11: Names And Descriptions
Chapter 1 Names and Descriptions... -
Page 12: Pv500
1.1 PV500 Operating LEDs Displays the status of the following signals and communication ports. POWER / READY / ERROR0 / ERROR1 / COM.0 / COM.1 / COM.2 Parallel I/O Connector I/O interface, MIL connector type Reset Switch Reboots PV500. COM0 Port RS-232C Communication port. - Page 13 “Change Battery!” appears in the information display area. Replace with a new one then. (Battery product No.: AFPX-BATT) · To replace the battery, before the procedure described above, turn on the power of PV500 a minute or more and replace it in two minutes after turning off the power. ·...
-
Page 14: Camera
*1: This product was discontinued as of the end of August 2011. Precautions for Use · Use only the camera and the camera cable with the proper product numbers specified by Panasonic Industrial Devices SUNX Co., Ltd. · Do not bend the camera cables forcibly or apply load to the connector joints. -
Page 15: Quad-Speed/ 2-Mega-Pixel Digital Camera
1.2.2 Quad-speed/ 2-Mega-pixel Digital Camera Product No.: Quad-speed Digital Camera=ANPVC1040 /2-Mega-pixel Digital Camera=ANPVC1210 Lens Attach a C-mount lens with adapter rings as necessary. Lens fixture C-mount Mounting plate Insulation type plate. The plate can be attached to four sides of the camera. Cable connector Connects a camera cable. -
Page 16: Ultra Compact Double Speed Digital Camera
1.2.3 Ultra Compact Double Speed Digital Camera Product No.: ANPVC1021 This product was discontinued as of the end of August 2011. Camera Head Lens Attach an exclusive lens for Ultra compact camera. Lens fixture Special mounting fixture. Lens securing ring A ring to secure the lens to the camera. -
Page 17: Mega Compact Gray Camera (Anpvc5030)15
· The camera cable has directionality. Be sure to connect the cable at the connector with a product number sticker to the camera, and the connector with a ferrite core to the PV500. · 0.3-Mega Compact Gray Camera (ANPVC5030) cannot be used. - Page 18 Product No.: ANPVC82XX (XX=03, 05, 10) Applicable camera: 0.3-Mega Compact Gray Camera (ANPVC5030) Camera-side PV500-side Camera-side connector Connects to a camera. Product number label The label indicates product number of the camera cable. PV500-side connector Connect the CAMERA connector of PV500.
-
Page 19: Keypad
To lock or disable the 1 - 8 keys by setting in “LOCK” side. The switch prevents undesired operation of the keys by mistake. The operation from the keypad may be off on the PV500. Refer to page 334 for details. -
Page 20: Xga Monitor
1.4 XGA Monitor Product No.: ANPVM11021 Mounting hole Attach the included mounting brackets. for mounting bracket Adjustment volume The following adjustments are available. BRIGHT Brightness Adjusts the brightness. (Brightness: approx. 20 to 100%) V-POS. Vertical Position Adjusts the screen vertical position (in 16 lines). -
Page 21: Installation And Wiring
Chapter 2 Installation and Wiring... -
Page 22: Basic System Configurations
2.1 Basic System Configurations An example of basic system configuration when connecting two cameras... -
Page 23: Pv500 Installation
2.2 PV500 Installation 2.2.1 Mounting Arrangement Install the main unit of PV500 by using the four mounting holes on the back side or using the screw holes on the bottom side after replacing the rubber legs. Before mounting PV500, attach a backup battery to it. Refer to page 315 on how to attach the battery. -
Page 24: Note On Mounting
2.2.2 Note on Mounting Mounting Direction Install PV500 in the correct direction (see the figures below) for heat radiation. Do not mount it sideways or upside down. Correct Wrong About Mounting Space Keep more than 50 mm of space around PV500 for ventilation. In addition, to wire cables safely, keep more than 100 mm of space in front of PV500. -
Page 25: Mounting A Camera
2.3 Mounting a Camera 2.3.1 Selecting a Lens (View Range Table) Select a lens according to the capturing range (view range). Depending on the size of object, decide the capturing range (view range). And then, referring to the view range table of each camera, confirm the distance from the object to the camera (WD: work distance) and select a suitable lens. - Page 26 View Range Table - 2-Mega-pixel Digital Camera: ANPVC1210 Lens ANPVL502 ANPVL252 ANPVL162 Resolution f=50 mm f=25 mm f=16 mm µm / Pixel View Range (mm) Adapter Adapter Adapter Ver. Hor. Ver. Hor. ring ring ring 52.5 10.0 13.3 13.0 12.5 16.7 10.5 10.4...
- Page 27 View Range Table - Ultra Compact Camera: ANPVC1021 These products (ANPVC1021, ANPVL3001, ANPVL1201, ANPVL0401) were discontinued as of the end of August 2011. Lens ANPVL3001 ANPVL1201 ANPVL0401 Resolution View Range f=30 mm f=12 mm f=4 mm (µm / Pixel) (mm) Adapter Adapter Adapter...
- Page 28 View Range Table - 0.3-Mega Compact Gray Camera :ANPVC5030 This product is supported in Ver.2.40. Lens ANB846NL ANB845NL ANM88501 ANB847L ANB 843L ANB 842NL Resolution ANM88251 ANM88161 f=50 mm f=50 mm f=8.5 mm f=6 mm µm/pixel View range f=25 mm f=16 mm (mm) Adapter...
-
Page 29: Mounting A Camera
2.3.2 Mounting a Camera Attach a lens to a camera. Remove the camera cap and attach the selected lens. Protect the CCD (image sensor) from dust. And do not touch the glass surface of CCD image sensor. Fixing a Lens of Ultra Compact Camera This product was discontinued as of the end of August 2011. -
Page 30: Note On Mounting
2.3.3 Note on Mounting Mounting a Camera · Use the mounting plate (insulation type) initially attached on the camera to mount it in an electrically insulated way. Without insulation, the internal circuit might be damaged because the camera case connects GND of the internal circuit if the electric potentials of the mounting point and the camera case are different. -
Page 31: Xga Monitor Installation
2.4 XGA Monitor Installation Install a XGA monitor: ANPVM11021 as below. Never block the ventilation slits of the XGA monitor. Prepare a panel to attach a monitor. Applicable panel thickness: 1 - 5 mm Insert the monitor into the panel. Attach the included attachment brackets to the monitor. -
Page 32: Connecting Cables
2.5 Connecting Cables 2.5.1 Connecting Peripherals Be sure to turn off the power source for PV500 before connecting peripherals. Connect a camera to PV500. Connect a camera cable with a camera connector. The camera cable has polarity. Connect the cable at the end with a product number sticker to the camera, and the end with a ferrite core to the PV500. -
Page 33: Connecting Power To Xga Monitor
2.5.2 Connecting Power to XGA Monitor Connect the power of 24 V DC to the terminal on the back side. Use an insulated power supply with a built-in protection circuit as a power supply device to supply 24 V DC. Rated voltage: 24 V DC Operating voltage range: 21.6 to 26.4 V DC Power consumption: 1A or less... -
Page 34: Connecting Power To Pv500
- Insulated power supply with a built-in protection circuit • Ensure to use the separate power supply for the PV500 from the power supply for power devices. • Turn ON/OFF the power supply at the primary side. If you turn ON/OFF it at the secondary side, the... - Page 35 Install the PV500 as close to the ground point as possible and keep the ground wire short. • The power circuit of PV500 is insulated and you can ground the positive (+) terminal of 24V DC power supply without fault.
-
Page 36: Supplying Power
When you start the very first time after delivery, the dialog to select interface language appears. Refer to the next chapter for more details. If the monitor screen displays nothing, confirm the following statuses. · Is power supplied to PV500 correctly? · Is the power switch of the monitor ON? ·... -
Page 37: Basic Operation
Chapter 3 Basic Operation... -
Page 38: About Windows
When you start the very first time after delivery, the English dialog to select interface language appears. You can display multiple languages in Ver.1.10 or later of PV500. Select an appropriate language in this dialog. Since the language can be changed in SETUP menu later as well, select your most accessible language for now. -
Page 39: Setup Menu And Run Menu
3.1.2 SETUP Menu and RUN Menu About windows PV500 has two windows; RUN menu for performing inspections and SETUP menu for making settings such as inspection conditions. When power is turned on, RUN menu is displayed. To make a configuration, switch to SETUP menu with Ope/Set Switch of the keypad. - Page 40 SETUP menu In SETUP menu, the display changes depending on operation. You can choose the colors of each area of display. Main menu Displays the menu to set in SETUP menu. Sub menu Displays a submenu of the menu selected in the main menu. Setting windows Setting windows displayed in the upper left of the screen.
- Page 41 SETUP menu. “Do not request a password every time.” Check this item to switch to SETUP menu without entering a password. However, after you reboot PV500, it requests a password again. Set the switch in "LOCK" side to change to request a password after that. (As the keys on the keypad are disabled when the switch is set to "Lock"...
-
Page 42: Basic Key Operation
3.2 Basic Key Operation 3.2.1 Selecting Items and Inputting Values or Characters Selecting an Item To select a menu or a value of an item, follow the instructions below. This manual describes this operation as “select xx”. Move the cursor to the menu or value you want to set by tilting the ENTER key on the keypad upward/downward/left/right. - Page 43 Inputting Characters Input characters in a title or comment field of Type, Checker, Layout, Numerical Calculation, or Judgement and a text of Data R/W using the software keyboard. With the setting simulation software PVWIN, you can input the characters that are not on the software keyboard.
-
Page 44: Selecting A Display Image (Image Menu)
3.2.2 Selecting a Display Image (Image Menu) An image captured with the connecting camera is displayed on the “Screen window”. You can choose a camera image and an image type to display. Select them from Image Menu. The information including camera number or type of the image displayed on the screen windows are displayed in the screen window bar. - Page 45 Memory: change even if you cover the lens or uncover it. If you want to run a test using the image memory of PV500 or images in a SD card in SETUP menu, switch to Memory. An image changes in real-time. When you cover the lens with •...
- Page 46 Displays an image preprocessed by the set step of the selected • Step: 1st to 10th preprocess group. (only for SETUP Example) When 10 steps are set in preprocess group A Menu) Selecting "3rd" for preprocess step displays the image preprocessed by the 3rd step, and inspects on the image preprocessed by the 10th step.
- Page 47 Selecting Image to Display on Screen Window in SETUP Menu Select “Memory / Live” from Image menu. The selection screen is displayed. Select Memory or Live in “Memory / Live”. Select Gray or Binary in “Gray / Binary”. Press the Cancel key. Select "Preprocess".
-
Page 48: Zooming In/Out Image (Image Menu)
3.2.3 Zooming In/out Image (Image Menu) Displayed camera image can be zoomed in/out. In RUN menu, you can change the size and position of the screen. Specifying Magnification (Zoom In/out) You can change Magnification between 2% and 400% by 1%. Magnification 100% indicates the status displayed in the following size. -
Page 49: Specifying Checker Area
Displaying Image Full-screen (Full Screen) This is the setting to display an image full-screen regardless of size of a screen window. Select "Full Screen". The image is displayed full-screen. In SETUP menu, the image is displayed in 100% for Quad-speed/ Ultra Compact camera and in 40% for 2-Mega-pixel camera. - Page 50 Set the start point (a square mark) of the rectangle. Move the start point by tilting the ENTER key and press it to determine the position. Set the end point (a filled square mark) of the rectangle. Move the end point by tilting the ENTER key and press it to determine the position. Set the angle of the area.
- Page 51 Polygon To draw a polygon, add vertices to a rectangle. Up to 64 vertices can be set. Select “Polygon” from “Change Shape” menu. Select "Change". Now you can draw an area. A rectangle is displayed when you set an area for the first time. Move the area.
- Page 52 Deleting a Vertex of Polygon Select "Change". Press the ENTER key repeatedly until the vertex you want to delete turns to be modifiable (the square is on the vertex). Press the FUNC key. The menu adding/deleting vertices is displayed. Select "Delete Vertex". The vertex you selected is deleted.
- Page 53 Setting a Mask Area Up to 16 mask areas, where checker does no inspection, can be set in an inspection area. (Some checkers cannot set a mask area. For details, see the descriptions of each checker.) Setting a Mask Area Inside mask area is excluded from inspection.
-
Page 54: Copying The Screen Display (Print Screen)
Image number: 0 to 9. Numbered consecutively within the same hour. About Save Folder of Image Files For SD card: /Panasonic MEW Vision/PV500/Screen For Ethernet: Specify with Image Receiver. Changing Destination of Image Files Select "ENVIRONMENT" > “INPUT / OUTPUT” from the menu bar. -
Page 55: Setting Inspection Conditions
Chapter 4 Setting Inspection Conditions... -
Page 56: Procedure For Setting Inspection
4.1 Procedure for Setting Inspection Set the inspection conditions in SETUP menu in the following order. Select a product type No. (Type Switch) page 55 Set camera type and capturing conditions page 58 (ENVIRONMENT > Camera, TYPE > Type Setting) Select Execution Mode condition page 74 (TYPE >... -
Page 57: Selecting A Product Type No
You can continue inspections only by switching to (calling up) the registered type if you need to inspect on the object with different conditions. Regarding types No.0 - 255 as a set of data, PV500 saves up to 100 sets of data in “Storage Space in PV500”. The data can be also saved in a SD memory card. - Page 58 Setting a Type to Be Read at Startup The type to be read at PV500 startup can be specified. This setting can be operated from ENVIRONMENT, and also the type switching window. If you change the setting in the window, the setting of ENVIRONMENT is also updated.
- Page 59 Deleting a Product Type In type selecting window, move the cursor onto the product type which you want to delete. Press the FUNC key and select “Delete” from the displayed menu. Select “Yes” following the displayed message. The type is deleted. If you select “No”, deleting is not executed. Deleting All Product Types All crated product types can be deleted at a time.
-
Page 60: Setting Capturing Conditions Of Camera
4.3 Setting Capturing Conditions of Camera Set conditions of capturing an image of an object. Camera Type: Four cameras (or two cameras) of two types can be connected. Set a type of camera for each connecting camera ports. (ANPVC1021: Discontinued as of August 2011.) Camera Trigger: When connecting multiple cameras, you can select Common Trigger or Individual Trigger. -
Page 61: Selecting A Camera Type (Environment)
4.3.1 Selecting a Camera Type (ENVIRONMENT) PV500 provides for two types of cameras and can connect two cameras or four cameras. Set a type of camera connecting to each camera port. (You can use two cameras at the same time.) Although three types of cameras are displayed for choices, "Ultra small"... -
Page 62: Setting Individual Capturing Condition By Type
4.3.2 Setting Individual Capturing Condition by Type Follow the procedure described below to set an Individual capturing condition for the type which is currently being set. Select "TYPE" > “Type Setting” from the menu bar. Select "Camera". Select "No (Individual)" for “Common Setting”. Now, the setting you are going to set applies only to the currently setting type. -
Page 63: Selecting Capture Timing (Camera Trigger)
4.3.3 Selecting Capture Timing (Camera Trigger) When using multiple cameras, images can be captured at separate timings by inputting a start signal to the cameras. This is "Individual Trigger”. On the other hand, the trigger starting image capturing with multiple cameras simultaneously is “Common Trigger”. - Page 64 Restrictions on when waiting for Individual Trigger Note the following restrictions on when waiting for Individual Trigger (at the time of "To" in the above figure) without using the timeout function. "Type Switch" and "Read Setting Data" with signals from the external device Type Switch or Read Setting Data will be executed if the signal of Abort Inspection/Process or the signal of the rest of Image Capture is input within 10 seconds from input of Type Switch signal or Read Setting Data signal.
- Page 65 About Detect Trigger (common) This function detects an inspect target inside the inspection area with Position Adjustment No.0. It repeats image capturing and execution of Position Adjustment No.0 until the Position Adjustment detects the target (Judgement = OK), and then other checkers are executed and results are output.
-
Page 66: Setting Capturing Condition For Each Camera
Select desired shutter speed. To observe the image easily, set “Window Transparency (SETUP menu)” to a larger value. On PV500 Ver.1.50 or older, the shutter speed is selected from the following values. 30μs, 100μs, 250μs, 500μs, 1ms, 5ms, 10ms, 50ms, 100ms, 500ms, 1000ms. - Page 67 Image data (10-bit) loaded in a camera has a value in the range of 0 to 1023. This value is a camera gray value. As PV500 performs image processing with 8-bit gray images in the range of 0 to 255, inspection images are converted to data in the range of 0 to 255.
- Page 68 Gain Range: 0.25 to 1.00 (Initial Value: 0.50) Setting unit: 0.01[Indication of setting] - When using 100% of camera gray value Camera gain = Max. value of PV500 gray value (255 fixed) / Max. value of camera gray value = 255 / 1023 = Approx.
- Page 69 Setting Offset What is Offset? Set which brightness in camera gray values is used as 0 for inspection gray values when converting the camera gray values to the inspection gray values (0 to 255). The brightness in the camera gray values (in the range of 0 to [Offset]) is regarded as 0 for the inspection gray value.
- Page 70 Difference in images set by Camera Gain and Offset The following figure shows the images on which "Camera Gain" and "Offset" are set. Offset Gain 0.25 0.50 0.75 1.00...
- Page 71 Setting Delay Time from START Signal Input to Image Capture Specify the time after inputting START 0-3 signals before cameras start capturing. Default value is “0”. After signal input, the camera starts image capture without delay. Use it as necessary. This setting can be set individually for each camera.
- Page 72 Capturing a Part of Image (Partial Imaging) This function takes a part of image captured by camera in PV500. (The size of image is 640 x 480 pixels for ANPVC1040 and ANPVC1021 and ANPVC5030, and 1600 x 1200 pixels for ANPVC1210.) Decreasing area to be taken shortens capturing time.
- Page 73 Changing the Coordinate Origin and Unit (Calibration) Calibration is the function that changes detected data of checkers from pixel unit into actual measure and moves coordinate origin to a desired position. Calibration can be set by a camera. After calibration is set, the data detected by checkers is output in calibrated value. Enter the tolerance in calibrated value in the checkers which detect position (coordinate) or measurement.
- Page 74 Changing Coordinate Origin The coordinate origin is set at upper left position of the image as the default. You can change this position. Select the camera No. to set in “Camera” window. Select "Calibration". “Calibration” window is displayed. Set “Calibration” to “Yes”. Now you can set all items.
-
Page 75: Error If Checker Area Outside Image
4.3.5 Error if Checker Area Outside Image This function cancels the checker when its area is outside an image captured by a camera after Position Adjustment or Area Size Adjustment adjusted the area as the figure on the right. In this case, the checker returns "Error". ·... -
Page 76: Inspecting Divided Type (Execution Mode)
4.4 Inspecting Divided Type (Execution Mode) In PV500, checkers can be divided by checker number to execute just one checker, multiple checkers or all checkers. Divided part is “Block” and the mode to decide how to execute is “Execution mode”. -
Page 77: Inspecting In "Execute All" Mode
Referring the results of other blocks In Execute All mode, all the set checkers are executed, however, some blocks are not executed in Automatic Switch mode or User Defined mode. When referring the result of other blocks, note that it may not work properly depending on the operation mode used even though it can be set. - Page 78 Flow concept The number of the executed block is displayed in the information area.
- Page 79 Specifying Execution Mode and Number of Blocks Select "TYPE" > “Type Setting” from the menu bar. “Type Setting” window is displayed. Select "Execution Condition". Select “Automatic Switch” for “Execution Mode”. Enter the number of blocks 2 to 10 for “Number of Blocks”. Setting a Branch Condition Select "INSPECTION”...
-
Page 80: Inspecting In "User Defined" Mode
4.4.4 Inspecting in “User Defined” Mode In this mode, inspections are executed by each block. Specify a block No.0 to 9 when inputting start signal from the external devices. (I/O input, serial command communication or Ethernet command communication.) The checkers, the numerical calculations, and the judgements belong to specified block are executed and output. The number of the executed block is displayed in the information area. -
Page 81: Capturing An Image
A test run is executed and an image is captured. You can call up the images saved in PV500 or a SD memory card to set checkers and execute a test. About how to save and read images, refer to Chapter 4.16, page 280. -
Page 82: Image Preprocessing (Slice Level / Preprocess)
4.6.1 Binarizing an Image (Slice Level) In PV500, up to 26 sets of slice level (A to Z) can be registered, which is called slice level group. Which slice level group is used to inspect an image is set in the checker setting window. -
Page 83: Setting Preprocess
4.6.2 Setting Preprocess In PV500, up to five sets of preprocess (A to E) can be registered per type and camera. The sets of preprocess A-E are preprocess groups. Up to 10 steps of filters can be set for a preprocess group. PV500 also has a function to temporarily disable a part of the specified 10 steps. - Page 84 Direction is to apply the selected preprocess and the options are X, Y, and X/Y. Set 2ND to 10TH process as necessary. When multiple steps are set, PV500 processes from 1ST step in numeric order. After setting is completed, press the CANCEL key.
- Page 85 Preprocess Filter List Index 1 · Denoising Main application: · Size: 3x3, 5x5, 7x7, 9x9 Common parameter: Direction: X/Y, X(only), Y(only) Dilation Dark (or black) noises are removed. Black areas in the image of the object contract. White areas in the image of the object expand. Erosion Light (or white) noises are removed.
- Page 86 Correction Setting Divides 256 gray levels into 8 groups. Nine-point gray levels are specified. It is possible to change a specific level. Area Averaging In Area Averaging, the pixel with the gray level of "Center Gray Level" +/- "Noise Range" is converted to "Center Gray Level". When "Center Gray Level"...
- Page 87 Move the cursor onto the point you want to change the value and press the F2 "Auto Adjustment". The value for the selected gray level (at the point marked with a black circle on the graph) is displayed. Tilt the ENTER key up/down to specify the value. Changing the value moves the point on the luminance graph up/down.
- Page 88 Edge Extract X In the X direction, extracts the area of which grayscale value changes. Edge Extract Y In the Y direction, extracts the area of which grayscale value has been changed. Sharpen Enhances the area of which grayscale value changes. The image becomes sharp.
- Page 89 Setting Dynamic thresholding Binarizes pixels using the threshold that is calculated by adding the offset value to the gray average of the specified size. The pixels with the gray level over the threshold change to white, and the pixels with the gray level below the threshold change to black.
- Page 90 Index 6 Main application: Rotation and Reflection Rotation Rotate the whole captured image at a specified angle. The gray level can be specified for the blank spaces of the image created by the rotation (i.e. the gray area in the right figure). When rotating the image partially captured, the area out of the capturing range is also displayed with the specified...
-
Page 91: Setting Inspection Area And Conditions (Checker)
Checker is a general term of the areas and the conditions for inspecting a captured image. Sixteen types of checkers are available in the PV500. You can set up to 1000 checkers per product type and checker type (when the number of used blocks is 10). However, the maximum number of checkers available for a type is 1000. - Page 92 Calculates gray average value within the segmented area (cell) in a line, arc and circle or rectangular area. If the PV500 detects an area more than a certain level of difference in average gray, the device judges it as a flaw.
- Page 93 Smart Edge (Line) Available from Ver.2.0 Main application: Detection of the position or angle of uneven end face. Description: Detects the approximate line based on the coordinate value of the edge of the end face detected by setting a number of cells. Detecting the coordinate value or angle of the approximate line enables the detection of the position or angle of the object by setting only one checker.
-
Page 94: Creating A Checker
4.7.2 Creating a Checker Creating a New Checker Select “INSPECTION” > "Checker". Select a checker type to create in "Checker Type". Select the checker No. list and specify a checker number to create. A new checker of the specified type is created and setting window is displayed. - Page 95 Displaying a checker list The checker list shows created/uncreated checker, comment, camera number and inspection result. Checker status, Comment The column on the right of checker number shows comments. The comments input in the checker setting window are displayed. When you have not set a comment for the checker, the list shows “Enter Comment”.
- Page 96 Selecting Display Pattern on Screen Window Set the display methods of various patterns to be displayed on the screen window in SETUP Menu. The display methods are selected for the following patterns. · Arrows indicating the inspection area and scan direction of checkers (including Position Adjustment and Area Size Adjustment) ·...
- Page 97 Pattern Display Hide Pattern This selection is kept until you cut the power of PV500. Once you reboot PV500, the patterns will be displayed. Common settings for checkers The procedures for setting Preprocess, selecting Slice Level group and selecting Position Adjustment group set for each checker are common to all checkers.
-
Page 98: Moving Checkers In Group
4.7.3 Moving Checkers in Group When you want to move the checker areas after creating checkers, you can move the areas of checkers set for each camera by checker types or setting value of Position Adjustment. This function is helpful to move several checkers or to move them keeping the positions between them. Select “INSPECTION”... -
Page 99: Line
4.7.4 Line What is Line? Line checker binarizes an image captured by a camera and counts target colored pixels and the number of objects on a line. Judges as OK/NG according to those values. Output Data No. of Pixels: Outputs in the number of target colored pixels on the line. No. - Page 100 Selecting Preprocess / Slice Level / Position Adjustment page 95 Setting an Inspection Area Set a line which is the inspection span. You cannot set a Mask Area in Line checker. Select “Area Setting” in “Line” setting window. Select "Area Setting". Area setting window is displayed.
- Page 101 Dilation and Erosion on Binary Image (Filter) This is the function that dilates or erodes the pixels of color selected for target color to count. Use this function mainly when you delete a slight noise or enhance a detected area. If applying this function is not necessary, proceed to the next step.
- Page 102 Setting Judgement Limits Set tolerance (Maximum and Minimum values) of the counted pixels and objects. If the counted pixels and objects are within the tolerance, the object will be judged as "OK", if it is out of it, the object is judged as "NG". Select "Judgement Limits".
-
Page 103: Binary Window
4.7.5 Binary Window What Is Binary Window? Binary Window binarizes an image captured by a camera and measures an area or the number of white or black pixels. Judges as OK/NG according to the measured area. Output Data Area: Outputs in the number of pixels. Judgement: If the number of detected area is within the allowable range you have set, the object will be judged as "OK", if it exceeds the allowable range, the object will be judged as "NG". - Page 104 Setting an Inspection Area Set a range to measure area. Select “Area Setting” in “Binary Window” setting window. Select "Area". “Area Setting” window is displayed. Select a shape of inspection area from “Change Shape”. Select from Rectangle, Ellipse, Circle and Polygon. Select “Change”...
- Page 105 Setting Judgement Limits Set a tolerance (Maximum and Minimum values) of the measured area. If the measured area is within the tolerance, the object will be judged as "OK", if it is out of it, the object is judged as "NG". Select "Judgement Limits".
-
Page 106: Gray Window
4.7.6 Gray Window What Is Gray Window? Gray Window calculates the gray average of the inspection area based on the gray values of every pixel on a gray image captured by a camera. And then the checker judges as OK/NG using the value. Output Data Gray Average: Average of gray value within an area. - Page 107 Setting an Inspection Area Set an area to measure gray average. Select “Area Setting” in “Gray Window” setting window. Select "Area". “Area Setting” window is displayed. Select a shape of inspection area from “Change Shape”. Select from Rectangle, Ellipse, Circle and Polygon. Select “Change”...
-
Page 108: Binary Edge
4.7.7 Binary Edge What Is Binary Edge? Binary Edge binarizes an image captured by a camera and detects an edge between white and black pixels. The checker judges as OK or NG in accordance with the number of detected points. Detect Example) Condition: Scan direction = Horizontal... - Page 109 Setting an Inspection Area Set a range to detect an object. You cannot set a Mask Area in Binary Edge checker. Select “Area Setting” in “Binary Edge” setting window. Select "Area (Set)”. “Area Setting” window is displayed. Select a shape of inspection area from “Change Shape”. Select from Line and Plane.
- Page 110 Edge Condition (White -> Black(-) / Black -> White(+) / Both) White -> Black(-) Black -> White(+) Both Detects a point changing from Detects a point changing from Detects both point from white to white to black as an edge. black to white as an edge.
- Page 111 Setting Judgement Limits Set a tolerance (Maximum and Minimum values) of the number of detected edges. If the number of detected edges is within the tolerance, the object will be judged as "OK", if it is out of it, the object will be judged as "NG". Select "Judgement Limits".
-
Page 112: Gray Edge
4.7.8 Gray Edge What Is Gray Edge? Gray Edge detects a brightness changing point (edge) on a grayscale image and judges as OK or NG in accordance with the number of detected points. This function is effective if the variation in image brightness is small and the contrast of an edge is low. - Page 113 Selecting Preprocess / Slice Level / Position Adjustment page 95 Setting an Inspection Area Set a range to detect an object. You cannot set a Mask Area in Gray Edge checker. Select “Area Setting” in “Gray Edge” setting window. Select "Area (Set)". “Area Setting”...
- Page 114 Press the FUNC key and select a scan direction “Clockwise” or “Counterclockwise”. Default is “Clockwise”. Tilt the ENTER key left/right to specify a start point and an end point. Tilting it right moves the start/end point clockwise and tilting left moves counterclockwise.
- Page 115 Edge Condition (Light -> Dark/ Dark-> Light/ Both) Light ->Dark Dark-> Light Both (default) Detects a pixel that changes from Detects a pixel that changes from Detects a pixel that changes both high gray to lower gray (or from low gray to high gray (or from from light to dark and from dark light to dark).
- Page 116 Average Range This item decides how many pixels from the detected edge positions are averaged. If the desired position cannot be detected as a result of the test using the default value, change the Average Range value. Increasing the Average Range value detects the position slightly inside the edge of the object. Decreasing the value detects the position on the edges of the object.
-
Page 117: Feature Extraction
4.7.9 Feature Extraction What Is Feature Extraction? Feature Extraction binarizes an image captured by a camera, detects a specified size of clusters of white or black pixels (hereinafter called “object”), and then judges as OK or NG depending on the measured number. The checker outputs the feature quantity such as the coordinates of a center of gravity or principal axis angle (+/-90 degrees). - Page 118 Selecting a Camera Select a camera image to set Feature Extraction checker. Select “Area Setting” in “Feature Extraction” setting window. Select a camera No. in “Camera”. The selected camera image is displayed. Select a displayed image type (Live/Memory or Gray/Binary) or magnification in “Image Menu” opened by pressing the F1 key.
- Page 119 Select a Target Color Set to detect which object of white or black on a binary image. Select “Inspection Condition” > "Target". Select “White” or “Black” to detect. White (default): Detects a white object. Black: Detects a black object. Dilation and Erosion on Binary Image (Filter) This is the function that dilates or erodes the pixels of color selected in “Target”.
- Page 120 Selecting Feature Data to Measure Select feature quantity data to measure on a detected object. Setting unnecessary items to “No” decreases the inspection time. Selectable feature data types are Perimeter, Projection Width/Height and Principal Axis Angle. Select "Search Method". Set whether or not to detect Perimeter, Projection Width/Height and Principal Axis Angle.
- Page 121 Set the Condition of Objects to Detect (Extraction Condition) Set the range of area, projection width, and projection height of objects to detect. Setting example of an area In the right figure, setting “Min. Object Area” to 100 detects 10 objects. Select “Extraction Condition”...
- Page 122 Running a Test Confirm if the current settings perform an inspection properly. To observe the image easily, set ““Window Transparency (SETUP menu)” to larger value. (“Changing Window Transparency (SETUP Menu)”, page 341 ) Press the TRIG key. When a live image is displayed on the screen, PV captures a new image first and runs a test.
-
Page 123: Smart Matching
Smart Matching of PV500 can register up to 64* templates per checker. This checker is suitable to detect a target having variable image pattern or to recognize its type. - Page 124 Selecting a Camera Select a camera image to set “Smart Matching” checker. Select “Area Setting” in “Smart Matching” setting window. Select a camera No. in “Camera”. The selected camera image is displayed. Select a displayed image type (Live/Memory and Gray/Binary) or magnification in “Image Menu” opened by pressing the F1 key.
- Page 125 Select a shape of template area from “Change Shape”. Select from Rectangle, Ellipse, Circle and Polygon. Select “Change” and set a template area. Refer to section of Drawing an Inspection Area (page 47). The maximum size to draw (the size of a circumscribing rectangle of the area) is as follow.
- Page 126 Selecting a Template from Common Image Patterns Other than templates created in each Smart Matching, PV500 provides with a function that saves common templates to all types, including Position Adjustment and Area Size Adjustment, that can be selected in all Smart Matchings as common using templates.
- Page 127 For example, the total number of templates is five in the figure at the previous page. After copying the templates to each checker, the total number is seven as the figure below which is increased by two. You cannot reset to "Per Checker“ when inadequate memory of PV500 or excessive number of registration prevents copying the templates.
- Page 128 After drawing is completed, press the CANCEL key. The set image pattern is registered as a template. Select “Register” for "To template #". (“#” indicates the number you have specified in step 1.) Through these steps, you can register the commonly saved template in “Template #”.
- Page 129 Selecting from Saved Common Template List Select a template No. in template setting window. A list of commonly saved templates is displayed. Select a template to use. Select “Register” for "To template #". (“#” indicates the number you have specified in step 1.) Through these steps, you can register the commonly saved template in “Template #”.
- Page 130 Set "Position". “Set Position” (Default): To register the image pattern within the template of selected Smart Matching. “Adjusted Position”: To execute the Position Adjustment relating to the selected Smart Matching and reregister the image pattern within the template of selected Smart Matching. .
- Page 131 Setting a Search Area Set the range to search the same image pattern as a template. You cannot set a Mask Area in the search area of Smart Matching checker. Select “Area Setting” in “Smart Matching” setting window. Select "Search Area". “Area Setting”...
- Page 132 Detecting Black/White Reversed Image To detect an image which has reversed gray level of registered image Template pattern, use the function of “Detect B/W Reversed Template”. This function allows to perform an inspection without lowering correlation value because of image reversal. Detecting Image Select "Inspection Condition".
- Page 133 ↓ Low Contrast • Lower contrast Slow • Position detection Select "Inspection Condition". Select “Low Contrast” for “Detect Mode”. The “Filter Adjustment” button is activated. Run a test in the current status. If an object cannot be detected stably, make filter adjustment. Filter Adjustment The Filter Adjustment function binarizes an object image and background using multiple items.
- Page 134 Template Rotated by 180d Use this function when running a test with a specified Rotation Range setting detects a180-degree reversed image by mistake, or a 180-degree reversed image is similar to the image pattern registered as a template. Select "Inspection Condition". .
- Page 135 The Items can be Confirmed in Sequence No. of Objects Number of the objects that were detected in each step. Correlation Value* Correlation value of the objects detected at each step. If multiple parts are detected in each step, the lowest correlation value is displayed.
- Page 136 Using Subtraction Function Subtraction function extracts a pixel that exceeds a certain degree of the difference in the gray value comparing the detected area and the template. With this feature, the PV can detect up to 128 subtraction parts that are difficult to reflect in the correlation value.
- Page 137 Running a Test and Confirming Result Confirm if the current settings perform an inspection properly. To observe the image easily, set “Window Transparency (SETUP menu)” to larger value. (“Changing Window Transparency (SETUP Menu)”, page 341 ) Press the TRIG key. When a live image is displayed on the screen, PV captures a new image first and runs a test.
-
Page 138: Flaw Detection
The checker calculates gray average value within the segmented area (cell) on a line, an arc, or a circumference, or in a rectangle. If the PV500 detects an area more than a certain level of difference in average gray, the device judges it as a flaw. - Page 139 Selecting a Camera Select a camera image to set “Flaw Detection”. Select “Area Setting” in “Flaw Detection” setting window. Select a camera No. in “Camera”. The selected camera image is displayed. Select a displayed image type (Live/Memory and Gray/Binary) or magnification in “Image Menu” opened by pressing the F1 key.
- Page 140 Drawing an Area: In the case of Area Shape = Line Set a start point (ST) and an end point (ED). You can set an area in the vertical and oblique directions as well as in the horizontal direction. Set the size of a cell (W) which is a rectangle calculating the average brightness.
- Page 141 In the case of Area Shape = “Plane” Scan direction: Horizontal Scan direction: Vertical . Set a start point and an end point. Set a start point (STX, STY) and an end point (EDX, EDY). PV scans from the start point to the end point.
- Page 142 In the case of Area Shape = “Ellipse” . Set the coordinates of the center of a circle as CPX and CPY, and set the radius in the X and Y directions of a circle as RX and RY. An inspection area (circle) and the rectangle circumscribing around it are displayed.
- Page 143 How to exclude from inspection (Mask area) Mask areas, where checker does no inspection, can be set in an inspection area. For Flaw Detection, set a first cell and an end cell of the range to be excluded from inspection. The number of mask areas is not limited.
- Page 144 Inspecting in “Differential” Mode Principle of “Differential Mode” of Flaw Detection Process description Image The checker calculates the brightness (average gray value) of each rectangular area, which is called cell, created in a certain size within the inspection area. If the calculated average brightness of the cells is more than the “threshold value”...
- Page 145 Inspecting in “Gray Range” Mode Principle of “Gray Range Mode” of Flaw Detection If the PV failed to detect any flaw after testing in Differential mode, try to test again after switching to Gray Range mode. Gray Range mode is effective to inspect the object with a surface of uneven brightness, but it will take longer time to process than Differential mode.
- Page 146 Setting Procedure Select "Search Method" in “Flaw Detection” setting window. Select “Gray Range” for “Detect Mode”. “Num. of Cells for Calc. Range” and ”Num. of Cells per Shift” become settable. Set “Num. of Cells for Calc. Range” and ”Num. of Cells per Shift”. Num.
- Page 147 Setting Judgement Limits Set a tolerance (maximum and minimum values) of the number of detected flaws. If the number of detected flaw is within the tolerance, the object will be judged as "OK", if it is out of it, the object will be judged as "NG". Select "Judgement Limits".
-
Page 148: Connector (Binary Window) And Connector (Gray Window)
4.7.12 Connector (Binary Window) and Connector (Gray Window) What are Connector (Binary Window) and Connector (Gray Window)? These are the functions that mainly perform appearance inspection such as foreign objects detection on IC pins. Connector (Binary Window) measures areas of multiple Binary Window cells set on the inspection line and outputs the measured areas. - Page 149 Selecting a Camera Select a camera image to set a checker. Select "Area Setting". Select a camera No. in “Camera”. The selected camera image is displayed. Select a displayed image type (Live/Memory or Gray/Binary) or magnification in “Image Menu” opened by pressing the F1 key.
- Page 150 Setting Judgement Limits Set a tolerance (Maximum and Minimum values) of area or gray average measured in each cell. If the detected data are within the tolerance, the object will be judged as "OK", if they are outside of it, the object will be judged as "NG".
- Page 151 Registering Inspection Results in Numerical Calculation (This is supported in Ver.1.30 or later.) The detected Area of cells (for Connector (Binary Window)) or Gray Average (for Connector (Gray Window)) and Judgement can be registered into Numerical Calculation from the checker setting window. Although you can register them also in Numerical Calculation setting window, information of many cells can be registered efficiently with less operation from the checker setting window.
- Page 152 Registering into Data R/W (This is supported in Ver.1.30 or later.) The detected Area of cells (for Connector (Binary Window)) or Gray Average (for Connector (Gray Window)), Judgement Limits, and Judgement can be registered into Data R/W from the checker setting window. Although you can register them also in Data R/W setting window, information of many cells can be registered efficiently with less operation from the checker setting window.
-
Page 153: Connector (Gray Edge)
4.7.13 Connector (Gray Edge) What is Connector (Gray Edge)? This checker measures gaps of IC pins, pitch and float of leads, and parts size (outside/inside diameters). It uses multiple Gray Edge checkers on a line in the area to detect edges of pins and an object, and helps to inspect on a connector IC with many pins. - Page 154 Specifying Checker No. Select “Connector (Gra. Edg.)” in "Checker Type". Select the checker No. list and specify a checker number to set. Press the ENTER key to determine the checker No. “Connector (Gra. Edg.)” setting window is displayed. The gray image is displayed on the screen window. Selecting a Camera Select a camera image to set Connector (Gray Edge) checker.
- Page 155 In the case of Execution Mode = Gap The procedure described below is for area setting and other inspection conditions when Execution Mode is set to “Gap”. Setting an Inspection Area You cannot set a Mask Area in Connector checker. Select “Area Setting”...
- Page 156 • Right -> Left • Left -> Right (Checker (Checker Direction Direction =Vertical) =Vertical) For the information of the following conditions, refer to the chapter of Gray Edge checker (page 110). · Inspection Condition - "Scan Method”, “Edge Condition", “Detected Position” ·...
- Page 157 In the case of Execution Mode = Float The procedure described below is for area setting and other inspection conditions when Execution Mode is set to “Float”. Setting an Inspection Area You cannot set a Mask Area in Connector checker. Select “Area Setting”...
- Page 158 Setting Edge Conditions Specify the condition of detecting edges and scanning. Select "Inspection Condition". Set "Detect Direction". Set a Detect Direction which is suitable for the captured image. For the image shown below, setting “Outside -> Inside” detects edges correctly. •...
- Page 159 Press the TRIG key to execute a test. Press the F1key to display the image and confirm that all parts are detected stably.
- Page 160 Setting Judgement Limits Set a tolerance (maximum and minimum values) of the values of detected floats and “Distance Difference”. If the floats and distance difference are within the tolerance, the object will be judged as "OK", if they are out of it, the object will be judged as "NG".
- Page 161 In the case of Execution Mode = Pitch The procedure described below is for area setting and other inspection conditions when Execution Mode is set to “Pitch”. Setting an Inspection Area You cannot set a Mask Area in Connector checker. Select “Area Setting”...
- Page 162 Setting Edge Threshold Decide a threshold value of differential in detecting area. Only the areas with differential value which is higher than this threshold are subjected to detect. The threshold can be set in two ways, common setting and individual setting. The common setting sets the same value for all pins and the individual setting sets separate values.
- Page 163 In the case of Execution Mode = Width Measurement The procedure described below is for area setting and other inspection conditions when Execution Mode is set to “Width Measurement”. Setting an Inspection Area You cannot set a Mask Area in Connector checker. Select “Area Setting”...
- Page 164 Deciding Differential Threshold Decide a threshold value of differential in detecting area. Only the areas with differential value which is higher than this threshold are subjected to detect. The threshold can be set in two ways, common setting and individual setting. The common setting sets the same value for all Gray Edge cells and the individual setting sets separate values.
- Page 165 Running a Test and Confirming Result Confirm if the current settings perform an inspection properly. To observe the image easily, set “Window Transparency (SETUP menu)” to a larger value. (“Changing Window Transparency (SETUP Menu)”, page 341 ) Press the TRIG key. When a live image is displayed on the screen, PV captures a new image first and runs a test.
- Page 166 Registering Inspection Results in Numerical Calculation (This is supported in Ver.1.30 or later.) The detected coordinate and differential value of cells and judgement can be registered into Numerical Calculation from the checker setting window. Although you can register them also in Numerical Calculation setting window, information of many cells can be registered efficiently with less operation from the checker setting window.
-
Page 167: Smart Edge (Circle)
4.7.14 Smart Edge (Circle) (Available from Ver.1.6) What is Smart Edge (Circle)? Smart Edge (Circle) is a function to output the center point, radius or diameter of a round object by detecting edges of the object with a number of cells. It is suitable for the detection of a missing edge and burr of a round object, angle of a convex (or concave) part, the inspection of circularity and the calculation of the angle of the diameter position of an ellipse. - Page 168 Specifying Checker No. [Select “Smart Edge (Circle)” in "Checker Type". Select the checker No. list and specify a checker number to set. Press the ENTER key to determine the checker No. “Smart Edge (Circle)” setting window appears. The gray image is displayed on the screen window. Selecting a Camera Select a camera image to set “Smart Edge (Circle)”...
- Page 169 Selecting a Preprocess Group Set a preprocess filter to apply on an image captured by a camera as necessary. Select “Virtual Circle Detect Condition” > "Preprocess". “Preprocess” window is displayed. Select a Preprocess group (A to E) in “Preprocess”. For details of preprocess, refer to page PAGEREF. After setting is completed, press the CANCEL key.
- Page 170 Setting Detect Mode Select “Virtual Circle Detect Condition” > "Detect Mode". Select a desired Detect Mode from the list. Depending on the selected Detect Mode, detected data items to be displayed at the bottom of the screen vary. Detect Mode •...
- Page 171 b) Maximum, minimum and average of measurement values Calculates the radius, diameter or width using the edges detected by each cell. Then, calculates the maximum, minimum and average values for the remaining data except the data judged as noises. The criterion to judge data as noises is decided by "Denoising" function. As the graph displayed on the screen (described below) shows the maximum and minimum values before denoising, the values of the graph may be different from the output values.
- Page 172 About Graphs and Cell results to be displayed Measurement values of each cell obtained from test results are displayed as graphs in Smart Edge (Circle). The graph shows the status of edge detection for each cell or whether they are within edge threshold as marks. It is also possible to shows a list of the status of edge detection or detection data for all cells.
- Page 173 Checking result and data of each cell Press the FUNC key and select “Cell Result” from the pop-up-menu. Cell number, judgement, measurement values, deviation, coordinate and differential are listed for all the set cells. The selected cell is displayed in pink on the screen window.
- Page 174 Displaying only the cells of a specific judgement result It is possible to display only the cell data of a specific result such as the cells judged as NG or the NG and excluded cells. Press the FUNC key when displaying the cell result list and select the type of the cells to be displayed from the pop-up menu.
- Page 175 Set a pitch of the angle to arrange the cells (cell X (Left/right key of Y (Up/down key of the keypad) the keypad) pitch) in 0.1 degree (*1). CP X coordinate of the Y coordinate of the When it is set to 10.0 (Default), 36 cells are arranged center of the circle center of the circle at every 10 degree for measuring whole...
- Page 176 Edge Detect Condition Set conditions of detecting edges of an object. Select "Edge Detect Condition". The list of the conditions for detecting edges and the graph is displayed. When Detect Mode is "Measure Width", two sets of conditions are provided. Setting these conditions enables the 2 edges of the outer circle and inner circle to be detected with different conditions.
- Page 177 How to read a graph when setting a threshold Pointing the cursor to "Edge Threshold" displays the graph of differentials of edges. Decide the appropriate threshold referring to the detection result and differential of each cell in "Cell Result" and this graph. Vertical axis: It indicates differential.
- Page 178 Select "Edge ratio used(%)".] The menu for setting "Edge ratio used" appears in the upper left of the screen. The screen window can be checked. Default: 80 (%) ○ When "Edge ratio used" is 100, all the detected edges are indicated with " "(light blue).
- Page 179 Setting Base Angle Select a base angle from the following three types for detecting the angles of the maximum and minimum values of radius, diameter or width. This setting affects the display of the lower horizontal axis of the graph that is displayed on the setting window.
- Page 180 Output example of angle Condition Start Angle: 45 degree End Angle: -45 degree Max. value (Max. angle): Projection Detection angle Position/Rotation Adjustment, Rotation Adjustment Yes: Adjustment angle = 30 degree X Direction 120 degree 120 degree Detects from the right side of X axis to the Detects from the right side of X axis (before maximum position.
- Page 181 Setting Judgement Condition Perform judgement for the following four conditions respectively. When all the conditions are met, the judgement result of the checker will be OK. · Measurement: Radius, Measurement: Diameter, Measurement: Width · Standard deviation (Standard deviation calculated from the result of measurement) ·...
- Page 182 Set "Denoising Range". Set the denoising range checking the graph or the result of each cell (Cell Result). Refer to page 171 for details of Cell Result. The figure below shows an example that Denoising is not used. Multiple edges in the two areas are targeted for measurement.
- Page 183 Setting Judgement Limits Select the table of maximum/minimum values in "Judgement Limits" setting window. Specify the maximum and minimum measurement values of radius (diameter/width). As the maximum and minimum measurement values are displayed at the bottom of the screen, make the setting checking it.
- Page 184 Running a Test and Confirming Result Confirm if the current settings perform an inspection properly. To observe the image or checker pattern easily, set “Window Transparency (SETUP menu)” to a larger value. (“Change Window Transparency (SETUP Menu)”, page 341 ) Press the TRIG key.
-
Page 185: Smart Edge (Line)
4.7.15 Smart Edge (Line) (Available from Ver.2.0) What is Smart Edge (Line)? Smart Edge (Line) is a function to calculate an approximate line using the coordinate values detected with a number of cells. Detecting the line of the edge face enables the detection of the angle of the object even if the object has a rough face. - Page 186 Specifying Checker No. [Select “Smart Edge (Line)” in "Checker Type". Select the checker No. list and specify a checker number to set. Press the ENTER key to determine the checker No. “Smart Edge (Line)” setting window appears. The gray image is displayed on the screen window.
- Page 187 Selecting a Camera Select a camera image to set “Smart Edge (Line)” checker. Select “Area Setting” in “Smart Edge (Line)” setting window. Select a camera No. in “Camera”. The image of the selected camera is displayed. Select a displayed image type (Live/Memory and Gray/Binary) or magnification in “Image Menu” opened by pressing the F1 key.
- Page 188 Execution Sequence of Smart Edge (Line) Related parameters • Area Setting (page 191) Detection of edges of target area • Edge Detect Condition (page 174) • Detection Detection of approximate line ┐ Method ├page 193 • Edge ratio ┘ used •...
- Page 189 Select “Approximate Line Detect Condition” > "Detect Mode". Select a desired Detect Mode from the list. Depending on the selected Detect Mode, detected data items to be displayed at the bottom of the screen vary. Detect Mode • Measure Deviation •...
- Page 190 About Positive and Negative of Deviation Data The deviation data detected when Detect Mode is "Measure Deviation" is positive or negative depending on the scan direction (of the cell). When the scan direction (upper dashed arrow) is from left to right, the right area across the approximate line is positive and left area is negative as the right figure When the scan direction is the other way, the...
- Page 191 About Graphs and Cell results to be displayed Measurement values of each cell obtained from test results are displayed as graphs in Smart Edge (Line). The graph shows the status of edge detection for each cell or whether they are within edge threshold as marks. It is also possible to show a list of the status of edge detection or detection data for all cells.
- Page 192 Checking result and data of each cell Press the FUNC key and select “Cell Result” from the pop-up menu. Cell number, judgement, measurement values, coordinate and differential are listed for all the set cells. The selected cell is displayed in pink on the screen window.
- Page 193 Setting Inspection Area Set the position and size of the area and the size of cells to detect edges of the object by the cells. Select “Area Setting” in “Smart Edge (Line)” setting window. Select "Area Setting" > "Change". Move the whole area by operating the ENTER key and press the ENTER key. Specify "Start point (ST)"...
- Page 194 Assignment of cell numbers Mask Area Include Cell numbers are assigned to the arranged cells from the start point. When a mask area has been set, it is also possible not to assign a cell number to the mask area (to skip the cell in the mask area). Select "Approximate Line Detect Condition".
- Page 195 When Detect Mode is "Measure Width", two edges are detected with one cell. The following is the example that the start point of the area is regarded as the position at six o'clock. Condition Conditi Scan Method on 1 -> ->...
- Page 196 Details Mode (Default): When an object has projections or concave surface, using this mode enables those edge coordinates not to use for calculating an approximate line. First, detects an approximate line using all the edge coordinates, and then detects the final approximate line only using the edge coordinates in "Edge ratio used"...
- Page 197 Setting Judgement Condition Perform judgement for the following four conditions respectively. When all the conditions are met, the judgement result of the checker will be OK. · Measurement: Deviation, Measurement: Distance or Measurement: Width · Standard deviation (Standard deviation calculated from the result of measurement) ·...
- Page 198 Set "Denoising Range". Set the denoising range checking the graph or the result of each cell (Cell Result). Refer to page 189 for details of Cell Result. The figure below shows an example that Denoising is not used. Multiple edges in the two areas are targeted for measurement.
- Page 199 Specify the maximum and minimum values of standard deviation and linearity. As the current value of each condition is displayed at the bottom of the screen, make the setting checking Specify the maximum value for "Unused Edge Count". Default: 2998 The current value of the unused edge count (test result) is displayed on the left of the screen.
-
Page 200: Adjusting Area Position (Position Adjustment)
You can set up to 1000 position adjustment checkers per type (when 10 blocks are used). PV500 has multiple types of position adjustments to detect the position and the rotation angle of an object. Position Adjustment (Horizontal/vertical shift amount) After each checker detected the position of the object, Position Adjustment calculates the misalignment between the object and the base position. -
Page 201: Position Adjustment Type
4.8.2 Position Adjustment Type Position Adjustment Binary Edge and Gray Edge These checkers detect in the same method of Binary Edge checker and Gray Edge checker. The X/Y coordinates of the detected edge is considered as a base position. They also have the Center detection function which decides a base position by calculating the middle of the detected two points both in horizontal and vertical directions. - Page 202 Smart Edge (Line) This checker detects an object in the same method of Smart Edge (Line) When the horizontal base checker and vertical base checker are both set, the intersection point of two approximate lines will be considered as the base position. When only the horizontal base checker or vertical base checker is set, the intersection point of the approximate line and the line passes through the center of the inspection area will be considered as the...
- Page 203 Smart Edge (Line) This checker detects an object in the same method of Smart Edge (Line) The intersection point of two approximate lines detected with two base checkers is considered as the base position, and the angle of the median on two approximate lines is considered as the base angle.
-
Page 204: Setting A Position Adjustment
Smart Edge (Line) (Horizontal), Smart Edge (Line) (Vertical) The angle of the approximate line detected in the same method of Smart Edge (Line) is considered as the base angle. The base coordinate is the intersection point of the line passing through the center of the inspection area and the approximate line. - Page 205 Creating a Base Checker Select "Base Setting" in “Checker Settings” setting window. Now, it is ready for base checker setting. Select a base checker to set. The setting window of selected base checker is displayed. Set necessary items. The setting procedure is the same as the other checkers.
- Page 206 When adjusting position by detecting the center Select "Base Setting" in “Checker Settings” setting window. Now, it is ready for base checker setting. At this moment, “Detect Center” cannot be selected. Select base checkers to detect the center (Horizontal base checker 0 and Vertical base checker 2).
- Page 207 Deleting a Base Checker With Position Adjustment - Binary Edge/ Gray Edge/ Smart Edge (Line), adjusting only either of horizontally or vertically can be performed. To delete (restore to be unset) the horizontal base checker or vertical base checker that has been "Set", operate from the pop-up menu. Move the cursor onto the set base checker to delete.
- Page 208 Position Adjustment - Feature Extraction, Matching and Pos/Rot Adjustment (Except Position Rotation Adjustment - Smart Edge (Line)) Select "Base Position". Select "Register". The window to select an object to use in Position Adjustment from the detected objects appears. Even if only one result is detected, this window is displayed.
-
Page 209: Applying Position Adjustment To Checkers
4.8.4 Applying Position Adjustment to Checkers Which Position Adjustment is applied to checkers must be determined because multiple Position Adjustments can be registered for a Type. To do so, select a Position Adjustment in Area Setting window of each checker. An area of Position Adjustment checkers also can be adjusted by Position Adjustment. -
Page 210: Adjusting Area Size (Area Size Adjustment)
4.9 Adjusting Area Size (Area Size Adjustment) This function expands or contracts the inspection area or mask area to fit a variable-sized object. The function detects the part which signifies an object size, such as edges of the object or register marks, and expands or contracts a checker area based on the coordinates of the part. - Page 211 Detecting a Object Size Binary Edge, Gray Edge, Feature Extraction, Smart Matching and Smart Edge (Line) can be set to detect an object size in Area Size Adjustment. Example 1: Example 2: Example 3: If Area Size Adjustment detects multiple parts, the coordinates of No.0 is used to adjust the area. When there is a possible to detect multiple parts, sort them so that the desired part is always No.0.
- Page 212 Using Area Size Adjustment for Checkers Multiple Area Size Adjustment checkers can be set. For performing auto adjustment of the area size of each checker, select an Area Size Adjustment checker to use its coordinates for the adjustment. After using Area Size Adjustment, the area frame (checker pattern) is displayed in the adjusted size. However, the positions of the start point (ST) and end point (ED) that are displayed by selecting “Area Setting”...
-
Page 213: Geometry Calculation Of Detected Data
4.10 Geometry Calculation of Detected Data 4.10.1 What is Geometry Calculation? Geometry Calculation is a function that calculates the distance between two points, intersection point of two lines and median using the data detected with each checker. With this function, only specifying the result detected by a checker enables to execute calculation without setting any operation expression. -
Page 214: Setting A Geometry Calculation
4.10.2 Setting a Geometry Calculation Selecting a Checker No. and a Type of Detect Mode Select “INSPECTION” > "Geometry Calc.". Select the checker No. list and specify a checker number to set. Move the cursor onto a type of Geometry Calculation to create. - Page 215 For Distance Point - Point In this section, for the object detected in Feature Extraction No.0, enter the detected zeroth coordinate in Point 0, and enter the detected first coordinate in Point 1. In Feature Extraction, it has been set to sort the objects in descending order of area and detect the circle of the largest area zerothly.
- Page 216 For Intersecting Point "Intersecting Point" is used to calculate the intersecting point using the lines detected by Smart Edge (Line) and Geometry Calculation. When using the lines detected by Geometry Calculation, only smaller numbers than the number of the currently setting Geometry Calculation can be specified.
- Page 217 For Approximate Circle Selecting "All Points" enables to set multiple points detected by one checker in block. In this section, enter all the coordinate positions of the object detected by Smart Edge (Line) in the point 0. The procedures for setting "Reference" of Approximate Line and Approximate Ellipse are the same as that of Approximate Circle.
- Page 218 List of Settable Items for Each Object Point All Points Line ○ × × PAC: Position Adjustment Base Position Coord. Detect Position Coord. Base Coord. (Detect Coord. of Base Checker) ○ × × AUC: Area Size Adjustment ○ ○ × BEC: Binary Edge ○...
- Page 219 Setting Measurement Condition Measurement conditions vary depending on the type of geometry calculation. Detect mode Measurement condition Distance Point-Point Line Display: Segment / Half line0 / Half line1 / Wall-to-wall Angle Range: 0<->360 / -180<->180 Direction: ST -> ED / ED -> ST / Down / Left / Up / Right Intersecting Point Intersecting Angle: Acute Angle / CW / CCW...
- Page 220 Direction Detected angles vary depending on the specified direction and the setting value of "Angle Range". Example) For Distance Point - Point Direction Appearance of Direction Angle Range and Detect Angle Angle Range: 0<->360 Angle Range: -180<->180 ST -> ED Range: 0 - 359.999 Range: -179.999 - 180 Result: 160...
- Page 221 Example) When Median of Two Lines - Direction = Vector Sum Angle Range Angle Range: 0<->360 Angle Range: -180<->180 Two lines are headed in the same direction. Two lines are headed in different directions. Example 1 Two lines are headed in different directions.
- Page 222 Intersecting Angle Specify one of the three methods to detect the angle between two intersecting lines. Line specified in Reference No.0 Line specified in Reference No.1 Acute Angle In case of CW or CCW, the start position is the line specified in Reference No.0.
- Page 223 Setting Judgement Condition Measurement conditions vary depending on the type of geometry calculation. Detect mode Judgement limits Input range Distance Point-Point Median X, Median Y -99999999.999 to 99999999.999 Distance 0 to 99999999.999 Line Angle 0 to 359.999(When Angle Range is 0<->360) -179.999 to 180.000 (When Angle Range is -180<->180) Intersecting Point IP X, IP Y...
- Page 224 Error messages when running a test If Geometry Calculation is not performed properly, error numbers and messages are displayed in the checker list. Error No. Message Cause E0070 Unset item found. When a checker to be used is not specified. E0071 No ref.
-
Page 225: Calculation Of Detected Data (Numerical Calculation)223
This function calculates using the data detected by checkers and outputs the data to the external devices. Up to 1000 expressions (when 10 blocks are used) can be set for each product type. · PV500 can handle the values from -2147483648.000 to + 2147483647.000, which are -(2 ) to (2 -1), during calculation. - Page 226 Select the numerical calculation input field and press the ENTER key again. The list of items that can be registered in a calculation is displayed. Checker: Select this to enter the inspection data or the statistics data of checkers including position adjustment and area size adjustment. Numerical Calculation: Select this to enter the result of numerical calculation or the statistics data of them.
- Page 227 Input Example: Entering a Result of a Checker For this example, enter the object area detected thirdly by Feature Extraction No.0. Depending on the type of checker, selectable data varies. In the list of items that can be entered in expression, select “Checker”...
- Page 228 Copying an Set Expression Select "INSPECTION” > “Num. Calcu.” from the menu bar. “Numerical Calculation” window is displayed. Select a numerical calculation list in the setting window and move the cursor onto the expression No. to copy. Press the FUNC key and select “Copy” from the displayed menu.
- Page 229 Setting Judgement Limits Set a tolerance (maximum and minimum values) of the calculated result. If the value is within the tolerance, the object will be judged as "OK", if it is out of it, the object will be judged as "NG". If any judgement is not necessary, there is no need to set.
- Page 230 4.11.2 Data That Can Be Used in Numerical Calculation The data described below is that can be used in numerical calculation. The symbols in parentheses are displayed in operation expressions. Inspection data that can be registered in Numerical Calculation Depending on type of result data, selectable statistics data varies when selecting “Statistics”. Statistics: Type 1 Scan Count (@COUNT)
- Page 231 Item Result Result Type Statistics Output Value, etc type Gray Window(GWC) Judgement (JUDGE) OK=1, NG=0 No.0-999 Inspection Time (TIME) Gray Average (AVE) 0 - 255 Binary Edge(BEC) Judgement (JUDGE) OK=1, NG=0 No.0-999 Inspection Time (TIME) No. of Objects (COUNT) 0 - 256 0-255 X coordinate (X) Y coordinate (Y)
- Page 232 Item Result Result Type Statistics Output Value, etc type Smart Judgement (JUDGE) OK=1, NG=0 Matching(SMC) Inspection Time (TIME) No.0-999 No. of Objects (COUNT) 0 - 255 0-255 Detect Template No. (TEMP) Correlation (COR) X coordinate (X) Y coordinate (Y) Angle (CANG) -179.999 -180.000 Pixels of Max.
- Page 233 Item Result Result Type Statistics Output Value, etc type Individual Result: 2/2 0-99 Pitch Individual Judgement OK=1, NG=0 page (PJUDGE) Distance difference individual OK=1, NG=0 judgement (UJUDGE) Pitch (PT) Distance difference (UPT) Edge X coordinate 0 of area 0 (X0) Edge Y coordinate 0 of area 0 (Y0) Edge differential 0 of area 0 (D0) 0 -255...
- Page 234 Item Result Result Type Statistics Output Value, etc type X 1 (X1) *1) Y 1 (Y1) *1) Differential 1 (D1) *1) Judgement Code (STAT) 0-4 *2) Smart Edge (Line) Max. Measurement value (LMAX) (SEL) No.0-999 Min. Measurement value (LMIN) Common Result: 1/3 Average Measurement (LAVE) page Standard Deviation (STD)
- Page 235 Item Result Result Type Statistics Output Value, etc type Individual Result: 0-2999 Individual Judgement (IJUDGE) OK=1, NG=0 3/3 page Measurement value (LEN) X 0 (X0) Y 0 (Y0) Differential 0 (D0) 0 -255 X 1 (X1) Data of the edges detected with the condition 1 when Y 1 (Y1) selecting Width for Detect...
- Page 236 Numerical calculation Item Result Type Statistics Output Value, etc type Numerical CAC Numerical 0-999 *1) Judgement (JUDGE) OK=1, NG=01 Calculation Calculation Result (VALUE) OCA Numerical 0-999 Judgement (JUDGE) OK=1, NG=0 Calculation Result (VALUE) (Previous Result) *1) Only smaller No. than the currently setting numerical calculation No. is settable. Judgement Item Result Type...
-
Page 237: Operators And Functions
4.11.3 Operators and Functions Operators Addition Subtraction Multiplication Division If denominator becomes "0", the calculation will be terminated and an error signal (ERROR1) will be output. (, ) Parenthesis Up to three parentheses can be used successionally. You cannot use four or more of them successionally. - Page 238 Trigonometrical Function = degree) · SIND · COSD · TAND SIN(Radian) Sine of angle DR (radian) e.g.) b = SIN (Radian) * c COS(Radian) Cosine of angle DR (radian) e.g.) a = COS (Radian) * c TAN(Radian) Tangent of angle DR (radian) e.g.) a / b = TAN (Radian) ASIN(S) Arcsine of angle DR (radian)
- Page 239 CIRCLEX Coordinate X and Y of the center and (x0,y0,x1,y1,x2,y2) radius (in pixels) of a circle through CIRCLEY three points, (x0,y0), (x1,y1) and (x0,y0,x1,y1,x2,y2) (x2,y2) CIRCLER (x0,y0,x1,y1,x2,y2) If it cannot be calculated, the judgement will be “Error”. LINELSA (C0,C1,S) Regression line expression in least squares LINELSB (C0,C1,S) Element a, b and c of a regression line (ax+by+c) when regarding numerical LINELSC (C0,C1,S)
-
Page 240: Totally Judging Results Of Checkers (Judgement)
4.12 Totally Judging Results of Checkers (Judgement) PV has a function that totally judges on the judgements of checkers and numerical calculations. Although 1000 Judgements are provided, No.0 to 999 (when 10 blocks are used), you can set maximum of 1000 expressions per type combining with numerical calculations. - Page 241 Enter an operation expression. Up to 16 items and 560 characters* can be set. If you selected a wrong item, delete it with the F2 key and reregister the expression. Moving the cursor onto an item displays the information of the item in the expression explanation field.
- Page 242 Copying an Expression Select "INSPECTION” > “Judgement” from the menu bar. “Judgement” window is displayed. Specify a type of judgement in the Judgement window. Select a calculation list and a judgement number to copy. Press the FUNC key and select “Copy” from the displayed menu.
- Page 243 Data That Can Be Used in Judgement The data described below is that can be used in judgement expression. The symbols in parentheses are displayed in operation expressions. Checker - Position Adjustment (PAC) No.0-999 Item Condition for OK judgement Judgement The specified (JUDGE) object or edge is...
- Page 244 Checker - Connector - Judgement (JUDGE) Binary Window(CBW) Individual No.0-999 Judgement(PJUDGE) No.0-99...
- Page 245 Item Condition for OK judgement Checker - Connector Gray Judgement (JUDGE) Window (CGW) No.0-999 Individual Judgement(PJUDGE) No.0-99 Checker - Connector Gray Judgement (JUDGE) Pitch Total Judgement and Distance Difference Edge (CGE) No.0-999 Total Judgement are both OK. Pitch total judgement Pitch Judgements are all OK.
- Page 246 Item Condition for OK judgement Geometry Calculation Intersecting Angle Judgement Intersecting Angle is within the range of the (GGC) No.0-999 (CAJUDGE) maximum/minimum limitations. Radius Judgement (RJUDGE) Radius is within the range of the maximum/minimum limitations. Major Axis Judgement Major Axis of Ellipse is within the range of the (LAJUDGE) maximum/minimum limitations.
- Page 247 About Operators Use operators to judge results of multiple checkers or numerical calculations. Example: JDC001=A+B +: Logical sum JDC001 Returns "OK (1)", if the result of either A or B is OK (1). OK (1) OK (1) OK (1) OK (1) NG (0) OK (1) NG (0)
-
Page 248: Total Judgement
4.12.2 Total Judgement Total Judgement is a judgement displayed in the status display area in RUN menu or SETUP menu. It can be output to the external devices solely. One of judgements per type can be registered as a Total Judgement. - Page 249 For “Automatic Switch” or “User-Defined” execution mode Select "Condition" in judgement output setting window. “Condition” setting window is displayed. Select “Total Judge.” in the item selecting field on the upper left. The list of the Total Judgement by blocks is displayed.
-
Page 250: Selecting An Image Output Condition
4.12.3 Selecting an Image Output Condition Inspected images can be saved in the image memory of PV500 and output to the external devices when the judgement of the judging checker is “NG” during an inspection. Select a judging checker to be a condition to output images. - Page 251 When Output Condition is “NG Judgment” and Execution Mode is "Automatic Switch" or "User-Defined" Select "Condition" in judgement output setting window. “Condition” setting window is displayed. Select “Image Output” in the item selecting field on the upper left. The list of the Image Output by blocks is displayed. Select “Condition”...
- Page 252 After setting is completed, press the CANCEL key. Now you completed registering. When Image output is "Judge. Per Cam." and Execution Mode is “Automatic Switch” or “User-Defined” Select "Condition" in judgement output setting window. “Condition” setting window is displayed. Select “Image Output” in the item selecting field on the upper left.
-
Page 253: Selecting An Image Memory Save Condition
4.12.4 Selecting an Image Memory Save Condition Inspected images can be saved in the image memory of PV500 when the judgement of the judging checker is NG during the inspection. Select a judging checker to be a condition to output images. - Page 254 When Execution Mode is “Automatic Switch” or “User-Defined” Select "Condition" in judgement output setting window. “Condition” setting window is displayed. Select “Save Image Memory” in the item selecting field on the upper left. The list of the Save Image Memory by blocks is displayed.
-
Page 255: Character/Figure Drawing
4.13 Character/Figure Drawing 4.13.1 What is Character/Figure Drawing? Character/Figure Drawing is the function to draw figures or characters, and display them on the screen window. The drawable figures are Line, Cross, Rectangle, Slanted rectangle, Ellipse and Character. For some shapes, an arrowhead can be added or figure can be filled. - Page 256 List of Menu Options Character/Figure Drawing No.000 to 999* └ ┬ Comment ├ Camera ├ Color by Judgement ├ Color (OK Color) ├ NG Color └ No.0 - 9 ───── ┬ Line ┬ Start XY, End XY ─ │ ├ ─...
-
Page 257: Creating Character/Figure Drawing
4.13.2 Creating Character/Figure Drawing Creating Character/Figure Drawing Select "Inspection” > “Draw Char/Fig.” from the menu bar. The list of Character/Figure Drawing checker is displayed. The number of figures that have been set in the highlighted checker number is displayed in the message field beneath the list. Example) No. - Page 258 When "Color" (Color by Judgement) has been set, select "OK Color" or "NG Color". A total of twelve colors are available, which are "Hide", 10 preset colors and one user-specified color. Select a desired color and press the ENTER key. The box of the selected color is checked.
-
Page 259: Setting The Drawing Position And Size Of A Drawing
Copying and Deleting Figure Figures can be deleted or copied from the pop-up menu to be displayed by pressing the FUNC key. Highlight the figure number you want to delete or copy and press the FUNC key. Select "Delete" or "Copy". When selecting "Delete", the dialog message appears. - Page 260 Optional Settings Select "Line Display". Select the type of the line from the following four types. Segment Half line 0 Half line 1 Wall-to-wall Display a line between Display a line between Display a line between Display a line between the start and end the end point and the the start point and the...
- Page 261 Select the item to input in IP X from the list of the selectable items. When selecting "Cursor", move the cross mark displayed on the screen window and press the ENTER key. About the items that X and Y-coordinates are input together (page 257) In the same way, set IP Y.
- Page 262 Slanted Rectangle Specify the center coordinate, width, height and rotation angle to draw a slanted rectangle. For details of selectable items, see page 266. Setting Size of Rectangle, Rotation Angle and Display Position Specifying Center Coordinate Select the table on the setting window of Slanted rectangle, and move the cursor onto "Center X"...
- Page 263 Specifying (Rotation) Angle Set the rotation angle of the rectangle. Specify the angle in a range of -360 to 360 regarding the position at three o'clock as 0 degree. Clockwise is positive angle (0 to 360) and counterclockwise is negative angle (0 to -360).
- Page 264 Move the cursor onto "Start Angle" and press the ENTER key. A list of available items is displayed. (The checkers displayed in gray indicates that they are not unset.) Select the item to input in Start Angle from the list of the selectable items.
- Page 265 Character Displays a maximum of 16 one-byte characters such as inspection results of checkers and system values. Set the characters to display, display position, character size, number of digits and alignment. Specifying Characters to Display Select “Display Character” in “Character” setting window. A list of available items is displayed.
- Page 266 Display Base When displaying a string in a specified position, the top left point of the string is placed on the specified coordinate value. This point is called "Display Base". It is selectable from nine points including Top Left. Differences in the display positions among display bases Example) When setting Coordinate X and Y to the center of the screen Display Base =Top Left Display Base = Center...
- Page 267 Set "Display Base". Select from nine points (the encircled positions in the right figure), which are eight points on the circumscribing rectangle of the characters (including margins) and the center point. Top Left (Default) / Top Center / Top Right / Left Center / Center / Right Center / Bottom Left / Bottom Center / Bottom Right When the displayed characters are numerical values, the size of the circumscribing rectangle of characters depends on the "Digit Count"...
- Page 268 A list of the Data Can Be Referred to Figure Coordinate X, Y Width, Height Angle ○ × ○ PAC: Position Adjustment Base Position Coord. Base Position Angle Detect Position Coord. Detect Position Angle Base Coord. (Detect Coord. of Base Checker) ○...
-
Page 269: Checker List
4.14 Checker List This function shows setting status and execution result of the checkers, position adjustments, area size adjustments, numerical calculations, judgements and character/figure drawing. To change the settings of them, you can jump to the setting window from this window. In this function, all displayed items in the table are called “checker”... - Page 270 Overview of Checker List 1 Checker Information a. Checker No. 2 Checker List b. Checker Type c. Setting Status/ Execution Result 1. Checker information It displays the information of the checker selected in Checker List described in 2. Selecting the checker outputting the judgement of which is error (“E”) shows detail of the error in the field of A in the figure above.
- Page 271 Changing Display Color The color of characters displayed in the checker list, of selecting cells and of enhanced cells can be changed. Press the FUNC key on the Checker list window. The pop-up menu appears. Select “Colors. The color setting window appears. Select an item to change its color.
-
Page 272: Outputting Inspection Results To The External Device270
4.15 Outputting Inspection Results to the External Device PV500 has features of outputting judgements of inspections and results of numerical calculations through the parallel I/O connector, the I/O terminal block, and the ports, and writing them in an attached SD memory card. - Page 273 Settable range is 1 - 1000 ms. (Default: 10 ms) After outputting OUT signal and TACT signal, PV500 holds to output for the time specified in the item. TACT signal turns off after the specified time passes. (Whether OUT signal is held or reset depends on the setting in “System Settings”...
- Page 274 Set “Output Signal Guarantee Time”. Settable range is 1 - 1000 ms. (Default: 10 ms) When Handshaking is not employed: OUT signal is output in the doubled cycle of the time specified in this item. When Handshaking is employed: After handshaking of the first inspection, output of the second inspection is not executed during "Output Signal Guarantee Time".
- Page 275 Outputting Scan Count and Numerical Calculation Scan Count and Results of Numerical Calculations can be output to “OUT0-15” (or “OUT0-7”) of the I/O connector dividing in multiple times. · Numerical Calculations can be set to output or not for each expression. Only the expression that is set to “Output”...
- Page 276 Example of Bit Assignment when outputting numerical data In the case of Data Bit: 32-bit, Bit Width: 8-bit OUT7 OUT6 OUT5 OUT4 OUT3 OUT2 OUT1 OUT0 Bit7 Bit6 Bit5 Bit4 Bit3 Bit2 Bit1 Bit0 Bit15 Bit14 Bit13 Bit12 Bit11 Bit10 Bit9 Bit8 Bit23...
- Page 277 Example of Output Data Assignment Scan Count, Judgement, and Numerical Calculation output with Bit Data: 32-bit and Bit Width: 16-bit Scan Count = 100, Judgement=JDC000-14(15 points), Numerical Calculation CAC000=70000 1st (Lower 16 bits of Scan Count) 2nd (Higher 16 bits of Scan Count) 3rd (Judgement 0-14) 4th (Lower 16 bits of CAC000) 5th (Higher 16 bits of CAC000)
-
Page 278: Outputting To Com.0/ Ethernet Port/ Sd Memory Card
Result of Numerical Calculation (up to 1000 data): -214783648.000 to + 2147483647.000. Scan Count will be automatically reset and return to "0" when you turn off the power of PV500 or switch types. In addition, resetting statistics data by I/O input or command input resets Scan Count as well. - Page 279 Displaying General Output Setting Window Select "ENVIRONMENT" > “Input/Output” from the menu bar. Select “General Output” in “Input/Output” setting window. Selecting Destination of General Purpose Communication and (General) Output data Select a data destination in “Destination”. You can select only one type as a destination. Select "General Purpose Comm."...
- Page 280 Specifying Digit Number of Output Data In general purpose communication, real numbers (values including after decimal point) can be output. Set the digit number of integer and after decimal point. Specify total digits of integer part and after decimal point in “No. of Digits”. In “Decimal Digit”, specify digits for after decimal point used from the digits set in step 1.
- Page 281 Example of Output Output Data: Date: 2008/01/15 Time: 09:25:48 Scan Count: 1234 times Total Judgement: Judgement: JDC000 = OK, JDC001 = unset, JDC002 = NG Numerical Calculation: CAC000 = 215.8, CAC001 = unset, CAC002 = -368.0 Output Condition: Date and Time: Output (Not available when Destination is Serial(COM.0)) No.
-
Page 282: Saving/ Outputting An Inspection Image
4.16 Saving/ Outputting an Inspection Image Captured inspection images can be saved in PV500, output to a PC through Ethernet, or saved in an attached SD memory card. Also, you can read the images to change the checker settings and run a test. - Page 283 Image Memory Map PC etc. PV500 SD memory card (¥¥Panasonic MEW Vision¥PV500¥Image¥) *1) The number of sets of images can be saved varies depending on the combination of camera type and the number of them. : Chapter4.16.2, page 286 : Chapter 6.2.2, page 332 : Chapter 4.16.3, page 286...
-
Page 284: Outputting Images Into External Device
Receiver for PV” needs to be installed in the PC. You can download the Image Receiver from our web site described below. http://panasonic.net/id/pidsx/global ("Products" > "Machine Vision System" > "PV500" > "Software") Downloading the software requires a user information registration. - Page 285 ¥Panasonic MEW Vision¥PV500¥Image¥Output¥ Initially, decide the number of folders to save images. When using a SD memory card with PV500, it has a limit that up to 100 files can be saved in per folder. Thus, the specified number of folders by 100 files can be saved.
- Page 286 Selecting Output Timing Set the timing to output images. There are two settings; to output images every time one inspection is executed, to output images while PV500 is able to output them until the start of the next inspection. Refer to page 335 for details.
- Page 287 Enter “File Header” with the software keyboard. Default: “Image_” Select an item from four types for “Additional Information 0” to “Additional Information 3”. Select "None" when no additional information is needed. Example) File Header: Image_ Setting and Condition: Additional information 0: Type No. (=50) Additional information 1: Date (=20071215) Additional information 2: Total Judgement (=NG) Additional information 3: None...
-
Page 288: Saving Images In The Image Memory Of Pv
0 - 1 for 2-camera type, and four images of camera 0 - 3 for 4-camera type. This image will be cleared when you cut the power of PV500. When you need to save the images, back up them in a SD memory card or a PC employing PVWIN. -
Page 289: Operation Of Test Image Memory
The images saved in the following three areas can be called up to the Test image memory. Image memory: Read from the Save image memory of PV500. Memory image in SD: Backup images in a SD memory card (folder = ¥Image¥Backup¥00-99) Test image in SD: Test images in a SD memory card (folder = ¥Image¥Backup¥Test) - Page 290 In the test images saved in the selected image number, there is an image of the camera number that has been set to "Unused" for "Camera Type" under "Camera" in PV500. Example) In the above example, there are the images of camera 0 and camera 2 in Image number 1.
-
Page 291: Reading/Saving Setting Data (Save/Read)
The conditions in the execution memory are temporarily called up to execute programs and are not saved in the memory. Regarding types No.0 - 255 as a set of data, PV500 saves the data in “Storage Space in PV500”. The data can be saved also in a SD memory card. -
Page 292: Reading Setting Data
4.17.2 Reading Setting Data The setting data registered in the Storage Space in PV500 or a SD memory card can be called up to the execution memory. The setting data that has been stored in the execution memory will be overwritten. Before reading, save the setting data as necessary. -
Page 293: Deleting Setting Data
4.17.3 Deleting Setting Data To delete the setting data registered in the Storage Space in PV500 or a SD memory card, follow the procedure below. You cannot delete multiple data. Delete one by one. Select "SAVE/READ" from the menu bar. -
Page 294: Displaying Data On The Screen And Updating Settings (Data R/W)
4.18 Displaying Data on the Screen and Updating Settings (Data R/W) In RUN menu, inspection results (judgement, data, execution time, etc.), setting values (parameters of checkers, etc.), information of PV (calendar, system register value, etc.) can be displayed. This is Data R/W (Read/Write) function. - Page 295 Registering Data in Data R/W Sheet Select a sheet number of Data R/W to register data in Data R/W setting window. Select a cell to register data. The item selecting window is displayed. For the information of settable items, refer to page 296. When the settable items in the list are displayed in gray (when the color setting is the default), it shows that those...
- Page 296 Copying a Cell To copy the data registered in a cell to the other cell. Select the cell that you want to copy and press the FUNC key. The pop-up menu appears. Select "Copy". Select the cell that you want to paste and press the FUNC key. The pop-up menu appears.
-
Page 297: Data R/W In Run Menu
While displaying Data R/W window, you can change the data registered in Data R/W. (Some data cannot be changed such as results.) It is helpful to execute inspections changing values frequently (when introducing PV500), or to permit changing some limited values (when using password for limitation of switch to the SETUP menu to prevent to change the setting data by mistake). - Page 298 Press the F1 key (“Select Window”) in RUN menu. Select a Data R/W window where the data you want to change is registered. The Data R/W window is displayed and you can select a cell. Select a cell where the data to change is registered.
-
Page 299: Registerable Items
4.18.3 Registerable Items The data that can be registered in cells of Data R/W are listed below. · “Yes” in the “Change” column indicates the value of the cell is modifiable from Data R/W sheet. · The columns of Position Adjustment and Area Size Adjustment show that the item can be registered in Data R/W or not, when they are used for the adjustments. - Page 300 Line (LIC) Change Statistics Parameter Area Area Setting (Refer to p.307) Setting Area Size Adjustment (Refer to p.307) Inspection Preprocess Conditions Slice Level Count Pixel Color Count Object Color Min. Object Size Min. Gap Size Filter Judgement Max. No. of Pixels Limits Min.
- Page 301 Binary Edge (BEC) Change Statistics Pos. Adj. - Area Size Base checker Adjustment Result Judgement Refer to the Refer to the items of items of Area Inspection time Position Size No. of Objects Adjustment Adjustment X coordinate (PAC) (AUC) Y coordinate Detect Color Proj.
- Page 302 Feature Extraction (FEC) Change Statistics Pos. Adj. - Area Size Base checker Adjustment Judgement OK Judge. Max. Limits OK Judge. Min. Result Common Judgement Refer to the Refer to the Result items of items of Area Inspection time Individual Position Size No.
- Page 303 Smart Matching (SMC) Change Statistics Pos. Adj. - Area Size Base checker Adjustment Min. Correlation Max. Count Min. Correlation Max. Count Min. Correlation Max. Count Square Correlation Subtractio Min. Subtracted Size Subtraction Threshold Filter Max. OK No. of Subtracted Objects Result Judgement Refer to the...
- Page 304 Connector (Binary Window) (CBW) Change Statistics Parameter Area Area Setting (Refer to p.307) Setting Area Size Adjustment (Refer to p.307) Inspection Preprocess Conditions Slice Level Target Filter Set Individually Judgement Common Judgement Max. Limits Common Judgement Min. Individual Judgement Max. Individual Judgement Min.
- Page 305 Connector - Gray Edge (CGE) Change Statistics Result Common Judgement Result Pitch Total Judgement 1/2 page Distance Difference Total Judgement Inspection time No. of Cells Max. Pitch Min. Pitch Average Pitch Individual Pitch Individual Judgement Result 1: Individual judgement for Distance 2/2 page Difference Pitch...
- Page 306 Change Statistics Pos. Adj. - Smart Edge (Circle) (SEC) Base checker Max. Standard Deviation Min. Standard Deviation Max. Circularity Min. Circularity Max. Unused Edge Cnt. Result Detected Max. Measurement Refer to the Result: 1/3 items of Min. Measurement page Position Average Measurement Adjustment Standard Deviation...
- Page 307 Change Statistics Pos. Adj. - Area Size Smart Edge (Line) (SEL) Base checker Adj. Filter 0 Width 0 Averange Range 0 Scan Direction 1 Scan Direction 1 Scan Method 1 Edge Condition 1 Edge Threshold 1 Detect Position 1 Filter 1 Width 1 Denoising 0 Judgement...
- Page 308 Change Statistics Pos. Adj. - Area Size Smart Edge (Line) (SEL) Base checker Adj. Line 1 Start Coord. X Line 1 Start Coord. Y Line 1 End Coord. X Line 1 End Coord. Y Line 1 Element a Line 1 Element b Line 1 Element c Line Angle 1 Linearity 1...
- Page 309 Geometry Calculation Change Statistics 2/2 page Judgement X Judge. Y Judge. Standard Devi. Judge. Angle Judge. Distance Judge. Intersecting Angle Judge. Radius Judge. Major Axis Judge. Minor Axis Judge. For All Checkers - Area Setting Line, Binary Edge, Gray Edge, Smart Matching, Flaw Change Statistics Detection (Line, Plane), Connector (Binary Window,...
- Page 310 For All Checkers - Area Setting - Area Size Adjustment Line, Binary Window, Gray Window, Binary Edge, Gray Edge, Change Statistics Feature Extraction, Smart Edge (Circle), Smart Edge (Line) Area Size Area Size Adjustment Offset (Top) Adjustment Area Size Adjustment Offset (Bottom) Area Size Adjustment Offset (Left) Area Size Adjustment Offset (Right) Flow Detection, Connector (Binary Window, Gray Window)
- Page 311 Preprocess Camera No.0 - 3, Group A - E, 1st step - Change Statistics 10th step Type Parameter 0 (Parameter name) to Parameter 8 (Parameter name) * The parameter name set for the selected step (1-10) is displayed. It shows the parameter number without name is not used for the selected preprocess type. Text Text Change...
-
Page 312: Marker
4.19 Marker Marker is the function that displays figures of line, rectangle, circle, polygon or cross line on the screen window of RUN menu. This function can display an image on the screen like indicating a guide to position the object with no effect on the inspection time. - Page 313 Copying Marker Highlight the marker number you want to copy and press the FUNC key. The pop-up menu appears. Select "Copy". Highlight the marker number you want to paste and press the FUNC key. The pop-up menu appears. Select "Paste". The same marker as the copied one is pasted.
- Page 314 Moving Marker (Inputting Command from External Device) Ver. 1.60 or later Rectangle Ellipse Cross line The created marker can be moved by inputting commands (*1) from the external device. It is also possible to read the current position. The position of the marker is based on the coordinate of the middle point of the circumscribing rectangle of the marker (the intersection point of two lines for Shape: Cross line).
-
Page 315: Setting Of Operation And Run Menu313
Chapter 5 Setting of Operation and RUN Menu... -
Page 316: Start /Stop Run Mode
5.1 Start /Stop RUN Mode Perform inspections along with the settings made in the previous chapter. Start RUN mode Switch to RUN menu by operating the “OPE/SET” switch. If you switched to SETUP menu from RUN menu during an inspection stoppage, follow the procedure described below to restart the operation. - Page 317 Inspection Time and Inspection Cycle Executing an inspection shows "Inspection Time" or both of "Inspection Time" and “Inspection Cycle” in ms units in the lower left of the screen. Inspection Time When “Inspection Process” is set to "Serial", Inspection Time equals "READY signal OFF time"...
-
Page 318: Control In Run Menu
This information can be registered as layout data. · Saves the settings modified in RUN menu in Save setting data (TOOL) the storage space in PV500 or a SD memory card. · Erases images saved during inspections and Save/clear image memory Page 317 backups them in a SD memory card. -
Page 319: Control Of "Tool" Menu
Select "TOOL" > "Save Setting Data". The destination selecting window is displayed. Select a place to save it. Select “Storage Space in PV500” (or “SD card”) for “Save to”. Select a “No.” of a saving area. When the dialog message appears, select “YES"... - Page 320 Backing Up Saved Image Backups the images saved in the image memory during inspections to a SD memory card. Backupping cannot be executed during operations (RUN). Select "TOOL" > "Save Image Memory". The message is displayed if it is operating. To stop the operation and backup the images, stop it from “OPERATION”...
-
Page 321: Setting Display In Run Menu
331 about the setting procedure 5.3.1 Selecting a Preset Layout PV500 has preset layouts to select. Based on a selected preset layout, you can arrange the layout and register it as a custom layout. . Select "LAYOUT" > “Layout” from the menu bar. -
Page 322: Arranging Layout
Be sure to save the setting data by registering the layout after layout arranging from “Layout”. If you switch to the other layouts or turn off the power of PV500 before registering and saving the setting, the arranged layout will be cleared. - Page 323 . Select "Data R/W" from “VIEW” menu and select the number of Data R/W window to hide. The selected number of Data R/W window is marked off and displayed. . Press the Cancel key. Select "Data R/W" from “VIEW” menu and select the number of Data R/W window to hide.
- Page 324 Arranging a Data R/W Window The data and the number of cells displayed in a Data R/W window can be specified from “TYPE” > “Data R/W” in SETUP menu. In RUN menu, the items listed below can be set. · Changes the position and size of the windows.
- Page 325 Optimizing Window Size (Optimize Size) Adjust the window size so that it displays all cells and no margin. This is optimization. While you can adjust the window size by modifying the start/end point by “Size”, using “Optimize Size” allows adjusting efficiently in one operation. Press the FUNC key to display the pop-up menu.
- Page 326 Press the ENTER key to execute the replacement. Before replacement After replacement Replacing Screen 2 and 0 . After setting is completed, press the CANCEL key. Selecting Pattern Display Select patterns to display on the screen window. The patterns that can be selected to display or hide are as follows.
- Page 327 Select “Display” or “Hide” for "Area". Area is an inspection area frame of each checker. In the right figure, it is indicated with a dotted line. Select “Display” or “Hide” for "Scan Direction". This item is available only when selecting "Display" for "Area".
-
Page 328: Registering/Copying/Deleting A Layout
Be sure to register the adjusted layout and save the setting data by following procedure after layout arranging. If you switch to the other layouts or turn off the power of PV500 before registering the setting, the arranged layout will be cleared. - Page 329 Copying/deleting a Layout Select "LAYOUT" > “Layout” from the menu bar. Move the cursor onto the layout number to copy (or delete). . Press the FUNC key and select “Copy” from the pop-up menu. If you want to delete it, select “Delete”. Move the cursor onto the layout number to paste, press the FUNC key, and select “Paste”...
-
Page 330: Switching A Layout
5.3.4 Switching a Layout The current layout can be switched to the registered layout. With keypad, you can switch from the layout list or pressing the F2 key. You can also switch it by inputting a signal from the external device. Selecting from Layout List When many layouts are registered, switching from the layout list is suitable. -
Page 331: Environment Settings (Changing System Settings)
Chapter 6 Environment Settings (Changing System Settings) -
Page 332: Overview Of Environment
Input/output (Page 338) This menu sets items on communication with external devices such as parallel I/O and serial port. Camera This menu sets camera type to use and the polarity of FLASH signal output from PV500. · Camera Page 58 ·... -
Page 333: System Settings
. Press the CANCEL key. The last layout number is held by using the backup battery on the back of PV500. When the battery runs out or no battery is installed, the layout number 00 is read. If the layout number 00 is not set, the preset layout number... -
Page 334: Selecting Operation When Switching To Setup Menu (Operation/Password)
. After setting is completed, press the CANCEL key. The last type No. is held by using the backup battery on the back of PV500. When the battery runs out or no battery is installed, the type with the smallest number from the existing types is called up. Also, if the type specified in "Select Type No."... - Page 335 Saving Inspection Image in Image Memory (Test Image Copy) This function saves the last inspection images of the cameras in Test image memory. The default setting is to save images. Change the setting only when you do not save them. .
- Page 336 The PV500 has "Keypad is invalid" function to disable various operations such as switching the menu to SETUP MENU with the keypad and editing in RUN MENU as a function to protect the PV500 from incorrect operations. When this function has been specified, "Keypad is invalid" is displayed in the key guide space on the window.
-
Page 337: Inspection Process And Output Timing
Asynchronous processing. Asynchronous: An inspection is complete before outputting results, and PV500 completes data output until the next inspection result output. Because the time of outputting general results is NOT included, its inspection time is shorter than Synchronous processing. - Page 338 If the number of images exceeds the storable capacity, new images cannot be stored in PV500 until enough space for storing is created by outputting the image that have been stored in PV sequentially. Inspections are executed on images that cannot be stored, however, image output is not executed.
-
Page 339: Setting Default Variable (System Register)
6.2.4 Setting Default Variable (System Register) PV500 offers eight value registers. These registers can be used in an expression of numerical calculation, or can be referred for a drawing position or figure size of character/figure drawing. The values of the registers can be changed by inputting a command through COM.0 interface or Ethernet interface from the external device. -
Page 340: Input/Output
6.3 Input/output This function assigns functions of signals input from the external device to PV500, and makes settings on outputting result data and images. Parallel I/O: Setting of the minimum OFF time of READ END signal and Page 339 ACCEPT signal, and assignment of ASSIGN0-5 signals. -
Page 341: Changing Setting Of I/O Terminals (Parallel I/O)
6.3.1 Changing Setting of I/O Terminals (Parallel I/O) Set the minimum OFF time of READ END signal and ACCEPT signal. And also, assign functions to ASSIGN0-5 when operating by inputting signals to I/O connector and I/O terminals ASSIGN0-5 from the external device. -
Page 342: Changing Color Of Menu And Window
6.4 Changing Color of Menu and Window Display color of letters and background on the screen and transparence of dialogue window in SETUP menu can be set from "Color” menu. 6.4.1 Changing Color of Letters and Background The color of letters, menus, and areas displayed on the screen can be changed. You can select from six preset color patterns. -
Page 343: Changing Window Transparency (Setup Menu)
6.4.2 Changing Window Transparency (SETUP Menu) You can change the transparence of the setting window displayed after selecting the submenu. You can recognize a screen window behind the setting window. It is useful to observe an image while making settings. The setting of transparence here is for SETUP menu only. -
Page 344: Initializing Environment Settings
6.5 Initializing Environment Settings This function initializes the Environment data and restores it to the default settings. Select "ENVIRONMENT" > “Initialize” from the menu bar. The confirmation message appears. . Select "Yes". Environment data are initialized. If you select “No”, initializing is canceled. Initializing Environment might shows the message below when “Common”... -
Page 345: Changing Configuration (Tool)
Chapter 7 Changing Configuration (TOOL) -
Page 346: Overview Of Tool
With “TOOL” in SETUP menu, the following can be performed; settings, information display, and updating of PV500 you use, adjustment support of optical parts and communication test at the introduction. In addition, you can switch the mode to communication with PVWIN, which is software of setting and simulation for PV series. -
Page 347: General Settings
7.2.1 Specifying Data to Read at Startup Specify the data to read from the storage space in PV500 to execution memory at PV startup. You can also save the data in a SD memory card, however, cannot read it at startup. -
Page 348: Changing Network Setting
7.2.2 Changing Network Setting Set a device name and make TCP/IP setting which is necessary to perform Ethernet communication. The port number of PV500 depends on type of communication data. · General output: 8601 · Image output: 8602 · Command* communication: 8604 (*See page 396.) Changing IP address Select "TOOL”... - Page 349 Changing the retry condition of TCP/IP (Available from Ver.2.23) Select “Details” for "TCP/IP" in “Network” setting window. Enter No. or Retries, Interval: Maximum Value and Minimum Value. No. of Retries (Default: 5) Interval: Maximum Value (Default: 2000 ms) Interval: Minimum Value (Default: 1000 ms) After setting is completed, press “Set”...
-
Page 350: Adjusting Calendar Date
Set the date and time of the built-in clock. The date recorded when outputting data is the date of this calendar. While PV500 is not energized, the information on calendar is saved with the power of the backup battery. To use calendar function, open the battery case lid on the back and connect the battery with PV500. -
Page 351: Initializing General Settings
7.2.5 Initializing General Settings This menu initializes the configuration. The items and their values to be initialized are listed below. Item Value after initialization Startup setting Start with Memory Area No.: Network IP Address 192.168.1.5 Subnet Mask 255.255.255.0 Default Gateway 192.168.1.1 Device Name ImageCheckerPV500... -
Page 352: Information Display And Ejection Of Sd Memory Card350
7.3.1 Displaying Information of SD Memory Card You can confirm the information of a SD memory card attached to the SD memory card slot of PV500. The information includes capacity and free space of the SD memory card, the saving date of the files, and their size. -
Page 353: Setting Help
7.4 Setting Help This function supports to make setting of optical parts of PV500, to confirm the communication, and its adjustment for introduction. · To adjust focus of the lens. Rotate the focus ring of the lens following the Focus Adjustment: displayed message. -
Page 354: Gray Data Analysis
Rotate the focus ring (or aperture ring) of the lens following the displayed message. . Rotate the ring until “Result” field shows “OK”. A level bar showing consistent percentage is displayed in the “Focus Adjustment Level” area. When “OK” is displayed, stop turning the ring and then press the ENTER key. -
Page 355: Capture Delay Control
7.4.3 Capture Delay Control This function helps to decide optimum capture conditions* by capturing and displaying images while changing the conditions for each camera. *) Shutter speed, Camera gain, Capture delay, FLASH delay, FLASH span . Select “TOOL” > “Setting Help”. The Setting Help menu appears. -
Page 356: I/O Test
Check the signal you turned on is input correctly from the external device. Input a signal from the external device to PV500. In the cell of the signal you input, “X” is displayed in the same way as the output signals. -
Page 357: Communication Test
The Communication Test window appears. Select a port to carry out communication test in “Select Port”. After you select a port, PV500 can receive commands from the external device. Receive and Send Test of Command . Select a port in the Communication test window and send a command from the external device. -
Page 358: Information Display And Updating Of Pv500
Free space in the memory for template of Matching checker created for Camera 2 and Camera 3. Free Storage Space in PV500 Free space in the Storage Space in PV500 which sets up to 100 data. SD Total Capacity This is displayed only when a SD memory card is attached. -
Page 359: Version Upgrading Of Pv500
Selecting “No” cancels upgrading and the screen returns to the previous one. Do not turn off the power of PV500 during the upgrading. If you turn off the power during the upgrading, the system might be damaged and might not be able to start or function correctly. -
Page 360: Customizing Splash Screen (Update)
7.5.3 Customizing Splash Screen (Update) A splash screen of PV500 is the blue screen showing the product name and the version at startup. The screen can be changed to another one. Changing the screen requires a SD memory card. Preparing a File Prepare an image to display as a splash screen. -
Page 361: Operation And Data Output Through I/O Terminals
Chapter 8 Operation and Data Output through I/O Terminals... -
Page 362: Main Items That Can Be Communicated Through I/O Interface
*3: Command to control with interface of RS-232C and Ethernet. Refer to page 396 for details. Output The data shown in the table below can be output from PV500 during inspections. “Total Judgement” is output without condition, however, outputting the other data is selective. -
Page 363: Specification Of I/O Interface
Four pins of Common (No.17, 18, 37, and 38) are common for all input signals of I/O connector. The signals shown with * mark in the table are also provided for I/O terminal. Use one of I/O connector and I/O terminal block. PV500 might be damaged by connecting to the both terminals and inputting different signals. - Page 364 Output Signal Signal COMMON FLASH 0 designated common FLASH 0 Flash signal for Camera 0 COMMON FLASH 1 designated common FLASH 1 Flash signal for Camera 1 COMMON FLASH 2 designated common FLASH 2 Flash signal for Camera 2 COMMON FLASH 3 designated common FLASH 3 Flash signal for Camera 3...
- Page 365 Output Circuit In the case of product number: ANPV0502ADN, ANPV0504ADN NPN Output Output load voltage: 5 to 24 V DC Maximum load current: 24mA/ terminal Connection Example In the case of product number: ANPV0502ADP, ANPV0504ADP PNP output (PhotoMos output) Output load voltage: 5 to 24 V DC Maximum load current’...
- Page 366 Input Circuit Rated input voltage: 24 V DC Input voltage range: 21.6 to 26.4 V DC Connection Example...
- Page 367 How to Wire Connect them using the discrete wires supplied with the product. The special tool is required to connect the wires. Included connector and special tool Product No. Included parts (Contact, housing and AFP2801 semi-cover) Special tool AXY52000FP Applicable wire Size Cross section area Outer insulation diameter...
-
Page 368: I/O Terminal Block
8.2.2 I/O Terminal Block All input signals are also available for I/O connector. Use one of I/O connector and I/O terminal block. Connecting to the both terminals might damage PV. The input/output circuit is the same as the I/O connector. See page 364. Pin Arrangement Input Output... - Page 369 Wiring with Terminal Block Be sure to cut the power of PV500 before wiring. Wiring while the power is supplied might cause damage of PV500 and the connecting external device. About Terminal Block Socket Terminal block socket (included): Manufactured by PHOENIX CONTACT Model number: FMC1.5 / 16-ST-3.5...
-
Page 370: Main Function Of Signals
Note that when executing the template reregistration. Run/Stop: Run/Stop Use this signal to switch between Run and Stop of PV500 by a signal from the external device. The status change of signal from OFF to ON (or rising edge of the signal) switches between RUN and STOP. - Page 371 SD memory card. Specify a storing area number (0 - 99) with “IN0 - IN6”. Read Data from PV (*): The setting data registered in the storage space in PV500 will be called up to “execution memory”. Specify a reading area number (0 - 99) with “IN0 - IN6”.
- Page 372 ACCEPT (ACPT): Available for receiving signals It turns on when PV can receive some of the signals of TYPE, DISPLAY, REENTRY and ASSIGN. When PV500 receives the signals, ACCEPT signal is turned off, and when the operation is finished, the signal is turned on.
- Page 373 Use the signal with ACKNOWLEDGE signal in pairs. PV500 turn on STROBE signal after outputting data. The external device receives data at rising edge of STROBE ON signal. Turn on Reception completion signal after reception is complete. PV 500 receives the reception completion signal with ACKNOWLEDGE terminal.
-
Page 374: Cause Of Turning On Error 0 Signal And Error 1 Signal
Check if PV500 makes the causes of turning on the error signals. And then, to prevent those causes, adjust the settings of PV500 or recheck the signal and the command that the external device sends to PV500. - Page 376 Execute an inspection, or • Template cannot be set because no image has been change the setting to “Capture captured after PV500 started up when you select “Use the New Image” to execute Last Image” for “Template Setting. Template setting.
- Page 377 PV500. Communication error (communication timeout or sum check error) E0111 Connect and set correctly. occurred during PLC communication. While PV500 stops the operation, a command to execute one of E0200 Operate (run) PV500 and the following is sent. execute again.
- Page 378 • Specification of the parameter is wrong. (A number other than 0 and 1 was specified.) Make PV500 be operable. • PV500 sent a command in the following inoperable state. – When selecting "TOOL" > "General", "Setting Help" or "Update –...
- Page 379 "Output Conditions" E0257 Capture an image. • There is no image captured. When saving Image memory of PV500 in a SD memory card; E0260 Correctly attach a SD memory • No SD memory card is attached, the card cannot be card which is writable and has accessed, or used up its capacity.
-
Page 380: Timing Chart
Make sure that REDY signal is ON and then turn on STA0 signal for more than 1 ms. PV500 turns off REDY signal and REN0 signal, and starts capturing an image. The OFF time of REDY signal is called "inspection time" up to No.4. - Page 381 Out signal keeps on status until the next output (Hold), or turns off when TACT signal turns off (Reset). To select “Hold” or “Reset”, select “ENVIRONMENT” > “System Settings” > “Operation” > “Parallel I/O Output Reset Condition”.
- Page 382 After image capturing is completed, PV turns on REN0 signal and executes checkers. After REN0 signal turns on, PV500 can receive STA0 signal (or capture and image). At the timing when it starts capturing the next image, input STA0 signal.
- Page 383 REN0 signal is turned on. If it has not, PV waits until the data is output and turns on REN0 signal. After REN0 signal turns on, PV500 can receive STA0 signal (or capture and image). At the timing when it starts capturing the next image, input STA0 signal.
- Page 384 STA signal (STA0 for the example above) for more than 1 ms. PV500 turns off REDY signal and REN0 signal, and starts capturing an image. To start capturing an image of the second camera (C1 above), make sure that REN signal for the...
- Page 385 Note on Displaying Live Image When Live image is displayed, a delay time occurs until starting image capture after inputting the START signal. Note that the timeout period is measured including this delay time. The delay time varies depending on cameras.
-
Page 386: Outputting All Results (Output = All)
8.3.2 Outputting All Results (Output = All) When the Handshake Function Is Set to “No” Inspection data are output at intervals of set “Output signal guarantee time (Tp)”. STROBE signal turns on each time outputting the data. Receive data with the external device after rising edge of STROBE ON signal and before the next STROBE signal turns on. - Page 387 Be sure to turn on ACK signal in the time of To after turning on Strob signal. PV500 checks that ACK signal is ON and turns off STROBE signal and TACT signal. Setting "Parallel I/O Output Reset Condition" to "Reset" resets OUT signal at this timing.
-
Page 388: Type Switch (Type)
However, when “ACCEPT OFF Min.” is set, ACCEPT signal turns on after whichever longer of the type switch time or Accept OFF Min. time pasts. Turns off TYPE signal and IN0-7 signals before inputting a signal, such as START, to PV500. -
Page 389: Flash Output Timing
When you turn on the light by inputting FLASH signal sent from PV500, the light continuously flashes while display image of PV500 is set to "Live". This is because the Flash signal is output continuously along with the display timing of the live image. It is advisable to display "Memory" image when you use the light using Flash signal. -
Page 391: Control With Communication Port
Chapter 9 Control with Communication Port... -
Page 392: Communication Port And Protocol
Ethernet interface 9.1.1 RS-232C Interface Using COM.0 port, PV500 communicates with the external device through RS-232C. Outputting inspection result data and sending/receiving control commands (General purpose communication only) can be performed. There are two types of protocols for communication available, “General Purpose Communication” and “PLC Communication”. - Page 393 • When “Flow Control” is "Hard Flow" manual of PLC to connect it as necessary. Connections with Panasonic PLC (FP series) FPΣ COM port: RS232C 1 channel type FP0 COM port FP-X COM port: RS232C 1channel type...
-
Page 394: Ethernet Interface
About Baud Rate PV500 automatically adjusts the baud rate according to the speed of the device to communicate. (Auto negotiation) You can know the current baud rate by the position and color of LED of Ethernet port that lights when communicating. - Page 395 About Port Number Port number differs depending on protocol or communication data. General Purpose PLC Communication Communication. Protocol TCP / IP UDP / IP Communication behavior Server Client Port No. Data Output 8601 1 to 65534 (Except 8600 to 8699 and 9090) Command send / 8604 receive...
- Page 396 Connect them with a commercially available straight cable (STP straight cable of category 5e or more is recommended.) through a hub or a router, which supports 1000BASE-T, 100BASE-TX, and 10BASE-T. Do not use the same IP addresses for the PV500 and the PC on the network.
-
Page 397: Protocols
PV500. As data is sent and received using ASCII strings, there is no restriction on external devices, however, a communication program for PV500 should be created in the external devices. Using this method enables to output inspection results, control PV500, read and change the setting values of PV500. -
Page 398: Communication Command
9.2 Communication Command 9.2.1 List of Commands The commands described in this chapter are the common commands for the ports to control PV500 through RS-232C interface and Ethernet interface. Port number of Ethernet interface to send/ receive commands for PV500 is “8604”. -
Page 399: Details Of Commands
This manual describes a block check code as “BBC”. As a block check code of PV500, a code that is given by removing a terminal code from Exclusive OR (8-bit) of a command message and converting it into ASCII code (two letters) is used. - Page 400 The specified block is invalid (the number which does not/ cannot exist was specified) • No camera is connected. • The specified camera number is set to "Unused" in PV500. Example: Starts the inspection of block No.2. Send * CR...
- Page 401 • The specified camera number is invalid. No camera is connected. The specified camera number is set to "Unused" in PV500. Other number than 01 and 15 is specified. • A command specifying the camera which has already captured an image is sent.
- Page 402 • The specified camera number is invalid. No camera is connected. The specified camera number is set to "Unused" in PV500. Other number than 01 and 15 is specified. • A command specifying the camera which has already captured an image is sent.
- Page 403 Error code Operation is stopped Execution mode is “User-Defined”. There is no image captured. Reinspection cannot be executed because PV500 is inspecting repeatedly For “User-Defined” execution mode % R ? ? = 0 - 9 (Block No. to execute) Send...
- Page 404 * The status where the device is waiting for the rest of camera triggers after receiving some of the camera triggers. Saving Setting Data Saving in the Storage Space in PV500 % M W ? ?? = 00 - 99 (Storage area No. of PV)
- Page 405 The Data file is incompatible. (Data of the later version, etc.) • The number and types of cameras connected to PV500 is different from the Camera setting of the data file. (including the case that the camera is unconnected because the camera cable came off unexpectedly.)
- Page 406 Abort Save/Read Setting Data % C D BCC=22 or ** Send Receive % C D $ BCC(06) Error (ERROR 1 signal = ON) % C D Error code (3-digit) Error code • Saving or reading setting data is not executed. •...
- Page 407 Specification of the parameter is wrong. (A number other than 0 and 1 was specified.) • PV500 sent a command in the following inoperable state. When selecting "TOOL" > "General", "Setting Help" or "Update” When displaying SETUP menu when "Run Mode in SETUP Menu"...
- Page 408 Resetting Error Signal To turns off ERROR 0 and ERROR 1. BCC = 60 or ** Send Receive BCC(44) Keypad Operation (Key Emulation) This is a command that performs the same operations of the keypad. % K s Send s = 0 - 1 (On/off switch of the shift key;...
- Page 409 Error (ERROR 1 signal = ON) Error code (3-digit) Error code Operation is stopped • Although PV500 is operating (RUN), displaying SETUP menu cannot switch layout. • Other number than 00-31 is specified for layout number. • No layout has been registered in the specified layout number.
- Page 410 • Other number than 000-999 for checker number, or 00-63 for template was specified. Template cannot be set because no image has been captured after PV500 started up when you select “Use the Last Image” for “Template Setting”. • No feature on the image of template registration area.
- Page 411 • Other number than 000-999 for checker number, or 00-63 for template was specified. Template cannot be set because no image has been captured after PV500 started up when you select “Use the Last Image” for “Template Setting”. • No feature on the image of template registration area.
- Page 412 Read Out Command This is a command that reads out the settings of PV500 and inspection results. For the information of readable data, refer to the pages after page 380. When reading one of data (such as Execution time, Total judgement, Maximum value, or Minimum value)
- Page 413 Write Command This is a command that changes the setting value of PV500. Writing is available only when being in RUN mode and displaying RUN menu. For the information of writable data, refer to the next page. When writing one of data (such as System Register, maximum...
- Page 414 Details of Read out/write Command Parameter When writing maximum and minimum values in sets using %PWP command, specify maximum values in Data 1 and minimum values in Data 2. When reading two data in sets using %PRP command, the data is output in the same order.
- Page 415 Gray Window Parameter Read Write Minimum Maximum Details value value OK Judge. Max. GWCnnn:MAX OK Judge. Min. GWCnnn:MIN OK Judge. Max and GWCnnn:LPAIR Data 1 = Min. Min. Data 2 = Max. Binary Edge Parameter Read Write Minimum Maximum Details value value OK Judge.
- Page 416 Connector Parameter Read Write Minimum Maximum Details (Binary Window) value value Common Judge. Max. CBWnnn:CMAX 62500 Common Judge. Min. CBWnnn:CMIN 62500 Common Judge. Max. CBWnnn:CPAIR 62500 Data 1 = Min. and Min. Data 2 = Max. Individual Judge. Max. CBWnnn:MAX.ss 62500 Individual Judge.
- Page 417 Smart Edge (Line) Parameter Read Write Minimum value Maximum value Details Max. Measurement *1) SELnnn:LMAX -99999999.999 99999999.999 Min. Measurement *1) SELnnn:LMIN -99999999.999 99999999.999 Max. and Min. SELnnn:LPAIR -99999999.999 99999999.999 Data 1 = Min. Measurement *1) Data 2 = Max. Max. Standard SELnnn:SMAX 99999999.999 Deviation...
- Page 418 Geometry Calculation Parameter Read Write Minimum value Maximum value Details Max. Radius GGCnnn:RMAX 99999999.999 Min. Radius GGCnnn:RMIN 99999999.999 Max. and Min. Radius GGCnnn:RPAIR 99999999.999 Data 1 = Min. Data 2 = Max. Max. Major Axis GGCnnn:LAMAX 99999999.999 Min. Major Axis GGCnnn:LAMIN 99999999.999 Max.
-
Page 419: Plc Communication
RS232C or Ethernet interface with an exclusive protocol. The following communications are available. Data Output PV500 writes the inspection results and data to the specified register of PLC as the beginning. The PLC does not need a communication program to receive data. - Page 420 In accordance with specification of PLCs, some of the registers in "Usable range" of "Usable device" listed below could not be used. Please confirm the specifications of PLC before use. FP series / FP series (ET-LAN unit) by Panasonic Industrial Devices SUNX Co., Ltd.
- Page 421 FX-2N series by Mitsubishi Electric Corporation · CPU: FX2N, FX3U, FX3UC Communication adapter: FX2N-232-BD, FX3U-232-BD, FX3U-232-ADP · Protocol: Special protocol for FX2N Register for specifying communication format: Store "0" in D8120. (Reboot the PLC after the setting.) · Usable device Data output/ Type switch Data output completion notice Register*...
-
Page 422: Outputting Data In Plc Communication
Goes back to the beginning and outputs START signal for the next inspection execution. About Data that can be Output When PV500 executes inspection, the data set to output are output in the following order. 1. Scan Count 2. Total Judgement 3. Judgement result: Up to 1000 points combining judgements and numerical calculations. - Page 423 Output format of Judgement data: Output Data A Judgement is output in 4-bit (digit) unit Four data of Judgement per word from PLC are saved starting with LSB. When the outputting data is other than multiples of four, hexadecimal E is output.
- Page 424 Example of Output Output Condition - Output Data: · Scan count: 1234 times · Total Judgement: OK · Judgement: JDC000=OK, JDC001=unset, JDC002=NG, JDC003 or later=Unset · Numerical Calculation: CAC000=215.3, CAC001=unset, CAC002=-2184.6, CAC003 or later=Unset Output Result: Output Data = 16 bit, the top of Output Registers = 500 Register Value Data...
- Page 425 %99#WDD0001 × × × × × Example) When Station No. is 99 . In “Start Register”, specify the first register number of the PLC that PV500 outputs data into. 0 to 99999 are available. Not all addresses 0 to 99999 can be used in destination PLC. As the address allowed to be written by the external device (PV500) varies depending on PLC, please make sure the address with the instruction manual of PLC.
- Page 426 20 – 20000 ms (default: 5000) When PV500 writes data in the specified address of PLC, it sends and receives commands and response messages in the dedicated protocol between PV500 and PLC. The value set here is Timeout in the message communication in this case.
- Page 427 Specify the port number of the PLC. Input the same number as the port number set on the PLC to communicate. Available port No. on PV500: 1 to 32767 (except 8600 to 8699 and 9090) Specify the station number of the PLC.
-
Page 428: Switching Types By Plc Communication
Default: 5000 Input the same number as the port number set on the PLC to communicate. Available port No. on PV500: 1 to 65534 (except 8600 to 8699 and 9090) 9.3.3 Switching Types by PLC Communication When outputting data through PLC communication, you can specify the product type to be switched by using the protocol of PLC communication. - Page 429 When Switching Types through PLC Communication . Select "ENVIRONMENT" > “Input/Output” > “General Output” from the menu bar. Set “Protocol” to “PLC Communication”. Select a destination in “PLC Type”, and select "PLC Communication Setting". Select “PLC Communication” for “Type Switching Signal”. Setting of “Parallel I/O”...
-
Page 431: Pvwin
Chapter 10 PVWIN... -
Page 432: About Pvwin
10.1 About PVWIN PVWIN is software of setting and simulation for PV series. Almost all items set in PV500 can be also set with PVWIN. In PVWIN, the program can be simulated off-line with PV500. For this, you can adjust the set programs by simulating them to confirm they obtain the expected results on the images captured with a camera and saved in a PC. - Page 433 Connecting PV500 with PC Connect PV500 and the PVWIN-installed PC with a USB cable or an Ethernet cable. About connection with an Ethernet cable, refer to page 392. Connecting with USB Cable Use a USB cable (for 2.0, AB type) of which length is 5m or less.
-
Page 434: Communication
PV500 (PV500 to PVWIN). After downloading a project file from PVWIN to PV500, be sure to save the data in PV500. Turning off the power of PV500 without saving data removes the downloaded project file from the PV500. -
Page 435: Reading The Latest Image Of Pv500
10.2.2 Reading the Latest Image of PV500 The latest image of PV500 can be read out on the camera window of PVWIN by a command from PVWIN. Regardless of the displayed menu (SETUP/RUN) and running status of PV500, reading the image can be executed. -
Page 436: Pv500
10.2.4 Downloading images into Test Image Memory of PV500 This is the function that downloads the images stored in a PC into the Test Image Memory of PV500 (Ver.1.40 or later) by a command from PVWIN (Ver.1.10 or later). Other than the images uploaded from PV500, images that meet the following conditions can be downloaded. -
Page 437: Specifications And List Of Product Numbers
Chapter 11 Specifications and List of Product Numbers... -
Page 438: General Specification
11.1 General Specification PV500 2-Camera type 4-Camera type 32-bit RISC CPU & DSP Number of camera connections Up to 2 Up to 4 Processing resolution Hor. 640 x Ver. 480 pixels (Quad-speed digital camera, Ultra compact digital camera, 0.3-Mega Compact Gray Camera*1) Hor. - Page 439 *1) 0.3-Mega Compact Gray Camera is supported in Ver.2.40. *2) Tested with the varistor and the condenser at the primary side of the power supply for the internal circuit removed. Keypad Operation keys ENTER key, TRIG(TRIGGER) key, FUNC(FUNCTION) key, CANCEL key, F1 key, F2 key, F3 key, OPE/SET switch, LOCK key, and SHIFT Environmental Operating humidity...
- Page 440 Weight Approx. 65 g (without lens) Ultra Compact Digital Camera: ANPVC1021 This product was discontinued as of the end of August 2011. Interline transfer method. 1/3-inch CCD, pixel size: 7.4 mm x 7.4 mm Image sensor (tetragonal pixel) Number of effective pixels Horizontal 659 x vertical 494 pixels Scanning method Non-interlace...
- Page 441 XGA Monitor: ANPVM11021 General Specification Rated power Power supply voltage 24 V DC Operating voltage range: 21.6 to 26.4 V Power Consumption 0.5 A (Max. 1 A) Environmental Operating ambient temperature 0 to +45 °C resistance Operating ambient humidity 35 to 85 %RH (without dew condensation at 25°C) Power noise 1,000 V (P-P) or more, pulse width 50 ns, 1 µs between power terminals (a noise simulator was used.)
-
Page 442: Product Numbers
*1 *2: Supported languages: Japanese, English, German, French, Spanish, Italian, Simplified Chinese, Korean and Traditional Chinese (For PV500V2: Ver.2.0, PV500: Ver.1.6) *4: These products were discontinued as of the end of August 2011. Attach the designated ferrite cores on the both sides of a monitor cable and a COM.0 connecting cable. Do not connect with the USB port. - Page 443 Camera Cable for 0.3-Mega Cable length: 3m ANPVC8203 Compliant Compact Camera with CE Cable length: 5 m ANPVC8205 Cable length: 10 m ANPVC8210 *1: Included item: Adapter ring 2.5 mm (1mm x 2, 0.5 mm x 1) *2: This product was discontinued as of the end of August 2011. *3: Included item: Adapter ring 2.5 mm (1mm x 2, 0.5 mm x 1), C-mount converter *4: This product is supported in Ver.2.40.
- Page 444 *2: Discontinued as of the end of August 2011. Repair Parts Backup buttery for PV500 Coin-type lithium buttery AFPX-BATT Compliant with CE Power cable for PV500 Cable length: 1 m ANPVH001 Terminal socket 16 pins for I/O port ANPVH002 non- compliant 6 pins for COM.1 and COM.2 ports x 1...
- Page 445 Lighting Ring light outside diameter: Ø 50, red AULDR2-50RD* [Direct lighting] outside diameter: Ø 50, white AULDR2-70SW* outside diameter: Ø 70, red AULDR2-70RD* outside diameter: Ø 70, white AULDR2-70SW* Options for ring For AULDR2-50RD/ Polarization plate AUPL-LDR-50B* light AULDR2-50SW Diffusing plate AUDF-LDR-50B* [Direct lighting] Diffusing plate,...
-
Page 446: Dimensions
11.3 Dimensions PV500 Keypad L = cable length ANPVP03: 3 m ANPVP10: 10 m... - Page 447 Camera Quad-speed Digital Camera: ANPVC1040 / 2-Mega-pixel Digital Camera: ANPVC1210 With the mounting plate Without the mounting plate The mounting plate can be attached to four sides of camera except lens attaching side and cable connecting side. 0.3-Mega Compact Gray Camera: ANPVC5030 With the mounting plate With the mounting plate and Without the mounting plate and...
- Page 448 Ultra Compact Digital Camera: ANPVC1021 (This product was discontinued as of the end of August 2011.) Camera Head With the mounting plate Without the mounting plate Camera Control Unit With the mounting plate Without the mounting plate...
- Page 449 Camera Cable ANPVC8103, ANPVC8105, ANPVC8110 1: Product number label 2: Ferrite core L: Cable length ANPVC8103: 3 m, ANPVC8105: 5 m, ANPVC8110: 10 m 0.3-Mega Compact Gray Camera (ANPVC5030) cannot be used. ANPVC8203, ANPVC8205, ANPVC8210 1: Product number label 2: Ferrite core L: Cable length Product Numbers Ø...
- Page 450 Lens ANPVL0401(Discontinued as ANPVL1201(Discontinued as ANPVL3001(Discontinued as of the of the end of August 2011.) of the end of August 2011.) end of August 2011.) ANM8850 (Discontinued product) ANM88501 ANB842NL ANB847L ANB843L ANB843L can not be used in combination with the 0.3M compact camera.
- Page 451 ANB846NL ANB845NL ANM88251 ANM88161 ANPV162 ANM88161 and ANM88251 can not be used in combination with the 0.3M compact camera.
- Page 452 ANPV252 ANPV502 Monitor (10.4-inch) Product No.: ANPVM11021 Cutting Dimensions of the Mounting Plate...
-
Page 453: Appendix
Appendix How to read commands This section describes the command names of the string functions used for Numerical Calculation or Judgement and the meanings in alphabetical order. "nnn" in the string functions expresses a checker number. "mmm" expresses a result number and the number of "m"... - Page 454 Numerical Calculation String function Judge. Meaning of function Statistics Result ATAN( Arctangent of value in parentheses (unit: radian) ATAND( Arctangent of value in parentheses (unit: degree) AUCnnn_JUDGE @ (Type1) Area Size Adj. Judgement AUCnnn_PX @ (Type2) Area Size Adj. Proj. X Axis AUCnnn_PY @ (Type2) Area Size Adj.
- Page 455 Numerical Calculation String function Judge. Meaning of function Statistics Result CGEnnn_PT.mm @ (Type2) Connector (Gray Pitch Edge) CGEnnn_PTJUDG @ (Type1) Connector (Gray Pitch Total Edge) Judgment CGEnnn_TIME @ (Type2) Connector (Gray Inspection Time Edge) CGEnnn_UJUDGE.mm @ (Type1) Connector (Gray Distance Difference Edge) Judgement CGEnnn_UPJUDG...
- Page 456 Numerical Calculation String function Judge. Meaning of function Statistics Result CWCnnn_BSD @ (Type2) Color Window B Standard Devi. CWCnnn_BSJUDG @ (Type1) Color Window B Standard Devi. Judge. CWCnnn_GAJUDG @ (Type1) Color Window G Ave. Judge. CWCnnn_GAV @ (Type2) Color Window G Ave.
- Page 457 Numerical Calculation String function Judge. Meaning of function Statistics Result FECnnn_RDY.mmmm @ (Type2) Feature Extraction Circumscribing Rectangle Lower Right Y FECnnn_RUX.mmmm @ (Type2) Feature Extraction Circumscribing Rectangle Upper Right X FECnnn_RUY.mmmm @ (Type2) Feature Extraction Circumscribing Rectangle Upper Right Y FECnnn_TIME @ (Type2) Feature Extraction...
- Page 458 Numerical Calculation String function Judge. Meaning of function Statistics Result GGCnnn_XJUDGE @ (Type1) Geometry Calcu. X Judgement GGCnnn_Y @ (Type2) Geometry Calcu. GGCnnn_YJUDGE @ (Type1) Geometry Calcu. Y Judgement Returns "1" when (the first term in parentheses) is greater than (the second term), otherwise "0".
- Page 459 Numerical Calculation String function Judge. Meaning of function Statistics Result OCAnnn_JUDGE @ (Type1) Numerical Calcu. Judgement (Previous Value) OCAnnn_VALUE @ (Type2) Numerical Calcu. Calculation Result (Previous Value) PACnnn_AJANG @ (Type2) Position Adjustment Adjustment Amount Theta PACnnn_AJX @ (Type2) Position Adjustment X Adjustment Amount PACnnn_AJY...
- Page 460 Numerical Calculation String function Judge. Meaning of function Statistics Result RTOPYC(c, Xr, Yr) Y coordinate of the coordinate in pixels converted from the real value specified by the second and third terms of the camera specified by the first term in parentheses. SECnnn_AMAX @ (Type2) Smart Edge (Circle)
- Page 461 Numerical Calculation String function Judge. Meaning of function Statistics Result SELnnn_EY0 @ (Type2) Smart Edge (Line) Line 0 End Coordinate Y SELnnn_EY1 @ (Type2) Smart Edge (Line) Line 1 End Coordinate Y SELnnn_FCNT @ (Type2) Smart Edge (Line) Used Edge Count SELnnn_IJUDGE.mmmm @ (Type1) Smart Edge (Line)
- Page 462 Numerical Calculation String function Judge. Meaning of function Statistics Result SMCnnn_TEMP.mmm @ (Type2) Smart Matching Detect Template No. SMCnnn_TIME @ (Type2) Smart Matching Inspection Time SMCnnn_X.mmm @ (Type2) Smart Matching SMCnnn_Y.mmm @ (Type2) Smart Matching SORT( The value of the number specified by the fourth term in parentheses when sorting the number of Calculation Nos.
- Page 463 List of general communication commands This section describes communication commands in alphabetical order. "nnn" in commands expresses a checker number. Refer Command Meaning Send Receive %!10035 BCC error, reception of an undefined command / error %!11034 Receive buffer overflow / error %A!20077 Smart Matching template setting / error %A!23074...
- Page 464 ??:Layout No.(00-31) %Ks??(BCC) Keypad Operation (Key Emulation) s:SHIFT OFF/ON(0-1) ??:Button information(01-16) %MR!20029 Reading setting data (Storage space in PV500) / error %MR!21108 Reading setting data (Storage space in PV500) / error %MR!2120B Reading setting data (Storage space in PV500) / error...
- Page 465 Refer Command Meaning Send Receive %PR CBWnnn:CMIN(BCC) Read / Checker / Connector(Binary Window) / Common Judge. Min. %PR CBWnnn:MAX.ss(BCC) Read / Checker / Connector(Binary ss: Cell No.(00-99) Window) / Individual Judge. Max. %PR CBWnnn:MIN.ss(BCC) Read / Checker / Connector(Binary ss: Cell No.(00-99) Window) / Individual Judge.
- Page 466 Refer Command Meaning Send Receive %PR GGCnnn:CAMAX(BCC) Read / Geometry Calculation / Geometry Calculation / Max. Intersect. Angle %PR GGCnnn:CAMIN(BCC) Read / Geometry Calculation / Geometry Calculation / Min. Intersect. Angle %PR GGCnnn:DMAX(BCC) Read / Geometry Calculation / Geometry Calculation / Max. Distance %PR GGCnnn:DMIN(BCC) Read / Geometry Calculation / Geometry Calculation / Min.
- Page 467 Refer Command Meaning Send Receive %PR LICnnn:LMAX(BCC) Read / Checker / Line / Max. No. of Objects %PR LICnnn:LMIN(BCC) Read / Checker / Line / Min. No. of Objects %PR SECnnn:CMAX(BCC) Read / Checker / Smart Edge(Circle) / Max. Circularity %PR SECnnn:CMIN(BCC) Read / Checker / Smart Edge(Circle) / Min.
- Page 468 Refer Command Meaning Send Receive %PR SYS_RUN(BCC) Read / System value / Operation Status %PR SYS_TIME(BCC) Read / System value / Current Time %PR SYS_TIME1(BCC) Read / System value / Inspection Time %PR SYS_TIME2(BCC) Read / System value / Inspection Frequency %PR SYS_TYPE(BCC) Read / System value / Current Type No.
- Page 469 Refer Command Meaning Send Receive %PR$CGEnnn:PMIN=[Data] Read / Checker / Connector(Gray Edge) / (BCC) Min. Pitch Judge. %PR$CGEnnn:UMAX=[Data]( Read / Checker / Connector(Gray Edge) / BCC) Max. Distance Difference Judge. %PR$CGEnnn:UMIN=[Data]( Read / Checker / Connector(Gray Edge) / BCC) Min. Distance Difference Judge. %PR$CGWnnn:CMAX=[Data]( Read / Checker / Connector(Gray Window) / BCC)
- Page 470 Refer Command Meaning Send Receive %PR$GGCnnn:LAMAX=[Data] Read / Geometry Calculation / Geometry (BCC) Calculation / Max. Major Axis %PR$GGCnnn:LAMIN=[Data]( Read / Geometry Calculation / Geometry BCC) Calculation / Min. Major Axis %PR$GGCnnn:RMAX=[Data]( Read / Geometry Calculation / Geometry BCC) Calculation / Max. Radius %PR$GGCnnn:RMIN=[Data]( Read / Geometry Calculation / Geometry BCC)
- Page 471 Refer Command Meaning Send Receive %PR$SECnnn:LMAX=[Data]( Read / Checker / Smart Edge(Circle) / Max. BCC) Measurement %PR$SECnnn:LMIN=[Data] Read / Checker / Smart Edge(Circle) / Min. (BCC) Measurement %PR$SECnnn:NMAX=[Data]( Read / Checker / Smart Edge(Circle) / Max. BCC) Unused Edge Count %PR$SECnnn:SMAX=[Data] Read / Checker / Smart Edge(Circle) / Max.
- Page 472 Refer Command Meaning Send Receive %PR$SYS_TIME=[Data] Read / System value / Current Time (BCC) %PR$SYS_TIME1=[Data] Read / System value / Inspection Time (BCC) %PR$SYS_TIME2=[Data] Read / System value / Inspection Frequency (BCC) %PR$SYS_TYPE=[Data] Read / System value / Current Type No. (BCC) %PRP BECnnn:LPAIR(BCC) Read / Checker / Binary Edge / OK Judge.
- Page 473 Refer Command Meaning Send Receive %PRP GGCnnn:LAPAIR(BCC) Read / Geometry Calculation / Geometry Calculation / Max. and Min. Major Axis %PRP GGCnnn:RPAIR(BCC) Read / Geometry Calculation / Geometry Calculation / Max. and Min. Radius %PRP GGCnnn:SAPAIR Read / Geometry Calculation / Geometry (BCC) Calculation / Max.
- Page 474 Refer Command Meaning Send Receive %PRP$BWCnnn:LPAIR=[Data Read / Checker / Binary Window / OK 1],[Data 2](BCC) Judge. Max. and Min. %PRP$CACnnn:LPAIR=[Data Read / Numerical Calculation / Max. and 1],[Data 2](BCC) Min. %PRP$CBWnnn:CPAIR=[Data Read / Checker / Connector(Binary 1],[Data 2](BCC) Window) / Common Judge. Max. and Min. %PRP$CBWnnn:LPAIR.ss=[D Read / Checker / Connector(Binary ata 1],[Data 2](BCC)
- Page 475 Refer Command Meaning Send Receive %PRP$GWCnnn:LPAIR=[Data Read / Checker / Gray Window / OK Judge. 1],Data 2](BCC) Max. and Min. %PRP$LICnnn:DPAIR=[Data Read / Checker / Line / Max. and Min. No. of 1],[Data 2](BCC) Pixels %PRP$LICnnn:LPAIR=[Data Read / Checker / Line / Max. and Min. No. of 1],[ Data 2](BCC) Objects %PRP$MRKcg_CXY=[Data1],...
- Page 476 Refer Command Meaning Send Receive %PW CBWnnn:CMAX=[Data] Write / Checker / Connector(Binary Window) (BCC) / Common Judge. Max. Write / Checker / Connector(Binary Window) CBWnnn:CMIN=[Data](BCC) / Common Judge. Min. %PW CBWnnn:MAX.ss=[Data] Write / Checker / Connector(Binary Window) (BCC) / Individual Judge. Max. ss: Cell No.(00-99) %PW CBWnnn:MIN.ss=[Data] Write / Checker / Connector(Binary Window)
- Page 477 Refer Command Meaning Send Receive %PW GGCnnn:AMIN=[Data] Write / Geometry Calculation / Geometry (BCC) Calculation / Min. Angle %PW GGCnnn:CAMAX= Write / Geometry Calculation / Geometry [Data](BCC) Calculation / Max. Intersect. Angle %PW GGCnnn:CAMIN=[Data] Write / Geometry Calculation / Geometry (BCC) Calculation / Min.
- Page 478 Refer Command Meaning Send Receive %PW LICnnn:DMIN=[Data] Write / Checker / Line / Min. No. of Pixels (BCC) %PW LICnnn:LMAX=[Data] Write / Checker / Line / Max. No. of Objects (BCC) %PW LICnnn:LMIN=[Data] Write / Checker / Line / Min. No. of Objects (BCC) %PW SECnnn:CMAX=[Data] Write / Checker / Smart Edge(Circle) / Max.
- Page 479 Refer Command Meaning Send Receive %PW SYS_DATE=[Data] Write / System value / Current Date (BCC) %PW SYS_TIME=[Data] Write / System value / Current Time (BCC) %PW!20031 Write / Error %PW!25135 Write / Error %PW!25236 Write / Error %PW!25430 Write / Error %PW$BECnnn:MAX(BCC) Write / Checker / Binary Edge / OK Judge.
- Page 480 Refer Command Meaning Send Receive %PW$CGEnnn:UMIN(BCC) Write / Checker / Connector(Gray Edge) / Min. Distance Difference Judge. %PW$CGWnnn:CMAX(BCC) Write/ Checker / Connector(Gray Window) / Max. Common Judge. %PW$CGWnnn:CMIN(BCC) Write/ Checker / Connector(Gray Window) / Common Judge. Min. %PW$CGWnnn:MAX.ss(BCC) Write/ Checker / Connector(Gray Window) / ss: Cell No.(00-99) Common Judge.
- Page 481 Refer Command Meaning Send Receive %PW$GGCnnn:RMAX(BCC) Write / Geometry Calculation / Geometry Calculation / Max. Radius %PW$GGCnnn:RMIN(BCC) Write / Geometry Calculation / Geometry Calculation / Min. Radius %PW$GGCnnn:SAMAX(BCC) Write / Geometry Calculation / Geometry Calculation / Max. Minor Axis %PW$GGCnnn:SAMIN(BCC) Write / Geometry Calculation / Geometry Calculation / Min.
- Page 482 Refer Command Meaning Send Receive %PW$SECnnn:NMAX(BCC) Write / Checker / Smart Edge(Circle) / Max. Unused Edge Count %PW$SECnnn:SMAX(BCC) Write / Checker / Smart Edge(Circle) / Max. Standard Deviation %PW$SECnnn:SMIN(BCC) Write / Checker / Smart Edge(Circle) / Min. Standard Deviation %PW$SELnnn:LIMAX(BCC) Write / Checker / Smart Edge(Line) / Max.
- Page 483 Refer Command Meaning Send Receive %PWP CBWnnn:LPAIR.ss= Write / Checker / Connector(Binary Window) [Data1],[Data2](BCC) / Individual Judge. Max. and Min. ss: Cell No.(00-99) %PWP CGEnnn:PPAIR= Write / Checker / Connector(Gray Edge) / [Data1],[Data2](BCC) Min. and Min. Pitch Judge. %PWP CGEnnn:UPAIR= Write / Checker / Connector(Gray Edge) / [Data1],[Data2](BCC) Max.
- Page 484 Refer Command Meaning Send Receive %PWP Write / Marker / Central Coordinate Moving MRKcg_MOVE=[Data1] Distance Set [Data2](BCC) c: Camera No.(0-3) g: Marker No.(0-7) %PWP SECnnn:CPAIR= Write / Checker / Smart Edge(Circle) / Max. [Data1],[Data2](BCC) and Min. Circularity %PWP SECnnn:LPAIR= Write / Checker / Smart Edge(Circle) / Max. [Data1],[Data2](BCC) and Min.
- Page 485 Refer Command Meaning Send Receive %PWP$FECnnn:LPAIR(BCC) Write / Checker / Feature Extraction / OK Judge. Max. and Min. %PWP$FWCnnn:LPAIR(BCC) Write / Checker / Flaw Detection / OK Judge. Max. and Min. %PWP$GECnnn:LPAIR(BCC) Write / Checker / Gray Edge / OK Judge. Max.
- Page 486 Refer Command Meaning Send Receive %PWP$SELnnn:LPAIR(BCC) Write / Checker / Smart Edge(Line) / Max. and Min. Measurement %PWP$SELnnn:SPAIR(BCC) Write / Checker / Smart Edge(Line) / Max. and Min. Standard Deviation %Q!20067 Statistics Data Reset / Error %Q$50 Statistics Data Reset %Q74 Statistics Data Reset %R77...
- Page 487 Refer Command Meaning Send Receive Switching Type / error %X!2006E Switching Type / error %X!2106F Switching Type / error %X!2116E Switching Type %X$59 %X???(BCC) Switching Type ???:Type No.(000-255) Switching Type %X$59...
-
Page 488: Index
INDEX Cell Result (Smart Edge Line) ....190 Change letter color ........ 340 ACCEPT OFF minimum time ....339 Change menu color ....... 340 Accuracy First (Smart Edge Circle) ..176 Character alignment and overwrite Accuracy First (Smart Edge Line) ..194 permission ......... - Page 489 Display NG checkers only (Checker List) 93 Individual trigger ........61 Display NG checkers only (Pattern) ..325 Information ........318, 356 Distance Point - Point ......213 Initialize Distance Point-Line ....... 211 All Types ..........57 Environment ........342 Splash screen ........
- Page 490 Line scan ..........138 device ..........248 Linearity ..........188 Output inspection images to external Low contrast .......... 130 device ..........251 Output inspection images to external device ..........282 Magnification ........... 46 Output Signal Guarantee Time ....272 Marker ........... 310 Mask area Add ............
- Page 491 Reset Error signal ........406 Reset statistics data ....317, 369, 405 Tact signal ..........370 Result No. Assignment ....173, 192 Test image ..........333 RUN mode Test image memory ....... 280 Start ........... 314 Timeout .......... 272, 424 Stop............
-
Page 492: Record Of Changes
ARCT1F466E-3 July 2013 Fourth edition • Revision and addition along with version update to Ver.2.30 • Correction of errors WME-PV500-OP-04 July 2014 Fourth edition • Revision and addition along with supporting 0.3-Mega Compact Gray Camera (Ver.2.40) • Correction of errors...
Need help?
Do you have a question about the PV500 and is the answer not in the manual?
Questions and answers