
Related Manuals for Oracle X7-2


Summary of Contents for Oracle X7-2
-
Page 1: Installation Guide
Oracle Servers X7-2 and X7-2L ® Installation Guide Part No: E72440-03 October 2017... - Page 3 Oracle. Oracle Corporation and its affiliates will not be responsible for any loss, costs, or damages incurred due to your access to or use of third-party content, products, or services, except as set forth in an applicable agreement between you and Oracle.
- Page 4 Oracle Corporation et ses affiliés déclinent toute responsabilité ou garantie expresse quant aux contenus, produits ou services émanant de tiers, sauf mention contraire stipulée dans un contrat entre vous et Oracle. En aucun cas, Oracle Corporation et ses affiliés ne sauraient être tenus pour responsables des pertes subies, des coûts occasionnés ou des dommages causés par l'accès à...
-
Page 5: Table Of Contents
Contents Using This Documentation ................. 9 Product Documentation Library ................. 9 Feedback ....................... 9 Installation Procedure .................. 11 Installation Procedure Overview ............... 11 Preparing for Server Installation ............... 13 Server Physical Specifications ................. 13 Receiving and Unpacking Requirements ............ 14 Rack Space Requirements ................ 14 Maintenance Space Requirements .............. 15 Environmental Requirements ................ 15 Temperature Guidelines ................ - Page 6 X7-2 Back Panel Connectors and Ports ............. 72 X7-2L Back Panel Connectors and Ports ............ 73 USB Port ..................... 75 SER MGT Ports .................. 75 NET MGT Port .................. 76 Ethernet Ports .................. 76 Preparing for Installation and Power On ............ 78 Oracle Servers X7-2 and X7-2L Installation Guide • October 2017...
- Page 7 ▼ Prepare to Power On the Server ............ 79 Logging In to Oracle ILOM and Powering On the Server ........ 79 ▼ Log In to Oracle ILOM and Power On the Server ........ 79 Using Oracle ILOM .................... 83 Connecting to Oracle ILOM ................ 83 Oracle ILOM Hardware and Interfaces ..............
- Page 8 Options for Accessing Firmware and Software Updates ........ 126 Software Releases .................. 126 Getting Updates From My Oracle Support ............ 127 ▼ Download Firmware and Software Updates From My Oracle Support .. 127 Getting Software From Software Delivery Cloud .......... 128 ▼ Download Software Using Oracle Software Delivery Cloud .... 128 Installing Updates Using Other Methods ............
-
Page 9: Using This Documentation
Using This Documentation Overview – Provides specifications and describes how to install and power on Oracle ■ Server X7-2 and Oracle Server X7-2L for the first time Audience – Technicians, administrators, developers, and authorized service providers who ■ need to perform the tasks or learn about the concepts in this document. - Page 10 Oracle Servers X7-2 and X7-2L Installation Guide • October 2017...
-
Page 11: Installation Procedure
“Installation Procedure Overview” on page 11 ■ Installation Procedure Overview The following table lists the tasks you need to complete to install Oracle Server X7-2 or Oracle Server X7-2L. Step Description... - Page 12 Power” on page 119 Review procedures for getting the “Getting Firmware and latest server firmware and software. Software” on page 125 Troubleshoot installation issues. “Troubleshooting Installation Issues” on page 131 Oracle Servers X7-2 and X7-2L Installation Guide • October 2017...
-
Page 13: Preparing For Server Installation
■ “Optional Component Installation” on page 22 ■ “PCIe Cards” on page 23 ■ Server Physical Specifications The following tables list the physical specifications for the Oracle Server X7-2 and Oracle Server X7-2L. Oracle Server X7-2: Dimension Server Specification Measurement... -
Page 14: Receiving And Unpacking Requirements
■ causes vibration. Rack Space Requirements The Oracle Server X7-2 is a 1 rack unit (1U) server. Oracle Server X7-2L is a 2U server. For physical dimensions, see “Server Physical Specifications” on page You can install the server into a four-post rack cabinet that conforms to ANSI/EIA 310-D-1992 or IEC 60297 standards, such as Oracle Rack Cabinet 1242 or Sun Rack II 1242. -
Page 15: Maintenance Space Requirements
Maintenance Space Requirements The maintenance area for the rackmounted Oracle Server X7-2 and Oracle Server X7-2L must have the required access space. The following table lists the maintenance access requirements for the server when it is installed in a rack. -
Page 16: Temperature Guidelines
Most computer equipment can operate in a wide range (20 to 80 percent), but 45 to 50 percent is the recommended optimal range for the following reasons: Helps protect computer systems from corrosion problems associated with high humidity ■ levels. Oracle Servers X7-2 and X7-2L Installation Guide • October 2017... -
Page 17: Ventilation And Cooling Requirements
Rackmountable servers and equipment, including Oracle Server X7-2 and Oracle Server X7-2L, draw cool air in through the front of the rack and release warm air out the back of the rack. There is no airflow requirement for the left and right sides due to front-to-back cooling. -
Page 18: Electrical Requirements
Frequency (nominal) 50/60 Hz (47 to 63 Hz range) Maximum power consumption 2400 W Maximum heat output 11600 BTU/Hr The servers can operate effectively over a range of voltages and frequencies. Oracle Servers X7-2 and X7-2L Installation Guide • October 2017... -
Page 19: Facility Power Guidelines
80 percent of the branch circuit AC current rating. PDU power cords for the Oracle Rack Cabinet 1242 and Sun Rack II are 4 meters (13.12 feet) long, and 1 to 1.5 meters (3.3 to 4.9 feet) of the cord might be routed in the rack cabinet. The installation site AC power receptacle must be within 2 meters (6.6 feet) of the rack. -
Page 20: Circuit Breaker And Ups Guidelines
■ Product Safety: UL/CSA 60950-1, EN 60950-1, IEC 60950-1 CB Scheme with all country differences ■ EMC ■ EMC: Emissions: FCC 47 CFR 15, ICES-003, EN55022, EN55032, KN32, EN61000-3-2, EN61000-3-3 ■ Immunity: EN 55024, KN35 Oracle Servers X7-2 and X7-2L Installation Guide • October 2017... -
Page 21: Shipping Inventory
All standards and certifications referenced are to the latest official version. For additional detail, contact your sales representative. ‡ Other country regulations/certifications may apply. Related Information Oracle Server X7-2 Safety and Compliance Guide ■ Oracle Server X7-2L Safety and Compliance Guide ■... -
Page 22: Tools And Equipment
Manual. Supported components and their part numbers are subject to change over time and without notice. For the most up-to-date list, review the Oracle System Handbook, which is available from the My Oracle Support website. Oracle Servers X7-2 and X7-2L Installation Guide • October 2017... -
Page 23: Pcie Cards
■ PCIe Cards The Oracle Server X7-2 has four PCIe slots, one of which can only accommodate an internal HBA card. The Oracle server X7-2L has eleven PCIe slots, and an additional twelfth nonstandard slot. These can contain cards installed at the factory, or ordered from Oracle and installed on site. - Page 24 Oracle Servers X7-2 and X7-2L Installation Guide • October 2017...
-
Page 25: Server Features And Components
One or two processors with six integrated DDR4 memory controllers per processor. Processors with the following capabilities are supported (factory installed): ■ Intel Xeon 8168, 24 core, 2.7 GHz, 205W (Oracle Server X7-2L only) ■ Intel Xeon 8160, 24 core, 2.1 GHz, 150W ■... - Page 26 Server Components Feature System Components Note - NVMe SSDs are supported only on servers running Oracle Linux or Oracle Solaris operating systems. Storage Drives The storage drive configuration can comprise both hard disk drives (HDDs) or solid (Oracle Server X7-2L) state drives (SSDs).
-
Page 27: X7-2 Front Panel Features
The following figure shows the status indicators (LEDs), connectors, and drives located on the front panel of Oracle Server X7-2 with eight 2.5-inch storage drives. For information about how to interpret the status indicators (LEDs), refer to the Oracle Server X7-2 Service Manual. - Page 28 Storage drive 0 HDD/SSD/NVM-Express Storage drive 1 HDD/SSD/NVM-Express Storage drive 2 HDD/SSD/NVM-Express Storage drive 3 HDD/SSD/NVM-Express Storage drive 4 HDD/SSD/NVM-Express Storage drive 5 HDD/SSD/NVM-Express Storage drive 6 HDD/SSD/NVM-Express Storage drive 7 HDD/SSD/NVM-Express Oracle Servers X7-2 and X7-2L Installation Guide • October 2017...
-
Page 29: X7-2 Back Panel Features
■ X7-2 Back Panel Features The following figure shows the Oracle Server X7-2 back panel and the location of status indicators (LEDs), connectors, and PCIe slots. For information about how to interpret the status indicators (LEDs), refer to the Oracle Server X7-2 Service Manual. -
Page 30: X7-2L Front Panel Features
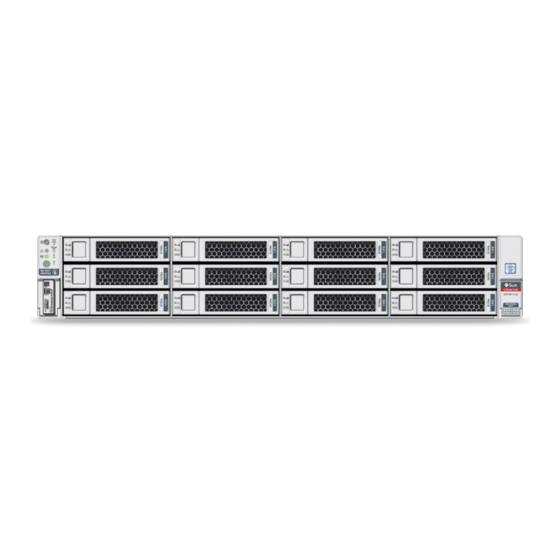
X7-2L Front Panel Features The following figure shows the status indicators (LEDs), connectors, and drives located on the front panel of a Oracle Server X7-2L configured with twelve 3.5-inch storage drives. Oracle Servers X7-2 and X7-2L Installation Guide • October 2017... - Page 31 X7-2L Front Panel Features Call Out Description Product Serial Number (PSN) label and Radio Frequency Identification (RFID) tag Locate LED/Locator button: white Fault - Service Required LED: amber System OK LED: green Power button Service Required LED: Top: Fan Module (amber) Service Required LED: Rear: Power Supply (amber) Service Required LED: Overtemp Icon: System Over Temperature Warning (amber) SP OK LED: green...
-
Page 32: X7-2L Back Panel Features
“X7-2L Back Panel Features” on page 32 ■ X7-2L Back Panel Features This section shows the Oracle Server X7-2L back panel and the location of status indicators (LEDs), connectors, and PCIe slots. For information about how to interpret the status indicators (LEDs), refer to the... - Page 33 PCIe slot 5 (Nonfunctional in single-processor systems) PCIe slot 6 Serial management (SER MGT) RJ-45 serial port Oracle Integrated Lights Out Manager (ILOM) service processor (SP) network management (NET MGT) RJ-45 10/100/1000BASE-T port Network (NET) 10/100/1000BASE-T RJ-45 Gigabit Ethernet (GbE) port: NET 0 USB 3.0 connector...
- Page 34 Oracle Servers X7-2 and X7-2L Installation Guide • October 2017...
-
Page 35: Server Management
■ “Single Server Management Tools” on page 35 ■ Multiple Server Management Tools If you are managing multiple servers, you can use Oracle Enterprise Manager Ops Center. For information about system management tools, refer to https://docs.oracle.com/cd/ E59957_01/index.htm. For more information refer to: http://www.oracle.com/goto/system-management. -
Page 36: Oracle Ilom
(SP) and then manage Oracle Server X7-2 and X7-2L. The servers are shipped initially with the latest version of Oracle ILOM. Oracle ILOM software resides on the server SP and allows you to monitor and manage server components. The software functions include: Configuring network information ■... - Page 37 Hardware Management Agent SNMP Plugins ■ Allows you to use SNMP to monitor Oracle servers from the operating system using a ■ single host IP address Connect to two management points (Oracle ILOM and the host) with only one ■...
- Page 38 Oracle Servers X7-2 and X7-2L Installation Guide • October 2017...
-
Page 39: Installing The Server Into A Rack
Installing the Server Into a Rack This section describes how to install the server into a rack using the slide-rail assembly in the Rackmount Kit. Figures for the rackmounting procedures depict Oracle Server X7-2L. The procedures are the same for the Oracle Server X7-2. -
Page 40: Safety Precautions
Lifting equipment: Oracle Server X7-2 weighs approximately 35 lbs (15.88 kg). Caution - Oracle Server X7-2L weighs 64 lbs (29.03 kg). Two people are needed to mount either server into the rack enclosure. Communicate instructions: When performing a two-person procedure,... -
Page 41: Esd Precautions
Important Safety Information for Oracle's Hardware Systems. Rack Compatibility The rack into which you install Oracle Server X7-2 or Oracle Server X7-2L must meet the requirements listed in the following table. Oracle Rack Cabinet 1242 and Sun Rack II are compatible with both servers. -
Page 42: Specifications
† Depth is measured from front door handle to back door handle. ‡ Depth is measured from front door handle to back door handle. The following table contains the Oracle Rack Cabinet 1242 rack specifications: Requirement Specification Usable rack units Height 199. -
Page 43: Rackmount Kit Contents
Rackmount Kit Contents Requirement Specification Maximum dynamic 1005 kg (2215 lbs) load Related Information “Preparing for Server Installation” on page 13 ■ Rackmount Kit Contents The following figure shows the Rackmount Kit contents. For instructions on how to install your server in a four-post rack using the slide-rail and cable management arm options, refer to the Rackmounting Template. -
Page 44: Rackmounting The Server
■ “Preparing for Server Installation” on page 13 ■ Rack cabinet documentation ■ Install Mounting Brackets on the Server To install the mounting brackets on the sides of the server: Oracle Servers X7-2 and X7-2L Installation Guide • October 2017... - Page 45 Install Mounting Brackets on the Server Position a mounting bracket against the chassis so that the slide-rail lock is at the server front, and the five keyhole openings on the mounting bracket are aligned with the five locating pins on the side of the chassis. Callout Description Chassis front...
-
Page 46: Mark The Rackmount Location
■ Mark the Rackmount Location Identify the location in the rack where you want to place the server. The Oracle Server X7-2 requires one rack unit (1U). The Oracle Server X7-2L requires two rack units (2U). Use the Rackmounting Template to identify the correct mounting holes for the slide-rails. -
Page 47: Install Ac Power Cables And Slide-Rails
Install AC Power Cables and Slide-Rails Place the Rackmounting Template against the front rails, aligning the bottom edge of the card with the bottom edge of the server, and measure up from the bottom of the Rackmounting Template. Mark the mounting holes for the front slide-rails. Mark the mounting holes for the back slide-rails. - Page 48 Install AC Power Cables and Slide-Rails 7079727 - Pwrcord, Jmpr, Bulk, SR2, 2m, C14RA, 10A, C13 ■ Install the slide-rails into the rack. Oracle Servers X7-2 and X7-2L Installation Guide • October 2017...
-
Page 49: Attach The Slide-Rails
Attach the Slide-Rails “Attach the Slide-Rails” on page Attach the Slide-Rails Use this procedure to attach slide-rail assemblies to the rack. Before you install the slide-rails, be sure to install right-angle AC power cables (part Note - number 7079727 - Pwrcord, Jmpr, Bulk, SR2, 2m, C14RA, 10A, C13). In the 1000 mm rack, the standard rail kit slide-rails obstruct access to the front of the 15kVA and 22kVA Power Distribution Unit (PDU) electrical sockets. - Page 50 Attach the Slide-Rails Orient the slide-rail assembly so that the ball-bearing track is forward and locked in place. Callout Description Slide-rail Ball-bearing track Locking mechanism Oracle Servers X7-2 and X7-2L Installation Guide • October 2017...
- Page 51 Attach the Slide-Rails Starting with either the left or right side of the rack, align the back of the slide-rail assembly against the inside of the back rack rail, and push until the assembly locks into place with an audible click. Align the front of the slide-rail assembly against the outside of the front rack rail, and push until the assembly locks into place with an audible click.
-
Page 52: Install The Server Into The Slide-Rail Assemblies
Push the slide-rails as far as possible into the slide-rail assemblies in the rack. Position the server so that the back ends of the mounting brackets are aligned with the slide-rail assemblies that are mounted in the rack. Oracle Servers X7-2 and X7-2L Installation Guide • October 2017... - Page 53 Install the Server Into the Slide-Rail Assemblies Insert the mounting brackets into the slide-rails, and then push the server into the rack until the mounting brackets are flush with the slide-rail stops (approximately 30 cm, or 12 inches). Callout Description Inserting mounting bracket into slide-rail Slide-rail release button Slide-rail lock...
-
Page 54: Install The Cable Management Arm (Optional)
Install the Cable Management Arm (Optional) Follow this procedure to install the cable management arm (CMA), which you can use to manage cables connected to the back of the server. Oracle Servers X7-2 and X7-2L Installation Guide • October 2017... - Page 55 Install the Cable Management Arm (Optional) Before you install the CMAs, ensure that the right-angle AC power cables are long Note - enough to connect to the rackmounted servers when routed through the CMAs. Unpack the CMA, which contains the following components. Callout Description Connector A...
- Page 56 Insert CMA connector A into the front slot on the left slide-rail until it locks into place with an audible click [frames 1 and 2]. The connector A tab (callout 1) goes into the slide-rail front slot (callout 2). Oracle Servers X7-2 and X7-2L Installation Guide • October 2017...
- Page 57 Install the Cable Management Arm (Optional) Gently tug on the left side of the front slide bar to verify that connector A is properly seated. Callout Description Connector A tab Left slide-rail front slot To install CMA connector B into the right slide-rail: Insert CMA connector B into the front slot on the right slide-rail until it locks into place with an audible click [frames 1 and 2].
- Page 58 Gently tug on the right side of the front slide bar to verify that connector B is properly seated. Callout Description Connector B tab Right slide-rail front slot To install CMA connector C into the right slide-rail: Oracle Servers X7-2 and X7-2L Installation Guide • October 2017...
- Page 59 Install the Cable Management Arm (Optional) Align connector C with the slide-rail so that the locking spring (callout 1) is positioned inside (server side) of the right slide-rail [frame 1]. Callout Description Connector C locking spring Insert connector C into the right slide-rail until it locks into place with an audible click [frames 2 and 3].
- Page 60 D and the latching bracket as one assembly into the slide-rail. Gently tug on the left side of the CMA back slide bar to verify that connector D is properly seated. Oracle Servers X7-2 and X7-2L Installation Guide • October 2017...
- Page 61 Install the Cable Management Arm (Optional) The slide-rail latching bracket has a green release tab. This tab is used to release and Note - remove the latching bracket so that you can remove connector D. Gently tug on the four CMA connection points to ensure that the CMA connectors are fully seated before you allow the CMA to hang by its own weight.
- Page 62 As you push the server into the rack, verify that the CMA retracts without binding. Oracle Servers X7-2 and X7-2L Installation Guide • October 2017...
- Page 63 Install the Cable Management Arm (Optional) To pull the green release tabs, place your finger in the center of each tab, not on the end, and apply pressure as you pull the tab toward the front of the server. Continue pushing the server into the rack until the slide-rail locks (on the front of the server) and engages the slide-rail assemblies.
- Page 64 CMA components. Otherwise, expansion and contraction of the CMA slide bars might be hindered when the server is extended from the rack and returned to the rack. Oracle Servers X7-2 and X7-2L Installation Guide • October 2017...
-
Page 65: Remove The Cable Management Arm
Remove the Cable Management Arm Related Information “Remove the Cable Management Arm” on page 65 ■ Remove the Cable Management Arm Follow this procedure to remove the cable management arm (CMA). Before you begin this procedure, refer to the illustration provided in Step 1 in the procedure “Install the Cable Management Arm (Optional)”... - Page 66 Note - Throughout the remainder of this procedure, the CMA must be supported until all the remaining connectors are disconnected and the CMA can be placed on a flat surface. Oracle Servers X7-2 and X7-2L Installation Guide • October 2017...
- Page 67 Remove the Cable Management Arm Callout Description Connector D release tab (green) Slide-rail latching bracket release tab (labeled PUSH) Use your right hand to support the CMA and use your left thumb to push in (toward the left) on the slide-rail latching bracket release tab labeled PUSH (callout 2), and pull the latching bracket out of the left slide-rail and put it aside [frames 3 and 4].
- Page 68 Connector B release lever To disconnect connector A: Place your left arm under the CMA to support it and grasp the back end of connector A with your left hand. Oracle Servers X7-2 and X7-2L Installation Guide • October 2017...
- Page 69 Remove the Cable Management Arm Use your right thumb to pull the connector A release lever to the right, away from the left slide-rail (callout 1), and use your left hand to pull the connector out of the slide-rail [frames 1 and 2]. Callout Description Connector A release lever...
- Page 70 Oracle Servers X7-2 and X7-2L Installation Guide • October 2017...
-
Page 71: Connecting Cables And Applying Power
“X7-2L Back Panel Connectors and Ports” on page 73 ■ “Preparing for Installation and Power On” on page 78 ■ “Logging In to Oracle ILOM and Powering On the Server” on page 79 ■ Related Information “Installation Procedure Overview” on page 11 ■... -
Page 72: X7-2 Back Panel Connectors And Ports
X7-2 Back Panel Connectors and Ports The following figure shows the locations of cable connectors and ports on the back of the Oracle Server X7-2 and the cables and devices that you connect to them. Cable Port or Expansion Slot... -
Page 73: X7-2L Back Panel Connectors And Ports
X7-2L Back Panel Connectors and Ports The following figure shows the locations of cable connectors and ports on the back of the Oracle Server X7-2L and the cables and devices that you connect to them. Connecting Cables and Applying Power... - Page 74 NET MGT port uses an RJ-45 cable for a 10/100/1000BASE-T connection. Ethernet port (NET 0) The Ethernet port enables you to connect the system to the network. The Ethernet port Oracle Servers X7-2 and X7-2L Installation Guide • October 2017...
-
Page 75: Usb Port
Note - connections. USB Port One USB 3.0 port is located at the rear panel. For Oracle Server X7-2 see the location of the USB port at “X7-2 Back Panel Features” on page 29 . For Oracle Server X7-2L, see the location of the USB port at “X7-2L Back Panel Features”... -
Page 76: Net Mgt Port
The NET MGT port, located on the rear panel, provides an optional Ethernet connection from Oracle ILOM to the SP. The NET MGT port uses an RJ-45 cable for a 10/100/1000 BASE-T connection. If your network does not use a DHCP server, this port is not available until you configure network settings through the SER MGT port. - Page 77 45 copper ports or two SFP+/SFP28 cages. Configure the host network media by selecting the media type for the ports in Oracle ILOM or the BIOS options for the BCM network controller. If the auto_media_detection option is enabled, and both SFP and RJ-45 ports are plugged Note - in, the system defaults to the SFP ports, and the RJ-45 ports are not usable.
-
Page 78: Preparing For Installation And Power On
(SP) to configure and boot the host server. To configure the host server and to view SP messages, do not apply AC power to the server until the SP and host networking connections are made. Oracle Servers X7-2 and X7-2L Installation Guide • October 2017... -
Page 79: Prepare To Power On The Server
The instructions in this guide work for any networking environment and require a terminal device for connecting ther server to the Oracle ILOM SP and to power on the server. You can establish a physical management connection to Oracle ILOM SP locally using the serial management port (SER MGT) or remotely using the Ethernet network management port (NET MGT). -
Page 80: Oracle Servers X7-2 And X7-2L Installation Guide • October
During the Oracle ILOM SP initialization, the green SP OK LED flashes rapidly. ■ After the Oracle ILOM SP fully initializes, the SP OK LED is steady on and the green ■ System OK LED flashes slowly, indicating the host in is Standby power mode. - Page 81 Log In to Oracle ILOM and Power On the Server The green System OK LED on the server front panel flashes rapidly to indicate that the host ■ is booting. The green System OK lights are steady on when the host is booted and the server is in Main ■...
- Page 82 Oracle Servers X7-2 and X7-2L Installation Guide • October 2017...
-
Page 83: Using Oracle Ilom
Using Oracle ILOM The Oracle Server X7-2 and Oracle Server X7-2L are shipped with the latest version of Oracle Integrated Lights Out Manager (ILOM). Oracle ILOM is system management firmware embedded on the service processor (SP). It provides extensive management and monitoring capabilities for the server. -
Page 84: Oracle Ilom Hardware And Interfaces
You can log in to the Oracle ILOM command-line interface (CLI) locally using the RJ-45 serial management port (SER MGT). You also can log in to the Oracle ILOM web interface or CLI remotely using one of the network ports on the server. -
Page 85: Log In To Oracle Ilom Using A Local Serial Connection
If this default Administrator account has since been changed, contact your system administrator for an Oracle ILOM user account with Administrator privileges. For information about how to change the root password, refer to the Oracle Integrated Light Out Manager (ILOM) Documentation library at: http://www.oracle.com/goto/ilom/docs... -
Page 86: Log In To Oracle Ilom Using A Remote Ethernet Connection
You can log in to the Oracle ILOM web interface or CLI remotely using one of the network ports on the server. You need to know the IP address or host name of the service processor (SP) to log in to Oracle ILOM remotely. If you do not know the IP address of the SP, see “Troubleshooting Oracle... - Page 87 ■ Initiate a secure shell session. Type: ssh username@host Where username is the user name of an Oracle ILOM account with Administrator privileges, and host is either the IP address or hostname (when using DNS) of the server SP. The Oracle ILOM password prompt appears.
-
Page 88: Exit Oracle Ilom
Modify Network Settings When you use Oracle ILOM to deploy or manage the server, you can optionally modify the default network settings provided for the service processor (SP). This procedure provides web interface and CLI instructions for viewing and modifying the network settings that are assigned to the SP. - Page 89 Modify Network Settings Log in to Oracle ILOM as an Administrator from the web interface or CLI. For details, see“Accessing Oracle ILOM” on page To modify the SP network settings, use either the Oracle ILOM web interface or CLI: From the web interface: ■...
-
Page 90: Test The Ipv4 Or Ipv6 Network Configuration
All user sessions on the SP are terminated upon committing the IP network property Note - changes. To log back in to Oracle ILOM, use the newly assigned service processor IP address. Test the IPv4 or IPv6 Network Configuration Use either the Oracle ILOM web interface or CLI to test the IPv4 or IPv6 network configuration. - Page 91 Destination field in the Network Configuration Test screen. Type the IPv4 or IPv6 test destination address in the Destination field and click Test. From the Oracle ILOM CLI ■ At the CLI prompt, type the show command to view the network test targets and properties.
-
Page 92: Redirecting The Host Console Using Oracle Ilom
Redirecting the Host Console Using Oracle ILOM Use Oracle ILOM Remote System Console Plus to remotely redirect a host server desktop or a host server storage device. Connecting to the host console through Oracle ILOM enables you to perform actions as if you were at the host. -
Page 93: Set The Mouse Mode
■ Set the Mouse Mode In Oracle ILOM, you can set the Mouse Mode property to optimize mouse movement in the Oracle ILOM Remote System Console Plus. The mouse mode can be set to either Absolute or Relative and must be set according to the requirements of the operating system that you are using to connect to Oracle ILOM. -
Page 94: Redirect Host Server Desktop Or Storage Devices
Before you begin, ensure that the following requirements are met: The following user credentials are required: ■ Console ( c ) user role privileges are required to use the Oracle ILOM Remote System ■ Console Plus. A user account on the host server is required to log in to the redirected host desktop. - Page 95 To redirect storage media, select a storage media entry in the Storage Device dialog box, and click Connect. The Oracle ILOM Remote System Console Plus application must have exclusive control of the storage device in order to establish a redirection connection to the storage device.
-
Page 96: Access Serial Remote Host Console
Note - command followed by the start /HOST/console command. To return to the Oracle ILOM console, press Esc and then press Shift + 9 to enter the open parenthesis ( character. Oracle Servers X7-2 and X7-2L Installation Guide • October 2017... -
Page 97: Configuring Storage Drives For Operating System Installation
Your server may have been shipped with an internal host bus adapter (HBA) card installed. To learn more about the internal HBA card, see the Oracle Storage 12 Gb SAS PCIe RAID HBA, internal: 16 port and 2 GB memory Internal Installation Guide at http://docs.oracle.com/... -
Page 98: Raid Configuration Requirements
Servers X7-2 and X7-2L Operating Systems Installation Guide. For information on creating RAID volumes after installing an operating system, refer to the Oracle X7 Series Servers Administration Guide at http://www.oracle.com/goto/ x86admindiag/docs. Oracle Servers X7-2 and X7-2L Installation Guide • October 2017... -
Page 99: Configuring Raid
OS as simple disks. Hardware RAID unburdens the OS and is more robust than software RAID. The Oracle Storage 12 Gb SAS PCIe RAID Host Bus Adapter supports hardware RAID. Software RAID - The OS manages the array, which normally must be created and ■... - Page 100 1 second to power off the server, and then press the Power button again to power on the server. From the Oracle ILOM web interface, select Host Management → Power Control, and ■ then select Reset from the Select Action list box. Click Save, and then click OK.
- Page 101 Configure RAID Using the Avago MegaRAID Configuration Utilities From the ACTIONS Menu, select Configure. Configuring Storage Drives for Operating System Installation...
- Page 102 Configure RAID Using the Avago MegaRAID Configuration Utilities Select Create Virtual Drive and press Enter. Oracle Servers X7-2 and X7-2L Installation Guide • October 2017...
- Page 103 Configure RAID Using the Avago MegaRAID Configuration Utilities The Create Virtual Drive – menu appears. Configuring Storage Drives for Operating System Installation...
- Page 104 Configure RAID Using the Avago MegaRAID Configuration Utilities Select RAID Level and press Enter to set the RAID level. Oracle Servers X7-2 and X7-2L Installation Guide • October 2017...
- Page 105 Configure RAID Using the Avago MegaRAID Configuration Utilities Navigate to Select Drives and press Enter. Select the drives you want to configure. Configuring Storage Drives for Operating System Installation...
- Page 106 For more information on performing this procedure, refer to the 12GB/s MegaRAID SAS Software User's Guide located at https://docs.broadcom.com/docs/pub-005110. To return to the Create Virtual Drive Advanced Menu, press ESC. Select Save Configuration. Oracle Servers X7-2 and X7-2L Installation Guide • October 2017...
-
Page 107: Rapid Storage Technology Enterprise (Rste)
To exit the Avago MegaRAID Utility, press the ESC. Rapid Storage Technology Enterprise (RSTe) You can create and manage RAID arrays on the Oracle Servers X7-2 and X7-2L SATA M.2 (SSDs) using Intel Rapid Storage Technology Enterprise (RSTe) which provides the following benefits: Additional protection from data loss. - Page 108 You can configure the volumes from the BIOS level or from Windows or Linux operating systems. Note - Oracle Solaris does not support RSTe. You can mirror Oracle Solaris M.2 root volumes with Oracle ZFS File System. Configure RAID Using RSTe This procedure configures a RAID volume so that you can install an operating system.
- Page 109 Configure RAID Using RSTe On the BIOS Setup Utility screen, select the Advanced tab, select PCH SATA Configuration, and press Enter. Configuring Storage Drives for Operating System Installation...
- Page 110 Configure RAID Using RSTe On the PCH SATA Configuration screen, select Configure SATA as. Oracle Servers X7-2 and X7-2L Installation Guide • October 2017...
- Page 111 Configure RAID Using RSTe In the Configure SATA as pop up, select RAID and press Enter. On the Save and Exit screen, select Save Changes and Exit and press Enter. Press F2 to return to the main BIOS Setup Utility menu. Configuring Storage Drives for Operating System Installation...
-
Page 112: Controller Option
Configure RAID Using RSTe Return to the Advanced tab and press Enter to select the Intel RSTe SATA controller option. Oracle Servers X7-2 and X7-2L Installation Guide • October 2017... - Page 113 Configure RAID Using RSTe Select Create RAID Volume and press Enter. On the Create RAID Volume Screen, select Name, and press Enter. Configuring Storage Drives for Operating System Installation...
- Page 114 Configure RAID Using RSTe You can assign a name to the RAID volume. Oracle Servers X7-2 and X7-2L Installation Guide • October 2017...
- Page 115 Configure RAID Using RSTe Select RAID Level and press Enter to set the RAID level. Configuring Storage Drives for Operating System Installation...
- Page 116 Configure RAID Using RSTe Select the disk you are configuring for RAID. Oracle Servers X7-2 and X7-2L Installation Guide • October 2017...
-
Page 117: Installing An Operating System
This completes the RAID configuration. You can now install an operating system on the volume that you created. Installing an Operating System For details on installing an operating system on Oracle Server X7-2 and Oracle Server X7-2L, refer to Oracle Servers X7-2 and X7-2L Operating Systems Installation Guide. - Page 118 Oracle Servers X7-2 and X7-2L Installation Guide • October 2017...
-
Page 119: Controlling System Power
“Resetting the Server” on page 122 ■ Related Information “Installation Procedure Overview” on page 11 ■ Oracle Integrated Lights Out Manager (ILOM) Documentation Library at: ■ http://www. oracle.com/goto/ilom/docs Powering the Host On and Off Your server has three power modes (states): power off, standby power, and main power. -
Page 120: Power Off The Host Using The Power Button
■ “Power On the Host Using the Power Button” on page 121 ■ “Power the Host On and Off Using Oracle ILOM” on page 121 ■ Power Off the Host Using the Power Button Locate the Power button on the server front panel. -
Page 121: Power On The Host Using The Power Button
■ Power the Host On and Off Using Oracle ILOM This procedure provides Oracle ILOM web interface and command-line interface (CLI) instructions to remotely power on or power off the host. These commands affect power to the host but not to the SP. To completely power off the Note - server, disconnect the power cords from the back panel of the server. -
Page 122: Resetting The Server
/SYSTEM ■ stop -f /SYSTEM ■ start /SYSTEM For more information, refer to Controlling Host Power, in the Oracle ILOM Administrator's Guide for Configuration and Maintenance Firmware Release 4.0.x at http://www.oracle. com/goto/ilom/docs. Resetting the Server During the reset process: It is unnecessary to power the server off and on to reset the server because a reset maintains ■... -
Page 123: Reset The Server Using Oracle Ilom
Reset the Server Using Oracle ILOM Reset the Server Using Oracle ILOM Log in to the Oracle ILOM web interface or command-line interface (CLI) using an account with admin (a) role privileges. To reset the server: From the web interface: ■... - Page 124 Oracle Servers X7-2 and X7-2L Installation Guide • October 2017...
-
Page 125: Getting Firmware And Software
Getting Firmware and Software This section explains the options for accessing server firmware and software updates using My Oracle Support. It also describes how to use the Oracle Software Delivery Cloud to download complete software applications. Customers are required to install the latest available operating system (OS), patches, and firmware versions for optimal system performance, security, and stability. -
Page 126: Options For Accessing Firmware And Software Updates
Options for Accessing Firmware and Software Updates Use one of the following options to obtain the latest firmware and software updates for your server: My Oracle Support – All system software releases are available from the My Oracle ■ Support web site at https://support.oracle.com. -
Page 127: Getting Updates From My Oracle Support
You need the Oracle VTS Diagnostics image. diagnostics image. Getting Updates From My Oracle Support You can obtain updated firmware and software from the My Oracle Support web site. For information, see “Download Firmware and Software Updates From My Oracle Support” on page 127. -
Page 128: Getting Software From Software Delivery Cloud
Download dialog box, click the patch zip file name. The patch for the software release downloads. Getting Software From Software Delivery Cloud You can obtain operating system and application software from the Oracle Software Delivery. For information, see https://edelivery.oracle.com/osdc/faces/Home.jspx. Download Software Using Oracle Software... -
Page 129: Installing Updates Using Other Methods
Follow the prompts to complete the download. Installing Updates Using Other Methods In addition to using My Oracle Support, you can install firmware and software updates using one of the following methods: Oracle Enterprise Manager Ops Center – Automatically or manually download the latest ■... -
Page 130: Oracle Support
For information, refer to the Oracle Integrated Lights Out Manager (ILOM) 4.0.x Documentation Library at: http://www.oracle.com/goto/ilom/docs Oracle Support If you need help getting firmware or software updates, call Oracle Support. Refer to Oracle Support Contacts Global Directory at: http://www.oracle.com/us/support/contact.html. Oracle Servers X7-2 and X7-2L Installation Guide • October 2017... -
Page 131: Troubleshooting Installation Issues
Troubleshooting Oracle ILOM This section addresses two issues that might occur on the Oracle ILOM service processor (SP): You need to reset the Oracle ILOM SP to complete an upgrade or to clear an error. ■ Resetting the server SP automatically disconnects any current Oracle ILOM sessions and renders the SP unmanageable until the reset process is complete. -
Page 132: Reset The Service Processor From The Server Back Panel
Reset the Service Processor From the Server Back Panel If the Oracle ILOM SP is hung and you cannot reset it using the Oracle ILOM web interface or the Oracle ILOM CLI command, use the following procedure to reset the SP from the server back panel. -
Page 133: Recover The Root Account Password
To recover the root account password you need a local serial management port (SER MGT) connection to Oracle ILOM. If the Physical Presence State is enabled (the default) in Oracle ILOM, you must prove that you are physically present at the server. -
Page 134: Resources For Troubleshooting And Diagnostics
Diagnostics” in Oracle Server X7-2 Service Manual Oracle Server X7-2L Service Manual. You can access knowledge articles, white papers, and product updates from the My Oracle Support web site at https://support.oracle.com. The following table lists diagnostic and troubleshooting resources that can assist you with resolving server issues. -
Page 135: Technical Support Information Worksheet
Locate the Customer Information Sheet (CIS) attached to your server packaging. This sheet ■ includes the serial number. From the Oracle ILOM web interface, go to the System Information → Summary ■ Information page in the Oracle ILOM web interface. -
Page 136: Auto Service Request
Oracle Auto Service Request (ASR) is provided to customers that have Oracle Premier Support. Oracle ASR is the fastest way to restore system availability if a hardware fault occurs. Oracle ASR software is secure and customer installable, with the software and documentation downloadable from My Oracle Support at https://support.oracle.com. -
Page 137: Site Planning Checklists
Preparation Checklists Complete the following checklists to ensure that your site meets the physical, electrical, and environmental requirements of the Oracle Server X7-2 or Oracle Server X7-2L before you receive the server. “Access Route and Data Center Checklist” on page 137 ■... -
Page 138: Data Center Environment Checklist
Do the data center air conditioners provide sufficient front to back airflow? Is airflow adequate to prevent hot spots? Can the data center continuously satisfy environmental requirements? Can more vented floor tiles be obtained if required? Oracle Servers X7-2 and X7-2L Installation Guide • October 2017... -
Page 139: Facility Power Checklist
Preparation Checklists Related Information “Environmental Requirements” on page 15 ■ “Ventilation and Cooling Requirements” on page 17 ■ Facility Power Checklist Complete the following checklist to ensure that the facility power requirements are met for the data center where the server is installed. Comment Facility Power Considerations Do you know the required operating voltage and... - Page 140 Can the customer provide a single PDU and its circuits to support the power requirements in case a PDU fails? Can the customer ensure power loads are evenly distributed across all circuits of a single PDU? Oracle Servers X7-2 and X7-2L Installation Guide • October 2017...
-
Page 141: Safety Checklist
Complete the following checklist if you are planning to use Auto Service Request with the server. Comment Auto Service Request Considerations Do you have a My Oracle Support Online Account to register Auto Service Request? Do you have your My Oracle Support Customer Support Identifier (CSI) number? -
Page 142: Logistics Checklist
Are you prepared for uncrating and trash removal? Are there any restrictions on delivery truck length, width, or height? Are cardboard boxes and other packing material allowed in the computer room? Oracle Servers X7-2 and X7-2L Installation Guide • October 2017... - Page 143 ■ “Receiving and Unpacking Requirements” on page 14 ■ Oracle Server X7-2 Service Manual ■ Oracle Server X7-2L Service Manual ■ Oracle Server X7-2 Safety and Compliance Guide ■ Oracle Server X7-2L Safety and Compliance Guide ■ Site Planning Checklists...
- Page 144 Oracle Servers X7-2 and X7-2L Installation Guide • October 2017...
-
Page 145: Index
27 standby, 119 access route and data center checklist, 137 agency compliance, 20 airflow requirements, 17 data center environment checklist, 138 documentation Oracle ILOM, 83 back panel connections, 32 electrical power requirements, 18 environmental cable connectors requirements, 15... -
Page 146: Oracle Servers X7-2 And X7-2L Installation Guide • October
121 tool required, 22 resetting the server, 123 inventory, ship kit, 21 resetting the service processor, 131 IPMI, 84 Oracle ILOM interfaces IPv4, 90 SNMP v3, 84 Oracle Servers X7-2 and X7-2L Installation Guide • October 2017... - Page 147 35 main, 120 physical specifications, 13 off, 119 power on and off with Oracle ILOM, 121 standby, 119 power on and off with Power button, 121 preparing for installation, 13 resetting power, 99 resetting with Oracle ILOM, 123...
- Page 148 27 support worksheet, 135 temperature guidelines, 16 tools and equipment, needed for installation, 22 troubleshooting, 131 service processor connection, 131 unpacking guidelines, 14 USB ports output power, 75 pinouts, 75 Oracle Servers X7-2 and X7-2L Installation Guide • October 2017...
Need help?
Do you have a question about the X7-2 and is the answer not in the manual?
Questions and answers