Oracle X5-2 Installation Manual
Hide thumbs
Also See for X5-2:
- Service manual (274 pages) ,
- Installation manual (152 pages) ,
- Safety and compliance manual (62 pages)
Table of Contents
Advertisement
Quick Links
Advertisement
Table of Contents
Troubleshooting

Related Manuals for Oracle X5-2


Summary of Contents for Oracle X5-2
- Page 1 Oracle Server X5-2 Installation Guide ® Part No: E48314-10 January 2021...
- Page 3 Oracle. Oracle Corporation and its affiliates will not be responsible for any loss, costs, or damages incurred due to your access to or use of third-party content, products, or services, except as set forth in an applicable agreement between you and Oracle.
- Page 4 Contrat-Cadre Oracle (OMA), Contrat de Licence et de Services Oracle (OLSA), Contrat Réseau Partenaires Oracle (OPN), contrat de distribution Oracle ou de tout autre contrat de licence en vigueur que vous avez signé et que vous vous engagez à respecter. Ce document et son contenu ne peuvent en aucun cas être communiqués, copiés, reproduits ou distribués à...
-
Page 5: Table Of Contents
Contents Using This Documentation ................ 11 Product Documentation Library ............... 11 Feedback ...................... 11 Installation Procedure .................. 13 Installation Procedure Overview ............... 13 Preparing for Server Installation ............... 15 Server Physical Specifications ................. 15 Space Requirements .................. 16 Receiving and Unpacking Guidelines ............ 17 Maintenance Space Guidelines .............. 17 Electrical Power Requirements ................ 18 Facility Power Guidelines ............... 19 Circuit Breaker and UPS Guidelines ............ - Page 6 Rear Cable Connections and Ports .............. 75 Ethernet Ports .................... 77 Preparing for Installation and Power On ............ 78 ▼ Prepare to Install the Server ............... 78 Connecting Cables and Power Cords .............. 78 ▼ Connect Cables and Power Cords ............ 79 Oracle Server X5-2 Installation Guide • January 2021...
- Page 7 Oracle ILOM Service Processor and User Interfaces .......... 83 Logging In or Out of Oracle ILOM .............. 84 ▼ Log In to Oracle ILOM Using a Local Serial Connection ...... 84 ▼ Log In to Oracle ILOM Using a Remote Ethernet Connection .... 85 Logging Out From Oracle ILOM ..............
- Page 8 Contents Configuring Storage Drives Into RAID Volumes Using Oracle System Assistant .. 114 ▼ Configure RAID on Storage Drives ........... 115 Configuring RAID Using the BIOS RAID Configuration Utilities ...... 121 ▼ Configure RAID in UEFI Boot Mode .......... 121 ▼ Configure RAID in Legacy BIOS Boot Mode ........ 127 ▼...
- Page 9 Contents Getting Updates From Oracle System Assistant or My Oracle Support .... 155 ▼ Download Firmware and Software Updates From My Oracle Support .... 156 Installing Updates Using Other Methods ............ 157 Oracle Support .................... 157 Controlling System Power ................ 159 Powering the Host On and Off ............... 159 ▼...
- Page 10 Oracle Server X5-2 Installation Guide • January 2021...
-
Page 11: Using This Documentation
Using This Documentation Overview – This installation guide contains hardware installation and configuration ■ procedures for the Oracle Server X5-2. Audience – This guide is intended for trained technicians, system administrators, and ■ authorized service personnel who have been instructed on how to install server systems and hardware components. - Page 12 Oracle Server X5-2 Installation Guide • January 2021...
-
Page 13: Installation Procedure
Review the entire installation procedure and find links “Installation Procedure Overview ” on page 13 to more information about each step. Installation Procedure Overview The following table lists the tasks you need to complete to install the Oracle Server X5-2. Step Description Links... - Page 14 Server X5-2 Installation Guide for Oracle Solaris Operating machines: System ■ “Installing a Linux Operating System” in Oracle Server X5-2 ■ Oracle Solaris Installation Guide for Linux Operating Systems ■ Oracle Linux and other Linux ■...
-
Page 15: Preparing For Server Installation
“Optional Component Installation” on page 25 Related Information “Installation Procedure Overview ” on page 13 ■ “Server Features and Components” on page 27 ■ Server Physical Specifications The following table lists the physical specifications for the Oracle Server X5-2. Preparing for Server Installation... -
Page 16: Space Requirements
The server can be installed into a four-post rack cabinet that conforms to ANSI/EIA 310-D- 1992 or IEC 60927 standards, such as Oracle's Sun Rack II. All Oracle racks have the same space requirements. The specifications for Oracle's Sun Rack II are listed in the following table. -
Page 17: Receiving And Unpacking Guidelines
“Receiving and Unpacking Guidelines” on page 17 ■ “Maintenance Space Guidelines” on page 17 ■ Receiving and Unpacking Guidelines The following table lists the dimensions and weights for the Oracle Server X5-2 shipping carton. TABLE 3 Shipping Carton Specifications Requirement... -
Page 18: Electrical Power Requirements
The numbers are not a rating of the actual power consumption of the system. For up-to-date information about the power consumption, go to Oracle Power Calculators web site and click on the Oracle Server X5-2 link: https://www.oracle.com/it-infrastructure/power-calculators/... -
Page 19: Facility Power Guidelines
AC input current load does not exceed 80 percent of the branch circuit AC current rating. For example, PDU power cords for the Oracle's Sun Rack II are 4 meters (13.12 feet) long, and 1 to 1.5 meters (3.3 to 4.9 feet) of the cord might be routed within the rack cabinet. The installation site AC power receptacle must be within 2 meters (6.6 feet) of the rack. -
Page 20: Environmental Requirements
0.65 m/s impact velocity ETE-1010-02 Rev A Set conditions to the optimal temperature and humidity ranges to minimize the chance of downtime due to component failure. Operating the Oracle Server X5-2 for extended periods at Oracle Server X5-2 Installation Guide • January 2021... -
Page 21: Temperature Guidelines
Ventilation and Cooling or near the operating range limits, or installing it in an environment when it remains at or near nonoperating range limits could significantly increase hardware component failure. See also: “Temperature Guidelines” on page 21 ■ “Humidity Guidelines” on page 21 ■... -
Page 22: Ventilation Guidelines
Rackmountable servers and equipment, including the Oracle Server X5-2, typically draw cool air in through the front of the rack and let warm air out the rear of the rack. There is no airflow requirement for the left and right sides due to front-to-back cooling. -
Page 23: Agency Compliance
All standards and certifications referenced are to the latest official version. For additional detail, please contact your sales representative. ‡ Other country regulations/certifications may apply. Related Information Oracle Server X5-2 Safety and Compliance Guide ■ Important Safety Information for Oracle's Hardware Systems ■... -
Page 24: Tools And Equipment Needed For Installation
Tools and Equipment Needed for Installation The ship kit for the Oracle Server X5-2 includes the following items: Power cords, packaged separately with country kit ■ Rackmount kit containing rack rails and installation instructions ■ Miscellaneous hardware, cables, and connectors ■... -
Page 25: Optional Component Installation
Wear an antistatic grounding strap connected to a metal surface on the chassis when you work on system components. Read the safety information in the Oracle Server X5-2 Safety and Compliance Guide and in the Important Safety Information for Oracle's Hardware Systems before installing the server. - Page 26 For the most up-to-date list, review the Oracle System Handbook at: https://support.oracle.com/handbook_private/Systems/index.html You can also log in to My Oracle Support to access the Oracle System Handbook. To access the handbook, log in to My Oracle Support. Select the Knowledge tab, and then select Oracle System Handbook.
-
Page 27: Server Features And Components
■ 12-core, 2.6 GHz, 135W processors ■ 10-core, 2.6 GHz, 105W processors ■ 8-core, 2.4 GHz, 85W processors For the latest information on CPU specifications, go to the Oracle x86 servers web site and navigate to the Oracle Server X5-2 page: https://www.oracle.com/servers/ technologies/x86-servers.html... - Page 28 (SSDs). The configuration includes: ■ Up to eight 2.5-inch hot-pluggable SAS HDDs or SSDs with an optional SATA Note - NVM-Express SSDs are only supported on servers running Oracle Linux or Oracle Solaris operating systems. Note - The NVM-Express PCIe switch card is required for storage drive configurations that contain NVM-Express SSDs.
-
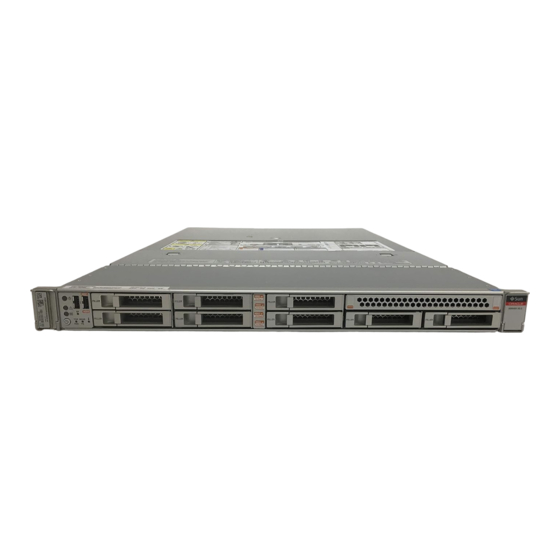
Page 29: Front Panel Status Indicators, Connectors, And Drives
Front Panel Status Indicators, Connectors, and Drives The following figure shows the status indicators (LEDs), connectors, and drives located on the front panel of a Oracle Server X5-2 configured with eight 2.5-inch storage drives and a SATA DVD drive. For information about how to interpret the status indicators (LEDs), refer to the... -
Page 30: Back Panel Status Indicators, Connectors, Drives, And Pcie Slots
Back Panel Status Indicators, Connectors, Drives, and PCIe Slots The following figure shows the Oracle Server X5-2 back panel and the location of status indicators (LEDs), connectors, and PCIe slots. For information about how to interpret the status indicators (LEDs), refer to the Oracle Server X5-2 Service Manual. - Page 31 PCIe card slot 1 (Nonfunctional in single-processor systems) PCIe card slot 2 PCIe card slots 3 and 4 Oracle Integrated Lights Out Manager (ILOM) service processor (SP) network management (NET MGT) 10/100/1000BASE-T port Serial management (SER MGT)/RJ-45 serial port Network (NET) 100/1000/10000 port: NET 3 (Nonfunctional in single-processor systems)
- Page 32 Oracle Server X5-2 Installation Guide • January 2021...
-
Page 33: Server Management
“Legacy BIOS and UEFI” on page 36 find more information. Multiple Server Management Tool If you are managing multiple servers, you can use Oracle Enterprise Ops Center. For information about Ops Center, refer to http://docs.oracle.com/cd/E40871_01/index.html. Single Server Management Tools The following table lists the tools available for managing a single server:... -
Page 34: Oracle System Assistant
Oracle System Assistant Oracle System Assistant enables you to set up and manage the Oracle Server X5-2. Oracle System Assistant is a task-based server provisioning tool that helps you to perform initial server setup and maintenance for Oracle x86 servers. Using Oracle System Assistant, you can install a supported Oracle Solaris, Oracle VM, Linux, or Windows operating system, update your server to the latest software release, and configure server hardware. -
Page 35: Oracle Hardware Management Pack
Oracle Hardware Management Pack (HMP) provides command-line interface (CLI) tools for managing your servers, and an SNMP monitoring agent. You can use the Oracle Server CLI tools to configure Oracle servers. The CLI tools work ■ with Oracle Solaris, Oracle Linux, Oracle VM, other variants of Linux, and Windows Server operating systems. -
Page 36: Legacy Bios And Uefi
Boot Mode or Legacy BIOS Boot Mode, refer to “Using UEFI” in Oracle Server X5-2 Service Manual. The following operating systems supported by the Oracle X5-2 Server can use either UEFI Boot Mode or Legacy BIOS Boot Mode: Oracle Solaris ■... - Page 37 UEFI Boot Mode during system setup. In UEFI Boot Mode, only boot candidates that support UEFI Boot Mode appear in the Boot Options Priority List in the BIOS Setup Utility. For instructions on making the selection, refer to the Oracle X5 Series Servers Administration Guide at https: //www.oracle.com/goto/x86admindiag/docs.
- Page 38 Oracle Server X5-2 Installation Guide • January 2021...
-
Page 39: Installing The Server Into A Rack
Installing the Server Into a Rack This section describes how to install the server into a rack using the rail assembly in the rackmount kit. Perform these procedures if you purchased the rail assembly. In this guide, the term "rack" means either an open rack or a closed cabinet. Note - Description Links... -
Page 40: Installation Prerequisites
Rack Requirements The rack into which you install the Oracle Server X5-2 must meet the requirements listed in the following table. Oracle's Sun Rack II is compatible with the Oracle Server X5-2. For information about Oracle's Sun Rack II, see “Preparing for Server Installation”... -
Page 41: Safety Precautions
Safety Precautions Safety Precautions This section describes safety precautions you must follow when installing the server into a rack. Leveling feet position: When unpacking at the installation site, or when repackaging Caution - and moving the rack to a new location, verify that the leveling feet are up before moving the rack. -
Page 42: Rackmount Kit Contents
Refer to the rackmount kit installation card for instructions on how to install your server Note - into a four-post rack, using the slide-rail and cable management arm options. Call Out Description Slide-rails Mounting brackets Four M4 x 5 fine-pitch mounting bracket securing screws (optional) Oracle Server X5-2 Installation Guide • January 2021... -
Page 43: Stabilize The Rack For Installation
Stabilize the Rack for Installation Call Out Description Installation card Related Information “Rack Requirements” on page 40 ■ Stabilize the Rack for Installation To reduce the risk of personal injury, stabilize the rack cabinet, and extend all anti-tilt Caution - devices before installing the server. -
Page 44: Install Mounting Brackets On The Server
With the heads of the five chassis locating pins protruding through the five keyhole openings in the mounting bracket, pull the mounting bracket toward the front of the chassis until the mounting bracket clip locks into place with an audible click. Oracle Server X5-2 Installation Guide • January 2021... -
Page 45: Mark The Rackmount Location
Mark the Rackmount Location Verify that the rear locating pin has engaged the mounting bracket clip. Repeat Step 1 through Step 3 to install the remaining mounting bracket on the other side of the server. Related Information “Mark the Rackmount Location” on page 45 ■... - Page 46 Mark the mounting holes for the rear slide-rails. Related Information “Rack Requirements” on page 40 ■ “Install Mounting Brackets On the Server ” on page 44 ■ “Attach Tool-less Slide-Rail Assemblies” on page 49 ■ Oracle Server X5-2 Installation Guide • January 2021...
-
Page 47: Connect Ac Power Cables Before Installing Tool-Less Slide-Rails In Sun Rack Ii 1042
You must perform the procedure in this section if you are installing the Oracle Server X5-2 in the Sun Rack II 1042 (1000-mm) system rack. This procedure does not need to be performed if you are installing the Oracle Server X5-2 in the Sun Rack II 1242 system rack. -
Page 48: Install Ac Power Cables And Slide-Rails
Prior to installing the slide-rails into the rack, install right-angle AC power cables into the left-side and right-side PDU electrical sockets for the servers you are going to rack mount. Install the slide-rails into the rack. Oracle Server X5-2 Installation Guide • January 2021... -
Page 49: Attach Tool-Less Slide-Rail Assemblies
Attach Tool-less Slide-Rail Assemblies “Attach Tool-less Slide-Rail Assemblies” on page Attach Tool-less Slide-Rail Assemblies Use this procedure to attach tool-less slide-rail assemblies to the rack. Installing the Server Into a Rack... - Page 50 Attach Tool-less Slide-Rail Assemblies Orient the slide-rail assembly so that the ball-bearing track is forward and locked in place. Number Description Slide-rail Ball-bearing track Locking mechanism Oracle Server X5-2 Installation Guide • January 2021...
- Page 51 Attach Tool-less Slide-Rail Assemblies Starting with either the left or right side of the rack, align the rear of the slide- rail assembly against the inside of the rear rack rail, and push until the assembly locks into place with an audible click. Align the front of the slide-rail assembly against the outside of the front rack rail, and push until the assembly locks into place with an audible click.
-
Page 52: Install The Server Into The Slide-Rail Assemblies
Push the slide-rails as far as possible into the slide-rail assemblies in the rack. Position the server so that the rear ends of the mounting brackets are aligned with the slide-rail assemblies that are mounted in the rack. Oracle Server X5-2 Installation Guide • January 2021... - Page 53 Install the Server Into the Slide-Rail Assemblies Insert the mounting brackets into the slide-rails, and then push the server into the rack until the mounting brackets encounter the slide-rail stops (approximately 30 cm, or 12 inches). Number Description Inserting mounting bracket into slide-rail Slide-rail release button Slide-rail lock...
-
Page 54: Install The Shipping Bracket With Cable Trough (Optional)
If you plan to ship the server in a rack with a space of one or more rack units below the server, you must install the Shipping Bracket With Cable Trough to prevent damage to the server. The bracket is required for each server in the rack that meets this requirement. Oracle Server X5-2 Installation Guide • January 2021... - Page 55 Install the Shipping Bracket With Cable Trough (Optional) The Shipping Bracket With Cable Trough is a separately orderable option. For information about ordering the Shipping Bracket With Cable Trough, contact your Oracle Sales representative. Unpack the Shipping Bracket With Cable Trough and components.
- Page 56 [2] Using the insertion tool, pull the cage nut through the hole until the top lip snaps into place. Repeat Step 2a through Step 2d for the remaining cage nuts. Oracle Server X5-2 Installation Guide • January 2021...
- Page 57 Install the Shipping Bracket With Cable Trough (Optional) Slide the bracket underneath the rear bottom edge of the server chassis with the cable trough facing up, aligning the top holes in the bracket with the first rail holes below the rear panel of the server. Using a No.
-
Page 58: Install The Cable Management Arm
Follow this procedure to install the cable management arm (CMA), which you can use to manage cables connected to the rear of the server. Unpack the CMA. The following figure shows the CMA components. Number Description Connector A Oracle Server X5-2 Installation Guide • January 2021... - Page 59 The CMA ships with three, flat cable covers installed. If you are going to install the Note - CMA on a Oracle Server X5-2L, you need to remove the flat cable covers and install the round cable covers. If you are installing the CMA on an Oracle Server X5-2L, remove the flat cable covers and install the round cable covers;...
- Page 60 One at a time, position each round cable cover horizontally over the hinges, and align the hinge connectors with the hinges. Using your thumb, apply downward pressure on each hinge connector to snap the hinge connector into place. Oracle Server X5-2 Installation Guide • January 2021...
- Page 61 Install the Cable Management Arm Swing the cable covers down and press down on the cable cover handle to lock them into the closed position. Ensure that the six Velcro straps are threaded into the CMA. Ensure that the two Velcro straps located on the front slide bar are threaded through the Note - opening in the top of the slide bar as shown in the illustration in Step...
- Page 62 Insert the CMA's connector B into the front slot on the right slide-rail until it locks into place with an audible click [frames 1 and 2]. The connector B tab (callout 1) goes into the slide-rail front slot (callout 2). Oracle Server X5-2 Installation Guide • January 2021...
- Page 63 Install the Cable Management Arm Gently tug on the right side of the front slide bar to verify that connector B is properly seated. Number Description Connector B tab Right slide-rail front slot To install the CMA's connector C into the right slide-rail: Installing the Server Into a Rack...
- Page 64 Insert connector C into the right slide-rail until it locks into place with an audible click [frames 2 and 3]. Gently tug on the right side of the CMA's rear slide bar to verify that connector C is properly seated. Oracle Server X5-2 Installation Guide • January 2021...
- Page 65 Install the Cable Management Arm To prepare the CMA's connector D for installation, remove the tape that secures the slide-rail latching bracket to connector D and ensure that the latching bracket is properly aligned with connector D [frames 1 and 2]. The CMA is shipped with the slide-rail latching bracket taped to connector D.
- Page 66 For instructions for stabilizing the rack, see “Stabilize the Rack for Installation” on page Slowly pull the server out of the rack until the slide-rails reach their stops. Inspect the attached cables for any binding or kinks. Oracle Server X5-2 Installation Guide • January 2021...
- Page 67 Install the Cable Management Arm Verify that the CMA extends fully with the slide-rails. To return the server to the rack: Simultaneously pull and hold the two green release tabs (one on each side of the server) toward the front of the server while you push the server into the rack.
- Page 68 Velcro straps. Route the cables through the cable troughs in this order: First through the front-most cable trough Then through the small cable trough Oracle Server X5-2 Installation Guide • January 2021...
- Page 69 Install the Cable Management Arm Then through the rear-most cable trough When securing the cables with the Velcro straps located on the front slide bar, ensure Note - that the Velcro straps do not wrap around the bottom of the slide bar; otherwise, expansion and contraction of the slide bar might be hindered when the server is extended from the rack and returned to the rack.
-
Page 70: Remove The Cable Management Arm
Unwrap the six Velcro straps that are securing the cables. Open the three cable covers to the fully opened position. Remove the cables from the CMA and set them aside. Oracle Server X5-2 Installation Guide • January 2021... - Page 71 Remove the Cable Management Arm To disconnect connector D: Press the green release tab (callout 1) on the slide-rail latching bracket toward the left and slide the connector D out of the left slide-rail [frames 1 and 2]. When you slide connector D out of the left slide-rail, the slide-rail latching bracket portion of the connector remains in place.
- Page 72 Use your right thumb to push in (toward the right) on the connector C release tab labeled PUSH (callout 1), and pull connector C out of the right slide-rail [frame 1 and 2]. Number Description Connector C release tab (labeled PUSH) To disconnect connector B: Oracle Server X5-2 Installation Guide • January 2021...
- Page 73 Remove the Cable Management Arm Place your right arm under the CMA to support it and grasp the rear end of connector B with your right hand. Use your left thumb to pull the connector B release lever to the left away from the right slide-rail (callout 1) and use your right hand to pull the connector out of the slide-rail [frames 1 and 2].
- Page 74 Remove the CMA from the rack and place it on a flat surface. Go to the front of the server and push it back into the rack. Related Information “Install the Cable Management Arm” on page 58 ■ Oracle Server X5-2 Installation Guide • January 2021...
-
Page 75: Cabling The Server And Applying Power
Rear Cable Connections and Ports The following figure shows the locations of cable connectors and ports on the back of the Oracle Server X5-2 and the cables and devices that you would typically connect to them. Cabling the Server and Applying Power... -
Page 76: Description
60 seconds if the server is not connected to a terminal, PC, or workstation. Note - Oracle ILOM will signal a fault on any installed power supply that is not connected to an AC power source, since it might indicate a loss of redundancy. -
Page 77: Ethernet Ports
Ethernet Ports Cable Port or Expansion Slot Description Note - Ethernet ports NET 2 and NET 3 are nonfunctional in single- processor systems. 5, 6 USB ports (USB 0, USB 1) The two USB ports support hot-plugging. You can connect and disconnect USB cables and peripheral devices while the server is running, without affecting system operations. -
Page 78: Preparing For Installation And Power On
Connecting Cables and Power Cords The following procedure explains how to cable the server for the first time, and then how to connect to the Oracle Integrated Lights Out Manager (ILOM) service processor (SP) using a serial connection. You can also connect to Oracle ILOM using one of these methods: Dedicated remote network management connection –... -
Page 79: Connect Cables And Power Cords
This connection provides the initial communication to the SP. (Optional) Connect an Ethernet cable between the network management port (NET MGT) and the network to which connections to the Oracle ILOM SP and host will be made. Configure the server for the first time using the SER MGT port. After initial configuration, you can set up communication between the SP and host through this Ethernet interface. -
Page 80: Powering On The Server
Powering On the Server This section explains how to power on the server locally using a serial connection and Oracle ILOM. If you want to power on the server remotely using an Ethernet connection and Oracle ILOM, “Log In to Oracle ILOM Using a Remote Ethernet Connection”... -
Page 81: Power On The Server
While the Oracle ILOM SP initializes, the green SP OK LED flashes rapidly. ■ Once the Oracle ILOM SP has fully initialized, the SP OK LED is steady on and the green ■ Power/OK LED flashes slowly, indicating that the host is in Standby power mode. - Page 82 Power On the Server Log in to Oracle ILOM using the command-line interface (CLI); use the root user account and the password changeme: host-name login: root Password: changeme The Oracle ILOM CLI prompt (->) appears. Do not apply full power to the server until you are ready to configure a preinstalled Caution - operating system or perform a fresh installation of an operating system.
-
Page 83: Connecting To Oracle Ilom
(ILOM) version 3.2.4. Oracle ILOM is system management firmware embedded on the service processor (SP). For a complete list of Oracle ILOM features, refer to the Oracle Integrated Lights Out Manager (ILOM) 3.2 Documentation Library at https://www.oracle.com/goto/ilom/docs. This section describes how to access and get started using Oracle ILOM for your server. -
Page 84: Logging In Or Out Of Oracle Ilom
■ Log In to Oracle ILOM Using a Local Serial Connection You do not need to know the IP address of the service processor (SP) to log in to Oracle ILOM locally. Oracle Server X5-2 Installation Guide • January 2021... -
Page 85: Log In To Oracle Ilom Using A Remote Ethernet Connection
Log In to Oracle ILOM Using a Remote Ethernet Connection You need to know the IP address or host name of the service processor (SP) to log in to Oracle ILOM remotely. If you do not know the IP address of the SP, see “Modifying the Service... - Page 86 To build a secure environment, you must change the default password (changeme) for the default Administrator account (root) after your initial login to Oracle ILOM. If this default Administrator account has since been changed, contact your system administrator for an Oracle ILOM user account with Administrator privileges.
- Page 87 Log In to Oracle ILOM Using a Remote Ethernet Connection The Oracle ILOM login screen appears. At the Oracle ILOM login screen, type your user name and password, and then click Log In. Connecting to Oracle ILOM...
-
Page 88: Logging Out From Oracle Ilom
The Summary Information screen appears, indicating that you have successfully logged in to Oracle ILOM. You are now logged in to Oracle ILOM. For more information about using Oracle ILOM, refer to the Oracle Integrated Lights Out Manager (ILOM) 3.2 Documentation Library at https:// www.oracle.com/goto/ilom/docs. -
Page 89: Modifying The Service Processor Network Settings Using Oracle Ilom
Modify Oracle ILOM SP Network Settings When you use Oracle ILOM to deploy or manage the server, you can optionally modify the default network settings provided for the service processor (SP). This procedure provides web and command-line interface (CLI) instructions for viewing and modifying the network settings that are assigned to the SP. - Page 90 Click Save to save your network property changes in Oracle ILOM. All user sessions on the SP are terminated upon saving the IP network property changes. Note - To log back in to Oracle ILOM, use the newly assigned service processor IP address. From the CLI, perform these steps: ■...
-
Page 91: Test The Ipv4 Or Ipv6 Network Configuration
All user sessions on the SP are terminated upon committing the IP network property Note - changes. To log back in to Oracle ILOM, use the newly assigned service processor IP address. Test the IPv4 or IPv6 Network Configuration Use either the Oracle ILOM web interface or CLI to test the IPv4 or IPv6 network configuration. - Page 92 At the CLI prompt, type the show command to view the network test targets and properties. For example, the following output shows the test target properties: -> show /SP/network/test Targets: Properties: ping = (Cannot show property) Oracle Server X5-2 Installation Guide • January 2021...
-
Page 93: Redirecting The Host Console Using Oracle Ilom
Ping of 2001::db8:5dff:febe:5000 succeeded Redirecting the Host Console Using Oracle ILOM Use Oracle ILOM Remote System Console Plus to remotely redirect a host server desktop or a host server storage device. Connecting to the host console through Oracle ILOM enables you to perform actions as if you were at the host. -
Page 94: Set The Mouse Mode
Set the Mouse Mode Set the Mouse Mode In Oracle ILOM you can set the Mouse Mode property to optimize mouse movement in the Oracle ILOM Remote System Console Plus. The mouse mode can be set to either Absolute or Relative and should be set according to the requirements of the operating system that you are using to connect to Oracle ILOM. - Page 95 Before you begin, ensure that the following requirements are met: The following user credentials are required: ■ Console ( c ) user role privileges are required to use the Oracle ILOM Remote System ■ Console Plus. A user account on the host server is required to log in to the redirected host desktop.
- Page 96 To redirect storage media, select a storage media entry in the Storage Device dialog box, and then click Connect. The Oracle ILOM Remote System Console Plus application must have exclusive control to the storage device in order to establish a redirection connection to the storage device.
-
Page 97: Access Serial Remote Host Console (Cli)
Before you begin, you can configure properties in Oracle ILOM to make the serial host console easier to view and to enable logging. For more information, refer to the Oracle ILOM Administrator's Guide for Configuration and Maintenance, Firmware Release 3.2.x at https: //www.oracle.com/goto/ilom/docs. -
Page 98: Reset The Service Processor Using Oracle Ilom
Reset the Service Processor Using Oracle ILOM You need to reset the Oracle ILOM SP to complete on upgrade or to clear an error. ■ Resetting the power on the server SP automatically disconnects any current Oracle ILOM sessions and renders the SP unmanageable until the reset process is complete. -
Page 99: Recover The Root Account Password
To recover the root account password you need a local serial management port (SER MGT) connection to Oracle ILOM. In addition, if the Physical Presence State is enabled (the default) in Oracle ILOM, you must prove that you are physically present at the server. - Page 100 Type the password for the default user account: defaultpassword. Reset the account password or re-create the root account. For more information, refer to "Configuring Local User Accounts" in the Oracle ILOM Administrator's Guide for Configuration and Maintenance, Firmware Release 3.2.x at https: //www.oracle.com/goto/ilom/docs.
-
Page 101: Setting Up Software And Firmware Using Oracle System Assistant
Launching Oracle System Assistant Oracle System Assistant is the preferred application for setting up your system software and firmware. Oracle System Assistant is an embedded, task-based server provisioning tool that enables you to perform initial server setup and maintenance for some Oracle x86 servers. -
Page 102: Launch Oracle System Assistant Locally
For the list of optional software that can be installed when you use Oracle System Assistant to install operating systems, refer to the Oracle System Assistant ReadMe. - Page 103 Launch Oracle System Assistant Locally The BIOS screen appears. When prompted, press the F9 function key to start Oracle System Assistant. Checkpoint messages appear, including the topic [Oracle System Assistant Selected]. If the Software License Agreement (SLA) dialog box appears, click Accept in the SLA dialog box to continue.
-
Page 104: Launch Oracle System Assistant Using The Oracle Ilom Web Interface
Launch Oracle System Assistant Using the Oracle ILOM Web Interface You can use Oracle ILOM to launch Oracle System Assistant locally or remotely. Before you begin, ensure the following: You have Admin (a) and Console (c) role privileges in Oracle ILOM. - Page 105 Ensure that full power is off and the server is in Standby power mode. The Power State field in the Actions panel indicates the server power state. In the Actions panel, click the Oracle System Assistant Launch button. If the server is powered on, you will be prompted to shut it down.
-
Page 106: Configure Oracle System Assistant Networking
The Oracle ILOM Remote System Console Plus window appears, and the server is powered on to Full power mode. Boot messages appear on the server. After a few moments, the Oracle System Assistant application is started, and the System Overview screen appears. -
Page 107: Setting Up An Operating System Using Oracle System Assistant
If you want to install a fresh or newer version of the preinstalled operating system or a different operating system, you can do so, provided it is a supported version. For a list of supported operating systems, refer to the Oracle Server X5-2 Product Notes at https://www.oracle.com/goto/x5-2/docs. -
Page 108: Setting Up Software And Firmware Using Oracle System Assistant
Setting Up Software and Firmware Using Oracle System Assistant Use Oracle System Assistant to simplify the setup and configuration of the server. For detailed information about using Oracle System Assistant, refer to the Oracle X5 Series Servers Administration Guide at https://www.oracle.com/goto/x86admindiag/docs. - Page 109 Using Oracle System Assistant” on page 107 or the installation Note - Do not use this option if your system guide for the OS you plan to install. came with a preinstalled OS. Setting Up Software and Firmware Using Oracle System Assistant...
- Page 110 Oracle Server X5-2 Installation Guide • January 2021...
-
Page 111: Configuring Storage Drives For Operating System Installation
RAID Configuration Tools The server supports the Oracle Storage 12 Gb/s SAS PCIe RAID HBA, Internal (part number 7110117), which includes utilities to configure RAID. This host bus adapter (HBA) requires a RAID array to install and boot an operating system (OS). -
Page 112: Raid Limitations On Preinstalled Operating Systems
Reconfiguring storage drives into RAID volumes is an optional task. If you choose to reconfigure the drives, it is recommended that you use Oracle System Assistant. If your server does not have Oracle System Assistant, use the BIOS RAID configuration utilities to configure RAID on the server. - Page 113 “Installing a Linux Operating System” in Oracle Server X5-2 Installation Guide for ■ Linux Operating Systems “Installing Oracle VM Server” in Oracle Server X5-2 Installation Guide for Oracle VM ■ “Installing a Windows Server Operating System” in Oracle Server X5-2 Installation ■...
-
Page 114: Configuring Storage Drives Into Raid Volumes Using Oracle System Assistant
Configuring Storage Drives Into RAID Volumes Using Oracle System Assistant Use Oracle System Assistant to configure RAID on the server. If your server does not have Oracle System Assistant, you can use the BIOS utilities to configure RAID. You can use Oracle System Assistant to configure RAID 0, RAID 1, RAID 5 or RAID Note - 10. -
Page 115: Configure Raid On Storage Drives
Configure RAID on Storage Drives Configure RAID on Storage Drives If you are not using a preinstalled operating system (OS) from Oracle, you must create Note - a bootable volume on a drive before installing an OS. The system does not recognize a drive unless it has a volume on it created by the HBA. - Page 116 Configure RAID on Storage Drives In the HBA list box, select Oracle Storage 12 Gb SAS PCIe RAID HBA, Internal. In the Select RAID Level list box, select the desired RAID level. Oracle System Assistant supports RAID 0, RAID 1, RAID 5, and RAID 10.
- Page 117 In the Create Volume dialog box: (Optional) Enter the Volume Name. Entering a volume name is optional. If you do not name the volume, Oracle System Assistant creates a volume without a name. Select the volume Stripe Size or accept the default stripe size.
- Page 118 If you entered a volume name earlier, you can modify it here; however, you cannot delete the name entirely. Naming the volume is optional. If you do not name the volume, Oracle System Assistant Note - creates a volume without a name.
- Page 119 Configure RAID on Storage Drives Click Save & Close. The Set Volume For Boot confirmation dialog appears. Click OK. Configuring Storage Drives for Operating System Installation...
- Page 120 The Disk Details dialog box appears. Select the Set as Hot Spare check box. You can create a maximum of 256 hot spares. Note - Click Save. The Disk Details dialog box closes. Oracle Server X5-2 Installation Guide • January 2021...
-
Page 121: Configuring Raid Using The Bios Raid Configuration Utilities
Configuring RAID Using the BIOS RAID Configuration Utilities If you choose not to use Oracle System Assistant to configure RAID, you can use the BIOS RAID configuration utilities that reside in the HBA firmware. The BIOS RAID configuration utilities support either UEFI BIOS Boot Mode or Legacy Bios Boot Mode. A separate utility is provided for each boot mode. - Page 122 Configure RAID in UEFI Boot Mode From the Oracle ILOM web interface, select Host Management → Power Control, and ■ then select Reset from the Select Action list box. Click Save, and then click OK. From the Oracle ILOM CLI, type: ■...
- Page 123 Configure RAID in UEFI Boot Mode Select Configuration Management, and then press Enter. Select Create Virtual Drive – Advanced, and then press Enter. Configuring Storage Drives for Operating System Installation...
- Page 124 Configure RAID in UEFI Boot Mode Alternatively, you can select the Create Virtual Drive option, which provides a RAID Note - configuration wizard with no advanced settings. Select the Select RAID Level option, and then press Enter. Oracle Server X5-2 Installation Guide • January 2021...
- Page 125 Configure RAID in UEFI Boot Mode The Select RAID Level dialog box appears. Select the desired RAID level from the dialog box, and then press Enter. Select the Select Drives option, and then press Enter. Configuring Storage Drives for Operating System Installation...
- Page 126 The Drive Selection screen appears. In the Drive Selection screen, select the media type, the interface type, and the drives to be included in the RAID configuration. Select Apply Changes, and then press Enter. Oracle Server X5-2 Installation Guide • January 2021...
-
Page 127: Configure Raid In Legacy Bios Boot Mode
You want to configure RAID on the intended OS installation hard drive and the server does ■ not have Oracle System Assistant or you do not want to use it. You want to create a RAID volume level 6, 50, or 60 using the storage drive on which you ■... -
Page 128: Make A Raid Volume Bootable Using The Lsi Megaraid Configuration Utility
Make a RAID Volume Bootable Using the LSI MegaRAID Configuration Utility Oracle System Assistant supports RAID 0, 1, 5, and 10 for the Oracle Storage 12 Gb/ Note - s SAS PCIe RAID HBA, Internal. You do not want to create a RAID volume, but the intended OS installation hard drive has ■... - Page 129 Make a RAID Volume Bootable Using the LSI MegaRAID Configuration Utility From the Oracle ILOM web interface, select Host Management → Power Control, and ■ then select Reset from the Select Action list box. Click Save, and then click OK.
- Page 130 Select the virtual drive that you want to make bootable, and then press Enter. Navigate to the Apply button, and then press Enter. Press the Esc key to exit the LSI MegaRAID Utility. Oracle Server X5-2 Installation Guide • January 2021...
-
Page 131: Configuring The Preinstalled Oracle Solaris Operating System
Preinstalled Oracle Solaris Image BIOS Boot Mode Restriction The Oracle Solaris 11.2 SRU5 operating system (OS) image is preinstalled on the server (if ordered) in the Legacy BIOS Boot Mode. Therefore, you must boot the server in Legacy BIOS Configuring the Preinstalled Oracle Solaris Operating System... -
Page 132: Operating System Options
UEFI Boot Mode, the server will not boot the Oracle Solaris preinstalled image and it cannot be used. If you want to switch to UEFI Boot Mode and use Oracle Solaris 11.2 SRU5, you must perform a fresh installation of the Oracle Solaris OS. - Page 133 ■ None* Time zone How do you want to specify your default time zone? ■ Geographic region* ■ Offset from GMT ■ Time zone file Root password Choose a root password for the system. Configuring the Preinstalled Oracle Solaris Operating System...
-
Page 134: Configure The Preinstalled Oracle Solaris Operating System
After you have completed the configuration worksheet, use the following procedure to configure the preinstalled Oracle Solaris operating system. If you are not already logged in to Oracle ILOM, log in either locally from a serial connection, or remotely from an Ethernet connection. - Page 135 You can choose whether you want to continue to direct the display to the serial output or direct the display to a device connected to the video port. If you are using the Oracle ILOM CLI (or a serial port connection), select the ■...
-
Page 136: Reinstalling The Oracle Solaris Operating System
■ Reinstalling the Oracle Solaris Operating System If you want to reinstall the Oracle Solaris OS or install a different version of the Oracle Solaris OS, refer to the relevant Oracle Solaris installation guide. You can download software for the Oracle Solaris OS from the following sites: To download the Oracle Solaris operating system, go to: ■... -
Page 137: Oracle Solaris Operating System Documentation
For patch and other late-breaking information about Oracle Solaris that apply specifically to the server, refer to the Oracle Server X5-2 Product Notes at: https://www.oracle.com/goto/x5-2/docs. For patches and instructions for Oracle Solaris, go to the My Oracle Support web site at the following location and navigate to the appropriate page: https://support.oracle.com Related Information “Oracle Solaris Configuration Worksheet”... - Page 138 Oracle Server X5-2 Installation Guide • January 2021...
-
Page 139: Configuring The Preinstalled Oracle Linux Operating System
Configuring the Preinstalled Oracle Linux Operating System This section describes how to configure the optional Oracle Linux 6.5 operating system (OS) that is preinstalled on your server, if ordered. The preinstalled OS image contains all of the necessary drivers for the server. -
Page 140: Preinstalled Oracle Linux Image Bios Boot Mode Restriction
Legacy BIOS Boot Mode (the default). If you boot the server in the UEFI Boot Mode, the server will not boot the Oracle Linux preinstalled image and it cannot be used. If you want to switch to UEFI Boot Mode and use Oracle Linux 6.5, you must perform a fresh installation of the Oracle Linux OS. -
Page 141: Configure The Preinstalled Oracle Linux Operating System
After you have completed the configuration worksheet, use the following procedure to configure the preinstalled Oracle Linux operating system. If you are not already logged in to Oracle ILOM, log in either locally from a serial connection, or remotely from an Ethernet connection. - Page 142 Serial console started. After the server boots, the GRUB menu appears. From the GRUB menu, you can choose whether to use the Oracle Linux Server Unbreakable Enterprise Kernel or a Red Hat compatible kernel. GNU GRUB version 0.97 (640K lower / 1703968K upper memory) Oracle Linux Server Unbreakable Enterprise Kernel (3.8.13-16.2.1.e16uek.x86_64)
- Page 143 Use Oracle Linux with the Unbreakable Enterprise Kernel for all enterprise applications. Note - Log in to the Oracle Linux OS. After you have selected an installation option, Oracle Linux starts and the Linux system login appears. For example: systemname login:...
-
Page 144: Register And Update Your Oracle Linux Operating System
Linux software patches, updates and fixes, and information on updates and support policies. If you are a licensed Oracle customer with an active Oracle Linux support subscription, use your Oracle Linux CSI (customer support identifier) number to register your server on ULN. -
Page 145: Configuring The Preinstalled Oracle Vm Server Software
Configuring the Preinstalled Oracle VM Server Software This section describes how to configure the optional Oracle VM Server 3.3 software that is preinstalled on the server, if ordered. The preinstalled image contains all of the necessary drivers for the server. -
Page 146: Preinstalled Oracle Vm Server Image Bios Boot Mode Restriction
If you use the Oracle VM Server software that is preinstalled on your system (if ordered), you must ensure that it is compatible with the version of Oracle VM Manager that you use to manage your Oracle VM infrastructure. If necessary to achieve compatibility, upgrade your Oracle VM Manager so that it is the same version. -
Page 147: Configure The Preinstalled Oracle Vm Server
Oracle VM also has other components, such as Oracle VM Manager, that must be installed or already running to support the virtual machine environment. If you are not already logged in to Oracle ILOM, log in locally from a serial connection or remotely using an Ethernet connection. - Page 148 The server begins the boot process. Start the remote host console using one of the following methods. From the Oracle ILOM web interface, select Remote Control → Redirection, and then ■ click the Launch Remote Console button to launch video console redirection.
- Page 149 As the configuration process begins, the following screen appears: Scroll down the screen and set and confirm the root password and the Oracle VM Agent password. The prompts for the root and the Oracle VM Agent passwords are only displayed the Note - first time you boot the Oracle VM Server.
- Page 150 Enter to save the settings. When all settings have been entered and saved, the system loads an Oracle VM Server Console session. For example: This completes the configuration of the preinstalled Oracle VM Server to create a virtual operating system.
-
Page 151: Oracle Vm Documentation
Oracle VM Documentation Oracle VM Documentation For information about using and updating Oracle VM software, refer to the Oracle VM documentation at: https://docs.oracle.com/cd/E50245_01/index.html Configuring the Preinstalled Oracle VM Server Software... - Page 152 Oracle Server X5-2 Installation Guide • January 2021...
-
Page 153: Getting Firmware And Software Updates
The server Product Notes list the curent server software release and firmware version that are available. To determine which firmware version is installed on your server, you can use either the Oracle ILOM web interface or the command-line interface (CLI). Getting Firmware and Software Updates... -
Page 154: Options For Accessing Firmware And Software Updates
157. Software Releases Software releases on My Oracle Support are grouped by product family (such as Oracle Server), then the product (the specific server or blade), and finally the software release version. A software release contains all the updated software and firmware for your server or blade as a set of downloadable files (patches), including firmware, drivers, tools, or utilities, all tested together to be compatible with your server. -
Page 155: Getting Updates From Oracle System Assistant Or My Oracle Support
Getting Updates From Oracle System Assistant or My Oracle Support My Oracle Support provides the set of software releases for your server as described in the following table. You can obtain these software releases by downloading the files from My Oracle Support. -
Page 156: Download Firmware And Software Updates From My Oracle Support
The Search tab area appears with search fields. In the Product field, select the product from the drop-down list. Alternatively, type a full or partial product name (for example, Oracle Server X5-2) until a match appears. In the Release field, select a software release from the drop-down list. -
Page 157: Installing Updates Using Other Methods
Installing Updates Using Other Methods Installing Updates Using Other Methods In addition to using Oracle System Assistant and My Oracle Support, you can install firmware and software updates using one of the following methods: Oracle Enterprise Manager Ops Center, available software to manage multiple systems ■... - Page 158 Oracle Server X5-2 Installation Guide • January 2021...
-
Page 159: Controlling System Power
Reset the server. “Reseting the Server” on page 162 Related Information “Installation Procedure Overview ” on page 13 ■ Oracle Integrated Lights Out Manager (ILOM) 5.0 Documentation Library at: ■ https:// www.oracle.com/goto/ilom/docs Powering the Host On and Off Your server has three power modes (states): power off, standby power, and full power. -
Page 160: Power Off The Host Using The Power Button
■ “Power On the Host Using the Power Button” on page 161 ■ “Power Host On and Off Using Oracle ILOM” on page 161 ■ Power Off the Host Using the Power Button Locate the Power button on the server front panel. -
Page 161: Power On The Host Using The Power Button
Power Host On and Off Using Oracle ILOM This procedure provides Oracle ILOM web interface and command-line interface (CLI) instructions to remotely power on or power off the host. Data loss. An immediate shutdown abruptly closes all applications and files without Caution - saving changes. -
Page 162: Reseting The Server
/SYSTEM ■ stop -f /SYSTEM ■ start /SYSTEM For more information, refer to "Controlling Host Power", in the Oracle ILOM Administrator's Guide for Configuration and Maintenance Firmware Release 5.0.x at https://www.oracle. com/goto/ilom/docs. Reseting the Server It is not necessary to power the server off and on to reset the server. A reset will maintain host power but will cause the processors to reinitialize. - Page 163 Reset the Server Using Oracle ILOM To reset the server: From the web interface: ■ In the left pane, click Host Management → Power Control, and select Reset from the Select Action list box. Click Save, and then click OK.
- Page 164 Oracle Server X5-2 Installation Guide • January 2021...
-
Page 165: Troubleshooting Installation Issues
Manual. The Oracle x86 Servers Diagnostics, Applications, and Utilities Guide for Servers with Oracle ILOM 3.1 and Oracle ILOM 5.0.x provides information about a wide variety of tools available for Oracle's x86 servers. Go to https://www.oracle.com/goto/x86admindiag/docs. Knowledge articles, white papers, and product updates are available through the Oracle Support portal at https://support.oracle.com. -
Page 166: Technical Support Information Worksheet
Technical Support Information Worksheet Technical Support Information Worksheet If the troubleshooting information fails to solve your problem, use the following table to collect information that you might need to communicate to the Oracle Service personnel. Troubleshooting Information Needed Your Information... - Page 167 Locate the Customer Information Sheet (CIS) attached to your server packaging. This sheet ■ includes the serial number. From the Oracle ILOM web interface, go to the System Information → Summary ■ Information page. From the Oracle ILOM CLI, type the show /System command.
- Page 168 Oracle Server X5-2 Installation Guide • January 2021...
-
Page 169: Site Planning Checklists
Site Planning Checklists This section provides reference checklists for site preparation. “Preparation Checklists” on page 169 ■ Preparation Checklists Complete the checklists in this section to ensure the site is prepared for the server. “Access Route and Data Center Checklist” on page 169 ■... -
Page 170: Data Center Environment Checklist
Are the perforated floor tiles each rated at 400 CFM or greater? Do the data center air conditioners provide sufficient front to back airflow? Oracle Server X5-2 Installation Guide • January 2021... -
Page 171: Facility Power Checklist
Preparation Checklists Data Center Environment Considerations Comment Is airflow adequate to prevent hot spots? Can the data center continuously satisfy environmental requirements? Can more vented floor tiles be obtained if required? Related Information “Environmental Requirements” on page 20 ■ “Ventilation and Cooling” on page 21 ■... -
Page 172: Rackmount Checklist
Does the rack have RETMA rail support? Does the rack support Oracle cable management arms (CMAs)? Does the rack support installation of Oracle vented and solid filler panels? Is there sufficient space for a cable harnesses and the power distribution units (PDUs) in the rack, if required? -
Page 173: Safety Checklist
Is the floor below the raised floor free of obstacles and blockage? Related Information “Electrical Power Requirements” on page 18 ■ Oracle Server X5-2 Safety and Compliance Guide ■ Auto Service Request Checklist Complete the following checklist if you are planning to use Auto Service Request with the server. -
Page 174: Logistics Checklist
Auto Service Request Checklist TABLE 18 Auto Service Request Considerations Comment Do you have a My Oracle Support Online Account to register Auto Service Request? Do you have your My Oracle Support Customer Support Identifier (CSI) number? Do you have the host name and IP address for the server... - Page 175 Related Information “Server Physical Specifications” on page 15 ■ “Receiving and Unpacking Guidelines” on page 17 ■ Oracle Server X5-2 Safety and Compliance Guide ■ Site Planning Checklists...
- Page 176 Oracle Server X5-2 Installation Guide • January 2021...
-
Page 177: Index
23 airflow requirements, 22 auto service request checklist, 173 data center environment checklist, 170 documentation for diagnostics, 165 for Oracle ILOM, 83 back panel for Oracle Linux, 144 connectors, 30 for Oracle Solaris, 137 features, 30 for Oracle VM, 151... - Page 178 SNMP v3, 83 logging in locally SSH command-line, 83 Oracle ILOM, 84 web browser, 83 logging in remotely Oracle Linux Oracle ILOM, 85 configuring preinstalled software, 139 logistics checklist, 174 registering, 144 Oracle Server X5-2 Installation Guide • January 2021...
- Page 179 173 configuring preinstalled software, 145 secure shell (SSH) command-line interface, 83 serial connection logging in to Oracle ILOM, 84 serial management (SER MGT) port, location of, 76 physical specifications, 15 serial null modem cable, connecting, 78 ports, 75...
- Page 180 USB ports, location of, 76 ventilation requirements, 22 video port, location of, 76 voltage, 18, 18 web browser interface, 83 worksheet configuring Oracle Linux, 140 configuring Oracle Solaris, 132 configuring Oracle VM, 146 worksheet, support, 166 Oracle Server X5-2 Installation Guide • January 2021...
Need help?
Do you have a question about the X5-2 and is the answer not in the manual?
Questions and answers