
Related Manuals for iPECS LDP-9008D


Summary of Contents for iPECS LDP-9008D
-
Page 1: User Guide
Ericsson LG IPECS eMG80 User Guide for LDP-9000, LIP-7000 and LIP-8000 series phones provided to you by http://electsys.biz LDP-9008D LDP9030D User Guide... -
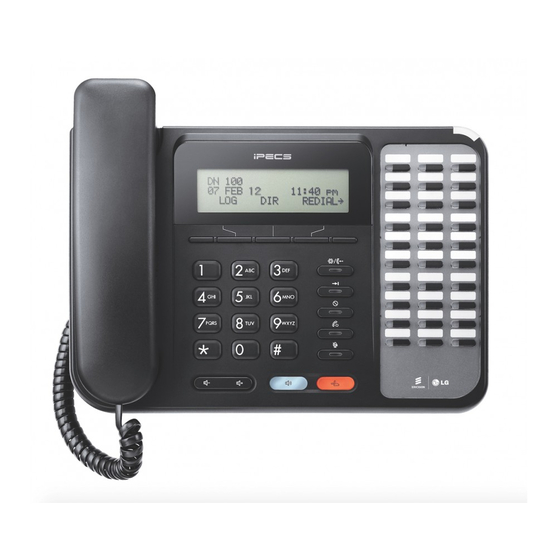
Page 2: Ldp-9008D View
LDP-9008D Digital Telephone Quick Guide Fixed Feature button definition Button Description This button is used to initiate a call transfer (TRS) or to enter programming mode Trans/PGM (PGM). Speed Used to access speed dialing, speed programming, saved number redial. The DND (Do Not Disturb) feature blocks all incoming calls. When DND is active, the red LED in this button is illuminated. -
Page 3: Ldp-9030D View
LDP-9030D Digital Telephone Description Quick Guide Fixed Feature button definition Fixed Feature button definition Button Description Used in conjunction with fixed and flexible features, and the function changes in 3 Soft relation to call progress, as indicated on the LCD display. Page Used to change more additional functions on the LCD display . -
Page 4: Keyset User Operation
LDP Keyset User Operation Receiving calls _ Answering a Call While Idle : To enter a Station Speed Dial number with CO 1. Lift the handset and press the flashing Flex button (as Line and Name: needed), the call will be connected. 1. -
Page 5: User Program Codes For Ipecs Emg/Ucp/Lik
User Program Codes for iPECS eMG & UCP & LIK • ▶ Press the [Trans/PGM] button • ▶ Enter the desired feature code below table CODE FUNCTION CODE FUNCTION Station Ring Type Set Preselected: Custom Message CO Ring Type PGM Custom Message... -
Page 6: Table Of Contents
1.1 General ..................1 1.2 Feature Information ................ 1 1.3 Feature Groupings ................1 1.4 LDP-9008D & 9030D Phone Description ......... 2 1.5 LDP-9008D & LDP-9030D Phone Installation ......... 3 1.5.1 Phone Connections .............. 3 1.5.2 Wall Mount ................4 1.6 DSS(Direct Station Select) Console Installation ...... - Page 7 LDP-9008D & LDP-9030D User Guide 4.1.2 Leaving a Message Wait ............. 17 4.2 External Calls ................17 4.2.1 Placing external CO/VoIP calls ........... 17 4.2.2 Waiting for the next available CO/IP line ......19 4.2.3 Account Codes: Tracking External calls for billing ....19 4.2.4 Disable dialing from your phone ..........
- Page 8 LDP-9008D & LDP-9030D User Guide 8.3 Using Internal, External and Meet-Me Paging ....... 35 8.4 Push-To-Talk (PTT) Page ............. 35 8.5 Wake-Up Alarm ................36 8.6 Alarm/Door Bell ................36 8.7 Power Fail Transfer (PFT) ............36 8.8 System Voice Memo ..............37 8.9 Hot Desk ..................
-
Page 9: Introduction
LDP-9008D & LDP-9030D User Guide NTRODUCTION 1.1 General Your telephone is connected to an advanced-technology, highly-versatile, fully-featured telecom system designed to make office communications easy and productive. 1.2 Feature Information We have taken every effort to make this user guide simple and straight forward. -
Page 10: Ldp-9008D & 9030D Phone Description
LDP-9008D & LDP-9030D User Guide 1.4 LDP-9008D & 9030D Phone Description The LDP-9008D and LDP-9030D Phones (shown) incorporate user interface to provide you with a cost effective, simple to use, productive communications tool. It includes a 2-line (LDP- 9008D) or 3-line (LDP-9030D) 24-character per line LCD (refer to Phone Diagrams). -
Page 11: Ldp-9008D & Ldp-9030D Phone Installation
LDP-9030D Phone Diagram 1.5 LDP-9008D & LDP-9030D Phone Installation 1.5.1 Phone Connections The LDP-9008D and LDP-9030D each have 3 connection ports (refer to following graphic). each port is for connecting to : Handset, Ear Mic., and the line cable. Connect the telephone cord (curly cord) to the handset and the other end to the handset jack at the bottom of the telephone. -
Page 12: Wall Mount
The LDP-9000 series phones can be wall mounted as needed. The following instructions describe how to perform a wall mount installation. For more information on installing your LDP- 9000 series phone, refer to the iPECS Hardware Description and Installation Manual. •... -
Page 13: Lcd, Speakerphone & Related Features
ELATED EATURES 2.1 Using the Display Menu The Liquid Crystal Display (LCD) of the LDP-9008D has two lines, and the LDP-9030D has three lines of 24 characters each. The LCD is used to convey information to you. It provides the date, time and station number on the display while idle. -
Page 14: Using The Speakerphone
LDP-9008D & LDP-9030D User Guide 2.2 Using the Speakerphone Activate the Speakerphone at any time (except for Paging) in place of lifting the handset to receive or place calls. Additionally, you may switch between the handset and Speakerphone during a call. By keeping the handset Off-hook, the Group Listen feature is activated, which provides incoming audio over the speaker with outgoing audio from the handset. -
Page 15: Receiving Calls
LDP-9008D & LDP-9030D User Guide ECEIVING CALLS 3.1 Answering a Call While Idle There are 3 basic types of incoming calls; internal/external ringing calls, Intercom Voice Announce calls, and Hold recalls. Your phone may be assigned Ringing Line Preference; in this case, calls that ring are answered by lifting the handset. -
Page 16: Responding To A Call While Busy
LDP-9008D & LDP-9030D User Guide 3.2 Responding to a Call While Busy While you are busy on another call, you may receive a Muted Ring, Camp-On tones, or Voice-Over announcements. Muted Ring is provided over the speaker of your Phone indicating a Call Waiting. -
Page 17: Using Answering Machine Emulation (Ame)
LDP-9008D & LDP-9030D User Guide 3.3 Using Answering Machine Emulation (AME) When a call is connected to your voice mail, you can screen the call as with a normal Answering Machine. The caller’s voice is played over your speaker while the message is being recorded. -
Page 18: Differential Ring Signals
LDP-9008D & LDP-9030D User Guide 3.4 Differential Ring Signals When multiple phones in a small area ring, it can be difficult to tell which are ringing. LDP-9000 Series Phone has 15 Ring Tones available for differentiating one phone’s ringing from another. -
Page 19: Using Do-Not-Disturb (Dnd) To Block Incoming Calls
LDP-9008D & LDP-9030D User Guide To answer a call ringing at a station in your group: • Lift the handset, • Dial 566 (Group Call Pick-Up code), the call is connected. 3.7 Using Do-Not-Disturb (DND) to Block Incoming Calls Activate Do-Not-Disturb when you wish to not be interrupted;... - Page 20 LDP-9008D & LDP-9030D User Guide 4: Busy/No Answer—forwards calls if the station is busy or does not answer within the No Answer timer. 5: Incoming CO Off-net: Forward calls to an external destination; calls can be forwarded from an internal station or a remote location.
-
Page 21: Forwarding Calls To An External Number
LDP-9008D & LDP-9030D User Guide 3.8.2 Forwarding calls to an external number Forward calls to an external destination; calls can be forwarded from an internal station or a remote location. You may define the conditions or ‘type of forward’ as listed below: 1: Unconditional—all calls to the station, except recalls,... -
Page 22: Forwarding Callers To A Text Message
LDP-9008D & LDP-9030D User Guide To activate Call Forward, Off Premise (forward to an external number) from a remote location: • Lift the handset, • Dial the telephone number of a DISA assigned CO line, • While receiving dial-tone, dial 554 (Call Forward feature code), •... - Page 23 LDP-9008D & LDP-9030D User Guide To activate Custom or Pre-Defined Message Forward: • Press TRANS • Dial User Program feature code 51, • Dial the two-digit text Message code (00-20), • Dial any auxiliary input for messages 01-04 and 06-08, •...
-
Page 24: Placing A Call
LDP-9008D & LDP-9030D User Guide LACING A CALL 4.1 Internal Calls You can place calls to other stations in the system over the Intercom. The call will ring, or for an ICM Voice Announce call, a splash tone will be heard. Ring or Voice Announce is normally determined by settings at the called station but you may change this by dialing ‘#’... -
Page 25: Leaving A Message Wait
LDP-9008D & LDP-9030D User Guide If you are the Attendant or Secretary, you may activate Intrusion. You may also use Step Call; dial the next station by dialing the last digit of the Intercom number. To Camp-On (wait off-hook) for a busy station: •... - Page 26 LDP-9008D & LDP-9030D User Guide Individual CO/IP line access— 88 + XX or XXX (XX or XXX are CO line number) CO/IP Group access— 89 + XX or XXX (XX or XXX are CO Group number) Any CO/IP Line access—...
-
Page 27: Waiting For The Next Available Co/Ip Line
LDP-9008D & LDP-9030D User Guide 4.2.2 Waiting for the next available CO/IP line If all the lines connected to your system are busy, you will receive an All Trunks Busy signal. You may request to be notified when a line becomes free. -
Page 28: Temporarily Override Dialing Restrictions At A Phone
LDP-9008D & LDP-9030D User Guide To activate Temporary COS: • Press TRANS • Dial 21 (User Program code), • Dial your Authorization code, • Press HOLD SAVE To deactivate Temporary COS: • Press TRANS • Dial 22 (User Program code), •... -
Page 29: Using And Entering Saved Number Dial
• Use Volume Up/Down to Navigate • Press Send softkey to call 4.3.4 Using and Entering Station Speed Dial Numbers Each station in the iPECS eMG80 is allocated memory for Station Speed Dial numbers each up to 23 digits. These... - Page 30 LDP-9008D & LDP-9030D User Guide numbers are entered at the user’s station and may include several ‘special’ instructions. Special instructions and the corresponding button are: PAUSE will momentarily stop dialing. FLASH as 1 digit—Activate dial tone detect. FLASH not as 1 digit—The system will generate a...
-
Page 31: Using Dial By Name And Entering Your Name
LDP-9008D & LDP-9030D User Guide To enter a Station Speed Dial number with Name: • Lift the handset, • Press the button, SPEED • Dial the desired Station Speed Dial bin number, • Select/dial the CO/IP line/group, • Dial the desired number to be stored, •... -
Page 32: Using Automatic Called Number Redial (Acnr)
LDP-9008D & LDP-9030D User Guide • Scroll using the Volume up/down keys, or enter search characters (refer to the above Character Entry Chart). • Press to place the call HOLD SAVE To enter your station user name: • Press the... -
Page 33: Transfer
LDP-9008D & LDP-9030D User Guide & O RANSFER ONFERENCE THER ANDLING 5.1 Call Transfer: Sending a call to a different destination You can send an active call to another station or other resource of the system, Call Transfer. You can screen the... -
Page 34: Broker Call: Switching Between Two Calls
LDP-9008D & LDP-9030D User Guide signal. If not answered in a timely manner, the Attendant will receive Attendant Hold Recall. To place a call on Hold: • Press HOLD SAVE 5.3 Broker Call: Switching between two calls You may switch between the active call and a call on Hold, placing the active call on Hold acting as a broker between two or more parties, Broker Call. -
Page 35: Setting Up A Conference Room
LDP-9008D & LDP-9030D User Guide To establish an Unsupervised Conference: • Establish conference with two external parties, • Select the Conf Soft button, • Hand-up handset. To retrieve an Unsupervised Conference: • Lift the handset, • Select the Soft button. -
Page 36: Call Park: Placing A Call On Hold To Page
LDP-9008D & LDP-9030D User Guide 5.5 Call Park: Placing a call on Hold to Page A user may transfer an active CO/IP call to a special holding location (Park Orbit), which can be accessed easily from any station in the system. Typically, this feature is used with Paging to notify the desired user of a parked call. -
Page 37: Send
LDP-9008D & LDP-9030D User Guide & R ETRIEVE ESSAGES 6.1 Responding to a Station Message Waiting Indication Another station can leave a Station Message Waiting indication (MWI) when you do not answer or your phone is in mode. The message will be displayed on the LCD screen in LDP-9000 Series phone. - Page 38 LDP-9008D & LDP-9030D User Guide To retrieve Voice Mail locally using a Flex button: • Press the programmed Flex button, VOICE MAIL • Dial your Mail Box number and corresponding password to receive the ‘Number of Messages’ prompt, • Dial desired option codes, •...
-
Page 39: Sending And Receiving Short Text Messages
LDP-9008D & LDP-9030D User Guide 6.3 Sending and Receiving Short Text Messages You can exchange short text messages (up to 80 alphanumeric characters) with other display phone users. These messages will activate the message on the LCD. If the ring/message LED is set to Message Wait indication, the ring/message LED of Call Back button will flash. -
Page 40: Remote System Access
LDP-9008D & LDP-9030D User Guide EMOTE YSTEM CCESS 7.1 Direct Inward System Access (DISA) DISA (Direct Inward System Access) allows remote users to gain access to the system’s resources (remote users may be required to enter an Authorization Code). The system will recognize remote user dialed inputs (call other stations, place calls over CO/IP lines, review voice mails, etc). - Page 41 Dial the ISDN DID number of the station; the system will check the Caller ID and answer the call. The user then will receive intercom dial tone, • Place internal or external iPECS call as normal. To Transfer a call from the mobile extension using the iPECS: •...
-
Page 42: Call Log
LDP-9008D & LDP-9030D User Guide EATURES 8.1 Call Log Users can view a log of Received, Dialed and Lost calls on the display. Pressing a Redial Soft button and then Back button provides simple access to Received, Dialed and Lost calls. -
Page 43: Using Internal, External And Meet-Me Paging
LDP-9008D & LDP-9030D User Guide 8.3 Using Internal, External and Meet-Me Paging The User can broadcast announcements to other stations and/or external speakers. Stations are assigned to one or more of the Internal Page Zones. The system has two External Page Zones that can be connected to external speakers. -
Page 44: Wake-Up Alarm
LDP-9008D & LDP-9030D User Guide To place a page announcement to the active PTT group: • Press and hold the Flex button, • After confirmation tone, make page announcement. 8.5 Wake-Up Alarm System supports an Alarm clock for each station in the system. -
Page 45: System Voice Memo
LDP-9008D & LDP-9030D User Guide CO line by the system. This SLT can be used as any normal SLT, providing service while power is out. 8.8 System Voice Memo The integrated Voice Mail modules incorporate several Voice Memos to provide Station Users with general information such as station number, date, time, and feature status. -
Page 46: Hot Desk
LDP-9008D & LDP-9030D User Guide 8.9 Hot Desk LDP-9000 Series phones in the system may be assigned for Hot Desk operation. These Hot Desk phones let you log-on and use the Hot Desk phone as if it were your station. -
Page 47: Access Pbx Or Centrex Features
ENTREX FEATURES 9.1 Access PBX or Centrex features The iPECS system has been designed to operate with a host PBX system or Centrex services from your service provider. The iPECS system connects to a host with analog CO lines. When accessing a CO line, the phone will act as an extension of the host, allowing access to the host system features using the host dial codes. -
Page 48: Using Isdn Supplementary Services
LDP-9008D & LDP-9030D User Guide To activate Keypad Facility operation: • Press the button to switch to keypad mode, KEYPAD FACILITY • Dial as desired. To deactivate Keypad Facility operation: • Press KEYPAD FACILITY • Press a Feature or Flex button. -
Page 49: Features
LDP-9008D & LDP-9030D User Guide & F EATURES LEX BUTTONS 10.1 Entering Station Program Data A special code set is available for LDP-9000 Series Phone users to assign certain attributes such as Authorization Codes (Passwords). After entering the User Program mode, dial the codes to select the attribute and setting. -
Page 50: Appendixa User Program Code
Attendant may dial while in the User Program Mode to assign certain Flex buttons and affect the status of a feature or setting. For more information on the User Program Mode refer to the iPECS eMG80 Features and Operation Manual. - Page 51 LDP-9008D & LDP-9030D User Guide Table A-1 STATION USER PROGRAM FIXED FUNCTION CODES FUNCTION FUNCTION CODE Delete Conference Room Monitor Conference Group Headset/Speakerphone Mode Change Ring Mode LCD Display Mode Version Display Background Music Station User Name Registration Display Phone Version...
- Page 52 LDP-9008D & LDP-9030D User Guide Table A-2 ATTENDANT USER PROGRAM FIXED FUNCTION CODES FUNCTION CODE FUNCTION Knock Down Station COS Restore Station COS Authorization Code Registration Erase Authorization System Date/Time Mode LCD Date Mode LCD Time Mode Set Wake Up Time from Attendant...
-
Page 53: Appendixb Flexible Numbering Plan
LDP-9008D & LDP-9030D User Guide PPENDIX LEXIBLE UMBERING The System Numbering Plan can be selected from 1 of 8 basic Numbering Plans. Table B-1 provides a brief description of the plans and Table B-2 and Table B-3 provide the Numbering Plan codes for each of the eight basic plans. - Page 54 LDP-9008D & LDP-9030D User Guide Table B-2 Basic Numbering Plan 1-4, Default Values Basic Numbering Plan Feature Remark (Internal/External SMDR Account *550 Code Enter Flash Command *551 to CO Line Last Number *552 Redial DND (Toggle *553 On/Off) Call Forward...
- Page 55 LDP-9008D & LDP-9030D User Guide Table B-2 Basic Numbering Plan 1-4, Default Values Basic Numbering Plan Feature Remark Code ACD Supervisor * 571 On/Off Duty ACD Supervisor * 572 Login ACD Supervisor * 573 Logout ACD Help Code * 574...
- Page 56 LDP-9008D & LDP-9030D User Guide Table B-2 Basic Numbering Plan 1-4, Default Values Basic Numbering Plan Feature Remark Retrieve Last Held CO/IP Retrieve 8#xx 8#xx 8#xx 4#xx xx: 01~74 Individual Held CO/IP Access CO Line in the 1st available CO...
- Page 57 LDP-9008D & LDP-9030D User Guide Table B-2 Basic Numbering Plan 1-4, Default Values Basic Numbering Plan Feature Remark Enter Into Conf- * 59 * 59 Room Enter Into Conf- * 68 * 68 Group Station ICR * 587 Pick up Group...
- Page 58 LDP-9008D & LDP-9030D User Guide Table B-2 Basic Numbering Plan 1-4, Default Values Basic Numbering Plan Feature Remark Station Speed [SPEED] [SPEED] [SPEED] [SPEED] XXX: Dial Access + XXX + XXX + XXX + XXX 000~099 System Speed [SPEED] [SPEED]...
- Page 59 LIP-7016D/7024D User Guide LIP-7016D & 7024D User Guide...
- Page 60 The Navigation button in the lower center of the Phone allows you to move through the menu choices when more than three selections are available. Features and functions of your iPECS are accessed either using the Fixed or Flexible buttons or by selecting a menu item using the Soft buttons.
- Page 61 LIP-7016D/7024D User Guide Interactive 3 Soft buttons Handset Speaker Flex buttons Dial pad Fixed Feature buttons: Speaker Hold/Save Navigation Microphone Speed Trans/Pgm button Call Back Volume iPECS LIP-7016D/7024D Diagram...
- Page 62 LIP-7016D/7024D User Guide iPECS Phone headset jack iPECS Phone LAN connection iPECS Phone to PC connection iPECS Phone handset connection iPECS LIP-7016D/7024D Connections...
- Page 63 User Guide TABLE OF CONTENTS 1. I ....................1 NTRODUCTION 1.1 General....................1 1.2 Feature Information ................1 1.3 Feature Groupings ................1 1.4 iPECS LIP-7016D & 7024D Phone Description........ 2 PECS P LCD, S & R ......5 HONE PEAKERPHONE ELATED EATURES 2.1 LCD Operation ..................
- Page 64 LIP-7016D/7024D User Guide 5. T & O .........26 RANSFER ONFERENCE THER ANDLING 5.1 Call Transfer: Sending a call to a different destination ....26 5.2 Call Hold: Placing a call in a waiting state ........26 5.3 Broker Call: Switching between two calls........27 5.4 Joining Multiple People in a Conference.........
-
Page 65: Introduction
Employing state-of-the-art Voice over Internet Protocol (VoIP) technology, voice and data converge on a single IP packet network. Because each iPECS Phone is an IP appliance, it can be moved easily throughout the office LAN and maintain normal operation. -
Page 66: Ipecs Phone Lcd, Speakerphone & Related Features
User Guide 2. iPECS Phone LCD, Speakerphone & Related Features LCD Operation The Liquid Crystal Display (LCD) of the iPECS LIP-7016D and LIP- 7024D has three lines of 24 characters each. The LCD is used to convey information to you. -
Page 67: Using A Bluetooth Wireless Headset
Before using the headset, the headset must be “paired” with the BTU, and then the headset must be enabled for use. Operation of the iPECS LIP-7024D with the headset is the same as with the Speakerphone; merely use the Speaker button to go ON and OFF- hook. -
Page 68: Receiving Calls
Otherwise, you must press the flashing Flex button. External calls to an iPECS Phone will appear under the CO/IP line or a LOOP button External calls are from CO lines or VoIP channels that are programmed to ring at your phone. -
Page 69: Responding To A Call While Busy
Speaker mode—when the call is sent to the voice mailbox, the caller’s voice is automatically broadcast over the speaker of your iPECS Phone. You may terminate screening, leaving the caller in voice mail to record a message, talk with the caller and record the conversation in the mailbox,... -
Page 70: Differential Ring Signals
LIP-7016D/7024D User Guide only available when using the iPECS VMIM/VSF Voice Mail; a button are required. OPERATION In iPECS-Lik To assign an AME button: Ring Mode – + 564 + 0 + TRANS FLEX HOLD SAVE Speaker Mode –... -
Page 71: Answering Calls
To answer a call ringing during night mode over an external bell: Lift the handset, Dial 567 (iPECS-Lik)/587(iPECS-MG) ( UA code) Answering Calls to Other Stations When nearby stations are ringing, you may pick-up (answer) the call. Select to answer a call ringing at a specific station (Directed Call Pick- Up) or you may choose to answer the oldest call ringing to your station group (Group Call Pick-Up). -
Page 72: Using Do-Not-Disturb (Dnd) To Block Incoming Calls
LIP-7016D/7024D User Guide Using Do-Not-Disturb (DND) to Block Incoming Calls When you need quiet, activate Do-Not-Disturb and the phone will block incoming calls. Internal callers will receive a fast busy tone and the display will show the DND status. Activate Do-Not-Disturb while busy (One-Time DND);... -
Page 73: Forwarding Calls To An External Number
Dial the type of forward code 1-4, Dial the destination number. Press (iPECS-MG) HOLD SAVE To deactivate Call Forward from your phone: Press the Fwd Soft button. To activate Call Forward for your phone from a different phone (Call Forward, Remote): ... - Page 74 LIP-7016D/7024D User Guide OPERATION In iPECS-eMG80 To activate Call Forward, Off Premise (forward to an external number) from your phone: Lift the handset, Press the Fwd Soft button, Dial the type of forward code 1-4, Press SPEED ...
-
Page 75: Forwarding Callers To A Text Message
User Guide 3.8.3 Forwarding callers to a Text Message Using an iPECS Phone, the system can be setup to return a ‘Text Message’ to internal callers. When calling your Station, internal callers will automatically receive the selected message or you can send a text message you select in response to an internal call, Silent Text Message. - Page 76 LIP-7016D/7024D User Guide In iPECS-eMG80 To activate Custom or Pre-Defined Message Forward: Press TRANS Dial User Program feature code 51, Dial the two-digit text Message code (00-20), Dial any auxiliary input for messages 01-04 and 06-08, ...
-
Page 77: Placing A Call
LIP-7016D/7024D User Guide 4. Placing a call Internal Calls 4.1.1 Placing Intercom calls You can place calls to other stations in the system over the Intercom. The call will ring, or for an ICM Voice Announce call, a splash tone will be heard. -
Page 78: Leaving A Message Wait
4.2.1 Placing external CO/VoIP calls External calls are placed on CO/IP lines. These ‘lines’ are accessed either by a button on the iPECS Phone assigned as a CO/IP line or by dial codes. The CO/IP lines are grouped for different types of calls, local, long distance, etc. -
Page 79: Waiting For The Next Available Co/Ip Line
LIP-7016D/7024D User Guide Any CO/IP Line access— When dialing on a CO line, which uses pulse style signals, you may activate Dial Pulse to Tone Switchover changing to DTMF style dialing for banking services, etc. When placing an IP call, you must dial an IP address using ‘*’ in place of the dot. -
Page 80: Account Codes: Tracking External Calls For Billing
4.2.4 Disable dialing from your phone You can temporarily ‘Lock’ your phone by activating Temporary COS, which will disable all dialing from the phone. To deactivate Temporary COS you must enter the station’s Authorization code. OPERATION In iPECS-eMG80 To activate Temporary COS: Press TRANS ... -
Page 81: Temporarily Override Dialing Restrictions At A Phone
4.3.1 Using Last Number Redial (LNR) The last number dialed on an external call is automatically saved in the Last Number Redial (LNR) buffer. For users of an iPECS Display Phone, the system will store the numbers dialed on the last ten calls. OPERATION To dial the Last Number for an external call: ... -
Page 82: Using And Entering Save Number Dial
SPEED 4.3.3 Using System Speed Dial Numbers The iPECS-eMG80 system has memory allocated for 3000 System Speed Dial numbers (bins 2000-4999), You may, if allowed, use System Speed Dial to call frequently dialed numbers. In some cases, these numbers are divided into groups called System Speed Zone Groups. - Page 83 8 - 80 Z - 9# *3 - , 7 - 70 9 – 90 0-00 Character Entry OPERATION In iPECS-eMG80 To place a call using Station Speed Dial: Lift the handset, Press SPEED Dial the desired Station Speed Dial bin number (00-19 or 000-099).
-
Page 84: Using Dial By Name And Entering Your Name
LIP-7016D/7024D User Guide Dial the desired Station Speed Dial bin number, Select/dial the CO/IP line/group, Dial the desired number to be stored, Press HOLD Enter the associated name if desired, using the alpha-numeric entry chart, ... -
Page 85: Acnr: To Retry A Busy External Number Until Answered
LIP-7016D/7024D User Guide To allow others to contact you via the Intercom directory, you must enter a name for your station, up to 12 characters. OPERATION In iPECS-eMG80 To place a call using Dial by Name: Press twice, SPEED ... - Page 86 LIP-7016D/7024D User Guide For each retry, the system will activate your speaker then place the call with the microphone muted. When the remote end answers, you must select the Speak Soft button or lift the handset. Either of these actions will cancel the ACNR request as well as connect you to the remote party.
-
Page 87: Transfer, Conference & Other Call Handling
SAVE button twice. The LEDs for CO/IP line buttons flash at distinctive rates for the holding station and other iPECS Phone users. There are also user operations such as pressing a button that will place a call in Automatic Hold. -
Page 88: Broker Call: Switching Between Two Calls
You may switch between the active call and a call on Hold, placing the active call on Hold acting as a broker between two or more parties, Broker Call. iPECS Phone users may ‘broker’ for multiple calls up to the number of CO/IP line buttons. -
Page 89: Setting Up A Conference Room
13 parties. When setting up a Conference Room, a password can be designated for invited parties (internal and external parties) to use for accessing the established Conference Room. OPERATION In iPECS-eMG80 To set-up a Conference Room: Press the button, TRANS ... -
Page 90: Call Park: Placing A Call On Hold To Page
Paging user of a parked call. Parked calls are subject to after the Call Park timer. Hold Recall OPERATION In iPECS-eMG80 To park an active external call: Press TRANS Dial the Park Orbit (601-610) ... -
Page 91: Two-Way Record: Recording A Call
LIP-7016D/7024D User Guide Two-Way Record: Recording a call You may record an active external conversation in your Voice Mail Box. Note: This feature must be activated by your system administrator. OPERATION To activate Two-Way Record while on a CO/IP call: ... -
Page 92: Get Your Messages & Send Sms
LIP-7016D/7024D User Guide 6. Get Your Messages & Send SMS The iPECS Phone allows you to send and receive several types of messages. These are accessed via the Message Summary Display, and described in the following paragraphs: In iPECS-eMG80 1: ST—Station Message Wait 2: CL—CLI Message Wait... -
Page 93: Responding To A Cli Message Indication
When external calls to your phone are not answered and Caller Identification is provided from the network, a Calling Line Id. (CLI) message is logged. You may review, delete or return these messages. OPERATION In iPECS-eMG80 To review CLI Messages using a Flex button: Press the flashing... -
Page 94: Getting Voice Mail Messages
When callers are forwarded or recall to your Voice Mail Box, they can leave a voice message. Your Voice Mail Box is part of the integrated VMIM/VSF module, the iPECS Feature Server or an external Voice Mail system. These Voice Mail systems allow access to and management of the received voice messages. - Page 95 LIP-7016D/7024D User Guide 001 001 005 006 001 Dial 3 for VMIM/VSF, 4 for external VM or 5 for Feature Server Voice Mail, After the prompt enter your station number and password, Dial desired option codes, At completion of session, hang-up to return to idle.
-
Page 96: Sending And Receiving Short Text Messages
Phone users. These messages will activate the button LED and are displayed on the iPECS Phone LCD. OPERATION In iPECS-eMG80 To send an SMS message to another iPECS display Phone: Press the button, TRANS ... -
Page 97: Remote System Access
Dial as needed for the desired system resource. Mobile Phone Extension When away from your desk or office you can place and receive iPECS calls on a registered mobile phone. You may need to activate the Mobile Phone Extension feature and assign the Mobile Phone number. - Page 98 LIP-7016D/7024D User Guide To Transfer a call from the mobile extension using the iPECS: Dial “*” while on an iPECS call, Dial the desired extension, the call is transferred and the mobile phone returns to idle, NOTE—The mobile may reconnect to the transfer by pressing the #...
-
Page 99: Features
User’s can view a log of incoming, outgoing and missed calls on the display. A Flex button assigned as a button provides simple CALL LOG access to incoming (Called), dialed (outgoing) and lost (missed) calls. PERATION iPECS Phone In iPECS-eMG80 To assign a CALL LOG button: ... -
Page 100: Background Music And Music On Hold
Background Music (BGM) and Music On Hold (MOH). In addition, a recorded message from the VMIM can be used. BGM is played over the speakers of the iPECS Phone when the station is idle. MOH is played to callers placed on Hold. -
Page 101: Push-To-Talk (Ptt) Page
Dial 544 544 Push-To-Talk (PTT) Page iPECS Phones can be assigned as a member of one or more of the system’s nine Push-To-Talk (PTT) page groups. Users separately log- in or log-out of any one or all PTT groups to which the phone is assigned. -
Page 102: Wake-Up Alarm
After confirmation tone, make page announcement. Wake-Up Alarm iPECS supports an Alarm clock for each station in the system. The alarm clock can be set to repeat daily or as a one-time alarm. When responding to the alarm by lifting the handset, BGM will be provided. -
Page 103: Power Fail Transfer
Lift the handset, Dial Door Open code, #* and contact number 1-4. NOTE—Contacts 3 & 4 are only available in the iPECS -300 & 600. —Contacts 1 is available in the iPECS -MG. Power Fail Transfer When AC power to the system fails, back-up operation may be provided with back-up batteries or Power Fail Transfer (PFT). -
Page 104: Hot Desk
Hot Desk iPECS phones in the system may be assigned for Hot Desk operation. These Hot Desk phones let you log-on and use the Hot Desk phone as if it were your station. Once logged-on, the Hot Desk station will take on the attributes assigned to your station number and you can make calls as normal. -
Page 105: Working With Pbx, Centrex & Isdn Features
When accessing a CO line, the phone will act as an extension of the host, allowing access to the host system features using the host dial codes. While on a call, use the iPECS Flash feature to transfer calls to other host extensions or access features of the host. -
Page 106: Using Isdn Supplementary Services
9.2.3 Activating ISDN Caller ID Restriction iPECS Phone users can restrict the transmission of Caller ID to the far- end. This may be a subscription service of your carrier. Separate Flex buttons are required to activate outgoing, Connected Line (COL), and incoming, Calling Line ID (CLID) restriction. -
Page 107: Setting Features & Flex Buttons
10. Setting Features & Flex buttons 10.1 Entering Station Program Data A special code set is available for iPECS Phone users to assign certain attributes such as Authorization Codes (Passwords). After entering the User Program mode, you dial the codes to select the attribute and setting. -
Page 108: Appendixa Flexible Numbering Plan
LIP-7016D/7024D User Guide 11. Appendix A Flexible Numbering Plan In iPECS-Lik Feature iPECS- iPECS- iPECS- Remark 100- 100- 1000- Intercom Call 1599 501- 501- 501-535 Internal Page Zone Internal All Call Page Meet Me Page 545- 545- 545-546 External Page Zone 1~2... - Page 109 LIP-7016D/7024D User Guide Feature iPECS- iPECS- iPECS- Remark ACD Supervisor Login ACD Supervisor Logout ACD Help Code ACD Calls In Queue Display ACD Supervisor Status Display ACD Supervisor Monitor ACD Reroute Queued Call w/answer ACD Reroute Queued Call w/o answer...
- Page 110 LIP-7016D/7024D User Guide Feature iPECS- iPECS- iPECS- Remark PTT Group Login/Logout In iPECS-MG 1) Basic Number Code Name Remark 100 ~ 4xx Station Number CO Group Access Code 801 ~ 872(MG-300) 801 ~ 824(MG-100) 620 ~ 669(MG-300) Station Group Number...
- Page 111 LIP-7016D/7024D User Guide Code Feature Name Remark Destination Pilot Hunt Call Forward Register 514 + Type + Destination Pilot Hunt Call Forward Cancel DND Status Change DND Delete Account Code CO Flash Last Number Redial Station Speed PGM Speed Dial MWI Register MWI Answer MWI Cancel...
- Page 112 LIP-7016D/7024D User Guide Code Feature Name Remark *: Log out Hot Desk Log In/Log out Name Register Create Conf Room 527 + Conf. Room Delete Conf Room 528 + Conf. Room Wake Up Register 529 + HH:MM Wake Up Cancel Temporarily COS Down Cancel Temp COS Down Password Change...
- Page 113 LIP-7016D/7024D User Guide Code Feature Name Remark Add Conf Member System Alarm Reset Fault Alarm Reset Door Open Keypad Facility T-Net Log-In/Out Universal Answer USB Call Record Delete All VM Message VM Page Message Record Direct VM Transfer Loop Key Call Log...
-
Page 114: Appendixb User Program Codes
LIP-7016D/7024D User Guide 12. Appendix B User Program Codes In iPECS-eMG80 Code Function Remarks Enblock Mode Dialing iPECS LIP-7000 only 11 x Select Ring Tone 1-8 Differential Ring, Intercom 12 x Select Ring Tone 1-8 Differential Ring, CO/IP line Select ICM Signal mode,... - Page 115 ATD I NTRUSION Assign Button Assign Button EYPAD ACILITY Assign Button OHVO Button Assignment iPECS LIP-7000 only PEED Button Assignment iPECS LIP-7000 only Button Assignment iPECS LIP-7000 only Button Assignment iPECS LIP-7000 only Button Assignment iPECS LIP-7000 only LASH Button Assignment...
- Page 116 LIP-8012E/8024E User Guide Please read this manual carefully before operating Phone. Retain it for future reference...
- Page 117 Phone allows you to move through the menu choices when more than three selections are available. Features and functions of your iPECS are accessed either using the Fixed or Flexible buttons or by selecting a menu item using the Soft buttons. In the remainder of...
- Page 118 One port is for connecting to the LAN (‘D’ in graphic), and the other can be connected to a desktop data device such as a PC (‘B’ in graphic), or another LAN interface terminal (refer to iPECS Hardware and Installation Manual).
- Page 119 LIP-8012E & LIP-8024E Gigabit Phone User Guide iPECS LIP-8012E & 8024E Connections 1.5.2 Wiring Connectors The LIP-8012E & LIP-8024E each have two (2) 10/100 Base-T Ethernet ports, a “LAN” port and a “PC” port. An intelligent switch, which implements voice packet priority, connects the two (2) ports.
-
Page 120: Revision History
Ericsson-LG Co., Ltd. All other brand and product names are trademarks or registered trademarks of their respective companies. -
Page 121: Important Safety Information
LIP-8012E & 8024E Gigabit Phone User Guide Important Safety Information To prevent unexpected danger or damage please read this information before installing or attempting to repair you phone. Warning and Caution information is provided to alert the consumer of known dangers: Warning: To reduce the possibility of electric shock, do not expose your phone to high humidity areas, such as a bathroom, swimming area, etc. -
Page 122: European Union Declarations Of Conformity
LIP-8012E & 8024E Gigabit Phone User Guide [EU] European Union Declarations of Conformity Ericsson-LG Co., Ltd. declare that the equipment specified in this document bearing the “ CE” mark conforms to the European Union Radio and Telecommunications Terminal Equipment Directive(R&TTE 1999/5/EC), including the Electromagnetic Compatibility Directive(2004/108/EC) and Low Voltage Directive(2006/95/EC). - Page 123 1.1 General ......................1 1.2 Feature Information ..................1 1.3 Feature Groupings ..................1 1.4 iPECS LIP-8012E & 8024E Gigabit Phone Description ........ 2 1.5 LIP-8012E & 8024E Phone Installation ............3 1.5.1 Phone Connections ................3 1.5.2 Wiring Connectors ................4 1.5.3 Power ....................
- Page 124 EATURES 8.1 Call Log ...................... 54 8.2 Contrast (iPECS-LIK) ................. 56 8.3 Background Music and Music on Hold (iPECS-LIK) ........56 8.4 Using Internal, External and Meet-Me Paging ..........57 8.5 Push-To-Talk (PTT) Page ................58 8.6 Wake-Up Alarm ..................58 8.7 Alarm/Door Bell ..................
- Page 125 LIP-8012E & LIP-8024E Gigabit Phone User Guide 9.2.2 Using ISDN Supplementary Services ..........63 9.2.3 Activating ISDN Caller ID Restriction ..........63 10. F & F ..............64 EATURES LEX BUTTONS 10.1 Entering Station Program Data ..............64 10.2 Assigning Features to Flex Buttons ............64 ............
-
Page 126: Introduction
Employing state-of-the-art Voice over Internet Protocol (VoIP) technology, voice and data converge on a single IP packet network. Because each iPECS Phone is an IP appliance, it can be moved easily throughout the office LAN and maintain normal operation. -
Page 127: Wall Mount
The following instructions describe how to perform a wall mount installation. For more information on installing your LIP-8000 series phone, refer to the iPECS Hardware Description and Installation Manual. • Mark and drill two (2) 7mm holes for plastic wall anchors. - Page 128 LIP-8012E & LIP-8024E Gigabit Phone User Guide LIP-8000 DSS Installation LIP-8000 DSS Installation (12DSS + 48DSS)
- Page 129 LIP-8012E & LIP-8024E Gigabit Phone User Guide LIP-8000 DSS Installation (12DSS + 12LSS)
-
Page 130: Lcd, Speakerphone & Related Features
EATURES Speakerphone 2.1 Using the Display Menu & Related The Liquid Crystal Display (LCD) of the iPECS LIP- Featrues 8012E has three lines, and the LIP-8024E has four lines of 24 characters each. The LCD is used to convey information to you. It provides the date, time and station number on the display while idle. - Page 131 LIP-8012E & LIP-8024E Gigabit Phone User Guide In iPECS-eMG80 To configure the Phone: • Press M button and 1 (Phone Setting), • The following menu displays: 1. STATION NAME PROGRAM 2. ICM RING 3. CO RING BACK 4. PASSWORD PROGRAM 5.
- Page 132 LIP-8012E & LIP-8024E Gigabit Phone User Guide • ICM Ring/CO Ring—Use Next Soft button to move through list of ring types, and press OK Soft button to select. • Password Program—Enter the current password and press the OK Soft button, then enter the new password and press the OK Soft button.
-
Page 133: Icm Sms (Ipecs-Lik)
LIP-8012E & LIP-8024E Gigabit Phone User Guide 2.1.3 ICM SMS (iPECS-LIK) The user can send SMS messages to other stations and retrieve received SMS messages. To retrieve a SMS message: • Press M button and 3 (ICM SMS), • The following menu displays: 1. -
Page 134: Network Config
The User can review the current network configuration or modify a new phone network configuration. To access Network Config. settings: • Press M button and 4(iPECS-LIK)/2(iPECS SBG-1000, iPECS-MG), • Enter the password (default=147*); the following will display: MFIM #[1/2] ? MFIM #1 - CHANGE[#] •... - Page 135 LIP-8012E & LIP-8024E Gigabit Phone User Guide To configure VPN: • In Network Config. Menu, use VOL buttons to locate the DNS Address menu. • Enter DNS address in DNS ADDRESS menu • Use VOL buttons to locate the VPN configuration screen (shown), VPN ? [ENABLED] –...
-
Page 136: Attendant Menu (Ipecs-Lik & Ipecs Sbg-1000)
LIP-8012E & LIP-8024E Gigabit Phone User Guide 2.1.5 Attendant menu (iPECS-LIK & iPECS SBG-1000) The Attendant menu is only available on the System Attendant phone. In iPECS-eMG80 To access the Attendant menu: • Press M button and 0 (Attendant); the following will display: 1. -
Page 137: Using The Speakerphone
LIP-8012E & LIP-8024E Gigabit Phone User Guide Using the Speakerphone Activate the iPECS Speakerphone at any time (except forPaging) in place of lifting the handset to receive or place calls. Additionally, you may switch between the handset and Speakerphone during a call. By keeping the handset... -
Page 138: Using A Serial Dss
LIP-8012E or LIP-8024E using the RS-232 cable. Be sure to verify the serial DSS and LSS capacities with the iPECS System to ensure usability (refer to iPECS Manual). The following graphics show the front and rear view of each. - Page 139 LIP-8012E & LIP-8024E Gigabit Phone User Guide In iPECS-LIK To use a Serial DSS: • Verify the Station has Serial DSS Usage authority (Admin PGM111-Flex21), • Verify the DSS power is OFF (LIP-8048DSS only), • Power-OFF the phone, • Connect the serial DSS to the phone, •...
-
Page 140: Receiving Calls
Otherwise, you must press the flashing Flex button. External calls to an iPECS Phone will appear under the CO/IP line or a LOOP button. External calls are from CO lines or VoIP channels that are programmed to ring at your phone. -
Page 141: Responding To A Call While Busy
There are two methods of notification and call screening provided, LED blink mode or Speaker hearing mode. Ring Mode (iPECS-LIK & SBG)/LED Blink Mode (iPECS-MG)—the Answering Machine Emulation (AME) Flex button will flash to notify you of a call. You may press the Flex button to hear the caller as the voice message is stored. - Page 142 Voicemail. The AME feature is only available when using the iPECS VMIB Voice Mail; a and AME button should be programmed (refer to Appendix A User Program Codes). To screen a call in Ring mode (iPECS-LIK & SBG)/LED blink mode (iPECS-MG): • Press the flashing button, the caller’s voice is broadcast over...
-
Page 143: Differential Ring Signals
Differential Ring Signals When multiple phones in a small area ring, it can be difficult to tell which are ringing. The iPECS Phone has 14 Ring Tones available for differentiating one phone’s ringing from another. Four of the tones are stored in the phone permanent memory;... -
Page 144: Answering Calls At Night
LIP-8012E & LIP-8024E Gigabit Phone User Guide Answering Calls at Night In the Night mode, Loud Bell Control may be used to send ring signals to external bells. You may answer these calls with Universal Night Answer (UNA). To answer a call ringing during night mode: •... -
Page 145: Forwarding Calls
LIP-8012E & LIP-8024E Gigabit Phone User Guide The Attendants and Secretary may be able to activate DND Override and Intrude on an active call. The Attendants may also cancel DND at other stations. To toggle DND ON and OFF: • Press the DND button. -
Page 146: Forwarding Calls To An External Number
LIP-8012E & LIP-8024E Gigabit Phone User Guide To activate Call Forward from your phone to another phone or internal system resource: • Lift the handset, • Press the Fwd Soft button, • Dial the type of forward code 1-4, • Dial the destination number. - Page 147 Code. In addition, from a remote location, you must access the system through a DISA enabled CO line. In iPECS-LIK & iPECS SBG-1000 To activate Call Forward, Off Premise (forward to an external number) from your phone: • Lift the handset, •...
-
Page 148: Forwarding Callers To A Text Message
User Guide 3.8.3 Forwarding callers to a Text Message Using an iPECS Phone, the system can be setup to return a ‘Text Message’ to internal callers. When calling your Station, internal callers will automatically receive the selected message or you can send a text message you select in response to an internal call, Silent Text Message. - Page 149 IN OFFICE STA xxxx Message 08: IN MEETING RETURN AT TIME hh:mm Message 09: AT HOME Message 10: AT BRANCH OFFICE In iPECS-MG Message 1: LUNCH RETURN AT hh:mm Message 2: ON VACATION RETURN AT DATE mm:dd Message 3: OUT OF OFFICE...
- Page 150 LIP-8012E & LIP-8024E Gigabit Phone User Guide In iPECS-eMG80 To activate Custom or Pre-Defined Message Forward: • Press TRANS • Dial User Program feature code 51, • Dial the two-digit text Message code (00-20), • Dial any auxiliary input for messages 01-04 and 06-08, •...
-
Page 151: Placing A Call
LIP-8012E & LIP-8024E Gigabit Phone User Guide 4. Placing LACING A CALL Calls 4.1 Internal Calls You can place calls to other stations in the system over the Intercom. The call will ring, or for an ICM Voice Announce call, a splash tone will be heard. Ring or Voice Announce is normally determined by settings at the called station but you may change this by dialing ‘#’... -
Page 152: Leaving A Message Wait
Placing external CO/VoIP calls External calls are placed on CO/IP lines. These ‘lines’ are accessed either using a button on the iPECS Phone assigned as a CO/IP line or using dial codes. The CO/IP lines are grouped for different types of calls, local, long distance, etc. - Page 153 LIP-8012E & LIP-8024E Gigabit Phone User Guide CO/IP Group access— 801-805 for 801-820 for iPECS- 50 & 100 Any CO/IP Line access— When dialing on a CO line which uses pulse style signals, you may activate Dial Pulse to Tone Switchover changing to DTMF style dialing (for banking services, etc.).
-
Page 154: Waiting For The Next Available Co/Ip Line
Account Code, which is output from the system to a printer in the SMDR report. You may have an Account Flex button (refer to Assigning features to Flex Code buttons). In iPECS-eMG80 To enter an Account Code before the call: • Lift the handset, • Press the assigned button, ACCOUNT CODE •... -
Page 155: Disable Dialing From Your Phone
Temporary COS, which will disable all dialing from the phone. To deactivate Temporary COS you must enter the station’s Authorization code. To activate Temporary COS: • Press TRANS • Dial 21(iPECS-LIK) User Program code), • Press HOLD SAVE To deactivate Temporary COS: • Press TRANS •... -
Page 156: Using Directory
Using Last Number Redial (LNR) The last number dialed on an external call is automatically saved in the Last Number Redial (LNR) buffer. The iPECS Display Phone, the system will store the numbers dialed on the last 15(iPECS- LIK)/100(iPECS-MG) calls. -
Page 157: Using System Speed Dial Numbers
To place a call using Save Number Dial: • Lift the handset, and/or press the DIR Soft button, • Press Speed Soft button(iPECS-LIK & SBG)/Dial 1 for Station Speed(iPECS-MG), • Dial #. To store a number in the Save Number Dial: •... -
Page 158: Using And Entering Station Speed Dial Numbers
LIP-8012E & LIP-8024E Gigabit Phone User Guide 4.3.4 Using and Entering Station Speed Dial Numbers Each station in the iPECS eMG80 supports 100 Station Speed Dial numbers (bins 000-099). These numbers are entered at the user’s station and may include several ‘special’ instructions. -
Page 159: Using Dial By Name And Entering Your Name
LIP-8012E & LIP-8024E Gigabit Phone User Guide To place a call using Station Speed Dial: • Lift the handset, and/or press the DIR Soft button, • Press the Speed Soft button • Dial the desired Station Speed Dial bin number 000- To enter a Station Speed Dial number with CO Line and Name: •... - Page 160 LIP-8012E & LIP-8024E Gigabit Phone User Guide Characters are entered with two keystrokes as in the chart below. Q – 11 A - 21 D - 31 Z – 12 B - 22 E - 32 . – 13 C - 23 F - 33 1 –...
-
Page 161: Using Automatic Called Number Redial (Acnr)
LIP-8012E & LIP-8024E Gigabit Phone User Guide 4.3.6 Using Automatic Called Number Redial (ACNR) When making an external call and a busy signal is received, the system can be set to retry the number until the call is connected, the feature is cancelled, or the maximum number of retries is attempted—this is Automatic Called Number Redial (ACNR). -
Page 162: Transfer , Conference & Other Call Handling
HOLD SAVE The LEDs for CO/IP line buttons flash at distinctive rates for the holding station and other iPECS Phone users. There are also user operations such as pressing a button that will place a call in Automatic Hold. -
Page 163: Broker Call: Switching Between Two Calls
You may switch between the active call and a call on Hold, placing the active call on Hold acting as a broker between two or more parties, Broker Call. iPECS Phone users may ‘broker’ for multiple calls up to the number of CO/IP line buttons. -
Page 164: Setting Up A Conference Room
LIP-8012E & LIP-8024E Gigabit Phone User Guide To establish a Conference: • Establish call with one of the desired conference parties, • Select the Conf Soft button, • Establish call with the other conference party, • Select the Conf Soft button, •... - Page 165 LIP-8012E & LIP-8024E Gigabit Phone User Guide In iPECS-eMG80 To set-up a Conference Room: • Press the button, TRANS • Dial 53 to create a Conference Room, • Dial the desired Conference Room number (1-9), • If desired enter a password for the Conference Room (up to 12 digits), •...
-
Page 166: Call Park: Placing A Call On Hold To Page
Paging to notify the desired user of a parked call. Parked calls are subject to Hold Recall after the Call Park timer. In iPECS-eMG80 To park an active external call: • Press TRANS • Dial the Park Orbit (601-619) •... -
Page 167: Send & Retrieve Messages
The message icon will be displayed on the LCD screen in LIP-8024E. If programmed, a flashing MSG LED on the iPECS Phone also will indicate when there is a Message Waiting. As a further notification, a Message Wait Reminder Tone can be provided. -
Page 168: Getting Voice Mail Messages
When callers are forwarded or recall to your Voice Mail Box, they can leave a voice message. Your Voice Mail Box is part of the integrated VMIM/VSF/VMIB module, the iPECS Feature Server or an external Voice Mail system. The Voice Mail system allows access to and management of received voice messages. -
Page 169: Sending And Receiving Short Text Messages
At completion of session, hang-up. Sending and Receiving Short Text Messages You can exchange short text messages (up to 100 alphanumeric characters) with other iPECS display phone users. These messages will activate the message icon on the LCD (LIP-8024E). If the ring/message LED is set to Message Wait indication, the ring/message LED will flash. - Page 170 LIP-8012E & LIP-8024E Gigabit Phone User Guide In iPECS-eMG80 To send an SMS message to another iPECS display Phone: • Press the button, TRANS • Dial 36 (SMS send code), • Dial 1 to resend an existing message, or 2 to send a new or edit an existing message, •...
-
Page 171: Remote System Access
Dial as needed for the desired system resource. Mobile Phone Extension When away from your desk or office you can place and receive iPECS calls on a registered mobile phone. You may need to activate the Mobile Phone Extension feature and assign the Mobile Phone number. - Page 172 Dial the ISDN DID number of the station; the system will check the Caller ID and answer the call. The user then will receive intercom dial tone, • Place internal or external iPECS call as normal. To Transfer a call from the mobile extension using the iPECS: •...
-
Page 173: Misc . Features
LIP-8012E & LIP-8024E Gigabit Phone User Guide 8. Misc. EATURES Features 8.1 Call Log Users can view a log of incoming, outgoing and missed calls on the display (up to 99 records). A LOG Soft button provides simple access to incoming (called), outgoing (dialed) and missed (lost) calls. - Page 174 LIP-8012E & LIP-8024E Gigabit Phone User Guide The first CO code is sent from the system in the saved call log. Normally the first CO code is ‘9’, but if the telephone number is equal to a number in the Speed Dial list, the first CO code will be the access code of the saved CO line of the speed dial.
- Page 175 Background Music (BGM) and Music On Hold (MOH). In addition, a recorded message from the VMIM can be used. BGM is played over the speakers of the iPECS Phone when the station is idle. MOH is played to callers placed on Hold.
-
Page 176: Using Internal, External And Meet-Me Paging
Internal Page Zones. The system has two External Page Zones that can be connected to external speakers. In iPECS-eMG80, Page Zone codes are: Internal Page Zones 301-335 Internal All Call Page 543 External Page Zones 545-546... -
Page 177: Push-To-Talk (Ptt) Page
LIP-8012E & LIP-8024E Gigabit Phone User Guide Push-To-Talk (PTT) Page iPECS Phones can be assigned as a member of one or more of the system’s nine Push-To-Talk (PTT) page groups. Users separately log-in or log-out of any one or all PTT groups to which the phone is assigned. Once... -
Page 178: Alarm/Door Bell
• Dial Door Open code, #* and contact number 1-4. NOTE—Contacts 3 & 4 are only available in the iPECS-300 & 600. Contacts 1 is available in the iPECS -MG. Power Fail Transfer (PFT) When AC power to the system fails, back-up operation may be provided with back-up batteries or Power Fail Transfer (PFT). -
Page 179: Hot Desk
NOTE—only activated features are announced. 8.10 Hot Desk iPECS phones in the system may be assigned for Hot Desk operation. These Hot Desk phones let you log-on and use the Hot Desk phone as if it were your station. Once logged-on, the Hot Desk station will take on the attributes assigned to your station number and you can make calls as normal. - Page 180 LIP-8012E & LIP-8024E Gigabit Phone User Guide In iPECS-eMG80 To Log on to a Hot Desk station: • Press the button, TRANS • Dial *0, • Dial your Authorization Code (Station Number and Password). To Log out of the Hot Desk station: •...
-
Page 181: Pbx, Centrex & Isdn Features
FEATURES Centrex & 9.1 Access PBX or Centrex features ISDN The iPECS has been designed to operate with a host PBX system or Centrex services from your service provider. The iPECS connects to a host with analog CO lines. When accessing a CO line, the phone will act as an extension of the host, allowing access to the host system features using the host dial codes. -
Page 182: Using Isdn Supplementary Services
9.2.3 Activating ISDN Caller ID Restriction iPECS Phone users can restrict the transmission of Caller ID to the far-end. This may be a subscription service of your carrier. Separate Flex buttons are required to activate outgoing, Connected Line (COL), and incoming, Calling Line ID (CLID) restriction. -
Page 183: Features & Flex Buttons
10. Features & 10.1 Entering Station Program Data Flex Buttons A special code set is available for iPECS Phone users to assign certain attributes such as Authorization Codes (Passwords). After entering the User Program mode, dial the codes to select the attribute and setting. Once selected, the setting is saved. -
Page 184: Appendixa Flexible Numbering Plan
LIP-8012E & LIP-8024E Gigabit Phone User Guide PPENDIX LEXIBLE UMBERING In iPECS-LIK & iPECS SBG-1000 Feature iPECS iPECS iPECS iPECS iPECS -100 -300 -600 -1200 Intercom Call 100 - 100 - 100 - 1000 - 1000 - 1599 2199 CO/IP Group Access 801 –... - Page 185 LIP-8012E & LIP-8024E Gigabit Phone User Guide Feature iPECS-eMG80 Remark CO System Hold SLT use only Program Mode Access SLT use only Attendant Unavailable Alarm Reset Group Call Pickup Universal Answer Account Code with bin Walking COS Code ACD Supervisor On/Off...
- Page 186 LIP-8012E & LIP-8024E Gigabit Phone User Guide 2) Feature Code Feature Name Code Remark Attendant Call Conference Room 1 Conference Room 2 Conference Room 3 Conference Room 4 Conference Room 5 Conference Room 6 Conference Room 7 Conference Room 8 Conference Room 9 Internal Page 543 + 00, xx...
- Page 187 LIP-8012E & LIP-8024E Gigabit Phone User Guide Feature Name Code Remark Pilot Hunt Call Forward Cancel DND Status Change DND Delete Account Code CO Flash Last Number Redial Station Speed PGM Speed Dial MWI Register MWI Answer MWI Cancel Call Back Register Call Back Cancel Group Call Pickup Direct Call Pickup...
- Page 188 LIP-8012E & LIP-8024E Gigabit Phone User Guide Feature Name Code Remark *: Log out Hot Desk Log In/Log out Name Register Create Conf Room 527 + Conf. Room # Delete Conf Room 528 + Conf. Room # Wake Up Register 529 + HH:MM Wake Up Cancel Temporarily COS Down...
- Page 189 LIP-8012E & LIP-8024E Gigabit Phone User Guide Feature Name Code Remark System Alarm Reset Fault Alarm Reset Door Open Keypad Facility T-Net Log-In/Out Universal Answer USB Call Record Delete All VM Message VM Page Message Record Direct VM Transfer Loop Key Call Log...
-
Page 190: Appendixb User Program Codes
User Guide PPENDIX ROGRAM ODES In iPECS-eMG80 CODE FUNCTION REMARK Enblock Mode Dialing iPECS LIP-7000 only 11 x Differential Ring, Intercom Select Ring Tone 1-8 12 x Differential Ring, CO/IP line Select Ring Tone 1-8 Select ICM Signal mode, 13 x... - Page 191 NTRUSION ICM Button Assign C Button Assign K Button EYPAD ACILITY Assign OHVO Button Button Assignment iPECS LIP-7000 only PEED Button Assignment iPECS LIP-7000 only Button Assignment iPECS LIP-7000 only Button Assignment iPECS LIP-7000 only Button Assignment iPECS LIP-7000 only...
- Page 192 LIP-8012E & LIP-8024E Gigabit Phone User Guide Code Function Remarks Set Wake-Up Time Input time, 24 hour clock Erase Wake-Up Time LCD Display Language SBG Version Display Background Music Station User Name Registration Input up to 12 characters Display Phone IP Address May require Authorization code Display Phone MAC IP Address Display Phone Version...
Need help?
Do you have a question about the LDP-9008D and is the answer not in the manual?
Questions and answers
Why don't I get a dial tone unless the speaker I press the speaker button
The iPECS LDP-9008D does not produce a dial tone unless the SPEAKER button is pressed or the handset is lifted because it uses a hands-free system. The dial tone is only activated when the phone is in active mode for making a call, which occurs by pressing the SPEAKER button or lifting the handset.
This answer is automatically generated
To record a message on night mode
The context does not provide information on how to record a message on night mode for iPECS LDP-9008D.
This answer is automatically generated