
Related Manuals for iPECS LDP-9030D


Summary of Contents for iPECS LDP-9030D
-
Page 1: User Guide
LDP-9030D User Guide Please read this manual carefully before operating Phone. Retain it for future reference. - Page 2 Important Safety Information...
- Page 3 Important Safety Information...
- Page 4 Important Safety Information...
-
Page 5: Getting Started
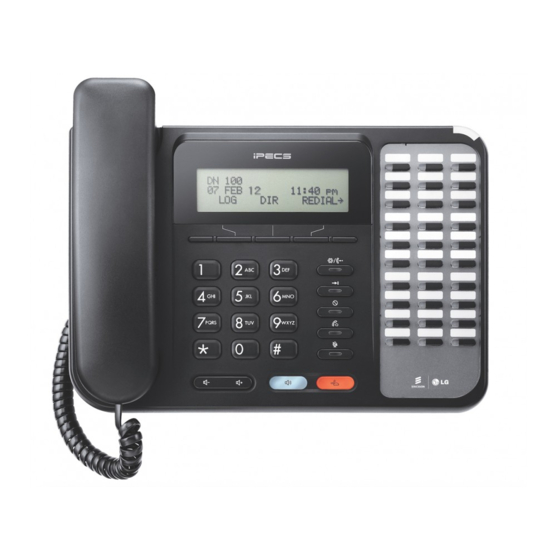
Getting Started LDP-9000 Series, Model LDP-9030D LDP-9030D are advanced, user-friendly digital keysets, offering the convenience of 3 soft buttons and a LCD with white backlight. • Features - Trendy and Stylish LDP Family design - Multi Level 3 Line LCD (3 x 24) - 30 Flexible buttons with dual-color LED’s... - Page 6 Getting Started Input / Output Devices and Buttons...
- Page 7 Getting Started Handset Used for handset call. Speaker Outputs tones and voice. 3 Soft Buttons Used in conjunction with fixed and flexible features, and the function changes in relation to call progress, as indicated on the LCD display. Page Button Used to change more additional functions on the LCD display .
- Page 8 Getting Started Cable Connection Cable connections A - Connect the telephone cord (curly cord) to the handset and the other end to the handset jack at the bottom of the telephone. B - Connect the line cable to the port at the bottom of telephone and the other end to the wall socket.
- Page 9 Getting Started 1. Placing a Call ICM Line ▶ ▶ talk Lift handset Enter the extension number CO Line Dial 9 or select ▶ ▶ ▶ CO line flexible talk button. Lift handset Enter the desired phone number 2. Answering an Outside Call ICM Line ▶...
-
Page 10: Page Button
3 Soft Buttons & Page Button 3 Soft Button The 3 Soft Buttons are located on the bottom of the LCD display. The function of each button changes, subject to call status and progress. The current functions are displayed on the LCD screen, directly above each button. -
Page 11: Basic Function
DND : press the [DND] to set Do Not Disturb. 1.1 Pickup A station can pickup a call ringing to an unattended station within the same pickup group by using the pickup procedure. * Refer to iPECS-MG system programming manual. Press [PICKUP] button. [PICKUP] b tt STATION 100 (T) - Page 12 Basic Function 1.2 Conference Dial the desired station number. CALL TO 100 (e.g.100) 12 OCT 09 12:00 pm Station 100 answers the call. FLASH Press [CONF] button. CONNECT TO 100 FEB 01 04 05:34 pm MUTE TRANS CONF Dial the phone number of the next desired station. CALL TO 104 (e.g.104) 12 OCT 09...
- Page 13 Basic Function 1.3 Redial The last number dialed on an external call is automatically saved in the LAST Number& Redial (LNR) buffer Or Call Log Buffer. Press the [REDIAL] button. STATION 100 (T) 12 OCT 09 12:00 pm REDIAL 123456789 Press [SEND] button to make call.
- Page 14 Basic Function 4. Intercom Ring Back MSG P MSG : Press to leave a your station number or t ti CALL TO 100 message. 12 OCT 09 12:00 pm FLASH : Press to disconnect the line and re-seize. FLASH 5. Intercom Busy C-BACK : Press to leave your station number or BUSY : 100 message.
- Page 15 Basic Function 9. Intercom Talk TRANS : Press to transfer an incoming call to another TRANS : Press to transfer an incoming call to another CONNECT TO 104 CONNECT TO 104 station. 12 OCT 09 12:00 pm CONF : Press to initiate a conference call. TRANS CONF MUTE...
- Page 16 Basic Function 12. CO Talk TRANS : Press to transfer a call to another station. 123456789 CONF : Press to initiate a conference call. LINE 08 00:00:03 MUTE : Press to mute the handset, speakerphone, or TRANS CONF MUTE headset microphone. Press the [SPEAK] button to re- activate microphone.
-
Page 17: Flexible Button Program
Basic Function 15. FLEXIBLE BUTTON PROGRAM • Press the [TRANS/PGM] button • Press the flexible button to be programmed • Enter the desired feature code below table. • Press the [HOLD/SAVE] button to save. *) The following Numbering Plan code can be changed by Admin Programming PGM 113~115 depending on the user’s needs. -
Page 18: Voice Over
Basic Function 18. CALL BACK When a called station is in busy, call back can be requested. BUSY : 100 12 OCT 09 12:00 pm FLASH C-BACK 19. CAMP ON When a called station is in busy, camp-on can be requested. BUSY : 100 12 OCT 09 12 OCT 09... -
Page 19: Call Log
Call Log The call log feature enables the LDP phone user to view a log of the last(100) incoming and outgoing calls. The user can scroll through the list of numbers stored, select the number and activate a redial to that number and activate a redial to that number. - Page 20 Menu Trans/PGM 1 > USER ORGANIZER 1 > USER ORGANIZER RING / BGM EXIT Press [PGM] button. 3 > COS/PASSWORD MULTI MESSAGE EXIT EXIT 5 > MOBILE/CONFERENCE ROOM HEADSET/BLUETOOTH EXIT Press [Volume] button. [V l ] b tt 7 > STATION ICLID KEYSET INFORMATION EXIT 9 >...
-
Page 21: User Organizer
Menu 1. USER ORGANIZER Trans/PGM Trans/PGM 1 > USER ORGANIZER RING / BGM EXIT Press [PGM] button. Press [OK] or [Hold/Save] button. 1 > ANSWER MODE(H/T/P) STATION NAME PROGRAM BACK EXIT Press [Volume] button Press [Volume] button. 3 > SET WAKE UP RESET WAKE UP BACK EXIT... -
Page 22: Station Name Program
Menu 1.1 ANSWER MODE(H/T/P) 1> ANSWER MODE(H/T/P) Press [OK] or [Hold/Save] button. 2 STATION NAME PROGRAM BACK EXIT Select ICM Mode. ENTER ICM ANS MODE (2) ENTER ICM ANS MODE (2) ※ There are three types as follows; H(1) T(2) P(3) H(1) HANDSFREE MODE BACK... - Page 23 Menu 1.3 SET WAKEUP Press [OK] or [Hold/Save] button. 3> SET WAKE UP 4 RESET WAKE UP BACK EXIT Enter the time and select once or repeat (#) ENTER WAKE UP TIME(RPT:#) ENTER WAKE UP TIME(RPT:#) HH:MM-ONCE 12:00 Press [OK] or [Hold/Save] button. BACK EXIT REGISTERED WAKE UP TIME...
-
Page 24: Language Program
Menu 1.5 LANGUAGE PROGRAM Press [OK] or [Hold/Save] button. 5> LANGUAGE PROGRAM 6 LCD DATE MODE CHANGE BACK EXIT Select language FOR LANGUAGE DIAL 00-14 FOR LANGUAGE, DIAL 00-14 ENGLISH (00) Press [OK] or [Hold/Save] button. BACK EXIT 1.6 LCD DATE MODE CHANGE 5 LANGUAGE PROGRAM Press [OK] or [Hold/Save] button. -
Page 25: Set Backlight
Menu 1.8 SET BACK LIGHT Press [OK] or [Hold/Save] button. 7 LCD TIME MODE CHANGE 8 >SET BACK LIGHT BACK EXIT Select language SET BACK LIGHT (1) SET BACK LIGHT (1) ENTER(0-4), TO CHOOSE Press [OK] or [Hold/Save] button. BACK EXIT... - Page 26 Menu 2. RING / BGM Press [OK] or [Hold/Save] button. 1 USER ORGANIZER 2> RING / BGM EXIT 1 > ICM RING TYPE PROGRAM CO RING TYPE PROGRAM BACK EXIT Press [Volume] button. 3 > SET BGM BACK EXIT 2.1 ICM RING TYPE PROGRAM 1 >...
- Page 27 Menu 2.2 CO RING TYPE PROGRAM 1 ICM RING TYPE PROGRAM Press [OK] or [Hold/Save] button. 2 >CO RING TYPE PROGRAM BACK EXIT Select Keyset ring source 1>KEYSET RING SOURCE Press [OK] or [Hold/Save] button. BACK EXIT Select ring tone Select ring tone.
-
Page 28: Cos / Password
Menu 3. COS / PASSWORD Press [OK] or [Hold/Save] button. 3> COS / PASSWORD 4 MULTI MESSAGE EXIT 1 > TEMPORAL COS MODE RETRIEVE COS BACK EXIT Press [Volume] button. 3 > WALKING COS REGISTER PASSWORD REGISTER PASSWORD BACK EXIT 5 >... -
Page 29: Walking Cos
Menu 3.2 RESTORE COS TEMPORAL COS MODE Press [OK] or [Hold/Save] button. 2 > RETRIEVE COS BACK EXIT ENTER CURRENT PASSWORD ENTER CURRENT PASSWORD Press [OK] or [Hold/Save] button. BACK EXIT PRESS OK / SAVE KEY Press [OK] or [Hold/Save] button. ******* ******* BACK... -
Page 30: Register Password
Press [OK] or [Hold/Save] button. BACK EXIT PROTECT ? Select 1 for Yes, 2 for No. YES : 1, NO : 2 BACK EXIT ※ Password should be registered. 3.6 SMS MESSAGE PROTECT ※ LDP-9030D does not support SMS feature. -
Page 31: Multi Message
Menu 4. MULTI MESSAGE Press [OK] or [Hold/Save] button. 3 COS / PASSWORD 4> MULTI MESSAGE EXIT 1 > PRESELECTED MSG PGM SET USER MESSAGE BACK EXIT Press [Volume] button. 4.1 PRESELECTED MSG PGM 1 > PRESELECTED MSG PGM Press [OK] or [Hold/Save] button. SET USER MESSAGE BACK EXIT... -
Page 32: Mobile/Conference Room
Menu 5. MOBILE/CONFERENCE ROOM Press [OK] or [Hold/Save] button. 5> MOBILE/CONFERENCE ROOM 6 HEADSET/BLUETOOTH EXIT 1 > MOBILE-EXT. ENABLE MOBILE-EXT. NUMBER PGM BACK EXIT Press [Volume] button. 3 > MOBILE-EXT. CLI PGM MOBILE SERVICE BY CLI BACK BACK EXIT EXIT 5 >... - Page 33 Menu 5.2 MOBILE-EXT. NUMBER PGM 1 MOBILE-EXT. ENABLE Press [OK] or [Hold/Save] button. 2> MOBILE-EXT. NUMBER PGM BACK EXIT Select Mobile Ext. index.(1 or 2) MOBILE-EXT. NUMBER PGM ENTER(1-2), TO CHOOSE BACK EXIT Enter Mobile Phone number with CO Access code Enter Mobile Phone number with CO Access code.
- Page 34 Menu 5.4 MOBILE SERVICE BY CLI 3 MOBILE-EXT. CLI PGM Press [OK] or [Hold/Save] button. 4> MOBILE SERVICE BY CLI BACK EXIT MOBILE SERVICE BY CLI (1:ON/0:OFF) : OFF Select ON/OFF to use the feature(1 or 0). BACK EXIT MOBILE SERVICE BY CLI MOBILE SERVICE BY CLI Press [OK] or [Hold/Save] button.
-
Page 35: Delete Conference Room
Menu 5.6 CREAT CONFERENCE ROOM 5 MOBILE-EXT SERVICE CLI Press [OK] or [Hold/Save] button. 6> CREATE CONFERENCE ROOM BACK EXIT Enter Conference Room Number DIAL ROOM NUMBER ※ Please refer to Feature Numbering Plan in System. BACK EXIT Enter Password for conference room Or Enter Password for conference room. - Page 36 Menu 6. HEADSET/BLUETOOTH Press [OK] or [Hold/Save] button. 5 MOBILE/CONFERENCE ROOM 6> HEADSET/BLUETOOTH EXIT 1 > SPEAKER/HEADSET PGM HEADSET RING PROGRAM BACK EXIT Press [Volume] button. 3 > REGISTER BLUETOOTH BACK BACK EXIT EXIT 6.1 SPEAKER/HEADSET PGM 1 > SPEAKER/HEADSET PGM Press [OK] or [Hold/Save] button.
- Page 37 Menu 6.3 REGISTER BLUETOOTH 3 > REGISTER BLUETOOTH Press [OK] or [Hold/Save] button. BACK EXIT Select 1 for Pairing, 2 for Unpairing, 3 for Paired t 1 f P i i P i d 1 > PAIRING Information UNPAIRING BACK EXIT 3>...
-
Page 38: Station Iclid
Menu 7. STATION ICLID Press [OK] or [Hold/Save] button. 7> STATION ICLID 8 KEYSET INFORMATION EXIT 1 > REGISTER STATION ICLID VIEW STATION ICLID BACK EXIT 3 > OUTCALL NOTI ENABLE Press [Volume] button. OUTCALL NOTI ATTEMPTS BACK BACK EXIT EXIT 5 >... -
Page 39: View Station Iclid
Menu 7.2 VIEW STATION ICLID 1 REGISTER STATION ICLID Press [OK] or [Hold/Save] button. 2> VIEW STATION ICLID BACK EXIT Select the list. >01 1234567 Press [SELECT] or [Hold/Save] button. 02 EMPTY BACK SELECT EXIT Press [DELETE] b tton to delete LIST Press [DELETE] button to delete LIST. - Page 40 Menu 7.4 OUTCALL NOTI ATTEMPTS 3 OUTCALL NOTI ENABLE Press [OK] or [Hold/Save] button. 4 >OUTCALL NOTI ATTEMPTS BACK EXIT Select Outcall Attempts Number(1-9). OUTCALL ATTEMPTS (1-9) Press [SELECT] or [Hold/Save] button. BACK SELECT EXIT 7 5 OUTCALL NOTI ENABLE 7.5 OUTCALL NOTI ENABLE 5 >OUTCALL NOTI INTERVAL Press [OK] or [Hold/Save] button.
-
Page 41: Keyset Information
Menu 8. KEYSET INFORMATION ※ LDP 9030 does not support this feature. 9. SYSTEM INFORMATION Press [OK] or [Hold/Save] button. 9> SYSTEM INFORMATION 0 ATTENDANT PROGRAM EXIT 1 > MPB VERSION DISPLAY VIEW IP ADDRESS BACK EXIT Press [Volume] button. 9.1 MPB VERSION DISPLAY 1 >... - Page 42 User Program Codes • Press the [TRANS/PGM] button • Enter the desired feature code below table CODE FUNCTION CODE FUNCTION Answer mode (H/T/P) Create Conference Room Station Name Program Delete Conference Room Set Wake Up Speaker/Headset PGM Reset Wake Up Headset Ring Program Language Program Register Station ICLID...
-
Page 43: Entering Characters
Entering characters... -
Page 44: Glossary Of Terms
Glossary of Terms Intercom – describes internal calls within the telephone system Intercom describes internal calls within the telephone system CO Line Central Office Line – also known as a trunk line, exchange line or outside line Speed Dial A commonly used number stored in a speed bin for easy access Do Not Disturb Do Not Disturb –...
Need help?
Do you have a question about the LDP-9030D and is the answer not in the manual?
Questions and answers
How do you do an announcement page and program flex buttons