iPECS LIP-9010 User Manual
Hide thumbs
Also See for LIP-9010:
- Features manual (3 pages) ,
- Manual (2 pages) ,
- User manual (95 pages)

Related Manuals for iPECS LIP-9010


Summary of Contents for iPECS LIP-9010
-
Page 1: User Guide
LIP-9000 Series User Guide Please read this user guide carefully before operating your set. Retain it for future reference. - Page 3 The information furnished by Ericsson-LG Enterprise in this material is believed to be accurate and reliable, but is not warranted to be true in all cases. Ericsson-LG Enterprise and iPECS are trademarks of Ericsson-LG Enterprise Co., Ltd. Document Information Issue...
-
Page 5: Table Of Contents
Table of Contents TABLE OF CONTENTS ...............I BEFORE USE ................1 ..................1 BOUT THIS UIDE Introduction of the Document ............1 Explanation of Symbol or Word ............ 1 INTRODUCTION ..............2 ..................2 ENERAL ..............2 EATURE NFORMATION ..............3 EATURE ROUPINGS PECS LIP-9000 P... - Page 6 ............20 SING THE PEAKERPHONE ..............21 SING A BUTTON KIT RECEIVING CALLS ............23 ............ 23 NSWERING A HILE ..........24 ESPONDING TO A HILE (AME) ......24 SING NSWERING ACHINE MULATION ............24 IFFERENTIAL IGNALS ............26 NSWERING ALLS AT IGHT ........
- Page 7 ..41 RANSFER ENDING A CALL TO A DIFFERENT DESTINATION ......41 LACING A CALL IN A WAITING STATE ......42 ROKER WITCHING BETWEEN TWO CALLS ....... 42 OINING ULTIPLE EOPLE IN A ONFERENCE 5.4.1 Setting up a Conference Room ........43 ......
- Page 8 [EU] ..................... 63 [USA/CSA] .................. 63 ............64 OURCE OFTWARE OTICE GPL License: ................64 LIP-9000 Series User Guide - ST...
-
Page 9: Before Use
This guide is intended for the LIP-9000 Series users, and provides user- related information. Introduction of the Document This guide explains how to install and correctly use LIP-9010, LIP-9020, LIP-9030 and LIP-9040. Product figures and screen images used in this guide could be changed without notice for quality improvement. -
Page 10: Introduction
Employing state-of-the-art Voice over Internet Protocol (VoIP) technology, voice and data converge on a single IP packet network. Because each iPECS Phone is an IP appliance, it can be moved easily throughout the office LAN and maintain normal operation. -
Page 11: Feature Groupings
The LIP-9010 includes a 3-line 320 by 48 dot graphic LCD. The LIP-9020 includes a 4-line 320 by 80 dot graphic LCD. -
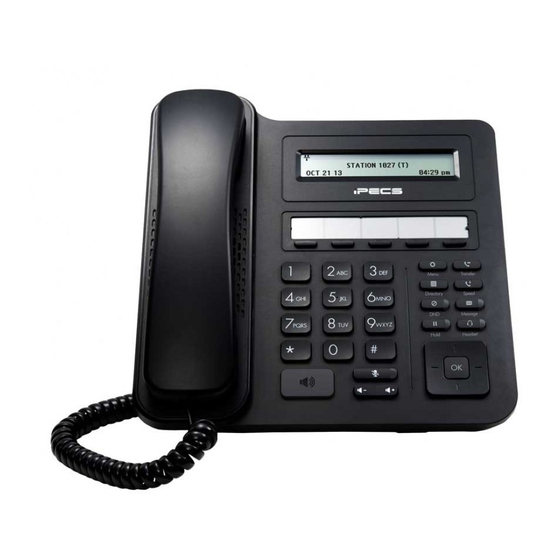
Page 12: Phone Layout And Functions
1.4.1.1 Phone Layout Below is the Layout of each LIP-Phone based on the front view. This layout may be a bit different among LIP-9010, LIP-9020, LIP-9030 and LIP-9040. Figure 1: LIP-9010 Front (above) Figure 2: LIP-9020 Front (above) LIP-9000 Series User Guide - ST... - Page 13 Figure 3: LIP-9030 Front (above) Figure 4: LIP-9040 Front (above) LIP-9000 Series User Guide - ST...
- Page 14 7. Volume control button: Use to adjust Ring, Headset, Handset, and Speaker volume. 8. Flexible buttons: Assigns as Line or feature in Phone configuration. LIP-9010 has 5-flexible buttons. LIP-9020 has 10-flexible buttons. LIP-9030 has 8-flexible buttons with maximum 3 pages.
- Page 15 Left: In LIP-9020, 30, and 40 models, use to select the previous group of softkeys when ◄ appears in the bottom-left of the LCD. In LIP-9010, use to go to previous step or select ‘no’ when user has to choose ‘yes’ or ‘no’.
-
Page 16: Lip-9000 Phone Installation
LIP-9000 Phone Installation The phone handset is attached as shown (A). The LIP-9000 has 2 RJ-45 and 10/100 Base-T LAN connection ports (shown). One port is for connecting to the LAN (D), and the other can be connected to a desktop data device or PC (B), or another LAN interface terminal. -
Page 17: Information About Compatibility Headset
Plus Star Table 1: LIP-9000 Series country-specific Adaptor 1.5.1.2 PoE Class PoE Class LIP Phone Class 1 LIP-9010 Class 2 LIP-9020, LIP-9030, LIP-9040 Table 2: LIP-9000 Series PoE Class 1.5.2 Information about compatibility headset We can't guarantee other headsets except the headset list posted on the web site. -
Page 18: Wall Mount
1.5.3 Wall Mount The LIP-9000 series phones can be wall mounted as needed. The following instructions describe how to perform a wall mount installation. 1. Align the wall-mount bracket (not included) over the back of the phone, then press the bracket forward applying steady pressure until it clicks into place. -
Page 19: Button Kit
Button Kit The button kit for the LIP-9000 Series phone provides 12 or 24 additional line/programmable feature keys. You can place the phone and button kit on your desktop or you can wall-mount them. Up to three different types of button kits are supported on a single phone. The button kits work with the LIP-9020, LIP-9030, and LIP-9040. -
Page 20: Lcd, Speakerphone & Related Features
LCD, Speakerphone & Related Features Using the LCD The LIP-9030 and LIP-9040 each has 6-line and 8-line Liquid Crystal Display (LCD) which is divided into 3 sections. The upper section, which consists of a single line, displays station number, various icons, time and flexible button page number. - Page 21 Wake Up icon, indicates one or more alarms are saved. Missed call icon, indicates one or more missed calls. LAN icon, indicates the status of the LAN connection to the IP Phone. (LIP-9010/20 Only) Flexible button icons (LIP-9030/40 only) Icon...
-
Page 22: Display Menu
Display Menu With the Display Menu, you can access the Network Configuration menu as well as other phone features through simple menu trees. The Display Menu is activated using the Menu button. To activate the Display Menu: Press the MENU button, ... -
Page 23: Conference Room
Station Name Program—Input up to 20 length using the keypad, then press the OK button. (OK Soft button also works in LIP-9020/LIP- 9030/LIP-9040). To input characters: – Press the DND button to delete a character. (DELETE Soft button also works in LIP-9020/LIP-9030/LIP-9040) –... -
Page 24: Icm Sms
The following menu list displays: 1. CREATE CONF ROOM 2. DELETE CONF ROOM Press the Navigation up/down keys to highlight and then press the OK button. (OK Soft button also works in LIP-9020/LIP-9030/LIP-9040) Dial the number associated to the selection, ... -
Page 25: Network Configuration
– To return to a previous branch in the menu, press the BACK Soft button in LIP-9020/LIP-9030/LIP-9040 and press the Navigation Left key in LIP-9010. Press the OK or HOLD(SAVE) button to save each setting. (OK Soft button also works in LIP-9020/LIP-9030/LIP-9040). -
Page 26: Button Program (Lip-9030/9040 Only)
The structure of the menu is like the following. 1. Profile Profile Number 1. Network Configuration 1. MAC Address 2. Web Password 2. Network Mode 3. Set to Default 1. Current Profile 3. IP Address 2. All Profiles 4. Subnet Mask 1. -
Page 27: Attendant Menu
Current feature is shown in the LCD. New feature can be entered. When BUTTON LABEL is chosen, press the desired button. Current label is shown in the LCD. New label can be entered. Press the OK button. 2.2.6 Attendant menu The Attendant menu is only available on the System Attendant phone. -
Page 28: Using The Speakerphone
Using the Speakerphone Activate the iPECS Speakerphone at any time (except for Paging) in place of lifting the handset to receive or place calls. Additionally, you may switch between the handset and Speakerphone during a call. By keeping the handset Off-hook, the Group Listen feature is activated, which provides incoming audio over the speaker with outgoing audio from the handset. -
Page 29: Using A Button Kit
LIP-9020, LIP-9030, and LIP-9040. Figure 7: LIP-9024 DSS button kit connected with LIP-9040 Phone Be sure to verify the DSS and LSS capacities with the iPECS-UCP System to ensure usability (refer to iPECS-UCP Manual). LIP-9024 LSS has 2-page LCD screen. The 2 buttons in the bottom are used to navigate between the pages. - Page 30 Power-ON the phone Program the DSS/LSS button using Web Admin - Station Data– Flexible Buttons. The default label is provided from iPECS-UCP. To initialize button kit Database: In Web Admin - Station Data – Terminal Attribute, choose Serial DSS Usage.
-
Page 31: Receiving Calls
Otherwise, you must press the flashing Flex button. External calls to an iPECS Phone will appear under the CO/IP line or a LOOP button. External calls are from CO lines or VoIP channels that are programmed to ring at your phone. -
Page 32: Responding To A Call While Busy
Speaker mode — when the call is sent to the voice mailbox, the caller’s voice is automatically broadcast over the speaker of your iPECS Phone. You may terminate screening, leaving the caller in voice mail to record a message, talk with the caller and record the conversation in the mailbox, or answer the call and disconnect the Voicemail. - Page 33 A. 1 - 4: System Ring. B. 5 - 8: Download Ring from System. C. 9-16: Phone Self Ring. To download a Ring Tone from System memory: Press the TRANSFER(PGM), Dial 1 for Ring Tones, Dial 5 for Ring Tone download, ...
-
Page 34: Answering Calls At Night
Answering Calls at Night In the Night mode, Loud Bell Control may be used to send ring signals to external bells. You may answer these calls with Universal Night Answer (UNA). To answer a call ringing during night mode: Lift the handset, ... -
Page 35: Using Do-Not-Disturb (Dnd) To Block Incoming Calls
Using Do-Not-Disturb (DND) to Block Incoming Calls Activate Do-Not-Disturb when you wish to not be interrupted; the phone will block incoming calls. Internal callers will receive a fast busy tone and the display will show the DND status. Activate Do-Not-Disturb while ringing(One-Time DND);... -
Page 36: Forwarding Calls To An External Number
Calls on a Private Line will not forward except to a station with an appearance of the Private Line or to Voice Mail. To activate Call Forward from your phone to another phone or internal system resource: Lift the handset, ... - Page 37 Remote – My station forward setting is possible at another person’s station. In this case, my station authorization code should be entered. Unconditional – all calls to the station, except recalls, are forwarded. Busy – Immediately forwards all calls, except recalls, when the station is busy.
-
Page 38: Forwarding Callers To A Text Message
3.8.3 Forwarding callers to a Text Message Using an iPECS Phone, the system can be setup to return a ‘Text Message’ to internal callers. When calling your Station, internal callers will automatically receive the selected message or you can send a text message you select in response to an internal call, Silent Text Message. - Page 39 To activate Custom or Pre-Defined Message Forward: Press the TRANSFER(PGM), Dial User Program feature code 51, Dial the two-digit text Message code (00-20), Dial any auxiliary input for messages 01-04 and 06-08, Press the HOLD(SAVE), forward confirmed. To cancel activated Message: ...
-
Page 40: Placing Calls
Placing Calls Internal Calls You can place calls to other stations in the system over the Intercom. The call will ring, or for an ICM Voice Announce call, a splash tone will be heard. Ring or Voice Announce is normally determined by settings at the called station but you may change this by dialing ‘#’... -
Page 41: Using Camp-On When Calling A Busy Station
External calls are placed on CO/IP lines. These ‘lines’ are accessed either using a button on the iPECS Phone assigned as a CO/IP line or using dial codes. The CO/IP lines are grouped for different types of calls, local, long distance, etc. - Page 42 A Flex button on the iPECS Phone assigned as a LOOP button lets you access a line from a group. Dial codes for access to CO/IP lines are: Individual CO/IP line access: 88 + Line number CO/IP Group access: 8 + Group number ...
-
Page 43: Waiting For The Next Available Co/Ip Line
4.2.2 Waiting for the next available CO/IP line If all the lines connected to your system are busy, you will receive an All Co line or Co Group Busy signal. You may request to be notified when a line is available for use. To activate a queue if the selected/dialed line is busy: ... -
Page 44: Temporarily Override Dialing Restrictions At A Phone
Using Last Number Redial (LNR) The last number dialed on an external call is automatically saved in the Last Number Redial (LNR) buffer. The iPECS-UCP system will store the numbers dialed on the last 15 calls. To dial the Last Number for an external call: ... -
Page 45: Using System Speed Dial Numbers
While on an outgoing external call, press the SAVE Soft button, or press SPEED button twice. 4.3.3 Using System Speed Dial Numbers The iPECS-UCP system has memory allocated for 12000 System Speed Dial numbers (bins 20000-31999). In some cases, these numbers are divided into groups called System Speed Zone Groups. - Page 46 When entering a Speed Dial, a 16-character name may be associated with the number for Dial by Name. (Refer to the 2.2.1Phone Setting -Station Name Program about the way to enter the Speed Name.) To place a call using Station Speed Dial: ...
-
Page 47: Using Dial By Name And Entering Your Name
4.3.5 Using Dial by Name and Entering Your Name Dial by Name employs three different Directories: Private directory (Station Speed dial), Public Directory (System Speed dial), or View Station Name (Intercom directory). NOTE To allow others to contact you via the Intercom directory, you must enter a name for your station (up to 20 characters). - Page 48 Flex button instead of the ACNR Soft button.) Hang-up handset. To cancel the ACNR request: Press the ACNR STOP Soft button. (In case of LIP-9010, use the programmed REDIAL Flex button instead of the ACNR STOP Soft button.)
-
Page 49: Call Handling
Call Handling Call Transfer: Sending a call to a different destination You can send an active call to another station or other resource of the system, Call Transfer. You can screen the transfer with the receiving party (Screened Call Transfer) or complete the transfer without screening (Unscreened Call Transfer). -
Page 50: Broker Call: Switching Between Two Calls
To establish a Conference: Establish call with one of the desired conference parties, Select the CONF Soft button, (in case of LIP-9010, use the programmed CONF Flex button instead of the CONF Soft button) Establish call with the other conference party, ... -
Page 51: Setting Up A Conference Room
Press the HOLD(SAVE) button. To retrieve the Conference from Hold: Select the CONF Soft button. To establish an Unsupervised Conference: Establish conference with two external parties, Select the CONF Soft button, Hang-up the handset. To retrieve an Unsupervised Conference: ... -
Page 52: Call Park: Placing A Call On Hold To Page
Use the Navigation button to display the next Menu and select the RECORD Soft button, record warning tone is heard and recording starts. (in case of LIP-9010, use the programmed RECORD Flex button instead of the RECORD Soft button) To stop Two-Way Record while on a CO/IP call: ... -
Page 53: Send & Retrieve Messages
DND mode. The message icon will be displayed on the LCD screen. If programmed, a flashing MSG LED on the iPECS Phone also will indicate when there is a Message Waiting. As a further notification, a Message Wait Reminder Tone can be provided. -
Page 54: Getting Voice Mail Messages
Getting Voice Mail Messages When callers are forwarded or recall to your Voice Mail Box, they can leave a voice message, as part of the integrated UVM/UVMU module, the iPECS Feature Server or an external Voice Mail system. The Voice Mail system allows access to and management of received voice messages. -
Page 55: Sending And Receiving Short Text Messages
Sending and Receiving Short Text Messages You can exchange short text messages (up to 80 alphanumeric characters) with other iPECS display phone users. If there are messages, the message button will be flashing. If the ring/message LED is set to MWI(Message Wait Indication –... - Page 56 Dial your message using 2 key strokes for each character (refer to 2.2.1Phone Setting Press the HOLD(SAVE) to send your message. To view your received Short text messages: Press the MSG button, the LCD will display the Message Summary display: 1.
-
Page 57: Remote System Access
Dial as needed for the desired system resource. Mobile Phone Extension When away from your desk or office you can place and receive iPECS calls on a registered mobile phone. You may need to activate the Mobile Phone Extension feature and assign the Mobile Phone number. - Page 58 1 to activate, 0 to deactivate, Press the HOLD(SAVE) button. To place a call from the mobile extension using the iPECS System: Dial the ISDN DID number of the station; the system will check the Caller ID and answer the call. The user then will receive intercom dial tone, ...
-
Page 59: Misc. Features
(up to 100 records). In case of LIP-9020, LIP-9030 and LIP-9040, a LOG Soft button provides simple access to incoming (called), outgoing (dialed) and missed (lost) calls. In case of LIP-9010, user can access it by the Navigation right key. - Page 60 SELECT▶ Highlight the desired item, and press the OK button to place a call. (Except for LIP-9010, SEND Soft button also works) To save an external call to the Station Speed dial: Use Navigation up/down buttons to highlight the desired external call item, ...
-
Page 61: Contrast
To select a CO Code (LIP-9010 doesn’t support): From the Call Log, use the right Navigation key, to advance to the next 3 Soft button items, Call Log 1006 1001 LEE K D KIM M J 1003 CO CODE ◀DELETE... -
Page 62: Background Music And Music On Hold
Background Music (BGM) and Music On Hold (MOH). In addition, a recorded message from the VMIM can be used. BGM is played over the speakers of the iPECS Phone when the station is idle. MOH is played to callers placed on Hold. -
Page 63: Push-To-Talk (Ptt) Page
Dial 544 (Meet-Me-Page code). Push-To-Talk (PTT) Page iPECS Phones can be assigned as a member of one or more of the system’s nine Push-To-Talk (PTT) page groups. Users separately log-in or log-out of any one or all PTT groups to which the phone is assigned. Once logged in, place or receive one-way page announcements to/from other users who are logged in to the same PTT group. -
Page 64: Wake-Up Alarm
Wake-Up Alarm iPECS-UCP supports an Alarm clock for each station in the system. The alarm clock can be set to repeat daily or as a one-time alarm. When responding to the alarm by lifting the handset, BGM will be provided. -
Page 65: System Voice Memo
The integrated Voice Mail modules incorporate several Voice Memos to provide Station Users with general information such as station number, date, time, and feature status. Voice Memos are heard over the iPECS Phone speaker and over the handset for SLTs. -
Page 66: Hot Desk
Hot Desk iPECS phones in the system may be assigned for Hot Desk operation. These Hot Desk phones let you log-on and use the Hot Desk phone as if it were your station. Once logged-on, the Hot Desk station will take on the attributes assigned to your station number and you can make calls as normal. -
Page 67: Features & Flex Buttons
Features & Flex Buttons Entering Station Program Data A special code set is available for iPECS Phone users to assign certain attributes such as Authorization Codes (Passwords). After entering the User Program mode, dial the codes to select the attribute and setting. - Page 68 To assign a feature to a Flex button: Press the TRANSFER(PGM), Press the desired Flex button, – In case of Station number, Co line, Co group, just enter the number, and press the HOLD(SAVE). – In case of Flexible Numbering Plan Code, just enter the numbering plan code, and press the HOLD(SAVE).
-
Page 69: Useful Information
Useful Information Disposal of your old appliance 1. When the crossed-out wheeled bin symbol is attached to a product, it means the product is covered by the European Directive 2012/19/EU. 2. All electrical and electronic products should be disposed of separately from the municipal waste stream via designated collection facilities appointed by government or the local authorities. - Page 70 4. If the power adapter is used, do not touch the plug with wet hands. This may result in a fire or an electric shock or equipment damage. 5. Do not use the phone during a thunderstorm. Lightning strike may result in fire, severe electrical or acoustic shock.
-
Page 71: Regulatory Information
Regulatory Information [EU] European Union Declarations of Conformity Ericsson-LG Enterprise Co., Ltd. declare that the equipment specified in this document bearing the “CE” mark conforms to the European Union Radio and Telecommunications Terminal Equipment Directive(R&TTE 1999/5/EC), including the Electromagnetic Compatibility Directive(2004/108/EC) and Low Voltage Directive(2006/95/EC). - Page 72 (1)This device may not cause harmful interference; and (2) This device must accept any interference received, including interference that may cause undesired operation. This Class B digital apparatus complies with Canadian ICES-003. Cet appareil numérique de la classe B est conforme à la norme NMB-003 du Canada.
- Page 73 Ericsson-LG Enterprise offers to provide source code to you on CD-ROM for a charge covering the cost of performing such distribution, such as the cost of media, shipping and handling upon e-mail request to Ericsson-LG at.: opensource@ericssonlg.com. This offer is valid for a period of three (3) years from the date of the distribution of this product by Ericsson-LG Enterprise.
- Page 75 The contents of this document are subject to revision without notice due to continued progress in methodology design and manufacturing. Ericsson-LG Enterprise shall have no liability for any error or damage of any kind resulting from the use of this document. www.ericssonlg-enterprise.com ©...
Need help?
Do you have a question about the LIP-9010 and is the answer not in the manual?
Questions and answers