Intermec CN2 User Manual
Hide thumbs
Also See for CN2:
- User manual (33 pages) ,
- Instructions & assembly (28 pages) ,
- Instructions manual (10 pages)
Table of Contents
Advertisement
Quick Links
Advertisement
Table of Contents

Subscribe to Our Youtube Channel
Related Manuals for Intermec CN2


Summary of Contents for Intermec CN2
- Page 1 User's Manual CN2 Handheld Computer...
- Page 2 Intermec. Information and specifications contained in this document are subject to change without prior notice and do not represent a commitment on the part of Intermec Technologies Corporation. © 2005 by Intermec Technologies Corporation. All rights reserved.
-
Page 3: Table Of Contents
............. 1 Introducing the CN2 Handheld Computer ............... 2 CN2 Features, Applications, and Accessories ..........3 Identifying the Optional Features Installed in Your CN2 ......3 Using the Battery....................... 5 Installing and Charging the Battery ............. 6 Removing the Battery.................. 8 Maximizing Battery Life ................ - Page 4 Using the Optional USB Keyboard................25 Configuring the CN2 ..................29 How to Configure the CN2 Parameters..............30 Configuring the CN2 With the Setup Assistant ............31 Configuring the CN2 Locally With Intermec Settings ..........32 Opening Intermec Settings................ 32 Navigating Through Intermec Settings............33 Saving Your Settings..................
- Page 5 Troubleshooting and Maintaining the CN2 ......... 83 Problems and Solutions ................... 84 Running Diagnostics ....................92 Sending the CN2 to Intermec for Service..............94 Booting the CN2..................... 94 Warm Booting the CN2................94 Cold Booting the CN2................95 Upgrading the CN2....................96 Upgrading the Operating System...............
- Page 6 Contents Specifications and Accessories ............103 Physical and Environmental Specifications............. 104 Accessories for the CN2..................105 Default Configuration ................. 107 Default Configuration ................... 108 Index ......................... 111 CN2 Handheld Computer User’s Manual...
-
Page 7: Before You Begin
Your safety is extremely important. Read and follow all warnings and cautions in this document before handling and operating Intermec equipment. You can be seriously injured, and equipment and data can be damaged if you do not follow the safety warnings and cautions. -
Page 8: Safety Icons
Global Services and Support Warranty Information To understand the warranty for your Intermec product, visit the Intermec web site at www.intermec.com and click Service & Support > Service & Support. The Intermec Global Sales & Service page appears. From the Service & Support menu, move your pointer over Support, and then click Warranty. - Page 9 Web Support Visit the Intermec web site at www.intermec.com to download our current manuals in PDF format. To order printed versions of the Intermec manuals, contact your local Intermec representative or distributor.
-
Page 10: Who Should Read This Document
Who Should Read This Document? The CN2 Handheld Computer User’s Manual provides you with information about the features of the CN2 and how to install, operate, maintain, and troubleshoot the CN2. Before you install and configure the CN2, you should be familiar with your network and general networking terms, such as IP address. -
Page 11: Other Copyright Information
Dr John Maddock makes no representations about the suitability of this software for any purpose. It is provided “as is” without express or implied warranty. CN2 Handheld Computer User’s Manual... - Page 12 Before You Begin CN2 Handheld Computer User’s Manual...
-
Page 13: Using The Cn2 Handheld Computer
Using the CN2 Handheld Computer Use this chapter to familiarize yourself with the CN2 handheld computer. In this chapter you will find these sections: • Introducing the CN2 Handheld Computer • Using the Battery • Using the Keypad • Using the Touch Screen •... -
Page 14: Introducing The Cn2 Handheld Computer
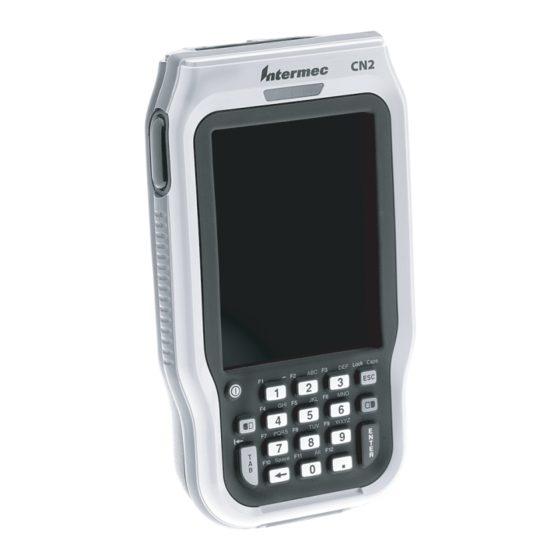
Lock Caps PQRS WXYZ Space USB/Serial port CN2 Handheld Computer With Numeric Keypad The CN2 handheld computer with an IEEE 802.11b/g radio ® installed is Wi-Fi certified for interoperability with other 802.11b/g wireless LAN devices. CN2 Handheld Computer User’s Manual... -
Page 15: Cn2 Features, Applications, And Accessories
• Transcriber • Wavelink Avalanche Enabler • WordPad For a complete list of accessories, see “Accessories for the CN2” on page 105. Identifying the Optional Features Installed in Your CN2 Before you continue learning to use your CN2, you need to determine which optional features are installed in your CN2: •... - Page 16 “Configuring USB dock to communicate with Communications” on a network. page 38. Does Your CN2 Contain a Numeric or Scroll Keypad? How to Determine Description In this Manual The numeric keypad has 18 You can type numbers and For details, see “Using the...
-
Page 17: Using The Battery
Chapter 1 — Using the CN2 Handheld Computer Using the Battery The CN2 uses a lithium-ion battery as its main power source. You must fully charge the main battery before you can use the CN2. When you change the battery, the backup battery maintains the computer’s status, memory, and real-time clock... -
Page 18: Installing And Charging The Battery
Installing and Charging the Battery Make sure you fully charge the battery before you use your CN2. To charge the battery, you need to install it in the CN2. To install and charge the battery 1 Push down on the battery door latch, and pull up on the battery door. - Page 19 Chapter 1 — Using the CN2 Handheld Computer You must use only the Intermec power supply approved for use with the CN2. Using any other power supply will damage the CN2. Attention: Vous devez utiliser seulement le bloc d’alimentation Intermec désigné pour le CN2.
-
Page 20: Removing The Battery
Attention: Utilisez uniquement le stylet pour retirer la pile. Si vous utilisez un autre instrument ou une autre méthode pour le faire, vous risquez d’endommager la pile ou le CN2. Removing the main battery when the backup battery low or critically low icon appears on the status bar may cause your CN2 to cold boot and you may lose data. -
Page 21: Maximizing Battery Life
Chapter 1 — Using the CN2 Handheld Computer 2 Remove the battery door and set it aside. 3 Insert the stylus between the battery and the CN2 case, and press straight down until the battery is released. 4 Lift the battery out of the battery compartment. -
Page 22: Using The Keypad
The battery is critically low. You need to charge the battery now. Using the Keypad The CN2 has either an 18-key numeric keypad or a 10-key scroll keypad. Using the Numeric Keypad You enter all of the characters and functions printed on the keys just like you would on a standard keyboard. - Page 23 Chapter 1 — Using the CN2 Handheld Computer 2 Press and release the key below the function printed in orange. For example, press the 5 key to access the F5 function, which refreshes the selected folder or desktop. The icon turns off.
-
Page 24: Using The Scroll Keypad
Chapter 1 — Using the CN2 Handheld Computer Using the Scroll Keypad You enter all of the characters and functions printed on the keys just like you would on a standard keyboard. Arrow keys Power key (4 places) Enter key... -
Page 25: Using The Power Key
94. then release it. Note: If your CN2 does not resume after you press the Power key, your battery may be too low to supply power. Replace or charge the battery. If replacing or charging the battery does not solve the problem, see “Booting the CN2”... -
Page 26: Using The Touch Screen
Chapter 1 — Using the CN2 Handheld Computer Using the Touch Screen The CN2 has a color touch-screen display. The screen is 240 x 320 pixels. The desktop is 240 x 300 pixels and the taskbar is 240 x 20 pixels. In addition, the screen supports Unicode characters, user-programmable fonts, and bitmap graphics. -
Page 27: Understanding The Desktop
The desktop displays shortcuts to some of the applications installed on the CN2. The first time you turn on the CN2, the taskbar displays the Start menu icon, the time, the keyboard icon, and the desktop icon. Most of the default shortcuts on the desktop are standard Windows CE applications. -
Page 28: Using Transcriber
2 Select or clear the symbologies you want to use and tap Back. 3 If you want to configure symbology parameters, tap Intermec Settings. Intermec Settings appears on your screen. 4 From the Intermec Settings application, go to Scanners Symbologies >... -
Page 29: Calibrating The Screen
If the screen does not respond when you tap it with the stylus, you may need to recalibrate the screen. To calibrate the screen on a CN2 with the numeric keypad 1 Press and hold the Orange ( ) key and then press Enter. -
Page 30: Understanding The Screen Icons
Battery is low. Charge the battery soon. Battery is critically low. Charge the battery now. Backup battery is low. Charge the battery now. The CN2 is authenticated with a strong connection to the access point. The CN2 is authenticated with a good connection to the access point. -
Page 31: Understanding The Status Lights
Tap the left arrow to view additional icons. Understanding the Status Lights The status lights on the CN2 turn on to indicate the status of the battery or a successful decode of a bar code. -
Page 32: Understanding The Beeps
Understanding the Beeps The CN2 uses beeps to provide you with audio feedback when it performs some functions. For example, you hear a beep each time you scan a valid bar code. -
Page 33: Scanning Bar Codes
Intermec Settings. Scanning Bar Codes Use the scanner to scan and enter bar code data. The CN2 supports the scanning of 1D linear bar codes. When you unpack the CN2, all the supported bar code symbologies are enabled: •... -
Page 34: Using The Optional Sd Card
To insert the SD card 1 Before inserting the SD card, you must attach one of the pull-tabs that ships with the CN2. An SD card without a pull-tab can be very difficult to remove. CN2 Handheld Computer User’s Manual... - Page 35 Chapter 1 — Using the CN2 Handheld Computer SD Card 2 Align the SD card as shown in the next illustration, and insert the SD card into the slot. SD card 3 Push the card into the slot until it is fully inserted.
- Page 36 5 Install the battery door. To access files stored on the SD card • If you have an SD card inserted in your CN2, it appears as the SDMMC Disk folder. To access this folder, double-tap the My Computer icon on the desktop and then double-tap the SDMMC Disk folder.
-
Page 37: Using The Optional Usb Keyboard
Chapter 1 — Using the CN2 Handheld Computer 6 Remove the battery and set it aside. 7 Pull the tab toward the bottom on the CN2 to remove the SD card. Using the Optional USB Keyboard If you prefer the convenience of using a keyboard with the CN2, you can attach a USB keyboard to the optional modem dock. - Page 38 CN2. Note: If you cannot connect the modem dock to an AC power source, you can configure the CN2 to use its battery to power the USB keyboard. In Step 4c, set USB Host Power to Always On. However, you will have to charge the CN2 battery more often.
- Page 39 Windows keyboard shortcuts, such as Ctrl-S to save a file. Note: When you tap some input fields, the Software Input Panel (or soft keyboard) appears on your CN2 screen. You can ignore this soft keyboard and continue typing on the USB keyboard.
- Page 40 Chapter 1 — Using the CN2 Handheld Computer CN2 Handheld Computer User’s Manual...
-
Page 41: Configuring The Cn2
Configuring the CN2 Use this chapter to understand how to configure the CN2. In this chapter, you will find these sections: • How to Configure the CN2 Parameters • Configuring the CN2 With the Setup Assistant • Configuring the CN2 Locally With Intermec Setting •... -
Page 42: How To Configure The Cn2 Parameters
Use Intermec Settings Locally Use Intermec Settings on the CN2 to set most parameters. Configuring the CN2: The CN2 provides several ways for you to configure the communications, device, and imaging parameters. CN2 Handheld Computer User’s Manual... -
Page 43: Configuring The Cn2 With The Setup Assistant
Chapter 2 — Configuring the CN2 Configuring the CN2 With the Setup Assistant The Setup Assistant runs on the CN2 the first time you turn on the computer. Use the Setup Assistant to set or enable basic network parameters and connect your CN2 to the network. The... -
Page 44: Configuring The Cn2 Locally With Intermec Settings
Chapter 2 — Configuring the CN2 Configuring the CN2 Locally With Intermec Settings Use Intermec Settings to configure the CN2 and view system information. You can access Intermec Settings while running any application. Opening Intermec Settings To open Intermec Settings 1 Tap the Start icon. -
Page 45: Navigating Through Intermec Settings
Use the following diagram to help find the commands you need to use to configure your CN2. These screens do not represent the exact information you will see on your CN2. They have been modified to show you how the information is structured. -
Page 46: Saving Your Settings
Chapter 2 — Configuring the CN2 Intermec Settings Menus: Use this diagram to help navigate through the Intermec Settings application. This diagram should only be used as a guide; it does not accurately represent all of the information you will see on your screen. -
Page 47: Exiting Intermec Settings
• From the Main Menu, tap File > Exit. If you try to exit Intermec Settings without saving your changes, a message box appears asking if you want to save your configuration changes. Tap Yes. -
Page 48: Configuring The Cn2 Remotely With Intermec Settings
8 Tap to exit Intermec Settings. Note: You can also return the CN2 to its default software configuration by resetting the registry and clearing the object store. For instructions, see page 86. Configuring the CN2 Remotely With Intermec Settings You can use Intermec Settings remotely to configure your CN2. -
Page 49: Adding The Cn2 To The Network
Adding the CN2 to the Network Use this chapter to understand how to configure the CN2 to communicate in your network. In this chapter, you will find these sections: • Configuring the CN2 for Your Network • Configuring Network Security •... -
Page 50: Configuring The Cn2 For Your Network
• USB communications • 802.11b/g radio communications Configuring USB Communications You can place the CN2 in the modem dock (P/N 075499) or the communications dock (P/N 225-696-001) to transfer data to, and receive data from, another device using USB communications. The USB cable, communications dock, and modem dock are sold separately. -
Page 51: Configuring 802.11B/G Radio Communications
électrique, faute de quoi vous risquez d'endommager votre installation. The wireless CN2 has an internal 802.11b/g radio to transfer data using wireless communications. This section of the manual assumes that you have already set up your wireless communications network including your access points. -
Page 52: Configuring The Network Parameters For A Tcp/Ip Network
Chapter 3 — Adding the CN2 to the Network Configuring the Network Parameters for a TCP/IP Network In a TCP/IP network, the CN2 communicates with a host computer directly using TCP/IP. The access point acts as a bridge to allow communications between the wired network and the wireless network. - Page 53 2 Configure security. For help, see “Configuring Network Security” on page 45. The easiest way to configure the network parameters on the CN2 is to use Intermec Settings. For help, see “Configuring the CN2 Locally With Intermec Settings” on page 32. CN2 Handheld Computer User’s Manual...
-
Page 54: Configuring The Network Parameters For A Udp Plus Network
Chapter 3 — Adding the CN2 to the Network Configuring the Network Parameters for a UDP Plus Network In a UDP Plus network, the CN2 communicates with a host computer through the Intermec Application Server. Host UDP Plus Ethernet Intermec Application Server... -
Page 55: Configuring The Cn2 For Microsoft Wireless Zero Configuration
Security” on page 45. The easiest way to configure the network parameters on the CN2 is to use Intermec Settings. For help, see “Configuring the CN2 Locally With Intermec Settings” on page 32. Configuring the CN2 for Microsoft Wireless Zero Configuration You can use Microsoft Wireless Zero Configuration with your wireless CN2. - Page 56 Chapter 3 — Adding the CN2 to the Network 2 You must use Intermec Settings to configure all the wireless network parameters for Microsoft Security. Save your settings. For help, see the next section, “Configuring Network Security.” 3 Double-tap the Network Connection icon ( ) in the taskbar.
-
Page 57: Configuring Network Security
• 802.1x • WEP This section explains how to configure security on your wireless CN2. If you choose not to use security, see “Disabling Security” on page 62. Intermec always recommends that you implement security. You must use either Microsoft Security or Funk Security software to implement your security solution. -
Page 58: Selecting Funk As Your Security Choice
An alert box appears telling you that you must save your settings and warm boot the CN2 for your new security choice to take effect. 6 Tap OK to close the alert box. 7 Save your settings. -
Page 59: Selecting A Profile For Funk Security
Chapter 3 — Adding the CN2 to the Network Note: You must warm boot the CN2 after you change your security choice. Selecting a Profile for Funk Security You can define up to four profiles for your Funk security. Different profiles let your CN2 communicate in different networks without having to change all of your security settings. -
Page 60: Switching From Funk Security To Microsoft Security
Chapter 3 — Adding the CN2 to the Network Switching from Funk Security to Microsoft Security If your CN2 is configured to use Funk Security, it is easy to switch to Microsoft Security. To switch to Microsoft Security 1 Tap Start > Intermec Settings > Communications > 802.11 Radio >... -
Page 61: Configuring Wpa Security With Funk Security
• user and root certificates (if you plan to use TLS for authentication) • an access point with an 802.11b/g radio that supports WPA. • a CN2 with the 802.11b/g radio and the 802.1x/WPA security option. Configuring WPA Security With Funk Security Use these procedures to set WPA-802.1x and WPA-PSK... - Page 62 Save. d For Validate Server Certificate, choose Enabled and tap Save. Note: You must have the date on the CN2 set correctly when you enable Validate Server Certificate. If you choose TLS: a For Validate Server Certificate, choose Enabled and tap Save.
-
Page 63: Configuring Wpa Security With Microsoft Security
0x for a total of 66 characters. The value must match the key value on the access point. The passphrase must be from 8 to 63 characters. After you enter a passphrase, the CN2 internally converts it to a pre-shared key. - Page 64 Press Enter. 8 Exit Intermec Settings. To enable WPA-PSK security on your CN2 With Microsoft security 1 Make sure you have configured the communications and radio parameters on your CN2. CN2 Handheld Computer User’s Manual...
-
Page 65: Using 802.1X Security
0x for a total of 66 characters. The value must match the key value on the authenticator. The passphrase must be from 8 to 63 characters. After you enter a passphrase, the CN2 internally converts it to a pre-shared key. -
Page 66: Configuring 802.1X Security With Funk Security
Chapter 3 — Adding the CN2 to the Network • a CN2 with an 802.11b/g radio and the 802.1x/WPA security option. • user and root certificates (if you plan to use TLS for authentication) These procedures assume that you have already selected either Microsoft Security or Funk Security software as your security choice, as described in “Choosing Between Microsoft Security... -
Page 67: Configuring 802.1X Security With Microsoft Security
Chapter 3 — Adding the CN2 to the Network If you choose TLS: a For Validate Server Certificate, choose Enabled and tap Save. b You can also enter a User Name, Subject Name and Server Common Name if you want to increase your level of security. -
Page 68: Using Leap Security
Chapter 3 — Adding the CN2 to the Network If you choose PEAP: a Select Properties and tap Run App. The Authentication Settings box appears. b Select the Validate Server check box. c Press Enter. Once the radio starts to authenticate, the Network Password dialog box appears. -
Page 69: Using Static Wep Security
10 Select User Password, type a user password, and then tap Save. 11 Exit Intermec Settings. Using Static WEP Security The CN2 uses the Wired Equivalent Privacy (WEP) protocol to add security to your wireless network based on the 802.11b standard. CN2 Handheld Computer User’s Manual... -
Page 70: Configuring Static Wep Security With Funk Security
Chapter 3 — Adding the CN2 to the Network To use WEP security, you need: • an access point with an 802.11b/g radio. • a CN2 handheld computer with an 802.11b/g radio. Configuring Static WEP Security With Funk Security 1 Make sure you have configured the communications and radio parameters on your CN2. -
Page 71: Loading Certificates
Note: Do not cold boot the CN2. Cold booting the computer resets the time and date. To load certificates on the CN2 if you are using Active Directory 1 Configure the network and radio settings for the CN2 to communicate with your certificate authority or establish an ActiveSync connection with the CA. - Page 72 8 Press Enter to close the Enrollment Tool message box. 9 Configure your CN2 for WPA or 802.1x security. To load certificates on the CN2 if you are using a third-party CA Note: You need to create the \temp\root and \temp\user folders on your CN2 before you can copy the certificate files to your handheld computer.
- Page 73 Chapter 3 — Adding the CN2 to the Network 3 Tap Start > Intermec Settings > Communications > 802.11 Radio > Security Settings > Certificates. 4 Select Import Root Certificates and tap Run App to load the .cer file. A dialog box appears asking if you want to add the certificate to the root store.
-
Page 74: Disabling Security
Using the Modem Dock for Internet Access and E-mail If you have purchased the optional CN2 Modem Dock (P/N 075499), you can configure the CN2 to use the modem dock to connect to the Internet and to access e-mail. If your Internet Service Provider (ISP) is providing your e-mail service, follow the steps in the next section, “Connecting to the... - Page 75 Chapter 3 — Adding the CN2 to the Network 2 Contact your ISP and obtain the following information: • ISP dial-up access phone number • User name • Password 3 Tap Start > Settings > Network and Dial-up Connections. 4 Double-tap Make New Connection.
- Page 76 Compatible on COM1. 9 Tap Configure. The Device Properties screen appears. Connection Preferences: The connection preferences (such as Baud Rate) specify how the CN2 communicates with the modem dock. 10 Set the Baud Rate to 115200 bps. CN2 Handheld Computer User’s Manual...
- Page 77 Chapter 3 — Adding the CN2 to the Network 11 (Optional) Tap the Call Options tab and make changes if necessary. 12 Tap OK at the top of the screen to return to the Modem screen. 13 If you changed the baud rate in Step 10, a message box appears.
- Page 78 Chapter 3 — Adding the CN2 to the Network 16 Tap Next. 17 Fill in the Country/region code field, the Area code field, and the Phone Number field with the information provided by your ISP. Note: When you connect to the Internet for the first time, you can specify the exact numbers that the modem dials.
- Page 79 Chapter 3 — Adding the CN2 to the Network 19 Tap Finish. 20 Perform the steps in the next procedure, “To connect to the Internet for the first time.” To connect to the Internet for the first time 1 Tap Start > Settings > Network and Dial-up Connections.
- Page 80 Chapter 3 — Adding the CN2 to the Network 7 By default, the CN2 assumes that you are dialing from work, on a phone system that requires you to enter a 9 before dialing. If you do not need to enter 9 before dialing, follow these steps: a Choose Home from the Location drop-down list.
-
Page 81: Setting Up An E-Mail Account Through The Modem Dock
Setting Up an E-mail Account Through the Modem Dock You can send and receive e-mail messages using the modem dock and the Inbox application on your CN2. You need to set up a connection to an e-mail server. Note: The ISP or network must use a POP3 or IMAP4 e-mail server and an SMTP gateway. - Page 82 Chapter 3 — Adding the CN2 to the Network 3 Tap Service > Options. The Options screen appears. 4 Drag the screen to the left to view the ride side of the screen. 5 Tap Add. The Service name screen appears.
- Page 83 14 Drag the screen to the left to view the right side of the screen. 15 If you want to be able to send e-mail from the CN2, in the SMTP host for sending email field, you must enter the SMTP host name provided by your ISP.
- Page 84 Chapter 3 — Adding the CN2 to the Network CN2 Handheld Computer User’s Manual...
-
Page 85: Developing And Installing Applications
Developing and Installing Applications Use this chapter to understand how to develop and install applications for the CN2. In this chapter, you will find these sections: • Developing Applications for the CN2 • Installing Applications on the CN2 • Launching Your Application Automatically... -
Page 86: Developing Applications For The Cn2
Developing a New Application Use the Intermec SDK to develop new applications to run on the CN2. The SDK is a library of C++ language functions you can use to create applications for the CN2. The SDK is available as a download from the Intermec Developers Library, which is located on the Intermec web site at www.intermec.com/idl. -
Page 87: Developing A Web-Based Application
Developing a Web-Based Application You can develop web-based data collection applications for use on the CN2. For help, see any HTML source book. The CN2 contains Internet Explorer (IE) 6.0 for Windows CE for you to use. The Microsoft standard IE 6.0 is available from the desktop and provides all of the common elements you expect to find. -
Page 88: Installing Applications Using Activesync
Note: ActiveSync is a free application available from the Microsoft web site. To establish a partnership between your PC and the CN2, you need these items: • USB interface cable (P/N 321-576-002) • CN2 communications dock (P/N 225-696-001) •... -
Page 89: Installing Activesync And Establishing A Partnership
PC. When the installation process is complete, the Get Connected dialog box appears. 2 Connect the CN2 to your PC with the CN2 communications dock and a USB cable. 3 Click Next in the Get Connected dialog box. ActiveSync detects a device on the USB port and prompts you to set up a new partnership. -
Page 90: Using Activesync To Copy Files And Install Applications
CN2. Using ActiveSync to Copy Files and Install Applications You can use ActiveSync to copy files to the CN2 and to install applications. Use the following procedures to learn how to copy files and install applications on the CN2 using ActiveSync. - Page 91 5 Place the cursor in the SDMMC Disk or DiskOnChip folder of your CN2, right-click, and click Paste. 6 The file is copied to the CN2 and you can see it using My Computer on the CN2. 7 Navigate to your application file and run it.
-
Page 92: Installing Applications Using The Optional Sd Card
The Avalanche Enabler is configured to activate automatically (typically on a warm boot). Note: If you manually activate the Avalanche Enabler on the CN2, you may be prompted for a password when you exit the Avalanche Enabler. The default password is leave Each time the Avalanche Enabler is activated, the CN2 attempts to connect to the Avalanche Agent. -
Page 93: Launching Your Application Automatically
Chapter 4 — Developing and Installing Applications To use Avalanche to remotely manage the CN2 1 Install software packages and updates for the CN2 using the Avalanche Management Console. For help using the console, see the online help. 2 Schedule the CN2 updates or manually initiate an update using the Avalanche Management Console. - Page 94 Chapter 4 — Developing and Installing Applications CN2 Handheld Computer User’s Manual...
-
Page 95: Troubleshooting And Maintaining The Cn2
Maintaining the CN2 Use this chapter to solve problems you may encounter while using the CN2. You will also find information on booting the computer, upgrading the CN2, and performing routine maintenance. In this chapter you will find these sections: •... -
Page 96: Problems And Solutions
CN2 and nothing the Power key for 2 to 3 seconds and then release it. happens. If the CN2 is processing data, it may not turn off when you press the Power key. Wait until the CN2 finishes processing. - Page 97 The CN2 appears to be locked up Try these possible solutions in order: and you cannot enter data. Wait at least 10 seconds and try again. If the CN2 is • still connecting to the Intermec Application Server or the host, it ignores any input from the keypad or scanner.
- Page 98 When the screen goes blank, immediately remove the battery and cold boot the CN2. For help, see “Cold Booting the CN2” on page 95. Note: You can also use this procedure to return the CN2 to its default software configuration. Problems While Configuring Security...
- Page 99 You receive a message saying, “The The date and time on the CN2 are not saved through server certificate has expired or your a cold boot. You need to re-enter the date and time system date is incorrect”...
- Page 100 The CN2 may not be recognizing the network card. was suspended for a while (10-15 Turn off the CN2, and then turn it on again. minutes or longer), it can no longer The host may have deactivated or lost your current send or receive messages over the terminal emulation session.
- Page 101 The no network connection icon appears in three appears on the status bar. situations: The CN2 may not have an IP address. You must • configure an IP address for the CN2 or make sure that DHCP assigned an address. Use Intermec Settings and select the radio tab to make sure an IP address has been assigned.
- Page 102 Chapter 5 — Troubleshooting and Maintaining the CN2 Problems While Scanning Bar Codes Problem Solution You cannot see a red beam of light There are three possible problems: from the scanner when you press the You may be too far away from the bar code label.
- Page 103 If your bar code symbology is disabled, enable it and then try scanning the bar code label again. Note: If you restored the CN2 to factory default settings, some of the symbologies may have been disabled. Make sure that the application you are running on the computer is expecting input from a bar code.
-
Page 104: Running Diagnostics
Chapter 5 — Troubleshooting and Maintaining the CN2 Running Diagnostics You can run Intermec Diagnostics to determine if there are any problems with your CN2. You can run Intermec Diagnostics at any time, even while running an application. To run Intermec Diagnostics 1 Tap Start >... - Page 105 Chapter 5 — Troubleshooting and Maintaining the CN2 Summary of Intermec Diagnostic Tests (continued) Test Name Description Tips Tap X to exit the test. 2. Battery Information Displays the charge levels for the main battery and the backup battery. Also indicates if AC power is detected.
-
Page 106: Sending The Cn2 To Intermec For Service
Chapter 5 — Troubleshooting and Maintaining the CN2 Sending the CN2 to Intermec for Service If you send the CN2 in for service, it is your responsibility to save the computer data and configuration. Intermec is responsible only for ensuring that the keypad and other hardware features match the original configuration when repairing or replacing your computer. -
Page 107: Cold Booting The Cn2
CN2 warm boots. Cold Booting the CN2 If the CN2 or application is locked up and does not respond to a warm boot, follow this procedure to perform a cold boot. When you perform a cold boot, all data in your RAM storage is deleted. -
Page 108: Upgrading The Cn2
Tap to exit Date/Time. f Tap to exit Control Panel. Upgrading the CN2 When you upgrade your CN2, you are updating these two components: • Operating system (OS) • Persistent Storage Manager (PSM) files CN2 Handheld Computer User’s Manual... -
Page 109: Upgrading The Operating System
5 Open the battery door and remove the battery. For help, see “Removing the Battery” on page 8. 6 Insert the SD card into the CN2. For help, see “Using the Optional SD Card” on page 22. 7 Using the end of the stylus, press the Reset button on the inside of the battery compartment. - Page 110 8 Hold down a key while you install the battery: • On the numeric keypad, hold down the 8 key while you install the battery. Do not release the 8 until the CN2 Bootloader Menu appears. • On the scroll keypad, hold down the D key while you install the battery.
-
Page 111: Upgrading The Persistent Storage Manager Files
PSM files. You should see these folders: • 2577 • DOCImage 2 Remove the SD card from the CN2 and place it in the SD card reader. For help, see “Using the Optional SD Card” on page 22. 3 Copy the 2577 and DOCImage folders to the SD card. -
Page 112: Cleaning The Scanner Window And The Touch Screen
PQRS WXYZ Space Cleaning the CN2: You can clean the scanner window and touch screen. Clean the scanner window and the touch screen as often as needed for the environment in which you are using the computer. Use a solution of ammonia and water. - Page 113 Chapter 5 — Troubleshooting and Maintaining the CN2 2 Dip a clean towel or rag in the ammonia solution and wring out the excess. Wipe off the scanner window and touch screen. Do not allow any abrasive material to touch these surfaces.
- Page 114 Chapter 5 — Troubleshooting and Maintaining the CN2 CN2 Handheld Computer User’s Manual...
-
Page 115: Specifications And Accessories
Specifications and Accessories CN2 Handheld Computer User’s Manual... -
Page 116: Physical And Environmental Specifications
Appendix A — Specifications and Accessories Physical and Environmental Specifications Use this section to find technical information about the CN2 and its available features and options. Physical Dimensions Length: 14.7 cm (5.8 in) Width: 8.6 cm (3.4 in) Thickness: 3.5 cm (1.4 in) Weight: 370 g (11.9 oz) -
Page 117: Accessories For The Cn2
25% contrast Accessories for the CN2 You can use these accessories (sold and ordered separately) with the CN2. To order accessories, contact your local Intermec sales representative. CN2 Battery (P/N 074201) Use the lithium-ion battery to provide main power to the computer. - Page 118 Use the handstrap for a comfortable way to hold the CN2 for extended periods of time. CN2 Holster (P/N 074490) Use the holster for a convenient way to carry the CN2 when you are not using it. CN2 Dust Cover (P/N 074103) Use the dust cover to protect the CN2 keypad in dusty environments.
-
Page 119: Default Configuration
Default Configuration CN2 Handheld Computer User’s Manual... -
Page 120: Default Configuration
Default Configuration Use the following tables to see the default configuration settings of the CN2. If you restore the CN2 to factory default settings, it will use these values. The tables are organized according to the options in Intermec Settings. - Page 121 UDP Plus Settings Default Value UDP Plus Activate Disable Controller IP 0.0.0.0 Controller Port 5555 Ack Delay Upper Limit 5000 ms Ack Delay Lower Limit 300 ms Retries Send Timer 20 sec Receive Timer 45 sec CN2 Handheld Computer User’s Manual...
- Page 122 Appendix B — Default Configuration Default Device Settings Configuration Device Settings Default Value Beeper Volume Very high Backlight Timeout 1 minute Power Management User Idle 1 minute System Idle 1 minute Suspend 1 minute CN2 Handheld Computer User’s Manual...
-
Page 123: Index
Index CN2 Handheld Computer User’s Manual... - Page 124 SD card, 80 See Caps Lock icon launching automatically, 81 problems after installing/removing, 86 See Green key storing on the CN2, 76 See Green mode Arrow keys, illustrated, 12 See Orange key attachments, downloading in email, 71 .NET Compact Framework, 3, 74...
- Page 125 105 card, SD charging the battery, 6 contents appear in SDMMC Disk green Power light, 7 folder, 76 Configuration number, 4 inserting, 23 configuration, default settings, 108 removing, 24 using to install applications, 80 CN2 Handheld Computer User’s Manual...
- Page 126 802.11b/g radio communications, 39 CN2 Communications Dock Quick Start 802.1x security Guide, 7 configuring, 53 CN2 Modem Dock Quick Start Guide, troubleshooting, 86 to 87 26, 62 date and time, 96 downloading from web, ix LEAP security, 56 Intermec Computer Command Reference...
- Page 127 46 applications, 74 supplicant, using, 46 Intermec Settings exiting, 35 navigating, 33 Good Read light opening on the CN2, 32 illustrated, 19 package for Wavelink Avalanche, 36 troubleshooting, 90 restoring default settings, 35 Green key saving, 34...
- Page 128 MSI, 21 manuals CN2 Communications Dock Quick Start Guide, 7 navigating in Intermec Settings, 33 CN2 Modem Dock Quick Start Guide, network communications lost, 35 26, 62 Network Connection icon, 18, 44, 86, 88, downloading from web, ix Intermec Computer Command Reference...
- Page 129 1D linear imager, 105 inserting, 23 refresh, 11, 12 removing, 24 registry, resetting, 86 required to upgrade operating system, remotely managing the CN2, using Avalanche, 80 using to copy and install files, 80 removing using to install applications, 80 applications, problems afterward, 86...
- Page 130 Touch Screen Test, diagnostics, 93 lights, understanding, 19 Transcriber, using, 16 status bar, See taskbar Transport Layer Security (TLS), described, storing your application on the CN2, 76 stylus troubleshooting calibrating the touch screen, 17 bar code symbologies, 91 using with touch screen, 14 configuring 802.1x security, 86 to 87...
- Page 131 86 password for exiting Enabler, 80 Unicode characters, 14 using to copy and install files, 80 unique client certificate, 59 using to remotely manage the CN2, 80 UPC/EAN, 21 WEP security, configuring, 57 upgrading Wi-Fi certified, 2 operating system, 97...
- Page 132 Index CN2 Handheld Computer User’s Manual...
- Page 134 Corporate Headquarters 6001 36th Avenue West Everett, Washington 98203 U.S.A. tel 425.348.2600 fax 425.355.9551 www.intermec.com CN2 Handheld Computer User's Manual *075464-001* P/N 075464-001...
Need help?
Do you have a question about the CN2 and is the answer not in the manual?
Questions and answers