Vodavi STARPLUS STSe Operation Manual
Starplus stse key systems
Hide thumbs
Also See for STARPLUS STSe:
- User manual (116 pages) ,
- User manual (118 pages) ,
- Quick start manual (72 pages)
Table of Contents
Troubleshooting

Related Manuals for Vodavi STARPLUS STSe


Summary of Contents for Vodavi STARPLUS STSe
- Page 1 STARPLUS STSe Key Systems System Programming & Operations Manual August 2005 - Issue 1.0...
- Page 2 Copyright Laws of the United States (17 U.S.C. Section 101 et. seq.). VODAVI reserves the right to make changes in specifications at any time and without notice. The information furnished by VODAVI in this material is believed to be accurate and reliable, but is not warranted to be true in all cases.
-
Page 3: Table Of Contents
Call Forward - Busy ........................... 2-28 Call Forward - Busy / No Answer ....................2-29 Call Forward - Follow Me ....................... 2-30 Call Forward - No Answer ......................2-31 Call Forward - External (Off-Net) ....................2-32 STARPLUS STSe - Programming & Operations Manual August 2005... - Page 4 CO Line - Access ......................2-67 CO Line Attributes ...................... 2-68 Initialize CO Line Attributes ......................2-68 Print CO Line Attributes ......................... 2-70 CO Line DTMF Sending ....................2-71 DTMF / Dial Pulse Programming ....................2-71 STARPLUS STSe - Programming & Operations Manual August 2005...
- Page 5 Conference / DISA Timer ........................ 2-102 Conference Combinations ......................2-103 Cordless Key Telephone Unit Feature Button ............2-105 Database Administration ................... 2-106 Administration Access ........................2-106 Administration Password ....................... 2-108 Database Printout (Dump) ..................2-109 STARPLUS STSe - Programming & Operations Manual August 2005...
- Page 6 Do Not Disturb Button Flash Rate ....................2-150 Do Not Disturb - DSS/BLF Flash Rate ..................2-150 Door Box ........................2-151 Executive Override ..................... 2-152 Executive Override - Enable/Disable ..................2-152 Executive Override Blocking ......................2-154 STARPLUS STSe - Programming & Operations Manual August 2005...
- Page 7 Outbound DID Number on PRI ....................2-195 ISDN Programming - Page A ..................2-197 Primary Rate Interface (PRI) CO Type ..................2-197 Framing ..............................2-198 Power ..............................2-198 Directory Number - PRI ........................2-198 STARPLUS STSe - Programming & Operations Manual August 2005...
- Page 8 Music-On-Hold - Enable/Disable ....................2-227 Music-On-Hold (per CO Line) ....................... 2-228 Mute Key ........................2-229 Muted Ring ........................2-230 Name In Display ......................2-231 Name / Number Display At Idle ....................2-232 STARPLUS STSe - Programming & Operations Manual August 2005...
- Page 9 Modem Answer Timer ........................2-261 Database Upload/Download ......................2-262 Remote System Monitor And Maintenance .............. 2-262 Maintenance ............................2-262 Monitor ..............................2-262 Ring Down / Hot Line / Off-Hook Preference ............2-263 STARPLUS STSe - Programming & Operations Manual August 2005...
- Page 10 Red Alarm ............................2-301 Bipolar Variations Alarm ......................... 2-302 Frame Slip Alarm ..........................2-302 Data Errors Alarm ..........................2-303 Clear Alarm ............................2-303 Minor Alarm ............................2-304 Major Alarm ............................2-304 STARPLUS STSe - Programming & Operations Manual August 2005...
- Page 11 VM Transfer with ID Digits ......................2-337 VM Tone Mode Calling Option ....................2-338 Voice Mail ID Translation ........................ 2-339 Message Waiting Indication ......................2-340 Message Wait / VM Button Flash Rate ..................2-341 STARPLUS STSe - Programming & Operations Manual August 2005...
- Page 12 Station ID for DSS/BLF Console With Map ................3-21 Display Timer ......................3-21 ICLID Call Management Tables .................. 3-22 Answered Call Management Table .................... 3-22 Unanswered Call Management Table ..................3-23 STARPLUS STSe - Programming & Operations Manual August 2005...
- Page 13 Ring Delay Timer ..........................A-9 Initialize ICLID-DID Tables ......................A-10 Print ICLID - DID Tables ........................A-12 ICLID Call Management Tables .................. A-14 Answered Call Management Table .................... A-14 Unanswered Call Management Table ..................A-15 STARPLUS STSe - Programming & Operations Manual August 2005...
- Page 14 How to Use the Voice Mail System ..................... C-44 Getting Started ..........................C-44 Message Options ..........................C-45 Mailbox Greeting Options ......................C-49 Passwords ............................C-51 Outcall Notification .......................... C-51 Direct Transfer ............................ C-51 STARPLUS STSe - Programming & Operations Manual August 2005...
- Page 15 Initialization ........................ E-6 Database Programming Worksheets ................ E-7 Database Upload/Download Routine ............... E-7 Upload/Download through Remote Administration ............E-7 Quick Reference Flash Code Index ......................F-3 Default Numbering Plan .................... F-16 STARPLUS STSe - Programming & Operations Manual August 2005...
- Page 16 Contents STARPLUS STSe - Programming & Operations Manual August 2005...
-
Page 17: Introduction
System. The described features are based on the current software release. If any of these features do not work on your system, call your sales representative regarding upgrade of your system. STARPLUS STSe - Programming & Operations Manual August 2005... - Page 18 N O T E S » » » » » » » » » » » » » »...
-
Page 19: General Description
With the flexibility of the STSe extensive feature content, and the capability to use an array of instruments, the STSe can be tailored to meet the short and long term needs of the most demanding customer requirements. STARPLUS STSe - Programming & Operations Manual August 2005... -
Page 20: System Features
General Description Introduction System Features STSe This page displays a condensed list of the extensive features available in the System: 911 Feature Incoming Calling Line Identification Account Codes Initializing - System Parameters Answering Machine Emulation Intercom Attendant Assignment / Features Inter-Digit Time-Out Automatic Privacy Keyset Mode... -
Page 21: Digital Keyset Telephones
Intercom Calls can be tone ringing or voice announced. If voice announced, the receiving station receives three tone bursts prior to the announcement. If a tone ringing call, the receiving station hears a tone ring every 2.4 seconds. STARPLUS STSe - Programming & Operations Manual August 2005... - Page 22 The three interactive soft keys provide additional feature functionality. P/N 3515 DSS Console When the DSS Console is added, 48 additional buttons can be used to support an attendant or other answering position. P/N 3510 STARPLUS STSe - Programming & Operations Manual August 2005...
-
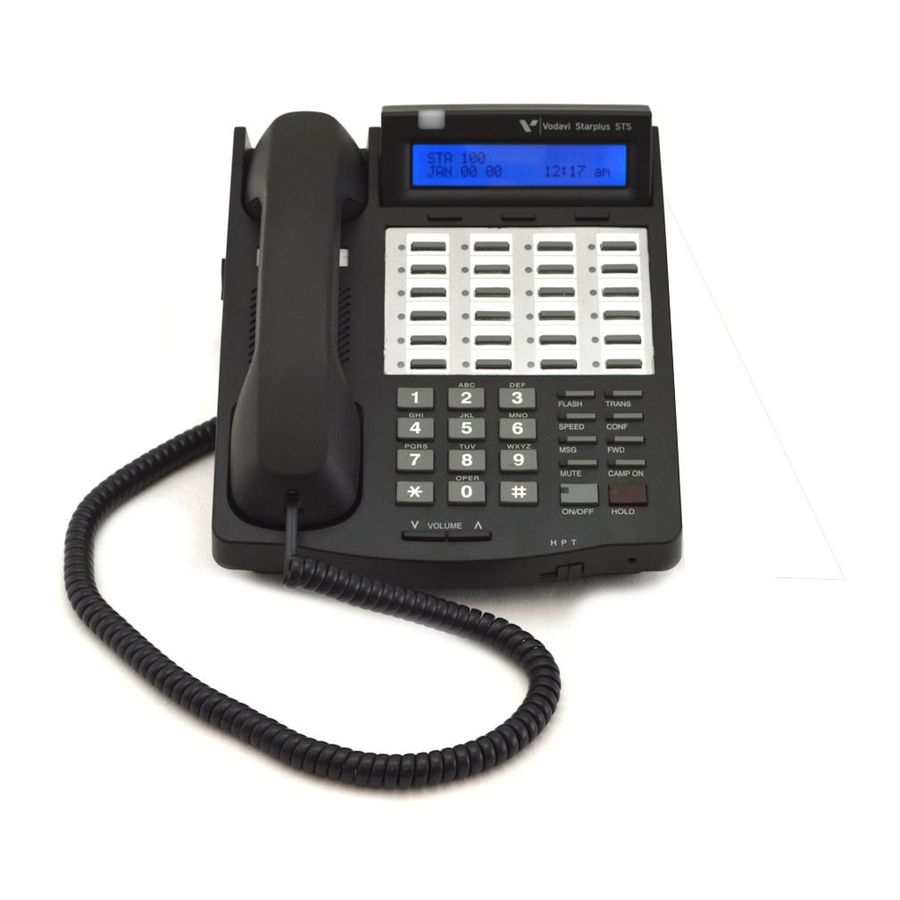
Page 23: 24-Button Digital Keyset / Button Diagram
A 24-button display telephone is necessary when programming the system features and functions available with the STSe System. FLASH TRANS SPEED CONF MUTE CAMP ON OPER HOLD ON/OFF VOLUME Figure 1-1: 24-Button Digital Key Telephone STARPLUS STSe - Programming & Operations Manual August 2005... - Page 24 Tone, or Privacy. Interactive Soft Keys Used to work in conjunction with fixed and flexible features. Headset Jack 2.5 mm Headset Jack is located on the left side of the telephone. STARPLUS STSe - Programming & Operations Manual August 2005...
-
Page 25: Features And Operation
Features and Operation Detailed descriptions of the System and Station features are presented in alphabetical order. An abbreviated feature index, that is organized in Flash code numerical sequence, is provided in Appendix F STARPLUS STSe - Programming & Operations Manual August 2005... - Page 26 N O T E S » » » » » » » » » » » » » »...
-
Page 27: About This Manual
B - Least Cost Routing C - Flash-Based Voice Mail D - Hard Drive-Based Voice Mail E - Customer Database Programming F - Quick Reference Tables Flash Codes Default Numbering Plan STARPLUS STSe - Programming & Operations Manual August 2005... -
Page 28: Manual Format & Description
If your single line telephone does not have a FLASH key, quickly press and release the hookswitch when instructed to press the FLASH key. Conditions » Describes any special criteria that affects the programming or operation of the feature. STARPLUS STSe - Programming & Operations Manual August 2005... -
Page 29: 911 Feature
XXX - XXX PAGE A E N T E R B U T TO N N U MBE R XXX-XXX = CO Line Range STARPLUS STSe - Programming & Operations Manual August 2005... -
Page 30: 911 Alert
An Attendant uses the following steps to delete the messages on a system-wide basis. 1. Press the 911 ALERT flexible button to display the 911 call information for deletion. 2. Press FLASH to delete that message. STARPLUS STSe - Programming & Operations Manual August 2005... -
Page 31: Enhanced 911 Integration
(FLASH 40, Page A, Button #15). » It is recommended to have a power failure procedure in place to ensure that 911 calls are always routed. Refer to FLASH 09, Button #7 for programming information. STARPLUS STSe - Programming & Operations Manual August 2005... -
Page 32: Enhanced 911 Power Failure Station
The use of forced Account Codes is optional, offered on a system-wide basis. Related Information Quick Reference Flash 21 Button 1 The SMDR function MUST be enabled for the Forced Account Code feature to operate (refer to “SMDR Enable/Disable” on page 2-288). STARPLUS STSe - Programming & Operations Manual August 2005... -
Page 33: Account Codes - Forced
1. Press the preprogrammed ACCOUNT CODE button (feature code 627 - refer to “Flexible Button Function Assignment” on page 2-163). 2. Dial account code up to 12-digits. 3. Dial [9] or CO Access code. Dial tone sounds. 4. Dial the desired number. STARPLUS STSe - Programming & Operations Manual August 2005... -
Page 34: Account Codes - Traveling Cos (Verified)
2. Enter 0 or 1 on the dial pad to enable/disable Verified Account Codes. [0] = Disabled [1] = Enabled 3. Press HOLD to save the entry. A confirmation tone sounds. DEFAULT … Verified Acct Codes are disabled. STARPLUS STSe - Programming & Operations Manual August 2005... - Page 35 2. Each press of the button erases one digit. Continue until all desired digits are erased. 3. Re-enter the correct digits, then press HOLD to complete the entry. A confirmation tone sounds. STARPLUS STSe - Programming & Operations Manual August 2005...
- Page 36 COS, but a user can enter a verified account code to upgrade their COS. » The Redial feature does not support Verified Account Codes. » Keyset users must preprogram an ACCOUNT CODE flexible button. STARPLUS STSe - Programming & Operations Manual August 2005...
-
Page 37: Initialize Verified Account Code Table
The system baud rate must match that of the printer or receiving device. ACCOUNT CODE TABLE ENTRY DGTS ----- ---- ... and so on through 249 Figure 2-1: Verified Account Codes Printout STARPLUS STSe - Programming & Operations Manual August 2005... -
Page 38: Answering Machine Emulation
S C RE E NI N G M MM D D Y Y H H : MM a m NOTE … Answering Machine Emulation only operates on Station No Answer Call Forwarding. STARPLUS STSe - Programming & Operations Manual August 2005... -
Page 39: Attendant Assignment/Features
VM. The call timer does not start at 0 in this case. Attendant Assignment/Features Refer to Chapter 3, Attendant Features and Operation. STARPLUS STSe - Programming & Operations Manual August 2005... -
Page 40: Automatic Privacy
M MM D D Y Y H H: M M a m -or- Use the Soft Key’s BGM option as a toggle to turn background music on or off. Confirmation tone sounds. STARPLUS STSe - Programming & Operations Manual August 2005... -
Page 41: Back Light Display
[101 101]. If HOLD is pressed without entering a station range, All stations are selected. -or- Enter a valid flexible number (100-8999) to be programmed. STARPLUS STSe - Programming & Operations Manual August 2005... -
Page 42: Battery Backup (Memory)
Battery Backup Memory retains all system features including system and station speed dial during a power outage. STARPLUS STSe - Programming & Operations Manual August 2005... -
Page 43: Baud Rate Assignments
DEFAULT . . . Ports #1, #2, and #3 are set at the 9600 baud rate. The highest connection rate for ports #1 and #2 is 9600 baud, but the system will connect at lower speeds if necessary. STARPLUS STSe - Programming & Operations Manual August 2005... -
Page 44: Call Back
1. Press the FLASH button. 2. Dial [622] and replace the handset. Only one Call Back request can be left at a station; the second request will convert to a message waiting request. STARPLUS STSe - Programming & Operations Manual August 2005... -
Page 45: Call Back Button Flash Rate
2. Enter a valid number on the dial pad that corresponds to 00-99 seconds in 1-second increments. 3. Press HOLD to save the entry. A confirmation tone sounds and the display updates. DEFAULT … Automatic Call Back Timer is set for 10 seconds (enabled). STARPLUS STSe - Programming & Operations Manual August 2005... -
Page 46: Auto Call Back - Blf Flash Rate
This feature can be programmed by the station user or through admin programming. DEFAULT … No call coverage buttons are assigned. Operation To assign a Call Coverage Button: 1. Press [SPEED] + [SPEED]. 2. Press a desired flexible button. STARPLUS STSe - Programming & Operations Manual August 2005... - Page 47 Only one button type (646 or 647) per covered station can be assigned on a keyset. » Call Coverage ringing at the coverage station will use the distinctive ring of the covered station. STARPLUS STSe - Programming & Operations Manual August 2005...
-
Page 48: Call Coverage Ring Timer
E NT ER B U T TO N NUMB ER EN TE R B UT TO N N U MBE R XXX-XXX = fixed station range XXX = 3- or 4-digit flexible number STARPLUS STSe - Programming & Operations Manual August 2005... -
Page 49: Call Forward
[100 100]. If HOLD is pressed without entering a station range, all stations are selected. -or- Enter a valid flexible number (100-8999) to be programmed. STARPLUS STSe - Programming & Operations Manual August 2005... - Page 50 An unlimited number of stations can be set up in a Station Call Forward chain. However, a station cannot forward to a station that is already a member of their chain. STARPLUS STSe - Programming & Operations Manual August 2005...
-
Page 51: Call Forward - All Calls
» When in an All Call Forwarding mode, UCD calls cannot be received. » Calls to a station in both Station Call Forward and DND mode follow the forward. STARPLUS STSe - Programming & Operations Manual August 2005... -
Page 52: Call Forward - Busy
Conditions are the same as described in the Conditions section of “Call Forwarding” on page 2-25 plus those noted in the following bullets. » Calls to a station in both Station Call Forward and DND mode follow the forward. STARPLUS STSe - Programming & Operations Manual August 2005... -
Page 53: Call Forward - Busy / No Answer
If a station is denied Station Call Forwarding, then Off-Net Forwarding is not allowed. » The No Answer Timer is controlled on an individual basis in Flash 50, Page C, Button #5 for manual forwarding and preset forwarding. STARPLUS STSe - Programming & Operations Manual August 2005... -
Page 54: Call Forward - Follow Me
3. Dial the station number of the station that forwarding is to be cancelled. 4. Dial [6] (regardless of the forward condition). 5. Redial the same station number. Confirmation tone sounds; 5 secs later = dial tone. STARPLUS STSe - Programming & Operations Manual August 2005... -
Page 55: Call Forward - No Answer
The SLT operation uses the same procedures as used in Digital Telephone operation described above, except there is no FWD button or Soft Keys. The user must use the feature codes as described in the keyset section above. STARPLUS STSe - Programming & Operations Manual August 2005... -
Page 56: Call Forward - External (Off-Net)
Announcement, etc.). » If a station is denied Station Call Forwarding, Off-Net forwarding is not allowed. » Toll Restriction is based on the forwarding station’s COS and the outgoing CO Line COS. STARPLUS STSe - Programming & Operations Manual August 2005... -
Page 57: Call Forward Button Flash Rate
DEFAULT … Call Forward Button flash rate is set for a Red Steady On (01). Conditions » This feature only changes the flash rate for the fixed feature button of STSe telephones. STARPLUS STSe - Programming & Operations Manual August 2005... -
Page 58: Call Forward Display
Hunt Group. Each CO line has a Preset Forward Timer. Each CO line also has a VMID field to allow specific VM digits to be sent when a CO line forwards to a VM group. Feature applies to initial CO ringing lines only. STARPLUS STSe - Programming & Operations Manual August 2005... -
Page 59: Preset Call Forward - Station
S TATI O N AT T R IB U T E S EN TE R S TAT I O N N U MBE R S EL E C T A S TAT I O N R A N GE STARPLUS STSe - Programming & Operations Manual August 2005... - Page 60 I N T E R NA L B U S Y F WD # ## # 2. Enter a valid flexible destination number and press HOLD. 3. To delete the entry, press the [#] key and then press HOLD. STARPLUS STSe - Programming & Operations Manual August 2005...
- Page 61 2. Enter a valid flexible destination number (if a 3-digit number, add a leading 0) and press HOLD. 3. To delete the entry, press the [#] key and then press HOLD. STARPLUS STSe - Programming & Operations Manual August 2005...
- Page 62 S P E C IA L N O A NS T MR 00-99 3. Enter a valid number (00-99) and press HOLD (00=disable). DEFAULT … Special No Answer Timer is set at 10 seconds. STARPLUS STSe - Programming & Operations Manual August 2005...
-
Page 63: Preset Call Forward - Co Line
VM group. Calls ringing into UCD Groups or Voice Mail Groups continue to ring the group. The CO line does not forward when ringing one of these types of groups. STARPLUS STSe - Programming & Operations Manual August 2005... -
Page 64: Programming Steps
[100-149] = Station Extensions [440-447] = Voice Mail Groups 1-8 [450-457] = Hunt Groups 1-8 [550-565] = UCD Groups 1-16 10. Press HOLD. A confirmation tone sounds and the LCD display updates. STARPLUS STSe - Programming & Operations Manual August 2005... -
Page 65: Preset Forward Voice Mail Id
3. Press HOLD to complete the entry. A confirmation tone sounds and the display updates. To delete numbers currently entered: 1. Press [#] button four times. 2. Press the HOLD button to update (all information is erased). DEFAULT … No digits are sent. STARPLUS STSe - Programming & Operations Manual August 2005... -
Page 66: Preset Forward Timer (Incoming Call To A Destination)
5. Enter valid number on dial pad which corresponds to 00–99 seconds. 6. Press HOLD to save the entry. A confirmation tone sounds and the display updates. DEFAULT … CO Line Preset Forward Timer is set at 10 seconds. STARPLUS STSe - Programming & Operations Manual August 2005... -
Page 67: Calling Forward Override
When placing a call to a station and tone ringing is desired: 1. Dial [6#] on the dial pad. 2. Dial the extension number, -or- Press DSS button of desired station (call tone rings station). STARPLUS STSe - Programming & Operations Manual August 2005... -
Page 68: Call Park
1. Press the FLASH button. The caller is put on Exclusive Hold. 2. Dial parking location (424-437). A confirmation tone will sound. 3. If busy, press the FLASH button twice and dial another park location. STARPLUS STSe - Programming & Operations Manual August 2005... -
Page 69: Call Park Recall Timer
1. Press the TRANS button. The caller is put on Exclusive Hold. 2. Dial the Personal Park location code [438] on the dial pad, -or- Press the preprogrammed PERSONAL PARK button. Dial tone sounds. STARPLUS STSe - Programming & Operations Manual August 2005... -
Page 70: Call Park - Station
Dial [# 6] + [XXX] (XXX = the station number used to park the call) while at any telephone in the system, including the initiator’s. -or- Dial [438] from the initiator’s station. STARPLUS STSe - Programming & Operations Manual August 2005... -
Page 71: Call Pickup
S TATI O N AT T R IB U T E S EN TE R S TAT I O N N U MBE R S EL E C T A S TAT I O N R A N GE STARPLUS STSe - Programming & Operations Manual August 2005... - Page 72 Only one station at a time can be programmed when using a flexible station number. » When in Flash 51 programming, if you press HOLD without specifying a flexible number to be programmed, you will get the station that is in port/station 100. STARPLUS STSe - Programming & Operations Manual August 2005...
-
Page 73: Directed Call Pickup
3. Dial #0. To use Group Call Pickup: 1. Lift handset or press ON/OFF button. 2. Dial [#0] on the dial pad, -or- Press preprogrammed PICKUP button to connect to calling party. STARPLUS STSe - Programming & Operations Manual August 2005... -
Page 74: Call Transfer
To answer a Screened Transfer (your intercom signals based on selected H-T-P mode): 1. Answer the intercom and receive the transfer notice. 2. Press the outside line button or loop button flashing on hold. STARPLUS STSe - Programming & Operations Manual August 2005... - Page 75 3. Announce the call. 4. Hang up to complete transfer. To make an Unscreened Transfer: 1. Press the FLASH button. 2. Dial desired intercom number. 3. Hang up to complete transfer. STARPLUS STSe - Programming & Operations Manual August 2005...
-
Page 76: Ringback On Transfer
[0] = Disabled (Music, if music source is connected to system, otherwise silence) [1] = Enabled (Ringback Tone) 3. Press HOLD to save the entry. A confirmation tone sounds. DEFAULT … Ringback on Transfer is disabled. STARPLUS STSe - Programming & Operations Manual August 2005... -
Page 77: Unanswered Co Call Transfer
4. Station user can return to call placed on hold. SINGLE LINE TELEPHONE Not applicable Conditions » Attendant stations do not send ID digits. » This feature only operates when the station is in an idle mode. STARPLUS STSe - Programming & Operations Manual August 2005... -
Page 78: Camp On
Calls cannot be camped on when a station is in DND or in Conference. » If the party that initiated the Camp On hangs up, then Camp On is canceled and the call is blind-transferred. STARPLUS STSe - Programming & Operations Manual August 2005... -
Page 79: Camp On Button Flash Rate
(e.g., for partial signaling with one cluster, the 4th and 24th channels are data channels. If two clusters are used, then the 8th and 24th channels are data channels.) STARPLUS STSe - Programming & Operations Manual August 2005... - Page 80 Ring Delay Timer to a setting of 05 (sec). This allows sufficient time for receipt of ICLID information from the telephone company. Refer to “Ring Delay Timer” on page A-9. STARPLUS STSe - Programming & Operations Manual August 2005...
-
Page 81: Centrex/Pbx
5. Enter a 0 or 1 which corresponds with the following entries: [0] = PBX [1] = CO PBX / CO 6. Press HOLD to save the entry. A confirmation tone sounds. DEFAULT … All lines are assigned as CO lines. STARPLUS STSe - Programming & Operations Manual August 2005... -
Page 82: Off-Hook Preference
Operation When connected to an outside line: Press FLASH to disconnect outside line and reseize outside line dial tone. SINGLE LINE TELEPHONE Press the FLASH button, then dial [660]. STARPLUS STSe - Programming & Operations Manual August 2005... -
Page 83: Centrex/Pbx Flash Timer
Speed Bin and programmed onto a flexible button for one button transfer. Consult your Centrex user guide for further instructions after flashing the line. Refer to “Centrex/PBX Flash Timer” on page 2-59. STARPLUS STSe - Programming & Operations Manual August 2005... -
Page 84: Pbx Dialing Codes
4. To delete a code, enter [#] [#] and press HOLD. DEFAULT … No PBX dialing codes are assigned. Conditions » Lines must be programmed as PBX lines before these codes apply. STARPLUS STSe - Programming & Operations Manual August 2005... -
Page 85: Class Of Service
888, 1-866, 1-877, 1-911, 1-611 are allowed, and 411, 976, and 555 numbers are denied. COS 7 allows 10- digit dialing maximum. Related Information Quick Reference Flash 70 Toll Restriction (refer to “Toll Restriction” on page 2-318). STARPLUS STSe - Programming & Operations Manual August 2005... -
Page 86: Class Of Service - Co Line
C L A S S O F S ER V I C E 6. Press HOLD to save the entry. A confirmation tone sounds and the display updates. DEFAULT … Class of Service setting is 1. STARPLUS STSe - Programming & Operations Manual August 2005... -
Page 87: Station Day Class Of Service
E NT ER B U T TO N NUMB ER EN TE R B UT TO N N U MBE R XXX-XXX = fixed station range XXX = 3- or 4-digit flexible number STARPLUS STSe - Programming & Operations Manual August 2005... -
Page 88: Station Night Class Of Service
S TATI O N AT T R IB U T E S EN TE R S TAT I O N N U MBE R S EL E C T A S TAT I O N R A N GE STARPLUS STSe - Programming & Operations Manual August 2005... - Page 89 [7] = COS 7; Restricts [0], [1], [ ], [#] dialed as first-digit with a 10-digit maximum. 7. Press HOLD to save the entry. A confirmation tone sounds and the display updates. DEFAULT … All stations are assigned a COS 1 for Night Mode. STARPLUS STSe - Programming & Operations Manual August 2005...
-
Page 90: Co Flexible Port Assignment
To change the CO Line number assigned to any port: 1. Dial the position number on the display (01 through 04). 2. Then dial the CO Line number desired and press HOLD. STARPLUS STSe - Programming & Operations Manual August 2005... -
Page 91: Co Line - Access
1. Lift the handset, and dial access code: 9, 801-823, or 88+LLL (LLL = CO line number). 2. Then dial telephone number. Conditions » Access to trunk group must be programmed by installer/administrator. » The CO line must be idle. STARPLUS STSe - Programming & Operations Manual August 2005... -
Page 92: Co Line Attributes
Disabled Music-On-Hold (per CO Line) Channel 1 Ring Tone (per CO Line) Tone # 00 Preset Call Forward Night Destination None Preset Call Forward Special Destination None Fax Detect Enable/Disable Disabled STARPLUS STSe - Programming & Operations Manual August 2005... - Page 93 I N I T I A LI Z E CO LI N ES P R ES S H O L D 2. Press the HOLD button. A confirmation tone sounds. STARPLUS STSe - Programming & Operations Manual August 2005...
-
Page 94: Print Co Line Attributes
SEIZE TIMER - 10 SEIZE TIMER - 10 PRESET FWD TIMER - 10 PRESET FWD TIMER - 10 ... and so on through all CO lines Figure 2-2: CO Line Attributes Printout STARPLUS STSe - Programming & Operations Manual August 2005... -
Page 95: Co Line Dtmf Sending
2. Enter a valid number for the range of lines being programmed. If only one line is being programmed, enter that number twice (001 001). If HOLD is pressed without entering a CO line range, all CO lines are selected. STARPLUS STSe - Programming & Operations Manual August 2005... -
Page 96: Dtmf On/Off Time Operation
2. Enter a valid number (1-9) on the dial pad for the DTMF On and Off Times (100-900 ms). 3. Press HOLD to save the entry. A confirmation tone sounds. DEFAULT … DTMF Time Operation is set for 100 ms On and 100 ms Off. STARPLUS STSe - Programming & Operations Manual August 2005... -
Page 97: Co Line Group
E NT ER B U T TO N NUMB ER EN TE R B UT TO N N U MBE R XXX-XXX = fixed station range XXX = 3- or 4-digit flexible number STARPLUS STSe - Programming & Operations Manual August 2005... -
Page 98: Co Line Group Programming
Group 0 as a private line. Also, all unused CO Lines should be placed in Line Group 0. CO Lines assigned to a Line Group 0 can only be accessed by stations with a direct CO appearance (button) on their phone. STARPLUS STSe - Programming & Operations Manual August 2005... -
Page 99: Co Line Group Queuing
E N T E R B U T TO N N U MBE R 2. Press button 1-24 to select desired CO Group (0-23) to be programmed. The following displays: G R O U P 1 E N AB LE D STARPLUS STSe - Programming & Operations Manual August 2005... -
Page 100: Co Line - Identification
1. Press FLASH and dial [40]. The following message displays: CO L I N E AT T R I B U T E S S E L EC T A CO L I NE R A NG E STARPLUS STSe - Programming & Operations Manual August 2005... - Page 101 If an error is made while entering digits, press HOLD to save the erroneous entry. Key in digits over the old name; if excess characters remain, use the digits [11] to transpose spaces over the undesired characters. STARPLUS STSe - Programming & Operations Manual August 2005...
-
Page 102: Co Line - Incoming Ringing Assignment
2. Enter a valid number for the range of lines being programmed. If only one line is being programmed, enter that number twice (001 001). If HOLD is pressed without entering a CO line range, all CO lines are selected. STARPLUS STSe - Programming & Operations Manual August 2005... - Page 103 [4] = Special Only [S] Flexible Numbers for UCD Groups 1–16* [5] = Day/Special [DS] [6] = Night/Special [NS] [7] = All Modes [Day/Night/Special [A] * Internal flexible numbers range = 100-8999 STARPLUS STSe - Programming & Operations Manual August 2005...
-
Page 104: Incoming Co Line Ringing - Setting Flash Rate
2-163). 3. Press HOLD to save the entry. A confirmation tone sounds and the display updates. DEFAULT … Incoming CO Ringing flash rate is set for RED 480 ipm Flutter (08). STARPLUS STSe - Programming & Operations Manual August 2005... -
Page 105: Display Ring Assignments
[A] = All Modes (Day/Night/Special) 5. Press Button #13 additional times to cycle to the next group of six ring assignments. Ring assignments are displayed in numerical order, from the lowest to the highest number. STARPLUS STSe - Programming & Operations Manual August 2005... -
Page 106: Release Timer
5. Enter a valid number on the dial pad which corresponds to 000-255 ms. 6. Press HOLD button to save entry. A confirmation tone sounds and the display updates. DEFAULT … Release Timer is set for 200 ms. STARPLUS STSe - Programming & Operations Manual August 2005... -
Page 107: Reseize Timer
2. Enter a valid number on the dial pad which corresponds to 1–60 (100 ms to 6 seconds). 3. Press HOLD to save the entry. A confirmation tone sounds and the display updates. DEFAULT …Guard Timer is set for 0.5 seconds. STARPLUS STSe - Programming & Operations Manual August 2005... -
Page 108: Seize Timer
If HOLD is pressed without entering a CO line range, all CO lines are selected. 3. Press HOLD to save the entry. A confirmation tone sounds and the display updates. Flexible Button #19 (Page A) is lit. STARPLUS STSe - Programming & Operations Manual August 2005... -
Page 109: Co Line Loop And Pool Buttons
(not busy) CO line in a CO line group. Stations may have as many POOL buttons as there are CO line groups. Multiple POOL buttons for the same group are also allowed. STARPLUS STSe - Programming & Operations Manual August 2005... - Page 110 5. Enter a 0 or 1 on the dial pad to enable/disable this feature. [0] = Disable [1] = Enable 6. Press HOLD to save the entry. A confirmation tone sounds. DEFAULT … CO Loop Pool is disabled. STARPLUS STSe - Programming & Operations Manual August 2005...
-
Page 111: In-Use Hold (I-Hold) Flash Rate
3. Press HOLD to save the entry. A confirmation tone sounds and the display updates. DEFAULT … In-Use Hold (I-Hold) flash rate is set for a Green 60 ipm Flash (17). STARPLUS STSe - Programming & Operations Manual August 2005... -
Page 112: Co Line - Loop Supervision
LO OP S UPE R V IS I ON 6. Press HOLD to save the entry. A confirmation tone sounds and the display updates. DEFAULT … Loop Supervision is set for 400 ms for all CO Lines. STARPLUS STSe - Programming & Operations Manual August 2005... -
Page 113: Co Line Loop Supervision - Forced Disconnect
S TATI O N AT T R IB U T E S EN TE R S TAT I O N N U MBE R S EL E C T A S TAT I O N R A N GE STARPLUS STSe - Programming & Operations Manual August 2005... - Page 114 Only one station at a time can be programmed when using a flexible station number. » When in Flash 51 programming, if you press HOLD without specifying a flexible number to be programmed, you will get the station that is in port/station 100. STARPLUS STSe - Programming & Operations Manual August 2005...
-
Page 115: Co Line - Queue
E NT ER B U T TO N NUMB ER EN TE R B UT TO N N U MBE R XXX-XXX = fixed station range XXX = 3- or 4-digit flexible number STARPLUS STSe - Programming & Operations Manual August 2005... - Page 116 Only one station at a time can be programmed when using a flexible station number. » When in Flash 51 programming, if you press HOLD without specifying a flexible number to be programmed, you will get the station that is in port/station 100. STARPLUS STSe - Programming & Operations Manual August 2005...
-
Page 117: Co Line Queue Button Flash Rate
S TATI O N AT T R IB U T E S EN TE R S TAT I O N N U MBE R S EL E C T A S TAT I O N R A N GE STARPLUS STSe - Programming & Operations Manual August 2005... - Page 118 Only one station at a time can be programmed when using a flexible station number. » When in Flash 51 programming, if you press HOLD without specifying a flexible number to be programmed, you will get the station that is in port/station 100. STARPLUS STSe - Programming & Operations Manual August 2005...
-
Page 119: Transfer Co Ringing
3. Press HOLD to save the entry. A confirmation tone sounds and the display updates. DEFAULT … Recall CO Ringing flash rate is set for a Red 480 ipm Flutter (08). STARPLUS STSe - Programming & Operations Manual August 2005... -
Page 120: Queued Co Ringing Flash Rate
3. Press HOLD to save the entry. A confirmation tone sounds and the display updates. DEFAULT … Reminder Ring Timer is set to 00 second. STARPLUS STSe - Programming & Operations Manual August 2005... -
Page 121: Co Direction
[3] = Both Incoming and Outgoing 6. Press HOLD to save the entry. A confirmation tone sounds and the display updates. DEFAULT … All CO Lines default to both incoming and outgoing type. STARPLUS STSe - Programming & Operations Manual August 2005... -
Page 122: Co Port Parameters And Feature Codes
STATION PORT NUMBERS FIXED FLEX NAME STATION 100 STATION 101 STATION 149 CALL PARK GROUP 1 (...actual printout includes all feature codes) Figure 2-4: CO Port Attributes and Feature Codes Printout STARPLUS STSe - Programming & Operations Manual August 2005... -
Page 123: Co Ring Detect Timer
2. Enter a valid number on the dial pad that corresponds to 2-9 (200 ms to 900 ms). 3. Press HOLD to save the entry. A confirmation tone sounds and the display updates. DEFAULT … CO Ring Detect Timer is set at 3 (300 ms). STARPLUS STSe - Programming & Operations Manual August 2005... -
Page 124: Co Tolerance
[0] = Disabled (Close to a CO) [1] = Enabled (Normal CO condition) 4. Press HOLD to save the entry. A confirmation tone sounds and the display updates. DEFAULT … Enabled (1) is the default. STARPLUS STSe - Programming & Operations Manual August 2005... -
Page 125: Conference
[100 100]. If HOLD is pressed without entering a station range, all stations are selected. -or- Enter a valid flexible number (100-8999) to be programmed. STARPLUS STSe - Programming & Operations Manual August 2005... -
Page 126: Conference / Disa Timer
Conference Timer, a tone is presented to both DISA parties, then one minute later the system automatically releases both trunks. The Conference Timer does not affect or control a DISA-to-Station call. STARPLUS STSe - Programming & Operations Manual August 2005... -
Page 127: Conference Combinations
This drops the busy or wrong number party. Press the conference button again and repeat step 4. 5. When last party answers, press the CONF button twice (all parties are connected). STARPLUS STSe - Programming & Operations Manual August 2005... - Page 128 3. Dial desired number for second call. 4. Press the FLASH button. The Intercom dial tone sounds. 5. Dial [664]. All three parties are conferenced. 6. Hang up to terminate the conference. STARPLUS STSe - Programming & Operations Manual August 2005...
-
Page 129: Cordless Key Telephone Unit Feature Button
E NT ER B U T TO N NUMB ER EN TE R B UT TO N N U MBE R XXX-XXX = fixed station range XXX = 3- or 4-digit flexible number STARPLUS STSe - Programming & Operations Manual August 2005... -
Page 130: Database Administration
Use Flash 50 programming when you want to modify a range of stations’ attributes using fixed station numbers. Use Flash 51 programming to modify a single station’s attributes using a flexible station number. STARPLUS STSe - Programming & Operations Manual August 2005... - Page 131 Only one station at a time can be programmed when using a flexible station number. » When in Flash 51 programming, if you press HOLD without specifying a flexible number to be programmed, you will get the station that is in port/station 100. STARPLUS STSe - Programming & Operations Manual August 2005...
-
Page 132: Administration Password
3. Press HOLD to save the entry. A confirmation tone sounds and the display updates. DEFAULT … Admin Password is set for 3226. Operation On the dial pad, press [ ][ ] plus dial the valid Admin Password. A confirmation tone sounds. STARPLUS STSe - Programming & Operations Manual August 2005... -
Page 133: Lcr Tables
2. To print the entire database, press the HOLD button. The display updates to indicate what portion of the database is printing. 3. When the system finishes sending the database to the printer, a confirmation tone sounds. STARPLUS STSe - Programming & Operations Manual August 2005... -
Page 134: Daylight Saving Time
02:00 a.m. local standard time to 03:00 a.m. local daylight saving time. » If enabled, on the last Sunday in October, the system will automatically”fall back” by one hour, from 02:00 a.m local daylight saving time to 01:00 local standard time. STARPLUS STSe - Programming & Operations Manual August 2005... -
Page 135: Dial Pulse Sending
2. Enter a valid number on the dial pad that corresponds to 300-600 ms. 3. Press HOLD to save the entry. A confirmation tone sounds and the display updates. DEFAULT … Pulse Dial Ring Timer is set for 300 ms. STARPLUS STSe - Programming & Operations Manual August 2005... -
Page 136: Pulse-To-Tone Switchover
DID circuits on the STSe. The system can accept 2-7 digits from the Central Office. By default, all entries in the DID Table (000-999) have phone numbers assigned. Refer to Table 2-6: DID Translation / Route Default Table Entries for additional information. STARPLUS STSe - Programming & Operations Manual August 2005... - Page 137 The top left button (ROUTE) in the flexible button field is lit for programming the Route number. The LEDs for the UP Button (Button #18), the DOWN Button (Button #19) is also lit. STARPLUS STSe - Programming & Operations Manual August 2005...
-
Page 138: Did Phone Number
2. Press the HOLD button to update the database. A confirmation tone sounds. 3. Use the BACK SPACE flexible button (Button #5) to erase the current letter to correct for errors. STARPLUS STSe - Programming & Operations Manual August 2005... -
Page 139: Erasing A Did Table Entry
To change to a different DID Route: Press the UP button (Button #18) to advance to the DID Route Number, -or- Press the DOWN button (Button #19) to return to a previous DID Route Number. STARPLUS STSe - Programming & Operations Manual August 2005... -
Page 140: Did/Iclid Ringing Assignments
Flexible Numbers for UCD Groups 1–16* [5] = Day/Special [DS] Local Number/Name Translation Table Number [600-799] [6] = Night/Special [NS] [7] = All Modes [Day/Night/Special [A] * Internal flexible numbers range = 100-8999 STARPLUS STSe - Programming & Operations Manual August 2005... -
Page 141: View Did/Iclid Ringing Assignments
1. Press the SELECT ROUTE NUMBER flexible button (Button #20) to select the desired route number. 2. Enter a valid route number (000–251). 3. Press HOLD to change to the different route entered. A confirmation tone sounds. DEFAULT … No destinations or ringing assignments exist. STARPLUS STSe - Programming & Operations Manual August 2005... -
Page 142: Preset Call Forward Destination - Day/Night/Special
P R ES E T F O R WAR D S P E CI A L D E S T # ## # 8. Enter the destination number, then press HOLD. A confirmation tone sounds and the LCD display updates. DEFAULT … No destinations are assigned. STARPLUS STSe - Programming & Operations Manual August 2005... -
Page 143: Preset Forward Voice Mail Id
5. Press HOLD to complete the entry. A confirmation tone sounds and the display updates. To delete numbers currently entered: 1. Press [#] button four times. 2. Press the HOLD button to update (all information is erased). DEFAULT … No digits are sent. STARPLUS STSe - Programming & Operations Manual August 2005... -
Page 144: Preset Forward Timer (Incoming Call To A Destination)
10. Enter valid number on dial pad which corresponds to 00–99 seconds. 11. Press HOLD to save the entry. A confirmation tone sounds and the display updates. DEFAULT … Preset Forward Special Timer is set at 10 seconds. STARPLUS STSe - Programming & Operations Manual August 2005... -
Page 145: Music-On-Hold (Per Co Line)
Music Channel #5* Music Channel #6* Music Channel #7* Music Channel #8* * Music Channels 4-8 can only be used for Music-On-Hold functions DEFAULT … Channel 1 is used for Music-On-Hold. STARPLUS STSe - Programming & Operations Manual August 2005... -
Page 146: Universal Night Answer (Una) / Universal Day Answer (Uda)
DEFAULT … UDA is disabled and UNA is enabled. Operation Upon hearing an incoming signal: 1. Lift handset. 2. Dial the UDA/UNA access code [#5] on the dial pad. You are connected to ringing outside line. STARPLUS STSe - Programming & Operations Manual August 2005... -
Page 147: Did Digits
DID Number. 3. Press the HOLD button to save the entry. A confirmation tone sounds and the display updates. DEFAULT … Number of DID digits is set to 3. STARPLUS STSe - Programming & Operations Manual August 2005... -
Page 148: Did Incoming Signaling
2. Enter a valid number for the range of lines being programmed. If only one line is being programmed, enter that number twice (001 001). If HOLD is pressed without entering a CO line range, all CO lines are selected. STARPLUS STSe - Programming & Operations Manual August 2005... - Page 149 5. Dial a valid number (0-2) on the dial pad. [0] = Immediate Start [1] = Wink Start [2] = Delay Start 6. Press HOLD to save the entry. DEFAULT … DID/TIE Signaling is set to Wink Start. STARPLUS STSe - Programming & Operations Manual August 2005...
-
Page 150: Did Collect Timer
5. Enter a valid number on the dial pad that corresponds to 010–200 (100 ms to 2.0 seconds). 6. Press HOLD button to save entry. A confirmation tone sounds and the display updates. DEFAULT … DID Collect Timer is set for 150 milliseconds. STARPLUS STSe - Programming & Operations Manual August 2005... -
Page 151: Initialize Did-Tie Parameters
I N I T I A LI Z E D I D - T I E TM R S P R ES S H O L D 2. Press the HOLD button. A confirmation tone sounds. STARPLUS STSe - Programming & Operations Manual August 2005... -
Page 152: Print Did-Tie Parameters
2. To print the DID-TIE Parameters, press the HOLD button. The following message displays: P R I NT IN G DI D /T I E TM RS When the system has finished sending the requested information to the printer, confirmation tone sounds. STARPLUS STSe - Programming & Operations Manual August 2005... -
Page 153: Direct Inward System Access (Disa)
DISA callers may dial any station directly without going through the Attendant. Vodavi has taken precautions to prevent fraud by requiring a security code for this feature. However, it is may still be vulnerable to fraud. -
Page 154: Disa Call Forwarding
It follows direct forward and busy forward the same as an initially ringing CO line. If the preset forward timer is set to 00 (disabled) the first forward of the DISA ringing call at a station takes 15 seconds. STARPLUS STSe - Programming & Operations Manual August 2005... -
Page 155: Disa Co-To-Co
5. Enter a 0 or 1 on the dial pad to enable/disable this feature. [0] = Disabled [1] = Enabled D I S A CO- TO- CO E N AB LE D STARPLUS STSe - Programming & Operations Manual August 2005... -
Page 156: Direct Station Selection / Busy Lamp Field
When a button on a Digital Telephone is assigned as a DSS, it also serves as a Busy Lamp Field (BLF) to display the status of that telephone. Refer to “Flexible Button Function Assignment” on page 2-163 for additional information. STARPLUS STSe - Programming & Operations Manual August 2005... -
Page 157: Direct Transfer Mode
2. Enter a 0 or 1 on the dial pad to enable/disable this feature. [0] = Disabled [1] = Enabled 3. Press HOLD to save the entry. A confirmation tone sounds. DEFAULT … Direct Transfer Mode is enabled. STARPLUS STSe - Programming & Operations Manual August 2005... -
Page 158: Directory Dial
1. Press Flexible button #20 for a directory list entry. 2. Dial a valid directory list entry number (000–199). 3. Press HOLD to save the entry. A confirmation tone sounds and the display updates. STARPLUS STSe - Programming & Operations Manual August 2005... - Page 159 For example, by last name and by first name, pointed to a station number and a speed dial bin (home, or mobile phone number), or several different names associated to the same speed dial bin. STARPLUS STSe - Programming & Operations Manual August 2005...
- Page 160 LCD display. The letters “Q” and “Z” are not marked on many telephone keypads; however, the illustration above shows the correct keys used to access these letters. STARPLUS STSe - Programming & Operations Manual August 2005...
- Page 161 Call progress tones are then heard. » If station is in Directory Dial mode and a CO or intercom call rings in, the station must exit Directory Dial mode to answer the call. STARPLUS STSe - Programming & Operations Manual August 2005...
-
Page 162: Initialize Directory Dial Table Parameters
I N I T I A LI Z E D IR - DI A L P R ES S H O L D 2. Press the HOLD button. A confirmation tone sounds. STARPLUS STSe - Programming & Operations Manual August 2005... -
Page 163: Print Directory Dial Table Parameters
The system baud rate must match that of the printer or receiving device. This is an example of the Directory Dial Table database printout. NAME Figure 2-9: Directory Dialing Table Printout STARPLUS STSe - Programming & Operations Manual August 2005... -
Page 164: Dial-By-Name
1. Dial the Dial-By-Name code [6 ] on the dial pad, -or- Press the preprogrammed DIAL-BY-NAME flexible button. 2. Dial person’s last name on the keypad as shown: OPER Figure 2-10: Dial-By-Name Keypad Map STARPLUS STSe - Programming & Operations Manual August 2005... -
Page 165: Distinctive Ringing
If HOLD is pressed without entering a CO line range, all CO lines are selected. 3. Press HOLD to save the entry. A confirmation tone sounds and the display updates. Flexible Button #19 (Page A) is lit. STARPLUS STSe - Programming & Operations Manual August 2005... - Page 166 1209/0 Tone Duration = 50 ms/50 ms 7. Press HOLD to save the entry. A confirmation tone sounds and the display updates. DEFAULT … Ring Tone is set for 00 (697/770). STARPLUS STSe - Programming & Operations Manual August 2005...
-
Page 167: Enabling/Disabling Co Line Distinctive Ring Tone
S TATI O N AT T R IB U T E S EN TE R S TAT I O N N U MBE R S EL E C T A S TAT I O N R A N GE STARPLUS STSe - Programming & Operations Manual August 2005... - Page 168 EN TE R B UT TO N N U MBE R XXX-XXX = fixed station range XXX = 3- or 4-digit flexible number 5. Press Button #13. The following message displays: R I NG TO NE 00-36 STARPLUS STSe - Programming & Operations Manual August 2005...
- Page 169 3. When the desired tone is selected (default ringing code is set to 00), press the SPEED button to save it as the tone to present when the station is tone rung. A confirmation tone sounds. STARPLUS STSe - Programming & Operations Manual August 2005...
- Page 170 - All Types of Forwarded Calls - Executive/Secretary calls - Line Queue Call Back - LCR Queue Call Back » CO Line Distinctive Ring Tone supersedes station ring tone and Call Coverage Distinctive Ringing. STARPLUS STSe - Programming & Operations Manual August 2005...
-
Page 171: Do Not Disturb / Page Block
[100 100]. If HOLD is pressed without entering a station range, all stations are selected. -or- Enter a valid flexible number (100-8999) to be programmed. STARPLUS STSe - Programming & Operations Manual August 2005... - Page 172 [631] or [662]. The button LED extinguishes and DND cancels. SINGLE LINE TELEPHONE To activate Do Not Disturb: 1. Lift the handset. 2. Dial [631]. 3. Replace the handset. STARPLUS STSe - Programming & Operations Manual August 2005...
-
Page 173: One-Time Do Not Disturb
Press the preprogrammed DND button while you are off-hook and connected to a CO line or intercom call. The DND button LED lights and off-hook tones at your station cancel. To cancel One-time Do Not Disturb: Replace handset. The DND button LED extinguishes and DND cancels. STARPLUS STSe - Programming & Operations Manual August 2005... -
Page 174: Do Not Disturb Button Flash Rate
3. Press HOLD to save the entry. A confirmation tone sounds and the display updates. DEFAULT … Do Not Disturb DSS/BLF flash rate is set for a Red 60 ipm Double Wink Off (04). STARPLUS STSe - Programming & Operations Manual August 2005... -
Page 175: Door Box
2. The Door Box emits three short bursts of tone to notify the visitor of the call and then the visitor can converse in a handsfree mode. The Call Button LED is lit whenever the Door Box is in an active state. STARPLUS STSe - Programming & Operations Manual August 2005... -
Page 176: Executive Override
S TATI O N AT T R IB U T E S EN TE R S TAT I O N N U MBE R S EL E C T A S TAT I O N R A N GE STARPLUS STSe - Programming & Operations Manual August 2005... - Page 177 Executive station is bridged onto the CO line conversation in progress at the called station. An optional warning tone is presented to all parties prior to cut-through. 2. Replace handset at Executive station to terminate the override. STARPLUS STSe - Programming & Operations Manual August 2005...
-
Page 178: Executive Override Blocking
S TATI O N AT T R IB U T E S EN TE R S TAT I O N N U MBE R S EL E C T A S TAT I O N R A N GE STARPLUS STSe - Programming & Operations Manual August 2005... - Page 179 Only one station at a time can be programmed when using a flexible station number. » When in Flash 51 programming, if you press HOLD without specifying a flexible number to be programmed, you will get the station that is in port/station 100. STARPLUS STSe - Programming & Operations Manual August 2005...
-
Page 180: Executive Override Warning Tone
E X ECU T IV E WA R NI N G E N AB LE D 3. Press HOLD to save the entry. A confirmation tone sounds. DEFAULT … Executive Override Warning Tone is enabled. STARPLUS STSe - Programming & Operations Manual August 2005... -
Page 181: Barge-In Warn Tone
Access CO Line Privacy Enabled Privacy Disabled Privacy Enabled Private Private (no cut-through) (no cut-through) Privacy Disabled Private Privacy Release (no cut-through) (cut-through allowed) DEFAULT … Barge-in Warn Tone is enabled. STARPLUS STSe - Programming & Operations Manual August 2005... -
Page 182: Executive/Secretary Pairs
If you are designated the Executive station and your phone is busy or in DND, all calls are routed to the Secretary station. » If you are the designated Secretary station, you can signal the Executive that is busy or in DND by using the Camp On feature. STARPLUS STSe - Programming & Operations Manual August 2005... -
Page 183: External Day Ring
E X T E R NA L N IG H T RI N G D I S A B LE D 3. Press HOLD to save the entry. A confirmation tone sounds. DEFAULT … External Night Ring is disabled. STARPLUS STSe - Programming & Operations Manual August 2005... -
Page 184: Fax Detect
6. Enter a 0 or 1 that corresponds with the following entries: [0] = Disabled [1] = Enabled 7. Press HOLD to save the entry. A confirmation tone sounds. DEFAULT … Fax Detect is disabled. STARPLUS STSe - Programming & Operations Manual August 2005... - Page 185 [1] = Enabled (Long Time option) 3. Press HOLD to save the entry. A confirmation tone sounds. DEFAULT … Fax Detect Long Time is disabled, which means that the fax detect time is 3.5 seconds. STARPLUS STSe - Programming & Operations Manual August 2005...
-
Page 186: Fixed Station/Port Number
CALLBACK BTN AUTO CBCK DSS/BLF LINE QUEUE BTN UCD UNAVL DSS/BLF DND BTN TRANSFER CO RING UCD WRAPUP END RECALL CO RING DND PAGE BLOCK QUEUED CO RING IN & OUT STARPLUS STSe - Programming & Operations Manual August 2005... -
Page 187: Flexible Button Function Assignment
Flexible Station Assignments -- Allows assignment of stations and complete flexibility within the system numbering plan. A station can be assigned a number between 100-8999. STARPLUS STSe - Programming & Operations Manual August 2005... - Page 188 [100 100]. If HOLD is pressed without entering a station range, all stations are selected. -or- Enter a valid flexible number (100-8999) to be programmed. STARPLUS STSe - Programming & Operations Manual August 2005...
- Page 189 BB = Desired Flexible Button Number When a button is assigned as a flexible button [0], the user can program any features or functions to which they have access on the buttons. STARPLUS STSe - Programming & Operations Manual August 2005...
- Page 190 After completing the first five steps of Flash 50/51, Page B, Button #11 programming described earlier in this section, continue programming using one of the following options. To assign a CO Line access function: Enter [01], [1], [LLL], [HOLD] LLL = CO Line Number STARPLUS STSe - Programming & Operations Manual August 2005...
- Page 191 Only one station at a time can be programmed when using a flexible station number. » When in Flash 51 programming, if you press HOLD without specifying a flexible number to be programmed, you will get the station that is in port/station 100. STARPLUS STSe - Programming & Operations Manual August 2005...
-
Page 192: Display Flexible Buttons
E NT ER B U T TO N NUMB ER EN TE R B UT TO N N U MBE R XXX-XXX = fixed station range XXX = 3- or 4-digit flexible number STARPLUS STSe - Programming & Operations Manual August 2005... - Page 193 2. Press SPEED, then dial [7] + [#]. 3. Dial [2] to select the KEYBTN option. 4. Press the desired flexible button(s) to display programming for the button(s) on the LCD. 5. When finished, replace the handset. STARPLUS STSe - Programming & Operations Manual August 2005...
- Page 194 Only one station at a time can be programmed when using a flexible station number. » When in Flash 51 programming, if you press HOLD without specifying a flexible number to be programmed, you will get the station that is in port/station 100. STARPLUS STSe - Programming & Operations Manual August 2005...
-
Page 195: Flexible Numbering
2. Press Button 1 (must be lit). 3. Press Button 2. 4. Press HOLD. Conditions » Feature access codes cannot conflict with station numbering. » CO line numbers are fixed and cannot be changed. STARPLUS STSe - Programming & Operations Manual August 2005... -
Page 196: Station Port Inquiry
G R O U P LI S T E N IN G D I S A B LE D 3. Press HOLD to save the entry. A confirmation tone sounds. DEFAULT … Group Listening is disabled. STARPLUS STSe - Programming & Operations Manual August 2005... -
Page 197: Headset Mode
Related Information Quick Reference Flash 50 Page B Button #4 The Speakerphone function MUST be disabled for use of the headset (refer to option 2 in “Speakerphone Options” on page 2-272). STARPLUS STSe - Programming & Operations Manual August 2005... - Page 198 STSe keyset. 0 = plugged into the jack normally used for the handset 1 = plugged into the 2.5 mm jack located on the left side of the keyset STARPLUS STSe - Programming & Operations Manual August 2005...
- Page 199 [ON/OFF] and then replacing the handset to return to headset operation. » Page announcements will be presented to the keyset speaker when the station is idle. STARPLUS STSe - Programming & Operations Manual August 2005...
-
Page 200: Hold - Exclusive
2-163). 3. Press HOLD to save the entry. A confirmation tone sounds and the display updates. DEFAULT … Exclusive Hold flash rate is set for a Green 120 ipm Flash (24). STARPLUS STSe - Programming & Operations Manual August 2005... -
Page 201: Exclusive Hold Recall Timer
H O L D P R EFE R EN C E S YS T EM 3. Press HOLD to save the entry. A confirmation tone sounds. DEFAULT … Hold Preference is System Hold. STARPLUS STSe - Programming & Operations Manual August 2005... -
Page 202: Hold - System
2. Enter a valid number on the dial pad that corresponds to 000-300 seconds. 3. Press HOLD to save the entry. A confirmation tone sounds and the display updates. DEFAULT … System Hold Recall Timer is set for 60 seconds. STARPLUS STSe - Programming & Operations Manual August 2005... -
Page 203: Hot Keypad
Hunt Group Pilot Number as the last entry of the group. 4. Press HOLD to save the entry. A confirmation tone sounds and the display updates. STARPLUS STSe - Programming & Operations Manual August 2005... -
Page 204: Station / Pilot / Pilot All Ring -- Hunting Assignments
[2] = Station Hunting (shown on LCD as CIRCULAR HUNT) Fixed Hunt Group numbers 458-461 are ONLY for RAN applications. 5. Press HOLD to save the entry. A confirmation tone sounds and the display updates. STARPLUS STSe - Programming & Operations Manual August 2005... -
Page 205: Overflow
An entry of 00 will disable the Overflow feature. 3. Press HOLD to save the entry. A confirmation tone sounds and the display updates. DEFAULT … Overflow Timer is set to (10) seconds. STARPLUS STSe - Programming & Operations Manual August 2005... -
Page 206: Initialize Hunt Group Parameters
I N I T I A LI Z E HUN T GR O U P P R ES S H O L D 2. Press the HOLD button. A confirmation tone sounds. STARPLUS STSe - Programming & Operations Manual August 2005... -
Page 207: Print Hunt Group Parameters
The Idle Speaker Mode feature allows you to select whether the first digit dialed is audible over the digital telephone speaker. This feature is allowed or denied on a system-wide basis in programming. When this feature is enabled, there can be some idle speaker noise. STARPLUS STSe - Programming & Operations Manual August 2005... -
Page 208: In And Out Button
DEFAULT … In and Out button flash rate is set for a Red 120 ipm Flash (10). Operation Press the preprogrammed In and Out Button (feature code 644). Conditions » Attendant stations and SLT stations do not have the In and Out feature capability. STARPLUS STSe - Programming & Operations Manual August 2005... -
Page 209: Incoming Calling Line Identification
2. The called station can place the current CO call on hold by pressing the HOLD button, -or- Place the current intercom call on hold by pressing the HOLD button. The intercom call is placed on hold on the available intercom button. STARPLUS STSe - Programming & Operations Manual August 2005... - Page 210 To utilize the capability of intercom buttons, busy forward cannot be active at the station. » A call ringing to a station on an intercom button and the DND button is pressed, returns DND tone to the caller and the call is dropped. STARPLUS STSe - Programming & Operations Manual August 2005...
-
Page 211: Intercom Calling
You will hear ringing if the called station is in the “T” answering mode or two bursts of tone if the called station is in the “H” or “P” modes. 3. Hang up to end the call. STARPLUS STSe - Programming & Operations Manual August 2005... -
Page 212: Incoming Intercom Ringing Flash Rate
Tone Ringing (T) -- A standard tone ring notifies the party of an incoming intercom call. The called party answers by lifting the handset or moving the switch to the handsfree (H) position or pressing the ON/OFF button. STARPLUS STSe - Programming & Operations Manual August 2005... -
Page 213: Intercom Transfer
2. Enter a valid number that corresponds to 01-99 seconds in 1-second increments. 3. Press HOLD to save the entry. A confirmation tone sounds and the display updates. DEFAULT … Inter-Digit Time-out is set for 5 seconds. STARPLUS STSe - Programming & Operations Manual August 2005... -
Page 214: Isdn
The PRIB does not support the trunk features of paging, reseize, queuing, or RAN support. Vodavi has successfully integrated its PRI ISDN with the Lucent 5 ESS, Siemens, Stromburg Carlson, and the DMS 100 Central Offices. Vodavi ISDN should interface with all Central Office switches, but this has not been verified. -
Page 215: Name/Number Display When Using Pri
Incoming call (DID number - 3 digits) Name in DID Translation Table is George (FLASH 44) Name in Name/Number Translation Table is Vodavi Comm Systems (FLASH 55) 1 0 0 A B C T E C H N O L O G Y C O... - Page 216 Name & Number Display with DNIS or ANI Signaling, 653 flex button Disabled/Unlit, & Flash 56, Button #2=No Figure 2-14: Display Examples (Using DNIS or ANI Signaling & FLASH 41, Button #9 Disabled) STARPLUS STSe - Programming & Operations Manual August 2005...
- Page 217 Name & Number Display with DNIS or ANI Signaling, 653 flex button Disabled/Unlit, & Flash 56, Button #2=No Figure 2-16: Display Examples (Using DNIS or ANI Signaling & FLASH 41, Button #9 Disabled) STARPLUS STSe - Programming & Operations Manual August 2005...
- Page 218 (including the space between them), the name in the Name/Number Translation Table will be truncated to accommodate 15 digits for the calling party name display, e.g., VODAVI COMM SYSTEMS is truncated to VODAV in the upper two examples of Figure 2-13.
-
Page 219: Outbound Did Number On Pri
E NT ER B U T TO N NUMB ER EN TE R B UT TO N N U MBE R XXX-XXX = fixed station range XXX = 3- or 4-digit flexible number STARPLUS STSe - Programming & Operations Manual August 2005... - Page 220 The feature will work if a call is dialed out directly from a hub or node over its own Telco PRI line. Conditions » This feature does not apply to CO to CO calls. STARPLUS STSe - Programming & Operations Manual August 2005...
-
Page 221: Isdn Programming - Page A
N I 2 1 = NI2 2 = PPNI2 (point-to-point NI2) 3 = Future feature (5 ESS Custom) 4 = Future feature (Nortel) DEFAULT … NI2 is the PRI CO type. STARPLUS STSe - Programming & Operations Manual August 2005... -
Page 222: Framing
The Directory Number is the main number of the PRI lines and it will be viewed by the called party on their caller ID display. Programming Steps 1. Press the DIRECTORY NUMBER flexible button (FLASH 45, Page A, Button #6). DIRECTORY NUMBER 0-9, *,# STARPLUS STSe - Programming & Operations Manual August 2005... -
Page 223: Max Out I-Frames
2. Enter a 0 or 1 on the dial pad to enable/disable this feature. [0] = Disabled [1] = Enabled 3. Press the HOLD button. A confirmation tone sounds and the display updates. DEFAULT … Leading 1 is enabled. STARPLUS STSe - Programming & Operations Manual August 2005... -
Page 224: Leading 011
3. Press the HOLD button. A confirmation tone sounds and the display updates. DEFAULT … ITU (ISDN plan) When connecting a PRI to a Nortel DMS 100, enter a 1 for the number plan. STARPLUS STSe - Programming & Operations Manual August 2005... -
Page 225: Calling Number
[0] = Normal mode [1] = Near end mode [2] = Far end mode 3. Press the HOLD button. A confirmation tone sounds and the display updates. DEFAULT … Loopback setting is normal. STARPLUS STSe - Programming & Operations Manual August 2005... -
Page 226: Isdn Programming - Page B
Y Y - Y Y PAG E B E N T E R B U T TO N N U MBE R YY = Slot (0-13) STARPLUS STSe - Programming & Operations Manual August 2005... -
Page 227: Maximum Number Retransmission
2. Enter a valid number (000-999) on the dial pad. 3. Press the HOLD button. A confirmation tone sounds and the display updates. (000 = Disable) DEFAULT … Maximum Octet setting is 260. STARPLUS STSe - Programming & Operations Manual August 2005... -
Page 228: Maximum Tei Request
2. Enter a valid number (00-99 seconds) on the dial pad. 3. Press the HOLD button. A confirmation tone sounds and the display updates. DEFAULT … T200 setting is 1 second. STARPLUS STSe - Programming & Operations Manual August 2005... -
Page 229: Minimum Tei Id Check Message
1. Press the MSG EXCHANGE TIMER flexible button (FLASH 45, Page B, Button #8). M S G E XC H A NG E T IM ER 00-99 T 2 0 3 2. Enter a valid number (00-99 seconds) on the dial pad. STARPLUS STSe - Programming & Operations Manual August 2005... -
Page 230: Minimum Xid Retransmission
2. Enter a valid number (00-99 seconds) on the dial pad. 3. Press the HOLD button. A confirmation tone sounds and the display updates. DEFAULT … Inter-digit Timeout setting is 25 seconds. STARPLUS STSe - Programming & Operations Manual August 2005... -
Page 231: Set-Up Timer
2. Enter a valid number (00-99 seconds) on the dial pad. 3. Press the HOLD button. A confirmation tone sounds and the display updates. DEFAULT … Release Request Timer setting is 4 seconds. STARPLUS STSe - Programming & Operations Manual August 2005... -
Page 232: Link Disconnect
2. Enter a valid number (00-99 seconds) on the dial pad. 3. Press the HOLD button. A confirmation tone sounds and the display updates. DEFAULT … Connect Request setting is 4 seconds. STARPLUS STSe - Programming & Operations Manual August 2005... -
Page 233: Restart Request Timer
PAGE A PRI CO Type Framing Power Disabled Directory Number None Max Out I-Frames K 001 Leading 1 Enabled Leading 011 Enabled PRI 7/11 Digit Number Plan Calling Number Enabled Loopback Normal STARPLUS STSe - Programming & Operations Manual August 2005... -
Page 234: Print Isdn Parameters
The system baud rate must match that of the printer or receiving device. When printing the ISDN Timers, the following data is printed: ISDN Parameters and Timers STARPLUS STSe - Programming & Operations Manual August 2005... - Page 235 2. To print the ISDN Parameters, press the HOLD button. The following message displays: P R I NT IN G IS D N When the system has finished sending the requested information to the printer, confirmation tone sounds. STARPLUS STSe - Programming & Operations Manual August 2005...
-
Page 236: Keyset Mode
The following Modes are described: Inactive -- No CTI information is sent/received by the telephone. PC Phone -- CTI information used with Vodavi Discovery Desktop and Discovery PC Phone software must be set to 4800 baud rate. ATD -- This is the modem dialing command. The telephone recognizes the ATD and accepts digits after the command. - Page 237 [5] = SPI Mode at 4800 baud [6] = TAPI Mode at 4800 baud 7. Press HOLD to save the entry. A confirmation tone sounds and the display updates. DEFAULT … Keyset is set for Inactive Mode. STARPLUS STSe - Programming & Operations Manual August 2005...
- Page 238 100. » Either the Wanderer or the CTI module can be connected to a station, but not both simultaneously. STARPLUS STSe - Programming & Operations Manual August 2005...
-
Page 239: Last Number Redial
Four contrast adjustments are available to adjust the LCD for different lighting levels. Operation At idle phone, press volume bar up or down for desired effect. SINGLE LINE TELEPHONE Not applicable Conditions » BGM must be inactive. STARPLUS STSe - Programming & Operations Manual August 2005... -
Page 240: Lcd Interactive Display
3. Press the left or center Soft Key located immediately below the desired option. Certain options require no further steps for activation. 4. Dial appropriate digits as necessary to activate selected features. STARPLUS STSe - Programming & Operations Manual August 2005... - Page 241 ZON E X H H : MM a m MMM DD Y Y H H : MM a m PAGE FROM ..(name).. MMM DD Y Y H H : MM a m STARPLUS STSe - Programming & Operations Manual August 2005...
- Page 242 B S Y / N A F W D TO S TA XXX No-Answer Call Forward MM M DD Y Y H H :MM a m (originating station) BSY/NA FWD TO ..(name).. MMM DD Y Y H H : MM a m STARPLUS STSe - Programming & Operations Manual August 2005...
- Page 243 H H : MM a m DO N OT D I ST U R B . . ( n a m e ) . . MMM DD Y Y H H:M M am STARPLUS STSe - Programming & Operations Manual August 2005...
- Page 244 C A LL TO S TA XXX VI A H U NT H H : MM a m CALL TO ..(name).. VI A H U NT H H : MM a m STARPLUS STSe - Programming & Operations Manual August 2005...
- Page 245 H H : MM a m MMM DD Y Y H H : MM a m Executive Override MON I TOR I NG STA XXX MMM DD Y Y H H : MM a m STARPLUS STSe - Programming & Operations Manual August 2005...
- Page 246 (when a call rings the station in ring mode) Answering Machine Emulation VM SCR EE N IN G MMM DD Y Y H H : MM p m (when station monitors caller in VM) STARPLUS STSe - Programming & Operations Manual August 2005...
-
Page 247: Lcob Loop Length
3. Dial a valid number (0-8) to identify the desired leading digit. 4. Press HOLD to save the entry. Only 3-digit codes will be changed to include a leading digit, e.g., 2-digit codes such as group call pickup (#0) are not affected. STARPLUS STSe - Programming & Operations Manual August 2005... -
Page 248: Least Cost Routing
E NT ER B U T TO N NUMB ER EN TE R B UT TO N N U MBE R XXX-XXX = fixed station range XXX = 3- or 4-digit flexible number STARPLUS STSe - Programming & Operations Manual August 2005... -
Page 249: Message Wait
1. Press the MSG button or dial [663]. The station that left message will be signaled with tone ringing. 2. If the called station does not answer, press the MSG button once if you want to leave that station a message waiting indication. STARPLUS STSe - Programming & Operations Manual August 2005... -
Page 250: Message Waiting Reminder Tone
CO line basis. This feature also allows the system to assign CO line circuits as additional music inputs. This increases the capacity of music channels beyond the one available on this system. A total of seven channels are available for use on the system. STARPLUS STSe - Programming & Operations Manual August 2005... -
Page 251: Moh Assignments
When connected to the system, a music source provides music to all lines on Hold, parked calls, transferred calls and calls waiting to be answered by Uniform Call Distribution (UCD). This feature is allowed or denied on a system-wide basis in programming. STARPLUS STSe - Programming & Operations Manual August 2005... -
Page 252: Music-On-Hold (Per Co Line)
4. Press the Page B flexible button (Button #20). The following message displays: XXX - XXX PAGE B E N T E R B U T TO N N U MBE R XXX-XXX = CO Line Range STARPLUS STSe - Programming & Operations Manual August 2005... -
Page 253: Mute Key
1. Press MUTE while off-hook on speakerphone or handset to activate. 2. Press MUTE again to deactivate. Mute automatically deactivates upon call termination. Conditions » Changing from handset to speakerphone (or the reverse) cancels the Mute function. STARPLUS STSe - Programming & Operations Manual August 2005... -
Page 254: Muted Ring
1 = KEYSET (Muted Ring is controlled by keyset firmware) 2 = OFF (Muted Ring is disabled) 4. Press [HOLD]. A confirmation tone sounds. DEFAULT … Ring code 0, where Muted Ring is controlled by KSU software. STARPLUS STSe - Programming & Operations Manual August 2005... -
Page 255: Name In Display
3. Press the FLASH button to complete the programming process. To erase your name: 1. Dial [690] on the dial pad. 2. Press the FLASH button to complete the erasing process. STARPLUS STSe - Programming & Operations Manual August 2005... -
Page 256: Name / Number Display At Idle
XXX = 3- or 4-digit flexible number 4. Press the NAME/NUMBER DISPLAY flexible button (Button #15). The following message displays: N A ME AT I D LE LC D N A ME STARPLUS STSe - Programming & Operations Manual August 2005... -
Page 257: Name/Number Translation Table
XXX = Table Number 600-799 ### = Route Number 000–251 The Route Number LED (Button #1) is lit. 2. Enter a Route Number (000–251) from what was entered in ICLID Ringing Assignments, FLASH [43]. STARPLUS STSe - Programming & Operations Manual August 2005... - Page 258 E N T E R TA B L E N UM B E R 2. Enter a valid number that corresponds to the table numbers 600-799. 3. Press HOLD to complete the entry. STARPLUS STSe - Programming & Operations Manual August 2005...
-
Page 259: Night Service
Saturday and Sunday ##:## ##:## (24-hour night-mode operation) - An entry of 00:00 23:59 indicates 24 hours of day mode. - An entry of ##:## ##:## directs the system to ignore these days. STARPLUS STSe - Programming & Operations Manual August 2005... -
Page 260: Day Of Week Programming
The system allows each station to be assigned a different COS for night operation. The night COS goes into effect when the system is put into night mode manually or via the automatic schedule. Prevents the misuse of phones after hours. STARPLUS STSe - Programming & Operations Manual August 2005... -
Page 261: Night Ringing Assignments
2-93). A Reminder Ring Timer provides the reminder ring every time the timer expires, as long as the incoming CO line remains connected. The system defaults this option to muted ringing. CO calls may also be camped-on to a busy station and receive muted ringing. STARPLUS STSe - Programming & Operations Manual August 2005... -
Page 262: Off-Hook Voice Over
[100 100]. If HOLD is pressed without entering a station range, all stations are selected. -or- Enter a valid flexible number (100-8999) to be programmed. STARPLUS STSe - Programming & Operations Manual August 2005... - Page 263 Option 1 -- This method lets the receiving station respond to an OHVO announcement utilizing the MUTE feature button. This button is pressed to carry on a two-way conversation with the OHVO initiator while still listening to the original call. STARPLUS STSe - Programming & Operations Manual August 2005...
- Page 264 The calling station of an OHVO call must remain off-hook to receive silent messages. The calling station's voice transmit remains connected to the receiving station and may respond verbally to the text messages. The OHVO call ends when calling station goes on-hook. STARPLUS STSe - Programming & Operations Manual August 2005...
-
Page 265: Outside Calls
Press HOLD button once for Exclusive Hold, twice for System Hold. If your system is programmed for System Hold Preference: Press HOLD button once for System Hold, twice for Exclusive Hold. STARPLUS STSe - Programming & Operations Manual August 2005... -
Page 266: Paging
[701- 720] = Internal Zone 1-20 [721] = Internal All Calls [761] = External Zone 3. Speak in normal tone of voice to deliver message. 4. Replace handset to terminate the page announcement. STARPLUS STSe - Programming & Operations Manual August 2005... -
Page 267: Paging Access
5. Enter a 0 or 1 on the dial pad to enable/disable this feature. [0] = Disabled [1] = Enabled 6. Press HOLD to save the entry. A confirmation tone sounds. DEFAULT … Paging is enabled at all stations. STARPLUS STSe - Programming & Operations Manual August 2005... -
Page 268: Paging - Meet Me
You are connected to the paging party. SINGLE LINE TELEPHONE The SLT operation uses the same procedures as used in Digital Telephone operation described above, except there is no MEET ME button. STARPLUS STSe - Programming & Operations Manual August 2005... -
Page 269: Paging Time-Out Timer
PAG E WA RN I NG TON E E N AB LE D 3. Press HOLD to save the entry. A confirmation tone sounds. DEFAULT … Page Warning Tone is enabled. STARPLUS STSe - Programming & Operations Manual August 2005... -
Page 270: Paging Zone(S)
E NT ER B U T TO N NUMB ER EN TE R B UT TO N N U MBE R XXX-XXX = fixed station range XXX = 3- or 4-digit flexible number STARPLUS STSe - Programming & Operations Manual August 2005... -
Page 271: Pause Timer
2. Enter a valid number on the dial pad that corresponds to 1-9 seconds. 3. Press HOLD to save the entry. A confirmation tone sounds and the display updates. DEFAULT … Pause Timer is set at 2 seconds. STARPLUS STSe - Programming & Operations Manual August 2005... -
Page 272: Personal Messages
MESSAGES button. The use of pre-assigned messages is cancelled by using feature code 662. Conditions » This feature is unavailable at Attendant stations. » Stations cannot be call forwarded or in DND and have this feature active. STARPLUS STSe - Programming & Operations Manual August 2005... -
Page 273: Custom Messages
SLT users can use custom messages (21-30) as described above. Unique custom messages (18-20) are not applicable. Custom message use is cancelled by using feature code 662. Conditions » This feature is not available to Attendant stations. STARPLUS STSe - Programming & Operations Manual August 2005... -
Page 274: Date And Time Entry Messages
To cancel the message: 1. Either dial the Personal Messages code [633] + [00], dial [662], or press the DND button. 2. Replace handset. DND button LED extinguishes. SINGLE LINE TELEPHONE Not applicable STARPLUS STSe - Programming & Operations Manual August 2005... -
Page 275: Scrollable Canned Messages
The telephone receiving the message must be a display telephone. » When a message displays by a key telephone, the DND button LED flashes at 15 ipm. » When DND is invoked on the telephone the message cancels. STARPLUS STSe - Programming & Operations Manual August 2005... -
Page 276: Personal Messages Flexible Button
Press [#] to scroll forward or [ ] to scroll backward through the list. When desired message is shown on the LCD, press HOLD to activate that message on your station. Confirmation tone sounds and DND button LED flashes SINGLE LINE TELEPHONE Not applicable STARPLUS STSe - Programming & Operations Manual August 2005... -
Page 277: Preferred Line Answer
XXX = 3- or 4-digit flexible number 4. Press the PREF LINE ANSWER flexible button (Button #8). The following message displays: P R EF L IN E A NS W E R E N AB LE D STARPLUS STSe - Programming & Operations Manual August 2005... -
Page 278: Privacy Release
CO Line in Use by Another Station Station Attempting to Access CO Line Privacy Enabled Privacy Disabled Privacy Enabled Private Private (no cut-through) (no cut-through) Privacy Disabled Private Privacy Release (no cut-through) (cut-through allowed) STARPLUS STSe - Programming & Operations Manual August 2005... - Page 279 (Flash 06, Button 1). Up to seven other stations may join an existing conversation. The station joining the call receives a solid red LED indication. DEFAULT … Privacy is enabled for all CO Lines. STARPLUS STSe - Programming & Operations Manual August 2005...
-
Page 280: Per Station Option
S TATI O N AT T R IB U T E S EN TE R S TAT I O N N U MBE R S EL E C T A S TAT I O N R A N GE STARPLUS STSe - Programming & Operations Manual August 2005... - Page 281 Only one station at a time can be programmed when using a flexible station number. » When in Flash 51 programming, if you press HOLD without specifying a flexible number to be programmed, you will get the station that is in port/station 100. STARPLUS STSe - Programming & Operations Manual August 2005...
-
Page 282: Private Line
T R A NS F E R R EC A LL 000-300 0 4 5 3. Press HOLD to save the entry. A confirmation tone sounds and the display updates. DEFAULT … Transfer Recall Timer is set for 45 seconds. STARPLUS STSe - Programming & Operations Manual August 2005... -
Page 283: Repeat Redial
REDIAL flexible button. During the Queue Call Back, the LCD display indicates this is a Redial Call Back. Once line queue is answered, the LCD indicates an outgoing CO line display. STARPLUS STSe - Programming & Operations Manual August 2005... -
Page 284: Relay Programming
[4] + CO # = CO Line Control [5] = Door Opener [0] = Disables Relay 3. Press HOLD to save the entry. A confirmation tone sounds and the display updates. STARPLUS STSe - Programming & Operations Manual August 2005... -
Page 285: Remote Administration
2. Enter a valid number on the dial pad that corresponds to 025-999 seconds. 3. Press HOLD to save the entry. A confirmation tone sounds and the display updates. DEFAULT … Modem Answer Timer is set for 25 seconds. STARPLUS STSe - Programming & Operations Manual August 2005... -
Page 286: Database Upload/Download
Capabilities reserved for this high-level troubleshooting also include: Monitor Mode Enable and Disable Event Trace Dump Trace Buffer (Up-Load) STARPLUS STSe - Programming & Operations Manual August 2005... -
Page 287: Ring Down / Hot Line / Off-Hook Preference
Use Flash 50 programming when you want to modify a range of stations’ attributes using fixed station numbers. Use Flash 51 programming to modify a single station’s attributes using a flexible station number. STARPLUS STSe - Programming & Operations Manual August 2005... - Page 288 E NT ER B U T TO N NUMB ER EN TE R B UT TO N N U MBE R XXX-XXX = fixed station range XXX = 3- or 4-digit flexible number STARPLUS STSe - Programming & Operations Manual August 2005...
- Page 289 If your phone is programmed for Off-Hook Preference and you were given the ability to enable or change the prime flexible button: 1. Dial [691] on the dial pad. 2. Dial the desired button number. STARPLUS STSe - Programming & Operations Manual August 2005...
-
Page 290: Save Number Redial (Snr)
If no lines are available in the same group, the station receives busy tone and can queue for a line. If the station user preselects a line before activating SNR, the preselection overrides the line originally used. STARPLUS STSe - Programming & Operations Manual August 2005... -
Page 291: School Zone
[100 100]. If HOLD is pressed without entering a station range, all stations are selected. -or- Enter a valid flexible number (100-8999) to be programmed. STARPLUS STSe - Programming & Operations Manual August 2005... - Page 292 8 = Busy Call Forward 6 = All Call Forward 9 = Busy / No Answer Call Fwd 7 = No Answer Call Forward 4. Press [HOLD]. A confirmation tone sounds. STARPLUS STSe - Programming & Operations Manual August 2005...
- Page 293 B /N A F W D TO XXXX C L A S S R O O M S TAT U S FW D TO XXXX 2. Press [ON/OFF] to return to an idle status. STARPLUS STSe - Programming & Operations Manual August 2005...
-
Page 294: Single Line Telephone
2. Enter a valid number that corresponds to 005–100 seconds. 3. Press HOLD to save the entry. A confirmation tone sounds and the display updates. DEFAULT … SLT DTMF Receiver Timer is set at 20 seconds. STARPLUS STSe - Programming & Operations Manual August 2005... -
Page 295: Slt Hook Flash Timer
The SLT Hook Flash Bounce Timer setting is variable from 0-1 seconds in 10 ms increments. This is a 3-digit entry where 010 equals 0.1 seconds. Figure 2-21: Hook Switch Activity STARPLUS STSe - Programming & Operations Manual August 2005... -
Page 296: Software Version (Mbu)
Use Flash 50 programming when you want to modify a range of stations’ attributes using fixed station numbers. Use Flash 51 programming to modify a single station’s attributes using a flexible station number. STARPLUS STSe - Programming & Operations Manual August 2005... - Page 297 5. Press the SPEAKERPHONE flexible button (Button #4). The following message displays: S P E AK ER P HON E F U L L S P EA K E R PH O N E STARPLUS STSe - Programming & Operations Manual August 2005...
-
Page 298: Speakerphone Operation
4. Press ON/OFF button to OFF to end the call. Where lift handset is specified, you may also press the ON/OFF button, if the telephone is programmed as a two-way speakerphone. SINGLE LINE TELEPHONE Not applicable STARPLUS STSe - Programming & Operations Manual August 2005... -
Page 299: Speed Dial
5. Press the SPEED button. 6. Replace the handset or press ON/OFF to end the speed bin programming. STARPLUS STSe - Programming & Operations Manual August 2005... -
Page 300: System Speed Dial Access
Use Flash 50 programming when you want to modify a range of stations’ attributes using fixed station numbers. Use Flash 51 programming to modify a single station’s attributes using a flexible station number. STARPLUS STSe - Programming & Operations Manual August 2005... - Page 301 The first programmed Attendant uses the same procedures to store system speed dial numbers, program multiple speed dial numbers, and to erase existing speed bins as described in the operation of station speed dial numbers. STARPLUS STSe - Programming & Operations Manual August 2005...
-
Page 302: Speed Bins - Chaining
I N I T I A LI Z E S YS S P E ED N O P R ES S H O L D 2. Press the HOLD button. A confirmation tone sounds. STARPLUS STSe - Programming & Operations Manual August 2005... -
Page 303: Print System Speed Numbers
2. To print the System Speed bins, press the HOLD button. The following message displays: P R I NT IN G S YS S P E ED NO When the system finishes sending the requested information to the printer, a confirmation tone sounds. STARPLUS STSe - Programming & Operations Manual August 2005... -
Page 304: Station Attributes
Line Group Access - Station Group 1 LCR Class of Service (COS) 0 (Unrestricted Access) Off-Hook Preference Programming 00=No specific button preferred; Enabled Flexible Button Programming (blank) Keyset Mode Inactive Mode STARPLUS STSe - Programming & Operations Manual August 2005... - Page 305 I N I T I A LI Z E S TATI O N S P R ES S H O L D 2. Press the HOLD button. A confirmation tone sounds. STARPLUS STSe - Programming & Operations Manual August 2005...
-
Page 306: Print Station Attributes
24LINEQ 19LNR 20SLGIN 21SLOUT 25FLASH 26XFER 27SPEED 22PKUP 23RPARK 24MUSIC 28CONF 29MSG 30FWD 31MUTE 32CAMP 33MON ... and so on through all stations 34HOLD 35VOL 36VOL Figure 2-23: Station Attributes Printout STARPLUS STSe - Programming & Operations Manual August 2005... -
Page 307: Station Identification
S TATI O N AT T R IB U T E S EN TE R S TAT I O N N U MBE R S EL E C T A S TAT I O N R A N GE STARPLUS STSe - Programming & Operations Manual August 2005... - Page 308 SLT w/Msg Wait (90 VDC) Vodavi SLTs w/Msg Wait [015] 3854 & 9854 Virtual Station [019] KTS 24-Btn (Remote IP Telephone) 3813 [020] Door Box 3560 = Codes available w/ver 1.01P05 or higher STARPLUS STSe - Programming & Operations Manual August 2005...
-
Page 309: Station Id Lock
7. Press HOLD to save the entry. A confirmation tone sounds and the display updates. 8. If a Virtual Station is used, a system reset is required. DEFAULT … The system auto-detects all Vodavi telephone types, DSS console, and Door Box. Conditions »... -
Page 310: Station Message Detail Recording
SMDR feature is enabled, the system starts collecting information about the call as soon as it starts and terminates when the call ends. If the call was longer then 30 seconds, the following information is printed: STARPLUS STSe - Programming & Operations Manual August 2005... - Page 311 “U” = Unanswered calls for ICLID SMDR call records - CC..CC = Number dialed - GG..GG = Last Account code entered (optional) - (CR) = Carriage return - (LF) = Line Feed Figure 2-24: SMDR Printout STARPLUS STSe - Programming & Operations Manual August 2005...
-
Page 312: Smdr Enable/Disable
LED ON = Long Distance is enabled LED OFF = All Calls is enabled 2. Press HOLD to save the entry. A confirmation tone sounds. DEFAULT … System records long distance (LD) calls only. STARPLUS STSe - Programming & Operations Manual August 2005... -
Page 313: Character Print Assignment
The LCD displays the current baud rate based on which Port number is assigned to the SMDR Port number. 3. Press HOLD to save the entry. A confirmation tone sounds and the display updates. DEFAULT … Port #1. STARPLUS STSe - Programming & Operations Manual August 2005... -
Page 314: Smdr Call Qualification Timer
2. Enter a valid number on the dial pad that corresponds to 00-60 seconds in 1-second increments. 3. Press HOLD to save the entry. A confirmation tone sounds and the display updates. DEFAULT … SMDR Call Qualification Timer is set to 30 seconds. STARPLUS STSe - Programming & Operations Manual August 2005... -
Page 315: Station Relocation
This feature is only applicable to keysets. » Digital stations must be relocated to another digital port. Digital stations cannot be relocated to an SLT port. » Station Lock disables this feature. STARPLUS STSe - Programming & Operations Manual August 2005... -
Page 316: System Parameters
ADDITIONAL SYSTEM TIMERS Repeat Redial Timer 60 sec Attendant Display Timer 01 sec Modem Answer T / O 025 sec Pulse Dial Inter-Digit Timer 300 ms Programmable DTMF Time Operation 1=100ms STARPLUS STSe - Programming & Operations Manual August 2005... - Page 317 Station ID Lock Disabled LCR Call Progress Enabled One-Touch Recording Warning Tone Enabled Ringback on Transfer Disabled 911 Feature Disabled Enhanced 911 Disabled VMID Same As Station Numbers STA Numbers = VMID STARPLUS STSe - Programming & Operations Manual August 2005...
- Page 318 STA 100 for 1st assigned in Grp 0 FLASH 11 System Time And Date MMM/DD/YY, 12-hour display FLASH 12 PBX Dialing Codes None FLASH 13 Executive/Secretary Pairs None FLASH 14 Relay Programming None STARPLUS STSe - Programming & Operations Manual August 2005...
- Page 319 I N I T I A LI Z E S YS PA R A M P R ES S H O L D 2. Press the HOLD button. A confirmation tone sounds. STARPLUS STSe - Programming & Operations Manual August 2005...
-
Page 320: Print System Parameters
LEADING DIGIT 7 NONE MUSIC ON HOLD ENABLED LEADING DIGIT OPTION DISABLED CALL QUALIFIER TONE DISABLED CENTREX DIGITS BARGE IN WARN TONE ENABLED VM ID DIGITS Figure 2-25: System Parameters Printout STARPLUS STSe - Programming & Operations Manual August 2005... - Page 321 WEEKLY NIGHT MODE SCHEDULE -------------------------- START TIME TIME 0800 1700 0800 1700 0800 1700 0800 1700 0800 1700 #### #### #### #### DIAL PULSE - 60/40 10 PPS Figure 12-20: System Parameters Printout STARPLUS STSe - Programming & Operations Manual August 2005...
-
Page 322: System Reset
R E S ET S YS T E M P R ES S H O L D 2. To reset the system without initializing the database, press the HOLD button. No confirmation tone sounds and the system resets. STARPLUS STSe - Programming & Operations Manual August 2005... -
Page 323: T-1 Alarm Programming
1. Press the CARRIER LOSS flexible button (FLASH 47, Button #1). Button #1 and Button #11 LEDs are lit steady. The following message displays: C A RR I ER LOS S E N AB LE D STARPLUS STSe - Programming & Operations Manual August 2005... -
Page 324: Blue Alarm
4. Continue programming the Blue Alarm parameters using the steps provided earlier in this section for Clearing the alarm, Minor alarm, Major alarm, Time Period, and Attendant display. DEFAULT … Blue Alarm is enabled for all T-1 Trunks. STARPLUS STSe - Programming & Operations Manual August 2005... -
Page 325: Yellow Alarm
4. Continue programming Red Alarm parameters using the steps provided in this section for Clearing the alarm, Minor alarm, Major alarm, Time Period, and Attendant display. DEFAULT … Red Alarm is enabled for all T-1 trunks. STARPLUS STSe - Programming & Operations Manual August 2005... -
Page 326: Bipolar Variations Alarm
4. Continue to program the Frame Slip Alarm parameters using steps provided in this section for Clearing the alarm, Minor alarm, Major alarm, Time Period, and Attendant display. DEFAULT … Frame Slip is enabled on T-1 trunks. STARPLUS STSe - Programming & Operations Manual August 2005... -
Page 327: Data Errors Alarm
D ATA ER R O R S C L E AR A L A RM P R ES S HOL D 2. Press the HOLD button to clear the alarm. A confirmation tone sounds. STARPLUS STSe - Programming & Operations Manual August 2005... -
Page 328: Minor Alarm
3. Press the HOLD button to save the entry. A confirmation tone sounds and the display updates. DEFAULT … Major Alarm threshold is set for 30 minutes and is variable from 00 to 99 minutes. STARPLUS STSe - Programming & Operations Manual August 2005... -
Page 329: Time Period
DEFAULT … All alarm conditions are enabled to be sent to the first Attendant station LCD display. Operation The Attendant can dial feature code [606] to clear any T-1 alarm from the display. It will not clear the condition, just clear the display. STARPLUS STSe - Programming & Operations Manual August 2005... -
Page 330: T-1 Trunking
4. Press the PAGE B flexible button (Button #20). The following message displays: XXX - XXX PAGE B E N T E R B U T TO N N U MBE R XXX-XXX = CO Line Range STARPLUS STSe - Programming & Operations Manual August 2005... - Page 331 Flash 55 programming ( ) for Name/Number Translation. 7. Press the HOLD button. A confirmation tone sounds and the display updates. DEFAULT … T-1 Signal Type option is Loop Start. STARPLUS STSe - Programming & Operations Manual August 2005...
-
Page 332: T-1 Ringback Option
2. Enter a 0 or 1 on the dial pad to enable/disable this feature. [0] = Disabled [1] = Enabled 3. Press the HOLD button to save the entry. A confirmation tone sounds and the display updates. DEFAULT … Dial Tone option is disabled. STARPLUS STSe - Programming & Operations Manual August 2005... -
Page 333: Wink Timer
5. Enter a valid number which corresponds to 100-290 ms. 6. Press HOLD button to save entry. A confirmation tone sounds and the display updates. DEFAULT … Wink Timer is set for 140 ms. STARPLUS STSe - Programming & Operations Manual August 2005... -
Page 334: T-1 Collect Timer
[0] = Dial Pulse [1] = DTMF 3. Press the HOLD button to save the entry. Confirmation tone sounds and display updates. DEFAULT … T-1 Signaling type is set for DTMF. STARPLUS STSe - Programming & Operations Manual August 2005... -
Page 335: T-1 Framing Type
[0] = D4SF-AMI [1] = ESF-B8ZS 3. Press the HOLD button to save the entry. A confirmation tone sounds and the display updates. DEFAULT … T-1 Framing type is set for D4SF-AMI. STARPLUS STSe - Programming & Operations Manual August 2005... -
Page 336: Tenant Groups
2. Enter a valid number (0 or 1) on the dial pad. [0] = Disabled [1] = Enabled 3. Press the HOLD button to save the entry. A confirmation tone sounds and the display updates. DEFAULT … Disabled. STARPLUS STSe - Programming & Operations Manual August 2005... -
Page 337: Attendant Station Assignment For Tenant Groups
[100 100]. If HOLD is pressed without entering a station range, All stations are selected. -or- Enter a valid flexible number (100-8999) to be programmed. STARPLUS STSe - Programming & Operations Manual August 2005... -
Page 338: Co Line Assignments For Tenant Groups
2. Enter a valid number for the range of lines being programmed. If only one line is being programmed, enter that number twice (001 001). If HOLD is pressed without entering a CO range, all CO lines are selected. STARPLUS STSe - Programming & Operations Manual August 2005... -
Page 339: Incoming Ring Assignments
4. Enter valid number on dial pad (0-9) to specify the desired group. 5. Press HOLD to save the entry. A confirmation tone sounds and the display updates. DEFAULT … Tenent Group 0. STARPLUS STSe - Programming & Operations Manual August 2005... -
Page 340: Co Line Sharing
The called party may press a preprogrammed Text Message button with a specific message [633+XX]. Example: [633] + [38] means a telephone calling the station receives the message WHO IS IT ? STARPLUS STSe - Programming & Operations Manual August 2005... - Page 341 Each message may be programmed onto a flexible button, including a flexible button on a DSS/BLF console. The calling station must be a display telephone and the receiving station must be a keyset. STARPLUS STSe - Programming & Operations Manual August 2005...
-
Page 342: Toll Restriction
For example, the code [1-555-1212] may be entered in the Deny Table to deny local toll information calls. Each Allow Table contains 20 bins for entry of allow codes. Each Deny Table contains 10 bins for entry of deny codes. STARPLUS STSe - Programming & Operations Manual August 2005... - Page 343 Each Special Table allows up to 800 entries (200–999). This offers the ability to allow every office code on an individual basis. STARPLUS STSe - Programming & Operations Manual August 2005...
-
Page 344: Entering Toll Table
4. To display entries in any of the tables, press the DISPLAY TABLES button (FLASH 70, Button #12). Entries in the Allow/Deny tables display two at a time. Entries in the Special tables display six at a time in ascending order. STARPLUS STSe - Programming & Operations Manual August 2005... -
Page 345: Allow Table
BB = Bin Number (Bins 17-19) XXX = Area Code (must match AREA-X entry) DDD = Do Not Care digit (three entries, DND button) [S] = Search Special Table Command (TRANS button) STARPLUS STSe - Programming & Operations Manual August 2005... - Page 346 5. When all entries for one table are complete, press the flexible button for the next table. To erase a bin number: 1. Enter a valid bin number. 2. Press the HOLD button. STARPLUS STSe - Programming & Operations Manual August 2005...
-
Page 347: Deny Table
5. When all entries for one table are complete, press the flexible button for the next table. To erase a bin number: 1. Enter a valid bin number. 2. Press the HOLD button. STARPLUS STSe - Programming & Operations Manual August 2005... -
Page 348: Special Table
3. Press HOLD after every code entered. A confirmation tone sounds and the display updates. Multiple codes may be entered in a row. The display updates showing the first six codes in ascending order. DEFAULT … No codes are on the Allow list. STARPLUS STSe - Programming & Operations Manual August 2005... -
Page 349: Display Toll Table Entries
S P E C IA L TA B L E 1 AC XXX Y Y Y Y Y Y Y Y Y Y Y Y Y Y Y Y Y Y XXX= Area Code YYY= Allowed Office Code STARPLUS STSe - Programming & Operations Manual August 2005... -
Page 350: Initialize Exception Tables
I N I T I A LI Z E E X TAB L E S P R ES S H O L D 2. Press the HOLD button. A confirmation tone sounds. STARPLUS STSe - Programming & Operations Manual August 2005... -
Page 351: Print Exception Tables
DENY TABLE A -------------------------------- ------------- ALLOWED OFFICE CODES SPECIAL TABLE 4 HOME AREA CODE -------------------------------- ALLOWED OFFICE CODES ALLOW TABLE B ------------- DENY TABLE B ------------- Figure 2-26: Exception Tables Printout STARPLUS STSe - Programming & Operations Manual August 2005... -
Page 352: Toll Restriction Related Items
The STSe system uses one DTMF receiver to monitor SLT dialing. If a system has heavy SLT usage, then toll restriction may inhibit dialing by SLT stations. STARPLUS STSe - Programming & Operations Manual August 2005... -
Page 353: Uniform Call Distribution
Each telephone utilizing Universal Day/Night Answer must have a loop button appearance if the ringing outside line does not display at their phone. UDA/UNA only works on direct ringing calls. It does not work for intercom or transferred calls. STARPLUS STSe - Programming & Operations Manual August 2005... -
Page 354: Universal Day Answer (Uda)
DEFAULT … Universal Day Answer feature is disabled. Operation Upon hearing an incoming signal: 1. Lift handset. 2. Dial the UDA/UNA access code [#5] on the dial pad. You are connected to ringing outside line. STARPLUS STSe - Programming & Operations Manual August 2005... -
Page 355: Universal Night Answer (Una)
XXX - XXX PAGE A E N T E R B U T TO N N U MBE R XXX-XXX = CO Line Range 4. Press the UNA flexible button (Button #3). STARPLUS STSe - Programming & Operations Manual August 2005... -
Page 356: Virtual Stations
In this manner two co-located businesses who share a common Attendant can know that a caller is calling for company A or for company B, depending on which call coverage button illuminates. STARPLUS STSe - Programming & Operations Manual August 2005... -
Page 357: Voice Mail
2. To change Voice Mail groups or enter further voice mail groups, press the appropriate flexible button 1-8 (440–447) and perform the following procedures. If installing a Vodavi voice mail system (except MiniVoice), skip directly to Button 12 and enter voice mail ports. -
Page 358: Alternate Voice Mail Group
1. Press [#] in the desired location on the keypad. 2. Then press the HOLD button. DEFAULT … Voice Mail Group 1 (440) Standard Leave Mail Index is set to zero (0). STARPLUS STSe - Programming & Operations Manual August 2005... -
Page 359: Retrieve Mail Index Entry
## ## , ## ## , ## ## , # ## #, ### #, ### #, ## ## , ## ## 3. Press HOLD to save the entry. A confirmation tone sounds and the display updates. STARPLUS STSe - Programming & Operations Manual August 2005... -
Page 360: No Answer Leave Mail Index Entry
To delete a busy leave mail index entry: 1. Press [#]. 2. Then press HOLD. DEFAULT … Voice Mail Group 1 (440) Busy Leave Mail Index is set to none (#). STARPLUS STSe - Programming & Operations Manual August 2005... -
Page 361: Vmid Station Numbers
Button #13 of administrative programming, there is a field to insert from 0-4 digits (0000-9999) which can be sent to the voice mail system in place of the station number. This is useful when a station user manually transfers a caller to a mailbox. STARPLUS STSe - Programming & Operations Manual August 2005... -
Page 362: Vm Tone Mode Calling Option
The VM system must be programmed when placing a call to a station and Tone Ringing is desired. 1. Dial [6#] on the dial pad. 2. Dial the station extension (call tone rings station). STARPLUS STSe - Programming & Operations Manual August 2005... -
Page 363: Voice Mail Id Translation
E NT ER B U T TO N NUMB ER EN TE R B UT TO N N U MBE R XXX-XXX = fixed station range XXX = 3- or 4-digit flexible number STARPLUS STSe - Programming & Operations Manual August 2005... -
Page 364: Message Waiting Indication
LCD display. The new VM LCD message on the keyset takes priority over Forward, DND, Messages, and idle displays. Ringing, Recalling, Outgoing Calls, and current call operation displays override the VM message display for the duration of the call or operation. STARPLUS STSe - Programming & Operations Manual August 2005... -
Page 365: Message Wait / Vm Button Flash Rate
2-163). 3. Press HOLD to save the entry. A confirmation tone sounds and the display updates. DEFAULT … Message Wait/VM Button flash rate is set for a Red Steady On (01). STARPLUS STSe - Programming & Operations Manual August 2005... -
Page 366: Voice Mailbox Button
To access a VM Group: Dial VM Group number (440-447), -or- Press preprogrammed VM Group flexible button, -or- Use Soft Key’s VM1 option when in an idle condition (to access group 440). STARPLUS STSe - Programming & Operations Manual August 2005... -
Page 367: Initialize Voice Mail Group Parameters
I N I T I A LI Z E VM G R O U P P R ES S H O L D 2. Press the HOLD button. A confirmation tone sounds. STARPLUS STSe - Programming & Operations Manual August 2005... -
Page 368: Print Voice Mail Group Parameters
VOICE MAIL OUT TABLE -------------------- TABLE PREFIX SUFFIX VOICE MAIL CO DISCONNECT SIGNAL APPLY IN-BAND DIGITS TO CO CALLS ALLOW FORWARD TO VM GROUP VM BROKER CALL Figure 2-27: Voice Mail Group Parameters Printout STARPLUS STSe - Programming & Operations Manual August 2005... -
Page 369: Voice Mail In-Band Features
Forward to VM Groups (lets voice mail calls, upon reaching a forwarded to VM station, forward back into the voice mail system). Programming Steps Press FLASH and dial [67]. The following message displays: VM FEATURES E N TE R B UT TON NUMB ER STARPLUS STSe - Programming & Operations Manual August 2005... -
Page 370: Voice Mail In-Band Digits
2. Enter a 0 or 1 to Enable/Disable this feature. [0] = Disabled [1] = Enabled 3. Press HOLD to save the entry. A confirmation tone sounds and the display updates. DEFAULT … VM Transfer/Forward feature is enabled. STARPLUS STSe - Programming & Operations Manual August 2005... -
Page 371: Voice Mail Broker
2. Enter a valid number (2, 3, or 4) that corresponds to the number of digits to be dialed. 3. Press HOLD to save the entry. A confirmation tone sounds. DEFAULT … VMID length is set to 3 digits. STARPLUS STSe - Programming & Operations Manual August 2005... -
Page 372: Voice Mail Modem Access
Voice Mail In-Band Features Features and Operation Voice Mail Modem Access Description You can program Vodavi voice mail systems (other than MiniVoice or PathFinder) using the telephone system modem. Programming Steps To enable or disable the VM port: 1. Press the VM PORT flexible button (FLASH 67, Button #6). The following message... -
Page 373: Voice Mail One-Touch Recording
3. When you finish recording, press the preprogrammed VM RECORD button or use the Soft Key’s STOP option. The LED extinguishes and the normal LCD call information displays. SINGLE LINE TELEPHONE Not applicable STARPLUS STSe - Programming & Operations Manual August 2005... - Page 374 One-Touch Recording uses Table 7 from the Voice Mail Outpulsing Table (refer to page 2-351). » Recordings made using the Soft Key are stored in VM group 440. » This feature only applies to digital voice mail systems. STARPLUS STSe - Programming & Operations Manual August 2005...
-
Page 375: One-Touch Recording Warning Tone
(Retrieve). By Default: Table 0 Prefix = P7 (Pause+7) Suffix = None Table 1 Prefix = P7 (Pause+7) Suffix = Table 7 Prefix = P7 (Pause+7) Suffix = 2 (Used for One-Touch Record) STARPLUS STSe - Programming & Operations Manual August 2005... - Page 376 4. Enter up to 12 digits, including [ ] and [#], TRANS button = pause. 5. Press HOLD to save the entry. A confirmation tone sounds and the display updates. To clear entries in a table: Press the pound key once [#], followed by HOLD. STARPLUS STSe - Programming & Operations Manual August 2005...
-
Page 377: Voice Mail Disconnect Table
VO ICE D I S E M A IL 3. Press HOLD to save the entry. A confirmation tone sounds and the display updates. DEFAULT … There are no entries in the Disconnect Table (Table #8). STARPLUS STSe - Programming & Operations Manual August 2005... -
Page 378: Voice Mail System Message Wait Indications
2. Dial the 2- to 4-digit mailbox number of the station user who will receive voice messages. 3. Dial a 3-digit number (000-127) that represents the amount of voice mail messages in the mailbox. Conditions Only VM extensions are allowed to turn ON/OFF VM message wait indications. STARPLUS STSe - Programming & Operations Manual August 2005... -
Page 379: Volume Control
M MM DD Y Y H H : MM a m Receiving a page announcement ... S P E AK ER PAG E [#########] M MM DD Y Y H H : MM a m STARPLUS STSe - Programming & Operations Manual August 2005... - Page 380 H H : MM a m SINGLE LINE TELEPHONE The volume control on the Vodavi Single Line Telephone is located on the right side of the telephone. The slider switch options are HI for loud volume, LO for low volume, and OFF to turn the ringer off.
- Page 381 System are listed and STSe described in alphabetical order. Attendant features are in addition to digital station features. The instructions in this chapter are based on the use of a digital display telephone. STARPLUS STSe - Programming & Operations Manual August 2005...
- Page 382 N O T E S » » » » » » » » » » » » » »...
-
Page 383: Introduction
LINE QUEUE button lets you queue onto an outside line when all lines in a group are busy. Your station is placed in queue awaiting a line in the same group to become available. STARPLUS STSe - Programming & Operations Manual August 2005... -
Page 384: Attendant Features - Index
SPEED DIAL - SYSTEM STORING ATTENDANT WITH DSS/BLF FEATURES 3-17 BUSY LAMP FIELD INDICATORS 3-17 DIRECT STATION CALLING 3-18 MAPPING OPTIONS 3-17 TRANSFER SEARCH 3-21 STATION ID FOR DSS/BLF CONSOLE WITH MAP STARPLUS STSe - Programming & Operations Manual August 2005... -
Page 385: Alert
An Attendant uses the following steps to delete the messages on a system-wide basis. 1. Press the 911 ALERT flexible button to display the 911 call information for deletion. 2. Press FLASH to delete that message. STARPLUS STSe - Programming & Operations Manual August 2005... -
Page 386: Attendant Co Line External (Off-Net) Forward
2. Dial the CO group access code. 3. Dial [#] on the dial pad. A confirmation tone sounds. Conditions » When CO lines are off-net forwarded, these lines display unique flash rates at the Attendant station. STARPLUS STSe - Programming & Operations Manual August 2005... -
Page 387: Attendant Custom Message
The Attendant must go idle after programming a message before another message may be programmed. 4. The Attendant then presses the HOLD button to enter the message and a confirmation tone sounds. STARPLUS STSe - Programming & Operations Manual August 2005... -
Page 388: Attendant Day/Night/Special
The DND button (by default) or Soft Key’s DND option acts as a rotary in this manner, starting in the Day mode, Night mode, and Special mode. When one Attendant activates this mode, other Attendant stations’ DND buttons are lit accordingly. STARPLUS STSe - Programming & Operations Manual August 2005... -
Page 389: Attendant Directory List Programming
[#] to scroll down (previous entry) through the list. If just changing a name associated with an existing station, skip to step 4. 2. Press TRANS. 3. Enter the 3- or 4-digit station intercom number. 4. Press MUTE. STARPLUS STSe - Programming & Operations Manual August 2005... - Page 390 6. Press SPEED when finished. Confirmation tone sounds and the display shows the new or changed name. 7. Press HOLD, then use [ ] or [#] to scroll to next entry. -or- Hang up to end programming. STARPLUS STSe - Programming & Operations Manual August 2005...
- Page 391 Names beginning with the letter chosen display on the LCD display. If there are no names in the Directory List beginning with the desired letter, a name with the next higher letter displays on the LCD display. STARPLUS STSe - Programming & Operations Manual August 2005...
-
Page 392: Attendant Disable Outgoing Co Line
3. Press the line button(s) of the CO Line(s) to disable. A confirmation tone sounds and the CO Line button(s) LED flashes. To reactivate the CO Line(s): Repeat Steps 1-3 to disable this feature. STARPLUS STSe - Programming & Operations Manual August 2005... -
Page 393: Attendant Override
After five seconds, the station’s CO line is automatically placed on hold and the Attendant is cut-through. To call a station in Do Not Disturb mode: Press the preprogrammed ATTN OVERRIDE button. The station is signaled with a Camp On tone. STARPLUS STSe - Programming & Operations Manual August 2005... -
Page 394: Attendant Setting Time And Date
MM = Month (01-12) MM = Minute (00-59) = Day (01-31) When the correct number of digits are entered, a confirmation tone sounds. 3. Press the ON/OFF button to OFF to update the display. STARPLUS STSe - Programming & Operations Manual August 2005... -
Page 395: Attendant Station Assignment
2. Enter a valid station number (100-8999) on the dial pad, followed by a “1” to add or “0” to delete the Attendant assignment. 3. Press HOLD to save the entry. A confirmation tone sounds and the display updates. DEFAULT … Station 100 is assigned as the first Attendant. STARPLUS STSe - Programming & Operations Manual August 2005... -
Page 396: Attendant Unavailable
» Recalls are directed to all programmed available Attendants. » If only one Attendant is programmed in the system, and that Attendant is unavailable, users dialing zero hear an error tone. STARPLUS STSe - Programming & Operations Manual August 2005... -
Page 397: Attendant Voice Mail Alarm Clear
Allows the Attendant to make a series of intercom calls without hanging up the handset. An intercom connection is switched to another station whenever a DSS key is pressed. Pressing the next DSS key terminates the previous intercom call. STARPLUS STSe - Programming & Operations Manual August 2005... -
Page 398: Mapping Options
DSS Console Map #1 -- by default 12 CO Lines, 36 Stations (100-135). This provides a default layout of a 12 X 36 configuration. CO12 CO10 CO11 Figure 3-2: DSS Console Map #1 STARPLUS STSe - Programming & Operations Manual August 2005... - Page 399 DSS Console Map #2 -- by default has 48 Stations, 100–147. All buttons are flexible and can be changed by the station user. This map can be duplicated on another DSS/BLF console and assigned to the same station. Figure 3-3: DSS Console Map #2 STARPLUS STSe - Programming & Operations Manual August 2005...
- Page 400 DSS Console Map #3 -- by default, CO Lines 1-28 appear in sequential order. CO12 CO10 CO11 CO13 CO14 CO16 CO15 CO17 CO18 CO20 CO19 CO21 CO22 CO24 CO23 CO25 CO26 CO28 CO27 Figure 3-4: DSS Console Map #3 STARPLUS STSe - Programming & Operations Manual August 2005...
-
Page 401: Station Id For Dss/Blf Console With Map
2. Enter a valid number on the dial pad that corresponds to 00-99 seconds. 3. Press HOLD to save the entry. A confirmation tone sounds and the display updates. DEFAULT … Attendant Display Timer is set for 1 second. STARPLUS STSe - Programming & Operations Manual August 2005... -
Page 402: Iclid Call Management Tables
Delete table entry (Attendant only) FLASH Exit table review function ON/OFF Step to previous table entry TRANSFER Call Back SPEED Conditions » Telco must activate Caller ID service. » Auto Attendant calls are considered answered. STARPLUS STSe - Programming & Operations Manual August 2005... -
Page 403: Unanswered Call Management Table
Delete table entry (Attendant only) FLASH Exit table review function ON/OFF Step to previous table entry TRANSFER Call Back SPEED Conditions » Telco must activate Caller ID service. » Auto Attendant calls are considered answered. STARPLUS STSe - Programming & Operations Manual August 2005... -
Page 404: Recall
While off-hook (on handset, not speakerphone) on an intercom call, transfer sequence, page announcement, or CO call: Press the preprogrammed RELEASE button [641] to terminate intercom call, transfer sequence, page announcement or CO call. STARPLUS STSe - Programming & Operations Manual August 2005... -
Page 405: Speed Dial - System Storing
Pressing the TRANS button as the first entry in the speed bin inserts a no-display character causing the numbers stored in the bin not to display on the Digital Telephones when the bin is accessed. Speed Bin numbers 9060-9099 are NOT monitored by Toll Restriction. STARPLUS STSe - Programming & Operations Manual August 2005... - Page 407 Uniform Call Distribution This chapter covers the topic of Uniform Call Distribution (UCD). STARPLUS STSe - Programming & Operations Manual August 2005...
- Page 408 » » » » » » » N O T E S » » » » » » »...
-
Page 409: Ucd Calls In Queue Status Display
1. Dial [567] on the dial pad, -or- Press preprogrammed flexible button. 2. Dial the UCD group number (550-565). ON/OFF button LED lights steady. 3. Hang up the handset or press ON/OFF button to terminate display. STARPLUS STSe - Programming & Operations Manual August 2005... -
Page 410: Alternate Ucd Group Assignments
CO Lines can be programmed to ring directly into a UCD group. When all agents are busy and RAN is enabled, the system answers the caller and presents the Primary Recorded Announcement automatically. STARPLUS STSe - Programming & Operations Manual August 2005... -
Page 411: Message Interval Timer
2. Enter a valid number on the dial pad which corresponds to 000-300 seconds. 3. Press HOLD to save the entry. A confirmation tone sounds and the display updates. DEFAULT … UCD No-Answer Timer is at 000 (disabled). STARPLUS STSe - Programming & Operations Manual August 2005... -
Page 412: No-Answer Retry Timer
6. Press HOLD to save the entry. A confirmation tone sounds and the display updates. To delete an UCD Overflow Station: 1. Press [#] three times. 2. Then press the HOLD button. STARPLUS STSe - Programming & Operations Manual August 2005... -
Page 413: Overflow Station Forwarding
5. Replace handset or press ON/OFF button. To remove Call Forwarding: 1. Lift handset or press ON/OFF button. 2. Press the FWD button. A confirmation tone sounds and the FWD LED extinguishes. STARPLUS STSe - Programming & Operations Manual August 2005... -
Page 414: Overflow Timer
5. To add a station as a primary agent of the UCD group, use the dial pad as follows: Enter XXXX 1 (XXXX = flexible station number). Press the HOLD button. STARPLUS STSe - Programming & Operations Manual August 2005... -
Page 415: Primary Recorded Announcement
RAN device can provide an announcement to one caller at a time. Subsequent callers are queued onto the message on a first-in basis. The Digital Voice Mail (DVM) can be used as a RAN device for UCD groups. STARPLUS STSe - Programming & Operations Manual August 2005... -
Page 416: Recorded Announcement Tables
2. Dial [3] for RAN Hunt Group. 3. Dial [0458-0461] for RAN Hunt Group used. 4. Enter message duration (000-300 seconds). 5. Press HOLD to save the entry. A confirmation tone sounds and the display updates. STARPLUS STSe - Programming & Operations Manual August 2005... -
Page 417: Ring Timer
2. Enter a valid number on the dial pad which corresponds to 000-300 seconds. 3. Press HOLD to save the entry. A confirmation tone sounds and the display updates. DEFAULT … UCD Ring Timer is set for 60 seconds. STARPLUS STSe - Programming & Operations Manual August 2005... -
Page 418: Secondary Recorded Announcement
3. Press HOLD to save the entry. A confirmation tone sounds and the display updates. DEFAULT … UCD Available/Unavailable DSS/BLF flash rate is set for a Red 60 ipm Double Wink Off (04). STARPLUS STSe - Programming & Operations Manual August 2005... - Page 419 You must dial [566] to make a station available or unavailable. Conditions » If key is programmed, it will flash at 60 ipm double wink. » SLTs receive a stutter dial tone when unavailable. STARPLUS STSe - Programming & Operations Manual August 2005...
-
Page 420: Wrap-Up Timer
3. Press HOLD to save the entry. A confirmation tone sounds and the display updates. DEFAULT … The Wrap-up End Button flash rate is set for a Red 120 ipm Flutter (11). STARPLUS STSe - Programming & Operations Manual August 2005... -
Page 421: Initialize Ucd Group Parameters
I N I T I A LI Z E U C D GR O U P P R ES S H O L D 2. Press the HOLD button. A confirmation tone sounds. STARPLUS STSe - Programming & Operations Manual August 2005... -
Page 422: Print Ucd Group Parameters
P R I NT IN G U C D G R O U P When the system finishes sending the requested information to the printer, a confirmation tone sounds. STARPLUS STSe - Programming & Operations Manual August 2005... - Page 423 ICLID / Caller ID This specification provides the functional and implementation definition for the addition of the ICLID feature to the Digital Key Telephone System. STSe STARPLUS STSe - Programming & Operations Manual August 2005...
- Page 424 N O T E S » » » » » » » » » » » » » »...
-
Page 425: Introduction
ICLID feature for the system. The phones are presumed to be in a UCD group in order to allow proper operation with the system. CO LINES (TRUNK CARD) Figure A-1: Caller ID System Configuration STARPLUS STSe - Programming & Operations Manual August 2005... -
Page 426: Functional Performance
Answer messages. If the user wishes to view the Line Number/Call Timer and the standard call information, they can press the flexible button to toggle between the name/number and normal mode. » A flexible button must be programmed for this feature to operate. STARPLUS STSe - Programming & Operations Manual August 2005... -
Page 427: Calling Number/Name Display
Central Office is effectively discarded. If No Name is available from the Central Office or a Translation Table, the delivered number is displayed as the repeated character N (14 characters). STARPLUS STSe - Programming & Operations Manual August 2005... -
Page 428: Incoming Number/Name For Smdr Records
2. To program ICLID features, use the flexible button(s) as defined in the following procedures. Button #1 = Disable/Enable Button #2 = Name In Display Button #3 = Baud Rate Display Button #4 = Port Assignment STARPLUS STSe - Programming & Operations Manual August 2005... -
Page 429: Enable/Disable
YES to show the name or NO to show the incoming telephone number in the LCD. 2. Press HOLD to save the entry. A confirmation tone sounds. DEFAULT … The system shows the name on the LCD display (YES option). STARPLUS STSe - Programming & Operations Manual August 2005... -
Page 430: Baud Rate Display
9 6 00 (LCD displays current baud rate assigned to the ICLID Port number.) 3. Press HOLD to accept the data. A confirmation tone sounds and the display updates. DEFAULT … Port #1. STARPLUS STSe - Programming & Operations Manual August 2005... -
Page 431: Ring Delay Timer
5. Enter a valid number on the dial pad (00–20) which corresponds to 00-20 seconds. 6. Press HOLD to save the entry. A confirmation tone sounds and the display updates. DEFAULT … Ring Delay Timer is set at 00 (disabled). STARPLUS STSe - Programming & Operations Manual August 2005... -
Page 432: Initialize Iclid-Did Tables
Phone Number None Name None Clear Entry None FLASH 56 ICLID Disable/Enable No=Disabled ICLID Name in Display Yes=Telephone number in display ICLID Baud Rate Display 9600 ICLID Port Assignment Port #1 STARPLUS STSe - Programming & Operations Manual August 2005... - Page 433 I N I T I A LI Z E I C LI D - D ID P R ES S H O L D 2. Press the HOLD button. A confirmation tone sounds. STARPLUS STSe - Programming & Operations Manual August 2005...
-
Page 434: Print Iclid - Did Tables
P R I NT IN G R O U T E P R I NT IN G D I D T R A NS NO 3. When the system finishes sending the requested information to the printer, a confirmation tone sounds. STARPLUS STSe - Programming & Operations Manual August 2005... - Page 435 NUMBER NAME 0000000 0000001 0000049 0000050 0000051 0000098 0000099 0000100 0000101 0000149 0000150 0000151 0000198 0000199 0000200 ... and so on through Entry 999 Figure A-2: ICLID - DID Tables Printout STARPLUS STSe - Programming & Operations Manual August 2005...
-
Page 436: Answered Call Management Table
Delete table entry (Attendant only) FLASH Exit table review function ON/OFF Step to previous table entry TRANSFER Call Back SPEED Conditions » Telco must activate Caller ID service. » Auto Attendant calls are considered answered. STARPLUS STSe - Programming & Operations Manual August 2005... -
Page 437: Unanswered Call Management Table
Delete table entry (Attendant only) FLASH Exit table review function ON/OFF Step to previous table entry TRANSFER Call Back SPEED Conditions » Telco must activate Caller ID service. » Auto Attendant calls are considered answered. STARPLUS STSe - Programming & Operations Manual August 2005... - Page 438 A-16 ICLID Call Management Tables ICLID / Caller ID STARPLUS STSe - Programming & Operations Manual August 2005...
- Page 439 This section describes the Least Cost Routing (LCR) feature and how to program the eight LCR Tables to monitor the digits dialed at each station and select the best route for the call. STARPLUS STSe - Programming & Operations Manual August 2005...
- Page 440 » » » » » » » N O T E S » » » » » » »...
-
Page 441: Lcr Tables
LCR Call Progress feature -- To allow all users to hear digits being dialed (refer to “LCR Call Progress” on page B-14). Flash 01 Button #20 Interdigit Timeout (refer to “Inter-Digit Time-Out” on page 2-189). STARPLUS STSe - Programming & Operations Manual August 2005... -
Page 442: Lcr Flowchart
All Lines Busy Insert/Delete Call is Queued on Table is Used If Least Costly Assigned with Group in List of Line Available Trunk Group Route Assigned Call is Processed Figure B-1: LCR Flowchart STARPLUS STSe - Programming & Operations Manual August 2005... -
Page 443: Operation (When Lcr Is Enabled)
(8) different tables set up to monitor the dialing of digits of a station and to select the best route programmed for the call. Flash 05, button #7 must be used to enable the Least Cost Routing feature. STARPLUS STSe - Programming & Operations Manual August 2005... -
Page 444: Digit Area / Office Code Table
Y = [0] Do not go to 6-digit table, [1] Go to 6-digit table PP = Number of digits expected to be dialed. 2. Press the HOLD button to save the entry. A confirmation tone sounds and the display updates. STARPLUS STSe - Programming & Operations Manual August 2005... -
Page 445: Digit Office Code Table
HOLD after each office code entry. 4. Press a flexible button to program a different table. To Delete All Entries in an Area Code/Route Table: Enter [0 AAA RR ###]. STARPLUS STSe - Programming & Operations Manual August 2005... -
Page 446: Exception Code Table
COS, a final check should be made to see if an Insert/Delete Table should be referenced. When all of the tables and entries are checked, the system then processes the call on the outside CO line. STARPLUS STSe - Programming & Operations Manual August 2005... - Page 447 A confirmation tone sounds and the display updates. 3. To enter additional CO Line groups in the same Time Period Route List number, dial [GG] + [DD] + [L], then press HOLD. STARPLUS STSe - Programming & Operations Manual August 2005...
- Page 448 To ensure that a pause is inserted in LCR at default, the database programming was changed to add a pause in each of the 20 LCR Insert and Delete Tables and insert table 0 in each of the route tables. STARPLUS STSe - Programming & Operations Manual August 2005...
-
Page 449: Daily Start Time Table
The first discount period usually starts at 5:00 pm and runs until 11:00 pm, often called Evening Rates. The remaining time (from 11:00 pm until 8:00 am) is referred to as night time rates which usually have the biggest discount. STARPLUS STSe - Programming & Operations Manual August 2005... - Page 450 Default times are 0800, 1700, 2300 (8 AM, 5 PM, and 11 PM), and the fourth time is disabled (####). To change a Start Time, all times must be re-entered. Four pound signs [####] are displayed if nothing is entered for a specific time. STARPLUS STSe - Programming & Operations Manual August 2005...
-
Page 451: Weekly Schedule Table
4th T = Time Period Route List for fourth Daily Start Time (applies to all Route List tables). 2. Press the HOLD button after each complete daily entry. A confirmation tone sounds and the display updates. STARPLUS STSe - Programming & Operations Manual August 2005... -
Page 452: Lcr Routing For Toll Information
2. Enter a 0 or 1 on the dial pad to enable/disable the use of this feature. [0] = Disabled [1] = Enabled 3. Press HOLD to save the entry. A confirmation tone sounds. DEFAULT … LCR Call Progress feature is enabled. STARPLUS STSe - Programming & Operations Manual August 2005... -
Page 453: Default Lcr Database
[100 100]. If HOLD is pressed without entering a station range, ALL stations are selected. -or- Enter a valid flexible number (100-8999) to be programmed. STARPLUS STSe - Programming & Operations Manual August 2005... -
Page 454: Lcr Class Of Service (Cos)
S TATI O N AT T R IB U T E S EN TE R S TAT I O N N U MBE R S EL E C T A S TAT I O N R A N GE STARPLUS STSe - Programming & Operations Manual August 2005... - Page 455 Only one station at a time can be programmed when using a flexible station number. » When in Flash 51 programming, if you press HOLD without specifying a flexible number to be programmed, you will get the station that is in port/station 100. STARPLUS STSe - Programming & Operations Manual August 2005...
-
Page 456: Enable/Disable Least Cost Routing
C A LL COS T D IS P L AY D I S A B LE D 3. Press HOLD to save the entry. A confirmation tone sounds. DEFAULT … Call Cost Display is disabled. STARPLUS STSe - Programming & Operations Manual August 2005... -
Page 457: Initialize Lcr Tables
I N I T I A LI Z E LC R TAB LE S P R ES S H O L D 2. Press the HOLD button. A confirmation tone sounds. STARPLUS STSe - Programming & Operations Manual August 2005... -
Page 458: Print Lcr Tables
2. To print the LCR Tables, press the HOLD button. The following message displays: P R I NT IN G LC R TA B L ES When the system finishes sending the requested information to the printer, a confirmation tone sounds. STARPLUS STSe - Programming & Operations Manual August 2005... -
Page 459: Lcr Printout
----------------------------------- TABLE TIME 1700 2300 #### WEEKLY SCHEDULE TABLE ----------------------------------- START TIME ----------------------------------- 1700 2300 #### LCR ROUTE FOR 555-1212 ----------------------------------- 6 DIGIT TABLE ----------------------------------- AREA ROUTE OFFICE CODE NO CODES STARPLUS STSe - Programming & Operations Manual August 2005... - Page 460 B-22 Programming LCR Tables Appendix B - Least Cost Routing 3 DIGIT TABLE ---------------------- CODE LEADING 1 NON-LEADING 1 ---------------------------------...
- Page 461 Programming LCR Tables B-23 Appendix B - Least Cost Routing...
- Page 462 B-24 Programming LCR Tables Appendix B - Least Cost Routing...
- Page 463 Programming LCR Tables B-25 Appendix B - Least Cost Routing...
- Page 464 B-26 Programming LCR Tables Appendix B - Least Cost Routing...
- Page 465 Programming LCR Tables B-27 Appendix B - Least Cost Routing...
-
Page 467: Introduction
Flash-Based Voice Mail This appendix includes an introduction, system programming procedures, and user procedures for the Flash-based Voice Mail system. STARPLUS STSe - Programming & Operations Manual August 2005... - Page 468 N O T E S » » » » » » » » » » » » » »...
-
Page 469: System Capabilities
If you are busy in your office or away on a business trip, customers, vendors, or other employees can leave detailed messages in your voice mailbox. Protected by your password, these messages are completely confidential. STARPLUS STSe - Programming & Operations Manual August 2005... -
Page 470: Programming The Voice Mail System
4. Press HOLD to save the entry. A confirmation tone sounds and the display updates. 5. Press the reset button on the Main Board Unit (MBU). Conditions » After programming card slots, a system reset must be performed. STARPLUS STSe - Programming & Operations Manual August 2005... -
Page 471: Recorded Announcement Tables
To program a Table for a Digital voice mail system, a CO Line port, an SLT port, or a RAN Hunt Group port, refer to “Recorded Announcements” on page 4-9. To clear entries: 1. Press the [#] button. 2. Then press HOLD. STARPLUS STSe - Programming & Operations Manual August 2005... - Page 472 PBX Integration (Telephone Type) PBX Integration parameters Record Prompts Review Prompts Select System Greeting / per Port Normal Night Temporary Software Version Upgrade Procedure System Greeting Review Record Delete Version Number STARPLUS STSe - Programming & Operations Manual August 2005...
-
Page 473: Programming System Functions Via Telephone
Programming Type Description PBX Integration Select your telephone system from a list of possibilities. Example - selection number 00 represents Vodavi STSe 3-digit telephone systems. Open & Close Schedule Identify the hours of your business operation. Number Plan Activate the numbers that will appear as menu selections. -
Page 474: Administrator Options
3. Enter the desired greeting number. For example: 1 = Default Day greeting 2 = Default Night greeting 3 = Default Temporary greeting 4 - 9 = Open for customized greetings STARPLUS STSe - Programming & Operations Manual August 2005... - Page 475 Once they are given the new temporary access code, the subscriber should immediately enter their mailbox and change the temporary access code to one of their own. This is the only method for changing the administrator mailbox access code. STARPLUS STSe - Programming & Operations Manual August 2005...
- Page 476 Press [ ] + [ ] to return to the system Main Customer Call Routing (CCR) Menu. Press [ ] + [ ] + [ ] to exit the system completely. STARPLUS STSe - Programming & Operations Manual August 2005...
- Page 477 Press [1] through [9] to select another System Administrator task to perform. Press [ ] to return to the system Main Customer Call Routing (CCR) Menu. Press [ ] + [ ] to exit the system completely. STARPLUS STSe - Programming & Operations Manual August 2005...
- Page 478 Press [1] through [9] to select another System Administrator task to perform. Press [ ] to return to the system Main Customer Call Routing (CCR) Menu. Press [ ] + [ ] to exit the system completely. STARPLUS STSe - Programming & Operations Manual August 2005...
- Page 479 Mode 2 - Fixed Night Mode: the system is in Night Mode all of the time. Mode 3 - Automatic Mode: the system follows the Open & Close times as programmed. STARPLUS STSe - Programming & Operations Manual August 2005...
- Page 480 [2] to change data - after the prompt, enter the desired two-digit Integration Number (00 = Vodavi STSe 3 digit; 01 = Vodavi STSe 2 digit; 02 = Vodavi STSe 4 digit). You are then returned to the prompt that asks if you want to review data, change data, or exit.
- Page 481 You can listen to a single prompt, a range of prompts, or the last prompt that was recorded. To listen to System Prompts: 1. Access the System Administrator Mailbox as described on page C-7. The Administrator Options Menu plays. 2. Press [8] to Listen to a Prompt. STARPLUS STSe - Programming & Operations Manual August 2005...
- Page 482 Press [1] through [9] to select another System Administrator task to perform. Press [ ] to return to the system Main Customer Call Routing (CCR) Menu. Press [ ] + [ ] to exit the system completely. STARPLUS STSe - Programming & Operations Manual August 2005...
-
Page 483: Programming System Functions Via Computer
These screens are accessed from the main menu by either selecting a number and pressing the <ENTER> key or by typing the number and pressing the <ENTER> key. STARPLUS STSe - Programming & Operations Manual August 2005... - Page 484 To enter the programming area, type in the correct password, then press <ENTER>. The default factory password is 0000. It can be changed by selecting Option 8 on the Programming Menu. The Flash-based Voice Mail displays the Programming Menu shown in Figure C-2. STARPLUS STSe - Programming & Operations Manual August 2005...
- Page 485 If the Programming Menu screen is left unattended for longer than five minutes, the screen will close and you will need to re-enter the System Password to gain access to the Programming Menu screen again. STARPLUS STSe - Programming & Operations Manual August 2005...
- Page 486 If you use the F4 key to clear all of the times, the system will continue to use the greeting that was active at the time that you cleared the entries. STARPLUS STSe - Programming & Operations Manual August 2005...
-
Page 487: System Numbering Plan
A CCR Menu 1 entry of 2 in the CCR field will link to CCR Menu 2 number plan (Sales). Sales can be subdivided into In-State and Out-of-State sales making two entries (3 & 4) in the CCR field of CCR Menu 2. Figure C-8 graphically portrays this example. STARPLUS STSe - Programming & Operations Manual August 2005... - Page 488 “Y” in the First Digit Permission field that is associated with the first dialed digit of 4; also the fields for Extension, Greeting, and CCR Number must be left blank. Figure C-5: Number Plan Example STARPLUS STSe - Programming & Operations Manual August 2005...
- Page 489 Programming the Voice Mail System C-23 Flash-Based Voice Mail Figure C-6: Five Possible Number Plans Sales Tech Support Services Repairs Figure C-7: CCR Menus Example STARPLUS STSe - Programming & Operations Manual August 2005...
- Page 490 This screen is used to instruct the Flash-based Voice Mail to ignore certain digits that may be dialed. When these digits are encountered, they are ignored. Figure C-9: Invalid Digits Screen STARPLUS STSe - Programming & Operations Manual August 2005...
-
Page 491: Auto Attendant Configuration
The greeting number (01-09) that plays when this port is accessed during the night hours, as defined in the Open & Close Schedule. NITE MODE CCR The number (01-05) identifying the CCR menu that answers during the night hours, as defined in the Open & Close Schedule. STARPLUS STSe - Programming & Operations Manual August 2005... - Page 492 4. Press the right arrow key or press the <ENTER> key. 5. Enter a four-digit value to indicate the year. 6. Press the right arrow key or press the <ENTER> key. STARPLUS STSe - Programming & Operations Manual August 2005...
- Page 493 0000, enter the new password here. (The password MUST be four digits.) The new password takes effect next time you access programming menus. Figure C-12: Password Screen STARPLUS STSe - Programming & Operations Manual August 2005...
- Page 494 The system will verify the outdial access code entered on the PBX Integration Screen. MSG_IND Shows the current status of the telephone MWI indicator according to the system. 0 = OFF 1 = ON STARPLUS STSe - Programming & Operations Manual August 2005...
- Page 495 After the mailbox is established, these fields and the beeper/pager No can be modified as desired. If an invalid beeper/pager number is entered, a user cannot activate this type of notification remotely. STARPLUS STSe - Programming & Operations Manual August 2005...
- Page 496 The mailbox will indicate that it is full, once this count is matched. For example, if set to 5, the 6th caller receives a message “I’m sorry, the mailbox is full” . STARPLUS STSe - Programming & Operations Manual August 2005...
- Page 497 Flash-based Voice Mail. The Memory Expansion Module increases the storage space by 360 minutes. Figure C-15: Free Sectors Screen PBX Integration The Flash-based Voice Mail provides several preprogrammed integration modules as shown Figure C-16. Figure C-16: PBX Integration Screen (1 of 2) STARPLUS STSe - Programming & Operations Manual August 2005...
- Page 498 <ENTER> key. Your selection is displayed in the Screen in Effect field. For example, if you scroll to 00 for Vodavi STSe 3 Digit numbering plan and press <ENTER>, the Screen In Effect field displays 00.
- Page 499 If no digits are received during this period, the system will then play the main greeting for that port and be ready to accept caller-dialed digits. (Default value = 20, which represents 2000 ms or 2 seconds) STARPLUS STSe - Programming & Operations Manual August 2005...
- Page 500 The system receives an entry for #MMM. The Action for this protocol is EnterMB. Once the match is made, the system opens mailbox 104, plays the mailbox name to the caller and asks for their password. STARPLUS STSe - Programming & Operations Manual August 2005...
- Page 501 If a line has multiple mailbox numbers, this indicates that the message has been copied to other mailboxes. As mailbox owners listen to their messages and delete them, their numbers will be removed from the screen. STARPLUS STSe - Programming & Operations Manual August 2005...
- Page 502 Debug Information Screen This screen shows various trouble-shooting information fields. They will usually be used in conjunction with a Vodavi technician when trying to identify a problem that may be occurring. This screen is accessible only when the Dealer Password is used to enter System Programming.
- Page 503 3. Using the pulldown menu, select Transfer>Send_Text File. 4. Browse to the location of the upload file. The upload file is identified as V70cxx (where xx reflects the version number). The upload file is normally obtained via the Vodavi website or via Vodavi-provided 3.5 inch floppy disk.
-
Page 504: Voice Prompts
Enter destination number The mailbox is not empty The system is full Enter a new password Press 1 You have… saved message messages Zero Three Four Five Seven Eight Nine Eleven Twelve STARPLUS STSe - Programming & Operations Manual August 2005... - Page 505 Press 1 to change an access code, 2 to add a mailbox, 3 to delete a mailbox, 4 to record a mailbox greeting, 5 to reset MWI Make your selection now Dial system greeting STARPLUS STSe - Programming & Operations Manual August 2005...
- Page 506 - Default Voice Menu greeting - - Welcome 1 = System Greeting 01 - Welcome 2 = System Greeting 02 - Greeting 3 = System Greeting 03 - Greeting 4 = System Greeting 04 STARPLUS STSe - Programming & Operations Manual August 2005...
- Page 507 This feature is currently in use, please try again later Dial destination number End of messages Playback is paused. Press 6 to resume playback. To review, press 1; To change, 2; To delete 3 STARPLUS STSe - Programming & Operations Manual August 2005...
- Page 508 Transfer options - press 1 to transfer to your extension, press 2 to transfer to your mailbox Transfer is set to extension Transfer is set to mailbox To dial beeper number, press 4 STARPLUS STSe - Programming & Operations Manual August 2005...
-
Page 509: Remote Programming & Maintenance Connection
“Connect using” box to: COM1 or COM2 (as required by your PC), then click on OK. 3. After the connection is established, type in the Voice Mail Password. STARPLUS STSe - Programming & Operations Manual August 2005... -
Page 510: User Operations
2. If you hear the system greeting, press [#], then enter your mailbox number. 3. When asked for your temporary password, enter ____ (for example, 0000). 4. Press [3] for Mailbox Options. 5. Press [2] for Passwords. STARPLUS STSe - Programming & Operations Manual August 2005... -
Page 511: Message Options
In particular, if new messages arrive during message review, they are presented in the same order as before but are considered "skipped”. STARPLUS STSe - Programming & Operations Manual August 2005... - Page 512 1. At the Main Menu, press [1] to review the message. 2. Press [3] to delete the message. 3. Press [#] to confirm deletion. After a message has been deleted, it cannot be restored. STARPLUS STSe - Programming & Operations Manual August 2005...
- Page 513 This time and date stamp allows the user to know how much longer the message can stay in the mailbox before it is automatically deleted. Reviewing a message and re-saving it does not change the time and date stamp or when the system automatically deletes the message. STARPLUS STSe - Programming & Operations Manual August 2005...
- Page 514 If you have selected the wrong mailbox, press the [ ] key and enter a new number. 7. Press [#] if there are no more destinations, or continue from Step 5. STARPLUS STSe - Programming & Operations Manual August 2005...
-
Page 515: Mailbox Greeting Options
1. At the Main Menu, press [3] to access Mailbox Options. 2. Press [1] to access Mailbox Greeting options. 3. Press [2] to select the Record option. 4. Press [1] to record your name. 5. Record your name, then press [#]. STARPLUS STSe - Programming & Operations Manual August 2005... - Page 516 1. At the Main Menu, press [3] to access Mailbox Options. 2. Press [1] to access Mailbox Greeting options. 3. Press [3] to select the Delete option. 4. Press [3] to delete the Temporary Greeting. STARPLUS STSe - Programming & Operations Manual August 2005...
-
Page 517: Passwords
1. From the Main Menu, press [3] to access Mailbox Options. 2. Press [4] for Direct Transfer. 3. Press [1] to select the Extension option or press [2] to select the Mailbox option. STARPLUS STSe - Programming & Operations Manual August 2005... -
Page 518: Starplus Stse - Programming & Operations Manual August
C-52 User Operations Flash-Based Voice Mail STARPLUS STSe - Programming & Operations Manual August 2005... - Page 519 Together, they will allow a System Administrator to set up voice mail parameters using a computer, or a touch-tone telephone in a local or remote setting. This appendix describes the features, administration, and user operation of the Vodavi STSe Hard Drive-based Voice Mail module.
-
Page 521: Basic Features
Save messages for future reference. Message Wait Light Light indicates new voice mail messages. Pager Notification Choose to be notified when system receives new messages. Remote Access Check voice mail messages from any touch-tone phone. STARPLUS STSe - Programming & Operations Manual August 2005... -
Page 522: Card Slot Programming
Ring Delay Timer to a setting of 05 (sec). This allows sufficient time for receipt of ICLID information from the telephone company. Refer to “Ring Delay Timer” on page A-9. STARPLUS STSe - Programming & Operations Manual August 2005... -
Page 523: Recorded Announcement Tables
To program a Table for a Digital Voice Mail, a CO Line port, an SLT port, or a RAN Hunt Group port, refer to “Recorded Announcements” on page 4-9. To clear entries: 1. Press the [#] button. 2. Then press HOLD. STARPLUS STSe - Programming & Operations Manual August 2005... -
Page 524: Programming Devices For Hard Drive-Based Voice Mail System
Reset Registry to default Add / Edit Registry items EDIT PROMPTS Menu prompts System prompts Mailbox signature SUBSCRIBER PROGRAMMING Add / Delete / Edit subscribers Name (for company directory) Password Department STARPLUS STSe - Programming & Operations Manual August 2005... - Page 525 Soft Keys Vodavi-branded telephones allow a mailbox owner to modify certain station settings using the soft programming keys. These keys also serve as navigation keys when used in conjunction with the LCD. For more detailed information … refer to the Station User Guide.
-
Page 526: Programming System Functions Via Computer
440 as configured at the factory. PC/Laptop Administrator Login -- To access the voice mail system as an administrator, … enter the system defaults which are: mailbox number 100, and password 0000. STARPLUS STSe - Programming & Operations Manual August 2005... - Page 527 The default baud rate is 115200. 5. Enter a valid mailbox number and password, then click FINISH to connect to host system. STARPLUS STSe - Programming & Operations Manual August 2005...
- Page 528 » After making changes to the system, click one of the “action” buttons presented before selecting another menu. The available buttons are: Save | Cancel | Restore | Add | Delete. STARPLUS STSe - Programming & Operations Manual August 2005...
- Page 529 This function is TURNED ON ( ) by default. The ABOUT menu displays the software version of the In-Skins Admin program being used to run your voice mail system. This information could be helpful when working with Vodavi Technical Support.
- Page 530 SHUTDOWN AND RESTART -- If you wish to recycle the voice mail system (i.e.., to change system settings), select the restart option. STARPLUS STSe - Programming & Operations Manual August 2005...
- Page 531 You will need to know the ID number of the prompt in order to record the new message. » To view a list of the default system prompts available, refer to “Hard Drive-based Default System Prompts” on page D-43. STARPLUS STSe - Programming & Operations Manual August 2005...
- Page 532 3. Click in the “Last Station to Delete” field, and then click on the dropdown arrow. 4. Select the ending number in the range, and click the DELETE button. 5. Click YES when the “Delete Subscriber Range” confirmation window displays. STARPLUS STSe - Programming & Operations Manual August 2005...
- Page 533 COS settings have been properly administered. Typical uses include archiving and notification of no answer to messages left in a mailbox (i.e. for Customer Service). STARPLUS STSe - Programming & Operations Manual August 2005...
- Page 534 Notification checkbox. Check this if the notification number is a pager. Be sure to press the OK button before leaving this window. Notification Time To receive your messages at a specific time, enter the time using the hh:mm format. STARPLUS STSe - Programming & Operations Manual August 2005...
- Page 535 [extension's name] is busy. If you would like to hold, press [1]. To try another extension or leave a message for this extension, press [2]." This option works only with Supervised Transfer. STARPLUS STSe - Programming & Operations Manual August 2005...
- Page 536 2. Click on the arrow to display the COS items available. 3. Select the COS you want to remove, then click the DELETE button. 4. When the “Delete COS” window displays, click YES to confirm this action. STARPLUS STSe - Programming & Operations Manual August 2005...
- Page 537 “Time Control Menus” on page D-29 for more details. NOTE … Use only with help from Vodavi Technical Support. User Type Set user type to 99 only when granting system administrator access. For all other uses, this should be set to 10. Types 02-98 are not used.
- Page 538 Last Options. NOTE… The mailbox greeting must include instructions for dialing [8] for urgent messages STARPLUS STSe - Programming & Operations Manual August 2005...
- Page 539 NEWEST MESSAGE FIRST - The last message left in chronological order will be the first one played. OLDEST MESSAGE FIRST - The first message left in chronological order will be the last one played. STARPLUS STSe - Programming & Operations Manual August 2005...
- Page 540 (such as for a pager). Notification is the indication of new messages in mailboxes. This does not affect message waiting indicators on telephones. STARPLUS STSe - Programming & Operations Manual August 2005...
- Page 541 ON EVERY MESSAGE - sends command after each new message. MWI Set Sequence String to send to phone system in order to activate MWI Lamp. MWI Clear Sequence String to send to phone system to deactivate MWI Lamp. STARPLUS STSe - Programming & Operations Manual August 2005...
- Page 542 NOTE … However, since Pager Retries are directly related to Notify Attempts, you may receive a “limited” number of notifications attempts. STARPLUS STSe - Programming & Operations Manual August 2005...
- Page 543 Hold files are recorded using telephone-based administration. The first prompt file is recorded by selecting system prompt 014. The second prompt is 015. The entire range of nine files is accessed by using the numbers 014 through 022. STARPLUS STSe - Programming & Operations Manual August 2005...
-
Page 544: Menu Options
Double-click on “Menu List” and select the desired menu. These multi-level menus are used to direct users and callers to information, assist them in performing tasks, and guide them in their use of the system. STARPLUS STSe - Programming & Operations Manual August 2005... - Page 545 Voice Mail system will transfer the caller to the operator. Key 8 Record Prompts Key 9 Hang Up » » » The menu action modules are briefly defined on the next page. STARPLUS STSe - Programming & Operations Manual August 2005...
- Page 546 For Example … a menu might include this option at the end of a list, "press [4] for sales, [5] for support, [#] to return to previous menu, and [9] to hang up". STARPLUS STSe - Programming & Operations Manual August 2005...
- Page 547 Refer to “Menu Options” on page D-26 for a description of these actions. STARPLUS STSe - Programming & Operations Manual August 2005...
- Page 548 To delete a member … click OK when the system asks you to confirm your delete action. STARPLUS STSe - Programming & Operations Manual August 2005...
- Page 549 MAILBOX LENGTH - maximum digits = 7 / default = 3 EXTENSION LENGTH - maximum digits = 7 / default = 3 PASSWORD LENGTH - maximum characters = 9 / default = 4 STARPLUS STSe - Programming & Operations Manual August 2005...
- Page 550 Since the keys are sent for all voice notifications, some users may find this a nuisance, and the recommended setting is “blank” . STARPLUS STSe - Programming & Operations Manual August 2005...
- Page 551 Default = 5 SINGLE DIGIT TIMEOUT, secs - Length of time that a caller can press a digit before STSe assumes the digit is being repeated. Default = 2 STARPLUS STSe - Programming & Operations Manual August 2005...
- Page 552 This wizard interface is used to check the current INI and database settings to make sure they remain consistent. First run the wizard in “Report” mode and review the modifications indicated. Then run the wizard in “Fix” mode to actually apply the changes. STARPLUS STSe - Programming & Operations Manual August 2005...
- Page 553 Double-click on File Manager. When the window displays, first click on the specified file. Then go to: File>File Transfer>Get File. After the requested file is downloaded, you can send it to Technical Support for review. STARPLUS STSe - Programming & Operations Manual August 2005...
-
Page 554: Programming System Functions Via Telephone
4. Enter the desired menu number, followed by [#]. Default menus are 100-179. 5. Select the desired action, and press [#] when finished. [1] to hear greeting [2] to re-record [3] to delete STARPLUS STSe - Programming & Operations Manual August 2005... - Page 555 Mailbox Administration. -or- b. To change password, enter the new password followed by [#]. After the system repeats the new password, press [#] to confirm. You will return to Mailbox Administration. STARPLUS STSe - Programming & Operations Manual August 2005...
- Page 556 3. Press [6] to delete a mailbox. 4. Enter the mailbox number to delete followed by [#]. 5. After the system repeats the mailbox number you selected, press [#] to confirm. You will return to Mailbox Administration. STARPLUS STSe - Programming & Operations Manual August 2005...
- Page 557 The system will present these options: [1] listen to a directory of members in the list [2] add members to the distribution list [3] delete members from the distribution list [#] return to the Administration menu STARPLUS STSe - Programming & Operations Manual August 2005...
- Page 558 [#] to confirm. 5. To delete a broadcast message, enter the desired message number and press [#] to confirm. 6. Press [#] to accept the delete action. The system returns to Broadcast Administration. STARPLUS STSe - Programming & Operations Manual August 2005...
- Page 559 1. At the Main Menu, press [7] to access the Administrator functions. 2. Press [8] to select System Administration. 3. When prompted, press [4]. The system will automatically reset itself, and you will return to System Administration. STARPLUS STSe - Programming & Operations Manual August 2005...
- Page 560 Set Call Hold - Press [2] Set Both - Press [3] Call transfers to the mailbox or extension of the person calling in (If transfer is Supervised or Immediate Forward, then select where to forward call.) STARPLUS STSe - Programming & Operations Manual August 2005...
-
Page 561: Voice Prompts
Pl e a s e co n t i n u e to h o l d. . . system must place a caller AAHOLD.9 on hold, if selected in COS. STARPLUS STSe - Programming & Operations Manual August 2005... -
Page 562: System Maintenance
For example … if you run a mailbox settings report, the mailbox range used in that report appears when you run a different report with a mailbox range criterion. STARPLUS STSe - Programming & Operations Manual August 2005... - Page 563 Total Trunk Access program. Duration between the caller's initial connection, and subsequent hang-up after leaving a message or time required for mailbox owner to retrieve messages STARPLUS STSe - Programming & Operations Manual August 2005...
- Page 564 The Notification activity report may be sorted by username, Time of day the notification was executed extension, or mailbox. Number of notification attempts Line number where notification went out Number of times a caller can initiate an invalid option STARPLUS STSe - Programming & Operations Manual August 2005...
- Page 565 Associated extension number The Mailbox Settings Detail report may be sorted by username, Mailbox owner's name extension, or mailbox. Mailbox state Class of service of mailbox owner Group (Department) Notification state Password STARPLUS STSe - Programming & Operations Manual August 2005...
- Page 566 (refer to You can easily determine how the key actions of your menus ACTIONS” on page D-27 for more are configured. information) Voice mail and Auto-Attendant settings, including notification rules STARPLUS STSe - Programming & Operations Manual August 2005...
-
Page 567: Troubleshooting
This is a comprehensive report that lists all current system lists which makes it a powerful evaluation and supervisory tool for Members’ extension numbers maintaining the voice mail system. Members’ names STARPLUS STSe - Programming & Operations Manual August 2005... - Page 568 Review this report to check on daily the voice mail system and by line number. activity. This report should not be confused with the Error Log. There are instances, however, when both are used together for diagnostic purposes. STARPLUS STSe - Programming & Operations Manual August 2005...
- Page 569 It can help determine if messages are being stored too long or if Total number of saved messages the voice mail system resources are being monopolized by any one user. Total time for all messages Total occupied disk space per owner STARPLUS STSe - Programming & Operations Manual August 2005...
- Page 570 This report is another tool that the system administrator can use to analyze and control the proper distribution of voice mail Type of mailbox greeting system resources. Total recorded time and file size STARPLUS STSe - Programming & Operations Manual August 2005...
- Page 571 Registry Variables IMPORTANT: Before attempting to change the Registry Settings for your STSe system … Contact Vodavi Technical Support for assistance. The Registry is a database of settings that controls how the voice mail system operates. By making changes to settings in the Registry, you can affect how the system will perform.
-
Page 572: Troubleshooting
10. Once the system has rebooted, test the new device. If new changes need to be made, make sure you re-run the "ewfmgr c: -commit" command to make them permanent before rebooting. For more information on managing devices on in-skins, see the FAQ on device management. STARPLUS STSe - Programming & Operations Manual August 2005... - Page 573 2004.06.30 15:01:20 Checking for updates 2004.06.30 15:01:22 Starting DigiTalk drivers 2004.06.30 15:01:24 Registering all components 2004.06.30 15:01:26 Reindexing data files 2004.06.30 15:01:37 Creating folders and configuring IP 2004.06.30 15:02:21 Starting PathFinder 2004.06.30 15:02:22 Starting DataServer STARPLUS STSe - Programming & Operations Manual August 2005...
-
Page 574: How To Use The Voice Mail System
Send a voice message. » Confirm a selection (allows you to change an entry). [9] Key Pressing the [9] key will hang up or disconnect your phone from the voice mail system. STARPLUS STSe - Programming & Operations Manual August 2005... -
Page 575: Getting Started
2. When you hear your mailbox greeting, press [ ]. 3. Enter your password. The system will then tell you how many new and saved messages you have, and then play the Main Mailbox Menu. STARPLUS STSe - Programming & Operations Manual August 2005... -
Page 576: Mailbox Options
The following drawing shows the menu structure for voice messaging. MAIN MENU Listen to Send a Extended Edit Personal Transfer to Messages Message Options Options Mlbx or Ext Figure D-1: Hard Drive-based Mailbox Options -- Main Menu STARPLUS STSe - Programming & Operations Manual August 2005... - Page 577 Hear Date & Time If you hang up without saving or deleting, your messages will automatically be saved in the state they originated when you accessed the mailbox. STARPLUS STSe - Programming & Operations Manual August 2005...
- Page 578 [6] for additional send options [1] Private [2] Urgent [3] Cancel [4] Confirmation [1] Certified [2] Notification of non-delivery [5] Future Delivery Enter MM:DD:HH:MM and press one of the following options: [1] AM [2] PM STARPLUS STSe - Programming & Operations Manual August 2005...
-
Page 579: Mailbox Options
[2] Turn Greeting On [4] Forward to a mailbox [5] Forward to an extension [6] Forward to a menu [7] Forward to a module [8] Mailbox off [#] Return to previous menu STARPLUS STSe - Programming & Operations Manual August 2005... - Page 580 1. From the Main Menu, press [8] for Personal Options, then press [8] for Other options. 2. Press [3] for Distribution List. 3. Press [2] to create a list. 4. Enter the list number [0-9]. 5. Enter [#] to confirm STARPLUS STSe - Programming & Operations Manual August 2005...
- Page 581 [1] to replay messages [2] to reply to owner [3] to play next message [8] to timestamp The system automatically deletes guest messages. The Guest Mailbox owner cannot save or forward the message. STARPLUS STSe - Programming & Operations Manual August 2005...
- Page 582 D-64 User Operations Hard Drive-Based Voice Mail STARPLUS STSe - Programming & Operations Manual August 2005...
- Page 583 Use Customer Database Worksheets to help keep track of the STSe system programming changes made for each individual system. STARPLUS STSe - Programming & Operations Manual August 2005...
- Page 584 N O T E S » » » » » » » » » » » » » »...
-
Page 585: Introduction
Introduction The STSe system is programmed to meet each customer’s individual needs. All programming is done at any 24-button Vodavi telephone as the programming station or through an ASCII terminal or PC. The digital display model is required for programming. - Page 586 FLEX 9 FLEX 21 FLEX 10 FLEX 22 FLEX 11 FLEX 23 FLEX 12 FLEX 24 TRANS MUTE ON-OFF FLASH ‘ HOLD HELP adm> Figure E-1: Data Terminal Program Codes Cross Reference STARPLUS STSe - Programming & Operations Manual August 2005...
- Page 587 FLEX 23 FLEX 24 FLEX 22 FLEX 23 FLEX 24 FLEX 26 FLEX 27 FLEX 25 FLEX 30 FLEX 28 FLEX 29 Figure E-2: Programming Button Mapping (30- & 24-Button Mapping) STARPLUS STSe - Programming & Operations Manual August 2005...
-
Page 588: Program Mode Entry (Data Terminal Or Pc)
2. Turn the power off and on to initialize the system database to the default. 3. Once database is initialized (phone displays the station number), place Switch #8 in the OFF position to protect the database. STARPLUS STSe - Programming & Operations Manual August 2005... -
Page 589: Database Programming Worksheets
Connection PC Side (DB-9) Figure E-3: KSU to PC Connection Configuration Then load a communication software package (e.g., Hyperterminal) into the PC and complete the following steps to reconfigure the system. STARPLUS STSe - Programming & Operations Manual August 2005... - Page 590 5. On the tool bar, click <Transfer> and select Send File. 6. Change Protocol setting to XMODEM. 7. Click <Browse> to locate database file; double-click on the filename. 8. Click <Send>. Adm> prompt displays when file transfer is complete. STARPLUS STSe - Programming & Operations Manual August 2005...
- Page 591 5. On the tool bar, click <Transfer> and select Receive File. 6. Change Receive Protocol setting to XMODEM, and click <Receive>. 7. Type database filename and click <OK>. The Adm> prompt displays when the file transfer is complete. STARPLUS STSe - Programming & Operations Manual August 2005...
- Page 592 4. Press <PgUp> on keyboard or locate file and select Upload. 5. Highlight XMODEM and click <OK>. 6. Type or select upload filename and click <OK>. The Adm> prompt displays when the file transfer is complete. STARPLUS STSe - Programming & Operations Manual August 2005...
- Page 593 4. Press <PgDn> on keyboard or locate file and select Download. 5. Highlight XMODEM and click <OK>. 6. Type or select download filename and click <OK>. The Adm> prompt displays when the file transfer is complete. STARPLUS STSe - Programming & Operations Manual August 2005...
- Page 594 E-12 Database Upload/Download Routine Customer Database Programming STARPLUS STSe - Programming & Operations Manual August 2005...
-
Page 595: Flash Code Index
- FLASH CODE INDEX - system features programming, organized in flash code numerical sequence. - DEFAULT NUMBERING PLAN - system features and default access codes, organized in alphabetical sequence. STARPLUS STSe - Programming & Operations Manual August 2005... - Page 596 » » » » » » » N O T E S » » » » » » »...
- Page 597 SYSTEM FEATURES 1 PROGRAMMING FLASH 05 Attendant Override 3-13 Disabled Hold Preference 2-177 System External Night Ring 2-159 Disabled Executive Override Warning Tone 2-156 Enabled Page Warning Tone 2-245 Enabled Background Music 2-16 Enabled STARPLUS STSe - Programming & Operations Manual August 2005...
- Page 598 Red 120 ipm flash UCD Available/Unavailable – DSS/BLF 4-12 Red 60 ipm Dbl Wink Off Transfer CO Ringing 2-95 Red 120 ipm flash Recall CO Ringing 2-95 Red 480 ipm flutter STARPLUS STSe - Programming & Operations Manual August 2005...
- Page 599 Port #3 (optional modem - baud auto- 2-19 None negotiated) ACCESS CODES FLASH 20 DISA Access Code 2-129 Database Admin Password 2-106 3226 STATION MESSAGE DETAIL RECORDING FLASH 21 SMDR Enable/Disable 2-288 STARPLUS STSe - Programming & Operations Manual August 2005...
- Page 600 2-11 None 2-75 CO LINE GROUP QUEUING FLASH 39 1-24 Enabled CO LINE ATTRIBUTES PAGE A PROGRAMMING FLASH 40 Btn 19 DTMF/Dial Pulse Programming 2-71 Page A DTMF CO/PBX Programming 2-57 STARPLUS STSe - Programming & Operations Manual August 2005...
- Page 601 Preset Call Forward Special Destination 2-39 None 2-160 Fax Detect Enable/Disable Disabled Scroll to next CO Line Scroll to previous CO Line Return to Flash 40 “Select a CO Line Range” Display STARPLUS STSe - Programming & Operations Manual August 2005...
- Page 602 Preset Forward Night Destination 2-118 None Preset Forward Special Destination 2-118 None Preset Forward VMID 2-119 None Preset Forward Day Timer 2-120 10 sec MOH Channel 2-121 None Universal Day Answer 2-122 None STARPLUS STSe - Programming & Operations Manual August 2005...
- Page 603 2-203 Maximum TEI ID Request 2-204 Maximum XID Retransmission 2-204 3 sec T-200 2-204 01 sec Minimum TEI ID Check Message 2-205 01 sec Minimum TEI ID Request 2-205 02 sec STARPLUS STSe - Programming & Operations Manual August 2005...
- Page 604 Privacy (Per Station) 2-256 Enabled System Speed Dial Access 2-276 Enabled Line Queuing 2-91 Enabled Preferred Line Answer 2-253 Enabled Off-Hook Voice Over (OHVO) 2-238 Disabled Call Forward - Enable/Disable 2-25 Enabled STARPLUS STSe - Programming & Operations Manual August 2005...
- Page 605 Internal No Answer Forward 2-36 Page C None Internal Busy/DND Forward 2-36 None Day External No Answer Forward 2-37 None Day External Busy/DND Forward 2-37 None Day No Answer Timer 2-38 10 sec STARPLUS STSe - Programming & Operations Manual August 2005...
- Page 606 2-234 None Clear Entry 2-234 None Scroll to next Table Scroll to previous Table Locate a specific Table ICLID FEATURES FLASH 56 Enable/Disable NO=Disabled Name in Display YES=phone number in display STARPLUS STSe - Programming & Operations Manual August 2005...
- Page 607 Voice Mail In-Band Signaling (Table 0) 2-351 Pre=P7 Suf=None (Table 1) 2-351 Pre=P7 Suf=* (Tables 2-6) 2-351 None (Table 7) 2-351 Pre=P7; Suf=2 (one-touch record) Voice Mail Disconnect Table 2-353 None STARPLUS STSe - Programming & Operations Manual August 2005...
- Page 608 FLASH 80 Initialize System Parameters 2-292 Default Initialize CO Line Attributes 2-68 Default Initialize Station Attributes 2-280 Default Initialize CO Port Assignments / Codes 2-98 Default Initialize Exception Tables 2-326 Default STARPLUS STSe - Programming & Operations Manual August 2005...
- Page 609 2-344 Default 2-128 Print DID-TIE Parameters Default Print Verified Account Codes 2-13 Default Print ISDN Parameters 2-210 Default LOAD DATABASE ROUTINE FLASH 86 Upload Database PC Only Download Database PC Only STARPLUS STSe - Programming & Operations Manual August 2005...
-
Page 610: Default Numbering Plan
Call Park Pickup - System (location 1-8 & 9-14) #430-#437 & #424-#429 2-44 Call Pickup (requires button) 2-49 Caller ID Display (Answered Calls) A-14 Caller ID Display (Unanswered Calls) A-15 Caller ID Name/Number (requires button) STARPLUS STSe - Programming & Operations Manual August 2005... - Page 611 Page - External Zone 760 or 761 2-242 Page - Internal Zones 1-20, All 701-720, 721 2-242 Page - Meet Me (Answer) 2-244 Personal Messages 633+[ZZ] 2-248 Release Button (requires button) 3-24 STARPLUS STSe - Programming & Operations Manual August 2005...
- Page 612 MMMM = 2- to 4-digit Mailbox Number ZZ = Personalized Messages NNN = CO Line Group Access Code of group to be forwarded (801-823 = CO Group 1-23, 824 = All CO Groups) STARPLUS STSe - Programming & Operations Manual August 2005...
- Page 613 Speed Dial - System Storing 3-25 Station 2-35 Station Assignment 3-15 Preset Forward Timer (Incoming Call to a Unavailable (Alternate Position) 3-16 Destination) 2-42 Auto Call Back - BLF Flash Rate 2-22 Station 2-25 STARPLUS STSe - Programming & Operations Manual August 2005...
- Page 614 Call Transfer 2-53 Connect Request 2-208 Direction 2-97 Cordless Key Telephone Unit Feature Button 2- Flexible Port Assignment 2-66 Line CTI 2-212 Access 2-67 Custom Messages 3-7 Attributes 2-68 Initialize 2-68 Print 2-70 STARPLUS STSe - Programming & Operations Manual August 2005...
- Page 615 Warning Tone 2-156 Directed Call Pickup 2-49 Executive/Secretary Pairs 2-158 Directory Dial Table Parameters External Initialize 2-138 Day Ring 2-159 Print 2-139 Night Ring 2-159 Directory Dialing 2-134 Directory List Programming 3-9 STARPLUS STSe - Programming & Operations Manual August 2005...
- Page 616 Verified Account Code Table 2-13 Hunting Assignment Voice Mail Group Parameters 2-343 Pilot 2-180 Insert/Delete Table (LCR) B-10 Pilot All Ring 2-180 Intercom Station 2-180 Buttons 2-185 HyperTerminal Calling 2-187 Downloading Database E-9 STARPLUS STSe - Programming & Operations Manual August 2005...
- Page 617 Loop and Pool Buttons 2-85 Set-Up Timer 2-207 Loop Supervision Programming T-200 2-204 CO Line 2-88 ISDN/VoIP Parameters CO Line - Forced Disconnect 2-89 Initialize 2-209 SLT 2-89 Print 2-210 Loopback 2-201 Keyset Mode 2-212 STARPLUS STSe - Programming & Operations Manual August 2005...
- Page 618 Stations 2-35 Night Class of Service (COS) 2-236 PRI 7/11 Digit Number Plan 2-200 Night Ringing Assignments 2-237 Primary Rate Interface (PRI) CO Type 2-197 Universal Night Answer (UNA) 2-237 Print STARPLUS STSe - Programming & Operations Manual August 2005...
- Page 619 Remote Access - System 2-276 Administration 2-261 Station 2-275 System Monitor And Maintenance 2-262 System Storing 3-25 Reseize Timer 2-83 Station Restart Request Timer 2-209 Attributes 2-280 Ring Detect Timer 2-99 STARPLUS STSe - Programming & Operations Manual August 2005...
- Page 620 Frame Slip Alarm 2-302 Primary Recorded Announcement 4-9 Major Alarm 2-304 Recorded Announcement Tables 4-10, C-5, Minor Alarm 2-304 Red Alarm 2-301 Recorded Announcements 4-9 Time Period 2-305 Ring Timer 4-11 Yellow Alarm 2-301 STARPLUS STSe - Programming & Operations Manual August 2005...
- Page 621 System Numbering Plan C-21 Your Temp Greeting C-50 Version Number C-27 Message Options C-45 Programming Devices for Flash- Delete a Message C-46 based Voice Mail System C-6 Forward a Copy to Another STARPLUS STSe - Programming & Operations Manual August 2005...
- Page 622 VM Transfer with ID Digits 2-337 VMID Station Numbers 2-337 Auto Attendant Options D-42 Voice Mail System Message Wait Indications - Analog 2-354 Broadcast Messages D-40 Volume Control 2-355 Default System Prompts D-43 STARPLUS STSe - Programming & Operations Manual August 2005...
-
Page 623: Starplus Stse - Programming & Operations Manual August
Index Wanderer 2-212 Weekly Schedule Table (LCR) B-13 Wink Timer 2-309 Yellow Alarm 2-301 STARPLUS STSe - Programming & Operations Manual August 2005... - Page 624 Index STARPLUS STSe - Programming & Operations Manual August 2005...
Need help?
Do you have a question about the STARPLUS STSe and is the answer not in the manual?
Questions and answers