Table of Contents
Advertisement
Quick Links
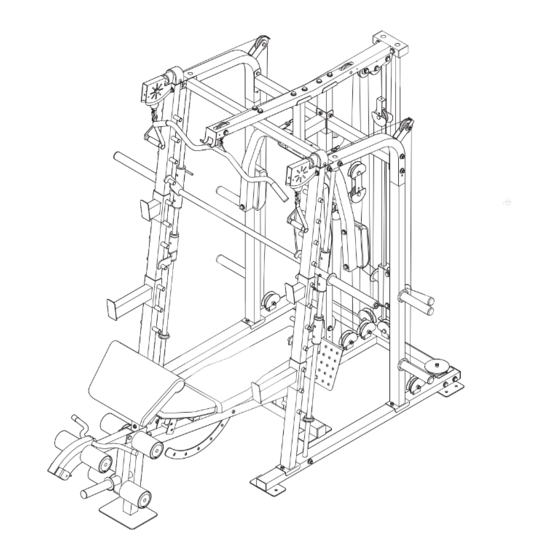
MULTIFUNTION
SMITH MACHINE
TOTAL BODY
WORKOUT SOLUTION
USER MANUAL
MACHINE
Includes:
• 11 Different height barbell rest levels
• Barbell drop safety mechanism
• Lat pull down bar
• Ankle strap for leg exercises
• Easy bar lock safety mechanism on each side
• 2 x Spring collars to secure weight plate
BENCH
Includes:
• 7 Back rest adjustment levels
• 2 Seat rest adjustment levels
• Preacher curl for isolated bicep workouts
• Mini barbell for bicep exercises
• Leg extension mechanism with weight load bar
• Thick comfort foam padding
CAUTION
READ ALL PRECAUTIONS AND
INSTRUCTIONS IN THIS MANUAL
BEFORE USING THIS EQUIPMENT.
KEEP THIS MANUAL FOR
FUTURE REFERENCE.
#21M05T035 Multifunction Smith Machine UM A4.indd 1
STRENGTH
& TONING
Visit facebook.com/trojanhealth
www.trojanhealth.co.za
www.instagram.com/trojanhealth
2021/06/24 11:27 AM
Advertisement
Table of Contents

Subscribe to Our Youtube Channel
Related Manuals for Trojan MULTIFUNTION SMITH MACHINE


Summary of Contents for Trojan MULTIFUNTION SMITH MACHINE
- Page 1 MULTIFUNTION SMITH MACHINE TOTAL BODY STRENGTH & TONING WORKOUT SOLUTION USER MANUAL MACHINE Includes: • 11 Different height barbell rest levels • Barbell drop safety mechanism • Lat pull down bar • Ankle strap for leg exercises • Easy bar lock safety mechanism on each side •...
-
Page 2: Table Of Contents
INDEX • Important Safety Instructions __________________________ • Pre Assembly Check List ___________________________ • Hardware & Tools List _____________________________ • Parts List _________________________________________ 11 • Exploded Drawing ________________________________ 13 • Assembly Steps ___________________________________ 17 • Attachments and Accessories ______________________ 49 • Cable Diagrams ___________________________________ 53 •... -
Page 3: Important Safety Instructions
IMPORTANT SAFETY INSTRUCTIONS It is the sole responsibility of the purchaser of Trojan products to read the owner’s manual, warning labels and instruct all individuals, on proper usage of the equipment. Understanding each and every warning to the fullest is important. If any of these instructions or warnings are unclear please contact Trojan Customer Services on 0861 TROJAN (0861 876526), within the Republic of South Africa. - Page 4 IMPORTANT SAFETY INSTRUCTIONS INSPECTION • Do not use or permit use of any equipment that is damaged, or has worn or broken parts. For all Trojan equipment use only replacement parts supplied by Trojan. • Always make sure that all nuts and bolts are tightened prior to each use.
-
Page 5: Pre Assembly Check List
PRE ASSEMBLY CHECK LIST Thank you for choosing the Trojan Multifunction Smith Machine. We take great pride in producing this product and hope it will provide many hours of quality exercise to make you feel better, look better and enjoy life to its fullest. -
Page 6: Hardware & Tools List
HARDWARE & TOOLS LIST INSTRUCTIONS FOR ASSEMBLY • Before you start to assemble, please check the hardware packaging to make sure all parts are included. • Each step has its own packet of bolts and nuts (look for sticker indicating what step the packet will be used for) •... - Page 7 HARDWARE & TOOLS LIST 21. M8 X 20 MM SCREW 22. WEIGHT BAR ADAPTER 23. WEIGHT BAR BUSHING 24. LEFT SPOTTER 25. RIGHT SPOTTER (2 PCS) (2 PCS) (2 PCS) (1 PC) (1 PC) 26. SPOTTER BUSHING 27. CARRIAGE BUMPER 28.
- Page 8 HARDWARE & TOOLS LIST 56. BEARING 57. SWIVEL AXLE 58. 90 MM PULLEY 59. 115 MM PULLEY 60. V-PULLEY (4 PCS) (2 PCS) (20 PCS) (3 PCS) (2 PCS) 61. SHORT METAL 62. LONG METAL 63. PLASTIC CABLE TRAP 64. CARRIAGE GUIDE 65.
- Page 9 HARDWARE & TOOLS LIST 91. SPRING COLLAR 92. M10 X 95 MM BOLT 93. M10 SPLIT WASHER 94. M8 WASHER 95. M10 X 30 MM (2 PCS) (2 PCS) (12 PCS) (4 PCS) BUTTON SCREW (2 PCS) 96. M10 X 45 MM BOLT 97.
- Page 10 HARDWARE & TOOLS LIST 126. 25 MM X 1.5 MM ROUND 127. PAD COVER 128. FOAM PAD 129. PAD TUBE 130. M8 X 42 MM BOLT CAP (2 PCS) (6 PCS) (6 PCS) (2 PCS) (4 PCS) 131. 63.5 MM X 1.5 MM 132.
-
Page 11: Parts List
PARTS LIST Description Description Base Barbell Spotter Centre Base Weight Bumper Left Upright Round Cap (48 mm) Right Upright Full Guard Weight Bar Guide Half Guard Left Support Weight Carriage Right Support Carriage Bushing Backrest Upright Ankle Strap Foot Plate Spacer (50 mm) Left Arm Spacer (24 mm) - Page 12 PARTS LIST Description Description Butterfly Cable Front Leg Low Cable Leg Lever High Cable Backrest Bracket Pulley Plate Curl Bar Spacer (6 mm) Curl Post Large Washer (M10) Curl Pad Button Bolt (M10 x 20 mm) Long Pad Tube Locknut (M8) Seat Locknut (M10) Backrest...
-
Page 13: Exploded Drawing
EXPLODED DRAWING DRAWING A 130 146 142 112 82 143 #21M05T035 Multifunction Smith Machine UM A4.indd 13 2021/06/24 11:27 AM... - Page 14 EXPLODED DRAWING DRAWING B 85 71 #21M05T035 Multifunction Smith Machine UM A4.indd 14 2021/06/24 11:27 AM...
- Page 15 EXPLODED DRAWING DRAWING C 56 57 97 93 84 79 79 40 #21M05T035 Multifunction Smith Machine UM A4.indd 15 2021/06/24 11:27 AM...
- Page 16 EXPLODED DRAWING DRAWING D 49 16 33 66 58 75 63 40 58 63 #21M05T035 Multifunction Smith Machine UM A4.indd 16 2021/06/24 11:27 AM...
-
Page 17: Assembly Steps
ASSEMBLY STEPS 1. PREPARATION • Before assembling make sure that you will have enough space around the item. • Use the supplied parts and hardware for the assembly. • Before assembling, please check whether all the required parts have been supplied as per the exploded drawings on pages 13 - 16. - Page 18 ASSEMBLY STEPS STEP 3: STEP 3 Attach a Base (1) to the Centre Base (2) with two M10 x 93 mm Bolts (97), an M10 Split Washer (93), two M10 Washers (84), and an M10 Locknut (79). Do not tighten the Button Bolts yet. Attach the other Base (not shown) to the Centre Base (2) in the same way.
- Page 19 ASSEMBLY STEPS STEP 5: Hole Hole STEP 5 Attach the Left Support (6) to the left Base (1) with the indicated two M10 x 65 mm Carriage. Bolts (83) and two M10 Locknuts (79). Do not tighten the Locknuts yet. 3.
- Page 20 ASSEMBLY STEPS ASSEMBLY STEPS STEP 7: STEP 7 Attach the Left Upright (3) to the left Base (1) with the indicated two M10 x 65 mm Carriage Bolts (83) and two M10 Locknuts (79). Do not tighten the Locknuts yet. Repeat this step with the Right Upright (not shown).
- Page 21 ASSEMBLY STEPS STEP 9: STEP 9 Orient the Left Spotter (24) as shown. Slide the Left Spotter (24) and two Carriage Bumpers (27) onto the left Weight Bar Guide (5). Then, engage the Left Spotter onto the Left Upright (3). 3.
- Page 22 ASSEMBLY STEPS STEP 11: STEP 11 Attach a Weight Bar Adapter (22) to one end of the Weight Bar (17) with an M10 x 30 mm Button Screw (95), an M10 Split Washer (93), and an M10 Large Washer (76). Repeat this step on the other end of the Weight Bar.
- Page 23 ASSEMBLY STEPS STEP 13: STEP 13 Insert an M10 x 68 mm Bolt (90) through the Left Upright (3) and the Side Top Frame (13). Hand tighten an M10 Washer (84) and an M10 Locknut (79) onto the Bolt. Repeat this step with the other Side Top Frame (13) and the right side of the weight rack.
- Page 24 ASSEMBLY STEPS STEP 15: STEP 15 Attach a Support Frame (15) to the left Side Top Frame (13) with two M10 x 93 mm Bolts (97), two M10 Washers (84), and two M10 Locknuts (79). Do not tighten the Locknuts yet. Attach the other Support Frame (15) to the right Side Top Frame (13) in the same way.
- Page 25 ASSEMBLY STEPS STEP 17: STEP 17 Apply some of the included grease to an M10 x 85 mm Bolt (144) and to the two Arm Bushings (31) in the Left Arm (10). Attach the Left Arm (10) to the Arm Frame (12) with the M10 x 85 mm Bolt (144) and an Grease M10 Locknut (79).
- Page 26 ASSEMBLY STEPS STEP 19: STEP 19 Attach the Top Frame (16) to the Carriage Guides (64) with two M10 x 90 mm Bolts (89), four M10 Washers (84), four 25 mm Spacers (55), and two M10 Locknuts (79). Do not tighten the Locknuts yet. STEP 20: STEP 20 Attach the Top Frame (16) to the Arm Frame (12)
- Page 27 ASSEMBLY STEPS STEP 21: STEP 21 Attach the Foot Plate (9) to the Centre Base (2) and the Backrest Upright (8) with four M10 x 20 mm Button Bolts (77) and four M10 Locknuts (79). See steps 3–8, 12, 14–16, and 18–20. Tighten all of the Bolts, Screws, and Locknuts used in these steps.
- Page 28 ASSEMBLY STEPS STEP 23: REAR OF THE WEIGHT RACK STEP 23 Identify the V-pulleys (60), the 90mm Pulleys (not shown), and the 115 mm Pulleys (not shown). Route the Butterfly Cable (71) over a V-pulley (60). Attach the V-pulley, a Short Metal Cable Trap (61), an M10 Washer (84), and two Full Guards (39) to the Backrest Upright (8) with an M10 x 63 mm Bolt (88) and an M10 Locknut (79).
- Page 29 ASSEMBLY STEPS STEP 25: STEP 25 REAR OF THE WEIGHT RACK Route the Butterfly Cable (71) over a V-pulley (60). Attach the V-pulley, a Short Metal Cable Trap (61), an M10 Washer (84), and two Full Guards (39) to the Backrest Upright (8) with an M10 x 63 mm Bolt (88) and an M10 Locknut (79).
- Page 30 ASSEMBLY STEPS STEP 27: REAR OF THE WEIGHT RACK STEP 27 IDENTIFY THE HIGH CABLE (73) Slide a Cable Stop (52) onto the High Cable (73). Hold an M6 Locknut (100) inside a Clip (53), and insert the High Cable (73) into the Clip and the Locknut.
- Page 31 ASSEMBLY STEPS STEP 29: REAR OF THE WEIGHT RACK STEP 29 Wrap the High Cable (73) under a 90 mm Pulley (58). Attach the 90mm Pulley, a Plastic Cable Trap (63), and two Half Guards (40) to the two 90 mm Pulley Plates (74) with an M10 x 50 mm Bolt (104) and an M10 Locknut (79).
- Page 32 ASSEMBLY STEPS STEP 31: STEP 31 REAR OF THE WEIGHT RACK Wrap the High Cable (73) over a 90 mm Pulley (58). Attach the 90 mm Pulley to the Top Frame (16) with an M10 x 45 mm Bolt (96) and an M10 Locknut (79).
- Page 33 ASSEMBLY STEPS STEP 33: STEP 33 REAR OF THE WEIGHT RACK IDENTIFY THE LOW CABLE (72) Attach a Cable Stop (52), a Clip (53), and an M6 Locknut (100) to the Low Cable (72) as described in step 27. Make sure that at least two threads of the Low Cable show past the Locknut.
- Page 34 ASSEMBLY STEPS STEP 35: REAR OF THE WEIGHT RACK STEP 35 Route the Low Cable (72) under a 90 mm Pulley (58). Attach the 90 mm Pulley and two Half Guards (40) to the Centre Base (2) with an M10 x 45 mm Bolt (96) and an M10 Locknut (79).
- Page 35 ASSEMBLY STEPS STEP 37: REAR OF THE WEIGHT RACK STEP 37 Route the Low Cable (72) under a 90 mm Pulley (58). Attach the 90 mm Pulley and two Half Guards (40) to the Centre Base (2) with an M10 x 45 mm Bolt (96) and an M10 Locknut (79).
- Page 36 ASSEMBLY STEPS STEP 39: STEP 39 REAR OF THE WEIGHT RACK Attach the Low Cable (72) to the U-bracket (47) with an M6 Washer (86) and an M6 Locknut (100). See the inset drawing. Do not overtighten the Locknut; it should be threaded onto the end of the Low Cable so that only two threads are showing below the Locknut.
- Page 37 ASSEMBLY STEPS STEP 41: STEP 41 REAR OF THE WEIGHT RACK Route the Long Cable ( ) over a 90 mm Pulley (58). Attach the 90 mm Pulley and a Plastic Cable Trap (63) to the left Side Top Frame (13) with an M10 x 50 mm Bolt (104) and an M10 Locknut (79).
- Page 38 ASSEMBLY STEPS STEP 43: STEP 43 REAR OF THE WEIGHT RACK Route the Long Cable (54) around a 115 mm Pulley (59). Attach the 115 mm Pulley, a Long Metal Cable Trap (62), an M10 Washer (84), and a Large Full Guard (103) to the Centre Base (2) with an M10 x 75 mm Button Bolt (102) and an M10 Locknut (79).
- Page 39 ASSEMBLY STEPS STEP 45: STEP 45 REAR OF THE WEIGHT RACK Route the Long Cable (54) over a 90 mm Pulley (58). Attach the 90mm Pulley, a Plastic Cable Trap (63), and two Half Guards (40) to the lower hole of the U-bracket (47) with an M10 x 50 mm Bolt (104) and an M10 Locknut (79).
- Page 40 ASSEMBLY STEPS STEP 47: REAR OF THE WEIGHT RACK STEP 47 Route the Long Cable (54) around a 115 mm Pulley (59). Attach the 115 mm Pulley, a Long Metal Cable Trap (62), an M10 Washer (84), and a Large Full Guard (103) to the Centre Base (2) with an M10 x 75 mm Button Bolt (102) and an M10 Locknut (79).
- Page 41 ASSEMBLY STEPS STEP 49: REAR OF THE WEIGHT RACK STEP 49 Route the Long Cable (54) over a 90 mm Pulley (58). Attach the 90 mm Pulley and a Plastic Cable Trap (63) to the right Side Top Frame (13) with an M10 x 50 mm Bolt (104) and an M10 Locknut (79).
- Page 42 ASSEMBLY STEPS STEP 51: STEP 51 REAR OF THE WEIGHT RACK Attach a Cable Stop (52), a Clip (53), and an M6 Locknut (100) to the Long Cable (54) as described in step 27. Make sure that at least two threads of the Long Cable show past the Locknut.
- Page 43 ASSEMBLY STEPS STEP 54: STEP 54 Slide a Weight Bumper (37) onto each storage tube on the Left Support (6). Make sure that the flat edge of each Weight Bumper is facing away from the Left Support. 2. Slide a Weight Bumper (37) onto each storage tube the Right Support (not shown).
- Page 44 ASSEMBLY STEPS STEP 56: STEP 56 Attach two Stabiliser Feet (50) to the Bench Stabiliser (108) with four M4 x 19 mm Self-tapping Screws (82). STEP 57: STEP 57 Attach the Bench Stabiliser (108) to the Bench Frame (107) with two M8 x 76 mm Carriage Bolts (143) and two M8 Locknuts (78).
- Page 45 ASSEMBLY STEPS STEP 59: STEP 59 Apply grease to an M10 x 81 mm Bolt (106). Attach the Leg Lever (110) to the Front Leg (109) with the M10 x 81 mm Bolt (106) and an M10 Grease Grease Locknut (79). Do not overtighten the Locknut;...
- Page 46 ASSEMBLY STEPS STEP 62: STEP 62 Attach the Seat (116) to the Seat Frame (122) with two M6 x 40 mm Screws (121) and two M6 Washers (86). Then, attach the other end of the Seat (116) to the Seat Frame (122) with two M6 x 20 mm Screws (34).
- Page 47 ASSEMBLY STEPS STEP 65: STEP 65 Attach the Seat Pin (123) to the Seat Frame (122) with an M4 x 19 mm Self-tapping Screw (82). Insert the Seat Pin into the Seat Frame and the Bench Frame (107). 3. See step 60. Tighten the M8 Locknuts (78). 4.
- Page 48 ASSEMBLY STEPS STEP 68: STEP 68 Attach the Curl Bumper (141) to the Curl Bar (112) with an M4 x 19 mm Self-tapping Screw (82). Attach the Curl Pin (142) to the Curl Bar (112) with an M4 x 19 mm Self-tapping Screw (82). ATTENTION 1.
-
Page 49: Attachments And Accessories
ADJUSTMENTS AND ACCESSORIES ATTACHING ACCESSORIES: To use a Handle (67), attach the Handle to the Clip (53) on the end of any cable. The other accessories can be attached to the cables in the same way. For some exercises, the Chain (not shown) should be attached between the Clip (53) and the accessory with the Cable Clip (not shown). - Page 50 ADJUSTMENTS AND ACCESSORIES ADJUSTING THE SPOTTERS: Before performing an exercise that uses the Weight Bar (17), disengage the Spotters (24, 25) from the Uprights (3, 4) and move them to the lowest height to which you want the Weight Bar to move.
- Page 51 ADJUSTMENTS AND ACCESSORIES ADDING WEIGHT: Slide the desired amount of weight (not included) onto the Weight Carriage (41), the Weight Bar (17), the Leg Lever (110), or your barbell (not included). Secure the weights with the Spring Collars (91). Store unused weight on the storage tubes on the Supports (6, 7).
- Page 52 ADJUSTMENTS AND ACCESSORIES ADJUSTING THE SEAT: Hold the Seat (116) with one hand and disengage the Seat Pin (123) from the Seat Frame (122). Move the Seat to the desired position and re-engage the Seat Pin into the Seat Frame and the Bench Frame (107).
-
Page 53: Cable Diagrams
CABLE DIAGRAMS The diagram below shows the correct route of each cable. The numbers in each drawing show the correct route of that cable. Use the diagram to make sure that each cable is correctly routed. If a cable is not correctly routed, the weight bench will not function properly and damage may occur. - Page 54 CABLE DIAGRAMS HIGH CABLE (73) Length: 4.13 metres LOW CABLE (72) Length: 7.47 metres #21M05T035 Multifunction Smith Machine UM A4.indd 54 2021/06/24 11:28 AM...
-
Page 55: Fitness Tips & Techniques
MUSCLE CHART The exercise routine that is performed on the Trojan Multifunction Smith Machine will develop your whole body. The targeted muscle groups are the chest, shoulders, back, legs and arms. It will also condition the circulatory system and provide a good aerobic workout. -
Page 56: Conditioning Guidelines
CONDITIONING GUIDELINES How you begin your exercise program depends on your physical condition. If you have been inactive for several years, or are severely overweight, you must start slowly and increase your time on the equipment, a few minutes per workout. Initially, you may be able to exercise only for a few minutes in your target zone, however, your aerobic fitness will improve over the next 6 to 8 weeks. -
Page 57: Warm Up & Cool Down
WARM UP & COOL DOWN WORKOUT GUIDELINES Each workout should include the following 3 parts: 1. A WARM-UP: 5 to 10 minutes of stretching and light exercise. A proper warm-up increases your body temperature, heart rate, and circulation in preparation for exercise. 2. -
Page 58: Maintenance
Do not overtighten the cables. If a cable tends to slip off the pulleys often, the cable may have become twisted. Remove the cable and reinstall it. If a cable needs to be replaced, contact the Trojan Call Centre on 0861 876 526. #21M05T035 Multifunction Smith Machine UM A4.indd 58... -
Page 59: Year Limited Warranty
The Consumer does not need to return the product to the store. The Consumer should call the Trojan Call Centre on 0861 876 526. Customers residing outside South Africa can contact us on +27 10 206 4405 and the call centre will advise of the procedure. -
Page 60: Repairs Procedure
Do not return the product to the store. Call the Trojan Call Centre on 0861 876 526 to log the faulty product (under warranty or out of warranty). Customers residing outside South Africa can contact us on +27 10 206 4405.
Need help?
Do you have a question about the MULTIFUNTION SMITH MACHINE and is the answer not in the manual?
Questions and answers