Quantum SuperLoader 3 User Manual
Quantum superloader 3: user guide
Hide thumbs
Also See for SuperLoader 3:
- User manual (210 pages) ,
- Quick start manual (18 pages) ,
- Manual (12 pages)
Table of Contents
Advertisement
Advertisement
Table of Contents
Troubleshooting

Related Manuals for Quantum SuperLoader 3


Summary of Contents for Quantum SuperLoader 3
-
Page 2: Copyright Statement
TRADEMARK STATEMENT Quantum and the Quantum logo are trademarks of Quantum Corporation, registered in the U.S.A. and other countries. SuperLoader, DLTtape, and Super DLTtape are trademarks of Quantum Corporation. Products mentioned herein are for identification purposes only and may be trademarks or registered trademarks of their respective companies. -
Page 3: Table Of Contents
Preface Chapter 1 Introduction General Description ... 1 Front View... 3 Mailslot... 3 LCD... 4 Function Keys... 4 Status LEDs... 5 Power Switch... 5 Magazines ... 5 Rear View ... 7 Cooling Fans ... 8 AC Power... 8 Ethernet Connection... 8 SCSI Connection... - Page 4 Contents Chapter 2 Installation and Configuration Preparation ...13 SCSI Bus Requirements ...14 Accessories ...14 Installation Location Requirements...15 Rack Mounting the SuperLoader ...16 General Preparation for Rack Mount Installation ...19 Stationary Rack Mount Installation...19 Making the SCSI Connection...26 Powering On the SuperLoader...28 Configuration...30 Setting SCSI ID...32 Setting Ethernet ...34...
- Page 5 Tape Drive Cleaning Methods ... 65 Manual Cleaning (DLT/SDLT Only)... 65 Auto Clean ... 66 Software... 67 Chapter 4 SuperLoader Operation Front Panel Components ... 70 Function Keys... 70 LEDs... 70 LCD... 71 Front Panel Menus... 71 Commands Menu ... 74 Status Menu ...
- Page 6 System Updates Page...127 Perform System Updates ...127 Chapter 5 Troubleshooting Before Contacting Quantum Support...129 Contacting Quantum Technical Support ...134 Returning Units for Repair...135 Return Authorization Process ...135 Policies and Procedures ...136 Repair Process...138 How to Return the SuperLoader for Service ...139 To Pack the SuperLoader ...142...
- Page 7 SuperLoader Error Logs... 146 Screen Display of Hard Error Logs ... 146 Hard Error Log Display ... 153 Hard Error Log Fields ... 155 Error Code Field Description ... 155 Error Code Listing ... 158 Tape Drive Error Logs... 165 Error Log Display ...
- Page 8 Contents A507/A508: Directory Read Failure/Directory Write Failure ...212 Cause...218 Suggested Actions...219 Chapter 6 Diagnostics POST...221 POST Descriptions ...222 Perform a POST ...222 Interpret the POST Results ...223 Diagnostic Tests...223 Set the Security ...223 Stop a Diagnostic Test ...224 Front Panel Diagnostic Tests ...225 On-board Remote Management Diagnostic Tests...226 Diagnostics Using On-board Remote Management ...227 Appendix A...
- Page 9 Appendix B Specifications SuperLoader Physical Specifications ... 244 SuperLoader Performance Specifications... 244 SuperLoader Power Specifications... 246 SuperLoader Environmental Specifications... 247 SuperLoader Vibration Specifications ... 248 SuperLoader Shock Specifications... 248 SuperLoader Product Safety/Compliance... 249 SuperLoader Acoustic and Noise Limits... 249 SCSI Specifications... 250 SCSI Cable and Terminator Requirements ...
- Page 10 Contents SuperLoader User’s Guide...
- Page 11 Figure 1 LCD Front Panel Screen ...xxii Figure 2 On-board Remote Management Screen ...xxiii Figure 3 SuperLoader Front View ... 3 Figure 4 Function Keys ... 4 Figure 5 Magazine (left and right sides)... 6 Figure 6 Magazine Blank ... 7 Figure 7 SuperLoader DLT Rear View ...
- Page 12 Figures Figure 18 Figure 19 Figure 20 Figure 21 Figure 22 Figure 23 Figure 24 Figure 25 Figure 26 Figure 27 Figure 28 Figure 29 Figure 30 Figure 31 Figure 32 Figure 33 Figure 34 Figure 35 Figure 36 Figure 37 Figure 38 Figure 39 Figure 40...
- Page 13 Figure 46 Password Screen... 53 Figure 47 DLTtape IV and Super DLTtape I Cartridges ... 57 Figure 48 SDLT II Cartridge ... 58 Figure 49 Ultrium Format Tape Cartridge ... 58 Figure 50 Write-Protect Switch (SDLT Shown) ... 59 Figure 51 Magazine Map ...
- Page 14 Figures Figure 75 Figure 76 Figure 77 Figure 78 Figure 79 Figure 80 Figure 81 Figure 82 Figure 83 Figure 84 Figure 85 Figure 86 Figure 87 Figure 88 Figure 89 Figure 90 Figure 91 Figure 92 Figure 93 Figure 94 Figure 95 Figure 96 Figure 97...
- Page 15 Figure 102 Example DLT1 Tape Drive Error Log ... 166 Figure 103 SCSI Check Condition Error Log ... 168 Figure 104 Bugcheck Error Log... 173 Figure 105 Event Error Log ... 175 Figure 106 Read Error Block Descriptor ... 176 Figure 107 Write Error Block Descriptor ...
- Page 16 Figures SuperLoader User’s Guide...
- Page 17 Table 1 LCD Panel Function Keys ... 5 Table 2 Location Criteria ... 15 Table 3 UL Criteria... 16 Table 4 Write-Protect Switch Positions ... 60 Table 5 LED Display ... 70 Table 6 SuperLoader Status ... 91 Table 7 Firmware Version Description ...
- Page 18 Tables Table 18 Table 19 Table 20 Table 21 Table 22 Table 23 Table 24 Table 25 Table 26 Table 27 Table 28 Table 29 Table 30 Table 31 Table 32 Table 33 Table 34 Table 35 Table 36 Table 37 Table 38 Table 39 Table 40...
-
Page 19: Preface
Please order the appropriate part numbers when replacing these items. Refer to the appropriate Quick Start reference guide for instructions on Customer-Replaceable Units (see Quantum Documentation on page xxi). SuperLoader User’s Guide Preface... - Page 20 Preface The purpose of this manual is to provide end users with the following Purpose information: • SuperLoader description and specifications • SuperLoader installation and configuration • Tape cartridge description and general overview • SuperLoader operation • Troubleshooting This manual is organized as follows: Document Organization •...
- Page 21 • Appendix D, Regulatory Statements required regulatory statements for the SuperLoader. Documents related to the Quantum SuperLoader are shown below: Related Documentation Related Quantum Documentation Document No. 81-81263 81-81264 81-81265 81-81266 81-81267 81-81237 - This appendix provides Document Title Document Description...
-
Page 22: Figure 1 Lcd Front Panel Screen
Preface This manual uses the following conventions to designate specific Notational elements: Conventions Note: Caution: Warning: Screen shots for the front panel LCD appear as follows: LCD Screen Shots Figure 1 LCD Front Panel Screen xxii Notes emphasize important information related to the main topic. -
Page 23: Figure 2 On-Board Remote Management Screen
Screen shots for On-board Remote Management sometimes contain callouts and appear as shown in Figure 2 On-board Remote Management Screen SCSI-2 Specification The SCSI-2 communications specification is the proposed American National Standard for information systems, dated March 9, 1990. Copies may be obtained from: Global Engineering Documents 15 Inverness Way, East... -
Page 24: Contact Information
Preface Contact Information This section provides contact information for worldwide customer support. Quantum To order documentation for the Quantum SuperLoader or other products contact: Quantum Corporation P.O. Box 57100 Irvine, CA 92619-7100 (949) 856-7800 (800) 284-5101 Technical Publications To comment on existing documentation, send e-mail to: doc-comments@quantum.com... - Page 25 North/South America Asia/Pacific Rim Europe/Middle East/Africa: Send e-mail for the Customer Support Department to: North/South America Asia/Pacific Rim Europe/Middle East/Africa: SuperLoader User’s Guide (949) 725-2176 (International Code) +61 7 3839 0955 (International Code) +44 (0) 1256 848777 www.quantum.com/askaquestion apachelp@quantum.com eurohelp@quantum.com Preface...
- Page 26 Preface xxvi SuperLoader User’s Guide...
-
Page 27: Chapter 1 Introduction
Chapter 1 Introduction This chapter describes the SuperLoader components and functionality. General Description Data backup is essential to protect irreplaceable information. Backing up data to magnetic tape is an easy, cost-efficient method used by many small and medium sized businesses. However, most enterprises have so much data that a single backup tape is not enough;... - Page 28 Chapter 1 Introduction General Description The SuperLoader contains either the DLT1, SDLT 220, SDLT 320, SDLT 600, HP LTO-1, or HP LTO-2 tape drive, and one or two magazines containing up to eight cartridges each. A single cartridge can be inserted directly via a password-protected mailslot.
-
Page 29: Front View
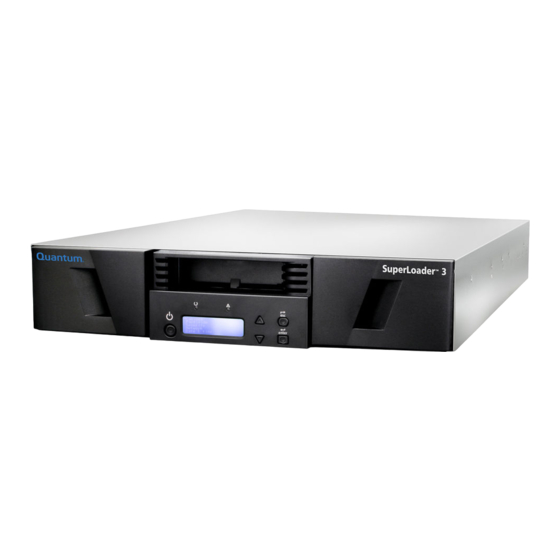
Front View The mailslot, LCD, function keys, status LEDs, power switch, and left and right magazines are visible on the front panel of the SuperLoader (see figure Figure 3 SuperLoader Front View Left magazine/blank The SuperLoader has a manual entry port, the mailslot, which you can Mailslot use to load or unload a single cartridge. -
Page 30: Chapter 1 Introduction Front View
Chapter 1 Introduction Front View The LCD allows you to use the scrolling menu to perform diagnostics and to enter commands. The function keys allow scrolling through menus to make selections as Function Keys shown in Figure 4 Function Keys figure 4. -
Page 31: Status Leds
Table 1 LCD Panel Function Key Function Keys Enter Escape The status LEDs show SuperLoader and drive status information. The Status LEDs green LED shows fault status information. A solid and a blinking The power switch is a soft key, which means that if the SuperLoader is Power Switch moving any cartridges when you press the power switch, it finishes moving them before powering off. -
Page 32: Figure 5 Magazine (Left And Right Sides)
Chapter 1 Introduction Front View Figure 5 Magazine (left and right sides) Use one of these knobs to manually rotate the magazine when you load and unload cartridges. SuperLoader User’s Guide The SuperLoader DLT and SuperLoader LTO magazines, magazine blanks, and magazine handles are not interchangeable. -
Page 33: Rear View
Figure 6 Magazine Blank Rear View The fans and connection ports are visible on the back of the SuperLoader as illustrated in SuperLoader LTO. Figure 7 SuperLoader DLT Rear View Ethernet connection figure 7 for SuperLoader DLT, and in AC power Power supply switch cooling fan... -
Page 34: Chapter 1 Introduction Rear View
Chapter 1 Introduction Rear View Figure 8 SuperLoader LTO Rear View The SuperLoader has a system cooling fan, plus a second fan to cool the Cooling Fans power supply. These fans maintain the acceptable temperature range for the tape drive path and all internal electronics. See page 243 for details about required specifications. -
Page 35: Scsi Connection
A low-voltage differential (LVD) SCSI connection links the SuperLoader SCSI Connection to the external host server. LVD connections allow you to have more devices and longer cable lengths than single ended (SE) SCSI connections. The LVD SCSI connection uses an 0.8 mm offset Very High Density (VHD) connector. -
Page 36: Chapter 1 Introduction Internal View
Chapter 1 Introduction Internal View Figure 9 Internal View of the SuperLoader Picker with misinsertion feature and turret spreader Magazine Note: Bar code reader bay Mailslot Picker Magazine blank Due to the nature of their similarities, unless noted otherwise, these illustrations are for the SuperLoader DLT and the SuperLoader LTO. -
Page 37: Picker
The picker is the component of the SuperLoader that shuttles cartridges Picker between the drive, both magazines, and the mailslot. It has two degrees of freedom: rotation and translation. The rotation axis positions the picker platform in front of each location while the translation axis moves cartridges on and off of the picker platform. -
Page 38: Chapter 1 Introduction Supported Software
(Red Hat , SuSe , Caldera™, and TurboLinux ® ® ® Tivoli Storage Manager ® Please check with your operating system supplier and your backup software vendor to verify which version is required for this SuperLoader. SuperLoader User’s Guide ®... -
Page 39: Chapter 2 Installation And Configuration
Chapter 2 Installation and Configuration This chapter describes how to rack mount and configure the SuperLoader. Preparation Before you install your new SuperLoader, unpack it carefully and inspect it for any damage that might have occurred during shipping. The SuperLoader Quick Start Guide included in the packaging describes all the necessary information to unpack and inspect your SuperLoader correctly. -
Page 40: Installation And Configuration Preparation
Chapter 2 Installation and Configuration Preparation You must connect the SuperLoader to one of the following SCSI bus SCSI Bus types: Requirements • Wide, SCSI-2, LVD • SE SCSI bus Your SCSI host adapter card must also support the SCSI bus type used to connect the SuperLoader. -
Page 41: Installation Location Requirements
• Bar code labels The SuperLoader is designed to fit in a standard 19-inch rack using either Installation the long or short brackets (depending on the depth of the rack) or the Location optional slide rail kit. When choosing an installation location, make sure Requirements that it meets the criteria found in Table 2 Location... -
Page 42: Chapter 2 Installation And Configuration Rack Mounting The Superloader
Chapter 2 Installation and Configuration Rack Mounting the SuperLoader Table 3 UL Criteria General Hazards Elevated Operating Ambient Temperature Reduced Air Flow Mechanical Loading Circuit Overloading Reliable Earthing (Grounding) Rack Mounting the SuperLoader The SuperLoader can be rack mounted in two ways: •... - Page 43 To mount the SuperLoader on the slide rail, refer to the Note: SuperLoader Slide Rail Kit Installation Quick Start Guide shipped with the optional shelf assembly. The SuperLoader Slide Rail Kit Installation Quick Start Guide is also available on the Documentation CD or at www.Quantum.com SuperLoader User’s Guide...
-
Page 44: Figure 10 Clearance Requirements For Rack Mounting
Chapter 2 Installation and Configuration Rack Mounting the SuperLoader Figure 10 Clearance Requirements for Rack Mounting Clearance to door inside a rack 2.0” [51 mm] Minimum side clearance (both sides) 1.0” [25 mm] Minimum clearance to load a tape via the mailslot 6.0”... -
Page 45: General Preparation For Rack Mount Installation
Take the following general safety steps before beginning either rack General mount installation. Preparation for Rack Mount 1 Lower the cabinet feet. Installation 2 Extend the cabinet anti-tip device, if available. 3 Ensure that the cabinet and all rack mounted equipment have a reliable ground connection. -
Page 46: Figure 11 Required Parts For Installation
Chapter 2 Installation and Configuration Rack Mounting the SuperLoader • Figure 11 Required Parts for Installation Short SuperLoader brackets (74-60604-03) 2 Install two clip nuts, 1.75 in. (44.45 mm) apart, onto each of the four rails of the rack, making sure that you install each pair of clip nuts at exactly the same level (see The following parts shipped with the rack: •... -
Page 47: Figure 12 Installing Two Clip Nuts
Figure 12 Installing Two Clip Nuts Rail Outer covers of the rack 3 Select the long or short SuperLoader brackets (depending on the depth of the rack), and then attach them to the rear of the SuperLoader (see Chapter 2 Installation and Configuration Rail Rail figure... -
Page 48: Figure 13 Attaching Superloader Brackets
Chapter 2 Installation and Configuration Rack Mounting the SuperLoader Figure 13 Attaching SuperLoader Brackets SuperLoader (SuperLoader DLT illustrated) SuperLoader User’s Guide Screws (10-32 x 1/4 only) SuperLoader bracket... -
Page 49: Figure 14 Attaching Support Brackets
4 Using rack screws, attach a support bracket to the clip nuts on each rear rail (see Tighten the screws just enough to hold the support brackets firmly against the rail while still allowing the support bracket to be slightly shifted by hand. -
Page 50: Figure 15 Sliding Superloader Into Rack
Chapter 2 Installation and Configuration Rack Mounting the SuperLoader 5 With the help of a second installer, insert the SuperLoader into the rack so that the SuperLoader brackets slide into corresponding support brackets on the rear rails and the tabs at the front of the SuperLoader align flush with the clip nuts on the front rails (see figure Figure 15 Sliding... -
Page 51: Figure 16 Front Alignment
6 While the other installer holds the front end of the SuperLoader, secure the SuperLoader in the rack by doing the following: Figure 16 Front Alignment Figure 17 Connecting Support Brackets 7 Verify that the SuperLoader is level. Adjust as needed. Secure the front end of the SuperLoader to the rack using four rack screws (two per tab) as shown in screws just enough to secure the SuperLoader to the front rails. -
Page 52: Figure 18 Making The Scsi Connection
Chapter 2 Installation and Configuration Making the SCSI Connection 8 When the SuperLoader is level, tighten all screws securing the SuperLoader to the rack. This includes the following: • • • Making the SCSI Connection The SCSI connection allows the host computer to communicate with the SuperLoader. - Page 53 4 Install the supplied VHDCI SCSI cable to the double-stacked SCSI connector on the back of the SuperLoader/DCA and tighten the screws. You can install the SCSI cable in either port. Figure 18 Making the SCSI Connection Double-stacked SCSI connector (SuperLoader DLT) 5 If the SuperLoader is the last device on the SCSI bus, install the supplied SCSI terminator to the remaining port that is on the...
-
Page 54: Chapter 2 Installation And Configuration Powering On The Superloader
(the is pressed). Wait while the SuperLoader performs The LCD screen indicates the model The LCD screen shows the Quantum logo and a progress bar, indicating the progress of the POST The SuperLoader performs a calibration and magazine element... -
Page 55: Figure 19 Sample Idle Screen Display
Once the power-on sequence completes and the SuperLoader is ready, the LCD lists the SuperLoader options that are present and the Ready Figure 19 Sample Idle Screen Display (SuperLoader LTO illustrated) 2 When you first power on the SuperLoader, it automatically runs a POST. -
Page 56: Chapter 2 Installation And Configuration Configuration
SCSI cable is connected to the SuperLoader and host computer • No error code appears on the SuperLoader LCD If you cannot resolve the problem yourself, contact your service representative or Quantum Customer Support. IP Address on page 34. To determine the IP on page 109). Status... -
Page 57: Figure 21 Submenu For Configuration
To Disconnect Power from AC Mains: 1 Press the power switch on the front panel and hold for approximately five seconds. 2 When the LCD screen goes blank, push the AC power switch on the back of the SuperLoader to the The configuration submenu has the following options: Figure 21 Submenu SuperLoader DLT/SDLT (prior to v45) -
Page 58: Setting Scsi Id
Chapter 2 Installation and Configuration Setting SCSI ID To configure the SuperLoader, you must verify the setup of the following: • SCSI ID(s). For the SuperLoader DLT and SuperLoader SDLT, there is a single SCSI ID. For the SuperLoader LTO, there are separate SCSI IDs for the drive and the loader. -
Page 59: Figure 22 Main Menu (Lcd)
Figure 22 Main Menu (LCD) 3 On the Configuration submenu, scroll to Figure 23 Configuration Menu (LCD) DLT/SDLT 4 Scroll to the number you want to set as the SuperLoader’s SCSI ID, then press 5 Press and hold the power button on the front panel until Shutdown Please Wait LCD, then the SuperLoader shuts off. -
Page 60: Chapter 2 Installation And Configuration Setting Ethernet
Chapter 2 Installation and Configuration Setting Ethernet Setting Ethernet Ethernet is the method the SuperLoader uses to access a network. With an Ethernet connection, you can remotely access the SuperLoader over the network to which it is connected. To use the Ethernet connection, you must define the following: •... -
Page 61: Figure 25 Main Menu (Lcd)
2 On the Configuration menu, scroll to 3 On the Ethernet submenu, scroll to 4 Scroll to the LCD. 5 Press and hold the power button on the front panel until Shutdown Please Wait LCD, then the SuperLoader shuts off. 6 Press the power button again to power on the SuperLoader. -
Page 62: Figure 26 Static Ip Selection
Chapter 2 Installation and Configuration Setting Ethernet Figure 26 Static IP Selection 5 At each position of the IP address, use the up and down arrows to change the value of each digit. Press the next digit. 6 When you have advanced through all of the digits of the IP address, the SuperLoader displays 7 Press now in effect. -
Page 63: Subnet Mask
Creating a subnet mask is a method to split IP networks into a series of Subnet Mask subgroups, or subnets, to improve performance and security. To Set a Subnet Mask: 1 On the main menu, scroll to Figure 27 Main Menu (LCD) 2 On the Configuration menu, scroll to 3 On the Ethernet submenu, scroll to... -
Page 64: Ip Gateway
Chapter 2 Installation and Configuration Setting Ethernet 6 When you have advanced through all of the digits of the IP address, the SuperLoader displays 7 Press to reboot the SuperLoader. 8 Press An IP gateway is a device that converts data to the IP protocol. IP Gateway To Set an IP Gateway: 1 On the main menu, scroll to... -
Page 65: Setting The Snmp Server
4 At each position of the gateway address, use the up and down arrows to change the value of each digit. Press the next digit. 5 When you have advanced through all of the digits of the IP address, the SuperLoader displays 6 Press reboot the SuperLoader. -
Page 66: Setting The Time Server
Chapter 2 Installation and Configuration Setting Ethernet Figure 32 Set IP Server 4 At each position of the SNMP server address, use the up and down arrows to change the value of each digit. Press cursor to the next digit. 5 When you have advanced through all of the digits of the IP address, the SuperLoader displays 6 Press... -
Page 67: Figure 33 Main Menu (Lcd)
To Set a Time Server: 1 On the main menu, scroll to Figure 33 Main Menu (LCD) 2 On the Configuration menu, scroll to 3 On the Ethernet submenu, scroll to The cursor automatically appears at the first digit. Figure 34 Setting a Time Server 4 At each position of the time server address, use the up and down arrows to change the value of each digit. -
Page 68: Chapter 2 Installation And Configuration Setting The Time
Chapter 2 Installation and Configuration Setting the Time Setting the Time The system time is displayed by the On-board Remote Manager and it is used internally when logging events and errors. The system time is either regular time or power-on time. Regular time is Month/Date/Year Time, for example Nov/21/2004 19:28. -
Page 69: Figure 35 Main Menu (Lcd)
To Set the Time Zone: 1 On the main menu, scroll to Figure 35 Main Menu (LCD) 2 On the Configuration menu, scroll to 3 On the Time submenu, scroll to Time Zone screen appears, allowing you to set the hours. The cursor automatically appears at the first digit. -
Page 70: Figure 37 Setting A Time Zone (Minutes)
Chapter 2 Installation and Configuration Setting the Time Figure 37 Setting a Time Zone (Minutes) 5 Scroll to set the number of minutes’ difference between your local time and GMT, then press 6 Press To Set the Date and Time: 1 On the main menu, scroll to Figure 38 Main Menu (LCD) -
Page 71: Figure 39 Setting The Date And Time
Figure 39 Setting the Date and Time 4 The first four digits represent the current year. At each position of the year, use the up and down arrows to change the value of each digit. Press 5 The next two digits represent the current month. At each position of the month, use the up and down arrows to change the value of each digit. -
Page 72: Chapter 2 Installation And Configuration Setting The Change Mode
Chapter 2 Installation and Configuration Setting the Change Mode Setting the Change Mode You can set the SuperLoader to either control mode is Random Mode cartridge you want to use and where you want it to go. You will probably use this mode the most. -
Page 73: Sequential Mode Operations
2 On the Configuration menu, scroll to The mode options appear. A check mark appears next to the currently enabled mode. 3 Do one of the following: • • If you enable Sequential Mode under the Commands menu to operate the SuperLoader after you reboot. Operations •... -
Page 74: Figure 41 Main Menu (Lcd)
Chapter 2 Installation and Configuration Setting the Change Mode To Start Sequential Mode Operation: 1 On the main menu, scroll to Figure 41 Main Menu (LCD) 2 On the Commands menu, scroll to 3 On the Sequential Ops submenu, scroll to Moving first tape to drive To Stop Sequential Mode Operation: 1 On the main menu, scroll to... -
Page 75: Setting Security
To Resume Sequential Mode Operation: 1 On the main menu, scroll to Figure 43 Main Menu (LCD) 2 On the Commands menu, scroll to 3 On the Sequential Ops submenu, scroll to Moving next tape to drive Setting Security You can add security to the front panel by password-protecting the SuperLoader’s functionality. -
Page 76: Chapter 2 Installation And Configuration Setting Magazines
Chapter 2 Installation and Configuration Setting Magazines To Set the Security Option: 1 On the main menu, scroll to Figure 44 Main Menu (LCD) 2 On the Configuration menu, scroll to 3 On the Security submenu, scroll to after the work, the security option is on. If no check mark appears, the security option is off. -
Page 77: V20 Firmware And The Superloader Lto
The v20 autoloader firmware was written to allow ISV packages to v20 Firmware and correctly identify the configuration of LTO-based SuperLoaders. This the SuperLoader firmware release does not require changing the existing versions of the drive code. After installing v20 and configuring your SuperLoader LTO (see Setting identified properly by the leading ISV packages. -
Page 78: Chapter 2 Installation And Configuration Passwords
Chapter 2 Installation and Configuration Passwords Passwords Many operations on the SuperLoader are password-protected to ensure data integrity. You can set passwords to administrator level and to operator level. Operator-level users have access to the Commands and Status menus. Administrator-level users have access to all functionality. Note: To Set a Password: 1 On the main menu, scroll to... -
Page 79: Getting Lost Passwords
You can reset front panel passwords to the factory defaults from the On-board Remote Manager. However, if the On- board Remote Management passwords are lost, you must call Quantum Customer Support. SuperLoader User’s Guide Chapter 2 Installation and Configuration Passwords... - Page 80 Chapter 2 Installation and Configuration Passwords SuperLoader User’s Guide...
-
Page 81: Chapter 3 Tape Cartridge Use
Chapter 3 Tape Cartridge Use Your SuperLoader uses magnetic tape technology to collect, backup, and archive data. Magnetic tape is made of flexible plastic that is coated with a ferromagnetic material on one side. A read/write head in the tape drive discharges electrical impulses onto the moving ferromagnetic surface, recording data as bits of positive and negative polarity. -
Page 82: Tape Cartridges Defined
For the SDLT 220 or SDLT 320 tape drives, use Super DLTtape I cartridges. Super DLTtape I cartridges contain Super DLTtape, which provides a storage capacity of up to 110 GB (native) per cartridge in the SDLT 220, and 160 GB (native) per cartridge in the SDLT 320. The tape... -
Page 83: Figure 47 Dlttape Iv And Super Dlttape I Cartridges
For the SDLT 600 tape drive, use Super DLTtape II cartridges. Super DLTtape II provides a storage capacity of up to 300 GB (native) per cartridge in the SDLT 600. The tape shell is blue in color and has a... -
Page 84: Figure 48 Sdlt Ii Cartridge
1 or 2. Ultrium format tape cartridges (see figure 200 GB (generation 2) per cartridge. Figure 49 Ultrium Format Tape Cartridge LTO Cartridge (generation 1 and 2) 49) provide a native storage capacity of 100 GB (generation 1) or SuperLoader User’s Guide... -
Page 85: Tape Maintenance
Tape Maintenance To greatly reduce the chance of problems with your tape cartridges or damage to your tape drive, follow the guidelines as listed in the appropriate tape product manuals supplied with the cartridges. The Write-Protect Switch All DLT tape cartridges have a write-protect switch (see prevent accidental erasure of data. -
Page 86: Chapter 3 Tape Cartridge Use Tape Drive Cleaning
Chapter 3 Tape Cartridge Use Tape Drive Cleaning Table 4 protect switch position. Table 4 Write-Protect Switch Positions Write-Protect Switch Write-Protect Position Indicator Visible Write-Protected Not visible Write-Enabled Tape Drive Cleaning Your tape drive’s read/write head may need to be cleaned periodically. When cleaning is needed, the drive automatically requests cleaning. -
Page 87: Insert The Cleaning Tape
To clean your tape drive, you need to use a cleaning tape. The cleaning tape looks similar to a data tape, except the tape shell is a generally a different color, such as beige. Note: You can insert the cleaning tape by one of the following methods: Insert the Cleaning Tape •... -
Page 88: Figure 51 Magazine Map
Chapter 3 Tape Cartridge Use Tape Drive Cleaning To Insert an LTO Cleaning Tape Through the Mailslot: Note: 1 On the main menu, scroll to 2 On the Configuration submenu, select The system displays a magazine map (see you to select a location for the cleaning tape. Figure 51 Magazine 3 Scroll to the slot where you want to store the cleaning tape, then press Enter... -
Page 89: Storing The Cleaning Tape (Dlt/Sdlt Only) In A Magazine
Storing your DLT/SDLT cleaning tape in a magazine is a good practice. Storing the When you store the cleaning tape, you can use it in the following ways: Cleaning Tape (DLT/SDLT Only) in • You can use it later for manual cleaning (see a Magazine SDLT •... -
Page 90: Eject The Cleaning Tape
Chapter 3 Tape Cartridge Use Tape Drive Cleaning You need to eject the cleaning tape from the SuperLoader under the Eject the Cleaning following conditions: Tape • If you do not want to store the cleaning tape in a magazine slot after manually cleaning the tape drive (DLT/SDLT only) •... -
Page 91: Tape Drive Cleaning Methods
Tape Drive Cleaning Methods You can clean your tape drive in three ways: • Manual cleaning (DLT/SDLT only) • Auto Clean • Software If neither Auto Clean nor the backup software’s cleaning option are Manual Cleaning enabled, and the drive requires cleaning, the SuperLoader displays a (DLT/SDLT Only) cleaning message on the LCD. -
Page 92: Auto Clean
Chapter 3 Tape Cartridge Use Tape Drive Cleaning Methods 5 On the Command submenu, scroll to 6 On the Cleaning Tape submenu, scroll to press tape drive. 7 When you have finished manually cleaning the tape drive, do one of the following: •... -
Page 93: Software
Before you enable the Auto Clean option, you must designate which slot contains the cleaning cartridge and load the cleaning cartridge into that slot. If you have not done this, the SuperLoader will not allow you to enable Auto Clean. To Set Auto Clean: 1 On the main menu, scroll to 2 On the Configuration submenu, scroll to... -
Page 94: Figure 52 Media Compatibility Chart
Chapter 3 Tape Cartridge Use Tape Drive Cleaning Methods Figure 52 Media Compatibility Chart SuperLoader User’s Guide... -
Page 95: Chapter 4 Superloader Operation
SuperLoader Operation This chapter describes how to operate the SuperLoader. You can operate the SuperLoader by any of the following methods: • SuperLoader’s front panel • Ethernet On-board Remote Management • Host backup software The front panel is located on the front of the SuperLoader and must be operated manually. -
Page 96: Front Panel Components
Chapter 4 SuperLoader Operation Front Panel Components Front Panel Components The front panel includes a blue backlit LCD, four function keys ▼ up], Use the function keys to navigate through the menu and select options. Function Keys Use the up and down scroll buttons to position the cursor next to the item you want. -
Page 97: Lcd
The screen displays a scrolling menu that allows you to access information and execute commands. Note: The four menus displayed on the LCD are circular menus. That is, you can scroll through the options using either the up or down scroll buttons. Front Panel Menus The first menu on the front panel contains the top-level menu items, each of which contains submenus as shown in... -
Page 98: Chapter 4 Superloader Operation Front Panel Menus
Chapter 4 SuperLoader Operation Front Panel Menus Figure 53 SuperLoader DLT Menu Tree Structure Status Commands AutoLoader Eject Status Tape to Mail Slot Version Element Status Drive Status Right Magazine Version Left Magazine Ethernet Enter (Mail Slot) To Drive To Location Move Inventory Enter Password... -
Page 99: Figure 54 Superloader Lto Menu Tree Structure
Figure 54 SuperLoader LTO Menu Tree Structure Status Commands AutoLoader Eject Status Version Element Status Drive Status Version Ethernet Enter (Mail Slot) Flex IO Move Inventory Enter Password Log Out Sequential Ops Home Configuration SCSI ID SCSI ID Drive Tape to Mail Slot SCSI ID Loader By Barcode Ethernet... -
Page 100: Commands Menu
Chapter 4 SuperLoader Operation Front Panel Menus All the functionality accessed from the scrolling menu is password- protected. Two levels of security are built into the menu. The lower-level security is the operator level and the higher-level security is the administrator level. -
Page 101: Configuration Menu
Using the Configuration procedures. The list of procedures follows the order of the Menu menu. • Setting SCSI ID • Setting Ethernet • Setting the Time • Setting the Change Mode • Set Data Compression • Set Security Options • Updating the System Using the Diagnostics Menu... -
Page 102: Chapter 4 Superloader Operation Front Panel Functionality
Chapter 4 SuperLoader Operation Front Panel Functionality To Enter a Password: Security must be turned on before you can enter a password (see Security Options 1 On the main menu, scroll to 2 On the Commands submenu, scroll to Enter 3 On the Enter Password submenu, scroll to: •... -
Page 103: Logout
9 Press Password submenu. If you submitted an incorrect password, appears on the LCD and the row of asterisks reappears so that you can re-enter the password. When you enter a password, all password-protected functionality is available until you log out (see Logout). If you do not use the front panel for a period of time, the logo reappears on the LCD. -
Page 104: Insert A Single Cartridge
Chapter 4 SuperLoader Operation Front Panel Functionality Typically, when you first install your SuperLoader, you load your cartridges into the magazines and then load the magazines into the SuperLoader. However, you can insert and eject cartridges individually using the mailslot, or you can eject a magazine, manually load and unload cartridges, then load the magazine back into the SuperLoader. -
Page 105: Figure 56 Loading A Cartridge (Sdlt Tape Shown)
Figure 56 Loading a Cartridge (SDLT Tape Shown) 4 Once you have inserted the cartridge, the prompt appears. You have 20 seconds to press To Insert a Cartridge in a Magazine Slot: 1 On the main menu, scroll to 2 On the Commands submenu, scroll to 3 On the Enter submenu, scroll to of all the magazine slots appears. -
Page 106: Move A Single Cartridge
Chapter 4 SuperLoader Operation Front Panel Functionality 4 Scroll to the slot where you want to store the cartridge, then press Enter You have 20 seconds to load a cartridge through the mailslot before it re-locks. The SuperLoader automatically loads the cartridge into the selected slot. - Page 107 To Eject a Cartridge by Bar Code: 1 On the main menu, scroll to 2 On the Commands submenu, scroll to 3 On the Eject submenu, scroll to 4 Scroll to . A bar code label appears. By Barcode 5 Scroll to the label that corresponds to the cartridge you want to eject. Press .
-
Page 108: Chapter 4 Superloader Operation Use Of Magazines And Magazine Blanks
Chapter 4 SuperLoader Operation Use of Magazines and Magazine Blanks Use of Magazines and Magazine Blanks The SuperLoader will not run unless both magazine openings are properly closed. One way that you can close the openings is to use two magazines. -
Page 109: Install A Magazine
4 Grasp the magazine by the handle with one hand and slide it out, supporting it underneath with the other hand. To install a magazine into the SuperLoader, use the following procedure. Install a Magazine To Install a Magazine: 1 Grasp the magazine by the handle with one hand and support it underneath with the other hand. -
Page 110: Manually Operate The Magazine
Chapter 4 SuperLoader Operation Use of Magazines and Magazine Blanks The magazine is correctly installed when you feel it click into place and the front is flush with the front panel. Mag Inserted runs an inventory. Figure 58 Installing a Magazine (continued) The following procedure describes how to operate a magazine. -
Page 111: Figure 59 View Of Magazines
Figure 59 View of Magazines View of right side of right magazine Knob View of right side of left magazine Caution: Use of Magazines and Magazine Blanks While you can load and unload a cartridge without fully removing the magazine, it is recommended that you fully remove the magazine. -
Page 112: Figure 60 Cartridge Orientation (Sdlt Shown)
Chapter 4 SuperLoader Operation Use of Magazines and Magazine Blanks 1 To load cartridges in the magazine, center a slot within one of the six openings located on the side of the magazine. Figure 60 Cartridge Orientation (SDLT Shown) Correct orientation of cartridge relative to the magazine 2 Properly orient the cartridge. -
Page 113: Figure 61 Upper Slot Of Magazine (Sdlt Shown)
To Unload Cartridges from a Fully Ejected Magazine: You can remove a cartridge in the same manner as you insert it. Use the knobs to center the desired slot(s) in the openings on the side of the magazine. Using your thumb and index finger, pull out the cartridge. You will feel a small resistance but continue to pull the cartridge until it comes free. -
Page 114: Figure 62 Top Of Magazine
Chapter 4 SuperLoader Operation Use of Magazines and Magazine Blanks Figure 62 Top of Magazine Use edge of frame as reference To Identify a Slot: Each slot has an identification number that is exposed when the slots are in the upper section of the magazine. You can see the identification mark on the top side of the magazine. -
Page 115: Figure 63 Identifying A Magazine Slot (Sdlt Shown)
Chapter 4 SuperLoader Operation Use of Magazines and Magazine Blanks Figure 63 Identifying a Magazine Slot (SDLT Shown) Top of magazine view Right side slot number Left side slot number SuperLoader User’s Guide... -
Page 116: Chapter 4 Superloader Operation View Status Information
Chapter 4 SuperLoader Operation View Status Information View Status Information From the scrolling menu, you can view the following information: • SuperLoader status • Firmware version • Element status • Tape drive status • Tape drive version • Ethernet information The SuperLoader status provides information about: View SuperLoader Status... -
Page 117: Figure 64 Lcd Messages
Figure 64 LCD Messages DLT/ SDLT Table 6 Table 6 SuperLoader Magazines Status Loader (DLT/SDLT Only) ONLINE OFFLINE Drive ONLINE OFFLINE Mode Random Sequential Barcode Reader Magazines: L=* R=* Loader: ONLINE Drive: ONLINE Mode: Random Barcode Reader: * SCSI ID 4 Magazines: L=* R=* Mode: Random Barcode Reader: *... -
Page 118: View Firmware Version
Chapter 4 SuperLoader Operation View Status Information To view the current firmware version, use the following procedure. View Firmware Version To View the Firmware Version: 1 On the main menu, scroll to 2 On the Status submenu, scroll to 3 On the SuperLoader submenu, scroll to list of messages similar to Figure 65 Firmware Version Display... -
Page 119: Figure 66 Element Status
To View an Element’s Status: 1 On the main menu, scroll to 2 On the Status submenu, scroll to 3 On the SuperLoader submenu, scroll to Enter Figure 66 Element Status 4 Press occupied by a data cartridge are indicated by an asterisk ( empty slot that is assigned to a cleaning tape is indicated with an exclamation point ( indicated with an ampersand (... -
Page 120: View Tape Drive Status
Chapter 4 SuperLoader Operation View Status Information Figure 68 Element Status To view the tape drive status, use the following procedure. View Tape Drive Status To View the Tape Drive Status: 1 On the main menu, scroll to 2 On the Status submenu, scroll to 3 On the Drive submenu, scroll to messages similar to Figure 69 Tape Drive... -
Page 121: View Tape Drive Version
Table 8 Tape Drive SCSI ID Status Loader LUN (DLT/SDLT only) Compression To view the tape drive version, use the following procedure. View Tape Drive Version To View the Tape Drive Version: 1 On the main menu, scroll to 2 On the Status submenu, scroll to 3 On the Drive submenu, scroll to messages similar to the following screen appears. -
Page 122: View Ethernet Information
Chapter 4 SuperLoader Operation View Status Information Table 9 Tape Drive Product Type Version Policy (DLT/SDLT Only) Servo (DLT/SDLT Only) Version (LTO Only) To view the Ethernet information, use the following procedure. View Ethernet Information To View Ethernet Information: 1 On the main menu, scroll to 2 On the Status submenu, scroll to messages similar to the following screen appears. -
Page 123: View Flex I/O Information
Table 10 Ethernet MAC address Information Messages IP address Network To view the Flex I/O information, use the following procedure. View Flex I/O Information To View Flex I/O Information: 1 On the main menu, scroll to Status, then press 2 On the Status submenu, scroll to messages similar to Figure 72 View Flex I/O Information (Scrolled... -
Page 124: Chapter 4 Superloader Operation Run Inventory
Chapter 4 SuperLoader Operation Run Inventory Flex I/O Status: Version: Run Inventory The SuperLoader automatically runs an inventory whenever you power it back on or insert a magazine. An inventory checks each magazine slot, the drive, the picker, and the mailslot to determine if a cartridge is present. -
Page 125: Updating The System
Compressing the data means that the SuperLoader can write twice as much data to the same amount of tape. Compression also increases the performance of the data transfers from or to the SCSI bus. Typically you will want to leave this option enabled. Note: To Set Compression Option: 1 On the main menu, scroll to... -
Page 126: Chapter 4 Superloader Operation Updating The System
Chapter 4 SuperLoader Operation Updating the System 3 On the Configuration submenu, scroll to Enter countdown appears. 4 Insert the Firmware Upgrade Tape into the mailslot. The SuperLoader automatically loads the upgrade tape into the tape drive. Messages appear on the display panel to indicate the update’s progress. -
Page 127: Figure 73 Accessing The Backup Copy Of Firmware (Superloader Dlt Shown)
Figure 73 Accessing the Backup Copy of Firmware (SuperLoader DLT Shown) If jumpers are vertical, change them to horizontal. If jumpers are horizontal, change them to vertical. To Change the Position of the Jumpers: 1 Remove the DCA. For more information on this procedure, refer to the SuperLoader Drive Carrier Assembly (DCA) Replacement Quick Start Guide . -
Page 128: Chapter 4 Superloader Operation On-Board Remote Management
Chapter 4 SuperLoader Operation On-board Remote Management On-board Remote Management Your SuperLoader’s firmware includes an Ethernet interface to allow remote administration of the SuperLoader. The interface, called On-board Remote Management, includes a Web server that provides an HTML- based GUI designed for ease of use. Many of the operations that you can perform from the front panel you can also perform remotely using On-board Remote Management. -
Page 129: Status Information
Figure 74 On-board Remote Management Home Page Status information appears on the right-hand side of the Home page and Status Information4 every page of On-board Remote Management except the Updates page. The status information is updated automatically every 60 seconds. So changes to the status appear in the status window update, but may take approximately 60 seconds to refresh. -
Page 130: Time Display
Chapter 4 SuperLoader Operation On-board Remote Management The time displayed is either regular time or power-on time. Regular time Time Display is Month/Date/Year Time, such as Power On Cycles (POC)/Power On Hours (POH), such as POH: 00002:07:45 • POC (5-digit number) is the number of times the system has booted since it was manufactured. -
Page 131: Commands Page
Commands Page You can move tapes, run a system inventory, reset the picker to its home position, or perform sequential operations from the Commands page. When you click Figure 76 Commands Page , the following page appears: Commands SuperLoader User’s Guide Chapter 4 SuperLoader Operation Commands Page... -
Page 132: Chapter 4 Superloader Operation Commands Page
Chapter 4 SuperLoader Operation Commands Page From a remote location, you can request that a tape be moved from one Moving Tapes position to another. To Move a Tape: 1 On any On-board Remote Management page, click 2 From the drop-down menu under the tape that you want to move. -
Page 133: Sequential Operations
To start Sequential Operations, click available cartridge from the storage slot to the drive. • To stop Sequential Operations, click from the drive and places it back into the cartridge’s previous storage slot. • To resume Sequential operations, click cartridge to the tape drive. -
Page 134: Chapter 4 Superloader Operation Configurations Page
Chapter 4 SuperLoader Operation Configurations Page Configurations Page The Configurations page includes a submenu on the left-hand side of the page. When you click Figure 77 Screen for Configurations Page You can set the System Operations, Networking, and Security options from this page. -
Page 135: System Operations Options
When you click System Operations Options Figure 78 Systems Operations Page You can change the SuperLoader’s and tape drive’s SCSI ID from SCSI ID On-board Remote Management. , the following page appears. System Operations SuperLoader User’s Guide Chapter 4 SuperLoader Operation Configurations Page... -
Page 136: Figure 79 Screen For Configurations
Chapter 4 SuperLoader Operation Configurations Page To Change the SCSI ID: 1 On any On-board Remote Management page, click from the banner. Figure 79 Screen for Configurations 2 From the drop-down list under the new SCSI ID. Both the autoloader and drive IDs must be unique on the SCSI bus. -
Page 137: Set The Mode
To set the Mode on the SuperLoader, use the following procedure. Set the Mode To Set the Mode: 1 On any On-board Remote Management page, click from the banner. Figure 80 Setting the Mode 2 Under a different option. The Sequential Mode 3 Click takes effect, or you can use the front panel to power cycle the... -
Page 138: View The Compression Setting
Chapter 4 SuperLoader Operation Configurations Page To view the Compression Setting on the SuperLoader, use the following View the procedure. Compression Setting To View the Compression Setting: 1 On any On-board Remote Management page, click from the banner. • • 2 Click Figure 81 Viewing the Compression Setting... -
Page 139: Set The Cleaning Mode
If no check mark appears in the box next to disabled. To enable 3 Click This setting is used to report the number of storage elements and the Set the Magazines element address to the SCSI host. This setting must match the physical configuration in order for correct information to be reported. -
Page 140: Set The System Time
Chapter 4 SuperLoader Operation Configurations Page The element addresses vary depending on which magazine is configured. If physically installed, the front panel and On-board Remote Manager will allow user access to the other magazine, but the SCSI host will not have access. To set the Magazine option: 1 On the main menu, scroll to 2 On the... - Page 141 The SuperLoader LTO and the SuperLoader DLT with an SDLT 600 drive have the ability to keep track of time when powered off. All other SuperLoaders must be reset after each power up. The time can be reset automatically if a time server is configured (see Otherwise, the time can be set manually from the front panel or through the On-board Remote Manager.
-
Page 142: Figure 82 Setting The System Time
Chapter 4 SuperLoader Operation Configurations Page To Set the System Time (for all other SuperLoader models): 1 Using the first drop-down list next to hours’ difference between your local time and Greenwich Mean Time (GMT). Figure 82 Setting the System Time 2 From the second drop-down list next to of minutes’... -
Page 143: Set Networking Options
6 In the 7 In the 8 Click When you originally installed the SuperLoader, you set the Ethernet Set Networking configurations through the front panel. However, you can change them Options through the On-board Remote Management tool. To Change the Ethernet Configurations: 1 On any On-board Remote Management page, click from the banner. -
Page 144: Set Security Options
Chapter 4 SuperLoader Operation Configurations Page 3 If a check mark appears in the box next to address option is enabled. To set a static IP address: 4 If no check mark appears in the box next to Configuration Protocol), the static IP address option is enabled. To change a static IP address, type in the new address in the IP address fields using the 5 To change the IP address from a static address to a dynamic address,... -
Page 145: Figure 84 Setting Security Options
Figure 84 Setting Security Options To Reset the Front Panel Password: 1 On any On-board Remote Management page, click from the banner. 2 On the secondary menu, click 3 Select the check box next to mark appears. 4 Click Security Reset Front Panel Password submit SuperLoader User’s Guide... - Page 146 Chapter 4 SuperLoader Operation Configurations Page To Set a Password: When you enter your password on the SuperLoader’s front panel there is no associated username. However, when you click any menu heading on the On-board Remote Management’s home page, you are prompted for a user name and password.
-
Page 147: Figure 85 Setting Authorized Client List
Figure 85 Setting Authorized Client List Under authorized to perform On-board Remote Management for this specific unit. There are two sets of IP address boxes. You can individually enable/disable and configure each set. If enabled, each set can be used to specify either a range of IP addresses or a pair of specific IP addresses that are allowed to administer this unit. -
Page 148: Figure 86 Disabling Sets
Chapter 4 SuperLoader Operation Configurations Page Figure 86 Disabling Sets 4 Type the IP addresses in the boxes. 5 Click To Set the Client Overlap Control: 1 On any On-board Remote Management page, click from the banner. 2 On the secondary menu, click submit Security SuperLoader User’s Guide... -
Page 149: Figure 87 Setting Client Overlap Control
Figure 87 Setting Client Overlap Control 3 Select a security option from the • • • • 4 Click allows multiple users to access the system and issue No Locking requests. allows only one user to access the system and issue Full Locking requests. -
Page 150: Diagnostics Page
Chapter 4 SuperLoader Operation Diagnostics Page Diagnostics Page From the Diagnostics page, you can run the loader tests. To run diagnostic tests on the SuperLoader, use the following procedure. Run Diagnostic Tests To Run a Diagnostic Test: 1 On any On-board Remote Management page, click the banner. -
Page 151: Figure 89 View Test Status
3 Specify a loop count if desired. 4 Click 5 While the test is running, you can view the status of the test. Under View Diagnostic Test Progress indicates which test is running and the current status of the diagnostic test. Figure 89 View Test Status 6 To refresh the status information, click... -
Page 152: Identify Superloader
Chapter 4 SuperLoader Operation Diagnostics Page Figure 90 Viewing Error or History Logs 3 Under the logs to a file by clicking you must select a destination folder within 60 seconds. You can identify the physical location of the SuperLoader by requesting Identify the LCD backlight to flash for a specified number of seconds. -
Page 153: Perform A System Reset
You can perform a system reset by clicking Perform a System Reset Reset drive, or approximately 30 seconds otherwise. You will use system reset when making SCSI ID changes, mode changes, magazine, and IP address changes. System Updates Page You can browse to find system updates and then upload the updates. Perform System Updates To Get System Updates:... -
Page 154: Figure 91 System Updates
Chapter 4 SuperLoader Operation System Updates Page SuperLoader User’s Guide... -
Page 155: Chapter 5 Troubleshooting
Errors that you may experience with your SuperLoader can range from severe hardware damage to simple connection problems. Before you return your SuperLoader to Quantum or your service provider, you may be able to fix the problem yourself by following some basic troubleshooting procedures. -
Page 156: Table 12 Suggested Actions For Performance Problems
Position of the Jumpers: • Go to the Quantum Support Website www.Quantum.com requirements. • Check all outlets and power cords for proper connection. • Go to the Quantum Support Web site www.Quantum.com requirements. SuperLoader User’s Guide To Change the on page 101. - Page 157 • Verify that the DCA is locked into the SuperLoader chassis with the four screws supplied. • Contact your Service Provider or Quantum Support. • Connect to the SuperLoader, using On- board Remote Management with an Ethernet connection and issue a the Diagnostic page.
- Page 158 • Issue a System Reset either by using the On-board Remote Management Diagnostic System Reset or by turning off power from the front panel. • Contact your Service Provider or Quantum Support. • For DLT/SDLT, verify that the SuperLoader LUN is set to 1. To do this, select Status on the LCD front panel, then select Drive, and then Status.
- Page 159 • Power off the SuperLoader by turning off the system from the front panel and turning it back on. • Contact your Service Provider or Quantum Support. • Use the On-board Remote Management page and verify that the media is in the expected location internal to the SuperLoader.
-
Page 160: Chapter 5 Troubleshooting Contacting Quantum Technical Support
Contacting Quantum Technical Support If necessary, obtain technical assistance by calling the support representative nearest you. Domestic and international contact information for Quantum Customer Support can be found by referring to Customer Support Suggested Action • Try a different piece of media. -
Page 161: Returning Units For Repair
This section describes what steps you need to take before returning the unit. Note: If you need to return the SuperLoader, or any of its parts to Quantum, Return you must first obtain a Return Authorization (RA) number from Authorization Quantum. -
Page 162: Policies And Procedures
Procedures Turn Around Time Policy It is Quantum’s intention to meet or exceed agreed upon turn around time commitments to our customers. Turn around time goals for all configurations for DLT, LTO-1, LTO-2, DLTtape, SDLT, and DLTstor products are generally five working days or less. - Page 163 Non-Quantum Product Shipment Policy In the event that non-Quantum product or enclosures are returned to any of our service centers, we will return these products to the sender, freight collect.
-
Page 164: Repair Process
Quantum. Third Party Returns – If a party outside of the United States wishes to return a product for repair to a Quantum Service Center, and the party is not the original buyer, Quantum must ensure compliance with all governmental import and export regulations. -
Page 165: Chapter 5 Troubleshooting How To Return The Superloader For Service
Once you determine the CRU to replace, contact your service provider. If your service provider instructs you to return the SuperLoader directly to Quantum, contact Quantum Technical Support to obtain a Return Authorization (RA) number and the shipping address. When you have the RA number, follow the instructions below. -
Page 166: Figure 92 Removing The Superloader From The Rack
Chapter 5 Troubleshooting How to Return the SuperLoader for Service To Remove the SuperLoader from the Rack: 1 Loosen the four screws that connect the two support brackets to the two SuperLoader brackets. Figure 92 Removing the SuperLoader from the Rack 2 Loosen the four screws on the front of the SuperLoader that attach the two front tabs (support brackets) to the front rails. -
Page 167: Figure 94 Connecting Support Brackets
Figure 94 Connecting Support Brackets 4 While supporting the front of the SuperLoader, remove the four front screws. 5 Using two people, or an appropriately rated mechanical lift, remove the SuperLoader from the rack by sliding the SuperLoader out and supporting it from the bottom. -
Page 168: Chapter 5 Troubleshooting To Pack The Superloader
Chapter 5 Troubleshooting To Pack the SuperLoader Figure 95 Removing the Brackets SuperLoader (SDLT model) 7 Place the SuperLoader into the original packaging box. If you no longer have the original packaging, contact your service representative to purchase the packaging kit. To Pack the SuperLoader Use the original packing material to pack the SuperLoader: the shipping container, two foam insert packing pieces, the accessory kit box (or the... -
Page 169: Figure 96 Shipping Materials
Figure 96 Shipping Materials Foam insert (one for each side of the autoloader) Accessory kit Carton 1 Place the antistatic bag over the SuperLoader. 2 Place one of the foam endcaps onto one side of the SuperLoader. Place the second foam insert onto the other side of the SuperLoader and make sure the pieces fit snugly onto the SuperLoader. -
Page 170: Chapter 5 Troubleshooting Check For Errors
Chapter 5 Troubleshooting Check for Errors 5 Place any necessary paperwork on top of the SuperLoader inside the box. 6 Close and seal the box. 7 Place the shipping label on the box. Check for Errors Errors are problems that occur while operating the SuperLoader. They prevent the SuperLoader from completing a specific action. -
Page 171: Figure 97 Error Flowchart
Figure 97 Error Flowchart Is there an error? Check Application logs Is the problem related to the motion of cartridges within the SuperLoader? Check SuperLoader logs Is the problem related to the operation of the tape drive? SuperLoader User’s Guide Chapter 5 Troubleshooting Check for Errors No corrective... -
Page 172: Chapter 5 Troubleshooting Superloader Error Logs
Chapter 5 Troubleshooting SuperLoader Error Logs Note: • SuperLoader Error Logs • Tape Drive Error Logs SuperLoader Error Logs The SuperLoader generates four types of logs. For troubleshooting errors, you will only use one type, Hard Error logs. The screen displays the error message and the Hard Error logs record all hard error events (see appendix A Note:... - Page 173 Screen Display TX Wait error TX Size error TX Group error TX EVT Timeout TX Option error TX QUE error TX QUE Timeout TX QUE Full TX SEM error TX SEM Timeout TX Thread error TX Priority err TX No Memory TX Start error TX Delete error TX Resume error...
- Page 174 Chapter 5 Troubleshooting SuperLoader Error Logs Screen Display TX Suspend Lifted SYS Cmd started SYS Failure SYS Busy SYS Timeout SYS SW err SYS HW err SYS Msg snd id err SYS Msg bad SYS Msg param bad SYS Inv element SYS Inv elem status SYS Element tbl bad SYS Global corrupt...
- Page 175 Screen Display SYS Performance SYS Asyc stop SYS Cleaning error SYS 12C Device Error SYS offline SYS Door locked SYS Open front SYS Over temp SYS Drive Error SYS Drv Load Err SYS Drv Unload Err Command in Progress Unsupported Command Command Failed Device Not Ready Invalid Element Address...
- Page 176 Chapter 5 Troubleshooting SuperLoader Error Logs Screen Display Source Element Empty Magazine Not Present Self Test Failure Barcode Reader\Not Present Internal Hardware\Error No Volume Tag\Information Available CUP In Progress Unload Retry Overtemp Rejected Command Communication Error SRVO Failure SRVO Reserved SRVO HW/MTR timeout SRVO SW error SRVO Not calibrated...
- Page 177 Screen Display SRVO DRV pth sns err SRVO MSdoor sns err SRVO MSdoor sol err SRVO Initialize err SRVO Event-1st err PKR Rot Sensor bad PKR no Rot Flag PKR Rot Flag bad PKR Trans Sensor bad PKR Trans Sns1 bad PKR Trans Sns2 bad PKR Trans Flag bad PKR Rot cal lost...
- Page 178 Chapter 5 Troubleshooting SuperLoader Error Logs Screen Display MTR SW error MTR HW error MTR Setup error MTR Position error MTR Direction error MTR Runaway error MTR Corrupt error MTR Accel error MTR Sensor noise MTR Timeout MTR Skipping MTR Stalled MTR Jammed MTR Stopped MAG Solenoid bad...
-
Page 179: Hard Error Log Display
Screen Display MAG Multi slot 0 MAG Tolerance MAG Cal lost MAG Pos lost MAG Pos err MAG Slot pos error MAG Jammed cart You can retrieve Hard Error logs through On-board Remote Hard Error Log Management. Partial information about Hard Error logs can be retrieved Display from the front panel and SCSI. -
Page 180: Figure 99 Hard Error Log As Displayed On Front Panel And Scsi Formats
Chapter 5 Troubleshooting SuperLoader Error Logs Figure 99 Hard Error Log as Displayed on Time: 17:24:06.001 Front Panel and SCSI Error: 002f0222 Formats Context: 4802/ 00000000 Whenever the SuperLoader generates a Hard Error log, On-board Remote Management automatically displays the log information. For the other retrieval methods, you must request the information. -
Page 181: Hard Error Log Fields
To Retrieve Hard Error Log Information from SCSI: To retrieve Hard Error log information from SCSI, execute the Log Sense command and access log page 7. Hard Error logs contain three main fields. By interpreting the information Hard Error Log in these fields you can determine how to troubleshoot errors (see Fields table... -
Page 182: Figure 100 Error Code Block Descriptor For Hard And Soft Event Logs
Chapter 5 Troubleshooting SuperLoader Error Logs Figure 100 Error Code Block Descriptor for Hard and Soft Event Logs Bits Bits Bits 31-30 29-28 27-24 Recovery Task ID Action Table 15 Table 15 Error Code Field Descriptions Field Description Recovery Action Defines what the SuperLoader will do based on the event that occurred. - Page 183 Field Description Magazine Up Right Loader Bar Code Reader Front Panel Diagnostic Error Code Update PSP Timer Volume Servo Manager HTTP SNTP Idle Watch Dog Un-handle Interrupt Error: Defines the type of error or event that did occur. Follow the suggested actions to troubleshoot each type of error.
-
Page 184: Error Code Listing
Error log, power cycle the SuperLoader and run the Health test. • Check the Quantum Web site for firmware updates. • If all previous steps fail, contact Quantum Customer Support and/or replace the DCA. • Check the SCSI bus cables and terminators. - Page 185 • Check the host application. • Power cycle the SuperLoader. Repeat checks after power cycle. • If all previous steps fail, contact Quantum Customer Support and/or replace the DCA. • Check the host device driver. • Check the host application.
- Page 186 • Install the magazine or magazine blank. • Replace the magazine or magazine blank. (Try a second one if possible.) • If all previous steps fail, contact Quantum Customer Support and/or replace the chassis/picker assembly. • Verify that the temperature of the SuperLoader inlet air is within specifications.
- Page 187 Source Magazine Missing Suggested Actions • Power cycle. • If the previous steps fails, contact Quantum Customer Support and/or replace the DCA. • Run the Health test. • If repeated events appear in the Hard log, power cycle the SuperLoader. Repeat tests after power cycle.
- Page 188 • Remove and insert the magazine again. • Try a second magazine if possible. • Power cycle the SuperLoader. • If all previous steps fail, contact Quantum Customer Support and/or replace the magazine and/or the chassis/picker assembly. • Verify the expected destination really does not have a cartridge.
- Page 189 • Run the Health test. • Power cycle the SuperLoader. • If all previous steps fail, contact Quantum Customer Support and/or replace the chassis/picker assembly. • Insert a cartridge into the SuperLoader via the mail slot. • Power cycle the SuperLoader.
- Page 190 Suggested Actions • Run the Health test. • Power cycle the SuperLoader. • If all previous steps fail, contact Quantum Customer Support and/or replace the chassis/picker assembly. • Check the Task ID in the hard log to determine if the problem is the right or left magazine.
-
Page 191: Tape Drive Error Logs
• Make sure that the sensor is not blocked by debris. • Power cycle the SuperLoader. • If all previous steps fail, contact Quantum Customer Support and/or replace the chassis/picker assembly. • Check the Task ID in the Hard log to determine if the problem is the right or left magazine. -
Page 192: Error Log Information
Chapter 5 Troubleshooting Tape Drive Error Logs Figure 101 Example Event log number Tape Drive Error Log Event Log # 2 - Event: A401 [V80-0 4-AUG-1998] 000:03:52.153 POH/PC= 340/16 110013B9 571E0101 00400000 00130000 02D10000 00440000 00000000 220024CA 00000000 04720000 00000000 00000000 00000000 00000000 00000000 000000000 00000000 Figure 102 Example DLT1 Tape Drive Error... -
Page 193: Scsi Check Condition Error Logs
POH/PC The tracking information for how many power-on-hours (POH) the drive has had since it was shipped from Quantum. This is how many hours the drive has had power applied regardless of the number of times it is turned on and off. POH is updated once every 60 minutes the drive has had power applied to it with no interruptions. -
Page 194: Figure 103 Scsi Check Condition Error Log
Chapter 5 Troubleshooting Tape Drive Error Logs Figure 103 SCSI Check Condition Error Event Log #6 - SCSI Event: POH/PC/MID/SK/ASC/ASCQ/ AddErr=340/16/13B9571E/1/80/02/ Table 18 fields. Table 18 SCSI Check Field Condition Error Log Field Descriptions Media ID Sense Key ASC/ASCQ describes each of the SCSI Check Condition log’s specialized Description A Media ID which is an internal identification number, written to... -
Page 195: Table 19 Sense Key Field Definitions
Table 19 Table 19 Sense Key Field Definitions Sense Key Definition . This is an indicator that the drive did not have an error but that the No Sense host system may have sent an incorrect command or that a field in the changing parameters information was not correct. - Page 196 Chapter 5 Troubleshooting Tape Drive Error Logs Sense Key Definition Unit Attention Examples include a SCSI Bus reset, or a transition from ready to not ready. A reset is required because Mode Page setting may change after a reset and the host will need to know that.
-
Page 197: Table 20 Asc/Ascq Field Description
Table 20 Table 20 ASC/ASCQ Field Description ASC/ASCQ Description . Drive was not 0C/00 Write Error able to successfully write the customer data to the tape. 11/00 Unrecoverable Read Error After exhausting the read recovery algorithms the drive was not able to read the data correctly . - Page 198 Chapter 5 Troubleshooting Tape Drive Error Logs ASC/ASCQ Description 80/00 Calibration Error failed calibration. 80/01 Cleaning Required has detected a condition in which a cleaning tape must be used. 80/02 Cleaning Requested drive has detected that using a cleaning tape would prevent possible failures due to debris on the head.
-
Page 199: Bugcheck Error Logs
Table 21 Typically, firmware problems are not the cause and you should check for other sources. If it is assumed to be a firmware issue, contact Quantum Customer Support for assistance. shows an example of a Bugcheck Error log. describes the Bugcheck logs’ specialized field. -
Page 200: Event Error Logs
Chapter 5 Troubleshooting Tape Drive Error Logs Table 21 Bugcheck Log Field Descriptions Field Description Event Number: The Event Number is one of the common first line fields explained in the Event Types sections. Below is a listing of the Bugchecks for each event number. Number Description B810... -
Page 201: Figure 105 Event Error Log
The version of firmware the drive was using when the event was logged. Date A reference date for when the firmware was created by Quantum Time Stamp The total time in which the tape drive has had power applied to the tape drive, since the last power cycle. -
Page 202: Chapter 5 Troubleshooting A400: Read Error
Chapter 5 Troubleshooting A400: Read Error • A501: SDLT Hard Write Error • A502: SDLT Loader Communication Error • A503: SDLT Drive-Servo Error • A507/A508: Directory Read Failure/Directory Write Failure page 212 A400: Read Error Read Error is a recorded event indication that the tape drive detected a condition in which the drive was not successfully able to read the data from a particular location on the media. -
Page 203: Table 23 Read Error Field Descriptions
Table 23 Read Error Field Descriptions Field Description Media ID Identifier placed on the media when the calibration tracks are written. This is used to help track which piece of media was in the drive at the time of the event. Media Format The value of this field defines the format or density the media is written. -
Page 204: Cause
Chapter 5 Troubleshooting A400: Read Error This error could be due to one or more of the following: Cause • A bad spot on the media • A failure of the drive to determine the data read from the tape was good due to CRC •... -
Page 205: A401: Write Error
A401: Write Error Write Error is an event in which the tape drive detected a condition that the drive was not successfully able to write data to the media. Figure 107 Write Error Block Descriptor Long Byte 03 Word Media ID (LDB) Physical Block Number on Track 6-17 Byte 02... -
Page 206: Chapter 5 Troubleshooting A401: Write Error
Chapter 5 Troubleshooting A401: Write Error Table 24 Write Error Field Descriptor Field Description Media ID Identifier placed on the media when the calibration tracks are written. Used to help track which piece of media was in the drive at the time of a failure. -
Page 207: Cause
This error could be due to one or more of the following: Cause • A bad spot on the media • A failure of the drive to determine the data written was good during the read after write Following is a list of suggested actions: Suggested Actions •... -
Page 208: Chapter 5 Troubleshooting A402: Drive Error
Chapter 5 Troubleshooting A402: Drive Error A402: Drive Error Drive Error indicated the drive has detected something out of the ordinary during normal operations. If this is a hard error, the drive will not be functional for reading, writing, or successfully loading or unloading the media. -
Page 209: Table 25 Drive Error Log Field Descriptions
Table 25 Drive Error Log Field Descriptions Field Description Media ID Identifier placed on the media when the calibration tracks are written. Used to help track which piece of media was in the drive at the time of failure. Drive Error Code Drive Error Codes listed are listed only as major codes indicating a category of drive error types rather than listing all possible error codes. - Page 210 Chapter 5 Troubleshooting A402: Drive Error Field Description 00B0h-00BFh Hardware Errors 00C0h-00EFh Interrupt Trap Errors 00E0h-00EFh Interrupt Trap Errors 00F0h-00FFh Miscellaneous Errors Drive Status (on Error) Description Drive is in the Process of using a Cleaning Tape Drive has a Cartridge Inserted Drive has No Tape Tension Drive is in the Process of Calibrating after loading a tape cartridge...
-
Page 211: Cause
Field Description Drive is in the Process of Loading a tape but has not entered the calibration phase of the load Drive is in the Process of Initializing (typical after power on or a total drive reset) POST Flags: 32-bit register to indicate the POST failure that failed. breakdown of the 32-bit register. -
Page 212: Chapter 5 Troubleshooting A403: Loader Log
Chapter 5 Troubleshooting A403: Loader Log Following is a list of suggested actions: Suggested Actions • Look for how frequent the events are being logged and how they relate to the media ID. Multiple events of this type would be an indicator that there may be a problem with the drive or the piece of media being used. -
Page 213: Cause
Table 26 Loader Error Field Descriptions Field Media Loader Identifier Media Loader Unit Number Loader Error Loader Command Status Loader Command Event Reference Number This error is due to a problem with the SuperLoader. Cause Look at the SuperLoader Error logs. For information on how to locate and Suggested troubleshoot the problem, see Actions... -
Page 214: Chapter 5 Troubleshooting A404/A405: Calibration
Chapter 5 Troubleshooting A404/A405: Calibration A404/A405: Calibration A404 and A405 are related event logs regarding drive calibration. A405 is a continuation of A404. Both event logs contain 20 long words. Figure 111 Calibration Block Descriptor Long Byte 03 Word Media ID (LDB) Cal Fail 4-20 Table 27 Calibration... - Page 215 Field Cal Info Flags: Used to help verify the media type and the format of that media that was inserted as to what the user had expected to use. This is another verification to determine if it is media or a user induced failure. Calibration Tracks Successfully Found. Description Forward and Backward Offset of Calibration Tracks too Far Apart...
-
Page 216: Cause
Chapter 5 Troubleshooting A404/A405: Calibration Field This error is due to a drive failing calibration. Cause Description Calibration Failed (DLT 2000/4000 only) Vertical R/W Offset Okay (DLT7000/8000 only) Calibration Successful, but a Cleaning Limit exceeded (DLT2000/4000 only) Azimuth R/W Offset is Okay (DLT7000/8000 only) Desperation Read Mode (Drive not Calibrated to write but will attempt to read only) -
Page 217: Suggested Actions
Following is a list of suggested actions: Suggested Actions • The data in the Cal Fail log word is critical to determine if the drive failed calibration and why. If the drive does a write from BOT, this failure is no longer important as the calibration information is overwritten with new data. -
Page 218: Figure 112 Directory Read Block Descriptor
Chapter 5 Troubleshooting A407: Directory Read Figure 112 Directory Read Block Descriptor Long Byte 03 Word Flags 6-20 Byte 02 Byte 01 Status Status 2 Media ID SuperLoader User’s Guide Byte 00 Called Mode Format Status 3... -
Page 219: Table 28 Directory Read Field Descriptions
Table 28 Directory Read Field Descriptions Field Description Called Mode What function was being performed when the event was logged. 1= Read of the Directory when Loading the tape. 2= Write of the Directory while Unloading the tape. 3= Write of Directory from BOT. This is the step in which the drive erases the directory when loading the media. - Page 220 Chapter 5 Troubleshooting A407: Directory Read Field Description DIR Write Failed Tape Format Mismatch Event Log Generated Tape Format Unknown Non-Zero First Track (DLT 4000 Reserved) Status Results of the directory read from the media during the load of media. Status is also displayed in byte 18 of Request Sense Response. 0 = Directory 1 = No Directory Found 2 = Media Contained Only a Partial Directory...
- Page 221 Field Description Status 2 Status of the Directory located on the media at BOT. Reason for the directory event if due to the BOT directory. DLT keeps the master copy of the directory near BOT. Other directory information is maintained in EEPROM and at the EOT side of the media as back up if the BOT directory is lost.
-
Page 222: Cause
Chapter 5 Troubleshooting A407: Directory Read Field Description Status 3 Directory Recovery Status (EEPROM directory status used for recovery) 01h = Recovered Directory, but pending validation 0Ah = No LBN 0 0Bh = Media ID of media and EEPROM directory do not match 0Ch = On Tape directory not empty 0Dh = Sync lock Mismatch 14h = Bugcheck during directory update... -
Page 223: A408: Directory Write
A408: Directory Write Directory write provides information as to why the DLT tape drive was not successful in writing a directory to the media. If a drive fails to write a good directory the next drive to load the tape may log an A407 Event, and it may have excessively long response times to a space or locate SCSI command. -
Page 224: Table 29 Directory Write Field Descriptions
Chapter 5 Troubleshooting A408: Directory Write Table 29 Directory Write Field Descriptions Field Description Called Mode What function was being performed when the event was logged. 1= Read of the Directory when Loading the Tape 2= Write of the Directory while Unloading the tape. 3= Write of Directory from BOT. - Page 225 Field Description DIR Write Failed Tape Format Mismatch Event Log Generated Tape Format Unknown Non-Zero First Track (DLT 4000 Reserved) Status Results of the directory read from the media during the load of media. Status is also displayed in byte 18 of Request Sense Response. 0 = Directory Unknown 1 = No Directory Found 2 = Media Contained Only a Partial Directory...
- Page 226 Chapter 5 Troubleshooting A408: Directory Write Field Description Status 2 Status of the Directory located on the media at BOT. Reason for the directory event if due to the BOT directory. DLT keeps the master copy of the directory near BOT. Other directory information is maintained in EEPROM and at the EOT side of the media as back up if the BOT directory is lost.
-
Page 227: A500: Sdlt Hard Read Error
A500: SDLT Hard Read Error Read Error is a recorded event indication the tape drive detected a condition in which the drive was not successfully able to read the data from a particular location on the media. Figure 114 Hard Read Error/Hard Write Error Block Descriptor Long Word... -
Page 228: Cause
Chapter 5 Troubleshooting A500: SDLT Hard Read Error Table 30 Hard Read Error/Hard Write Error Field Descriptions Field Description Media ID Random number used to identify tapes Physical Block Physical block location where the error occurred. There is one Number (PBN) physical block for each read/write head on each track. -
Page 229: Suggested Actions
Following is a list of suggested actions: Suggested Actions • Verify if multiple events on the same media occur, or multiple events on different media occur. With this information you can determine if the failures is media caused or drive caused. •... -
Page 230: Table 31 Hard Read Error/Hard Write Error Field Descriptions
Chapter 5 Troubleshooting A501: SDLT Hard Write Error Retry Count Head Wear Hours Table 31 Hard Read Error/Hard Write Error Field Descriptions Field Description Media ID Random number used to identify tapes Physical Block Physical block location where the error occurred. There is one Number (PBN) physical block for each read/write head on each track. -
Page 231: Cause
This error could be due to one or more of the following: Cause • A bad spot on the media • A failure of the drive to determine the data read from the tape was good due to bad CRC Following is a list of suggested actions: Suggested Actions... -
Page 232: Chapter 5 Troubleshooting A503: Sdlt Drive-Servo Error
Chapter 5 Troubleshooting A503: SDLT Drive-Servo Error Description Parity Error Framing Error This error could be due to an internal communication error. Cause Following is a list of suggested actions: Suggested Actions • Power cycle the unit. • If the problem repeats, perform an SuperLoader Random Access test. •... -
Page 233: Table 33 Drive Servo Error Field Descriptions
7-11 16-36 Table 33 Drive Servo Error Field Descriptions Field Description Description Calibration Failure Drive Command Time Out Controller to Drive Interface Drive Command Time Out Drive Event Drive Error Code: Error code from Servo processor Major Error Code 0000h-001Fh Physical Block Number (PBN) Power on Hours (LSW) Head Wear Hours... - Page 234 Chapter 5 Troubleshooting A503: SDLT Drive-Servo Error Field Description 0020h-003Fh 0040h-004Fh 0050-005F 0060h-006F 0070-007F 0080h-009Fh 00A0h-00Afh 00B0h-00BFh 00C0h-00DFh 00E0h-00EFh 00F0h-00FFh Drive Status (on Error) MSW Bits Initialization Errors Cartridge Insertion Errors Cartridge Unload Errors Cartridge Unload Errors Cartridge Extraction Errors Servo Errors Miscellaneous Tape Motion Errors...
- Page 235 Field Description LSW Bits Drive did not buckle the tape when loading Drive is unloading a tape Drive is loading a tape Description Drive is running a cleaning tape Drive is ejecting a cartridge Drive has No Tape Tension Drive is in the Process of Calibration after loading a tape cartridge Drive is in the Process of Rewinding the tape to Drive is at a End of Track...
- Page 236 Chapter 5 Troubleshooting A503: SDLT Drive-Servo Error Field Description POST Flags MSW Bits LSW Bits Drive is in the Process of Initializing (typical after power on or a total drive reset) Description Unused Unused Unused Unused Unused Unused Unused Unused Unused Unused Unused...
-
Page 237: Cause
Field Description This error could be due to grave failure to track the optical servo or Cause electrical servo. Run a Tape Drive Write/Read test with two pieces of media. If test fails, Suggested replace the DCA. Actions A to D test failed Unused Unused EEROM check sum... -
Page 238: Chapter 5 Troubleshooting A507/A508: Directory Read Failure/Directory Write Failure
Chapter 5 Troubleshooting A507/A508: Directory Read Failure/Directory Write Failure A507/A508: Directory Read Failure/Directory Write Failure These events indicate a possible problem in reading or writing to the tape directly. Figure 118 Directory Read Failure/Write Failure Block Descriptor Long Word 10-12 Byte 03 Byte 02 Save Format... -
Page 239: Table 34 Directory Read Failure/Write Failure Field Descriptions
Table 34 Directory Read Failure/Write Failure Field Descriptions Field Description Called Mode Directory mode called from Mode READ on LOAD WRITE on UNLOAD WRITE from BOT READ BOTH REVERSE READ BOTH FORWARD A507/A508: Directory Read Failure/Directory Write Failure Value SuperLoader User’s Guide Chapter 5 Troubleshooting... - Page 240 Chapter 5 Troubleshooting A507/A508: Directory Read Failure/Directory Write Failure Field Description Save Format Tape format before reading directory Format TK85 TK86 DLT 2000 DLT 4000 DLT 7000 DLT 8000 DLT1 SDLT 220 SDLT 320 SDLT 600 Unknown Initial New Format Tape format of the directory.
- Page 241 Field Description Flags Directory flags Bits 14-31 A507/A508: Directory Read Failure/Directory Write Failure Description Filler Calibration On Load success Lram directory stale Tape direction rev Directory stale Retry needed Directory clobbered Non-zero first track Unknown format Event log Format mismatch Directory Write failed LBN 0 found Inhibit directory write...
- Page 242 Chapter 5 Troubleshooting A507/A508: Directory Read Failure/Directory Write Failure Field Description Read Fail Status Status for Directory Read failures Description Unknown Retry failed No Blocks Goofy Blocks No Block 0 Bad ECC Directory Cell Recovery Directory Cell stale Directory Cell fail Serpentine Verify fail BOT fail...
- Page 243 Field Description Status Media directory status Description Directory unknown No directory Partial directory Directory complete Directory stale EEPROM Status EEPROM directory status Description Directory recovered No LBN 0 Media ID mismatch On Tape directory not empty Sync Lock mismatch Directory unreliable Media ID Media ID from tape A507/A508: Directory Read Failure/Directory Write Failure...
-
Page 244: Cause
Chapter 5 Troubleshooting A507/A508: Directory Read Failure/Directory Write Failure Field Description EOT Status Directory status four Description Directory recovered Directory attempt Bad directory cell structure Bad directory cell entry Invalid track Sync Lock mismatch Track zero Directory No Pair Directory Zeroed Directory Bad Revision Directory Bad Media... -
Page 245: Suggested Actions
Following is a list of suggested actions: Suggested Actions • Check for other Write Errors. • Perform a Tape Drive Write/Read test with two pieces of media. If test fails, replace the DCA. • Perform a complete Drive Read Only test. A507/A508: Directory Read Failure/Directory Write Failure SuperLoader User’s Guide Chapter 5 Troubleshooting... - Page 246 Chapter 5 Troubleshooting A507/A508: Directory Read Failure/Directory Write Failure SuperLoader User’s Guide...
-
Page 247: Chapter 6 Diagnostics
Chapter 6 Diagnostics The POST and diagnostic tests are helpful tools for testing the SuperLoader’s functionality and for troubleshooting errors. With the results from the POST and diagnostic tests, you can determine how well the SuperLoader is working and locate any problems. The Diagnostics chapter describes the POST and its various tests. -
Page 248: Post Descriptions
Chapter 6 Diagnostics POST POST Table 35 Descriptions Table 35 POST Descriptions POST MICROP IRAM Addr Lines SRAM Code Chksum EERom PLL Clock Ethernet Barcode Temperature Sense If you experience errors while operating your SuperLoader, you may Perform a POST need to reboot the SuperLoader to perform a POST. -
Page 249: Interpret The Post Results
To Reboot the SuperLoader: 1 Hold down the appears. 2 Release the 3 Press the automatically. While the POST is running, a progress indicator showing the name of the Interpret the POST test displays on the front panel. If the SuperLoader is working properly, Results the message POST completes successfully. -
Page 250: Stop A Diagnostic Test
Chapter 6 Diagnostics Diagnostic Tests To Enter an Administrator Password: 1 On the main menu, scroll to 2 On the Command submenu, scroll to Enter 3 On the Enter Password submenu, scroll to Enter The Login screen appears with a row of asterisks. A textbox appears above the first asterisk. -
Page 251: Front Panel Diagnostic Tests
To Perform a Halt Test on On-board Remote Management: 1 Select Halt Test from the Diagnostics drop-down menu, and click submit. 2 Select appears along with any text results. You can perform the following diagnostic tests using the front panel: Front Panel Diagnostic Tests •... -
Page 252: Diagnostics On-Board Remote Management Diagnostic Tests
Chapter 6 Diagnostics On-board Remote Management Diagnostic Tests from 30 seconds to several minutes to complete. The Health Check test displays an ongoing progress indicator while executing. When the test completes, either the message message 3 If you are not logged in, you will be asked to enter the Administrator password. - Page 253 • Picker Test • Magazine Test • Inventory Test • Drive Read Test (only runs on SDLT) • Drive Write Test (only runs on SDLT) • Drive Read/Write Test Note: Many tests can be run using On-board Remote Management. Diagnostics Using On-board Remote Management To Perform the On-board Remote Management Diagnostic Tests:...
- Page 254 Chapter 6 Diagnostics On-board Remote Management Diagnostic Tests SuperLoader User’s Guide...
-
Page 255: Appendix A Basic Information Logs
Although there are several types of logs, all of them have the same basic format and are interpreted in same manner. For information on interpreting logs, see Basic Information Logs on page 238 Before Contacting Quantum Support SuperLoader User’s Guide Appendix A chapter 5, on page 129. -
Page 256: Superloader Logs
Appendix A Basic Information Logs SuperLoader Logs SuperLoader Logs The SuperLoader generates seven types of logs. The following sections describe the first six types: • Soft Logs • Update Logs • Shadow Event Log • Boot Logs • OEM Logs •... -
Page 257: Common Information
SuperLoader logs have the following information in common. Common Information Figure 119 Log Display Figure 119 Log Display Time stamp Block 1, 007/370 entries @ 16 bytes each, wrap @ 000, erase @ 300 0000: 2001-Jun-27, 17: 23: 57. 333, Error: 00000001, Context: 0002 / 00000003 0001: 2001-Jun-27, 17: 24: 06. -
Page 258: Error Codes
Appendix A Basic Information Logs SuperLoader Logs Table 37 Basic Information (SuperLoader) Log Fields Field Description Time Stamp The time the event occurred. This field helps correlate the event with a possible application interruption. If the unit is unable to acquire the correct time/date from the SNTP time server or the front panel, the timestamp contains values indicating the power cycle number and the time an entry was written relative to that power cycle, listed as power on hours (POH). -
Page 259: Table 38 Error Code Field Descriptions
Table 38 Error Code Field Descriptions Field Description Recovery Action Defines what the SuperLoader will do based on the event that occurred. • If the value is 0 the SuperLoader will continue operations since this is typically a soft recoverable event, or an event that is just recording a action for when the develop team is working on enhancements. - Page 260 Appendix A Basic Information Logs SuperLoader Logs Field Description Task ID in (Hex) Description PSP Timer HTTP SNTP Idle Watch Dog Un-handle Interrupt Error Type Defines the type of error or event that did occur. Code Description 00-25 General Software flags Message Send ID error Message Bad Message parameter Bad...
- Page 261 Field Description Code Description Over Temp Drive Error Load Error Unload Error 60-69 Internal communication events A0-A4 Picker Servo Errors Source Element Empty Source Magazine Missing Destination Magazine Missing Destination Element Full Picker Full Picker Cartridge Sensor Error Drive Path Sensor Error Mail Slot Door Sensor Error Mail Slot Solenoid Error Unknown Servo Error...
-
Page 262: Soft Logs
An update log also records when hardware is updated or changed. Shadow Event Log Note: Shadow logs record the picker EEPROM used only at Quantum Engineering. Shadow logs appear differently than the other logs (see figure There are no important fields in the Shadow Event log. This log is used only at Quantum Engineering. -
Page 263: Boot Logs
Figure 121 Shadow Event Log Block 1, 001/001 entries @ 512 bytes each, wrap @ 000, erase @ 001 0000: EEROM Shadow: d9c9afff: ffffffff: ffffffff: ffffffff: ffffffff: ffffffff: ffffffff: ffffffff ffffffff: ffffffff: ffffffff: ffffffff: 00e00012: 0d549e03: c0a8147a: ffffffff ffffffff: ffffffff: c0a81412: ffffffff: ffffffff: ffffffff: ffffffff: ffffffff ffffffff: ffffffff: ffffffff: ffffffff: ffffffff: ffffffff: ffffffff: ffffffff ffffffff: ffffffff: ffffffff: ffffffff: ffffffff: ffffffff: ffffffff: ffffffff 00000000: 00000000: ffffffff: ffffffff: ffffffff: ffffffff: ffffffff: ffffffff... -
Page 264: Tape Drive Logs
Appendix A Basic Information Logs Tape Drive Logs Tape Drive Logs The tape drive generates six types of logs. SCSI Check Condition Error logs, Bugcheck Error logs, and Event Error Logs are described in chapter 5 Tape drive logs have the following information in common. Common Information Partial information about tape drive logs can be retrieved from SCSI and... -
Page 265: Post Failure Logs
POH/PC The tracking information for how many power-on-hours (POH) the drive has had since it was shipped from Quantum. This is how many hours the drive has had power applied regardless of the number of times it is turned on and off. POH is updated once every 60 minutes the drive has had power applied to the drive with no interruptions. -
Page 266: Dlt Drive Diagnostic Results Logs
Appendix A Basic Information Logs Tape Drive Logs Figure 123 POST Failures Event Log Event Log # 4 - PO / ST Error - Last Fail: 88021950 POH / PC = 527 / 71 70000000 00000000 00000000 00000000 00000000 00000000 00000000 00000000 00000000 00000000 00000000 00000000 00000000 00000000 00000000 00000000 Table 40 Table 40 POST... -
Page 267: Dlt Firmware Changes
Figure 124 DLT Drive Diagnostics Event Log Event Log # 5 - Diag ILOG: POH/PC = 6/3 Test: IWR-RD Time: 6:07, Sts-Miscompare DLT8000 ENt. Wr/Rd: 299545/169 Compare ON ErrRate Wr: 1.4145 / MB, Rd: 357. 14/ Gb pHWE: 0 pHRE: 0 4 - Chan. - Page 268 Appendix A Basic Information Logs Tape Drive Logs • If an attempt to enter the code update routine was entered and not successful, the following log is displayed in the format of an Event log. Event Log#6-Event: CA02 [V60-0 14-AUG_1997] 000:00:04.455 POH/PC=0/7 00000000 00000000 00000000 00000000 00000000 00000000 00000000 00000000 00000000 00000000 00000000 00000000 00000000 00000000 00000000 00000000 00000000 00000000 00000000 00000000...
-
Page 269: Appendix B Specifications
This appendix describes the specifications relating to the SuperLoader. The SuperLoader is equipped with one of the following drive types: • DLT1 • SDLT 220 • SDLT 320 • SDLT 600 • HP LTO-1 • HP LTO-2 SuperLoader User’s Guide Appendix B Specifications... -
Page 270: Superloader Physical Specifications
Appendix B Specifications SuperLoader Physical Specifications SuperLoader Physical Specifications Rack Mount Height Width Length Footprint Weight (without media) Shipping The SuperLoader requires a standard 19-inch rack. With a mounting kit, the SuperLoader does not exceed 2U form factor. SuperLoader Performance Specifications Mean Cycles Between Failure (MCBF) Mean Time To Repair (MTTR) Initialize element status... - Page 271 Avg load time (after placing cartridge in drive) Avg unload time (from BOT) Max transfer rate Media Capacity Storage capacity (DLT1) Storage capacity (SDLT 220) Storage capacity (SDLT 320) Storage capacity (SDLT 600) Storage capacity (LTO-1) Storage capacity (LTO-2) SuperLoader Performance Specifications LTO=<...
-
Page 272: Superloader Power Specifications
Appendix B Specifications SuperLoader Power Specifications SuperLoader Power Specifications Line voltage Line frequency AC Input current Power consumption : 90 to 265 VAC; 60 Hz system : 90 to 265 VAC 50 Hz system 47 Hz to 63 Hz : 4.0 A (RMS) for 115 VAC 60 Hz system : 4.0 A (RMS) for 230 VAC 50 Hz system... -
Page 273: Superloader Environmental Specifications
SuperLoader Environmental Specifications Temperature Range (Dry Bulb) Operating Non-Operating Temperature Variation Operating Non-Operating Humidity Operating Non-Operating Gradient Wet Bulb Operating Non-Operating Altitude Operating Non-Operating SuperLoader Environmental Specifications +10ºC to +35ºC - 40ºC to +65ºC 10ºC per hour 20ºC per hour 20% to 80% non-condensing 10% to 90% non-condensing 10% per hour without condensation... -
Page 274: Superloader Vibration Specifications
Appendix B Specifications SuperLoader Vibration Specifications SuperLoader Vibration Specifications Operating Swept Sine Vibration Random Vibration Non-Operating Swept Sine Vibration Random Vibration SuperLoader Shock Specifications Operating Non-Operating 5 to 500 Hz, 0.25 G, 0.01 inch (0.254 mm) to smooth crossover, 1 8ve/min, (X, Y, Z) axes 0.25 Grms, 5 to 500 Hz (X, Y, Z) axes 5 to 500 Hz, 0.75 G, 0.02 inch(0.51 mm) to smooth crossover, 1 8ve/min, (X, Y, Z) axes... -
Page 275: Superloader Product Safety/Compliance
SuperLoader Product Safety/Compliance The SuperLoader complies with the following Electromagnetic Interference (EMI) standards and directives: • EEC Directive 89336 CE BS6527 (UK) • EN55022 (EU) • EN55024 (EU) • CFR 47, 1995 FCC Rules Part 15B Class B (MDOC) • IECS-003 Canada •... -
Page 276: Scsi Specifications
Appendix B Specifications SCSI Specifications SCSI Specifications The SuperLoader uses an LVD SCSI connection. SCSI connectors are VHDCI SCSI connectors. All cables conform to SPI-4 (SCSI Parallel Interface-4), Revision 7. Please refer to this document for more information. If the SuperLoader is the last device on the SCSI bus you must attach a SCSI Cable and terminator to the SCSI connector on the back panel of the SuperLoader. -
Page 277: Appendix C Time Zones
Appendix C Time Zones This appendix outlines the various times and time zones. This information is used to set the time. SuperLoader User’s Guide... -
Page 278: Table 42 Times And Time Zones
Appendix C Time Zones Table 42 Times and Time Zones Country/Region Canada/USA Time Zone Newfoundland Standard Time Newfoundland Daylight Time Atlantic Standard Time Atlantic Daylight Time Eastern Standard Time Eastern Daylight Time Central Standard Time Central Daylight Time Mountain Standard Time Mountain Daylight Time Pacific Standard Time Pacific Daylight Time... - Page 279 Country/Region Mexico Central America (except Panama) Panama Colombia, Ecuador, Peru Chile, Paraguay Argentina, French Guiana, Suriname, Uruguay Brazil Bolivia, Venezuela, Guyana Time Zone Time Zone I Standard Time Time Zone I Summer Time Time Zone II Standard Time Time Zone II Summer Time Time Zone III Standard Time Time Zone III Summer Time Time Zone IV Standard Time...
- Page 280 Appendix C Time Zones Country/Region Europe China/Hong Kong/Macau Japan, North Korea, South Korea Australia New Zealand (except Chatham Islands) Chatham Islands Vietnam, Cambodia, Laos, Thailand India Pakistan Time Zone Western European Standard Time Western European Summer Time Central European Standard Time Central European Summer Time Eastern European Standard Time Eastern European Summer Time...
-
Page 281: Fcc Statement
FCC Statement This equipment has been tested and found to comply with the limits for a Class B digital device, pursuant to Part 15 of the FCC rules. These limits are designed to provide reasonable protection against harmful interference in a residential installation. Any modifications to this device—unless expressly approved by the manufacturer—can void the user’s authority to operate this equipment under part 15 of the FCC rules. -
Page 282: Appendix D Regulatory Statements Taiwan Statement
Appendix D Regulatory Statements Taiwan Statement • Connect the equipment into an outlet on a circuit different from that to which the receiver is connected • Consult the dealer or an experienced radio/TV technician for help. Taiwan Statement Additional information on the need to interconnect the Note: device with shielded (data) cables or the need for special devices, such as ferrite beads on cables, is required if such... -
Page 283: Japan Notice
Japan Notice Canadian Notice (Avis Canadien) This Class B digital apparatus complies with Canadian ICES-003. Cet appareil numérique de la classe B est conforme à la norme Canadian Notice (Avis Canadien) This Class B digital apparatus meets all requirements of the Canadian Interference-Causing Equipment Regulations. -
Page 284: Product Safety Electrostatic Discharge
Appendix D Regulatory Statements Product Safety Electrostatic Discharge Compliance with these directives implies conformity to the following European Norms (in brackets are the equivalent international standards): • EN55022 (CISPR 22) - Electromagnetic Interference • EN50082-1 (IEC801-2, IEC801-3, IEC801-4) - Electromagnetic Immunity •... -
Page 285: Grounding Methods
Grounding Methods There are several methods for grounding. Use one or more of the following methods when handling or installing electrostatic-sensitive parts: Use a wrist strap connected by a ground cable to a grounded workstation or computer chassis. Wrist straps are flexible straps with a minimum of 1 mega-ohm 10 percent resistance in the ground cords. - Page 286 Appendix D Regulatory Statements Taiwan Battery Recycling Label SuperLoader User’s Guide...
-
Page 287: Glossary
The removal of data from the computer system on to A robot that includes one tape drive and one or more A copy of a file, directory, or volume on a separate storage The ability of a current drive product to read SuperLoader User’s Guide... - Page 288 (DCM) and features of Quantum’s LGMR technology, which is at the heart of the Super DLTtape technology. Of the five technologies that constitute the LGMR technology, two are found in the DCM. These are the POS and the MRC heads.
- Page 289 device connected to a single SCSI bus. Each SCSI device contains a SCSI ID number that can be set to 0 through 7. device driver component that enables a PC to communicate with peripheral devices such as fixed disk drives, CD-ROMs, and tape drives. Each kind of device requires a different driver.
- Page 290 Glossary error recorded data. Usually due to magnetic issues or defects in or on the media. Error Correction Code Error Detection Code Ethernet communications at 10 megabits per second. external drive computer system enclosure, with its own power supply and fan, and connected to the system by a cable.
- Page 291 Hierarchical Storage Management (HSM) amounts of data in tape libraries that allows for easy and rapid recall of the material. Due to the lowering cost of disk drives, HSM has yet to reach its full potential.
- Page 292 Distinguishable from stackers and autoloaders in their ability to provide random access to tape cartridges. The DLTstor is a tape library system offered by Quantum Corporation. A hardware or software protocol, contained in the electronics A drive mounted inside one of a computer’s drive bays.
- Page 293 In addition, by using a uniform particle shape, a dense binding system, a smooth coating surface, and a specially selected base file, Quantum DLTtape half-inch cartridge tapes take advantage of shorter wavelength recording schemes to ensure read compatibility with future generations of DLT drives.
- Page 294 A somewhat out-of-date term used to describe a class of Applications that are vital to a company or Refers to the uncompressed storage capacity of a tape or An application that uses a tape drive or tape Command overhead refers to the processing time required by To write data on top of existing data thus erasing the original Original Equipment Manufacturer.
- Page 295 Power-on Hours. The unit of measurement for mean time between Power-on Self Test. Diagnostics programs, loaded automatically See Partial Response, Maximum Likelihood. Quarter Inch Cartridge. A tape storage subsystem that uses Random Access Memory. an integrated circuit memory chip that Redundant Array of Independent Tape Drives...
- Page 296 Glossary SCSI Standards Institute (ANSI) interface between the computer and peripheral controllers. Apple MacIntosh systems and many UNIX operating system workstations use the SCSI interface. scalability family to read tapes from previous generations of drives. Allows users to upgrade to a faster, higher capacity DLT drive, yet still be able to read tape recorded on an older system.
- Page 297 Glossary A faulty data reading that does not recur if the same data is soft error reread from the disk or corrected by ECC. Usually caused by power fluctuations or noise spikes. A tape automation system that sequentially loads and unloads stacker tape cartridges.
- Page 298 Glossary TCP/IP communications protocol which ensures that the total amount of bytes sent is received correctly, and also provides the routing information. thin film used on tape drive read/write heads. Media with thin film surfaces can store greater amounts of data. track tape drives write information on multiple tracks simultaneously.
-
Page 299: Index
A400, Read Error 175 A401, Write Error 175 A402, Drive Error 175 A403, Loader Log 175 A404/A405 Calibration 175 A407, Directory Read 175 A408, Directory Write 175 A500, SDLT Hard Read Error 175 A501, SDLT Hard Write Error 176 A502, SDLT Loader Communication Error 176 A503, SDLT Drive-Servo Error 176 A507/A508, Directory Read... - Page 300 98 setting with On-board Remote configuration 30 Configuration menu, overview 75 configuring Ethernet (with On-board Remote contacting Quantum Technical Support 134 Control Mode On-board Remote Management setting 46 setting with On-board Remote cooling fans 8 data compression 98...
- Page 301 setting IP address (dynamic) 34 setting IP address (static) 35 status information 96 Ethernet configurations On-board Remote Management Ethernet connection location 8 Ethernet information viewing 96 event error logs A400, read error 176 description 174 example 175 field descriptions 175 types 174 event logs A401, write error 179...
- Page 302 Index identifying slots 88 inserting tape cartridge 78 installing magazine 83 Inventory running 98 inventory On-board Remote Management IP gateway setting 38 jumpers, changing position 101 menu tree 71 overview 71 panel 4 LEDs 5 indicator activity 70 overview 70 loading magazine 83 location requirements 15...
- Page 303 POST (Power-on Self Test) 221 POST failure logs 239 power specifications 246 power switch 5 powering on 28 Power-on Self Test (POST) interpreting results 223 Power-on self test (POST) performing 222 Quantum Technical Support contacting 134 repair process 138 return procedure 139 Index...
- Page 304 Index rackmounting 16 Recovery action, error code 156 removing SuperLoader from rack 140 requirements location 15 SCSI bus 14 UL 15 returning units 135 safety electrostatic discharge 258 grounding methods 259 SCSI bus requirements 14 SCSI connection location 9 making 26 specifications 250 SCSI ID changing with On-board Remote...
- Page 305 element 93 Ethernet information 96 SuperLoader 90 tape drive 94 status information On-board Remote Management viewing 90 status LEDs, LEDs Status menu, overview 74 subnet mask setting 37 SuperLoader configuration 30 element status 93 powering on 28 rackmounting 16 removing from rack 140 return procedure 139 setting data compression 98 status 90...
- Page 306 Index requirements 15 updating firmware 99 firmware from a tape 99 vibration specifications 248 Viewing firmware version 92 viewing element status 92 Ethernet information 96 firmware version 92 hardware version 92 mechanical version 92 status information 90 SuperLoader status 90 tape drive status 94 tape drive version 95 write-protect switch...
Need help?
Do you have a question about the SuperLoader 3 and is the answer not in the manual?
Questions and answers