Table of Contents
Advertisement
Quick Links
Advertisement
Table of Contents
Troubleshooting

Related Manuals for Christie IMB


Summary of Contents for Christie IMB
- Page 1 Christie Integrated Media Block U s e r M a n u a l 020-100845-05...
- Page 3 Christie Integrated Media Block U S E R M A N U A L 020-100845-05...
- Page 4 Performance specifications are based on information available at the time of printing. Christie makes no warranty of any kind with regard to this material, including, but not limited to, implied warranties of fitness for a particular purpose.
- Page 5 Addendum Translated copies of this document are provided on the CD in the back of this document. The CD may also contain additional product documentation. Read all instructions before using or servicing this product. Le CD au dos de ce document contient des traductions de celui-ci dans différentes langues. Ce CD peut également contenir de la documentation supplémentaire sur le produit.
-
Page 7: Table Of Contents
Christie IMB Connectors ..........2 Sample Christie IMB Network Topology ....... . . 3 Safety Precautions . - Page 8 Ingest Content and the KDM Key ........35 Ingest Remote Content from a Network IMB .
- Page 9 Manage Christie IMB Settings ........
- Page 10 Delete a Christie IMB Backup File ........
- Page 11 Terminology ........... 107 Christie Integrated Media Block User Manual...
-
Page 13: Hardware Installation And Setup
Christie Solaria 2K and 4K projectors. To use the Christie IMB, the projector must be in full power mode. If the projector is not in full power mode, you cannot access the Christie IMB web interface or the Christie IMB touch panel controller (TPC) menus. -
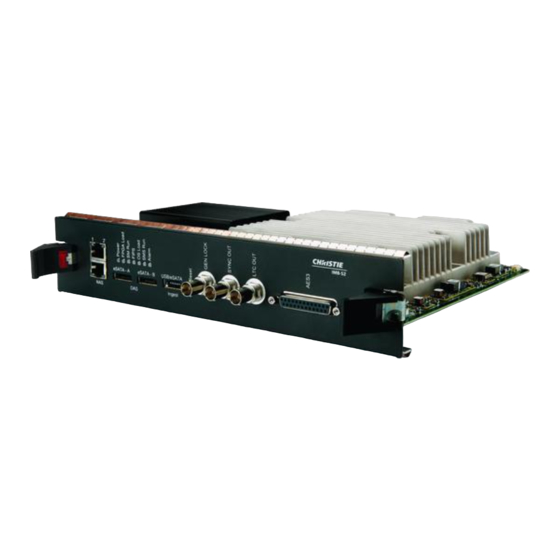
Page 14: Christie Imb Connectors
(DAS) devices LED status indicators USB/eSATA port to ingest content Reset button Input for multi-projector playback (Christie IMB to Christie IMB only) Output for multi-projector playback LTC output AES3 port for digital audio output Christie Integrated Media Block User Manual 020-100845-05 Rev. -
Page 15: Sample Christie Imb Network Topology
Hardware Installation and Setup Sample Christie IMB Network Topology This diagram illustrates a typical Christie IMB network topology: Device Description Theatre network Laptop Switch Christie ACT automation device Network-attached storage (NAS) Direct attached storage (DAS) Ingest hard drive Digital cinema audio processor Christie Integrated Media Block User Manual 020-100845-05 Rev. -
Page 16: Safety Precautions
Configure the NAS1 and NAS2 ports on the Christie IMB faceplate to use DHCP when they are not in use. When you set DHCP on a NAS port and nothing is connected to the port, the Christie IMB does not mount the port and there is no risk of an IP address conflict. -
Page 17: Install And Configure The Christie Imb
Hardware Installation and Setup Install and Configure the Christie IMB The Christie Integrated Media Block (IMB) is installed in the card cage located on the operator side of the projector. The part number for the Christie IMB is 108-384107-XX. Administrator permissions are required to access the Administrator Setup menu. - Page 18 If the Christie IMB shows signs of tampering, contact Christie support. For contact information for your region, see the back cover of this document. 9. Align the Christie IMB with the guides in the card cage, and then slide it into the projector until the ejector tabs click to indicate they are locked.
-
Page 19: Activate Marriage
Storage Devices on page 15. 2. Connect one end of an Ethernet cable to the NAS-A or NAS-B ports on the IMB and the other end to your NAS device or network. 3. Tap Menu > Christie IMB > System. -
Page 20: Configure The Audio Settings
Hardware Installation and Setup Configure the Audio Settings 1. Connect one end of the audio cable to the Christie IMB AES3 port and the other end to a digital cinema audio processor. 2. Configure your speaker and channel settings. See Manage Audio Settings on page 63. -
Page 21: Licensing
Each license file is unique to a specific Christie IMB, and it is associated with the electronic serial number (eSN) of the Christie IMB installed in the projector. After you receive the license file, you must add it to the Christie IMB to enable functionality. - Page 22 (HFR) or 4K RealD will authorize Christie to generate a license key for the RealD 3D EQ feature for the specified Christie IMB. Christie will send you the license by e-mail.
- Page 23 1. Tap Menu > Christie IMB > System > Licenses. 2. Tap Add. 3. Insert a USB flash drive with the Christie IMB license into the USB port on the side of the touch panel controller (TPC). 4. Select a license file and then tap Accept.
-
Page 24: Play Content
6. Tap Accept. Play Content After installing and configuring the Christie IMB, these are the tasks that you typically complete to play content: 1. Ingest the content. Content is typically provided on a hard drive sent by your movie distributor. -
Page 25: Contact Support
Troubleshooting on page If you are unable to resolve your issue, contact Christie support. In order that a support representative can better assist you, have the model and serial number of your projector ready. For contact information for your region, see the back cover of this document. -
Page 27: Manage Storage Devices
Typically, the NAS1 and NAS2 ports on the Christie IMB have static IP addresses. When setting the static IP value, you are setting the IP address for the NAS port on the Christie IMB. The static IP address must be in the same subnet as the NAS device; it cannot be the same IP address as the NAS device. -
Page 28: Add A Nas
Complete the procedures in the order they are written. Prerequisites To connect a QNAP NAS to a Christie IMB, install and format the NAS hard drives and verify that they are configured for RAID 5. For more information about installation and setup, see http:// docs.qnap.com/nas/en/index.html. - Page 29 192.168.1.100 (QNAP Lan1 IP address) Subnet Mask 255.255.255.0 Default Gateway 0.0.0.0 or Christie NAS1 port IP address 11. Click OK. 12. Add your computer to the subnet of the NAS device: a. On the computer, click Start > Control Panel.
- Page 30 IP address of your computer must be on the same subnet as the projector and the computer must be connected by an Ethernet cable to the Ethernet port of the PIB. 1. Disconnect the Ethernet cable from the computer and connect it to the NAS1 port on the Christie IMB.
- Page 31 Manage Storage Devices 2. On the projector TPC, tap Menu > Christie IMB > System. 3. Tap IMB Network. 4. In the NAS 1 area, select Static IP and then complete these fields: a. Enter 192.168.1.1 in the IP Address field.
-
Page 32: Connect To An Iomega Nas
This section provides detailed instructions for connecting an Iomega StorCenter px4-300r network storage array to a Christie IMB. The instructions should be applicable to other Iomega NAS devices. The IP addresses and folder names used in this document are provided as examples. Use IP addresses and share names that are unique to your theater environment. - Page 33 3. Expand the second network interface. 4. Expand Information. 5. Enter an IP address that allows the NAS device to communicate with the Christie IMB NAS1 port in the IP Address field. For example, 192.168.1.100. To configure the settings of the NAS1 port, Configure the Christie IMB Communication Settings on page 23.
- Page 34 5. Select Parity (RAID5) in the Protection list. 6. Select Enable periodic consistency check. 7. Clear the Create commonly used Shares check box. 8. Select all of the drives in the device image. 9. Click Create. Christie Integrated Media Block User Manual 020-100845-05 Rev. 1 (08-2013)
- Page 35 IP address of your computer must be on the same subnet as the projector and the computer must be connected by an Ethernet cable to the Ethernet port of the PIB. 1. Disconnect the Ethernet cable from the computer and connect it to the NAS1 port on the Christie IMB.
-
Page 36: Connect To A Content Network
Connect to a Content Network With a content network, you can ingest content from a theatre management system (TMS), a satellite receiver, or another IMB. The NFS service must be enabled on the file share accessed by the Christie IMB. - Page 37 10/100 switch for command and control network GigE switch for content network Projector intelligence board (PIB) Christie IMB Network attached storage (NAS) Command and control network (10/100) Content network (GigE) Home run connections (GigE) Christie Integrated Media Block User Manual 020-100845-05 Rev. 1 (08-2013)
-
Page 38: Edit Nas Settings
Manage Storage Devices Edit NAS Settings 1. Tap Menu > Christie IMB > System. 2. Tap Storage. 3. Tap a NAS device in the NAS list. 4. Edit the NAS settings. 5. Tap OK. 6. Tap Save 7. Tap OK. -
Page 39: Refresh Nas Share Names
6. Tap Start Test. 7. Tap Close. 8. Tap Cancel. Refresh NAS Share Names 1. Tap Menu > Christie IMB > System. 2. Tap Storage. 3. Tap a NAS device in the NAS list. 4. Tap Refresh Share Names. 5. Tap OK. -
Page 40: Delete A Das
Manage Storage Devices 6. Tap Save. 7. Tap OK. Delete a DAS 1. Tap Menu > Christie IMB > System. 2. Tap Storage. 3. Tap a DAS device in the DAS list. 4. Tap Delete. 5. Tap Yes. 6. Tap Save. -
Page 41: Content Management
Load Content Before you can select content or a play list for playback, you must load it. 1. Tap Menu > Christie IMB > Control. 2. Tap the Unlock icon. 3. Tap Load Content. -
Page 42: Control Content Playback
Content Management Control Content Playback To control the playback of content, tap Menu > Christie IMB > Control, load the content, and then use these controls: Control Description Stop an intermission and resume playback of the primary play list. This... -
Page 43: Play Mpeg-2 Content
MPEG-2 content is automatically converted by the Christie IMB to match the color format and color space of JPEG 2000 content. A channel change is not required to play MPEG-2 and JPEG 2000 content in the same play list. -
Page 44: Loop Content
Progressive 8-bits 4:2:0 Although the Christie IMB supports all of the listed frame rates, the projector in which the Christie IMB is installed may limit the display of some formats. Loop Content 1. Tap Menu > Christie IMB > Control. -
Page 45: Refresh The Locally Stored Content List
3. Tap a content item in the content list. 4. Tap Details. 5. Tap Close to return to the Content window. Refresh the Locally Stored Content List 1. Tap Menu > Christie IMB > Content. 2. Tap Local Content. 3. Tap Refresh. Delete Locally Stored Content 1. -
Page 46: View Keys Not Yet Valid
4. Tap Delete All Displayed Keys. 5. Tap Yes. View Ingestible Content 1. Connect the device containing the content you want to ingest to the Ingest port on the IMB. 2. Tap Menu > Christie IMB > Content. 3. Tap Ingestible Content. -
Page 47: Ingest Content And The Kdm Key
USB flash drive. To ingest content, connect a hard drive to the Christie IMB Ingest port. You can use USB or eSATA connections. Typically, using the eSATA port to ingest content is faster, but it might be necessary to restart the Christie IMB so the data on the eSATA hard drive is recognized. -
Page 48: View The Progress Of Ingestible Content
Content Management View the Progress of Ingestible Content 1. Tap Menu > Christie IMB > Content. 2. Tap Ingest Status. Refresh the Ingest Status List 1. Tap Menu > Christie IMB > Content. 2. Tap Ingest Status. 3. Tap Refresh. -
Page 49: Manage Automation
Manage Automation You use automation to control playback, the projector, and external devices. The Christie IMB includes built-in support for some external automation devices. If the device is not supported, you can use the serial-over-Ethernet protocol to send automation commands. -
Page 50: Available Macro Actions
IP address. Add an Automation Device The Christie IMB has built-in support for the Christie ACT, Dolby CP650, Dolby CP750, and the Integ JNIOR. You need to add and configure the device before you can run commands. 1. Tap Menu > Christie IMB > System. -
Page 51: Control Christie Act Automation
Causes a specific LED to flash. Set all LEDs Sets values for all of the LEDs. Control INTEG JNIOR Automation Christie recommends that you use the built-in commands to control an INTEG JNIOR device. These are the available built-in commands: Command Description Open relay Opens a specific JNIOR relay. -
Page 52: Control Dolby Cp750 And Dolby Cp650 Cinema Processor Automation
Manage Automation Control Dolby CP750 and Dolby CP650 Cinema Processor Automation Christie recommends that you use the built-in commands to control Dolby CP750 and Dolby CP650 devices. These are the available built-in commands: Command Description Fader level Sets the fader level. -
Page 53: Add A Macro
Manage Automation Add a Macro 1. Tap Menu > Christie IMB > System. 2. Tap Automation > Macros. 3. Tap Add. 4. Enter a name for the macro and then tap Enter. 5. Tap Save. Add an Activity to a Macro 1. -
Page 54: Remove An Activity
Tap Down arrow to move the activity down. 6. Tap Save. Remove an Activity 1. Tap Menu > Christie IMB > System. 2. Tap Automation > Macros. 3. Tap a macro in the left pane. 4. Tap an activity in the Macro Activities list. -
Page 55: Remove A Macro
Manage Automation Remove a Macro 1. Tap Menu > Christie IMB > System. 2. Tap Automation > Macros. 3. Tap a macro in the left pane. 4. Tap Remove. 5. Tap Yes. 6. Tap Save. Add an Input Cue 1. Tap Menu > Christie IMB > System. -
Page 56: Add A Global Trigger
4. Tap Remove. 5. Tap Yes. 6. Tap Save. Add a Global Trigger 1. Tap Menu > Christie IMB > System. 2. Tap Automation > Global Triggers. 3. Tap Add. 4. Select an automation device in the Automation Device list. -
Page 57: Sample Automation Procedure
You cannot add GPO activities to Solaria One and Solaria One projectors because the communication panel does not include a GPI/O port. Create Macros 1. Tap Menu > Christie IMB > System. Christie Integrated Media Block User Manual 020-100845-05 Rev. 1 (08-2013) - Page 58 Manage Automation 2. Tap Automation > Macros. 3. Tap Add. 4. Enter Preshow and then tap Enter. Christie Integrated Media Block User Manual 020-100845-05 Rev. 1 (08-2013)
- Page 59 GPI/O port. 1. Tap the Preshow macro in the left pane. 2. Tap Add in the Macro Activities list. 3. Select Projector in the Automation Device list. Christie Integrated Media Block User Manual 020-100845-05 Rev. 1 (08-2013)
- Page 60 Lights 50% (GPO 4 High, GPO 5 Low) PIN Number: 4 Signal Direction: High Automation Device: IMB Automation Activity Type: GPO Set Lights 50% (GPO 4 High, GPO 5 Low) PIN Number: 5 Signal Direction: Low Christie Integrated Media Block User Manual 020-100845-05 Rev. 1 (08-2013)
- Page 61 1. Tap the Trailers and Features macro in the left pane. 2. Tap Add in the Macro Activities list. 3. Select IMB Automation in the Automation Device list. 4. Select GPO Set in the Activity Type list. 5. Select 4 in the Pin Number list.
- Page 62 1. Tap the Credits macro in the left pane. 2. Tap Add in the Macro Activities list. 3. Select IMB Automation in the Automation Device list. 4. Select GPO Set in the Activity Type list. 5. Select 4 in the Pin Number list.
- Page 63 Add Christie ACT Automation to a Macro You can use a GPIO control or an external automation device such as a Christie ACT to control automated events in your theatre. To add Christie ACT automations to a macro, you must add the Christie ACT to the Device Type list and define its connection parameters including the IP address, log in user name, and password.
- Page 64 Manage Automation Add the Christie ACT to the Device Type List 1. Tap Menu > Christie IMB > System. 2. Tap the Automation tab. 3. Tap the Devices tab. 4. Tap Add > Christie ACT > Accept. Christie Integrated Media Block User Manual...
- Page 65 Manage Automation 5. Enter Christie ACT Automation and then tap Enter. 6. Enter the IP address, user name, and password for the Christie ACT in the Device Configuration pane. In this example, use IP address 192.168.1.30 and service (the default setting) for the user name and password.
- Page 66 Message). An decryption key is not required for trailers and other unencrypted content. The KDM key is typically provided on a USB flash drive or by email. To generate the KDM keys, you must provide the electronic serial number (eSN) of the Christie IMB. See Identifying the Christie IMB Electronic Serial Number on page 4.
- Page 67 To ingest content, you can use a USB hard drive or connect a hard drive to the eSATA port. Typically, using the eSATA port to ingest content is faster, but you might need to restart the Christie IMB so the data on the eSATA hard drive is recognized.
- Page 68 This procedure adds an advertisement, a trailer, and the main feature to the play list. You can add your own content to the play list, or move to Add the Preshow Macro to the Play List. 1. Tap Menu > Christie IMB > Play Lists. 2. Select Blockbuster in the Selected Play List list.
- Page 69 6. Tap Insert Before or drag and then drop the content in the time line. The advertisement appears in the time line at the bottom of the play list window. If you insert content in the wrong location, drag and drop it to a new position. Christie Integrated Media Block User Manual 020-100845-05 Rev. 1 (08-2013)
- Page 70 1. Select Blockbuster in the Selected Play List list. 2. Select the advertisement content in the time line at the bottom of the play list. A yellow box appears around the content when you select it. Christie Integrated Media Block User Manual 020-100845-05 Rev. 1 (08-2013)
- Page 71 Manage Automation 3. Tap the Automation tab. 4. Select the Preshow macro in the top right pane. 5. Tap Insert. Christie Integrated Media Block User Manual 020-100845-05 Rev. 1 (08-2013)
- Page 72 3. Tap the Automation tab. 4. Select the Trailers and Features macro in the top right pane. 5. Tap Insert. 6. Tap Before Clip Start in the Offset From area. Christie Integrated Media Block User Manual 020-100845-05 Rev. 1 (08-2013)
- Page 73 In this example, you want the End of Show macro to run when the Sintel content ends. 1. Select Blockbuster in the Selected Play List list. 2. Select the feature content in the time line at the bottom of the play list. Christie Integrated Media Block User Manual 020-100845-05 Rev. 1 (08-2013)
- Page 74 This indicates that the End of Show macro will run after the feature finishes playing. Tap the triangle to display the settings for the End of Show macro. 8. Tap Save Changes. Christie Integrated Media Block User Manual 020-100845-05 Rev. 1 (08-2013)
-
Page 75: Manage Audio Settings
Map Channels on page 63. Map Speakers 1. Verify the digital cinema audio processor is connected to the AES3 port on the Christie IMB. 2. Tap Menu > Christie IMB > System. 3. Tap Audio > Speaker Mapping. 4. Complete the fields in the AES Output area. This is an example of speaker mapping for a Dolby 7.1 DS configuration:... - Page 76 Manage Audio Settings 1. Verify the digital cinema audio processor is connected to the AES3 port on the Christie IMB. 2. Tap Menu > Christie IMB > System. 3. Tap Audio > Channel Mapping. 4. Select Interop in the Mapping list.
-
Page 77: Manage Christie Imb Settings
Manage Christie IMB Settings This section provides procedures for managing Christie Integrated Media Block (IMB) settings. Restart the Server 1. Tap Menu > Christie IMB > System. 2. Tap General > Settings. 3. Tap Reboot Server. 4. Tap Yes. 5. Tap OK. -
Page 78: Restore Factory Default Settings
Restoring the factory default settings does not affect ingested content, keys, or play lists. After restoring the Christie IMB to its default settings, you must reconfigure the settings of your NAS or DAS device. -
Page 79: Install The Christie Imb Software Upgrade Package
Manage Christie IMB Settings 2. Tap Menu > Christie IMB > System. 3. Tap General > IMB Upgrade. 4. Tap Browse and browse to the location of the file. 5. Select the file. 6. Tap Accept. Install the Christie IMB Software Upgrade Package 1. -
Page 81: Play Lists
A play list is a list of content files and automated events that play in an order that you define. View an Existing Play List 1. Tap Menu > Christie IMB > Play Lists. 2. Select a play list in the Selected Play List list. -
Page 82: Copy A Play List
7. Enter a name for the play list. Tap Enter. 8. Tap OK. Copy a Play List 1. Tap Menu > Christie IMB > Play Lists. 2. Select a play list in the Selected Play List list. 3. Tap Copy this Play List in the Play List Tasks list. -
Page 83: Change The Order Of Content In A Play List
Tap Cancel Changes to undo your change. Change the Order of Content in a Play List 1. Tap Menu > Christie IMB > Play Lists. 2. Select a play list in the Selected Play List list. 3. Tap the Content tab. -
Page 84: Add Automation To A Play List
41 and Add Christie ACT Automation to a Macro on page 1. Tap Menu > Christie IMB > Play Lists. 2. Select a play list in the Selected Play List list. 3. Tap the Automation tab. 4. Tap content in the time line. The time line appears at the bottom of the Play List window. - Page 85 Play Lists 7. Select IMB Automation in the Automation Device list. 8. Select Delay in the Activity Type list. 9. Enter 5000 in the Duration (ms) list. 10. Tap Accept. 11. Tap Save. 12. Insert the 5 Second Black macro before content in a play list: a.
-
Page 86: Add An Intermission To A Play List
69 and Add Content to a Play List on page 70. 2. Tap Menu > Christie IMB > Play Lists. 3. Select the play list with the content you want to play during the intermission in the Selected Play List list. -
Page 87: Modify When An Automation Occurs
Play Lists Modify When an Automation Occurs 1. Tap Menu > Christie IMB > Play Lists. 2. Select a play list in the Selected Play List list. 3. Tap content in the time line. The time line appears at the bottom of the Play List window. -
Page 89: Schedule Views
45 minutes before the content is scheduled to appear. The projector is on, but the lamp is off. It is recommended that you add a lamp on command to your play lists. View the Schedule Calendar View Tap Menu > Christie IMB > Schedule Calendar View. Christie Integrated Media Block User Manual 020-100845-05 Rev. 1 (08-2013) -
Page 90: View The Schedule Day View
View the Schedule Day View Tap Menu > Christie IMB > Schedule Day View. Add a New Item to the Schedule 1. Tap Menu > Christie IMB > Schedule Day View. 2. Tap Add New Item in the Schedule Tasks list. 3. Tap Browse. -
Page 91: Copy A Scheduled Item
Modify the date and time the item plays. 6. Tap Accept. Copy a Scheduled Item 1. Tap Menu > Christie IMB > Schedule Day View. 2. Tap the forward and backward buttons in the right pane to select a day. 3. Tap the content. -
Page 92: Delete A Day Schedule
Schedule Views Delete a Day Schedule 1. Tap Menu > Christie IMB > Schedule Day View. 2. Tap the forward and backward buttons in the right pane to select a day. 3. Tap Clear Entire Day. 4. Tap Yes. Enable or Disable Auto Play When auto play is enabled, scheduled items play automatically. -
Page 93: Work With Configuration Files
Work with Configuration Files You use configuration files to modify the behavior of third-party software instructions supported by the Christie IMB. Use the procedures in this section to load a modified or default configuration file. Load a RealD 3D EQ Configuration File 1. -
Page 94: Load A Default Dolby Color Correction Configuration File
Load a Default Dolby Color Correction Configuration File This procedure overwrites modified Dolby Color Correction configuration files. 1. Tap Menu > Christie IMB > System. 2. Tap General > Config Files. 3. Tap Load Default Config in the Dolby color correction area. -
Page 95: Logs
Logs You can use logs to identify issues with Christie IMB performance. These are the available logs: • Screen Management System (SMS) - shows the date and time of important events and errors that occurred during SMS operation. • Security Manager (SM) - shows the date and time of events during the security manager operation •... -
Page 96: View Log Detail
4. Select SM in the Type list. 5. Tap Retrieve Logs. View Log Detail 1. Tap Menu > Christie IMB > Logs. 2. Select a start date for the log in the From list. 3. Select an end date for the log in the To list. -
Page 97: Clear The Log List
Logs Clear the Log List Clearing the log list refreshes the screen and does not remove log files from memory. 1. Tap Menu > Christie IMB > Logs. 2. Tap Clear Logs. Christie Integrated Media Block User Manual 020-100845-05 Rev. 1 (08-2013) -
Page 99: Backup And Restore
You can backup and restore content drive settings, automation definitions, scheduling, and audio and speaker mappings. When you run a backup, a backup file is created on the Christie IMB. You can copy the backup file from the Christie IMB to a USB flash drive. -
Page 100: Delete A Christie Imb Backup File
Backup and Restore Delete a Christie IMB Backup File 1. Tap Menu > Christie IMB > System. 2. Tap General > Backup/Restore. 3. Select a file in the Restore Files on Server list. 4. Tap Delete. 5. Tap Yes. 6. Tap OK. -
Page 101: Troubleshooting
Troubleshooting This section provides information and procedures for resolving common issues with the Christie Integrated Media Block (IMB). If you cannot resolve an issue, see the back cover of this document for contact information for your region. Diagnostic Troubleshooting Problem... -
Page 102: Ingest Troubleshooting
(API). You cannot access the FTP server directly to ingest content. For more information, see Ingest Remote Content from a Network IMB in the Christie IMB User Manual and the topic How do I set up a content network in Troubleshooting. What Ethernet ports can I use to remotely Ingest Remote Content from a Network IMB on page 31. -
Page 103: Key Delivery Message (Kdm) Key Troubleshooting
If a KDM expires during playback, does playback stop? When a play list is loaded, the Christie IMB verifies that all of the content in the play list can be played within the time allowed by the KDM. In addition, the DCI specification grace period allows playback to continue for up to 6 hours past the KDM expiry as long as playback was initiated before the KDM expired. -
Page 104: License Troubleshooting
SM but not the SMS (they do not appear on the Keys tab). This issue can occur when a NAS device or the Christie IMB is moved to another projector. Ingest the KDM keys again so they appear in the Keys tab. -
Page 105: Playback Troubleshooting
If the lamp turns off unexpectedly, does Yes. playback stop? If the lamp goes out, the Christie IMB pauses playback. As soon as the lamp is turned on, you can resume playback from where it was paused. How do I play high frame rate (HFR) •... - Page 106 Resolution Why do flashes appear on the screen during • Make sure the Christie IMB is firmly inserted into the IMB slot in playback? Turning the projector or Christie the projector card cage. If it appears loose, remove it, re-seat it, IMB on and off does not correct the issue and make sure it is securely locked in position.
-
Page 107: Set Up And Connection Troubleshooting
If you want to play 2D and 3D content in the same play list, play the content with a 3D channel. The Christie IMB frame doubles the 2D image to generate left and right eye frames... - Page 108 • This issue can also occur when you log in to the projector and it is in standby mode and then you move the Christie IMB to full power mode. To see all of the Christie IMB menus, log out and then log in again.
- Page 109 Verify: • The marriage ring is locked. • The security door is on and it is locked. • Christie is selected in the IMB Installed list. Tap Menu > Administrator Setup > Content Devices Configuration. Unload all content: 1. Tap Menu > Christie IMB > Control.
-
Page 111: Specifications
Specifications This section provides detailed specifications for the Christie Integrated Media Block (IMB). Regulatory This product conforms to the following regulations related to product safety, environmental requirements and electromagnetic compatibility (EMC): Safety • CAN/CSA C22.2 No. 60950-1-07 2nd Edition •... -
Page 112: Smpte Compatible Cinema Formats - 2D Video (Jpeg2000)
A rechargeable battery keeps anti-tamper monitoring active when the Christie IMB is removed from the projector. If the Christie IMB is not installed within a year, the battery can fail and you must return the Christie IMB to Christie Digital. To allow the Christie IMB to remain out of a projector beyond a year, a charging connector allows the battery to be recharged. -
Page 113: Smpte Compatible Cinema Formats - 3D Video
X'Y'Z' (4:4:4) SMPTE Compatible Cinema Formats - 3D Video The hardware configuration of the projector in which the Christie IMB is installed can affect frame rate performance. JPEG content must be contained in an Interop or Society of Motion Picture and Television Engineers (SMPTE) Digital Cinema Package (DCP) To support 3D playback the projector must be in line interleave mode. -
Page 114: Supported Audio Formats
8-bits 4:2:0 1920 x 1080 30.0 Progressive 8-bits 4:2:0 Supported Audio Formats The Christie IMB supports 8 channel pairs of AES/3 digital audio output on a standard D-SUB 25-pin connector. Specification Sample Rate Bit Depth SMPTE 428-2-2006 48.000 kHz 24-bits SMPTE 428-2-2006 96.000 kHz... -
Page 115: Aes3 Port Pin Map
Ch 5 & 6 plus Ground Ch 3 & 4 minus Ch 1 & 2 plus Ground Control Signal Compatibility Ethernet Port Interface: 10-Base-T/100-Base-T/1000-Base-T Connector: Female RJ-45 Bit Rate: 1000 Mbps Christie Integrated Media Block User Manual 020-100845-05 Rev. 1 (08-2013) -
Page 116: Power Requirements
Connector: Series 2-compatible backplane, PCI Express (x16) card edge connection Physical Specifications Overall Size (L x W x H): 280 mm (11 inches) x 219 mm (8.62 inches) x 57 mm (2.24 inches) Weight: 2.0 kg (4.4 lb) Christie Integrated Media Block User Manual 020-100845-05 Rev. 1 (08-2013) -
Page 117: Environment
Temperature: 0°C to 35°C (50°F to 95°F) Humidity (non-condensing): 20% to 80% Altitude: 0 - 3000 meters Maximum ambient temperature: 35°C Non-Operating Environment Temperature: 20°C to 65°C (-4°F to 149°F) Humidity (non-condensing): 0% to 95% Christie Integrated Media Block User Manual 020-100845-05 Rev. 1 (08-2013) -
Page 119: Terminology
Integrated Cinema Processor Integrated Media Block The Christie IMB is a printed circuit board that is installed in the projector card cage. The Christie IMB is connected to an external storage device and its role is to decrypt encrypted content stored on the external storage device. - Page 121 *000-103128-04* ASSY TECH DOCS Christie IMB...
- Page 122 Corporate offi ces Worldwide offi ces USA – Cypress United Kingdom Eastern Europe Singapore Japan ph: 714-236-8610 ph: +44 118 977 8000 ph: +36 (0) 1 47 48 100 ph: +65 6877-8737 ph: 81-3-3599-7481 Canada – Kitchener France Middle East Beijing South Korea ph: 519-744-8005...
Need help?
Do you have a question about the IMB and is the answer not in the manual?
Questions and answers