Table of Contents
Advertisement
Advertisement
Table of Contents

Related Manuals for Fermax LYNX VIVO


Summary of Contents for Fermax LYNX VIVO
- Page 1 LYNX Monitors USER & INSTALLER'S MANUAL ENGLISH...
- Page 2 Code 970013I V11_16 This technical document has been edited by FERMAX ELECTRÓNICA for informational purposes, and the company reserves the right to modify any of the technical specifi cations of the products referred to herein at any time without prior notice. These changes shall be refl ected in later editions of the same document.
-
Page 3: Table Of Contents
LYNX Monitor INDEX 1. INTRODUCTION ........................6 1.1 FUNCTION DESCRIPTION: LED NAVIGATION BUTTONS AND ICONS ........6 Function description ............................8 Buttons ................................8 Icons ................................8 2 SCREEN DESIGN. START MENU ..................10 2.1 STRUCTURE AND ARRANGEMENT OF FUNCTIONS ..............12 3 DESCRIPTION OF FUNCTIONS AVAILABLE ON MONITOR ..........15 3.1 GENERAL SETTINGS. - Page 4 LYNX Monitor 3.2.7 AUDIO NOTES ............................38 a) Record audio note..........................39 b) Play back audio note......................... 39 3.2.8 CALL HISTORY ............................. 40 a) Calls made ............................40 b) Calls received ........................... 40 c) Missed calls............................41 3.2.9 INTERNAL CALLS ..........................41 3.2.10 EXTERNAL CALLS ..........................
- Page 5 LYNX Monitor CONGRATULATIONS ON BUYING A QUALITY PRODUCT! Fermax Electrónica develops and manufactures premium equipment that meets the highest design and technology standards. Lynx monitors are technological devices designed to maximise communication, safety and comfort in the home. All of the monitor’s available functions are described in this manual. These functions may be enabled or disabled as you wish, according to your installation requirements.
-
Page 6: Introduction
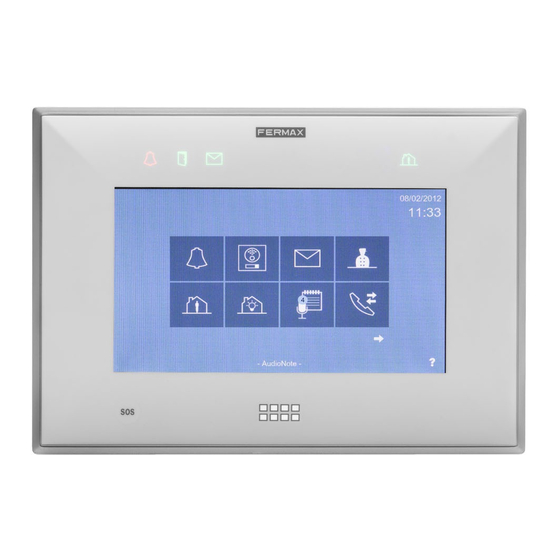
1.1 FUNCTION DESCRIPTION: LED NAVIGATION BUTTONS AND ICONS Once switched on, the monitor will start up and display the FERMAX logo, fi rmware version, MAC address and IP address. The boot-up process fi nishes in 60 seconds and the monitor enters in stand-by mode. - Page 7 LYNX Monitor Icon-button display on SMILE MONITORS Fermax SMILE Firmware version F _V03.00.007_SMILE MAC=28:04:E0:FF:71:52. Touch screen IP=10.0.0.1 DO NOT DISTURB MODE Message alert Outside Sleep Home MENU button Panic button (SOS) Alarm modes Audio Activation and Door Opening Button confi guration...
-
Page 8: Function Description
LYNX Monitor Buttons Function description MENU button When the touch screen is idle, pressing MENU will turn the screen on. When the touch screen is on, pressing MENU will turn the screen to idle. When the user is navigating a sub-menu, pressing MENU causes the monitor to return to the main home screen. - Page 9 LYNX Monitor Message alert When a new message is received, the message icon on the monitor lights up and a "beep" is heard (this sound is optional and can be disabled). If this message icon is lit, this indicates either a message, audio note, or missed call.
-
Page 10: Screen Design. Start Menu
LYNX Monitor 2 SCREEN DESIGN. START MENU The number of icons on the touch screen may vary depending on the features enabled in each specifi c installation. The icons are displayed with a maximum number of 8 per screen. This screen shows the available factory default icons. On the screen there is a question mark which, when selected, will open a screen showing the icon and explaining what it does. - Page 11 LYNX Monitor These are all the functions available on the monitor. When these functions are enabled, the screens will be as shown. The installer must select the icons that they wish to activate, according to the requirements of the installation. The descriptions and functions of these icons will be expanded upon in the various chapters of the manual.
-
Page 12: Structure And Arrangement Of Functions
LYNX Monitor Icons can be dragged in order to personalize the confi guration of the start menu with the user’s most frequently used functions, in any desired order. 2.1 STRUCTURE AND ARRANGEMENT OF FUNCTIONS Default functions + Optional functions enabled Do not disturb mode (3.2.1) Camera Activated... -
Page 13: General Settings
LYNX Monitor Image visualisation (3.2.12) Lift control (3.2.13) Doormatic mode (3.2.14) Send Message (3.2.15) Timer (3.2.16) Screen cleaning (3.2.17) Contact list - Friendship request (3.2.18) Mobility (3.2.19) Relay control (3.2.20) (3.2.21) Induction loop (3.2.22) General Settings (3.1) Ring settings (3.1.1) Background settings (3.1.2) Language settings... - Page 14 LYNX Monitor General Settings (3.1) Installer menu (3.1.9) Monitor settings (3.1.9.1) Delete all settings (reset) (3.1.9.2) Lift control settings (3.1.9.3) Optional functions(3.1.9.4) Alarm settings (3.1.9.5) Home Automation settings (3.1.9.6) Installer privacy settings (3.1.9.7) SD card menu (3.1.9.8) Mobility settings (3.1.9.9) Relay control (3.1.9.10) Doorbell settings...
-
Page 15: Privacy Settings (User)
LYNX Monitor 3 DESCRIPTION OF FUNCTIONS AVAILABLE ON MONITOR You must fi rst set the monitor’s language, date/time and address settings in order to confi gure / program the remaining functions. 3.1 GENERAL SETTINGS This function enables the confi guration of various monitor settings. When you press the General Settings icon, you will be taken to a screen containing various icons that control these settings. - Page 16 LYNX Monitor 3.1.2 General Settings. BACKGROUND SETTINGS The background settings function allows you to: - Select the background colour and brightness of the screen. - Select the audio level of the screen. Change the click volume. 3.1.3 General Settings. LANGUAGE SETTINGS The language settings function allows you to select the desired language for the monitor.
-
Page 17: Pin Required
LYNX Monitor 3.1.5 General Settings. REGIONAL SETTINGS The regional settings function allows you to not only change / update the date and time, but also adapt to the appropriate local date format. 3.1.6 General Settings. PRIVACY SETTINGS (USER) The privacy settings function allows you to lock some features of the monitor via a PIN code (password), for want of privacy or for other reasons. - Page 18 LYNX Monitor b) Messages Reading If in Privacy Settings, PIN required is selected: In Messages Reading, press the Receive Messages icon which will automatically open the PIN code request screen. Proceed with the messages as explained in: 3.2.4 Page 18 Receive messages...
-
Page 19: Change Pin
LYNX Monitor 3.1.6.2 Change PIN a) User PIN To change the user PIN. The default user PIN is: 1234. b) Alarm PIN To change the Alarm PIN. The default Alarm PIN is: 0000. Page 19... -
Page 20: Home-To-Home Call Settings
LYNX Monitor 3.1.7 General Settings. HOME-TO-HOME CALL SETTINGS The home-to-home settings function opens a screen that allows you to fi ll in the monitor labels: Tenant name: Identifi es the house (i.e., the García family, name Marta Jover ...). Note: - All monitors belonging to the same property must have the same Name, Block and Unit. -
Page 21: Installer Settings
LYNX Monitor 3.1.9 General Settings. INSTALLER SETTINGS Press Installer Settings, enter the installer PIN code (which is 4444 by default), press OK and access the screen containing various icons allowing you to make adjustments. Note: - The installation settings function is protected by a PIN so that it can only be manipulated by qualifi ed personnel. -
Page 22: A) Standard Lynx Mode / C) Static Ip Mode
LYNX Monitor a) Standard Lynx Mode / c) Static IP Mode If the selected network mode is LYNX Mode or Static Mode, the monitor will check if the IP address and the destination settings are available. Should any of these be unavailable, the monitor will not change its settings. -
Page 23: Optional Functions
LYNX Monitor 3.1.9.3 General Settings. Installer Settings LIFT CONTROL SETTINGS The Lift Control Settings function allows you to program the relays that are activated when the lift control icon is pressed. Up to 3 relays can be activated when this icon is pressed (depending on the installation / confi... -
Page 24: Alarm Settings
The Alarm settings function allows you to confi gure the various Sensor Unit Modules and their parameters. The monitor can manage a proprietary Fermax alarm via its Sensor Unit Module, which allows up to 16 areas to be managed. The monitor communicates with the Sensor Unit Module using a proprietary protocol via an RS- 485 interface. -
Page 25: Home Automation Settings
LYNX Monitor Type. Area type: * 24/7 Area. 24 hours, 7 days. Sensors such as smoke, gas, water, etc. which are always armed. * Night Area. Perimeter-control and movement sensors. * Out Area. All types of sensors. Mode. Area Working Mode: NO (Normally open) / NC (normally closed). The fi rst eight areas will be NC (normally closed), the other 8 areas can be confi... -
Page 26: Installer Privacy Settings
- Server. Server IP address. - Door. Optional (if needed). Door number. - URL. Web server address For example: http://www.fermax.com - Unit Router. Select this option if the automation server is located on another LAN. The household requires a ROUTER confi gured to its respective address. - Page 27 LYNX Monitor b) Alarm PIN To change the Alarm PIN. The default Alarm PIN is: 0000. c) Installer PIN To change the installer PIN. The default Installer PIN is: 4444. Note: - For security reasons, we recommend that you change these passwords as soon as possible and customise them to any other 4-digit number.
-
Page 28: Mobility Settings
LYNX Monitor SD options: a) Firmware updates. From the SD card. b) Loading confi gurations. Select a confi guration fi le from the SD card and load it into the monitor. c) Loading ringtones. Loading of ring tones from the SD card to the monitor. The ringtones loaded will be available to the user, each under the appropriate fi... -
Page 29: Doorbell Settings
LYNX Monitor Group: Name of the relay group. · This is the last digit of the IP address selected in the corresponding main IP relay module, Ref.1615. Module: module number · Indicate 255 to select the main module. · Indicate 1 -32 to select a secondary module. Relay: relay number on said module ·... -
Page 30: B) Edit Camera
LYNX Monitor 3.1.9.12 General Settings. Installer Settings IP CAMERA SETTINGS This function allows you to confi gure an IP camera. IP cameras must be manually added to the monitor. In the settings screen you can add cameras, test the camera you want to add, edit those cameras that have already been added and delete one or more cameras. -
Page 31: A) - B) Test Camera
LYNX Monitor a) - b) Test camera In both the edit and add screen,there is a camera icon with a question mark that can be used to check that the data you have entered will let you connect correctly to the camera. Note: - In case of any error, a warning message will appear on the screen. -
Page 32: Default Functions + Optional Functions Enabled
LYNX Monitor 3.2 DEFAULT FUNCTIONS + OPTIONAL FUNCTIONS ENABLED The functions that appear by default on the main screen of the monitor are: Using the Optional Functions command, (Chapter 3.1.9.4), the installer may activate the remaining functions of the monitor. 3.2.1 Default functions + Optional functions enabled. - Page 33 LYNX Monitor Notes: - If the Do Not Disturb mode is enabled and the monitor is reset or turned off (no power), it is disabled. - When the Do Not Disturb mode is enabled, the message reception tone is not deactivated. This tone may be disabled via the following option: 3.1.1 Call Settings 3.2.2 Default functions + Optional functions enabled.
- Page 34 LYNX Monitor 3.2.4 Default functions + Optional functions enabled. RECEIVE MESSAGES Function for viewing received messages. The monitor can receive text messages from the PMU Property Management Units (concierges) and other monitors. Note: This function is synchronised across all monitors belonging to the same unit. When a new message is received on the monitor, the user is informed in three different ways: 1.
- Page 35 3.1.6.). 3.2.5 Default functions + Optional functions enabled. ALARM MODE The monitor can manage a proprietary Fermax alarm by means of a Sensor Module. The monitor can communicate with (and confi gure) the Sensor Module, and also change the alarm OUTSIDE mode to different states.
- Page 36 LYNX Monitor To change the mode, you need to press the desired alarm icon. The following modes may be selected: HOME. Change to House mode. All sensors are disabled, except those in 24/7 areas, which remain armed. SLEEP. Change to Night mode. All sensors in 24/7 areas and Night areas are armed OUT.
- Page 37 LYNX Monitor SLEEP mode. (blue) OUT mode. (red) Notes: - In areas where Delayed Activation Mode applies, the system will offer a 100-second delay before arming when the safety level is increased. For example: After switching from Home mode to Out mode, 100 seconds will pass during which the door can be opened in order to leave the house without triggering the alarm.
-
Page 38: Audio Notes
LYNX Monitor Sabotage detection system (tamper alarm) The Vivo monitor has a tamper detection connector. If someone tries to disconnect it, the monitor will generate an alarm sound and send an alarm report to the Property Alarm Management Unit. Any sabotage action should be detected and communicated to the Property Alarm Management Unit (Concierge). -
Page 39: A) Record Audio Note
LYNX Monitor a) Record audio note Press the REC icon to access the Recorder screen. Press the record icon to start recording the audio note. Press the accept icon to fi nalise the recording of the audio note. The maximum recording duration is 30 seconds. -
Page 40: Call History
LYNX Monitor Notes: - Delete audio note (recycle bin), erases the selected audio note. Multiple audio notes may be selected. - You may if you wish erase ALL audio notes, without selecting a note; a sustained press on the delete (recycle bin) icon will erase all audio notes (confi... -
Page 41: C) Missed Calls
LYNX Monitor c) Missed calls The call log icon on the home screen may display two different options: List of calls. If the call log icon does not display a number, this indicates that no new missed calls have been received. New list of calls. -
Page 42: External Calls
LYNX Monitor 3.2.10 Default functions + Optional functions enabled. EXTERNAL CALLS This function allows you to make a call from a monitor to any other monitor on the same installation. Pressing the external call icon (Home-to-Home call) will display a list of all available monitors. Select the desired monitor and the call is sent automatically. -
Page 43: Image Visualisation
LYNX Monitor 3.2.12 Default functions + Optional functions enabled. PICTURE VIEW This function allows you to view all captured images. To see images that have been captured, press the images icon on the home screen. The most recent image is displayed, along with the pre-defi ned description of the Terminal from which the call was made, the date and the time. -
Page 44: Doormatic
LYNX Monitor 3.2.14 Default functions + Optional functions enabled. DOORMATIC According to confi guration. 3.2.15 Default functions + Optional functions enabled. SEND MESSAGES This function allows you to send messages. The monitor can send text messages to the PMU Property Management Units and other monitors (found in the contact list, see chapter 3.2.18 Contact list - Friendship request). -
Page 45: Timer
LYNX Monitor Notes: - Due to the message capacity limit, if the number of saved messages reaches the maximum and a new message arrives, the oldest message will be deleted in order to allow the new message to be recorded. - If there is more than one monitor in the house, actions taken on one of them will affect the others (e.g. -
Page 46: Contact List - Friendship Request
LYNX Monitor Notes: - Should a call come through during the cleaning period, the monitor will unlock itself automatically. - Use only a soft, lint-free cloth for cleaning. Abrasive cloths, towels, paper towels and similar products may cause damage to the monitor screen. Avoid getting any liquid and moisture in the openings. - Page 47 LYNX Monitor Select Add to Friends List and press confi rm. Note: - Once confi rmed, a text message is sent to the destination home, and a screen appears indicating that the friendship request is being sent. When the message is received at the destination home, the message icon on the monitor lights up and a "beep"...
-
Page 48: Mobility
LYNX Monitor If you click accept, an acceptance message is sent to the originating home and if the Contact List option is opened, the destination tag will display the housing label (if available). The contact list shows who you can call, and who can call you: (Arrow pointing to the right), appear in their list, but they do not appear in yours so you can receive... -
Page 49: A) Link Mobile Device
LYNX Monitor This screen shows the function in the title (in this case, it concerns mobility) and there is also a check box to enable mobility in the current unit. If the user selects this option, Call Divert is activated and from that moment on, any linked mobile telephones will receive call notifi... -
Page 50: Relay Control
LYNX Monitor 3.2.20 Default functions + Optional functions enabled. RELAY CONTROL This function will allow you to activate any relay from the list for 3 seconds. This option displays a list with the relay identifi er and the relay name. The user can activate a relay for 3 seconds by clicking on the corresponding row in the list. -
Page 51: Configuring The Monitor From The Web Server
LYNX Monitor 4 CONFIGURING THE MONITOR FROM THE WEB SERVER The monitor has an integrated web server, allowing for confi guration changes. This web server is accessed via the monitor’s IP address. The monitor’s IP address should by factory default be 10.0.0.1 (Block # 0, Unit # 1), but the monitor will surely already have a corresponding installation IP address, which will have been assigned under the 3.1.9.1 Monitor settings... -
Page 52: Calls
LYNX Monitor 5 CALLS 5.1 RECEIVING CALLS The monitor can receive calls from: - Outdoor panels • General Entrances • Panels within its block • Panels associated with the same home - Concierges (Property Management Unit = PMU) - Another monitor installed in the same home/apartment. - Another monitor on the same installation. - Page 53 LYNX Monitor When you receive a call, you have 30 seconds to answer before the device returns to idle. If the audio channel is opened, the communication will end automatically after 90 seconds or when the end call button is pressed. Reject call Answer call.
-
Page 54: Camera Activated
LYNX Monitor Information and icons that are displayed, depending upon the terminal from which the call was made: OUTDOOR PANEL PMU (Concierge) Monitor (same apartment) Monitor (another apartment) Notes: - Receiving calls with several monitors in the house. If there is more than one monitor in the house, all the monitors will sound and display the conversation screen with the incoming call. -
Page 55: D) Intercommunication: Calls Between Monitors
LYNX Monitor d) Intercommunication: Calls between monitors Calls may be made from one monitor to another. There are 2 types of calls: - Internal: when you make a call from your monitor to any other monitor in the same property. internal - External: when you make a call between properties, i.e. - Page 56 LYNX Monitor Note regarding SMILE monitors: - For the external panic button to work, the SOS icon must have been enabled by the installer in Optional Functions. See chapter 3.1.9.4 Optional Functions. - The P / A terminal is confi gured as an input and detects the push of the pushbutton when the SOS function is enabled.
-
Page 57: Installation - Monitor Measurements
LYNX Monitor 6 INSTALLATION - MONITOR DIMENSIONS 6.1 SMILE MONITOR FLUSH-MOUNT Installation Connect the cable to the RJ-45 connector. The cable should protrude by at least 10 centimetres, to facilitate the connection process. Male RJ45 connectors must be pre- installed at both ends of the cable, with no protection on the connectors. Put the excess cable back into the hole in the wall. -
Page 58: Dimensions (Flush / Surface)
LYNX Monitor DIMENSIONS Surface Flush Dimensions of Fermax fl ush box, ref. 6551: Note: 186 x 198 x 46 mm (Height x Width x Depth) - Does not require a bezel, (see installation). 6.2 VIVO/VIVO+ MONITOR DIMENSIONS Vivo Vivo+ Page 58... -
Page 59: Connectors - Technical Specifications
LYNX Monitor 7 CONNECTORS - TECHNICAL SPECIFICATIONS 7.1 SMILE MONITOR. a) Connectors Connections: RJ-45 10/100 Base -T Ethernet, powered by mains socket RJ-45. +, - : 12 Vdc power supply, (if PoE switch is not used). P/A: Using this terminal, you can choose between 2 different, mutually exclusive operations: connection of an external panic button or the option to connect a call extension or a light / doorbell activator. -
Page 60: B) Technical Specifi Cations
LYNX Monitor b) Technical Specifi cations - Operating temperature -5ºC to +40ºC. - Relative humidity: 5-95%, without condensation. Consumption (with external 12 Vdc supply): • Boot-Up Process (up to 3 seconds after power is switched on): 430mA. • Idle: 225 mA. •... -
Page 61: Vivo/Vivo+ Monitor
LYNX Monitor 7.2 VIVO/VIVO+ MONITOR. a) Connectors Monitor connections. - 30 pins to connect to monitor connector. - Mini USB (internal) for the fi rmware (at startup). - SD card slot. Monitor connector. Connections: RJ-45 10/100 Base -T Ethernet, powered by mains socket RJ-45. NG, P: To connect a secondary external SOS panic button (dry contact). -
Page 62: B) Technical Specifi Cations
LYNX Monitor b) Technical Specifi cations - Operating temperature 5ºC to +40ºC / 41ºF to +104ºF. - Relative humidity: 5-90%, without condensation. Monitor Capacity and Parameters, (default values in brackets []): - Maximum number of monitors per dwelling: 8. - Maximum number of dwellings per block: 8,192. - PIN codes: •... - Page 63 LYNX Monitor Page 63...
Need help?
Do you have a question about the LYNX VIVO and is the answer not in the manual?
Questions and answers