Table of Contents
Advertisement
Advertisement
Table of Contents

Related Manuals for Netscout AirCheck G2


Summary of Contents for Netscout AirCheck G2
- Page 1 AirCheck ™ Wireless Tester User Manual Released 03/2016, Revision 09/2017 Copyright ©2017 NETSCOUT SYSTEMS, INC. All rights reserved. All product names are trademarks of their respective companies. Wi-Fi ® is a registered trademark of the Wi-Fi Alliance.
- Page 2 Use of this product is subject to the End User License Agreement available at or which accompanies the product at the time of shipment or, if applicable, the legal agreement executed by and between NETSCOUT SYSTEMS, INC., and the purchaser of this product ("Agreement").
-
Page 3: Table Of Contents
The NETSCOUT Website ..............................3 Contact NETSCOUT ................................3 Safety Information ................................3 Package Contents ................................5 Internal Battery Charging and Life ..........................5 AirCheck G2 Tester Physical Features ......................6 III. The AirCheck G2 Home Screen .........................7 Discovering Networks and Access Points ....................9 The Networks List Screen ..............................10 How to: Search for Ad-Hoc networks ............................12... - Page 4 Viewing Channel Usage ..........................21 The Channels Utilization Screen ............................ 21 The Select Channel Screen .............................. 23 The Channel Details Screen ............................24 The Channels Overlap Screen ............................25 Discovering Clients ............................. 27 The Client List Screen ..............................27 The Client Details Screen ..............................29 Troubleshoot: If the Tester Does Not Discover a Client ....................
- Page 5 How to: Enter credentials in AirCheck G2 Manager ........................50 Using Profiles to Manage Settings and Security Credentials ..................51 How to: Save the current settings as a Profile on the AirCheck G2 Tester ................52 How to: Transfer a Profile from a PC to the Tester ........................53 How to: Load a Profile that is saved in the AirCheck G2 Tester ....................
- Page 6 How to: Add a new network Test Target ............................56 Running a Connect to Network or Connect to AP Test ....................58 Reviewing Connect to Network or AP Results ......................59 Connection Established ................................. 59 IP Address ....................................59 Captive Portal ..................................59 Target Tests .....................................
- Page 7 How to: View available memory on the Tester ..........................87 Using the Remote Interface ............................88 Managing Profiles and Sessions on a PC using AirCheck G2 Manager ..............88 How to: Transfer and view test sessions with AirCheck G2 Manager ..................88 How to: Transfer and view Profiles with AirCheck G2 Manager ....................
- Page 8 How to: Add a network and configure network settings ......................91 How to: Edit a network ................................... 92 How to: Delete a network ................................92 Access Points ..................................92 How to: Add an AP and configure AP settings ..........................92 How to: Edit an AP ..................................
- Page 9 XIX. Maintenance ............................... 107 Cleaning the Tester ................................107 Updating the AirCheck G2 Firmware ..........................108 Exporting a Troubleshooting Log ........................... 108 Restoring Factory Defaults .............................. 108 Viewing Device Information ............................109 Troubleshoot: If the Tester Will Not Turn Off ....................... 109 XX.
- Page 10 What Networks or Access Points Come into Range as I Move? ................. 128 How Can I Document My Network and My Test Session? ..................128 viii...
- Page 11 List of Figures Figure Page AirCheck G2 Physical Features ...........................6 AirCheck G2 Home Screen............................7 Networks List Screen ..............................10 Possible Ad-Hoc Network............................12 Networks Sorted by Client Count..........................12 Network Details Screen...............................12 Access Points List .................................15 Select BSSID to View AP Details..........................17 Access Point Details Screen ............................18 Channels Utilization Screen ............................21...
- Page 12 AutoTest Network Connection Test Results ......................42 AutoTest Network Test IP and Test Targets......................43 Ethernet Test Screen ..............................44 Successful Link-Live Upload Field ..........................46 Session Data > Networks in AirCheck G2 Manager ....................47 Settings Menu Screen..............................48 Network Details Screen...............................49 Configured Networks in Settings ..........................50 Settings >...
- Page 13 Locate Screen Connection Lost/Recovered ......................68 Locate Interferer Screen .............................69 Search Pattern for the External Antenna........................71 How to Point the External Antenna ...........................72 Network Roaming Test Screen ...........................74 Roaming Test Ping Stats..............................74 Roaming Test Connection Range ..........................75 AP Range Test Screen ..............................78 AP Range Test Connection Range Graph ........................79 Select iPerf Server Screen ............................80 Touch to Select an iPerf Server ..........................81...
-
Page 14: Introduction
The high-level discovery screens for Networks, Access Points, and Clients each show an overview of the In addition to the AirCheck G2 Tester hand-held tool, the devices that AirCheck G2 has detected on your network. Link-Live Cloud Service and AirCheck G2 Manager PC... -
Page 15: Aircheck G2 Manager
Blue underlined links test results; and update your AirCheck G2 Tester software. go to external resources on the internet. For example, you can use AirCheck G2 Manager to compare Register Your Product information from different test sessions to see changes in a wireless LAN and generate reports based on test data. -
Page 16: The Netscout Website
The NETSCOUT Website Safety Information The NETSCOUT (formerly Fluke Networks) website provides Table 1 gives descriptions of the safety symbols used on the additional documentation, release notes, software updates, Tester and in this manual. and other resources. Table 1. Safety Symbols Go to http://enterprise.netscout.com, and click Support. - Page 17 Read all safety information before using this Product. If you use an external antenna, use only the antenna made for the AirCheck G2 Tester. The Tester may not Carefully read all instructions. operate correctly with other antennas and may violate local regulations.
-
Page 18: Package Contents
Package Contents Internal Battery Charging and Life The AirCheck G2 Wireless Tester comes with the accessories Charge the battery for 3 hours before you use it for the first in the list below. If something is damaged or missing, tell the time. -
Page 19: Aircheck G2 Tester Physical Features
USB Port 3: For Power Button but the unit is off. 200mA of current, e.g., and LED thumb drives, etc. Once the battery is fully Charging charged, the LED turns Port off. Figure 1. AirCheck G2 Physical Features... -
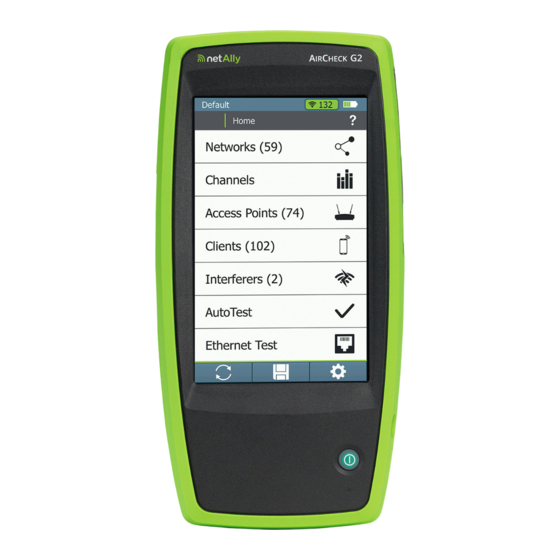
Page 20: The Aircheck G2 Home Screen
The AirCheck G2 Home Screen G2 H III. HECK CREEN The AirCheck G2 Wireless Tester features a full color touchscreen. Touch functions are noted in the following descriptions of the Home Screen components: Profile Name: This field displays the name of the Profile ... - Page 21 AutoTest and open the AutoTest screen. “Using AutoTest to Diagnose Your Network Health,” Touch the Home button to return to the Home Screen page 36. from any other screen on the AirCheck G2 Tester. Ethernet Test : This function runs a wired network ...
-
Page 22: Discovering Networks And Access Points
with SSIDs and access points that have been discovered by background turns gray to the AirCheck G2 Tester in your location. indicate that a network or device has not been detected for the last four scans, or is From the Home Screen, select Networks or Access now out of range. -
Page 23: The Networks List Screen
Discovering Networks and Access Points The Networks List Screen The Networks list screen provides an overview of the Wi-Fi networks that the AirCheck G2 has discovered in your environment. The networks are identified by SSID. Networks (#): The screen title displays the number of ... - Page 24 This icon appears to the right of the active filter. containing the discovery or test results that Touch the icon to remove the filter. have been collected since the AirCheck G2 last refreshed. See “Saving Sessions and Touch the Help button on the Filter Networks By: Packet Captures,”...
-
Page 25: How To: Search For Ad-Hoc Networks
Discovering Networks and Access Points The Network Details Screen How to: Search for Ad-Hoc networks On the Networks list screen, look for networks with 0 APs Touch any network’s row on the Networks list screen (Figure and 1 or more clients. These could be Ad-Hoc Networks. 3) to open the Network Details screen. - Page 26 Discovering Networks and Access Points This triangle symbol in the top right corner of a field Gray closed lock: Access points on this network are indicates that you can touch the field to go to a new screen. using multiple security protocols. Touch functions are explained in the following descriptions: 802.11 Types: The 802.11 standards that the access points in Screen Title: The SSID of the network shown.
-
Page 27: The Access Points List Screen
Save: Touch this button to save a session file containing bands as two separate access points, regardless of AP the discovery or test results that have been collected since grouping settings. the AirCheck G2 last refreshed. See “Saving Sessions and Packet Captures,” page 85. See “802.11 Settings,” page 94. - Page 28 Discovering Networks and Access Points The Access Points list screen displays all the access points that AirCheck G2 has discovered. Access Points (#): The number of APs discovered by the Tester. Sort (Option Field): This field shows the sort option that ...
- Page 29 G2 in Settings > 802.11 Settings > Default AP screen for more detail about each option. Authorization or using AirCheck G2 Manager's Profile Setup. If you have not set a default authorization, the Channel: The channel used by the AP.
-
Page 30: The Access Point Details Screen
Save: Touch this button to save a session file containing the discovery or test results that have been collected since the AirCheck G2 last refreshed. See “Saving Sessions and Packet Captures,” page 85. Figure 8. Select BSSID to View AP Details... - Page 31 Discovering Networks and Access Points Screen Title: The AP’s name (BSSID, Cisco AP name, or user- created alias) is displayed at the top of the AP Details screen. Signal Strength: The signal strength rating for the AP. Signal Level: The AP’s signal level in dBm. NOTE: If Custom Signal Adjustments are applied to a client, an asterisk (*) appears next to the Signal Level value on this screen.
- Page 32 Discovering Networks and Access Points Green closed lock: All access points use security Clients: The number of clients connected to the AP. protocols that are more secure than WEP, for example, Touch this row to open the Clients list screen with the WPA or WPA2.
-
Page 33: Troubleshoot: If The Tester Does Not Discover An Access Point Or Network
The access point does not beacon when the Tester is the discovery or test results that have been collected since listening to the channel that the access point uses. the AirCheck G2 last refreshed. See “Saving Sessions and The Tester cannot hear the access point because the ... -
Page 34: Viewing Channel Usage
From the Home Screen, touch Channels to open the Channels Utilization screen, which provides an overview of all channels and their APs. AirCheck G2 calculates and records the average 802.11 and Non 802.11 channel utilization for each channel per each scan. Discrete channel utilization measurements begin when you power on and update with each scan. - Page 35 802.11 utilization, and non-802.11 utilization) for each show 802.11 usage because of overlap from access channel in the session. These results are sent to AirCheck G2 points on adjacent channels. Manager when you upload the session file. If there are too many APs to show individual dark ...
-
Page 36: The Select Channel Screen
Viewing Channel Usage The Select Channel Screen The channel being selected. The number of APs on the channel. The Select Channel screen offers a close-up view of the selected channel. The bar graphs show how much of the channel capacity ... -
Page 37: The Channel Details Screen
Viewing Channel Usage The Channel Details Screen The Channel Details screen shows the following detailed information about the selected channel: Screen Title: The channel number and frequency of the channel being monitored. APs: The number of access points discovered on the channel. Touch this row to open the Access Points list screen with the APs filtered for the selected Channel. -
Page 38: The Channels Overlap Screen
(in dBm) of the AP, correlating with A colored parabola is shown on the graph for each active the y-axis. Access Point the AirCheck G2 detects. The parabola is centered on the center channel (x- Touch an AP's parabola to open the corresponding AP Details axis) being used by the AP. - Page 39 Viewing Channel Usage A line extends from the top of the parabola to the AP's primary channel on the x-axis. Only APs with a detected signal level of -85 dBm or above are shown on the graph. Touch Utilization to return to the Channels Utilization screen.
-
Page 40: Discovering Clients
Discovering Clients ISCOVERING LIENTS While the Tester is on, it monitors each channel for client traffic to discover client devices. To see these clients, touch the Clients row on the Home Screen. NOTES: The Tester is only able to update the client’s information when the client transmits data at the same time that the Tester is monitoring the channel that the client uses. - Page 41 Save: Touch this button to save a session file available. containing the discovery or test results that have been collected since the AirCheck G2 last NOTE: The client name can be either (1) MAC colon refreshed. See “Saving Sessions and Packet format, e.g., 00:11:22:33:44:55 or (2) OUI compact colon...
-
Page 42: The Client Details Screen
Discovering Clients The Client Details Screen Touch the Help button on the Filter Clients By: screen for more detail about each option. The Client Details screen shows the following detailed Channel: The channel which a client is using. This field is ... - Page 43 Discovering Clients Security: Shows the security type for the client-AP connection. The field will be blank if the client is not associated with an AP, is using an ad-hoc connection, or its security standard is unknown. 802.11 Type: The 802.11 type that the client is using: 802.11a: Uses the 5-GHz band.
-
Page 44: Troubleshoot: If The Tester Does Not Discover A Client
Save: Touch this button to save a session file containing the discovery or test results that have been collected since a Client the AirCheck G2 last refreshed. See “Saving Sessions and In some situations, the Tester will not discover a client Packet Captures,”... -
Page 45: Detecting Interferers
Event (#): Numbers the interferer events in order of To view a list of all the interferer types AirCheck G2 can occurrence. NOTE: Events may or may not be listed in display if detected, touch the Filter button... - Page 46 Util: The percentage of time, during the most recent sample, for which the interferer was detected. Band: The band on which the AirCheck G2 detects the interfering device. This is also a variable field, which changes based on the Sort option currently applied.
-
Page 47: The Interferer Event Details Screen
Refresh: Touch this icon to clear the current AirCheck G2. results and restart the scan. Caution Type: The type of interfering device detected by AirCheck G2. Average Power: The average observed power output in Touching the Refresh button will erase all dBm of the interfering device. - Page 48 “Locating an Access Point, Client, or Interferer,” page 64. Save: Touch this button to save a session file containing the discovery or test results that have been collected since the AirCheck G2 last refreshed. See “Saving Sessions and Packet Captures,” page 85.
-
Page 49: Using Autotest To Diagnose Your Network Health
Adjacent Channel Interference has failed. These ratings are controlled by the Thresholds configured in the AirCheck G2’s Settings > Thresholds. See “Adjusting the Test Thresholds,” page 54. To run an AutoTest, touch the AutoTest field on the Home Screen. -
Page 50: Non-802.11 Utilization
Using AutoTest to Diagnose Your Network Health measured utilization percentage and rating of Pass, Non-802.11 Utilization Warning, or Fail, based on the Channel 802.11 The Non-802.11 Channel Utilization results include the top Utilization threshold. three channels in each band (2.4 GHz and 5 GHz) with the most non-802.11 interference, e.g., noise. -
Page 51: Co-Channel Interference
Using AutoTest to Diagnose Your Network Health Co-Channel Interference The Co-Channel Interference results display the top three channels in each band (2.4 GHz and 5 GHz) with the highest number of APs that exceed the minimum AP signal level threshold in the same channel. This measurement is independent of SSIDs and solely looks at the number of APs using the same channel and their signal quality. -
Page 52: Rogue Access Points Test
You must also select the networks you want tested If no rogue access points are detected, the field turns during AutoTest from the AutoTest Settings screen green. Settings > AutoTest Settings). If AirCheck G2 detects APs that have a Flagged status, the field turns yellow. - Page 53 Using AutoTest to Diagnose Your Network Health Figure 22. AutoTest Settings Screen Touch AutoTest from the Home Screen. Once the SSID and security credentials have been entered, AutoTest runs Network Tests for each network selected. In the example shown in Figure 22, security for the SSID, “Cisco4400,”...
-
Page 54: Network Quality Results
Using AutoTest to Diagnose Your Network Health Network Quality Results Connection Test Results The Connection test results indicate whether or not you can connect to an AP for the configured network at your current location. The Connection field turns green if the connection was successful and if the connect was unsuccessful. -
Page 55: Ip Address Result
Using AutoTest to Diagnose Your Network Health BSSID: The MAC address of the access point. AP Name: The name of the AP to which the Tester is connected. The address starts with a vendor abbreviation prefix, if the prefix is available. Channel: The channel the AP uses. -
Page 56: Target Test Results
DHCP Server: Indicates whether or not the DHCP service could be successfully pinged. The optional test targets show whether or not AirCheck G2 DNS1 and DNS2: Indicate whether the DNS server could be can ping the targets selected in Settings > Test Targets, which successfully pinged. -
Page 57: Testing Ethernet For Access Point Backhaul
VLAN IDs. The information is gathered from switch port info packets (CDP, EDP, and LLDP). NOTE: The AirCheck G2 listens for the first switch info packet (LLDP, CDP, or EDP) on the wire after it establishes link and uses this to populate the Port information. - Page 58 Stop: While the test is running, select this button to stop the not always be from its link partner. test. Furthermore, when AirCheck G2 is not linked directly to a Restart: After the test has completed (or you've stopped the managed switch that emits these types of packets, but is test), select the Restart button to start a new test.
-
Page 59: Companion Services
OMPANION ERVICES These two free services enhance your testing, analysis, and In the Claim Unit dialog, select the AirCheck G2 image. documentation capabilities with the AirCheck G2 Tester. Follow the on-screen instructions to finish claiming. Getting Started in Link-Live Cloud Service Click “Listen”... -
Page 60: Getting Started With The Aircheck G2 Manager Pc Application
After downloading and installing the application, connect the Link-Live Cloud Service web site. For more information your AirCheck G2 Wireless Tester to the PC using the supplied about Link-Live, click Support > Questions from the left-side Micro Type B to USB cord. -
Page 61: Customizing The Tester For Your Network
Tester for your network and running in-depth performance tests. For a description of all other settings, see “All AirCheck G2 Settings” on page To change the settings on the Tester, touch the Settings button from the Home Screen. -
Page 62: Entering Network Security Credentials
screen In the Tester’s Settings menu In AirCheck G2 Manager’s Profile Setup menu How to: Enter credentials from the Networks or Access Points list If you select a discovered network or AP from the Networks or Access Points list, you will not need to enter the SSID. -
Page 63: How To: Enter Credentials In The Settings Menu
Select Networks. NOTE: See the AirCheck G2 Manager Help On the Networks settings screen, touch Add Network. additional instructions. Figure Connect the Tester to a PC with AirCheck G2 Manager Enter the necessary SSID. installed. Open the AirCheck G2 Manager application. -
Page 64: Using Profiles To Manage Settings And Security Credentials
If necessary, transfer the “Default” Profile (or a profile Tester and security credentials for networks and APs, which created on AirCheck G2) from AirCheck Profiles, in the let the Tester connect and perform roaming tests and left pane, to Local Profiles in the right pane by connectivity tests to DNS servers, DHCP servers, the default dragging and dropping the Profile name. -
Page 65: How To: Save The Current Settings As A Profile On The Aircheck G2 Tester
(*) if you have changed a setting on the Tester since you last saved the Profile. You can create and edit Profiles on both the AirCheck G2 Tester and in AirCheck G2 Manager on a personal computer (PC). -
Page 66: How To: Transfer A Profile From A Pc To The Tester
NOTE: See the AirCheck G2 Manager Help Touch Name and use the on-screen keyboard to additional instructions. type in a new name. Use the Profile Setup in AirCheck G2 Manager to make a Touch DONE when finished. Profile. To save a Secured Profile:... -
Page 67: How To: Load A Profile That Is Saved In The Aircheck G2 Tester
NOTE: You must Load the Profile on the Tester before you can use it. The AirCheck G2 Tester illustrates the status of your network How to: Load a Profile that is saved in the AirCheck G2 using red, green, and yellow... -
Page 68: How To: Change The Test Thresholds On The Tester
Customizing the Tester for your Network How to: Change the test thresholds on the Tester Touch Settings on the Home Screen. Select Thresholds. Figure 36. Thresholds Screen Touch the buttons to increase or decrease the measurements that will receive a rating of Pass (green) or Fail (red). -
Page 69: Verifying Connectivity And Coverage
NOTE: Up to 10 test targets can be configured and saved as connectivity. However, the Connect to Network or AP part of a Profile on the AirCheck G2 Tester. tests connect to one SSID at a time, allow you to enter... - Page 70 URL Keyboard or IPv4 Address Keyboard, and type in the address. (In Figure 38, the user has added NOTE: When you add a test target in Settings > Test www.netscout.com.) Targets, the target is automatically added to AutoTest and Connect to Network/AP tests. See Figure...
-
Page 71: Running A Connect To Network Or Connect To Ap Test
Verifying Connectivity and Coverage Running a Connect to Network or Connect to AP Test From the Home Screen, touch Networks or Access Points. Touch the row of the relevant network or AP to open its Details screen. From the Network or AP details screen, touch the Connect button at the bottom of the screen to open the Connect to Network or Connect to AP screen, ... -
Page 72: Reviewing Connect To Network Or Ap Results
Verifying Connectivity and Coverage Reviewing Connect to Network or AP Results Captive Portal When the Captive Portal setting is enabled, this portion of the The results fields on this screen change color to indicate the test opens a web browser window that allows you to enter success or failure of each portion of the Connect to Network the required credentials for the network. -
Page 73: Target Tests
NOTE: If the Tester roams to a new AP after a connection test has completed, a data rate of -- will be displayed. The -- indicates that AirCheck G2 is not currently transmitting Wi-Fi data and a data rate cannot be Figure 41. -
Page 74: Reviewing User-Defined Test Target Results
Verifying Connectivity and Coverage Reviewing User-Defined Test Target Results While the Connection test is still running, the Target Test fields displays: Once the test finishes, the field turns green if successful. Figure 42. The Connect to Network Screen Signal Level: The measured real-time signal level. Noise Level: The measured real-time noise level. - Page 75 IP Address: IP address for the ping or the TCP Port Connect target. Pings Sent: The number of pings the AirCheck G2 Tester sent to the target. Pings Returned: The number of pings the Tester received back from the test target.
-
Page 76: Next Steps
Verifying Connectivity and Coverage Next Steps After running Connection tests, the AirCheck G2 Tester displays the buttons to start a Network Roaming Test or AP Range Test. On the completed Connect to AP screen (Figure 41), press Range Test to begin a range test for the AP. ... -
Page 77: Locating An Access Point, Client, Or Interferer
The AirCheck G2 Tester can use either the external antenna or the internal antennas, but not both at the same time. Divide the area you want to search into four sections, as When you are on the Locate screen, if AirCheck G2 has shown in Figure 45. -
Page 78: How To: Search Using The Internal Antennas
Locating an Access Point, Client, or Interferer How to: Search using the Internal Antennas Make a note of the signal strength. Go to the first corner of the section that had the strongest signal. Figure 45. Search Pattern for the Omni-directional Antennas in the Tester... -
Page 79: The Locate Ap Screen
Signal Strength line graph at the time of connection loss, but the graph continues scrolling. Once AirCheck G2 comes back within the range of the AP’s signal, a green vertical line appears on the line graph. -
Page 80: The Locate Client Screen
Locating an Access Point, Client, or Interferer increases (i.e., as you are moving closer to the AP). The sound icon displays in the screen header when sound is On. External Antenna Icon: Press this button to turn the External Antenna on or off. The external antenna is On when the icon displays in the screen header, as shown in Figure The Locate Client Screen... - Page 81 Signal Strength line graph at the time of connection loss, but the graph continues scrolling. Once AirCheck G2 comes back within the range of the client’s signal, a green vertical line appears on the line graph.
-
Page 82: The Locate Interferer Screen
(high watermark). Figure 49. Locate Interferer Screen Sound/Mute Icon: Press this button to turn off the sound. When sound is on, the icon displays in the screen header, and AirCheck G2 emits an audible single-tone clicking... -
Page 83: Using The External Directional Antenna
Use these guidelines when you use the external antenna functional in the Locate screens. (See Figure 51.): While on one of the Locate screens, the AirCheck G2 Hold the antenna at a constant height. You can get more Tester does not transmit. - Page 84 Locating an Access Point, Client, or Interferer The signal can be stronger above or below you. Go to the middle of the section that has the strongest signal until you find the access point. Figure 50. Search Pattern for the External Antenna...
- Page 85 Locating an Access Point, Client, or Interferer Figure 51. How to Point the External Antenna...
-
Page 86: Performing A Network Roaming Test
Once AirCheck G2 has connected to a network, the Roaming The Roaming Test screen displays the following information: Test button appears at the bottom of the Connect to AP Name: Shows the name of the AP to which AirCheck G2 is Network screen (Figure 44). - Page 87 Ping information: Figure 53. Roaming Test Ping Stats IP Address: The IP address of the target to which AirCheck G2 is sending ping packets. Pings Sent: The number of ping packets sent. Figure 52. Network Roaming Test Screen Pings Returned: The number of ping packets returned.
- Page 88 Connection Range line graph shows a green vertical line that target, e.g., netscout.com, the results of the test at the time the tool connected to the new AP. will be displayed as follows: PHY Date Rate: The connection's transmit physical data rate in Mbps.
- Page 89 Performing a Network Roaming Test Press the Stop button to stop the test. Press the Log button to see detailed connection activities.
-
Page 90: Performing An Access Point Range Test
Use the keyboard to enter the IP address or host name How to: Start a Range Test of the target. Once AirCheck G2 has connected to an AP, the Range Test Select DONE. button appears at the bottom of the Connect to AP screen (Figure 41). -
Page 91: The Ap Range Test Screen
Performing an Access Point Range Test The AP Range Test Screen The Range Test screen shows the following information: AP Name: The name of the AP to which AirCheck G2 is currently connected. Target: The selected test target. Ping Stats: The percentage of ping packets lost. Select the... - Page 92 Select the up arrow to collapse it. test has completed, a data rate of -- will be displayed. NOTE: AirCheck G2 does not roam during a range test. It The -- indicates that AirCheck G2 is not currently disconnects when it goes beyond the AP's signal transmitting Wi-Fi data and a data rate cannot be coverage area.
-
Page 93: Conducting Iperf Performance Testing
The Select iPerf Server Screen The iPerf Test is a standardized network performance tool used to measure UDP or TCP capacity and throughput. The AirCheck G2 can perform iPerf testing with either a NETSCOUT Test Accessory or iPerf server software installed on a PC as the test endpoint. - Page 94 Server field at the top of this screen. The currently selected iPerf Server IP address displays in If you have recently run an iPerf test on the AirCheck G2, the top field on this screen. Touch any of the discovered...
-
Page 95: Available Iperf Remotes List
Test Accessory. If you restore a Test Accessory to factory default Connect your AirCheck G2 to your subnet using the same configuration, you must un-claim the Test Accessory in Ethernet switch port you will use to connect your Test Link-Live and re-claim it before AirCheck G2 will be Accessory. -
Page 96: Reviewing Iperf Test Results
Pass (green), Fail (red), or Warning (yellow) results: NOTE: To adjust the Pass/Fail thresholds, TCP/UDP, and other settings for the iPerf Test, go to Settings > iPerf Settings on your AirCheck G2. See “iPerf Settings,” page 101. Touch Start to run another iPerf test to the same iPerf Server. -
Page 97: Tcp Only Results
Conducting iPerf Performance Testing TCP only Results Avg. Up Speed: The network's average upload rate. Max Up Speed: The network's maximum upload rate. Avg. Down Speed: The network's average download rate. Max Down Speed: The network's maximum download rate. NOTE: This icon indicates that the hardware may be limiting the maximum speed measurement. -
Page 98: Saving Test Sessions And Managing Files
Refresh, pressed AutoTest, disconnected the USB cable, or rebooted the Tester. The AirCheck G2 Tester saves up to 100 test results. A session file includes this information: AutoTest results (if saved when exiting AutoTest) ... -
Page 99: How To: Save And View A Packet Capture
When finished, touch Apply to save the session file. capture file. To view the saved session, open it in AirCheck G2 Manager. To view packet captures, export them onto a USB drive, and See “Managing Profiles and Sessions on a PC using open them on a PC or tablet with a packet capture viewing AirCheck G2 Manager,”... -
Page 100: How To: Export Files To A Usb Drive
Saving Test Sessions and Managing Files To delete a file, touch the icon next to the filename Insert a USB flash drive into one of the AirCheck G2's USB you want to delete, and then touch Yes in the ports. -
Page 101: Using The Remote Interface
When you are done with the remote session, you must turn From the Session Details screen, click the Transfer your AirCheck G2 Tester off and back on to reset it to normal button to open the Transfer Sessions dialog box. -
Page 102: How To: Transfer And View Profiles With Aircheck G2 Manager
The left “AirCheck G2 Profiles” pane shows Profiles that are saved on the AirCheck G2 Tester. To transfer a Profile from the Tester to AirCheck G2 Manager’s Local Profiles, drag and drop the Profile name from the left pane into the right pane. - Page 103 Saving Test Sessions and Managing Files Click Open. If you wish to manually add vendor prefixes into the oui_abbr.txt file, use Microsoft WordPad, and preserve the tab delimited fields. Figure 64. oui_abbr.txt File...
-
Page 104: Xviii.all Aircheck G2 Settings
All AirCheck G2 Settings G2 S XVIII. HECK ETTINGS Touch the Settings button to adjust settings. For additional information, touch the (Help) button on the Tester to open the Help topic for the current screen. Profiles The Profiles screen provides tools for managing Profiles. -
Page 105: How To: Edit A Network
All AirCheck G2 Settings If the network is behind a Captive Portal, switch the How to: Delete a network toggle to On to enable the Captive Portal setting. Select the (Delete) icon. Touch the down arrow in the Authentication field, Select Yes in the pop-up confirmation message window. -
Page 106: How To: Delete An Ap
All AirCheck G2 Settings Make the desired changes. Select Apply. How to: Delete an AP Select (Delete). Select Yes in the pop-up confirmation message window. -
Page 107: 802.11 Settings
Description Associated Tester Functions Channels and Bands Allows you to select which band(s) and/or which channel(s) AirCheck G2 Networks, Channels, scans, the frequency at which they are scanned, and the time duration for Access Points, and which each channel(s) in the selected band(s) is scanned. - Page 108 AP. The feature is turned On by default. Toggle the On/Off switch to Off to turn it off. The AirCheck G2 attempts to group virtual APs by BSSID patterns. It will not group APs from different bands.
- Page 109 Access Point or Locate Client screens. AirCheck G2 will only transmit probe requests for the legal channels in the country for which it is currently configured. AirCheck G2 will only transmit probe requests on channels on which it has discovered one or more APs.
-
Page 110: Interferer Settings
Interferers Only Scan: Switch the toggle button to On to “Test Targets” on page 102. cause the AirCheck G2 to look ONLY for interfering devices. How to: Configure a Test Target for Ethernet Tests NOTE: AirCheck G2 will not discover or display Networks,... - Page 111 All AirCheck G2 Settings If you have selected TCP Port Open for the Test Type, you can change the default Port number (for example, Port 80 for www.google.com) by touching the field to open a numeric keyboard. Enter the port number, and touch DONE when finished.
-
Page 112: Thresholds
All AirCheck G2 Settings Thresholds The Thresholds screen allows you to set the threshold values the Tester uses to rate the quality of performance or service. The quality categories are pass/warning/fail or green/yellow/red. You can adjust the range of values represented by green, yellow, to your preference. - Page 113 AutoTest Network Tests of the maximum PHY data rate that the AP supports. iPerf Thresholds Target Speed The requested rate of traffic (from the AirCheck G2 to the iPerf iPerf Test server/Test Accessory). Loss Percentage The percentage of frames that can be lost. This threshold only iPerf Test applies when iPerf testing with the UDP protocol.
-
Page 114: Autotest Settings
How to: Configure AutoTest settings change the battery type to match the batteries in the NETSCOUT Test Accessory you use to conduct iPerf Tests. This Set the Channel Scan Cycles. setting allows the AirCheck G2 to display the battery level on... -
Page 115: Test Targets
All AirCheck G2 Settings Test Targets the Select iPerf Server screen. If you have multiple Test Accessories, select the most common battery type. This Test targets are part of Connect to Network, Connect to AP, setting is not relevant for Test Accessories running on PoE. -
Page 116: How To: Add A User-Defined Test Target
66, the user-definable test targets are www.google.com and www.netscout.com. The Google ping Select (Edit). test is included by default, and a ping test to NETSCOUT has been added. You can add up to 10 user-defined test targets Make the desired changes. with the following procedures: Select Apply. -
Page 117: Location Settings
Language: Sets the AirCheck G2's language. Number Format: Toggles between 0.0 and 0,0 number formats. By default, AirCheck G2 uses the decimal (0.0) number format. You can change to comma (0,0) number format (or vice versa) by touching the down arrow selecting the new format, and touching Apply. -
Page 118: Link-Live Settings
Link-Live Cloud Service. must first Claim your AirCheck G2 Tester in Link-Live. NOTE: If this setting is Off, the AirCheck G2 will not scan See “How to: Claim the AirCheck G2 to Link-Live,” page 46. for or display Test Accessories from Link-Live on the... -
Page 119: How To: Configure Link-Live Settings For Web Proxy
Select iPerf Server Screen,” page 80. The About screen shows the following information about Web Proxy: This option enables uploading of test results to your AirCheck G2 Wireless Tester: your Link-Live account through a web proxy. By default, Web Serial Number ... -
Page 120: Maintenance
Maintenance XIX. AINTENANCE Warning Cleaning the Tester To prevent possible fire, electrical shock, personal To clean the display, use lens cleaner and a soft, lint-free injury, or damage to the Tester: cloth. To clean the case, use a soft cloth that is moist with water or water and a weak soap. -
Page 121: Updating The Aircheck G2 Firmware
Use the USB cable supplied with the Tester to connect the Tester to the PC. Caution In AirCheck G2 Manager, select Device Info, and click the Restoring factory defaults erases all saved test data button to “Update AirCheck G2 Firmware...”... -
Page 122: Viewing Device Information
NOTE: After performing a factory restore on your WLAN MAC: Media Access Control address. The unique AirCheck G2 unit, you must un-claim it on Link-Live and address of the Tester on the WLAN. re-claim it to continue uploading and viewing new test results. -
Page 123: Specifications And Compliance
Specifications and Compliance PECIFICATIONS AND OMPLIANCE Environmental Specifications Operating temperature 32ºF to 113ºF (0ºC to +45ºC) NOTE: The battery will not charge if the internal temperature of the Tester is above 122ºF (50ºC). Operating relative humidity 90% (50ºF to 95ºF; 10ºC to 35ºC) (% RH without condensation) 75% (95ºF to 113ºF;... -
Page 124: General Specifications
Specifications and Compliance General Specifications Dimensions 3.8 in x 7.7 in x 1.6 in (9.7 cm x 19.6 cm x 4.1 cm) Weight 18 oz (0.51 kg) Battery Rechargeable lithium-ion battery pack (3.6 V, 6 Ah, 21 Wh) Battery life Typical operating life is 4.5 hours. -
Page 125: Wireless Specifications
NOTE: The Tester receives on all of the frequencies in every country. frequencies of the channels that 2.4 GHz band: 2.412 – 2.484 GHz (channel 1 to channel 14) the AirCheck G2 Tester 5 GHz band: 5.170 – 5.320 GHz, 5.500 – 5.700 GHz, 5.745 – 5.825 GHz (channels supports. -
Page 126: Wi-Fi Antennas
Specifications and Compliance Frequencies of channels transmitted (continued) 5 GHz band 802.11a/n 20 MHz BW (HT20): 5.180 – 5.320 GHz, 5.500 – 5.700 GHz, 5.745 – 5.825 GHz (channels 36, 40, 44, 48, 52, 56, 60, 64, 100, 104, 108, 112, 116, 120, 124, 128, 132, 1, 36, 140, 144, 149, 153, 157, 161, 165) 802.11n 40 MHz BW (HT40/VHT40): 5.190 –... -
Page 127: Wi-Fi Adapter
Specifications and Compliance Wi-Fi Adapter Applicant's name NetScout Systems, Inc. Equipment name Wi-Fi testing device Model number WA7-43460AC Manufacturing Year/Month 2015/06 Manufacturer Universal Global Scientific Industrial Co. (USI) Country of origin Taiwan Data Rate 802.11a: 6/9/12/24/36/48/54 Mbps 802.11b: 1/2/5.5/11 Mbps 802.11g: 6/9/12/24/36/48/54 Mbps... - Page 128 Specifications and Compliance Transmit 802.11a: 12 dBm ± 2 dBm @ 54 Mbps output 802.11b: 17 dBm ± 2 dBm @ 11 Mbps power 1 802.11g: 16 dBm ± 2 dBm @ 54 Mbps (tolerance: 802.11gn HT20: 16 dBm ± 2 dBm @ MCS0 ±2.0 dBm) 802.11gn HT20: 15 dBm ±...
- Page 129 Specifications and Compliance Receive 802.11a: -81 dBm ± 2 dBm @ 54 Mbps sensitivity 802.11b: -92 dBm ± 2 dBm @ 11 Mbps (tolerance: 802.11g: -82 dBm ± 2 dBm @ 54 Mbps ±2 dBm) 802.11gn HT20: -79 dBm ± 2 dBm @ MCS7 802.11gn HT40: -76 dBm ±...
-
Page 130: Certifications And Compliance
Specifications and Compliance Certifications and Compliance Conforms to relevant European Union directives. Conforms to relevant Australian Safety and EMC standards. Certified by CSA Group to North American safety standards. Complies with 47 CFR Part 15 requirements of the U.S. Federal Communications Commission. Certified by the National Agency of Telecommunications (Anatel). -
Page 131: Federal Communication Commission And Industry Canada Interference Statement
Specifications and Compliance Federal Communication Commission and This device complies with Part 15 of the FCC and IC Rules. Operation is subject to the following two conditions: Industry Canada Interference Statement (1) This device may not cause harmful interference, and (2) This equipment has been tested and found to comply with this device must accept any interference received, including the limits for a Class B digital device, pursuant to Part 15 of... -
Page 132: Important Note: Fcc And Ic Radiation Exposure Statement
Industrie Canada. RADIATION. Dans le but de réduire les risques de brouillage The AirCheck G2 Tester is a radio transmitter and receiver. It radioélectrique à l'intention des autres utilisateurs, il faut is designed and manufactured not to exceed the emission... - Page 133 Specifications and Compliance organizations. The tests are performed in positions and maximum value because the device operates at multiple locations (e.g., next to the body) as required by the FCC for power levels and uses only the power required to reach the each model.
-
Page 134: Regulatory Statements
Specifications and Compliance Regulatory Statements Brazil Este equipamento opera em caráter secundário, isto é, não tem direito a proteção contra interferência prejudicial, mesmo de estações do mesmo Regulatory Statement tipo, e não pode causar interferência a sistemas operando em caráter primário. -
Page 135: Appendix A: Quick Reference: Examining Your Network Health
Appendix A: Quick Reference: Examining your Network Health How is my Network Quality? What is my Wi-Fi From the Home Screen, touch AutoTest. The tester opens the AutoTest screen to show the results of Air Air Quality? Quality, including 802.11 Channel Utilization, Non-802.11 Channel Utilization, Co-Channel Interference, and Adjacent Channel Interference. - Page 136 What is my Wi-Fi To test your Network Quality, you must configure your AirCheck G2 with the proper credentials to connect Network Quality? to the network and/or access points. See “Entering Network Security Credentials," page 49. Next, go to the AutoTest Settings screen ( (Settings) >...
-
Page 137: What Is In The Wireless Environment
What is in the Wireless Environment? What wireless LANs are From the Home Screen, select Networks to see a list of wireless LANs and the number of available? access points for each one. To see all access points that are available at your location, select Access Points on the Home Screen. -
Page 138: Can Devices Connect To My Network
For example, if it failed to authenticate, check the does the connection procedure security type and credentials match between the AP and AirCheck G2. fail? Look at the connection test log by tapping Log at the bottom of the Connect test results screen. - Page 139 The Connection Range graph will show you the quality of the connection to the current AP. When the AirCheck G2 roams to another AP, a green vertical line appears when the association to the new AP occurs. Also the new AP name will appear in the top line. ...
-
Page 140: What Is Causing Slow Network Performance Or Dropped Connections
What is Causing Slow Network Performance or Dropped Connections? Is the signal strength sufficient? Select Access Points. The Access Points screen shows the signal strength for each access point. Select an access point to see more details about the signal strength and congestion. See “The Access Point Details Screen,"... -
Page 141: Where Is An Access Point
How Can I Document My Network and My Test Session? Touch the (Save) button to save the session. Use AirCheck G2 Manager software to transfer the session file to a PC and make a report. See “Managing Profiles and Sessions on a PC using AirCheck G2 Manager," page 88.
Need help?
Do you have a question about the AirCheck G2 and is the answer not in the manual?
Questions and answers