Sign In
Upload
Manuals
Brands
Electrolux Manuals
Ranges
30" GAS FREESTANDING RANGES
Electrolux 30" GAS FREESTANDING RANGES Manuals
Manuals and User Guides for Electrolux 30" GAS FREESTANDING RANGES. We have
3
Electrolux 30" GAS FREESTANDING RANGES manuals available for free PDF download: Service Manual, Service Update Manual, Installation Instructions Manual
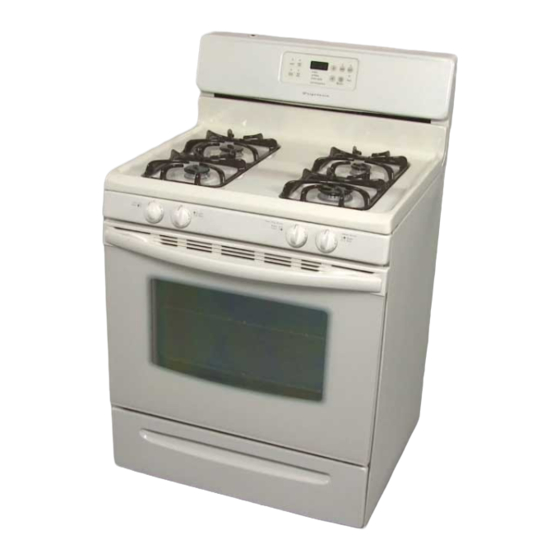
Electrolux 30" GAS FREESTANDING RANGES Service Manual (132 pages)
freestanding
Brand:
Electrolux
| Category:
Ranges
| Size: 10.14 MB
Table of Contents
2
Safe Servicing Practices
3
Table of Contents
12
Quick Reference Sheet
13
Maximum Surface Temperatures
14
Section a - Installation Instructions
14
Installation Instructions 30" Ranges
14
Safety
14
Clearances and Dimensions
14
Fuel Types
15
Important Notes to Installer
15
Important Note to Consumer
15
Important Safety Instructions
15
Models with Self-Clean Feature
16
Tools You Will Need
16
Normal Installation Steps
16
Anti-Tip Bracket Installation Instructions
17
Provide Adequate Gas Supply
17
Seal the Openings
18
Connect the Range to the Gas Supply
18
Checking Manifold Gas Pressure
18
Electrical Requirements
18
Entension Cord Precautions
18
Grounding Instructions
19
Surface Burners
19
Installation of Burner Cap Assembly
19
Electric Ignition Surface Burners
19
Adjusting Low Setting of Surface Burner Valve
19
Electric Ignition Burners
19
10. Air Shutter-Oven Burner
20
Converting to LP
20
Tools Required for LP Conversion
21
Converting the Pressure Regulator
22
Converting Surface Burner to LP
23
Converting the Oven and Broil Burners
23
Reconnect Gas and Electric Supply to Range
24
Air Sutter Ajustment Oven and Broil Burners
25
Installation of New Lp/Propane Rating/Serial Plate
25
Conversion to Natural Gas
26
Installation Instructions 36" Ranges
26
Safety
26
Dimensions and Clearance
27
Important Notes to the Installer
27
Important Safety Instructions
28
Provide an Adequate Gas Supply
28
Seal the Openings
28
Connecting the Range to Gas
29
LP Gas Conversion
29
Pressure Regulator Conversion
30
Surface Burner Valves Conversion
30
Adjusting Low Surface Burner Setting
30
Air Adjustment Shutter
31
Converting Oven Burner Orifice
31
Converting Broil Burner Orifice
32
Electrical Requirements
32
Extension Cord Cautions
32
Grounding Instructions
32
Check Operation
32
Check Igniters
33
Non Self Clean Models
33
Adjusting Simmer Setting
33
Leveling the Range
33
Anti-Tip Bracket Installation
35
Section B - Gas Flow
35
Gas Flow
36
Electric Circuits
37
How Gas Flow System Works
37
Troubleshooting
37
Burner Flame Too Large
37
Burner Flame Too Small
37
Burner Flame Yellow Tipped
37
Top Burner Flame Lifts Off
38
Top Burner Spark Ignition System
38
Troubleshooting
38
Igniters Do Not Spark
38
Igniter System Works Normal for All but One Valve
38
Igniter Sparks at Normal Rate with All Valves Turned Off
38
Igniter Sparks Intermittently with All Valves Turned Off
39
Section C - Electronic Oven Control Systems
39
ES 100 Oven Control System
39
How to Program the ES 100 Control
39
To Set the Clock
39
To Set the Minute Timer
39
To Change the Minute Timer While in Use
40
To Change the Oven Temperature After Baking Has Started
40
To Set the Oven Control for Broil
40
How the ES 100 System Operates
40
Bake
41
Broil
41
Calibration
41
To Change Calibration
41
Troubleshooting
41
F1 Code
41
F3 Code
42
Control Will Not Program
42
Blank Display
42
No Heat
43
Sample Schematic for Es100 Control System
44
Es 200 Oven Control System
44
How to Program the Es 200
44
Temperature Conversion
44
To Set the Clock
44
To Set the Minute Timer
45
To Change the Minute Timer While in Use
45
To Set the Control for Baking
45
To Change the Oven Temperature After Baking Has Started
45
To Set the Control for Continuous Bake or 12 Hour Energy Saving
45
To Set the Control for Oven Lockout Feature
45
To Set the Control to Broil
46
To Set the Control for a Self-Clean Cycle
46
When the Self-Clean Cycle Is Complete
46
Stopping or Interrupting a Self-Cleaning Cycle
46
How the ES 200 Operates
46
Bake
47
Broil
47
Clean
47
Calibration
47
To Change the Calibration
48
Troubleshooting
48
F1 Code
48
F3 Code
48
F9 Code
48
Control Will Not Program
48
Blank Display
49
Broil Burner Operates but Bake Does Not Heat
49
Bake Burner Operates but Broil Does Not Heat
49
Self-Cleaning
49
Oven Door Does Not Lock When the Oven Is Programmed for Clean
49
Oven Door Locks When the Oven Is Programmed for Clean but the Oven Does Not Heat
49
Lock Motor Runs Continuously
50
Sample Schematic for ES 200 Control System
51
The ES 300 Electronic Oven Control System
51
How to Program the ES 300 System
51
For a Silent Control Panel
51
Temperature Conversion
51
To Set the Clock
51
To Set the Minute Timer
52
To Change the Minute Timer While It Is in Use
52
To Cancel the Minute Timer before the Set Time Has Run Out
52
To Set the Controls for Bake
52
To Change the Oven Temperature After Baking Has Started
52
To Set Control for Continuous Bake or 12 Hour Energy Saving
52
To Set the Control Oven Lockout
53
To Program the Oven to Begin Baking Immediately
53
And Shut Off Automatically
53
To Program Oven for a Delay Start Time and to Shut-Off Automatically
53
When the Set Bake Time Runs Out
53
To Change the Oven Temperature or Bake Time After Baking Has Started
53
Speed Bake
54
To Set Speed Bake Cooking System
54
To Broil
54
Self-Cleaning Oven
55
To Start the Self-Clean Cycle
55
When the Self-Clean Cycle Is Completed
55
How the ES 300 Control System Works
55
Bake
56
Time Bake
56
Speed Bake
56
Broil
56
Clean
57
Calibration
57
To Change the Calibration
57
Troubleshooting
57
F1 Code
57
F3 Code
57
F9 Code
58
No Heat
58
Broil Burner Operates but Bake Burner Does Not
58
Bake Burner Operates but Broil Burner Does Not
58
Fan in Oven Does Not Run When Speed Bake Switch Is Turned On
59
Self-Cleaning
59
Oven Door Locks but Oven Does Not Heat in Clean
59
Lock Motor Runs Continuously
59
Door Latch Is Partly Closed with Door Open
60
Sample Schematic for ES 300 Control System
61
The ES 400 Electronic Oven Control System
61
How to Program the Es 400
61
Clock
61
To Set the Clock
61
Changing Between 12 or 24 Hour Time of Day Display
61
To Set the Control for Continuous Bake or 12 Hour Energy Saving
62
To Set the Minute Timer
62
To Change the Minute Timer While in Use
62
To Cancel the Minute Timer before the Set Time Has Run Out
62
Oven Lockout Feature
62
To Active the Oven Lockout
62
To Reactivate Oven Operation
63
To Change Preheat Temperature While Oven Is Preheating
63
Bake
63
Time Bake
63
To Program the Oven to Begin Baking Immediately and to Shut Off Automatically
64
To Program Oven for a Delayed Start Time and to Shut-Off Automatically
64
Broil
64
To Set the Oven to Broil at 550 Degrees
65
Convection Bake
65
Convection Roast
65
To Start the Self-Clean Cycle
65
To Set the Controls for the Self-Cleaning Cycle to Start Immediately and Shut Off Automatically
66
When the Self-Clean Cycle Is Completed
66
Stopping or Interrupting a Self-Cleaning Cycle
66
How the ES 400 Operate
66
Preheat
67
Bake
67
Time Bake
67
Convection Bake
67
Convection Roast
68
Broil
68
Clean
68
Calibration
68
To Check Oven Calibration
68
To Adjust the Oven Temperature Higher
68
To Adjust the Oven Temperature Lower
69
F3 Code
69
F9 Code
69
Control Will Not Program
69
Time Bake Does Not Operate
69
Convection Bake
69
Blank Display
70
Bake and Broil Burner Does Not Heat
70
Broil Burner Operates but Bake Burner Does Not Heat
70
Bake Burner Operates but Broil Burner Does Not Heat
70
Self-Cleaning
70
Oven Door Does Not Lock When the Oven Is Programmed for Clean
70
Oven Door Locks When the Oven Is
72
Sample Schematic for ES 400 Control System
73
The ES 450 Electronic Oven Control System
73
How to Program the Es 450
73
Clock
73
Changing Between 12 or 24 Hour Time of Day Display
73
Continuous Bake or 12 Hour Energy Saving
74
Minute Timer
74
To Change the Minute Timer While It Is in Use
74
To Cancel the Minute Timer before the Set Time Has Run Out
74
Oven Lockout Feature
74
To Active the Oven Lockout
74
To Reactivate Oven Operation
75
Preheat
75
Bake
75
Time Bake
75
To Program the Oven to Begin Baking Immediately and to Shut Off Automatically
76
Broil
76
To Set Oven to Broil
77
Convection Bake
77
Setting Food Catagory Feature
77
Self-Clean
78
To Set the Control for the Self-Cleaning Cycle to
78
Start Immediately and Shut Off Automatically
78
When the Self-Clean Cycle Is Complete
78
Stopping or Interrupting a Self-Cleaning Cycle
78
To Set the Controls for the Self-Cleaning Cycle to Start at a Delayed Time and Shut Off Automatically
78
When the Self-Clean Cycle Has Completed
79
Bake
79
Time Bake
79
Convection Bake
80
Fixed Setting
80
Meats
80
Cakes
80
Breads
80
Broil
80
Clean
81
Troubleshooting
81
F1 Code
81
F3 Code
81
F9 Code
81
Control Will Not Program
81
Time Bake Does Not Operate
82
No Heat
82
Bake and Broil Burners Do Not Heat
82
Broil Burner Operates but Bake Burner Does Not Heat
82
Bake Burner Operates but Broil Burner Does Not Heat
82
Self-Cleaning
82
Oven Door Does Not Lock When the Oven Is Programmed for Clean
83
Oven Door Locks When the Oven Is Programmed for Clean but the Oven Does Not Heat
83
Lock Motor Runs Continuously
83
Door Latch Is Partly Closed with Door Open
84
Sample Schematic for ES 450 Control System
85
Electronic Oven Control System for 36" Self-Cleaning Gas Ranges
85
How to Program the 36" Gas Range Control
85
For a Silent Control Panel
85
Temperature Conversion Fahrenheit/Celsius
85
Lockout
85
Sabbath Feature
86
To Set the Clock
86
To Set the Minute Timer
86
To Change the Minute Timer
86
To Cancel the Minute Timer before the Set Time Has Run Out
87
To Set the Preheat Temperature
87
To Set the Control for Normal Baking
87
To Set or Change Temperature
87
To Set Automatic Timer
87
To Start Heating Immediately and Shut-Off Automatically
87
Once the Oven Controls Are Set
88
For a Delayed Start Time and Shut-Off Automatically
88
To Broil
88
To Set the Oven Control for Self-Clean Cycles
89
Calibrating Oven Temperature
89
How the Electronic Oven Control System On a 36" Gas Range Operates
89
Preheat
90
Bake
90
Broil
90
Clean
91
Calibration
91
To Change Calibration
91
Troubleshooting
91
F1 Code
91
F3 Code
91
"Door" Code
92
No Heat
92
Broil Burner Operates but the Bake Burner Does Not Heat
92
Bake Burner Operates but the Broil Burner Does Not Heat
92
Self-Cleaning
92
Oven Does Not Heat in Self-Clean
92
Oven Heats in Self-Clean but the Oven Is Not Clean
93
Sample Schematic for 36" Gas Range
94
Warmer Drawer
94
To Set the Warmer Drawer Control
94
How the Warmer Drawer Circuit Works
94
Troubleshooting
94
If the Element Does Not Heat
95
If the Element Heats During Preheat Then Stays Off
95
Until the Temperature Drops to about 130 Degrees
95
Element Does Not Cycle Off
95
Warmer Drawer Is Slow to Preheat
95
Warmer Drawer Heats but Indicator Light Does Not Glow
96
Section D - Disassembly and Replacement of Parts
96
30" Gas Ranges
96
Removing Backguard Back Panel
96
Removing Infinite Switches
97
Removing Indicator Light
97
Removing Electronic Oven Control
97
Removing Oven Light Switch
97
Removing the Control Panel
97
Removing the End Cap
98
Removing the Main Top
99
Removing Sealed Burner Base
99
Removing Top Burner Igniter
99
Removing Fixed Top Orifice Sealed Burner
99
Removing Manifold Panel Sealed Burners
100
Removing Burner Pan
100
Removing Top Burner Igniter Switches
100
Removing Top Burner Valve
101
Removing the Manifold Pipe
101
Removing Oven Door Seal
101
Removing Oven Door
102
Door Hinge Adjustment
102
Removing the Hinge Opening Cover
102
Removing the Door Hinge
102
Removing the Upper Door Trim
102
Removing Door Handle
103
Removing Outer Door Glass Trim
103
Removing Center Door Glass
103
Removing Door Wool Shield
103
Removing Glass Package and Inner Door Liner
103
Removing Oven Bottom
103
Removing Bake Burner Baffle
104
Removing Bake Burner Igniter
104
Removing Bake Burner (Self-Clean Models)
104
Removing Burner Heat Shield (Self-Clean Models)
105
Convection and Speed Bake Models
105
Removing Fan Cover
105
Removing Fan Blade
105
Removing Convection Assist Element
106
Removing Broil Burner and Baffle (Self-Clean Models)
106
Removing Broil Igniter
106
Removing Oven Vent (Self-Clean Models)
106
Removing Oven Safety Valve (Self-Clean Models)
107
Components Removed From the Rear of the Range
107
Removing Rear Manifold Cover
107
Removing Back Cover
107
Removing Heat Shield
108
Removing Pressure Regulator
108
Removing Top Burner Igniter Spark Module
108
Removing Lock Motor Assembly
109
Removing Oven Sensor
109
Door Switch and Rod Removal
109
Removing Convection and Speed Bake Motor Assemblies
110
Removing Bodyside Panels
111
Storage Drawer
111
Removing Storage Drawer Front Panel
111
Removing Inside Drawer Panel
111
Removing Drawer Glides
111
Removing the Warmer Drawer
112
Removing the Warmer Drawer Side Rails
112
Removing Warmer Drawer Low Limit Thermostat
112
Removing the Warmer Drawer Element
113
36" Gas Range
113
Removing Backguard Glass and Trim
113
Removing Control Buttons
113
Removing Electronic Oven Control
113
Removing Fluorescent Lamp Starter
113
Removing Starter Base
114
Removing Fluorescent Ballast
114
Removing Oven Light or Fluorescent Light Switch
114
Removing Backguard Trim
115
Removing Back Panel of Backguard
116
Removing Fluorescent Lamp Socket
116
Removing Splasher Panel
116
Removing Grates, Griddle Cover Griddle Fifth Burner Pan and Main Top
116
Removing Pressure Regulator
121
Oven Door
Advertisement
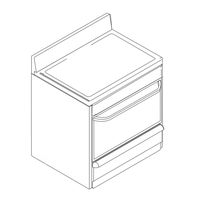
Electrolux 30" GAS FREESTANDING RANGES Service Update Manual (43 pages)
Brand:
Electrolux
| Category:
Ranges
| Size: 5.58 MB
Table of Contents
2
Table of Contents
3
Safe Servicing Practices
4
Service Tips Develop Good Work Habits
5
Service Tools and Equipment
5
Changes and Features Overview
5
Abbreviations and Terms
6
Model Numbering System
6
Serial Numbering System
7
Range Technical Data
7
Quick Reference Sheet
7
Maximum Allowable Surface Temperatures
7
RTD Temperature / Resistance Chart
7
Removing and Replacing Warmer Drawer
8
Gas Range Component Resistance Chart
8
Oven Temperature Calibration
9
EOC Failure / Fault Codes
9
Range Technical Data
10
Range Installation Instructions
10
Delivery Installation Bulletin
11
Clearances and Dimensions
12
Important Safety Information
12
Safety Instructions
13
Tools You Will Need
13
Anti-Tip Bracket Installation Instructions
13
Gas Supply Connection
14
Seal the Openings
14
Connect the Range to the Gas Supply
14
Provide an Adequate Gas Supply
15
Electric Requirements
15
Extension Cord Precautions
16
Burner Head Assembly
16
Electric Ignition Surface Burners
17
Adjusting Burner Flame (Low Setting)
17
Operation of Oven Burners & Adjustment
18
Model & Serial Number Location
18
Care, Cleaning & Maintenance
18
Before You Call for Service
19
Gas Range Cooktop Styles
20
Gas Range Cooktop Styles
21
Cooktop Servicing
21
Removing and Replacing Cooktop
22
Manifold Panel and Burner Box
23
Replacing Orifi Ce Holders
23
Surface Burner Valves
23
Removing Door Latch Hook Assembly
24
Replacing Oven Door Light Switch
24
Servicing Oven Burners and Components
24
Convection Fan Blade Cover
24
Removing Oven Bottom
25
Servicing Bake Burner and Ignitor
26
Servicing Broil Burner and Ignitor
27
Diagnosing Oven Component Failure
27
Incorrect Voltage
27
Gas Regulator Cut Off Lever
27
Faulty Oven Ignitor
27
Faulty Gas Safety Valve
28
How the Safety Valve Works
29
Safety Valve LP Gas Conversion
30
Warmer Drawer
30
Warmer Drawer Theory of Operation
31
Troubleshooting Warmer Drawer Operation
31
Servicing Warmer Drawer Components
33
Oven Door
33
Remove and Replace Oven Door
34
Door Hinge Replacement
35
Replacing Door Hinge Receptacle
36
Bodyside Mounting
36
Leg Levelers
37
Component Testing
39
Electronic Oven Controls
39
Es 200 Control
39
Es 300 Control
39
Es 330 Control
40
Es 340 Control
40
Es 510 Control
41
Troubleshooting Electronic Oven Controls
42
EOC Failure / Fault Codes
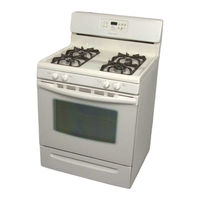
Electrolux 30" GAS FREESTANDING RANGES Installation Instructions Manual (28 pages)
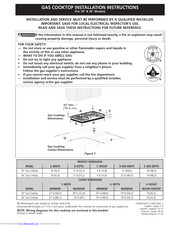
GAS COOKTOP
Brand:
Electrolux
| Category:
Cooktop
| Size: 1.91 MB
Table of Contents
2
Important Notes to the Installer
2
Important Safety Instructions
6
Provide an Adequate Gas Supply
6
Cooktop Installation
7
Install Pressure Regulator
7
Electrical Requirements
7
Grounding Instructions
8
Check Operation
8
Model and Serial Number Location
9
Before You Call for Service
14
Front View
16
Instrucciones Para La Puesta a Tierra
17
Antes De Llamar Al Servicio
Advertisement
Share and save
Advertisement
Related Products
Electrolux FGF326WGSJ
Electrolux FGEF301DNB
Electrolux Frigidaire FGF366DCC
Electrolux Frigidaire FGFL67DCA
Electrolux Frigidaire FGF366DBA
Electrolux FGEF300DNW
Electrolux FEF365CGSC
Electrolux FEF369CGSE
Electrolux FEFL79JCC
Electrolux Frigidaire FEFL79JQA
Electrolux Categories
Refrigerator
Oven
Washer
Freezer
Dishwasher
More Electrolux Manuals
Login
Sign In
OR
Sign in with Facebook
Sign in with Google
Upload manual
Upload from disk
Upload from URL