3Com EtherLink 3C985B-SX User Manual
Gigabit etherlink server nic 1000 pci server nic with dynamicaccess technology
Hide thumbs
Also See for EtherLink 3C985B-SX:
- Installation and user manual (44 pages) ,
- Installation and user manual (40 pages)
Table of Contents
Advertisement
Quick Links
Advertisement
Table of Contents
Troubleshooting

Subscribe to Our Youtube Channel
Related Manuals for 3Com EtherLink 3C985B-SX


Summary of Contents for 3Com EtherLink 3C985B-SX
- Page 2 ® Gigabit EtherLink Server NIC User Guide 3C985B-SX 1000 PCI server NIC with ® DynamicAccess technology http://www.3com.com/ http://www.3com.com/productreg Part No. 09-1151-003 Published June 1999...
- Page 3 3Com Corporation. 3Com Corporation reserves the right to revise this documentation and to make changes in content from time to time without obligation on the part of 3Com Corporation to provide notification of such revision or change.
-
Page 4: Table Of Contents
ONTENTS BOUT UIDE Conventions Year 2000 Compliance NTRODUCTION Hardware Features Software Features NSTALLING THE ARDWARE Safety Precautions Installation Requirements Installation Instructions NSTALLING AND ONFIGURING THE NT D INDOWS RIVER Software Installation Requirements Installation and Configuration Scenario Getting Help Installing the Software Creating a Load Balancing/RSL and VLAN Configuration Planning the Configuration Starting DynamicAccess Software... - Page 5 RIVER Software Installation Requirements Planning NIC Groups Obtaining Slot Numbers Installation and Configuration Scenario Installing and Configuring the Software Loading the 3Com EtherLink Server CD NetWare 4.11 NetWare 5.0 Copying the Driver Specifying the Slot Number Loading the Driver Setting Up Another NIC Installing Load Balancing/RSL Software Configuring Load Balancing/RSL Groups...
- Page 6 IAGNOSTICS AND ROUBLESHOOTING LED Operation Using the 3Com NIC Diagnostics Program Starting the 3Com NIC Diagnostics Program Accessing the 3Com Help System Using the General Window Displaying the General Window Selecting a NIC Viewing NIC Details...
- Page 7 World Wide Web Site 3Com Knowledgebase Web Services 3Com FTP Site 3Com Bulletin Board Service Access by Analog Modem Access by Digital Modem 3Com Facts Automated Fax Service Support from Your Network Supplier Support from 3Com Returning Products for Repair...
- Page 8 NDEX ORPORATION IMITED ARRANTY FCC C LASS TATEMENT FCC D ECLARATION OF ONFORMITY OFTWARE ICENSE GREEMENT RODUCT EGISTRATION...
-
Page 10: About
Most user guides and release notes are available in Adobe Acrobat Reader Portable Document Format (PDF) or HTML on the 3Com World Wide Web site: http://www.3com.com/ Conventions Table 1 and Table 2 list conventions that are used throughout this guide. -
Page 11: Year 2000 Compliance
Identify menu names, menu commands, and software button names. Examples: From the Help menu, select Contents. Click OK. Year 2000 Compliance For information on Year 2000 compliance and 3Com products, visit the 3Com Year 2000 Web page: http://www.3com.com/products/yr2000.html... -
Page 12: Introduction
NTRODUCTION The 3C985B-SX server NIC connects a PCI-compliant server computer to a Gigabit Ethernet network. It is fully interoperable with existing Ethernet equipment and operates at 1 gigabit per second (Gbps) in full-duplex mode when connected to a Gigabit Ethernet port. -
Page 13: Hardware Features
62.5/125 µm or 50/125 µm multimode fiber, using a fiber interface duplex SC connector Adaptive interrupt frequency The 3C985B-SX server NIC driver intelligently adjusts host interrupt frequency based on traffic conditions to increase overall application throughput. In light traffic, the NIC driver interrupts the host for each received packet, minimizing latency. -
Page 14: Software Features
(VLANs) divide network segments into logical partitions that simplify changes or additions to the network. Failover to 3Com EtherLink 10/100 PCI NIC (3C980B-TX server NIC) provides cost-effective fault tolerance. * The UnixWare 7 driver is available from the software downloads page at the... -
Page 16: Installing The Hardware
NSTALLING THE ARDWARE Follow these instructions to install the NIC hardware. Safety Precautions Observe the following safety precautions. WARNING: Server computers operate with voltages that can be lethal. Before removing the cover, turn off the computer and unplug it. Disconnect all cables that are connected to the main system unit. -
Page 17: Installation Instructions
Cable — 62.5/125 µm or 50/125 µm multimode fiber-optic. Connector — SC duplex. Software — One 3Com EtherLink Server CD with DynamicAccess software for servers and network drivers. Operating system — One of the following: Microsoft Windows NT version 4.0 with the most recent Service Pack available from Microsoft technical support (www.microsoft.com). - Page 18 Installation Instructions c Exit all open applications and user processes. d Turn off the power to the server and attached devices. e Unplug the power cables from the power source. f Remove the computer cover from the server. g Locate an empty bus master PCI-bus expansion slot. h Write down the MAC address of the NIC and note the relative position of the intended PCI slot.
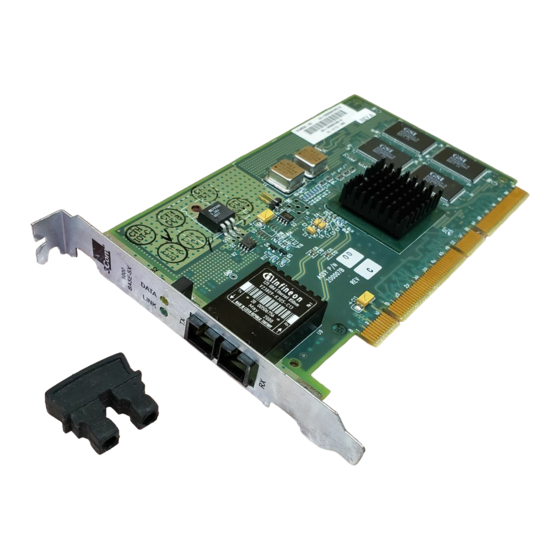
- Page 19 2: I HAPTER NSTALLING THE ARDWARE Figure 2 Installing the NIC 1 Remove slot cover 2 Insert NIC PCI slots 3 Connect to the network 0354 1 0 0 0 E -S X B A S SC connector To switch...
-
Page 20: Installing And Configuring The Windows Nt Driver
DynamicAccess software on a server running Windows NT 4.0. Software Installation Requirements NIC — At least one 3Com 3C985B-SX server NIC must be installed in a PCI bus master slot. Operating system — Microsoft Windows NT version 4.0 must be installed with the most recent Service Pack and patches available from Microsoft technical support (www.microsoft.com). -
Page 21: Getting Help
Make sure that all software installation requirements are met. Boot the system under Windows NT. Log in to the Windows NT Administrator account. 1 Insert the 3Com EtherLink Server CD in the CD-ROM drive. 2 From the Windows Start menu, select Settings/Control Panel. - Page 22 3Com Gigabit Ethernet Adapter (3C985) and click OK. The installation program copies the driver and related files to the system hard disk and then detects the 3Com 3C985B-SX server NICs installed in the system. The 3Com Installation dialog box appears (Figure...
-
Page 23: Creating A Load Balancing/Rsl And Vlan Configuration
TCP/IP configuration values. Contact the network administrator for appropriate IP addresses and subnet masks. 13 Remove the 3Com EtherLink Server CD from the CD-ROM drive. CAUTION: To avoid system failure on multiprocessor servers running Windows NT Service Pack 4, you must install a Microsoft TCP/IP hot fix patch and reboot the... -
Page 24: Starting Dynamicaccess Software
Decide which NIC is to be the primary NIC in each group. Decide whether you want to specify failover to another 3C985B-SX server NIC or to a 3Com 3C980B-TX server NIC. If you choose to failover to the 3C980B-TX server NIC, you must disable load balancing for that group. -
Page 25: Creating A Load Balancing/Rsl Group
3: I NT D HAPTER NSTALLING AND ONFIGURING THE INDOWS RIVER Creating a Load Balancing/RSL Group Figure 4 and follow these steps: 1 Click the Load Balance/RSL tab. 2 In the Load Balance/RSL window, click Create Group. 3 In the Create Group dialog box, type a group name. 4 Set the load balancing: The default setting is bidirectional load balancing and a dedicated Class C IP address of 253. - Page 26 Creating a Load Balancing/RSL and VLAN Configuration Figure 4 Creating a Load Balancing/RSL Group...
-
Page 27: Adding Nics To A Group
3: I NT D HAPTER NSTALLING AND ONFIGURING THE INDOWS RIVER Adding NICs to a Group Figure 5 and follow these steps: 1 Click the Load Balance/RSL tab. 2 In the Load Balance/RSL window: a Select a group from the Load Balancing/RSL Groups list. b Select a NIC from the Network Interface Cards list. -
Page 28: Creating A Vlan
Creating a Load Balancing/RSL and VLAN Configuration Creating a VLAN Figure 6 and follow these steps: 1 Click the VLANs tab. 2 In the VLANs window, select a NIC or group from the VLANs list and click Create VLAN. 3 In the VLAN ID dialog box, type a VLAN ID number and click OK. - Page 29 3: I NT D HAPTER NSTALLING AND ONFIGURING THE INDOWS RIVER Figure 6 Creating a VLAN...
-
Page 30: Specifying Traffic Priorities
Creating a Load Balancing/RSL and VLAN Configuration Specifying Traffic Priorities You can use the DynamicAccess Software Setup screen to specify traffic priorities. 1 Double-click the 3Com DynamicAccess icon in the Windows Control Panel. The DynamicAccess Software Setup windows appear. 2 Click the appropriate tab: Traffic Prioritization —... -
Page 31: Saving The Configuration
A prompt asks whether you want to configure traffic prioritization. If you click Yes, DynamicAccess Software Setup windows appear. For detailed information on DynamicAccess software, go to: http://www.3com.com/dynamicaccess To exit without saving the configuration, click Cancel. Other Procedures Use the following procedures as needed to maintain the configuration. -
Page 32: Changing The Primary Nic
Other Procedures Changing the Primary NIC The first NIC added to an empty group is automatically designated the primary NIC. NICs added subsequently are designated as secondary NICs. Primary status is indicated by a P icon at the beginning of the NIC name. When there are more than one NIC in a group, you can change the primary NIC as follows (see Figure... -
Page 33: Removing A Nic From A Group
3: I NT D HAPTER NSTALLING AND ONFIGURING THE INDOWS RIVER Removing a NIC from a Group 1 Click the Load Balance/RSL tab. 2 In the Load Balance/RSL window, select a NIC from a group in the Load Balancing/RSL Groups list. 3 Click Remove NIC. -
Page 34: Displaying Nic Properties
Other Procedures Displaying NIC Properties Figure 10 and follow these steps: 1 Click the Load Balance/RSL tab. 2 In the Load Balance/RSL window, select a NIC. 3 Click Properties. The NIC Properties window appears, showing the properties of the selected NIC. Figure 10 Displaying NIC Properties... -
Page 35: Displaying Group Properties
3: I NT D HAPTER NSTALLING AND ONFIGURING THE INDOWS RIVER Displaying Group Properties Figure 11 and follow these steps: 1 Click the Load Balance/RSL tab. 2 In the Load Balance/RSL window, select a group in the Load Balancing/RSL Groups list box. 3 Click Properties. -
Page 36: Specifying Failover To Fast Etherlink
Creating a Load Balancing/RSL Group. 2 Add 3Com server NICs to the group. Add at least one 3C985B-SX server NIC and at least one 3Com 3C980B-TX server NIC to the group. Designate the 3C985B-SX server NIC as the primary NIC. -
Page 37: Link Negotiation
3: I NT D HAPTER NSTALLING AND ONFIGURING THE INDOWS RIVER Link Negotiation Related to flow control is the auto-negotiation capability, in which linked devices advertise their flow control capabilities and automatically select the best common mode of communication. Rare cases (for example, linking to a device that does not support auto-negotiation) may require that auto-negotiation be disabled on a port, thereby enabling forced link on that port. -
Page 38: Installing And Configuring The Net Ware Driver
3Com Software During NetWare Installation. Software Installation Requirements NIC — At least one 3Com 3C985B-SX server NIC must be installed in a PCI bus master slot. Operating system — Novell NetWare version 4.11 or 5.0 must be installed with the most recent patches and updates available from Novell technical support (www.novell.com). -
Page 39: Planning Nic Groups
4: I HAPTER NSTALLING AND ONFIGURING THE RIVER A Packet Receive Buffer is equal to the MAXIMUM PHYSICAL RECEIVE PACKET SIZE. To calculate the minimum and maximum memory consumed by the receive buffers, multiply the number of buffers by the maximum physical receive packet size. -
Page 40: Obtaining Slot Numbers
NIC. When you load the driver again, the installation program displays the slot numbers for all the 3C985B-SX server NICs in the system. The slot number that did not appear when you installed the driver for the first NIC is the slot number... -
Page 41: Installation And Configuration Scenario
In NetWare screens, use the arrow keys to select an item and then press Enter. The major steps are listed below and described in detail in the rest of this section. Loading the 3Com EtherLink Server CD Copying the Driver Specifying the Slot Number... -
Page 42: Loading The 3Com Etherlink Server Cd
Select a driver. The Select a Driver screen appears, listing all previously saved drivers in the system. If this is the first installation of the 3Com server NIC driver, it does not appear in this list. 5 Press Insert. A system message for selecting a disk drive appears. -
Page 43: Specifying The Slot Number
4: I HAPTER NSTALLING AND ONFIGURING THE RIVER 9 Select Yes at the prompt to confirm the name of the driver to copy. The installation program copies the driver to the appropriate server subdirectory. The Configuration screen appears. Specifying the Slot Number You need not specify the slot number if you are installing only one NIC. -
Page 44: Installing Load Balancing/Rsl Software
3 Press F3. 4 Enter the path to the software: 3C985B_SX:\netware The following message appears: Product “3Com Load Balancing/RSL Server Software vX.X” was found. Verify that this is the product you want to install before proceeding. Press <ENTER> to continue. - Page 45 4: I HAPTER NSTALLING AND ONFIGURING THE RIVER b Add or verify the LOAD commands for the LAN drivers for all slot-frame instances. c In each Load Balancing/RSL group, load the same protocols and frame types on the primary and all secondary NICs. d On the primary NIC only, bind a protocol to each slot-frame instance.
-
Page 46: Verifying The Load Balancing/Rsl Configuration
2 If other error messages appear, make corrections in the appropriate .NCF files and reboot. Verifying the Installation and Configuration To verify that the 3Com server NIC driver has been properly loaded on the NetWare server, perform the following procedure:... -
Page 47: Maintaining A Load Balancing/Rsl Configuration
4: I HAPTER NSTALLING AND ONFIGURING THE RIVER Maintaining a Load Balancing/RSL Configuration The examples in this section illustrate typical actions you might take in the course of maintaining a Load Balancing/RSL configuration. They show how to add NICs and groups to a server where Load Balancing/RSL software is already installed and configured. -
Page 48: Adding A Load Balancing/Rsl Group
Maintaining a Load Balancing/RSL Configuration 3 Reboot the server. The sample AUTOEXEC.NCF file in Figure 13 shows a group of three NICs. The primary NIC in slot 1 is bound to two secondary NICs in slot 2 and slot 3. Adding a Load Balancing/RSL Group 1 Install the NICs. - Page 49 4: I HAPTER NSTALLING AND ONFIGURING THE RIVER Figure 14 AUTOEXEC.NCF File for Two Groups of NICs load el985 ;Define Group 1 primary NIC slot-frame instances load 3c985 slot=1 frame=ethernet_802.2 name=p1_802.2 load 3c985 slot=1 frame=ethernet_ii name=p1_ii ;Define Group 1 secondary NIC slot-frame instances load 3c985 slot=2 frame=ethernet_802.2 name=p2_802.2 load 3c985 slot=2 frame=ethernet_ii name=p2_ii...
-
Page 50: Changing Driver Configuration Parameters
Changing Driver Configuration Parameters Changing Driver Configuration Parameters You can change parameters from the installation program Configuration screen. Table 3 lists the parameters shown on the Configuration screen. Default values are shown in bold. Table 3 NetWare Installation Program Configuration Parameters Range of Values Parameter (Defaults in Bold) - Page 51 4: I HAPTER NSTALLING AND ONFIGURING THE RIVER 3 Enter the slot number. The slot number is the PCI slot number of the physical NIC. The following fields appear: Node Address Log Message Level When multiple NICs are installed, you must determine which physical NIC corresponds to which PCI slot to correctly connect the cables to the hub or the switch.
-
Page 52: Load Balancing/Rsl Commands
Load Balancing/RSL Commands 10 Continue with the installation: If you are installing only one NIC, select No to finish loading and exit. If you are installing more than one NIC, select Yes to set up another NIC. Load Balancing/RSL Commands Load Balancing/RSL commands can be used to create sophisticated configurations or for troubleshooting. -
Page 53: Display Status
4: I HAPTER NSTALLING AND ONFIGURING THE RIVER Link integrity check for primary slot # xxxxx (0xHH) Failed - Setting board status to Inactive. Link integrity check for primary slot # xxxxx Passed. display status This command displays information about all Load Balancing/RSL groups, or if a primary slot parameter is specified, only about the specified group. -
Page 54: Load Sharing
Load Balancing/RSL Commands load sharing This command toggles outbound load sharing individually for each Load Balancing/RSL group. Syntax el980lb load sharing pri_slot where: pri_slot is the PCI slot number of the primary NIC. Example el980lb load sharing 10001 Default Messages Displays the current state. -
Page 55: Receive Tmo
4: I HAPTER NSTALLING AND ONFIGURING THE RIVER receive tmo This command sets the receive timeout individually for each Load Balancing/RSL group. Syntax el980lb receive tmo pri_slot in_ticks where: pri_slot is the PCI slot number of the primary NIC. in_ticks is the time in ticks (18 ticks = 1 second). Example el980lb receive tmo 10001 1 Default... -
Page 56: Send Tmo
Load Balancing/RSL Commands send tmo This command sets the timeout value, in seconds, that Load Balancing/RSL software waits before retransmitting a probe packet when a send request to the link support layer (LSL) is not acknowledged. Syntax el980lb send tmo pri_slot value_in_seconds where: pri_slot is the PCI slot number of the primary NIC. -
Page 57: Wait Tmo
4: I HAPTER NSTALLING AND ONFIGURING THE RIVER wait tmo This command sets the timeout value, in seconds, that Load Balancing/RSL waits before marking a NIC that is in wait mode as failed (see retry count). Syntax el980lb wait tmo value_in_seconds where: value_in_seconds is any positive integer. -
Page 58: Diagnostics And Troubleshooting
Using the 3Com NIC Diagnostics Program Using the 3Com DOS Diagnostics Program Uninstalling 3Com Software Troubleshooting Tips Constructing Loopback Plugs The 3Com World Wide Web site offers the latest drivers, troubleshooting information, and software updates in the Support area: http://www.3com.com/ LED Operation Two status LEDs are located above the cable connector. -
Page 59: Using The 3Com Nic Diagnostics Program
NIC that you can e-mail to 3Com. Starting the 3Com NIC Diagnostics Program Make sure the 3C985B-SX server NIC and the Windows NT driver are installed. 1 From the Windows Start menu, select Settings/Control Panel. -
Page 60: Accessing The 3Com Help System
Using the 3Com NIC Diagnostics Program Accessing the 3Com Help System To display the entire Help system, click Help on any 3Com NIC Diagnostics program window. To display information about any item on a window, click the question mark (?), drag it to the item, and click. The pop-up box displays information about the selected item. -
Page 61: Viewing Nic Details
Figure 17 NIC Details Window Using the Diagnostics Window From the Diagnostics window, you can run the diagnostic tests summarized in Table Table 4 3Com NIC Diagnostic Tests Test Description NIC self-test These tests check the physical components, circuitry, and connectors on the NIC. -
Page 62: Running The Nic Self-Test
Running the NIC Self-Test Run the NIC self-test to check the physical components, connectors, and circuitry on the NIC. Make sure the 3C985B-SX server NIC is installed and connected to the network, and that the Windows NT driver is installed. -
Page 63: Running The Packet Tests
NIC to send and respond to echo packets. Requires two connected computers. To run the packet tests: 1 Start the 3Com NIC Diagnostics program. 2 Click the Diagnostics tab. 3 Click Choose Test. The Packet Test window appears (Figure 19). -
Page 64: Running The Internal Loopback Test
To run the internal loopback test: 1 Bring up the Packet Test window (Figure 19): a Start the 3Com NIC Diagnostics program. b Click the Diagnostics tab. c Click Choose Test. 2 In the Internal Loopback Test area, click Start. -
Page 65: Running The External Loopback Test
To run the external loopback test, you must use a loopback plug. CAUTION: Do not run the External Loopback Test when the 3C985B-SX server NIC is cabled to another device. To run the external loopback test: 1 Insert the loopback plug into the 3C985B-SX server NIC. -
Page 66: Running The Transmit/Receive Test
The transmit/receive test checks the NIC’s ability to transmit or receive packets from another computer. To run the transmit/receive test, two servers with 3C985B-SX server NICs installed are required. One server sends data and the other receives data. Both servers must be running Windows NT 4.0. - Page 67 IAGNOSTICS AND ROUBLESHOOTING To run the transmit/receive test: 1 Install a 3C985B-SX server NIC and the network driver in each of two different servers and connect both to the same inactive network. The server that contains the NIC being tested is the transmitting server.
-
Page 68: Running The Echo Test
Using the 3Com NIC Diagnostics Program Figure 22 Transmit/Receive Windows Running the Echo Test The echo test verifies the ability of the 3C985B-SX server NIC to transmit and receive data on the network. You must have two servers with 3C985B-SX server NICs and network drivers installed to run an echo test. - Page 69 To run the echo test: 1 Install a 3C985B-SX server NIC and the network driver in each of two different servers and connect both to the same inactive network.
- Page 70 Using the 3Com NIC Diagnostics Program 5 On the responding server, click Stop. 6 To exit the test, click Close on both servers. Figure 23 Echo Test Windows...
-
Page 71: Using The Support Window
1 Start the 3Com NIC Diagnostics program. 2 Click the Support tab. Figure 24 Support Window Accessing Support Services To access 3Com support services in the Support window: Click Diagnostics to display the Diagnostics window. (See Using the Diagnostics Window earlier in this chapter for information on how to run diagnostic tests.) -
Page 72: Generating A Problem Report
Select your network operating system using the pull-down menu. h Select your computer processor speed using the pull-down menu. 5 Click Next to display the Problem Description window. 6 Type the problem description and the 3Com case number if you have one. -
Page 73: Using The 3Com Dos Diagnostics Program
View the report: click View Report. 10 Click OK. The General window appears. 11 To exit the program, click Cancel. Using the 3Com DOS Diagnostics Program The DOS Configuration and Diagnostics Program includes the diagnostic tests summarized in Table 6. If the NIC passes the Group 1 and Group 3 tests, hardware failure is ruled out. -
Page 74: Copying The Program
CONFIG.SYS files. The program name is 3C985CFG.EXE. To run the program in DOS, you must copy it from the 3Com EtherLink Server CD to a bootable DOS diskette. Follow these steps to copy the program and start it in DOS: 1 Create a bootable DOS diskette. -
Page 75: Starting The Program
3 Enter this command to start the program: a:\3c985cfg The Configuration and Diagnostics Program detects all 3C985B-SX server NICs in the system. The main screen appears with a NIC selected. Slot numbers listed in the Configuration and Diagnostics Program may not match those labeled on the mother board. -
Page 76: Running The Group 1 Tests
Using the 3Com DOS Diagnostics Program Running the Group 1 Tests The Group 1 tests check the integrity of the on-board ASIC circuitry. The types of tests and number of test repetitions are set to the default values (that is, Group 1 tests enabled, other tests disabled). -
Page 77: Running The Group 2 Tests
To run the External Loopback Test, you must use a loopback plug. CAUTION: Do not run the External Loopback Test when the 3C985B-SX server NIC is cabled to another device. To run the Group 2 tests: 1 Insert the loopback plug into the 3C985B-SX server NIC. -
Page 78: Running The Group 3 Tests
PCs being tested are operating. To run the Transmit/Receive Test: 1 Make sure that a 3C985B-SX server NIC is installed in the transmitting PC and connected to the network. 2 Install a 3C985B-SX server NIC in another PC (the receiving PC) and connect it to the network. -
Page 79: Running The Echo Server Test
PC being tested is operating. To run the Echo Server Test, follow these steps: 1 Make sure that a 3C985B-SX server NIC is installed in the sending PC and connected to the network. 2 Install a 3C985B-SX server NIC in another PC (the... - Page 80 Using the 3Com DOS Diagnostics Program 3 Launch the DOS diagnostics program on both PCs. 4 On the echo server (responder): a From the Select menu item on the main screen, select the NIC to be tested. b From the Test menu, select Test Setup.
-
Page 81: Viewing Test Results And Nic Information
To exit the DOS diagnostics program, from the Quit menu, select Exit, or press F3. Uninstalling 3Com Software Follow the procedures in this section to remove 3C985B-SX server NIC drivers and associated software from the server. Windows NT Software Removal 1 From the Start menu, select Settings/Control Panel. -
Page 82: Netware Software Removal
From the Installation Options screen, select Product options. b From the Other Installation Actions screen, select View/Configure/Remove installed products. c Delete 3Com Load Balancing Server Software from the Currently Installed Products list. DynamicAccess Software for Servers Removal 1 From the Start menu, select Settings/Control Panel. -
Page 83: Troubleshooting Tips
If you need to test the NIC further after running diagnostic tests, use the following troubleshooting tips. You can find the latest troubleshooting tips at the 3Com web site on the Customer Support page: http://www.3com.com WARNING: Before inserting or removing the NIC from the server, turn off the power to the server. -
Page 84: Constructing Loopback Plugs
To test for a defective server, install the NIC in a functioning server. Other NICs may be causing contention. Remove all other NICs from the server and test the 3C985B-SX server NIC separately. Constructing Loopback Plugs To run the External Loopback Test, you must first insert a loopback plug into the cable connectors of the 3C985B-SX server NIC. - Page 85 2 Clip together the connectors of one of the strands (one strand has markings on it; the other does not). 3 Insert the connectors into the SC connector ports of the 3C985B-SX server NIC.
-
Page 86: Dynamic Access Technology Server Features
Access YNAMIC ECHNOLOGY ERVER EATURES Topics: About Load Balancing About Resilient Server Links About Failover Specifying a Dedicated IP Address Changing an IP Address Troubleshooting a Load Balancing Configuration About VLANs About Load Balancing Load balancing removes bandwidth bottlenecks at the server through the use of multiple parallel resilient server links (RSLs) that share the network load. -
Page 87: About Failover
A: D Access T HAPTER YNAMIC ECHNOLOGY ERVER EATURES About Failover In addition to load balancing, RSLs provide failover fault tolerance between a server and a switch — if one NIC in a group fails, the others assume the network load of the failed NIC. -
Page 88: Specifying A Dedicated Ip Address
Specifying a Dedicated IP Address Specifying a Dedicated IP Address Bidirectional load balancing requires that you specify a dedicated IP address for the load balancing group. This address must be unique (not used elsewhere on the network). For example: Network ID Host ID Byte 1 Byte 2... -
Page 89: Changing The Group's Dedicated Ip Address
Use the troubleshooting tips below to solve problems that may occur in a load balancing configuration. For the latest troubleshooting tips, see the Customer Support page at the 3Com Web site: http://www.3com.com/ Table 9 Troubleshooting Tips for Load Balancing Symptom... -
Page 90: About Vlans
About VLANs About VLANs A VLAN is a group of location-independent and topology-independent devices that communicate as if they were on the same physical LAN. Network devices on different LAN segments and of different media types can be members of the same VLAN. Membership in a VLAN is determined by a VLAN tag that is transmitted with the Ethernet frame for use by a switch. -
Page 92: During
(This procedure is often called “performing a fresh install.”) These instructions apply to NetWare versions 4.11 and 5.0. Software Installation Requirements NIC — At least one 3Com server NIC must be installed in a PCI bus master slot. The following models are supported: 3C985B-SX. - Page 93 6 Remove the NetWare CD from the CD-ROM drive. 7 Insert the 3Com EtherLink Server CD in the CD-ROM drive. 8 Press F3. 9 Enter the location of the driver on the 3Com CD. For example: D:\netware 10 The next screen lists the drivers on the 3Com CD.
-
Page 94: S Pecifications
PECIFICATIONS Hardware Memory 16 Kb serial EEPROM 1 MB SRAM Bus interface PCI Local Bus Specification, Revision 2.1 PCI Compliance Checklist 32-bit zero wait state master 32- or 64-bit bus (33/66 MHz) PCI master Supports up to 13 dword bursts Supports bus master scatter-gather DMAs Memory read line support Memory read multiple support... -
Page 95: Specifications
C: S PPENDIX PECIFICATIONS Standards Conformance PCI Local Bus Specification, Revision 2.1 IEEE 802.1p IEEE 802.1Q IEEE 802.3 IEEE 802.3z IEEE 802.3x Cabling Types and Distances Maximum Cable Modal Length Connector Cable Diameter Bandwidth Signal Type Type Type (Microns) (MHz*km) (Meters) (Feet) 1000BASE-SX 62.5... -
Page 96: Technical Support
3Com Corporation World Wide Web site. Online Technical Services 3Com offers worldwide product support 24 hours a day, 7 days a week, through the following online systems: World Wide Web site 3Com Knowledgebase Web Services... -
Page 97: 3Com Knowledgebase Web Services
3Com FTP Site Download drivers, patches, software, and MIBs across the Internet from the 3Com public FTP site. This service is available 24 hours a day, 7 days a week. To connect to the 3Com FTP site, enter the following... -
Page 98: Access By Digital Modem
Up to 53,333 bps 1 847 262 6000 Access by Digital Modem ISDN users can dial in to the 3Com BBS using a digital modem for fast access up to 64 Kbps. To access the 3Com BBS using ISDN, call the following number:... -
Page 99: Support From 3Com
ECHNICAL UPPORT Support from 3Com If you are unable to obtain assistance from the 3Com online technical resources or from your network supplier, 3Com offers technical telephone support services. To find out more about your support options, call the 3Com technical telephone support phone number at the location nearest you. -
Page 100: Returning Products For Repair
Enterprise Customers: 1 800 876-3266 Returning Products for Repair Before you send a product directly to 3Com for repair, you must first obtain an authorization number. Products sent to 3Com without authorization numbers will be returned to the sender unopened, at the sender’s expense. - Page 101 South Africa 0800 995014 Spain 900 983125 Sweden 020 795482 Switzerland 0800 55 3072 U.K. 0800 966197 1 408 326 7120 U.S.A. and Canada 1 800 NET 3Com (not toll-free) (1 800 638 3266) Enterprise Customers: 1 800 876 3266...
- Page 102 82 connectors 94 commands for Netware server features 3C985CFG.EXE DOS Configuration and bind 51 Diagnostics Program 73 display status 52 3Com bulletin board service (3Com help 52 BBS) 96 link tmo 52 3Com Knowledgebase Web load sharing 53 Services 96...
- Page 103 Echo test 67 configuring 29 NIC Self-Test 60 environment specifications 93 Windows NT 4.0 58 External Loopback Test 76 diagnostics programs 3Com NIC Diagnostics program, Windows NT 4.0 58 DOS Configuration and Diagnostics failover about 86 Program 73 dimensions, NIC 93...
- Page 104 NDEX adding, NetWare 47 configuring during NetWare installation driver installation 43 dialog box 21, 58 creating, Windows NT 4.0 24 driver maintaining, NetWare 46 NetWare 40 removing NICs from, Windows Windows NT 4.0 20 NT 4.0 32 during NetWare NOS load sharing command 53 installation 91 fresh install...
- Page 105 NDEX configuration parameters receive tmo command 54 NetWare installation relative humidity, operational 93 program 49 removing connecting to network 17 NIC from a group, Windows NT information 80 4.0 32 primary 85 software 80 properties requirements displaying, Windows NT driver installation 4.0 33 NetWare 37, 91 editing, Windows NT 4.0 32...
- Page 106 NetWare 49 Windows NT 4.0 Windows NT 22 adding NICs to a group 26 technical support changing the primary NIC 31 3Com Knowledgebase Web creating a group 24 Services 96 creating a VLAN 27 3Com URL 95 diagnostics program 58...
- Page 108 ARDWARE 3Com warrants this hardware product to be free from defects in workmanship and materials, under normal use and service, for the following length of time from the date of purchase from 3Com or its authorized reseller: Five (5) years 3Com’s sole obligation under this express warranty shall be, at 3Com’s option and expense, to...
- Page 109 (48) hours of installation but no later than thirty 30) days after the date of purchase, and this is verified by 3Com, it will be considered dead- or defective-on-arrival (DOA) and a replacement shall be provided by advance replacement. The replacement product will normally be shipped not later than three (3) business days after 3Com’s...
- Page 110 This booklet is available from the U.S. Government Printing Office, Washington, D.C. 20402. Stock No. 004-000-00345-4. NOTE: In order to maintain compliance with the limits of a Class B digital device, 3Com requires that you use quality interface cables when connecting to this device. Changes or modifications not expressly approved by 3Com could void the user’s authority to operate this equipment.
- Page 111 TRADE SECRETS; TITLE: You acknowledge and agree that the structure, sequence and organization of the Software are the valuable trade secrets of 3Com and its suppliers. You agree to hold such trade secrets in confidence. You further acknowledge and agree that ownership of, and title to, the Software and all subsequent copies thereof regardless of the form or media are held by 3Com and its suppliers.
- Page 112 ENTIRE AGREEMENT: This License Agreement sets forth the entire understanding and agreement between you and 3Com, supersedes all prior agreements, whether written or oral, with respect to the Software, and may be amended only in a writing signed by both parties.
Need help?
Do you have a question about the EtherLink 3C985B-SX and is the answer not in the manual?
Questions and answers