Table of Contents
Troubleshooting

Related Manuals for 3Com 3C905CX


Summary of Contents for 3Com 3C905CX
-
Page 1: User Guide
User Guide 10/100 PCI Network Interface Cards 3C905CX For Complete PC Management 3C905C For Complete PC Management 3C905B 3C900B http://www.3com.com/ http://www.3com.com/productreg Published September 2001 User guide version 5.4.0... - Page 2 U.S.A. Copyright © 2001 3Com Corporation. All rights reserved. No part of this documentation may be reproduced in any form or by any means or used to make any derivative work (such as translation, transformation, or adaptation) without written permission from 3Com Corporation.
-
Page 3: Table Of Contents
Contents Learning About the NICs 3C905CX-TX-M and 3C905C-TX-M NICs 3C905B NICs 3C905B-TX NICs 3C905B-COMBO NIC 3C905B-FX NIC 3C900B NICs Remote Wake-Up Remote Wake-Up Cable Multiple NIC Installations and Remote Wake-Up Managed PC Boot Agent (MBA) Software 3Com Connection Assistant Desktop Management Interface (DMI) 2.0s... - Page 4 Using the Boot ROM on the NIC to Boot from the Network BBS BIOS-Compatible PCs Non-BBS BIOS-Compatible PCs Enabling or Disabling the Boot ROM Setting Disabling the 3Com Logo Troubleshooting the NIC Installing and Using the 3Com Connection Assistant System Requirements Installation Accessing 3Com Support Databases Knowledgebase NIC Help System...
- Page 5 Troubleshooting with the LEDs Running the NIC Diagnostics Tests Network Test NIC Test Viewing Network Statistics Using the 3Com Icon in the Windows System Tray Enabling the Icon Displaying Network Statistics Specifications and Cabling Requirements 3C905CX-TX-M and 3C905C-TX-M NIC Specifications 3C905B NICs Specifications...
- Page 6 Installing From Diskette Technical Support Online Technical Services World Wide Web Site 3Com Knowledgebase Web Services 3Com FTP Site Support from Your Network Supplier Support from 3Com Returning Products for Repair Index...
-
Page 7: C905Cx-Tx-M And 3C905C-Tx-M Nics
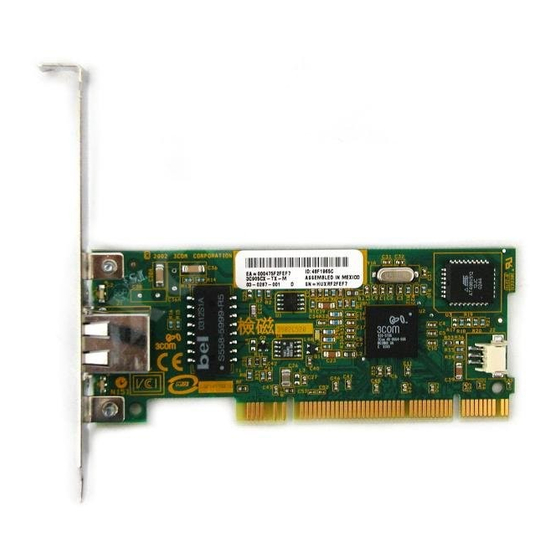
Ethernet networks and NICs is assumed. 3C905CX-TX-M and 3C905C-TX-M NICs The 3C905CX-TX-M and 3C905C-TX-M NICs connect your PCI-compliant PC to either a 10 Mbps Ethernet network or a 100 Mbps Fast Ethernet network. The NICs support a suite of desktop and network management features, including:... -
Page 8: C905B Nics
L IN K A C T 1 0 0 A C T 3C905CX-TX-M 3C905C-TX-M The following table outlines the features of the 3C905CX-TX-M and 3C905C-TX-M NICs. Features Supported 3C905CX-TX-M NIC 3C905C-TX-M NIC ✔ ✔ RJ-45 connector for 10BASE-T or 100BASE-TX ✔... -
Page 9: C905B-Tx Nics
3C905B NICs 3C905B-TX NICs Boot ROM Boot ROM socket MBA Boot ROM socket T X D D A T A D A T A A T A A C T A C T A C T Remote Remote 1 0 0 1 0 0 1 0 0 Wake-Up... -
Page 10: C905B-Fx Nic
AUI and BNC connectors for 10BASE5 and 10BASE2 ✔ SC connector for 100BASE-FX ✔ ✔ ✔ ✔ Remote Wake-Up ✔ ✔ ✔ ✔ ✔ 3Com Connection Assistant software ✔ ✔ ✔ ✔ ✔ DMI 2.0s ✔ ✔ ✔ ✔ Boot ROM socket ✔... -
Page 11: C900B Nics
The 3C900B NICs connect your PCI-compliant PC to a 10 Mbps Ethernet network. The 3C900B NICs support the following desktop and network management features: Remote Wake-Up (3C900B-FL only) 3Com Connection Assistant Software DynamicAccess LAN Agent for traffic prioritization and remote monitoring (RMON and RMON2) Desktop Management Interface (DMI) 2.0s... -
Page 12: Remote Wake-Up
EtherCD, where it can be used as a bootable CD. When you boot the PC with the EtherCD, MBA uses the NIC to do a network boot, allowing the PC to be managed in the preboot stage. The bootable EtherCD feature supports most 3Com PCI NICs, LAN CardBus PC cards, Mini PCI cards, and USB/Ethernet adapters. -
Page 13: Com Connection Assistant
NIC problem. The assisted service support is available only with an active Internet connection. The 3Com Connection Assistant can be installed after you install the NIC driver. For more information, see “Installing and Using the 3Com Connection Assistant” on page 37. -
Page 14: Desktop Management Interface (Dmi) 2.0S
For instructions on installing the 3Com DMI Agent, see “Installing the 3Com DMI Agent” in Appendix C. For more detailed information on DMI, refer to the 3Com DMI Agent User Guide located with the 3Com DMI Agent software on the EtherCD. Information is also available at: http://www.3com.com... -
Page 15: Meeting Pc Requirements
Minimum of 640 K of memory Obtaining Drivers To obtain the latest drivers, or for a list of additional drivers that are not included on the EtherCD, go to the 3Com Web site and search for 3C905C drivers: http://www.3com.com Installation Overview The NIC installation varies depending on your PC operating system. -
Page 16: Installing Multiple Nics
“Installing Multiple NICs” on page 25. Updating the Network Driver and NIC Software If you already have a 3Com NIC installed and want to update the driver and/or NIC software, follow the instructions in “Updating the Network Driver and NIC Software” on page 24. -
Page 17: Inserting The Nic In The Pc
Inserting the NIC in the PC 10 Click Done. 11 Exit the EtherCD, shut down Windows, and then turn off the power to the PC. Do not remove the EtherCD from the CD-ROM drive. The next step is to install the NIC in the PC. -
Page 18: Connecting The Remote Wake-Up Cable
This section describes how to connect the Remote Wake-Up (RWU) cable from the NIC to the PC motherboard. Connecting the Remote Wake-Up cable is optional. Connect this cable only if your NIC supports Remote Wake-Up and you want to use this feature. The following NICs support Remote Wake-Up: 3C905CX-TX-M 3C905C-TX-M 3C905B-TX 3C905B-TX-M 3C905B-COMBO... - Page 19 Connecting the Remote Wake-Up Cable NOTE: If you have a 3C905CX-TX-M or 3C905C-TX-M NIC and your PC is compliant with PCI 2.2, Remote Wake-Up is automatically enabled through the PCI bus. You do not need to connect the Remote Wake-Up cable.
-
Page 20: Connecting The Nic To The Network
Follow the procedure for the port that matches your NIC and your network environment. RJ-45 Port On the 3C905CX-TX-M, 3C905C-TX-M and 3C905B NICs, the RJ-45 port provides a 10 Mbps or 100 Mbps connection automatically, depending on the speed of the connected hub or switch. -
Page 21: Bnc Port
Connecting the NIC to the Network BNC Port The BNC port provides a 10 Mbps connection only. The following table shows the cable requirement and maximum network cable length for the BNC port. Maximum Network Port Cable Required Cable Length 10BASE2 thin Ethernet coaxial 185 m (607 ft) (10 Mbps only) -
Page 22: Aui Port
Installing and Connecting the NIC AUI Port The AUI port provides a 10 Mbps connection only. The following table shows the cable requirement and maximum network cable length for the AUI port. Maximum Network Port Cable Required Cable Length 15-pin AUI 10BASE5 thick Ethernet coaxial 500 m (1,640 ft) (10 Mbps only) - Page 23 Connecting the NIC to the Network SC Port The SC port on the 3C905B-FX NIC provides a 100 Mbps fiber-based connection only. The following table shows the cable requirements and maximum network cable lengths for the SC port. Port Cable Required Maximum Network Cable Length Long-wavelength fiber-optic (1300 nm):...
- Page 24 Installing and Connecting the NIC ST Port The ST port on the 3C900B-FL NIC provides a 10 Mbps fiber-based connection only. The following table shows the cable requirements and maximum network cable lengths for the ST port. Port Cable Required Maximum Network Cable Length Short-wavelength fiber-optic (850 nm):...
-
Page 25: Windows Xp, Windows 2000, And Windows Me
PC. It also allows you to view and configure NIC settings such as duplex mode and media type. You can install other NIC software, such as the 3Com Connection Assistant, DynamicAccess LAN Agent, or DMI Agent, after the NIC driver is installed. See the... -
Page 26: Windows 95 And Windows 98
Installing the NIC Driver and Software in Windows Windows 95 and Windows 98 Before installing the driver, make sure that: You have run the preinstallation program, as described in “Running the Preinstallation Program for Windows 95/98” on page 10. The NIC is installed in the PC and that it is connected to the network. You have the Windows installation files. -
Page 27: Installing The Driver In Windows 98
Windows NT 4.0 Installing the Driver in Windows 98 To install the network driver and NIC software: 1 Turn on the power to the PC. The operating system detects the NIC. The Insert Disk dialog box appears, prompting you to insert the EtherCD. NOTE: If the Add New Hardware Wizard starts, the NIC preinstallation program was not run on the PC. -
Page 28: Verifying Successful Installation
7 Make sure that the letter name of the CD-ROM drive (for example, d:\) appears in the entry box, and then click OK. The Select OEM Option dialog box appears. 8 Make sure that the 3Com EtherLink PCI NIC is selected, and then click OK. The Adapters tab of the Network screen appears. 9 Click Close. -
Page 29: Installing The 3Com Nic Diagnostics Program
Installing the 3Com NIC Diagnostics Program If you installed the driver only and at a later time want to install the 3Com NIC Diagnostics program, you must run the Update NIC Driver program on the EtherCD. The 3Com NIC Diagnostics program allows you to run tests that determine the status of your network and the NIC. -
Page 30: Updating The Network Driver And Nic Software
To update the driver using diskettes that were downloaded from the Web or that were created using the EtherCD: 1 Open the Windows Device Manager. 2 Locate the 3Com NIC under Network Adapters, and then click Properties. 3 Select the Driver tab. 4 Click Update Driver. -
Page 31: Installing Multiple Nics
Installing Multiple NICs Installing Multiple NICs This section describes how to install multiple 3Com PCI NICs in a PC. NOTE: You must use these procedures to install multiple NICs. Failure to follow these procedures may lead to problems requiring you to reinstall your operating system. -
Page 32: Windows Nt 4.0
Installing the NIC Driver and Software in Windows 4 Insert the EtherCD when prompted, and then click OK. 5 Follow the prompts on the screen to install the network driver. See the “Installing the Driver in Windows 95” or “Installing the Driver in Windows 98” section earlier in this chapter for instructions. -
Page 33: Installing The Netware Server Driver
Additional files (NetWare Loadable Modules [NLMs]) that are required for servers running NetWare are on the EtherCD in the \NWSERVER directory, or they can be obtained from Novell. NOTE: The 3Com PCI NICs do not support NetWare 3.xx or 4.xx servers that are not updated to the latest driver pack. -
Page 34: Netware 4.X And 5.X
Pressing the [Esc] key prevents loading of the driver. Because of the Novell scheme for identifying PCI slots, it is not possible for 3Com to pre-identify the slot number. See “Verifying the PCI Slot Number” on page 29 for instructions on obtaining... -
Page 35: Installing Multiple Nics
The values <slot1> and <slot2> are the numbers of the PCI slots in which the NICs are physically installed. To view the numbers of these PCI slots, use the 3Com Configuration and Diagnostic program for DOS. See “Verifying the PCI Slot Number” on page 29 for instructions. -
Page 37: Configuring The Nic
Configuring the NIC This chapter describes how to configure the NIC. NOTE: Before you change the NIC configuration settings, consult your system administrator. Default NIC Settings The table below lists the configuration settings for the NIC. The default setting is in bold in the Settings column. -
Page 38: Configuration Methods
Configuration Methods The NIC can be configured using any of the methods listed in the table below. NOTE: This chapter describes how to configure the NIC using the 3Com NIC Diagnostics program for Windows. For instructions on using the other methods, see the file or section mentioned in the table. -
Page 39: Booting From The Network
Booting From the Network NOTE: Click Help to obtain general information about the function of a screen. To obtain specific information about any topic on a screen, click the question mark (?) in the upper right corner of the screen, move it over a topic, and click once. 4 If your PC has more than one NIC installed, open the Network Interface Card (NIC) list box and select the NIC to be configured. -
Page 40: Using The Boot Rom On The Nic To Boot From The Network
Configuring the NIC To boot from the network using the MBA software on the EtherCD: 1 Insert the EtherCD in the CD-ROM drive. 2 Reboot the PC. The MBA code runs and attempts to boot from the network using the default protocol PXE. -
Page 41: Enabling Or Disabling The Boot Rom Setting
4 Click 3Com NIC Doctor. The 3Com NIC Diagnostics General screen appears. 5 On the General screen, make sure that the check box next to Show 3Com Logo on Startup is not selected. 6 Exit the 3Com NIC Diagnostics program. -
Page 43: Troubleshooting The Nic
Fix NIC installation problems. Fix network connection problems. Download the latest NIC drivers. Access a list of frequently asked questions as well as the 3Com Knowledgebase. System Requirements To install and use the 3Com Connection Assistant requires: Windows 95, Windows 98, Windows Me, Windows 2000, or Windows NT 4.0. -
Page 44: Accessing 3Com Support Databases
NIC Help System To access the 3Com NIC Help system: 1 Make sure that the NIC, its driver, and the 3Com NIC Diagnostics program are installed. See “Installing the 3Com NIC Diagnostics Program” on page 23 for instructions. 2 Open the Windows Start menu. -
Page 45: Troubleshooting The Nic Installation
4 Click Installation Utilities. 5 Click Undo Broken Installation and Uninstall. 6 Click Proceed. A message appears stating that all of the 3Com NICs will be removed from your system. 7 Click OK. A message appears stating that the NIC has been removed. -
Page 46: Other Installation Problems
11 Install the network driver, as described in “Installing the NIC Driver and Software in Windows” on page 19. If you are prompted for 3Com files when Windows restarts on Windows 95 and Windows 98 PCs, open the drop-down box and select the following path: \options\cabs To verify successful installation, see “Verifying Successful Installation”... -
Page 47: Troubleshooting The Network Connection
NIC is probably defective. For information on product repair, see “Technical Support” in Appendix E. Run the 3Com Connection Install the 3Com Connection Assistant and run the self-service option. This option analyzes your NIC and Assistant self-service. system, and guides you through troubleshooting steps to help resolve the problem. -
Page 48: Removing The 3Com Nic Diagnostics Program
PC motherboard. Consult your PC manufacturer. Removing the 3Com NIC Diagnostics Program The 3Com NIC Diagnostics Program can be removed using the Add/Remove Programs Wizard in Windows, or by using the EtherCD. For instructions on using the Add/Remove Programs Wizard in Windows, refer to your Windows documentation. -
Page 49: Removing The Driver
Removing the Driver Removing the Driver To remove the 3Com NIC driver from your PC, follow the steps for your operating system. Windows XP and Windows 2000 To remove the driver: 1 Right-click the My Computer icon, and then click Properties. -
Page 50: Windows Nt 4.0
Troubleshooting the NIC Windows NT 4.0 To remove the driver: 1 Double-click the My Computer icon, then the Control Panel icon, and then the Network icon. The Network screen appears. 2 Click the Adapters tab. 3 Highlight the name of the NIC in the Network Adapters box, and then click Remove. 4 Click Yes to confirm the removal. -
Page 51: Running Nic Diagnostics
Interpret the NIC LEDs. Run the NIC diagnostic tests. View network statistics. Use the 3Com icon in the Windows system tray. Interpreting the NIC LEDs The NICs have light-emitting diodes (LEDs), as described in the following tables, that can assist with network diagnostics and troubleshooting. -
Page 52: 3-Led Configuration
No network traffic is present. Viewing the NIC LEDs in the Diagnostics Program In addition to the LEDs that are on the NIC, you can view LEDs in the 3Com NIC Diagnostics program. 1 Make sure that the NIC, the driver, and the 3Com NIC Diagnostics program are installed. -
Page 53: Troubleshooting With The Leds
HELP directory on the EtherCD for instructions. To run the NIC Test or Network Test: 1 Make sure that the NIC, the driver, and the 3Com NIC Diagnostics program are installed. 2 Open the Windows Start menu. 3 Select Programs, and then 3Com NIC Utilities. -
Page 54: Viewing Network Statistics
The 3Com icon, which can be enabled to appear in the Windows system tray, allows you to start the 3Com NIC Diagnostics program. It also allows you to view the NIC’s link speed and number of frames sent and received. -
Page 55: Displaying Network Statistics
NIC since the last time statistics were reset. Link Speed—The speed (10 Mbps or 100 Mbps) at which the NIC is connected to the network. The information is updated each time you move your mouse pointer over the 3Com icon. -
Page 57: Specifications And Cabling Requirements
Specifications and Cabling Requirements This appendix lists the specifications, standards conformance, cable requirements, and connector pin assignments for the EtherLink PCI NICs. 3C905CX-TX-M and 3C905C-TX-M NIC Specifications Hardware Bus interface PCI Local Bus Specification, Revision 2.2 32-bit bus PCI master Supports bus master scatter-gather DMAs. -
Page 58: 3C905B Nics Specifications
Specifications and Cabling Requirements Standards Conformance IEEE 802.3 10BASE-T IEEE 802.3u 100BASE-TX IEEE 802.3x Full Duplex auto-negotiation and flow control NWay 10/100 auto-negotiation IEEE 802.1p/Q IEEE 802.3x RMON-1/RMON-2 Microsoft PC99 Microsoft PC2001 PCI 2.2 DMI 2.0s ACPI ASF specification Wired for Management (WfM) 1.1a, 2.0, including: PXE 2.0 and BIS SMBus 2.2 Pre-OS boot protocol support (PXE, BootP/DHCP, NCP, RPL) 3C905B NICs Specifications... -
Page 59: 3C900B Nics Specifications
3C900B NICs Specifications Network Interface 10 Mbps Ethernet 10BASE-T Ethernet IEEE 802.3 industry standard for a 10 Mbps baseband CSMA/CD local area network 100 Mbps Ethernet 100BASE-TX Ethernet IEEE 802.3u industry standard for a 100 Mbps baseband CSMA/CD local area network 100 Mbps Ethernet 100BASE-FX Ethernet IEEE 802.3q industry standard for 100BASE-FX Environment... -
Page 60: Cabling Requirements
Specifications and Cabling Requirements Environment Operating temperature 32˚ to 158˚ F (0˚ to 70˚ C) Storage temperature –22˚ to 194˚ F (–30˚ to 90˚ C) Operating humidity 10 to 90% noncondensing Storage humidity 10 to 90% noncondensing Altitude –984 ft to 9,840 ft (–300 to 3,000 m) Standards Conformance IEEE 803.3x flow control Microsoft PC98... -
Page 61: 10Base-T Operation
RJ-45 Connector Pin Assignments 10BASE-T Operation 10BASE-T is the Institute of Electrical and Electronics Engineers (IEEE) 802.3 standard for Ethernet signaling over unshielded twisted-pair wire at 10 Mbps. Ethernet, as the most widely used network protocol, uses 10BASE-T as its primary cabling scheme. -
Page 63: Installing The Dynamicaccess Lan Agent
NOTE: For an overview of the DynamicAccess LAN agent, see “DynamicAccess LAN Agent” on page 8. For detailed information on using, configuring, and troubleshooting the DynamicAccess LAN agent, refer to the 3Com DynamicAccess Technology User Guide on the EtherCD. Client PC Requirements The DynamicAccess LAN agent can be installed on a PC running Windows 95, Windows 98, Windows NT 4.0, or Windows NT 3.51. -
Page 64: Installing The Dynamicaccess Lan Agent
All protocols are re-bound to the virtual NIC. The bindings to the physical NIC are still intact. A 3Com DynamicAccess LAN agent entry appears as a protocol. A 3Com DynamicAccess LAN agent icon is installed in the Windows Control Panel. -
Page 65: Configuring The Dynamicaccess Lan Agent
Ethernet network. The instructions in this section are for configuring the DynamicAccess LAN agent on a local PC. You can obtain the complete configuration instructions by accessing the 3Com DynamicAccess Technology User Guide on the EtherCD. -
Page 67: Installing The 3Com Dmi Agent
MIF for that particular NIC. This ensures that the network management application does not receive irrelevant information for the NIC. For a description of each MIF that is supported by the 3Com DMI Agent, refer to the 3Com DMI Agent User Guide included with the 3Com DMI Agent software on... -
Page 68: System Requirements
1 Make sure that the PC meets the requirements listed in “Client PC Requirements” above. 2 Make sure that the 3Com NIC is installed in the PC and is connected to the network. 3 Insert the EtherCD in the CD-ROM drive. - Page 69 8 Restart the PC when prompted. To verify successful installation, use a DMI-compatible browser or a network management application that supports DMI 2.0s to verify that the 3Com NIC is present. Refer to the 3Com DMI Agent User Guide or contact your system...
-
Page 71: Installing From Diskette
If your PC does not have a CD-ROM drive, access a PC that has a CD-ROM drive and create installation diskettes from the EtherCD. You can also download the EtherCD software and place it on diskettes from the 3Com World Wide Web site: http://www.3com.com/... - Page 72 Installing From Diskette 7 Click Next. 8 Insert the blank, formatted diskette labeled EtherDisk 1 in the PC, and then click Next. Files are copied. 9 Remove the disk and insert the disk labeled EtherDisk 2 when prompted, and then click OK.
-
Page 73: Technical Support
3Com recommends that you access the 3Com Corporation World Wide Web site. Online Technical Services 3Com offers worldwide product support 24 hours a day, 7 days a week, through the following online systems: World Wide Web site 3Com Knowledgebase Web Services... -
Page 74: Support From Your Network Supplier
3Com. Support from 3Com If you are unable to obtain assistance from the 3Com online technical resources or from your network supplier, 3Com offers technical telephone support services. To find out more about your support options, call the 3Com technical telephone support phone number at the location nearest you. - Page 75 Support from 3Com Country Telephone Number Europe, Middle East, and Africa From anywhere in these regions, call: +44 (0)1442 435529 phone +44 (0)1442 436722 fax Europe and South Africa From the following countries, you may use the toll-free numbers: Austria...
-
Page 76: Returning Products For Repair
Technical Support Returning Products for Repair Before you send a product directly to 3Com for repair, you must first obtain an authorization number. Products sent to 3Com without authorization numbers will be returned to the sender unopened, at the sender’s expense. -
Page 77: Index
48 requirements 10Mbps, link LED 46 configuring 61, 65 overview 3C900B-COMBO NIC DynamicAccess LAN agent 3Com icon, in Windows system tray features removing picture of CRC errors, viewing 48 showing specifications 3Com Knowledgebase 67 3C900B-FL NIC 3Com logo, disabling 35... - Page 78 16 Link LED, viewing 46 red X in Windows Device Manager 39 link speed, viewing 49 release notes, accessing 39 logo, 3Com, disabling 35 remote monitoring (RMON) 8 Fast Ethernet protocol, characteristics remote system alerts, overview 8 of 55...
- Page 79 NIC installations STP wire 54 removing NIC software updating support databases, accessing 38 verifying installation network driver Windows system tray, 3Com icon 48 NIC diagnostic program Windows XP installing driver technical support installing multiple NICs 3Com Knowledgebase verifying successful installation 22...
Need help?
Do you have a question about the 3C905CX and is the answer not in the manual?
Questions and answers