Breas Vivo 3 User Manual
Hide thumbs
Also See for Vivo 3:
- User manual (137 pages) ,
- Clinician manual (143 pages) ,
- User manual (113 pages)
Table of Contents
Advertisement
Quick Links
Vivo 3
User's
,
Breas Vivo 3
User Manual
ENGLISH (EU)
007231 F-3 en-EU
USER MANUAL
Breas Medical AB, Företagsvägen 1, SE-435 33 Mölnlycke, Sweden
Phone +46 31 86 88 00
Order +46 31 86 88 20 , Technical Support +46 31 86 88 60
7 321820 072316
Fax +46 31 86 88 10,, www.breas.com, Date: 2023-12-07 | 25391
Advertisement
Table of Contents

Related Manuals for Breas Vivo 3


Summary of Contents for Breas Vivo 3
- Page 1 Breas Medical AB, Företagsvägen 1, SE-435 33 Mölnlycke, Sweden Phone +46 31 86 88 00 Order +46 31 86 88 20 , Technical Support +46 31 86 88 60 7 321820 072316 Fax +46 31 86 88 10,, www.breas.com, Date: 2023-12-07 | 25391...
-
Page 3: Table Of Contents
Symbols on the Vivo 3 ........ - Page 4 6.5.1 Treatment Values Monitored by the Vivo 3 ......43 Using Accessories..............43 6.6.1...
- Page 5 Cleaning the Vivo 3........
- Page 6 Power Supply ............... .72 Operating Conditions.
-
Page 7: Introduction
Every other use may lead to risk of personal injury! CAUTION! Read this manual thoroughly so that you completely understand how the Vivo 3 is oper- ated and maintained before taking it into use, to ensure correct usage, maximum per- formance and serviceability. -
Page 8: What Is The Vivo 3
Day-to-day caregivers, patients, relatives and other non-professional users may operate the Vivo 3 with the Home mode activated, after it has been set up according to the prescribed treatment. In Home mode, some settings and controls are locked or hidden. -
Page 9: Contraindications
Training The lay operator shall be trained to basic knowledge of the Vivo 3 and in the specific opera- tions they are assigned to perform. The training shall be based on this user manual and the responsible clinical personnel shall assess the level of training required for each lay operator. -
Page 10: About This Manual
About this Manual 1.6.1 Audience This manual is intended for patients and other lay users operating the Vivo 3. • Care providers, clinical personnel, physicians and others who require a working knowledge of the Vivo 3 will find additional information on settings and functions in the Clinician’s Manual. -
Page 11: Safety Information
The Vivo 3 shall not be used with nebulizers. Risk of Insufficient Ventilation Usage outside the specified operating conditions may cause reduced performance. The Vivo 3 must only be used in accordance with the operating conditions specified in this manual. Risk of Faulty Treatment Do not use the Vivo 3 in the event of: •... - Page 12 Risk of Unnoticed Critical Conditions • All the physiological alarms of the Vivo 3 must be set at safe levels that will effec- tively warn the user of any risk. The alarm levels should be assessed considering the patient’s treatment settings.
-
Page 13: Electricity - Warnings And Precautions
Due to the internal battery, the Vivo 3 may start if the Start/Stop button is pressed even without the mains being connected. Do not use the Vivo 3 with nitric oxide, helium or helium mixtures. This may affect patient air flow and volume measurements. -
Page 14: Electromagnetic Compatibility And Electrostatic Discharge
Vivo 3. Please note some of these RF emitters may not be visible and the Vivo 3 can potentially be exposed to fields from these RF emitters without the user’s awareness. If abnormal performance of the Vivo 3 is observed, and the RF emitters cannot be identified and removed, the Vivo 3 may need to be reoriented or relocated. -
Page 15: Patient Circuit - Warnings And Precautions
Do not use or store the Vivo 3 in a magnetic resonance (MR) environment. Use of the Vivo 3 in an MR environment may result in malfunction of the Vivo 3 and pose unacceptable risk to the patient, medical staff or other persons. - Page 16 (this is even more important for treatments with low pressure). Make sure that it is not blocked or obstructed. • The Vivo 3 should be turned on and the function of the leakage port should be checked before use: Risk of Insufficient Ventilation Incompatible patient circuits may come loose.
-
Page 17: Filter Usage - Warnings And Precautions
Risk of Cross-Contamination Patient circuits might get contaminated by exhaled gases. To avoid cross-contamination, always use a new patient circuit when the Vivo 3 is to be used by a new patient. NOTE For masks and accessories, always follow the manufacturer’s instructions. -
Page 18: Invasive Use - Warnings And Precautions
The Vivo 3 is equipped with a low leakage alarm. However, the alarm is not a substitute for operator vigilance for ensuring that the leakage ports remains clear at all times. -
Page 19: Cleaning And Maintenance - Warning And Precautions
WARNING! Risk of Faulty Treatment Service and Maintenance of the Vivo 3 shall not be performed when the Vivo 3 is in use. WARNING! Risk of Electric Shock Cleaning with excessive water or opening the device’s casing without certified training... - Page 20 CAUTION! Do not attempt to autoclave or sterilize the Vivo 3. 18 Safety Information User Manual Doc. 007231 F-3...
-
Page 21: Oxygen Usage - Warning And Precautions
Oxygen Usage — Warning and Precautions When using the Vivo 3 with oxygen, always follow the oxygen provider’s instructions and use only medical grade oxygen complying with local regulations. WARNING! As this medical device uses an alternative small-bore connector design different from... -
Page 22: Mobile Use - Warning And Precautions
• 80% oxygen concentration: -7.5% deviation 2.10 Mobile Use — Warning and Precautions This section applies if using the Vivo 3 during transit, for example on a wheel chair or in a car. 20 Safety Information User Manual Doc. 007231 F-3... - Page 23 WARNING! Risk of Electric Shock If connecting the Vivo 3 to an external DC power source, always use the DC DC Power Supply accessory. Connecting directly to an external DC power source may compromise the electrical isolation and cause an electric shock.
-
Page 24: Product Description
Overview This overview shows the ventilator with operator detachable parts connected. For detailed information about connecting parts and accessories, see 5 Prepare the Vivo 3 for Use, page 36 and 6.6 Using Accessories, page 43. 1. Ventilator unit 2. Filter holder with air inlet filter 3. -
Page 25: Ventilator Back
For external DC power other than the Breas XPAC, always use the DC/DC power sup- ply adapter (accessory). The Vivo 3 has a power management system that automatically selects the best available power source, according to the priority list below: 1. -
Page 26: Menus
Power supply Y-cable is required. If a power source fails, the Vivo 3 will switch to the next source in priority and show a mes- sage on the display. If all available sources fail, the Power Failure alarm is given and the Vivo 3 shuts down. - Page 27 a. Navigation buttons b. Active page indicator c. Directional buttons d. Page number indicator (for functions with several pages) Selecting the Section to Display Press the navigation button for the requested function page. ⇒The page is now displayed. 2 For functions with several pages grouped together, press the navigation button again to browse the pages.
- Page 28 Select an Item on a Page This procedure describes how to navigate between selectable items. Read-only information cannot be selected. Selectable Items • Sub pages (indicated by an arrow to the right of the item text) • Settings • Commands Press the Up or Down arrow button to select the first selectable item on the page.
-
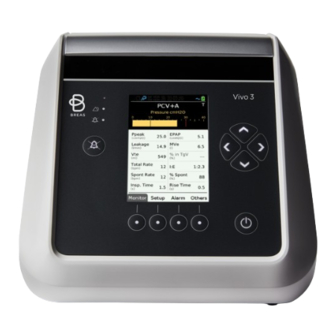
Page 29: The Monitor Page
See also 6.5.1 Treatment Values Monitored by the Vivo 3 , page 43. Bar graph legend 1. Current pressure 2. Low pressure alarm level 3. -
Page 30: The Others
3.5.5 The Others Pages The Others pages contain non-clinical settings and information. 3.5.5.1 Device Settings This section describes device settings that don’t affect the ventilating function of the Vivo 3. Setting Description Language Value range: The available languages are listed with their native names accompanied by a flag representing a country where the lan- guage is spoken. - Page 31 3.5.5.5 Clock Setting Description Time Sets the time for the Vivo 3. The time is used for logs and reports. Date Sets the date for the Vivo 3. The date is used for logs and reports. Time Format Select whether to use 12 hr clock or 24 hr clock.
-
Page 32: Symbols On The Vivo 3
Average % Spontaneous breaths for selected period. Insp Time Average Inspiratory Time for selected period. Average I:E Ratio for selected period. *) The displayed value is rounded to the nearest whole number. Symbols on the Vivo 3 Symbol Description Manufacturer information Nemko certifikation mark (NRTL/SCC accredited) - Page 33 Symbol Description Degree of protection provided by enclosure. See 9.3 Operating Conditions, page 73 for explanation. Caution: U.S. Federal law restricts this device to sale by or on the order of a licensed healthcare practitioner. (Symbol only applicable in U.S.) Read user instructions RTCA/DO-160 G categorization.
- Page 34 Additional Symbols on Parts and Accessories This section describes additional symbols for Vivo 3 detachable parts and accessories from Breas Medical AB. Each item, or its package, have the symbols that applies for the specific accessory. Symbol Description Caution, hot surface Caution symbol, read the Accessory’s instructions for more...
-
Page 35: Symbols On The Display
Symbols on the Display 6 7 8 9 10 S S S 1. SD card inserted and working 2. Nurse call connected 3. Remote alarm connected 4. SpO2 connected 5. Humidifier activated 6. Heated circuit activated 7. “Clock radio wake up” activated 8. -
Page 36: Treatment Functions And Settings
Lay operators must only use the User Manual, not the Clinician’s Manual. Treatment Settings This section describes settings and parameters that affects the ventilating function of the Vivo 3. On the machine, these settings are in the Settings menu. 4.1.1 Ramp Up The ramp up setting defines a ramp time for increasing the airway pressures. -
Page 37: Heated Circuit
4.1.5 Heated Circuit This setting defines whether a heated patient circuit shall be used as patient circuit. The Heated circuit for Vivo 123 cannot be used in HFNT mode. Always check with the manufacturer for the external humidifier that is used. WARNING! Read the section 2.7 Humidification and Heating —... -
Page 38: Prepare The Vivo 3 For Use
2 Make sure that nothing can block the patient air inlet at the back of the Vivo 3, such as a curtain etc. 3 Make sure that the controls are accessible for the operator. -
Page 39: Connecting The Patient Circuit
Read the chapter 2.4 Patient Circuit — Warnings and Precautions, page 13 Carefully to make sure all conditions are considered and met. The Vivo 3 is intended to be used with leakage circuits only. Recommended leak rate: 20 to 50 liters per minute at 10 cmH Check that the circuit is clean and undamaged. -
Page 40: Disconnect The Heated Patient Circuit From The Ventilator
• The audio pause LED lights yellow. • In about a second, both LEDs are turned off. If the test fails, do not use the Vivo 3. Contact your supplier of the Vivo 3 for a technical check. 3 Disconnect the power cord for more than 5 seconds. -
Page 41: Actions At Pre-Use Test Failure
The ventilator will apply the default values to compensate for circuit resistance and compli- ance. These values will deviate from the values for the circuit in use. Ensure that the delivered ventilation is closely monitored. Prepare the Vivo 3 for Use 39 User Manual Doc. 007231 F-3... -
Page 42: How To Use The Vivo 3
• The audio pause LED lights yellow • In about a second, both LEDs are turned off If the function test beep absents, take the Vivo 3 out of use and contact your supplier of the Vivo 3 . 40 How to Use the Vivo 3 User Manual Doc. -
Page 43: Stop The Treatment
Confirm Start/Stop is set to Off Make sure that the Vivo 3 is in Standby mode. 2 Press the On/Off button. 3 The machine performs a function test as described above. Stop the Treatment It is possible to choose how the machine will start and stop. If you want to confirm the start- ing and stopping or not, see3.5.5.1 Device Settings, page 28... -
Page 44: Switch Off The Vivo 3
Switch Off the Vivo 3 Confirm Start/Stop is set to On Make sure that the treatment is stopped and the Vivo 3 is in Standby mode. 2 Press the On/Off button. ⇒When the message “Do you want to turn off the ventilator?”... -
Page 45: Treatment Values Monitored By The Vivo 3
This value is only displayed if the SpO module is connected. Displayed ranges: According to the manufacturer’s specifications. Using Accessories This section describes how to use accessories provided by Breas Medical AB. 6.6.1 Using the Attachable Humidifier WARNING! Read the section 2.7 Humidification and Heating — Warnings and Precautions, page 16 before using the Vivo 3 with the attachable humidifier. - Page 46 The humidifier is intended for stationary use and requires a connection to the Mains power supply to work. During mobile use of the Vivo 3, remove the humidifier water chamber and insert the air bypass unit. Using the Attachable Humidifier for the First Time — Overview Take out the air bypass unit by pressing the locking latch (a) and then pulling it out.
- Page 47 Humidifier level (5): 12 hours. At lower settings, the duration will be longer. CAUTION! • The water chamber must be detached from the Vivo 3 when filling water into the water chamber. • Use only distilled or sterilized water or boiled, chilled tap water in the humidifier water chamber.
-
Page 48: Using The Heated Circuit
Using the Heated Circuit WARNING! Read section 2.7 Humidification and Heating — Warnings and Precautions, page 16 before using the Vivo 3 with the heated circuit. NOTE The heated circuit requires connection to the Mains power supply to work. Information about safety, warnings, product description, installation, usage, cleaning, maintenance and technical specifications can be found in the user instruction for the heated circuit. -
Page 49: Using The Spo 2 Sensor
SpO module. CAUTION! • When using the Vivo 3 with the SpO2 sensor, the Vivo 3 displays functional oxygen saturation measured by the sensor. • The following information concerns the light emitted by the SpO2 •... -
Page 50: Using The Oxygen Supply Adapter
Connect the Oxygen supply Connect the oxygen adapter (article no. 005032) to the oxygen supply’s tube. 2 Connect the oxygen adapter to the oxygen port at the back of the Vivo 3. See 3.3 Ventilator Back , page 23 for detailed information. -
Page 51: Using The Remote Alarm Unit
6.6.9 Using the Y-Cable The Y-cable is used for connecting the Vivo 3 to both mains and external DC at the same time. see 5.3 Connecting the Vivo 3 to Power Supply, page 36. When both power sources are avail- able, the mains will be used. -
Page 52: Using The Vivo 3 With The Trolley
The trolley shall only be used in indoor, hospital environment. The trolley system consists of a trolley base and a mounting bracket. This section describes how to use the Vivo 3 and a trolley with mounting bracket. Mount and dismount the Vivo 3 as shown in the picture: The bottom plate is mounted to the trolley using four screws. -
Page 53: Basic Troubleshooting
If the air is dry despite using the humidifier, increase the level of humidification. If the humidifier doesn’t deliver any heat, check that the Vivo 3 is powered from the AC power supply; the humidifier doesn’t work on battery. How to Use the Vivo 3 51 User Manual Doc. -
Page 54: Alarms
Risk of Unnoticed Critical Conditions • All the physiological alarms of the Vivo 3 must be set at safe levels that will effec- tively warn the user of any risk. The alarm levels should be assessed considering the patient’s treatment settings. -
Page 55: Checking The Operator's Position
Handle Alarms 7.2.1 Identify an Alarm Condition If an alarm condition is detected, the Vivo 3 main unit and the remote alarm unit (if con- nected) will alarm without delay. The alarms will remain active until the alarm condition is resolved. -
Page 56: Pause The Alarm Sound
To reset an alarm, correct the cause of the alarm condition. ⇒Once the cause is corrected, the alarm disappears from the display. WARNING! If an alarm condition cannot be corrected, take the Vivo 3 out of use and contact your supplier of the Vivo 3 e. 54 Alarms User Manual Doc. -
Page 57: View Historical Alarms
7.2.4 View Historical Alarms To view historical alarms, press the Alarm button until Alarm/Event history is shown. Alarms 55 User Manual Doc. 007231 F-3... -
Page 58: Adjust The Alarm Sound Level
7.2.5 Adjust the Alarm Sound Level Alarm Sound Level is found in the Alarm Settings. Press the Alarm navigation button until the Alarm settings page with Alarm Sound Level is shown. 2 Press the Down or Up arrow button to select the Alarm Sound Level setting. -
Page 59: High Pressure Alarm
Description Alarm text Low Pressure Priority High Alarm condition A Low Pressure alarm will be given when the Vivo 3 pressure fails to reach the low pressure alarm limit for 15 seconds. Possible cause • Disconnection of patient circuit. •... -
Page 60: High Breath Rate Alarm
Increased Breath Rate. • Too sensitive setting of the inspiratory trigger setting. Reset criteria The breath rate goes below the alarm limit. Ventilator action The Vivo 3 will continue treatment according to the current settings. 7.3.4 Low Breath Rate Alarm Property Description... -
Page 61: High Minute Volume Alarm
Leakage from the mask or other components of the patient circuit. • Increased breath rate. Reset criteria The minute volume goes below the alarm limit. Ventilator action The Vivo 3 will continue treatment according to the current settings. 7.3.6 Low Minute Volume Alarm Property Description Alarm text... -
Page 62: Rebreathing Alarm
Possible cause • Obstructed or occluded patient circuit. • Incorrect patient circuit. Reset criteria The leakage is back within limits. Ventilator action The Vivo 3 will continue treatment according to the current settings. 7.3.8 Apnea Alarm Property Description Alarm text Apnea... -
Page 63: High Epap Alarm
• The patient has removed the mask. • Circuit disconnection. Reset criteria The leakage is back within limits. Ventilator action The Vivo 3 will continue treatment according to the current settings 7.3.10 High EPAP Alarm Property Description Alarm text High EPAP... -
Page 64: High Spo
Too high flow of bleed-in oxygen. Reset criteria The SpO value goes back below the alarm limit. Ventilator action The Vivo 3 will continue treatment according to the current settings. This alarm requires a connected SpO sensor. 7.3.13 Low SpO... -
Page 65: Low Pulse Rate Alarm
Too low flow of bleed-in oxygen. • Insufficient ventilatory support. Reset criteria The pulse rate goes back above the alarm limit. Ventilator action The Vivo 3 will continue treatment according to the current settings. This alarm requires a connected SpO sensor. 7.3.16 Circuit Disconnection Alarm... -
Page 66: Technical Alarms
External power supply connected to ventilator. Ventilator action The Vivo 3 stops the treatment, turns off the display and gives the Power Fail alarm for at least 2 minutes. If power is restored within the alarm time, the ventilator will automatically resume treatment with current settings. -
Page 67: Spo Sensor Failure / Disconnected Alarm
Reset criteria Normal communication with the sensor is re-established. An information message remains until acknowledged by the user. Ventilator action The Vivo 3 will continue treatment according to the current settings. 7.4.4 Artifact This alarm requires a connected SpO sensor. -
Page 68: Ambient Pressure Compensation Lost Alarm
Ventilator action The Vivo 3 will continue treatment according to the current settings. Normal atmospheric pressure at sea level will be used as approxi- mation for the temporary ambient pressure compensation. If used at other altitude, delivered and measured pressures may deviate. -
Page 69: High Patient Air Temp. (High Patient Air Temperature)
Reset criteria Correct data from the sensor is received again. An information message remains until acknowledged by the user. Ventilator action The Vivo 3 will continue treatment but with the following limitations: • Monitoring of leakage is disabled. • Volume measurements are disabled. -
Page 70: Internal Function Failure
The ventilator will stop the treatment. Action to take Restart the Vivo 3. If the alarm persists or reoccurs: Take a note of the error code and contact your supplier of the Vivo 3 . 68 Alarms User Manual Doc. 007231 F-3... -
Page 71: Cleaning And Maintenance
4 Clean the outside of the Vivo 3 using a lint free cloth moistened with a mild soap solution and / or ethanol 70%. 5 When the equipment is clean and dry, reconnect the patient circuit and any accessories that was disconnected during the cleaning. -
Page 72: Clean The Humidifier
Clean and Replace Patient Air Inlet Filters The Vivo 3 patient air inlet filters are located inside a magnetic filter holder at the back of the ventilator. The table below describes the filters and their minimum maintenance intervals. -
Page 73: Disposal
* If the Vivo 3 is used in an environment with high grades of pollen or pollutions, shorter intervals might be required. Turn off the Vivo 3 and place it on a clean dust free surface. 2 Pull out the filter holder and remove the filters. -
Page 74: Technical Specifications
Technical Specifications Ventilator Size and Weight Property Value Dimensions (WxHxD) 166 x 185 x 200 mm Weight 1,8 kg Power Supply Mains Power Supply Property Value Mains Power Supply 100–240 V AC tolerance: +10%/-20%, 50 to 60 Hz, max 1.2 A. The approved AC/DC supply listed in must be used. -
Page 75: Operating Conditions
• The Vivo 3 must not be stored in a warm place, such as direct sunlight or close to a radiator. If stored in temperatures outside normal operation conditions, let the Vivo 3 acclimate before taking it to use. - Page 76 Environmental Condition Specification Ventilator ingress IP 22 protection Mechanical ingress protection: protected from touch by fingers and objects greater than 12.5 mm Liquid ingress protection: The device withstands dripping water(equivalent to 3 mm rainfall /minute) when not tilted more than 15 degrees from vertical. The protection has been tested for 10 minutes (2.5 minutes in every tilt direction).
-
Page 77: Appendices
Breas Medical has successfully completed testing for the ventilator System. The ventilator System complies with RTCA/DO-160, Section 21, Category M and can be considered FAA compliant. Some airlines may require advance notification before travel, and devices may need to be operated by battery. Breas Medical rec- ommends that customers check with their airline. -
Page 79: Index
Index Alarm time ......29 Alarm volume......29 Alarms . - Page 80 Display ....... . 22 Display light......28 Languages .
- Page 81 connect ......36 Pre-use test......38 Undesirable side effects.
Need help?
Do you have a question about the Vivo 3 and is the answer not in the manual?
Questions and answers