Table of Contents
Advertisement
Quick Links
Table of Contents
1
Introduction ..................................................................................................................... 3
1.1
1.2
1.3
1.4
2
Safety Information........................................................................................................... 7
2.1
2.2
2.3
2.4
2.5
2.6
2.7
2.8
2.9
2.10
3
Product Description....................................................................................................... 18
3.1
3.2
3.3
3.4
3.5
4
Functions and Parameters of the Vivo 40 ..................................................................... 25
4.1
4.2
4.3
4.4
4.5
5
Using the Vivo 40 .......................................................................................................... 27
5.1
5.2
5.3
5.4
5.5
5.6
5.7
6
Preparing the Vivo 40 for Use ....................................................................................... 39
6.1
6.2
6.3
6.4
7
Alarms .......................................................................................................................... 43
7.1
7.2
Doc. 003821 En-Uk E-1
What is the Vivo 40? ......................................................................................... 4
Intended Use..................................................................................................... 4
Contraindications .............................................................................................. 5
.......................................................................................... 6
General User Precautions ............................................................................... 7
Electrical Safety .............................................................................................. 9
Environmental Conditions ............................................................................. 10
Invasive Use ................................................................................................... 13
Usage of Filters ............................................................................................... 14
Humidification ............................................................................................... 15
Cleaning and Maintenance ............................................................................. 16
Adverse Patient Symptoms............................................................................. 16
Usage of Oxygen .......................................................................................... 17
Main Components ........................................................................................... 18
Equipment Designation and Safety Label .................................................... 23
Ventilation Mode.............................................................................................. 25
Settings ........................................................................................................... 25
Standby and Operating Mode ......................................................................... 25
Low Leakage Detection................................................................................... 26
Humidifier (optional) ........................................................................................ 26
Set up the Vivo 40 Before Use........................................................................ 27
Switching the Vivo 40 On and Off ................................................................... 28
Using the Menu ............................................................................................... 29
Monitoring Section .......................................................................................... 32
Using Batteries................................................................................................ 34
Vivo 40 Operating Time................................................................................... 38
Installing the Vivo 40 ....................................................................................... 39
Placing the Vivo 40 ....................................................................................... 40
Connecting the Vivo 40 to the Mains Supply .................................................. 40
Connecting the Patient Circuit......................................................................... 41
Alarm Function ................................................................................................ 43
Physiological Alarm......................................................................................... 45
............................................................................... 11
................................................................................. 20
......................................................................... 21
........................................................... 22
....................................................................... 33
Table of Contents
Vivo 40 users manual
1
Advertisement
Table of Contents

Related Manuals for Breas Vivo 40


Summary of Contents for Breas Vivo 40
-
Page 1: Table Of Contents
Preparing the Vivo 40 for Use ..................39 Installing the Vivo 40 ..................39 Placing the Vivo 40 ..................40 Connecting the Vivo 40 to the Mains Supply ..........40 Connecting the Patient Circuit................. 41 Alarms .......................... 43 Alarm Function ....................43 Physiological Alarm.................. - Page 2 Technical Alarm....................52 Cleaning the Vivo 40 and Replacement of Accessories ..........55 Cleaning the Vivo 40 ..................55 Cleaning and Replacing the Patient Air Filters..........58 Maintenance ......................... 59 Regular Maintenance Control ................. 59 Service and Repair..................60 Storage......................60 Disposal ......................
-
Page 3: Introduction
WARNING! Do not use the Vivo 40 for any kind of life support treatment. Breas Medical AB reserves the right to make changes to this product without any prior notification. -
Page 4: What Is The Vivo 40
The Vivo 40 is intended for non-invasive use, or invasive use with appropriate patients. The Vivo 40 is intended for use in clinical settings (e.g., hospitals, sleep labora- tories, sub-acute care institutions) and home environments. The Vivo 40 must always be prescribed by a licensed physician. -
Page 5: Contraindications
The Vivo 40 is intended for treatment of both adult and paediatric (who weigh more than 10 kg) patients. The Vivo 40 is intended to be operated by qualified and trained personnel, or by personnel who have been taught using the clinician’s manual. -
Page 6: About This Manual
1.4 About this Manual Always read this manual before setting up and using the Vivo 40 or per- forming maintenance on the machine, to ensure correct usage, maxi- mum performance and serviceability. Breas Medical AB reserves the right to make changes to the contents of this manual without any prior notification. -
Page 7: Safety Information
Safety Information 2.1 General User Precautions • The Vivo 40 must be switched off and on at least once a day. This is neces- sary in order for the Vivo 40 to perform a self test. • The Vivo 40 should not be used for total life support treatment. - Page 8 Start/Stop button is pressed even without the mains being connected. • Do not use the Vivo 40 while in a carry bag. Attach the rear lid and place the swivel in a down position when placing the Vivo 40 in the bag.
-
Page 9: Electrical Safety
2.2 Electrical Safety • Do not operate the Vivo 40 if it has a damaged power cord or casing. • The Vivo 40 may not work properly if any part has been dropped, damaged or submerged in water. • To avoid electrical shock, disconnect the electrical supply to the Vivo 40 before cleaning. -
Page 10: Environmental Conditions
• The performance of the Vivo 40 may deteriorate at ambient temperatures below 5°C (41°F) and above 38°C (100°F). • Do not use the Vivo 40 while positioned in a warm place, such as direct sunlight. • The device complies with the EMC requirements of standards. Measures should include but not be limited to: –... -
Page 11: Usage Of Patient Circuit
2.4 Usage of Patient Circuit • Only use the Vivo 40 with a mask, patient tube and leakage port recom- mended by Breas Medical AB and your health care professional. • The Vivo 40 requires a leak port instead of an actively controlled exhalation valve to remove exhaled gases from the patient circuit. - Page 12 • Do not leave long lengths of air tubing around the top of the bed. It could twist around the patient’s head or neck while sleeping. • Always follow the instructions of the mask manufacturer. 12 Safety Information Vivo 40 users manual Doc. 003821 En-Uk E-1...
-
Page 13: Invasive Use
• The Vivo 40 is equipped with a low leakage alarm. The low leakage alarm is not a substitute for operator vigilance in ensuring that the leakage ports remains clear at all times. -
Page 14: Usage Of Filters
Vivo 40 to operate at higher temperatures than intended. • When operating the Vivo 40, make sure that the air inlet and filters are not obstructed or occluded. • The use of a high resistance bacteria filter on the output of the device may interfere with the operation of the patient disconnect function. -
Page 15: Humidification
• Before transportation of the Vivo 40 with the installed HA 20 humidifier, always disconnect the water chamber from the heating unit. • Do not place the Vivo 40 with the HA 20 humidifier in a bag when the water chamber is attached. -
Page 16: Cleaning And Maintenance
• Vivo 40 should be subjected to maintenance, service and control and any applicable upgrades, in accordance with Breas service instructions. • Vivo 40 shall only be repaired or modified in accordance with Breas service manuals, technical bulletins, and any special service instructions, by service technicians authorized by Breas Medical AB. -
Page 17: Usage Of Oxygen
• Do not use aerosols or solvents close to the oxygen supply, even when the oxygen supply is shut off. • When the Vivo 40 is not in operation, and the oxygen flow is left on, oxy- gen delivered into the patient tubing may accumulate within the machine enclosure. -
Page 18: Product Description
Product Description 3.1 Main Components The Vivo 40 system contains the following components: 18 Product Description Vivo 40 users manual Doc. 003821 En-Uk E-1... - Page 19 003520) Filter (white, disposa- Inlet air filtration 003526 ble) Filter (grey, washable) Inlet air filtration 003527 Rear lid For usage without 003591 the HA 20 humidifier Vivo 40 main unit Product Description Vivo 40 users manual Doc. 003821 En-Uk E-1...
-
Page 20: Accessories
• Isolation • Battery pack • Carry bag • Power cord 24 V AC • Power cord 24 V DC • Power cord mains • EB 2 User manual 20 Product Description Vivo 40 users manual Doc. 003821 En-Uk E-1... -
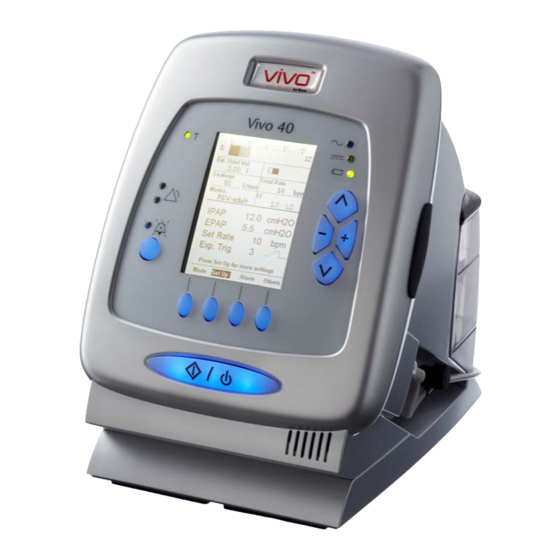
Page 21: The Vivo 40'S Front Panel
3.3 The Vivo 40’s Front Panel 7, 8, 9, 10 UTTONS UNCTION Start/Stop Start/Stop ventilation treatment Audio pause Pause the alarm sound 7-10 Function/Navigation Function according to display 14-17 Navigation/Setting Navigation in current menu selection/ Define settings UNCTION Trigger Patient breath trigger indication Alarm (red &... -
Page 22: The Vivo 40'S Back And Side Panels
3.4 The Vivo 40's Back and Side Panels UNCTION Air inlet Air path in, replaceable filters Locking mechanism Release and lock the HA 20 humidifier or rear lid Air outlet Air path out to the patient Memory card slot Read and write memory card... -
Page 23: Equipment Designation And Safety Label
Read user instructions. Caution. Read the user manual thoroughly before using the Vivo 40. Class II equipment; double insulation. Body floating (IEC 60601-1 Type BF, Isolated Applied Part) Product Description Vivo 40 users manual Doc. 003821 En-Uk E-1... - Page 24 Date of manufacture: YYYY-MM Caution. Before using the internal battery, read “Using Batteries” on page 34 carefully. Read user instructions. Read “Disposal” on page 60 for information about recycling and disposal. Manufacturer 24 Product Description Vivo 40 users manual Doc. 003821 En-Uk E-1...
-
Page 25: Functions And Parameters Of The Vivo 40
On/Off switch is on, but without starting the Vivo 40 with the Start/ Stop button. Operating mode is defined as the state of the Vivo 40 when the fan is operating and producing an air flow. Enter operating mode by switching the Vivo 40 on (see “Switching the Vivo 40 On and Off ”... -
Page 26: Low Leakage Detection
4.4 Low Leakage Detection The Vivo 40 automatically detects if the mask and tubing fitted to the device has sufficient leakage. If the leakage measured is below the recommended level it will generate a Low Leakage Alarm. The Vivo 40 will continue to deliver breaths during the alarm. -
Page 27: Using The Vivo 40
Press the Start/Stop button on the front panel. Check that a short sound signal is heard. If there is no signal, do not use the Vivo 40 and contact your service provider. Ensure that the settings are adjusted as prescribed. -
Page 28: Switching The Vivo 40 On And Off
5.2 Switching the Vivo 40 On and Off Switching On Make sure the mains supply is connected and the On/Off switch is switched on. Turn on the Vivo 40 by pressing the Start/Stop button on the front panel for 2 seconds. Press for 4 sec- onds when using an external or inter- nal battery. -
Page 29: Using The Menu
“+” and “-” buttons on the front panel to navigate the Vivo 40 menu. Read chapter “The Vivo 40’s Front Panel” on page 21 for exact position of the buttons. The navigation buttons are used to view the different sections defined above each navigation button. - Page 30 Minute Panel locked On, Off Panel locked by the Breas On, Off Vivo PC software Overview The Vivo 40 menu has the following section layout: Others Ramp (if active) Main Humidity (if used) Wake Up Alarm Device Settings Device Information...
- Page 31 The menu list for “Others” in operat- ing mode. Wake up Alarm Navigate to the section “Others” and select “Wake up Alarm” to reach the “Wake up Alarm” page. Using the Vivo 40 Vivo 40 users manual Doc. 003821 En-Uk E-1...
-
Page 32: Monitoring Section
The monitoring section contains a bargraph, information about the alarm time, HA 20 humidifier, remaining ramp time, battery status and the panel lock is shown. 32 Using the Vivo 40 Vivo 40 users manual Doc. 003821 En-Uk E-1... -
Page 33: Using The Ha 20 Humidifier
The HA 20 humidifier is intended to humidify the patient air. The HA 20 humidifier must be installed in order to access and navigate to the humidifier setting on the Vivo 40 menu. The HA 20 humidifier can only be activated if the Vivo 40 is operating. -
Page 34: Using Batteries
Mains power External DC Internal battery When a power source fails, the Vivo 40 will switch to either the internal or the external battery if installed and show a message in the display window. When running on battery, the bat-... - Page 35 • Exercise the battery every 3 months by discharging it completely and fully recharging it again. Repeat this procedure twice. • If the Vivo 40 is stored for more than 1 month, connect it to the mains sup- ply to recharge the internal battery and alarm battery.
- Page 36 Sea level External Battery The Vivo 40 can be operated from a 12 V or a 24 V DC external battery. • Use the battery cable 12/24 V DC or the Breas external EB 2 Battery Pack. If using other DC power than Breas external EB 2 Battery Pack, check care- fully that the voltage is 12 V or 24 V.
- Page 37 Connect the other end of the cable to the battery source. • Only use a Breas external DC cable to connect the Vivo 40 to the external battery. • An external battery must be disconnected when the Vivo 40 is switched off, otherwise the battery can be discharged.
-
Page 38: Vivo 40 Operating Time
Total Operating Time Shows the total number of hours the Vivo 40 have been operating. Patient Operating Time Shows the total number of hours a patient have been using the Vivo 40 for breathing therapy. 38 Using the Vivo 40 Vivo 40 users manual Doc. -
Page 39: Preparing The Vivo 40 For Use
Ensure that the equipment is in good condition. If stored more than 1 month, connect the Vivo 40 to the mains supply and switch on the On/Off switch to recharge the internal battery and the alarm battery in standby mode. -
Page 40: Placing The Vivo 40
Make sure that nothing can block the patient air inlet at the rear of the Vivo 40. 6.3 Connecting the Vivo 40 to the Mains Supply Read the chapter “Electrical Safety” on page 9 carefully to make sure all conditions are fulfilled and considered. -
Page 41: Connecting The Patient Circuit
Non-Invasive Use Connect the patient tube to the air outlet. Connect the other end of the patient tube to the mask and the leakage port, if applicable. Preparing the Vivo 40 for Use Vivo 40 users manual Doc. 003821 En-Uk E-1... - Page 42 20 to 40 litre/min at 10 cmH O pressure. This leakage may be achieved by: • integrated leakage in the mask • an adjoining leakage port 42 Preparing the Vivo 40 for Use Vivo 40 users manual Doc. 003821 En-Uk E-1...
-
Page 43: Alarms
This chapter describes the alarm functions used for the Vivo 40. 7.1 Alarm Function The alarm function of the Vivo 40 consists of the alarm LEDs on the front panel, an audible alarm, and messages on the LCD display (see “The Vivo 40’s Front Panel”... - Page 44 An alarm will automatically be reset once the cause of the alarm has been cor- rected. If an alarm condition cannot be corrected, discontinue use and refer the Vivo 40 for service. 44 Alarms Vivo 40 users manual Doc. 003821 En-Uk E-1...
-
Page 45: Physiological Alarm
• Setting is higher than IPAP/IPAPmin. • Leakage from the mask or other components of the patient circuit. Ventilator action The Vivo 40 will continue to give breaths with the same settings. Indication The alarm is given audibly with a high priority sig- nal and visibly by the red alarm LED and a display message. - Page 46 Only activated under exceptional conditions, such as a strong cough during the ventilator’s inspiration phase. Ventilator action The Vivo 40 will terminate inspiration from the first high pressure breath. The Vivo 40 will then continue to give breaths with same settings.
- Page 47 Possible cause • Restrictions in airways. • Obstructed or occluded patient circuit. Ventilator action The Vivo 40 will continue to give breaths with the same settings. Indication The alarm is given audibly with a high priority sig- nal and visibly by the red alarm LED and a display message.
- Page 48 • Setting is higher than breath rate. • The patient doesn’t trigger any breaths. • Decrease of the patient’s spontaneous breath- ing. Ventilator action The Vivo 40 will continue to give breaths with the same settings. Indication The alarm is given audibly with a medium priority signal and visibly by the yellow alarm LED and a display message.
- Page 49 The alarm for high breath rate is activated if the patient hyperventilates or if the ventilator starts to self-trigger because of incorrect settings. Ventilator action The Vivo 40 will continue to give breaths with the same settings. Indication The alarm is given audibly with a medium priority signal and visibly by the yellow alarm LED and a display message.
- Page 50 Possible cause • Incorrect patient circuit leakage. • Obstructed or occluded patient circuit. Ventilator action The Vivo 40 tries to continue delivering breaths according to settings. Indication The alarm is given audibly with a medium priority signal and visibly by the yellow alarm LED and a display message.
- Page 51 15 seconds. Possible cause • Leakage in patient circuit. • The patient has removed the mask. Ventilator action The Vivo 40 tries to continue delivering breaths according to settings. Indication The alarm is given audibly with a high priority sig- nal and visibly by the red alarm LED and a display message.
-
Page 52: Technical Alarm
If this should happen, restart the Vivo 40 on internal battery. If the low bat- tery alarm persists, the internal battery needs to be charged. - Page 53 Possible cause Discharged batteries. Ventilator action The Vivo 40 stops giving breaths and gives alarm for 2 minutes. Indication The alarm is given audibly with a high priority sig- nal and visibly by the red alarm LED and a display message.
- Page 54 Internal Function Failure Alarms ESCRIPTION Definition An internal function failure alarm will be given when the Vivo 40 has an internal function failure. Ventilator action The Vivo 40 will stop treatment. Indication The alarm is given audibly with a tone and visible by a display message at least for 120 seconds.
-
Page 55: Cleaning The Vivo 40 And Replacement Of Accessories
Accessories The patient-connected parts and the filter must be cleaned and replaced regu- larly to ensure correct function of the Vivo 40. All replaced parts must be dis- posed of in accordance with local environmental regulations regarding the disposal of used equipment and waste. - Page 56 The HA 20 humidifier should be cleaned, maintained and replaced in accordance with the care provider's instructions. For more information, see Breas HA 20 Humidifier User Manual. 56 Cleaning the Vivo 40 and Replacement of Accessories Vivo 40 users manual...
- Page 57 The patient circuit should always be cleaned, disinfected and replaced in accordance with the care provider’s instructions. Always replace the patient circuit with a new one when the Vivo 40 is to be used by a new patient. All parts that come into contact with the respiration gas must be cleaned.
-
Page 58: Cleaning And Replacing The Patient Air Filters
Replace the filter at least every 4th week, or more often when used in high pol- lution or pollen-rich environments. Do not wash or reuse the disposable filter. 58 Cleaning the Vivo 40 and Replacement of Accessories Vivo 40 users manual Doc. 003821 En-Uk E-1... -
Page 59: Maintenance
• Do not under any circumstances attempt to service or repair the Vivo 40 yourself. If you do so, the manufacturer will no longer be responsible for the performance and safety of the Vivo 40. EVIATION FROM THESE SERVICE INSTRUCTIONS MAY LEAD TO RISK OF PERSONAL INJURY 9.1 Regular Maintenance Control... -
Page 60: Service And Repair
9.2 Service and Repair The service and repair of the Vivo 40 must be carried out by authorized service personnel in accordance with Breas service instructions. Service inspections must always be carried out after any repair of the device. Authorized service workshops can order the Vivo 40 Service Manual that con- tains all technical documentation required for the maintenance and service of the Vivo 40. -
Page 61: Technical Specifications
10 Technical Specifications 10.1 Data The Vivo 40 and it’s packaging do not contain any natural rubber latex. ETTING ALUE ANGE ERFORMANCE ESOLUTION Ventilation • PSV (Pressure Support modes Ventilation) • PCV (Pressure Control Ventilation) • CPAP (Continuous Posi- tive Airway Pressure) Patient modes •... - Page 62 0.3 to 3 sec (0.3 to 2 sec in 0.1 sec time paediatric mode), Off Rise time 1 to 9 Inspiratory trig- 1 to 9, Off. ger effort level 62 Technical Specifications Vivo 40 users manual Doc. 003821 En-Uk E-1...
- Page 63 Breathing resist- 4 cmH O at 30 litre/min ance under sin- 6 cmH O at 60 litre/min gle-fault Sound level at Less than 30 dB(A) Measured at 1 m 10 cmH Technical Specifications Vivo 40 users manual Doc. 003821 En-Uk E-1...
- Page 64 1 BPM alarm and a warning mes- sage on the display. Low leakage On/Off Yellow LED, audible alarm alarm and a warning mes- sage on the display. 64 Technical Specifications Vivo 40 users manual Doc. 003821 En-Uk E-1...
- Page 65 Capacity 3.8 Ah. NiMH (Nickel-Metal Hydride). Operational time 3 hours, lifetime 3 years. External battery 12/24 V DC, tolerance: +20%/-15% (10.5 to 15 V/20.4 to 30 V). Max 120 W with Breas external battery. Technical Specifications Vivo 40 users manual Doc. 003821 En-Uk E-1...
- Page 66 12 litre/min at 4 cmH IMENSIONS PECIFICATIONS 223 mm (with rear lid) × × × × Weight 4.0 kg (with rear lid) Air outlet 22 mm male conical standard connector 66 Technical Specifications Vivo 40 users manual Doc. 003821 En-Uk E-1...
-
Page 67: Accessories
Only use accessories recommended by Breas Medical AB. Breas Medical AB cannot guarantee the performance and safety for the use of other accessories with the Vivo 40. The following Breas accessories are currently available for the Vivo 40: ESCRIPTION Carry bag... - Page 68 IEC 60601-1-1. If in doubt, consult the technical service department or your local representative. 68 Accessories Vivo 40 users manual Doc. 003821 En-Uk E-1...
-
Page 69: Patient Settings
12 Patient Settings Patient Settings - Breas Vivo 40 Patient ....................Date ....................Clinic ....................Set by ....................CPAP IPAP ......Max Inspiration Time ....IPAPmin ......Min Inspiration Time ....EPAP ......Inspiration Time ....Breath Rate ......Inspiration Trigger .... - Page 70 70 Patient Settings Vivo 40 users manual Doc. 003821 En-Uk E-1...
Need help?
Do you have a question about the Vivo 40 and is the answer not in the manual?
Questions and answers