Table of Contents
Advertisement
Advertisement
Table of Contents

Related Manuals for Leckey BeMe


Summary of Contents for Leckey BeMe
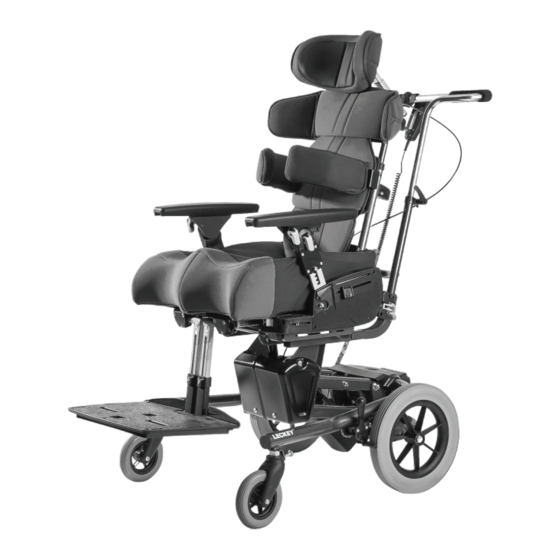
- Page 1 BeMe User Manual English Supporting Children...
-
Page 2: Table Of Contents
Leckey BeMe User Manual The Leckey BeMe has been designed to offer postural positioning while enabling function and mobility. This manual shows how you can quickly, easily and safely make use of all the functions. The instructions on safety and maintenance will ensure that you will enjoy the use of this product for a long time. -
Page 3: Intended Use
50 kg chassis. The High-Low chassis has been designed for use with the Leckey BeMe and is • Large Seat Core is suitable for children available in indoor-only and outdoor variants. - Page 4 Full details can be found on the Leckey website at www.leckey.com Indications for Use BeMe is a modular seating system designed to cater for the needs of children with a variety of disabilities which effect their ability to sit independently without external postural supports. It is indicated for use primarily within a home, indoor school environment or outdoors, if used on a mobility base.
-
Page 5: Certification
SECTION 03: CERTIFICATION WARNINGS AND CAUTIONS The Leckey BeMe is classified as a Class 1 Medical Device under EU and UK regulations. Note: Not following these instructions may As the manufacturer, James Leckey Design result in physical injury, damage to the... - Page 6 Leckey BeMe User Manual • Caution Finger Pinch Hazard: Take • Caution Servicing/Repair of Electronic care when assembling or adjusting the Components on Powered High-Low Chassis: There are no user-serviceable position of the seat components that your fingers do not get pinched such...
-
Page 7: Terms Of Warranty
Leckey BeMe User Manual p7 SECTION 04: SECTION 4.1: TERMS OF WARRANTY ADDITIONAL WARRANTY The warranty applies only when the product INFORMATION is used according to the specified conditions and for the intended purposes, following all manufacturers’ recommendations (also see... -
Page 8: Product History Record
SECTION 6: PRODUCT HISTORY PRODUCT TRAINING RECORD RECORD Your Leckey product is a Medical device (Parents, Teachers & Carers) and should only be prescribed, set up or Your Leckey product is a prescribed Class reissued for use by a technically competent... -
Page 9: Safety Information
7.4 If in any doubt to the continued safe use of 7.12 Leckey products comply with fire safety your Leckey product or if any parts should regulations in accordance with EN12182. fail, please cease using the product and... - Page 10 Leckey head support attached. If the Leckey BeMe seat is being used in a vehicle the following points must be adhered • The Leckey BeMe must be positioned forward facing.
-
Page 11: Precautions And Contraindications
Leckey BeMe User Manual p11 SECTION 8: Contraindications PRECAUTIONS AND There are no contraindications associated with the Leckey BeMe product. CONTRAINDICATIONS All precautions and contraindications are taken at the discretion of the prescribing clinician. Leckey recommends a trained and Precautions experienced clinician to be present during the •... -
Page 12: Frequent Adjustments For Daily Use
Leckey BeMe User Manual SECTION 9: SECTION 9.1: FREQUENT TRANSFERRING CHILD ADJUSTMENTS FOR IN AND OUT OF SEAT DAILY USE Before transferring the child into the seat, carry out the daily product inspection as outlined in (Therapists/Carers/Parents) section 11 of this user manual. - Page 13 Leckey BeMe User Manual p13 SECTION 9.2: SECTION 9.3: OPERATING FLIP AWAY ATTACHING, LATERALS DETACHING AND ADJUSTING 4-POINT To operate the flip away laterals, pull BELT the pin shown in the picture below. To attach the 4-point belt, pass the grey...
- Page 14 Leckey BeMe User Manual Attach the buckle , at the front to secure the user. Always attached the pelvic strap first before making any other adjustments. To detach the 4-point belt, reverse the process. Safety Information: You must ensure when using the 2-point...
- Page 15 Leckey BeMe User Manual p15 SECTION 9.4: To detach the 2-point belt, reverse the process. ATTACHING, DETACHING AND Safety Information: You must ADJUSTING 2-POINT ensure when using the 2-point belt that the webbing is fed BELT through the slot in the seat core (not over the seat core).
- Page 16 Leckey BeMe User Manual SECTION 9.5: SECTION 9.6: ADJUSTING PELVIC CHASSIS HEIGHT CRADLE ADJUSTMENT – GAS SPRING The pelvic cradle can be tightened or loosened for user comfort and pelvic stability For safety, the height adjustment pedal on the...
- Page 17 Leckey BeMe User Manual p17 SECTION 9.7: SECTION 9.8: CHASSIS HEIGHT CHASSIS HEIGHT ADJUSTMENT – ADJUSTMENT – ELECTRIC HYDRAULIC (PUMP ACTION) The powered chassis can be easily adjusted with the push button control handset and can To raise the chair pump the foot pedal several be height adjusted with the client in the chair.
- Page 18 Leckey BeMe User Manual When not in use, ensure the push button control handset is stowed on the chassis as shown Before operation, ensure that the cable to the hand controller is not caught or wrapped around any of the chassis parts.
- Page 19 Leckey BeMe User Manual p19 SECTION 9.9: To unlock the tilt, pull out and twist the locking . Press the lever to operate the tilt TILT IN SPACE – SMALL Always make sure you are holding the seat or push handle to prevent sudden movement.
- Page 20 Leckey BeMe User Manual SECTION 9.10: To adjust the tilt angle, press the lever under the seat base. Once you have selected the TILT-IN-SPACE – angle you require, simply remove your hand from the lever and the chair will be locked in MEDIUM HIGH-LOW position.
- Page 21 Leckey BeMe User Manual p21 SECTION 9.11: Always keep the tilt-in-space lever in the locked position to prevent accidental TILT IN SPACE – LARGE actuation of the lever which could cause the seat unit to jolt and possibly cause injury to HIGH-LOW CHASSIS the child.
- Page 22 Leckey BeMe User Manual SECTION 9.12: Warning: The pressure range ADJUSTING DYNAMIC is 50-250psi. Never exceed an air pressure of 250psi in the BACKREST RESISTANCE uncompressed shock system. Exceeding the maxium air pressure of 250lbs/inch could The resistance to increasing back angle is result in serious injury.
- Page 23 Leckey BeMe User Manual p23 SECTION 9.13: SECTION 9.14: ADJUSTING DYNAMIC SETTING DYNAMIC BACKREST SPEED BACKREST TO “FIRM” To adjust the dynamic backrest speed of To lock the dynamic backrest, toggle the return, rotate the red wheel ,on the blue lever on the dynamic shock to the ‘lock’...
- Page 24 Leckey BeMe User Manual SECTION 9.15: BUTTERFLY HARNESS ADJUSTMENT To adjust the butterfly harness, either change the amount of webbing passing through the cam buckles at the back of the seat base or top of the backrest . Or, adjust the length...
- Page 25 Leckey BeMe User Manual p25 SECTION 9.16: Do not place objects, hotter than 40 degrees Celsius (104 degrees Fahrenheit) on the tray. ATTACHING AND Please note that the tray is for the use of the DETACHING TRAY user only. Do not lean or place objects on the tray, greater than 8kgs (17.6lbs).
- Page 26 Leckey BeMe User Manual SECTION 9.18: SECTION 9.17: ADJUSTING ARMREST ADJUSTING TRAY ANGLE ANGLE To adjust the tray angle, locate the cam lever, To adjust the armrest angle, locate the cam , in the centre of the armrest. Raise the lever , in the centre of the armrest.
- Page 27 Leckey BeMe User Manual p27 SECTION 9.19: SECTION 9.20: OPERATING FLIP AWAY ADJUSTING SANDALS FOOTPLATE To position the user’s feet in the sandals, secure the Velcro straps provided so the foot To flip up the one-piece footplate, locate the is held in place. The straps should be placed...
- Page 28 Leckey BeMe User Manual SECTION 9.21: SECTION 9.22: ADJUSTING ANKLE ADJUSTING ANKLE WRAPS HUGGERS To adjust the ankle wrap, adjust the position To adjust the ankle hugger, adjust the position of the Velcro straps around the bridge of the...
- Page 29 Leckey BeMe User Manual p29 SECTION 9.23: SECTION 9.24: APPLYING THE BRAKES ADJUSTING HEIGHT OF PUSH HANDLE To apply the brakes on an indoor chassis, apply pressure with your foot to the brake To adjust the height of the push handle, rotate pedal , until a click is heard.
- Page 30 Leckey BeMe User Manual SECTION 9.25: SECTION 9.26: ATTACHING AND ATTACHING AND DETACHING POMMEL DETACHING FEMORAL GUIDES The pommel attaches to the basic seat only. The correct orientation of the pommel is the To attach the femoral guide, slot the femoral thinner edge facing towards the child.
-
Page 31: Cleaning And Care Information
Leckey BeMe User Manual p31 SECTION 9.27: SECTION 10: ATTACHING AND CLEANING AND CARE DETACHING BACKREST INFORMATION How to maintain: To attach the backrest, locate the backrest receiver at the back of the seat base When cleaning we recommend that you... -
Page 32: Daily Product Inspection
Make sure the product is dry before use. If in any doubt to the continued safe use of your Leckey product or if any parts should fail, please cease using the product and contact our Customer Care Team or your local dealer... -
Page 33: Annual Product Inspection
If in any doubt to the continued safe use of Check all ratchet handles, knobs, nuts, your Leckey product or if any parts should fail, bolts and plastic buckles are in place, please cease using the product and contact replacing any missing items. -
Page 34: Re-Issuing Leckey Products
If in any doubt to the continued safe use of A detailed technical inspection should be your Leckey product or if any parts should fail, carried out on the product prior to re-issuing. please cease using the product and contact... -
Page 35: Product Servicing
Leckey BeMe User Manual p35 SECTION 14: PRODUCT SERVICING Servicing of all Leckey products should only be carried out by technically competent persons who have been trained in the use of the product. All international service enquiries should be directed to the appropriate Leckey distributor who will be delighted to assist you. -
Page 36: Technical Information
Leckey BeMe User Manual SECTION 15: TECHNICAL INFORMATION - METRIC Seat Core and Seats Medium Small Medium Large Large Long Long Seat Depth (mm) 170*-325 275-390 350-475 325-440 400-525 Seat Width Maximum (No Hip Guides) (mm) Seat Width Maximum... - Page 37 Leckey BeMe User Manual p37 Footrest Small Medium Large Lower Leg length with Basic/Split 185-285 280-450 290-510 Seat (mm) Lower Leg length with Contoured 185-285 290-460 300-520 Seat (mm) Maximum Dorsiflexion +/- 10 +/- 10 +/- 10 (degrees) Maximum Plantarflexion...
- Page 38 Leckey BeMe User Manual TECHNICAL INFORMATION - IMPERIAL Seat Core and Seats Medium Small Medium Large Large Long Long Seat Depth (inches) 6.7-12.8 10.8-15.4 13.8-18.7 12.8-17.3 15.7-20.7 Seat Width Maximum 10.8 12.8 16.3 12.8 16.3 (No Hip Guides) (inches) Seat Width Maximum 11.8...
- Page 39 Leckey BeMe User Manual p39 Footrest Small Medium Large Lower Leg length with Basic/Split 7.3-11.2 11-17.7 11.4-20.1 Seat (inches) Lower Leg length with Contoured 7.3-11.2 11.4-18.1 11.8-20.5 Seat (inches) Maximum Dorsiflexion +/- 10 +/- 10 +/- 10 (degrees) Maximum Plantarflexion...
- Page 40 Leckey BeMe User Manual TECHNICAL SPECIFICATIONS: Feature Parameter Value Make and Model Actuator LINAK 281209-01 Battery LINAK BA18021-00 Hand Controller LINAK HB41000-00004 Battery Charger LINAK Battery Charger CH01. Only use this supplied battery charger Seat lift operation Duty Cycle...
- Page 41 Leckey BeMe User Manual p41 TABLE OF SYMBOLS Symbol Meaning Medical Device Read The Instructions For Use Ce Mark Warning Manufacturer Serial Number Product Code Max Occupancy Weight Date Of Manufacture Latex Free Unique Device Identification Crash Tested Machine Wash - Water Temperature 60°C...
-
Page 42: How To Unpack And Assemble The Seating System
Once you have checked all the components you are then ready to assemble the BeMe Seating System and attach it to its base. Safety First: Keep polthene bags away from children. - Page 43 Leckey BeMe User Manual p43 SECTION 16.1: Locate the right and left grey locking latch release buttons at the front of the seat ATTACHING AND Simultaneously rotate the buttons towards the centre of the seat , and then press inwards, DETACHING SEATING .
- Page 44 Leckey BeMe User Manual Once the locking latches are released the seat base can be placed on the chassis. Lift the seat base with both hands at either side of the seat base. On the rear of the seat base there...
- Page 45 Leckey BeMe User Manual p45 SECTION 16.2: ATTACHING AND DETACHING EXTENDABLE PUSH HANDLE (SMALL AND MEDIUM CHASSIS HIGH-LOW ONLY) To detach the handlebars, reverse step The push handle is attached to the high-Llow then press in the safety poppers , and pull chassis by inserting the two lower stems the handlebar tubes out of the lower stems.
- Page 46 Leckey BeMe User Manual SECTION 16.3: ATTACHING AND DETACHING FEMORAL BARS First, secure the hardware into the front two curved slots on the underside of the seat base . Ensure the split washer , goes between the larger plane washer and the head of the bolt.
- Page 47 Leckey BeMe User Manual p47 SECTION 16.4: ATTACHING AND DETACHING LEG STEM Before attaching the upper leg stem ensure the clamp , is loosened. Then slot the round boss of the upper leg stem into the clamp from the inside face and re-tighten the clamp , using the Allen key.
- Page 48 Leckey BeMe User Manual SECTION 16.5: ATTACHING AND DETACHING BASIC, SPLIT AND CONTOURED SEAT HARDWARE The front seat plate of the basic, split and contoured seats secures to the receivers on the seat base. First locate the downward pointing prongs at the front of the seat plate,...
- Page 49 Leckey BeMe User Manual p49 SECTION 16.6: To attach the contoured seat to the seat base, align the front of the seat base platework with ATTACHING AND the front of the contoured seat foam. Press down to secure the Velcro.
- Page 50 Leckey BeMe User Manual SECTION 16.7: ATTACHING AND DETACHING BACKREST To attach the backrest, locate the backrest receiver at the back of the seat base Open up the receiver lock paddles , at the back of the seat base by pulling horizontally outwards on the paddles and then rotating upwards.
- Page 51 Leckey BeMe User Manual p51 SECTION 16.8: To detach the footrest, reverse the process. ATTACHING AND Always make sure the foot plate DETACHING FOOTREST is attached firmly. To attach the footrest, orientate the locking plate within the lower leg stem , so that the short edge faces forward.
- Page 52 Leckey BeMe User Manual SECTION 16.9: To detach the armrest, slide the release button towards the front of the seat , and pull the ATTACHING AND armrest out of the slot DETACHING ARMREST To attach the armrest, locate the slot on the...
- Page 53 Leckey BeMe User Manual p53 SECTION 16.10: To detach the attachment bolts on sandals, reverse the process. ATTACHING AND To attach the sandal , place it on the DETACHING SANDALS footplate , so that the attachment bolt, , goes through the slot in the footplate.
- Page 54 Leckey BeMe User Manual SECTION 16.11: To detach the ankle huggers, reverse the process. ATTACHING AND You can also attach the ankle huggers to a DETACHING ANKLE single or two-piece piece footplate. Slot the webbing through the slots and secure with HUGGERS the tri-glide supplied with all ankle huggers.
- Page 55 Leckey BeMe User Manual p55 SECTION 16.12: ATTACHING AND DETACHING ANKLE WRAPS To attach the ankle wrap, feed the lower , and upper , poppers of the ankle wrap under and over the back arch of the sandal and snap together To detach the ankle wraps, reverse the process.
- Page 56 Leckey BeMe User Manual SECTION 16.13: SECTION 16.14: ATTACHING AND ATTACHING AND DETACHING BOOTIES DETACHING LATERAL BRACKET – BASIC To attach the booties, slide the webbing BACKREST through the slots on the one-piece footplate, and secure using tri-glide provided...
- Page 57 Leckey BeMe User Manual p57 Place the split washer, then the plane washer onto the bolt and pass it through the hole in the radial clamp , engaging the threads of the t-nut. Secure in place with the Allen key.
- Page 58 Leckey BeMe User Manual SECTION 16.15: Place the split washer, then the plane washer onto the bolt and pass it through the vertical ATTACHING AND slot at the back of the thoracic moulding , engaging the threads of the t-nut. Secure in DETACHING LATERAL place with the Allen key.
- Page 59 Leckey BeMe User Manual p59 SECTION 16.16: Place the split washer, then the plane washer onto the bolt and pass it through the threaded ATTACHING AND hole in the machined part . Secure in place with the Allen key. DETACHING SLIM...
- Page 60 Leckey BeMe User Manual SECTION 16.17: Place the split washer, then the plane washer onto the bolt and pass it through the hole in ATTACHING AND moulding , engaging the threads of the nut. Secure in place with the Allen key.
- Page 61 Leckey BeMe User Manual p61 SECTION 16.18: Place the split washer, then the plane washer onto the bolt and pass it through the threaded ATTACHING AND hole in the machined part . Secure in place with the Allen key. DETACHING FLEXIBLE...
- Page 62 Leckey BeMe User Manual SECTION 16.19: SECTION 16.20: ATTACHING AND ATTACHING AND DETACHING DETACHING HIP PROTRACTION PAD GUIDES (BASIC BACKREST) To attach the protraction pad, align the two holes of the protraction pad platework with To attach the hip guides to the basic backrest,...
- Page 63 Leckey BeMe User Manual p63 SECTION 16.21: Place the split washer, then the plane washer onto the bolt and pass it through the hole at ATTACHING AND the back of the sacral moulding , engaging the threads of the t-nut. Secure in place with DETACHING HIP the Allen key.
- Page 64 Leckey BeMe User Manual SECTION 16.22: Place the back plate pacer , onto the front surface of the lower clamp moulding ATTACHING AND Reattach the backrest platework by securing DETACHING SMALL the four screws, top and bottom BASIC BACKREST...
- Page 65 Leckey BeMe User Manual p65 SECTION 16.23: ATTACHING AND DETACHING HEADREST To attach the headrest, ensure the clamp is open by loosening the bolt and releasing it from the other side of the clamp . Place the clamp over the top bar of the backrest and centralise.
- Page 66 Leckey BeMe User Manual SECTION 16.24: ATTACHING AND DETACHING UNIVERSAL HEADREST BRACKET To attach the universal headrest bracket, To detach the universal headrest ensure the clamp is open by loosening the bracket, reverse the process. bolt and releasing it from the other side of the clamp .
- Page 67 Leckey BeMe User Manual p67 SECTION 16.25: ATTACHING AND DETACHING UNIVERSAL HEADREST BRACKET To attach the universal headrest, place the sleeve , into the receiving bracket . Slide the stem , into the sleeve , and secure using the hand lever To detach the universal headrest, reverse the process.
- Page 68 Leckey BeMe User Manual SECTION 16.27: SECTION 16.26: ATTACHING AND ATTACHING AND DETACHING TRAY DETACHING WHITMYER HEADREST Before inserting the tray, ensure that the cam lever , located at the front of each armrest To attach the Whitmyer headrest, slide the is open.
- Page 69 Leckey BeMe User Manual p69 SECTION 16.28: Always use caution to ensure the child’s hands or arms do not become trapped when ATTACHING AND inserting the tray. DETACHING BUTTERFLY Never use the tray to steer or push the chair. HARNESS Do not place objects, hotter than 40 degrees Celsius (104 degrees Fahrenheit) on the tray.
- Page 70 Leckey BeMe User Manual SECTION 16.29: ATTACHING AND DETACHING RAIN CANOPY To attach the rain canopy, the rain canopy backrest tube needs to be installed. To remove the existing backrest tube, loosen the bolts of the backrest height adjustment clamp, , and raise the tube up to the maximum height.
- Page 71 Leckey BeMe User Manual p71 Loosen the bolts of the shoulder pad clamp, , and slide off the backrest tube. Slide the shoulder pad clamp onto the rain canopy backrest tube and secure the bolts To attach the rain canopy, slide the...
- Page 72 Leckey BeMe User Manual SECTION 16.30: ATTACHING AND DETACHING PADDED TRAY COVER To attach the padded tray cover, first remove the tray from the seat. Undo the Velcro straps and slot the padded cover , over the plastic tray .
- Page 73 Leckey BeMe User Manual p73 SECTION 16.31: To detach the elbow blocker, reverse the process. ATTACHING AND The elbow blockers can be installed on both DETACHING ELBOW the standard and padded tray. BLOCKER To attach the elbow blockers, first remove the tray from the seat.
- Page 74 Leckey BeMe User Manual SECTION 16.32: Attach the buckle , at the front to secure the user. ATTACHING AND DETACHING 4-POINT BELT To attach the 4-point belt, pass the grey webbing through the upper slot in the seat moulding...
- Page 75 Leckey BeMe User Manual p75 SECTION 16.33: To detach the 2-point belt, reverse the process. ATTACHING AND DETACHING 2-POINT Safety Information: You must BELT ensure when using the 2-point belt that the webbing is fed through the slot in the seat core.
- Page 76 Leckey BeMe User Manual SECTION 16.34: To attach the pelvic cradle to a basic backrest, trim the rear Velcro strap to the level of the ATTACHING AND top of the pelvic cradle. Secure as per & DETACHING PELVIC Attach the buckle...
- Page 77 Leckey BeMe User Manual p77 SECTION 16.35: Align the holes of the aluminium bracket of the dynamic back assembly , with the holes ATTACHING AND on the seat base. Secure using the five bolts provided DETACHING DYNAMIC BACK To attach the dynamic backrest, the static backrest plate must first be removed.
- Page 78 Leckey BeMe User Manual SECTION 16.36: ATTACHING AND DETACHING SHOULDER WING UPGRADE (MODERATE BACKREST ONLY) To detach the shoulder wing upgrade, To attach the shoulder wing upgrade the reverse the process. shoulder blank moulding must first be removed by unscrewing the 3 screws holding it in place , using the Allen key.
- Page 79 Leckey BeMe User Manual p79 SECTION 16.37: ATTACHING AND DETACHING SHOULDER ANGLE SPACER (MODERATE BACKREST ONLY) Secure the angled shoulder spacer using the To attach the angled shoulder spacer, four longer screws . Reattach the shoulder remove the cushion cover from the shoulder...
- Page 80 Leckey BeMe User Manual SECTION 16.38: If the attachment mechanism becomes loose over time, it can be tightened by tightening ATTACHING AND the screw (clockwise) located within the cam lever when in the raised position DETACHING POMMEL Always remove the pommel The pommel attaches to the basic seat only.
- Page 81 Leckey BeMe User Manual p81 SECTION 16.39: To detach the femoral guide, slide the release button diagonally upwards , and pull the ATTACHING AND femoral guide out of the slot. DETACHING FEMORAL GUIDES To attach the femoral guide, slot the femoral...
- Page 82 Leckey BeMe User Manual SECTION 16.40: Place the base of the backrest , into the receiver, ensuring it is as deep into the ATTACHING AND receiver as it can go. Rotate the paddles DETACHING BACKREST downwards , and push inwards , to secure the backrest in place.
-
Page 83: Fitting The Upholstery
Leckey BeMe User Manual p83 SECTION 17: SECTION 17.1: FITTING THE ATTACHING AND UPHOLSTERY DETACHING FEMORAL COVERS We suggest the cushions are fitted in the following order: To attach the femoral guide cover, slot the Femoral Covers (Optional) cover over the end of the femoral guide... - Page 84 Leckey BeMe User Manual SECTION 17.2: To attach the front of the basic seat cushion, align the front of the cushion with the front of ATTACHING AND the seat ramps, and press down to Velcro in place. Locate the snap fasteners at the front...
- Page 85 Leckey BeMe User Manual p85 SECTION 17.3: To attach the front of the split seat cushion, align the front of each side of the cushions ATTACHING AND with the front of each of the seat ramps, and press down to Velcro in place. Locate the...
- Page 86 Leckey BeMe User Manual SECTION 17.4: Slide the front of the seat cushion fabric over the front of the seat , and stretch the back ATTACHING AND section over the back, and press down to Velcro in place DETACHING...
- Page 87 Leckey BeMe User Manual p87 SECTION 17.5: ATTACHING AND DETACHING BASIC BACKREST FOAM To attach the basic backrest foam, locate the holes at the top and bottom of the foam . Place the washer on the screw , and pass the screw through the holes in the foam...
- Page 88 Leckey BeMe User Manual SECTION 17.6: ATTACHING AND DETACHING BASIC BACKREST COVER To attach the basic backrest cover, slide the top of the cover over the top of the backrest, , and secure in place with the snap fasteners .
- Page 89 Leckey BeMe User Manual p89 SECTION 17.7: SECTION 17.8: ATTACHING AND ATTACHING AND DETACHING SACRAL DETACHING THORACIC COVER BACKREST COVER To attach the sacral cover, align the cover To attach the thoracic cover, slot the top with the moulding and secure in place...
- Page 90 Leckey BeMe User Manual SECTION 17.9: ATTACHING AND DETACHING SHOULDER SECTION COVER To attach the shoulder cover, slot the top of the thoracic cover into the cavity on the To detach the shoulder cover, reverse the underside of the shoulder cover .
- Page 91 Leckey BeMe User Manual p91 SECTION 17.10: When attaching the pelvic cradle to a basic backrest, you can trim the rear Velcro strap ATTACHING AND to the level of the top of the pelvic cradle. Secure as per & DETACHING PELVIC...
- Page 92 Leckey BeMe User Manual SECTION 17.11: SECTION 17.12: ATTACHING AND ATTACHING AND DETACHING HIP PAD DETACHING CHEST/ COVERS BUTTERFLY HARNESS To attach the hip pad covers, undo the zip To attach the butterfly harness, first locate and slide the cover over the moulding, with the cam buckles at the top rear area of the zip facing outwards.
- Page 93 Leckey BeMe User Manual p93 SECTION 17.13: The bottom connection points are on the back of the seat base . Pass the webbing ATTACHING AND through the cam buckle and secure in place by clamping down DETACHING LATERAL COVERS - SLIM...
- Page 94 Leckey BeMe User Manual SECTION 17.14: SECTION 17.15: ATTACHING AND ATTACHING AND DETACHING LATERAL DETACHING LATERAL COVERS – HINGED COVERS – FLEXIBLE HUGGING WRAPAROUND To attach the lateral covers, undo the Velcro To attach the flexible lateral covers, undo the...
- Page 95 Leckey BeMe User Manual p95 SECTION 17.16: SECTION 17.17: ATTACHING AND ATTACHING AND DETACHING HEADREST DETACHING FOOTREST COVER COVER To attach the headrest cover, align the To attach the footrest cover, first remove any headrest cover with the front of the moulding...
- Page 96 Leckey BeMe User Manual SECTION 17.18: ATTACHING AND DETACHING POMMEL COVER To attach the pommel cover, undo the Velcro and slide the cover , over the plastic pad , with the Velcro facing downwards and with the pad orientated to match the contours of the pad.
- Page 97 Leckey BeMe User Manual p97 SECTION 17.19: ATTACHING AND DETACHING PROTRACTION PAD COVER To attach the protraction pad cover, undo To detach the protraction pad cover, the Velcro and slide the cover , over the reverse the process. platework , with the Velcro facing upwards and the pad orientated so that the solid grey fabric side faces towards the front of the seat.
- Page 98 Leckey BeMe User Manual SECTION 17.20: ATTACHING AND DETACHING LATERAL BRACKET COVER To attach the lateral bracket cover, undo the Velcro and wrap the cover , over the platework , with the Velcro facing downwards and the pad orientated so that...
-
Page 99: Clinical Setup For Postural Management
Tighten competent person who has been trained in both bolts to secure in place. the use of the product. Leckey recommend a written record is maintained of all clinical setups for this product. Set the backrest height, seat depth and footplate height before placing the child in the seat. - Page 100 Leckey BeMe User Manual SECTION 18.2: SECTION 18.3: ADJUSTING SEAT ADJUSTING DEPTH AND LEG ANGLE SEAT DEPTH ON (ABDUCTION AND CONTOURED SEAT ADDUCTION) ON SPLIT To adjust the seat depth of the contoured SEAT seat, first remove the contoured cushion...
- Page 101 Leckey BeMe User Manual p101 To achieve maximum range of seat depth, the front section should be orientated as shown above. To achieve minimum range of seat depth, remove the bolts , at either side of the seat, and rotate the front section so that the short edge faces upwards .
- Page 102 Leckey BeMe User Manual SECTION 18.4: SECTION 18.5: ADJUSTING HIP WIDTH ADJUSTING HIP PAD ON CONTOURED SEAT WIDTH ON BASIC AND SPLIT SEAT (BASIC To adjust the hip width of the contoured BACKREST) seat, the left and right hip pads...
- Page 103 Leckey BeMe User Manual p103 SECTION 18.6: SECTION 18.7: ADJUSTING HIP PAD ADJUSTING HIP PAD WIDTH ON BASIC AND HEIGHT AND ANGLE SPLIT SEAT (MODERATE To adjust the hip pad height, remove the AND COMPLEX two bolts , and reset into the adjacent...
- Page 104 Leckey BeMe User Manual SECTION 18.8: SECTION 18.9: ADJUSTING HEIGHT OF ADJUSTING HEIGHT BACKREST OF INDIVIDUAL PADS ON MODERATE AND To adjust the height of the backrest, loosen COMPLEX BACKRESTS the bolts of the backrest height adjustment clamp , and raise or lower the backrest telescoping tubes to the desired height.
- Page 105 Leckey BeMe User Manual p105 SECTION 18.10: SECTION 18.11: ADJUSTING DEPTH ADJUSTING ANGLE OF SACRAL SECTION OF SACRAL SECTION (MODERATE AND (MODERATE AND COMPLEX ONLY) COMPLEX ONLY) The complex clamps are found on the The complex clamps are found on the...
- Page 106 Leckey BeMe User Manual SECTION 18.12: SECTION 18.13: ADJUSTING DEPTH ADJUSTING ANGLE OF MIDDLE BACKREST OF MIDDLE BACKREST SECTION (COMPLEX SECTION (COMPLEX ONLY) ONLY) The complex clamps are found on the The complex clamps are found on the sacral, thoracic and shoulder sections of the...
- Page 107 Leckey BeMe User Manual p107 SECTION 18.14: SECTION 18.15: ADJUSTING DEPTH OF ADJUSTING ANGLE OF SHOULDER SECTION SHOULDER SECTION (COMPLEX ONLY) (COMPLEX ONLY) The complex clamps are found on the The complex clamps are found on the sacral, thoracic and shoulder sections of the...
- Page 108 Leckey BeMe User Manual SECTION 18.16: SECTION 18.17: ADJUSTING ANGLE ADJUSTING FOOTREST OF SHOULDER WINGS LENGTH (MODERATE OR To adjust the footrest height, loosen the COMPLEX ONLY) bolt , and lengthen or shorten the height of the footrest to the desired position.
- Page 109 Leckey BeMe User Manual p109 SECTION 18.18: SECTION 18.19: ADJUSTING FOOT ADJUSTING STEM ANGLE FOOTREST ANGLE (KNEE ANGLE) (DORSIFLEXION AND PLANTARFLEXION) To adjust the foot stem angle, loosen the bolt , and rotate the foot stem to the To adjust the angle of the footrest to desired position.
- Page 110 Leckey BeMe User Manual SECTION 18.20: SECTION 18.21: ADJUSTING SANDALS ADJUSTING ANKLE HUGGERS To position the user’s feet in the sandals, secure the Velcro straps provided so the foot To adjust the ankle hugger, adjust the position is held in place. The straps should be placed...
- Page 111 Leckey BeMe User Manual p111 SECTION 18.22: SECTION 18.23: ADJUSTING ANKLE ADJUSTING BOOTIES WRAPS To adjust the booties, adjust the position of the Velcro strap around the bridge of the foot, To adjust the ankle wrap, adjust the position , the Velcro strap around the ankle...
- Page 112 Leckey BeMe User Manual SECTION 18.24: SECTION 18.25: ADJUSTING LATERALS ADJUSTING LATERALS (WIDTH, HEIGHT AND (DEPTH) ANGLE) To adjust the lateral depth, open the Velcro of the cover to gain access to the adjustment To adjust the Lateral height, width and angle, bolt .
- Page 113 Leckey BeMe User Manual p113 SECTION 18.26: SECTION 18.27: ADJUSTING FLEXIBLE ADJUSTING ARMREST WRAPAROUND HEIGHT HUGGING LATERALS The armrest can be adjusted into several incremental height positions. To adjust the The hardware for the flexible laterals is armrest height, loosen the bolt , which rests adjusted in the same way as the Laterals.
- Page 114 Leckey BeMe User Manual SECTION 18.28: SECTION 18.29: ADJUSTING ARMREST ADJUSTING ARMREST ANGLE DEPTH To adjust the armrest angle, locate the cam To adjust the armrest depth, remove the lever , in the centre of the armrest. Raise the...
- Page 115 Leckey BeMe User Manual p115 SECTION 18.30: SECTION 18.31: ADJUSTING BUTTERFLY ADJUSTING HEADREST HARNESS To adjust the headrest, loosen the bolts & . Adjust the headrest height, depth and To adjust the butterfly harness, either change angle into the desired position. Tighten the...
- Page 116 Leckey BeMe User Manual SECTION 18.32: SECTION 18.33: ADJUSTING HEADREST ADJUSTING TRAY LATERAL ANGLE ANGLE To adjust the angle of the headrest laterals, To adjust the tray angle, locate the cam lever, unzip the cover on both sides to access the , in the centre of the armrest.
- Page 117 Leckey BeMe User Manual p117 SECTION 18.34: SECTION 18.35: ADJUSTING ATTACHING, ELBOW BLOCKER DETACHING AND POSITIONING ADJUSTING 4-POINT BELT To adjust the elbow blocker, loosen the bolts, , and slide the pad along the slots into the To attach the 4-point belt, pass the grey desired position.
- Page 118 Leckey BeMe User Manual SECTION 18.36: Attach the buckle , at the front to secure the user. ATTACHING, DETACHING AND ADJUSTING 2-POINT BELT To attach the 2-point belt, pass the grey webbing through the upper slot in the seat moulding...
- Page 119 Leckey BeMe User Manual p119 SECTION 18.37: To detach the 2-point belt, reverse the process. ADJUSTING PELVIC CRADLE Safety Information: You must ensure when using the 2-point belt that the webbing is fed To adjust the pelvic cradle, either change the...
- Page 120 Leckey BeMe User Manual SECTION 18.38: SECTION 18.39: ADJUSTING FEMORAL ADJUSTING THE GUIDES (WIDTH & BACKREST ANGLE ANGLE) The backrest angle can be adjusted in two ways: through the backrest recline mechanism To adjust the width and angle of the femoral...
- Page 121 Leckey BeMe User Manual p121 To adjust the back angle through the backrest There are six positions of the backrest recline interface at the base of the backrest, locate mechanism, in 5-degree increments, as the bolt , within the interface.
- Page 122 Leckey BeMe User Manual The follow back angles can be achieved by the below combinations. Backrest Interface Backrest Recline (symbol facing Seat to Back Angle (°) Recline Range (°) Mechanism forward)
- Page 123 Leckey BeMe User Manual p123 SECTION 18.40: Warning: The pressure range ADJUSTING DYNAMIC is 50-250psi. Never exceed an air pressure of 250psi in the BACK STRENGTH uncompressed shock system. Exceeding the maxium air pressure of 250lbs/inch could The resistance is adjusted by varying the air result in serious injury.
- Page 124 Leckey BeMe User Manual Dynamic Back Strength Log Date Client Reference Strength (PSI)
- Page 125 Leckey BeMe User Manual p125...
- Page 126 Leckey BeMe User Manual...
- Page 127 Leckey BeMe User Manual p127...
- Page 128 Sunrise Medical F: +1.800.561.5834 237 Romina Drive, Unit 3, E: mkt.canada@sunmed.com Concord, ON, L4K 4V3 sunrisemedical.ca Please visit leckey.com for a full list of Leckey distributors. James Leckey Design Limited (+44) 28 9260 0750 19 Ballinderry Road hello@leckey.com Lisburn, BT28 2SA Northern Ireland leckey.com...
Need help?
Do you have a question about the BeMe and is the answer not in the manual?
Questions and answers