Table of Contents
Advertisement
Quick Links
Advertisement
Table of Contents

Related Manuals for Leckey Freestander


Summary of Contents for Leckey Freestander
- Page 1 Freestander User Manual English Supporting Children...
- Page 2 Freestander User Manual The Leckey Freestander has been designed to promote weight bearing and mid line symmetry. This manual shows you how you can quickly and easily make use of all of the functions. The instructions on the safety and maintenance of the product will ensure that you will enjoy it for a long time.
- Page 3 Freestander User Manual p3 CONTENTS Intended use Certification Warnings and Cautions Terms of warranty Product History Record Product Training Record Safety Information Precautions and Contraindication How to unpack and assemble Clinical setup for postural management Frequent adjustments for daily use Cleaning & care information Daily product inspection Annual product inspection Reissuing Leckey products Product servicing Technical information Technical Details...
- Page 4 Freestander User Manual SECTION 02: SECTION 01: CERTIFICATION INTENDED USE Intended use The Freestander is classified as a Class I Medical Device under EU and The devices are intended to assist UK regulations. As the manufacturer, children that cannot stand or maintain James Leckey Design Limited, declares a standing position independently as that this product conforms to the part of a supported weight bearing Medical Device Regulation (2017/745), program. UK Medical Device Regulations 2002, Medial Device Directive (93/42 EEC) Indications for use and EN 12182:2012 Assistive products for persons with disability, general Freestander has been designed for requirements and test methods. used at home or in school for upright Notice to the user and/or patient: Any standing. The stander is available...
-
Page 5: Section 03: Warnings And Cautions
Freestander User Manual p5 SECTION 03: WARNINGS AND CAUTIONS 1) WARNING TOPPLING HAZARD carer should strive to keep product • N ever use the product on a sloping adjustments to a minimum. surface greater than 5 degrees. • T ake care when assembling or • A lways check operation of linear drives, adjusting the position of the stander gas struts, and motor drives before use. components that your fingers do • W hen adjusting the stander angle not get pinched when positioning ensure there is adequate access space stander components and tightening on all sides of the product. mountings. • A lways lock casters facing outwards • D uring product assembly and before placing the user in the product. -
Page 6: Section 04: Terms Of Warranty
Freestander User Manual SECTION 04: household cleaners and moist cloths, do not use running water on the TERMS OF WARRANTY upholstery whilst it is still attached to the seat. See section Cleaning & Care The warranty applies only when Information. the product is used according to the specified conditions and for the 8) CAUTION CLEANING POWER intended purposes, following all WASHERS/HOSES manufacturers’ recommendations • H oses and power washers are not to (also see general terms of sales, be used to clean the product. Standers delivery and payment). A three with the electric lift system are not year warranty is provided on all sealed against running water and may Leckey manufactured products and be damaged by water ingress. See components. section Cleaning & Care Information. 9) CAUTION SERVICING/REPAIR OF... -
Page 7: Section 06: Product Training Record
Freestander User Manual p7 SECTION 06: SECTION 07: PRODUCT TRAINING SAFETY INFORMATION RECORD 1. Always read instructions fully (PARENTS, TEACHERS & CARERS) before use. Your Leckey product is a prescribed 2. Users should not be left Class 1 Medical Device and as such unattended at any time whilst Leckey recommend that parents, using Leckey equipment. teachers and carers using the equipment should be made aware 3. Only use Leckey approved of the following sections of this user components with your product. manual by a technically competent Never modify the product in any person. way. Failure to follow instructions may put the user or carer at risk and will invalidate the warranty on SECTION 07 the product. - Page 8 Freestander User Manual The chest and knee straps should 14. Clean the product regularly. Do not then be fastened. use abrasive cleaners. Carry out maintenance checks on a regular 8. When the product is stationary basis to ensure your product is in ensure that all castors are locked good working condition. and facing away from the base as this will improve product stability. 15. The product is designed for indoor use and when not in use should 9. Never adjust the overall height of be stored in a dry place that is the Freestander while the frame not subjected to extremes of is in use. Other finer positional temperature. The safe operating adjustments may be carried out temperature range of the product safely when the user is in the is +5 to +40 deg Celsius. frame. 10. Never leave the product on a sloping surface, greater than 5 degrees. Always remember to lock all the castors. 11. The product contains components which could present a choking hazard to small children. Always...
-
Page 9: Section 08: Precautions And Contraindications
Freestander User Manual p9 SECTION 08: PRECAUTIONS AND CONTRAINDICATIONS Precautions Contraindications • Fixed spinal deformities such as • Children experiencing pain or scoliosis or kyphosis discomfort that cannot be resolved by adjustment of support/positioning • Severe muscle contractures • Children with hip/ knee flexion • Severe muscular or skeletal contracture beyond the limits of the asymmetry including hip dislocation stander • Progressive and muscle wasting All precautions and contraindications conditions are taken at the discretion of the prescribing clinician or parent. • High risk or recent history of bone Leckey recommends a trained and fractures experienced clinician to be present • High risk of pressure related injury or... -
Page 10: Section 09: How To Unpack And Assemble
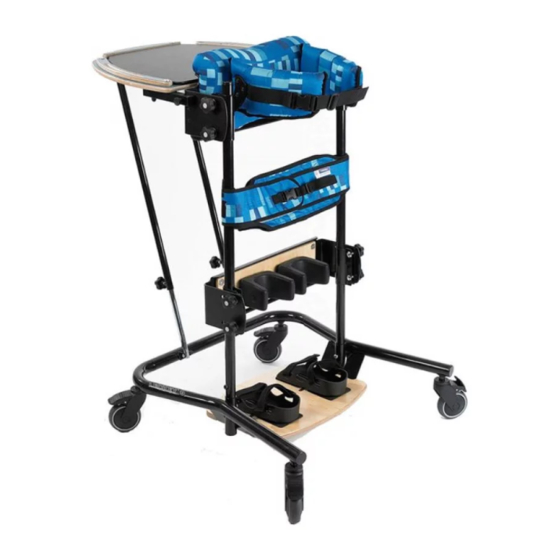
Freestander User Manual SECTION 09: 9.1 ASSEMBLING THE HOW TO UNPACK FREESTANDER AND ASSEMBLE To assemble your Freestander, firstly loosen the height adjustment bolt’s on Check parts the outer upright poles and remove the inner poles. Congratulations on purchasing your Leckey Freestander. When you receive your Freestander it will be boxed Insert the inner poles into place into and wrapped in several parcels. Your the receiver tubes on the base castor Freestander comes as standard with frame. The allen key provided tighten chest plate including flexible laterals, the two small socket screws on each knee plate, pelvic strap, activity tray receiver tube securely and bowl, base with castors, inner Then slide the main outer frame over poles and sandals. the inner poles and tighten the two The Totstander is supplied without height adjustment bolts at the castors, tray and with a chest strap desired height. - Page 11 Freestander User Manual p11 9.2 ATTACHING THE TRAY The Freestander tray is attached by sliding the outer poles already attached to the tray over the inner poles already attached to the base and then tightening the bolts The tray is then secured with a tray pin into one of the slots on the side of the frame.
- Page 12 Freestander User Manual Place the sandal so that the 9.3 ATTACHING THE attachment bolt goes through the slot in the footplate. To secure, on the SANDALS underside of the footplate place the rubber washer , followed by the Insert the required attachment bolt metal washer and then the knob along with the retention plate Place onto the attachment bolt. a rubber lid on both the top and bottom of the sandal. Fasten using the To position the sandals simply loosen four screws provided. To remove or the knob G under the footplate, select replace the attachment bolt, reverse the position you require and re-fasten this process. the knob.
-
Page 13: Section 10: Clinical Setup For Postural Management
Freestander User Manual p13 SECTION 10: CLINICAL SETUP FOR POSTURAL MANAGEMENT The clinical setup of the product should be completed by a technically and clinically competent person who has been trained in the use of the product. Leckey recommend a written record is maintained of all clinical setups for this product. 10.1 ADJUSTING THE CHEST PLATE You should firstly measure the distance from the user’s feet to just under the arms. This is best done where practical in a lying position, on a mat. The height between the top of the chest plate, and sandals should be set to the equivalent of this distance. This will always be the first adjustment you need to carry out. To adjust the height of the chest plate, loosen the bolts , adjust to the required position, then re-tighten the bolt securely. The chest plate has a number of other adjustments that are carried out by loosening the bolts at the side of the chest plate. - Page 14 Freestander User Manual Always use caution to ensure fingers do not become trapped when 1. Forwards and backwards for body adjusting the knee plate. profiling. 2. Up and down for finer, last minute adjustments to the height of the chest plate. 3. To angle forwards/down or backwards/up slightly to assist in the positional management of extension or flexion respectively. Never attempt to adjust the height of the main frame when the stander is in use. 10.2 ADJUSTING THE KNEE CUPS The knee cups are fixed with the bolts at the front of the knee block. When this bolt is loosened, the knee cup can be moved from left to right and rotated. Once the desired position is obtained the bolt should be re- 10.1 ADJUSTING THE tightened securely. KNEE PLATE...
-
Page 15: Adjusting The Sandals
Freestander User Manual p15 10.3 ADJUSTING THE SANDALS To position the sandals simply loosen 10.4 ATTACHING the knob under the footplate, select the position you require and re-fasten THE PELVIC BAND the knob. To position the user’s feet in the sandals secure the Velcro straps The pelvic belt should be attached to provided so the foot is held in place. the user first, again if practical on a mat. The straps should be placed over the bridge of the foot and over the toes. The pelvic straps are attached around The front strap can be fed through the user’s pelvis. The longer straps are one of two slots on either side of the then slipped through the outer poles sandals, depending on the size of the of the frame and secured firmly behind user’s feet. the user with the Velcro on the belt. To ensure that you can easily identify the If the child is wearing sandals or strap that goes around the user and light footwear check the straps to the one that attaches to the frame, a make sure the webbing does not Leckey label is sewn on to the one that irritate the skin. - Page 16 Freestander User Manual SECTION 11: FREQUENT ADJUSTMENT FOR DAILY USE Parents and carers should be shown how to make frequent adjustments and made aware of the safety checks in section 7 by a technically and clinically competent person who has been trained in the use of the product. Leckey recommend that a written record is maintained of all parent and carers who have been trained in the use of this product. 11.1 TRANSFERRING THE USER INTO AND OUT OF THE STANDER Before transferring the child into the stander carry out the daily product inspection as outlined in section 13 of this user manual. Before transferring the child into the product lock all the castors, ensuring that they are facing outwards to maximise product stability. Make sure the straps on the chest, hip support...
- Page 17 Freestander User Manual p17 Always secure the pelvic band and safety strap first then the chest strap and the users feet. 11.2 ADJUSTING THE FLEXIBLE LATERALS The Freestander flexible lateral Always use caution to ensure supports can be adjusted in and out fingers do not become trapped by loosening the bolts on the back when adjusting the lateral of the chest plate. Once these bolts supports. have been loosened, the flexible lateral supports can be adjusted 11.3 ADJUSTING to the required position and once in position the bolts should be re- THE KNEE CUPS tightened securely. The flexible laterals also have a small amount of height adjustment. To alter the height loosen The knee cups are fixed with the bolts the allen bolts , position the lateral at the front of the knee block. When as required and then re- tighten the this bolt is loosened, the knee cup allen bolts securely. The flexible...
- Page 18 Freestander User Manual 11.4 ADJUSTING THE Always use caution to ensure SANDALS fingers do not become trapped when adjusting the lateral supports. To position the sandals simply loosen the knob under the footplate, select the position you require and re-fasten 11.5 ADJUSTING the knob. To position the user’s feet in the sandals secure the Velcro straps THE TRAY provided so the foot is held in place. The straps should be placed over the The tray can be height and angle bridge of the foot and over the toes. adjusted by loosening the bolt on The front strap can be fed through the tray poles, adjusting to the required one of two slots on either side of the position and then re- tightening the sandals, depending on the size of the bolts securely. user’s feet. The position of the tray can also be altered in relation to the chest plate. One of three positions can be selected to help facilitate good hand function. The tray will come complete with a tray...
-
Page 19: Section 12: Cleaning & Care Information
Freestander User Manual p19 SECTION 12: CLEANING & CARE INFORMATION How to maintain When cleaning we recommend that you use only warm water and a non- abrasive detergent. Never use organic 11.6 ATTACHING solvents or dry cleaning fluids. THE PELVIC BAND Upholstery and fabrics 1. The upholstery and fabrics can be The pelvic band should be attached cleaned by hand whilst in place. to the user first, again if practical on When cleaning we recommend a mat. The pelvic straps are attached that you use only warm water and around the user’s pelvis, the longer a nonabrasive detergent. straps are then slipped through the outer poles of the frame and secured 2. The best cleaning method is a firmly behind the user with the Velcro ‘wipe & dry’ technique. -
Page 20: Section 13: Daily Product Inspection
Freestander User Manual SECTION 13: DAILY PRODUCT INSPECTION Metal and plastic and wooden (Therapists, Parents & Carers) components We recommend that daily visual checks of the equipment are carried 1. Soap and water or antibacterial out by therapists, carers or parents to spray can be used for daily ensure the product is safe for use. The cleaning. recommend daily checks are detailed below. 2. For deep cleaning a low pressure steam cleaner can be used. 1. Ensure all adjustment knobs and 3. Do not use solvents to clean bolts are in place and secure. plastic, wooden or metal 2. Check all upholstery for signs of components. -
Page 21: Section 14: Annual Product Inspection
Freestander User Manual p21 SECTION 14: ANNUAL PRODUCT INSPECTION (Therapist, Technician, Leckey Product Advisor, Dealer) Leckey recommend that each product 3. Visually check the structure of the should be subject to a detailed product, paying attention to weld inspection at least once a year and points on the frame ensuring there every time the product is reissued are no signs of fatigue or cracking for use. This inspection should be around the welds. carried out by a technically competent 4. Leckey recommend that a written person who has been trained in the record is maintained of all annual use of the product and should include product inspections. the following checks as a minimum requirement. 1. Check all knobs, nuts, bolts and If in any doubt to the continued plastic buckles are in place, safe use of your Leckey product replacing any missing items. -
Page 22: Section 15: Re-Issuing Leckey Products
Freestander User Manual SECTION 15: RE-ISSUING LECKEY PRODUCTS Most Leckey products are assessed 2. Where an automated disinfection and ordered to meet the needs of system is not available, all product an individual user. Before reissuing surfaces should be wiped over a product we recommend that the with disinfectant surface wipes or therapist prescribing the product has liquid disinfectant on a soft cloth. carried out an equipment compatibility Suitable products are 70% IPA, check for the new user and has 70% Alcohol or diluted bleach. The ensured that the product being re- manufacturer’s instructions for the issued contains no modifications or chosen product should be followed. special attachments. Product upholstery and fabrics should be cleaned thoroughly in A detailed technical inspection should accordance with section, Cleaning be carried on the product prior to and Care Information, of this re-issuing. This should be carried out manual. by a technically competent person who has been trained in the use and Ensure a copy of the user manual is inspection of the product. -
Page 23: Section 16: Product Servicing
Freestander User Manual p23 SECTION 16: PRODUCT SERVICING Servicing of all Leckey products should only be carried out by technically competent persons who have been trained in the use of the product. In the UK & ROI please contact the Leckey Service Centre on: • UK 0800 318265 or ROI 1800 626020 and our customer service department will be delighted to assist you with your servicing requirements. All international service enquiries should be directed to the appropriate Leckey distributor who will be delighted to assist you. For further information on Leckey distributors please visit our website : www.leckey.com/contact SECTION 17: TECHNICAL INFORMATION Product Code The Freestander comes in 2 fabrics. Size 1 comes as standard in Meadow fabric LFS/#/ Freestander and size 2 and 3 in Mondeo blue fabric. LFS/T Totstander Head Support Options are available (comes as standard in Medow Fabric) with this product. Accessory Codes... -
Page 24: Section 18: Technical Details
Size 2 Size 3 Size 1 - 5 4 - 10 9 - 18 Age (Years Approx) LFS/1 LFS/2 LFS/3 Codes Inches Inches Inches Freestander 18.5 Chest Plate Height 1350 Base length width Activity Tray depth width 60kg 132lbs 80kg 176lbs... - Page 25 Freestander User Manual p25 TABLE OF SYMBOLS Symbol Meaning Medical Device Read the Instructions for Use CE mark Warning Manufacturer Serial number Product code Max occupancy weight Date of Manufacture For indoor use only Latex free...
- Page 26 Freestander User Manual Symbol Meaning Unique Device Identification Machine wash- water temperature 50°C Tumble dry- low heat Cool iron Do not dry-clean...
- Page 27 Freestander User Manual p27 NOTES...
- Page 28 LS146-07...
Need help?
Do you have a question about the Freestander and is the answer not in the manual?
Questions and answers