DURKOPP ADLER M-Type Delta D867 Operating Instructions Manual
Hide thumbs
Also See for M-Type Delta D867:
- Service instructions manual (250 pages) ,
- Additional instructions (22 pages) ,
- Additional instructions (22 pages)
Table of Contents
Advertisement
Quick Links
Advertisement
Table of Contents

Related Manuals for DURKOPP ADLER M-Type Delta D867


Summary of Contents for DURKOPP ADLER M-Type Delta D867
- Page 1 Operating Instructions D867 M-TYPE DELTA...
- Page 2 IMPORTANT READ CAREFULLY BEFORE USE KEEP FOR FUTURE REFERENCE All rights reserved. Property of Dürkopp Adler AG and protected by copyright. Any reuse of these contents, including extracts, is prohibited without the prior written approval of Dürkopp Adler AG. Copyright © Dürkopp Adler AG 2019...
-
Page 3: Table Of Contents
Table of Contents About these instructions ..............5 For whom are these instructions intended? .......... 5 Representation conventions – symbols and characters ......6 Other documents ................... 7 Liability ....................8 Safety....................9 Basic safety instructions ................ 9 Signal words and symbols used in warnings........10 Machine description................ - Page 4 Table of Contents 5.2.3 Navigating the burger menu ..............55 5.2.4 Navigation during the start of the control panel ........55 User Configuration ................56 5.3.1 Setting the language ................57 5.3.2 Setting the brightness................58 5.3.3 Setting the volume................58 5.3.4 User Management administration ............
- Page 5 Table of Contents Parts list..................... 147 Setup ....................149 Checking the scope of delivery ............149 Removing the transport locks ............149 Assembling the stand ................ 150 Assembling the pedal and setpoint device ........151 Tabletop .................... 152 7.5.1 Completing the tabletop ..............152 7.5.2 Assembling the tabletop to the stand ..........
- Page 6 Table of Contents Operating Instructions M-TYPE DELTA - 01.0 - 08/2019...
-
Page 7: About These Instructions
About these instructions About these instructions These instructions have been prepared with utmost care. They contain information and notes intended to ensure long-term and reliable operation. Should you notice any discrepancies or if you have improvement requests, then we would be glad to receive your feedback through Customer Service (... -
Page 8: Representation Conventions - Symbols And Characters
About these instructions Representation conventions – symbols and characters Various information in these instructions is represented or high- lighted by the following characters in order to facilitate easy and quick understanding: Proper setting Specifies proper setting. Disturbances Specifies the disturbances that can occur from an incorrect setting. Cover Specifies which covers must be disassembled in order to access the components to be set. -
Page 9: Other Documents
About these instructions Information Additional information, e.g. on alternative operating options. Order Specifies the work to be performed before or after a setting. References Reference to another section in these instructions. Security Important warnings for the user of the machine are specifically marked. -
Page 10: Liability
About these instructions Liability All information and notes in these instructions have been compiled in accordance with the latest technology and the applicable standards and regulations. Dürkopp Adler cannot be held liable for any damage resulting from: • Breakage and damage during transport •... -
Page 11: Safety
Safety Safety This chapter contains basic information for your safety. Read the instructions carefully before setting up or operating the machine. Make sure to follow the information included in the safety instruc- tions. Failure to do so can result in serious injury and property damage. -
Page 12: Signal Words And Symbols Used In Warnings
Safety All the warnings and safety signs on the machine must always be in legible condition. Do not remove! Missing or damaged warnings and safety signs must be replaced immediately. Requirements Only qualified specialists may: to be met by • Setting up the machine the personnel •... - Page 13 Safety CAUTION (with hazard symbol) If ignored, moderate or minor injury can result CAUTION (with hazard symbol) If ignored, environmental damage can result NOTICE (without hazard symbol) If ignored, property damage can result Symbols The following symbols indicate the type of danger to personnel: Symbol Type of danger General...
- Page 14 Safety Examples Examples of the layout of warnings in the text: DANGER Type and source of danger! Consequences of non-compliance. Measures for avoiding the danger. This is what a warning looks like for a hazard that will result in serious injury or even death if ignored. WARNING Type and source of danger! Consequences of non-compliance.
- Page 15 Safety NOTICE Type and source of danger! Consequences of non-compliance. Measures for avoiding the danger. This is what a warning looks like for a hazard that could result in property damage if ignored. CAUTION Type and source of danger! Consequences of non-compliance.
- Page 16 Safety Operating Instructions M-TYPE DELTA - 01.0 - 08/2019...
-
Page 17: Machine Description
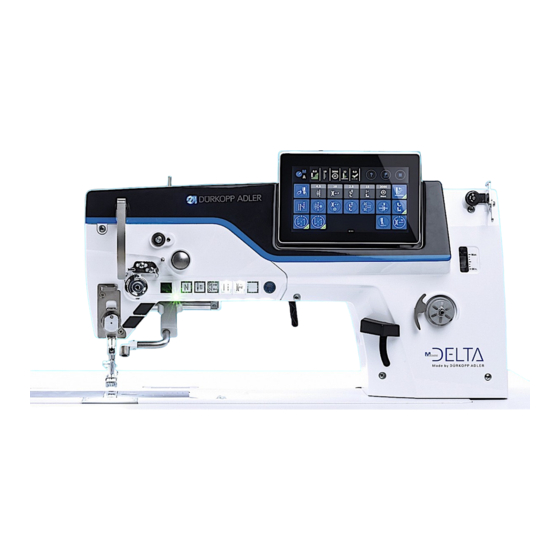
Machine description Machine description Components of the machine Fig. 1: Components of the machine ① ⑨ ⑧ ② ③ ④ ⑤ ⑥ ⑦ (1) - Motor driven (5) - Service Stop button thread tension (6) - Electronic stitch regulator (2) - Favorite buttons (7) - Winder (motor driven) (3) - Jog-Dial (8) - Oil level indicator... -
Page 18: Proper Use
Machine description Proper use WARNING Risk of injury from live, moving and cutting parts as well as from sharp parts! Improper use can result in electric shock, crushing, cutting and punctures. Follow all instructions provided. NOTICE Non-observance will lead to property damage! Improper use can result in material damage at the machine. -
Page 19: Declaration Of Conformity
Machine description Declaration of Conformity The machine complies with European regulations ensuring health, safety, and environmental protection as specified in the declara- tion of conformity or in the declaration of incorporation. Operating Instructions M-TYPE DELTA - 01.0 - 08/2019... - Page 20 Machine description Operating Instructions M-TYPE DELTA - 01.0 - 08/2019...
-
Page 21: Operation
Operation Operation The operating sequence consists of several different steps. Fault-free operation is necessary in order to achieve a good sewing result. Preparing the machine for operation WARNING Risk of injury from moving, cutting and sharp parts! Crushing, cutting and punctures are possible. If possible, make preparations only when the machine is switched off. -
Page 22: Switching On And Off The Machine
Operation Switching on and off the machine Fig. 2: Switching on and off the machine ① ② (1) - Button (2) - Switch Switching on the machine To switch on the machine: Press the switch (2) on the rear of the control to position I. ... -
Page 23: Switching On And Off The Sewing Lamps
Operation Switching on and off the sewing lamps The machine comes with a classic sewing lamp (1) in the area of the needle and machine head lighting (2) in the area of the arm. Fig. 3: Switching on and off the sewing lamp (1) ②... -
Page 24: Inserting/Changing The Needle
Operation Inserting/changing the needle CAUTION Risk of injury from sharp parts! Puncture possible. Switch off the machine before you insert or change the needle. NOTICE Property damage may occur! There is a risk of machine damage, needle breakage or thread breakage if the distance between needle and hook tip is incorrect. - Page 25 Operation To change the needle in a 1-needle machine: Turn the handwheel until the needle bar block (1) reaches the upper end position. Loosen the screw (2). Pull the needle out towards the bottom. Insert the new needle into the hole of the needle bar block (1) until it reaches the stop.
-
Page 26: On 2-Needle Machines
Operation 4.4.2 On 2-needle machines Fig. 5: Inserting/changing the needle ① ④ ② ② ③ ③ (1) - Needle bar (3) - Groove (2) - Screw (4) - Needle holder To change the needle in a 2-needle machine: Turn the handwheel until the needle bar (1) has reached the upper end position. -
Page 27: Threading The Needle Thread
Operation Order Always adjust the clearance between the hook and the needle after changing to a different needle strength ( Service Instructions). Disturbance An incorrect hook clearance can cause the following disturbances: • Changing to a thinner needle: • Skip stitches •... -
Page 28: On 1-Needle Machines
Operation The instructional video Threading: two needles starts automatically. 4.5.1 On 1-needle machines To thread the needle thread: Fit the thread reel on the reel stand. The unwinding bracket must stand directly above the thread reel. Feed the thread from the rear to the front through the thread guide on the unwinding bracket. - Page 29 Operation Fig. 6: Threading the needle thread (1) ① ⑦ ⑥ ⑤ ④ ② ③ (1) - Tube (5) - Front tensioner (2) - Thread tensioning spring (6) - Rear tensioner (3) - Hook (7) - Pretension (4) - Pin Insert the thread from the top and guide it through the tube (1).
- Page 30 Operation Feed the thread over the hook (3) before feeding it clockwise through the thread tensioning spring (2) from below. Fig. 8: Threading the needle thread (3) ⑫ ⑪ ⑬ ② ⑩ ⑨ ⑧ ② (2) - Thread tensioning spring (11) - Needle thread regulator (8) - Thread guide (12) - Thread lever (covered)
- Page 31 Operation 13. Insert the thread through the right hole of the guide below the thread clamp. Fig. 9: Thread clamp 14. Insert the thread into the thread clamp from the right so that the thread is held in place inside the hook of the clamp. The thread is supposed to run through the clamp almost without touching it and in such a way that it only makes contact with the guides above and below the thread clamp.
-
Page 32: On 2-Needle Machines
Operation 4.5.2 On 2-needle machines To thread the needle threads: Fit the thread reels on the reel stand. The unwinding bracket must stand directly above the thread reels. Feed the threads from the rear to the front through the thread guides on the unwinding bracket. - Page 33 Operation Threading the right needle thread Fig. 10: Threading the needle thread (1) ① ⑯ ⑮ ② ⑭ ③ ④ ⑤ ⑬ ⑥ ⑫ ⑦ ⑪ ⑧ ⑨ ⑩ (1) - Tube (9) - Thread guide (2) - Thread lever (10) - Thread tensioning spring (3) - Needle thread regulator (11) - Hook...
- Page 34 Operation Feed the thread clockwise around the pin (13) and keep feeding it clockwise through the front tensioner (14). Fig. 11: Threading the needle thread (2) ⑮ ⑭ (14) - Front tensioner (15) - Rear tensioner Feed the thread from the right to the left through thread guide (12).
- Page 35 Operation Threading the left needle thread Fig. 12: Threading the needle thread (3) ① ⑮ ⑭ ② ⑬ ③ ④ ⑤ ⑥ ⑫ ⑦ ⑪ ⑧ ⑨ ⑩ (1) - Tube (9) - Thread guide (2) - Thread lever (10) - Thread tensioning spring (3) - Needle thread regulator (11) - Hook (4) - Pin...
- Page 36 Operation Feed the thread clockwise around the pin (12) and keep feeding it clockwise through the front tensioner (13). Fig. 13: Threading the needle thread (4) ⑭ ⑬ (13) - Front tensioner (14) - Rear tensioner Feed the thread over the hook (11) before feeding it clockwise through the thread tensioning spring (10) from below.
-
Page 37: Winding The Hook Thread
Operation Winding the hook thread WARNING Risk of injury from needle tip and moving parts! Puncture, cutting and crushing possible. Turn off the machine before threading the thread. The hook thread can be wound on without sewing. Important Never use the winder without a bobbin. If using it without a bobbin, you run the risk of the thread winding itself around the bobbin shaft, which may cause damage to the winder. - Page 38 Operation Fig. 14: Winding the hook thread (1) ③ ① ② (1) - Pretension (3) - Thread guide (2) - Thread guide Insert the thread in a wavelike manner through the first 2 holes of the thread guide (2): from left to right through the first hole and from right to left through the second hole.
- Page 39 Operation Fig. 15: Winding the hook thread (2) ⑥ ⑤ ③ ④ (4) - Winder lever (6) - Knife (5) - Bobbin shaft (7) - Winder Guide the thread to the winder (7). Clamp the thread behind the cutter (6) and tear off the loose end behind it.
-
Page 40: Changing The Bobbin
Operation Changing the bobbin WARNING Risk of injury from needle tip and moving parts! Puncture, cutting and crushing possible. Turn off the machine before changing the bobbin. NOTICE Property damage may occur! The surface of the bobbin may become damaged, causing the bobbin rotation monitor to stop working correctly. - Page 41 Operation To change the bobbin: Swivel up the bobbin case retainer (1). Remove the empty bobbin. Insert a full bobbin: Important Insert the bobbin so that it moves in the opposite direction of the hook when the thread is pulled out. Feed the hook thread through the slot (5) in the bobbin case retainer.
-
Page 42: Thread Tension
Operation Thread tension Together with the hook thread tension, the needle thread tension influences the final seam pattern. With thin sewing material, excessive thread tension can lead to undesired gathering and thread breakage. Proper setting If the tension of needle thread and hook thread is identical, the thread interlacing lies in the middle of the sewing material. -
Page 43: Setting The Hook Thread Tension
Operation 4.8.2 Setting the hook thread tension WARNING Risk of injury from needle tip and moving parts! Puncture, cutting and crushing possible. Switch off the machine before setting the hook thread tension. Fig. 19: Setting the hook thread tension ① ②... -
Page 44: Setting The Needle Thread Regulator
Operation Setting the needle thread regulator WARNING Risk of injury from needle tip and moving parts! Puncture, cutting and crushing possible. Switch off the machine before setting the needle thread regulator. The needle thread regulator determines the tension applied to guide the needle thread around the hook. -
Page 45: Lifting The Sewing Feet
Operation 4.10 Lifting the sewing feet Fig. 21: Lifting the sewing feet ① (1) - Pedal To lift the sewing feet: Press the pedal (1) halfway back. The machine stops and lifts the sewing feet. The sewing feet remain up as long as the pedal is pressed halfway back. -
Page 46: Sewing Backwards With The Stitch Regulator (Optional)
Operation 4.11 Sewing backwards with the stitch regulator (optional) The electronic stitch regulator on the machine arm reduces the stitch length down to sewing backwards in the lower end position. Fig. 22: Sewing backwards with the stitch regulator ① (1) - Stitch regulator Slowly push the stitch regulator (1) down. -
Page 47: Quick Functions On The Push Button Panel
Operation 4.13 Quick functions on the push button panel The machine has push buttons on the machine arm which can be used to activate specific functions while sewing. You can assign any functions you require to the function buttons. You can define the settings in the software (... - Page 48 Operation Functions of the buttons Button Function Sewing backwards When this button is activated, the machine sews in reverse. Needle position When this button is activated, the needle moves to a specific position. This position is determined individually via the parameter settings.
-
Page 49: Assigning A Function To The Favorite Buttons
Operation 4.13.2 Assigning a function to the favorite buttons You can transfer the button functions from the push button panel to the favorite buttons. Select a function that you frequently use so that you can switch it on faster while sewing. Fig. -
Page 50: Sewing
Operation 4.14 Sewing WARNING Risk of injury from the needle if sewing is started unintentionally! Puncture possible. Do not press the pedal when you fingers are in the area of the needle tip. Fig. 25: Sewing ① ② ③ ④ (1) - Position +1 (3) - Position -1 (2) - Position 0... - Page 51 Operation Condition Processes Start bartack • Press the pedal forwards (position +1) and keep it and sew there. Machine sews a start bartack (if specified). Afterwards, the machine continues to sew - with increasing speed the further forward the pedal is pressed.
- Page 52 Operation Operating Instructions M-TYPE DELTA - 01.0 - 08/2019...
-
Page 53: Programming Commander Delta
Programming Commander DELTA Programming Commander DELTA Control panel Commander DELTA Fig. 26: Control panel Commander DELTA All settings in the software are performed using the Commander DELTA control panel. Information If a value is entered that is not within the specified value range, the software will automatically adopt the limit value which is closest to your entry from the value range. -
Page 54: Navigating The Commander Delta Control Panel
Programming Commander DELTA Navigating the Commander DELTA control panel You navigate the control panel by tapping the screen with your fingers. There is no need for an input device. You can open menus by tapping the corresponding button with your finger. You switch between the different pages of the main screen by swiping with one finger. -
Page 55: Symbols And Tiles
Programming Commander DELTA 5.2.1 Symbols and tiles Explanation of recurring symbols: Icon Meaning The letter shown in blue is active. A = Automatic mode M = Manual mode Tap the symbol to toggle between the two modes. Programming mode (access via the burger menu), see ... -
Page 56: Entering Values
Programming Commander DELTA Icon Meaning Blue tiles (multifunction) You can active or deactivate dark tiles encircled by a white line and showing a blue triangle in the corner by tapping. A long tap opens a menu that lets you input values. Blue tiles (not stored) You cannot enter any values for dark tiles surrounded by a square white line. -
Page 57: Navigating The Burger Menu
Programming Commander DELTA 5.2.3 Navigating the burger menu You can open the burger menu with a tap of the symbol Fig. 28: Navigating the burger menu to Manual mode (see p. 77) to Automatic mode (see p. 104) to Programming mode (see ... -
Page 58: User Configuration
Programming Commander DELTA User Configuration The User Configuration allows the currently logged-in user to customize the software interface to their specific needs. To access the User Configuration: Tap the symbol to bring up the navigation pane. This opens the navigation interface. Fig. -
Page 59: Setting The Language
Programming Commander DELTA Tap the item User Configuration (2) on the left. You are in the User Configuration. 5.3.1 Setting the language Here, you can set the language of the software. Fig. 31: Setting the language (1) ① (1) - Language indicator To set the language: Tap on the language indicator (1). -
Page 60: Setting The Brightness
Programming Commander DELTA 5.3.2 Setting the brightness Here, you can adjust the brightness of the control panel. Fig. 33: Setting the brightness (1) ① (1) - Brightness indicator To set the brightness: Tap on the brightness indicator (1). Enter the desired value using the keyboard or the buttons ... -
Page 61: User Management Administration
Programming Commander DELTA To set the audio volume: Tap on the audio volume indicator (1). Enter the desired value using the keyboard or the buttons The volume of the control panel is adjusted. 5.3.4 User Management administration This section is locked if you are logged in as the Default User. Settings in User Management cannot be adjusted without extended authorizations. - Page 62 Programming Commander DELTA Fig. 36: Setting the fast menu key configuration (2) Press on the bar of the button to which you wish to assign a function. This opens the selection of the functions that can assigned to this button. Fig.
-
Page 63: Setting The Screen Configuration
Programming Commander DELTA 5.3.6 Setting the screen configuration The screen configuration is used for the display of the tiles in Manual mode. The setting is explained at the appropriate place in the chapter on Manual mode ( p. 78). User Management The User Management section allows you to create users and roles with different authorizations. - Page 64 Programming Commander DELTA Fig. 38: User Management (1) ① (1) - Logout Tap Logout (1). This opens the Login interface. Enter technician and 25483 for username and password. The user is logged in. Operating Instructions M-TYPE DELTA - 01.0 - 08/2019...
- Page 65 Programming Commander DELTA To access User Management: Tap the symbol to bring up the navigation pane. This opens the navigation interface. Fig. 39: User Management (2) ② (2) - Settings Tap Settings (2). This opens the Settings interface. Fig.
- Page 66 Programming Commander DELTA Tap the item User Management (4) on the right. The user management interface opens - which may look different depending on the user. Fig. 41: User Management (4) Define the desired settings (for explanations, see p. 65). to return to Settings or to return to Manual mode.
-
Page 67: Authorizations As Default Technician
Programming Commander DELTA 5.4.1 Authorizations as Default Technician The factory setting for the Default Technician requires that the technician enter their username and password (techni- cian, 25483) to log in. If selecting User Management as a Default Technician ( p. 61), you will be presented with the following interface: Fig. - Page 68 Programming Commander DELTA 5.4.1.1 Managing roles If selecting User Management as a Default Technician ( p. 56), you will be presented with the following interface: Fig. 43: Managing roles ① (1) - Tab for roles Tap the tab (1) reserved for the Roles on the left-hand side. Deleting a role To delete a role: Tap the desired role.
- Page 69 Programming Commander DELTA Creating/deriving a new role To create a new role: (only a role with fewer or equal authorizations than your own). The list shows a new role. Define the settings for the role (see table below). Information When logged in as a Default Technician, you can only select role derivations up to the role of Technician.
- Page 70 Programming Commander DELTA Read/Edit/Access Menu item Edit Manual bartack Edit Sewing foot lifted Edit Needle stop position Edit Bobbin Wind Mode Edit Segment abort Edit Edge trimmer Edit Edge Guide Position Edit Additional Height Edge Guide Edit Edge Guide reference position Edit Stitch length Edit...
- Page 71 Programming Commander DELTA Read/Edit/Access Menu item Edit Seam Center Guide Automatic mode Access Program selection Edit Program Edit Stitch length correction factor Edit Needle thread tension correction factor Sewing Access Submenu Start bartack Access Submenu End bartack Access Submenu Sewing foot lift Access Submenu Thread clamp Access...
- Page 72 Programming Commander DELTA Read/Edit/Access Menu item Edit Roles up to technician Edit Users up to technician Edit Auto Login editable 5.4.1.2 Managing users If selecting User Management as a Default Technician ( p. 56), you will be presented with the following interface: Fig.
- Page 73 Programming Commander DELTA The left-hand side holds a list of all users (2) that have been created. When tapping a user in this section, you will see on the right-hand side which settings (3) have been defined for the selected user. Deleting a user To delete a user: Tap the desired user.
- Page 74 Programming Commander DELTA Icon Setting Explanation On/Off Login with username and Username password Name for logging in Password Password for logging in Login by NFC chip allowed Login with NFC or not allowed token Login by USB key allowed Login with USB key or not allowed Automatic login when Automatic...
-
Page 75: User Login
Programming Commander DELTA 5.4.2 User login The factory setting of the software is such that the Default User will be logged in automatically when the machine is switched on. This does not require any type of authorization. The following explains how you can switch users. To access User Management: Tap the symbol to bring up the navigation pane. - Page 76 Programming Commander DELTA There are three ways to log in. The three options - including the necessary settings in the software - are described below. 5.4.2.1 Logging in with username and password Assigning a username and password To assign a username and password: Create a new user in User Management and assign this user a username and password (...
- Page 77 Programming Commander DELTA Login in with USB key To log in with a USB key: Plug the assigned USB key into the control panel. If the USB key has been assigned correctly, the user will be logged in. 5.4.2.3 Login in with NFC chip Assigning an NFC chip to a user To assign an NFC chip to a user: Select a user in User Management or create a new user...
-
Page 78: Software Operating Modes
Programming Commander DELTA Software operating modes The software of the control panel offers various operating modes: • Manual mode Manual mode is the simplest operating mode. There are no programs/seam programs and no inputs for individual seam sections. Changes to the sewing foot pressure, stroke height, stitch length, needle thread tension and, also, the activation of other functions are always implemented immediately. -
Page 79: Using Manual Mode
Programming Commander DELTA Using Manual mode In manual mode, no programs have been saved, allowing you to use all parameters in a variable manner. To access the Manual mode: Tap the symbol to bring up the navigation pane. This opens the navigation interface. Fig. -
Page 80: Setting Up The User Interface
Programming Commander DELTA 5.6.1 Setting up the user interface You can customize the arrangement of the tiles and the appearance of the status bar in Manual mode. Arranging the tiles on the main screen The main screen consists of three pages, which you can customize to your individual needs. - Page 81 Programming Commander DELTA Fig. 49: Setting up the user interface (2) ② ③ (2) - Screen configuration (3) - Main screen configuration Go to Screen configuration (2) and tap on Manual mode - Main screen configuration (3). The interface used for configuring the main screen opens. Fig.
- Page 82 Programming Commander DELTA Adjusting the information displayed in the status bar To adjust the appearance of the status bar: Go to Settings (see above). Fig. 51: Setting up the user interface (4) ④ ⑤ (4) - Screen configuration (5) - Status bar configuration Go to Screen configuration (4) and tap on Manual mode - Status bar configuration (5).
-
Page 83: Setting The Parameters
Programming Commander DELTA Default status bar settings Fig. 53: Default status bar Material thickness Sewing speed Distance detection edge guide (if available) Seam Length Empty Stitch count 5.6.2 Setting the parameters In Manual mode, you can set a variety of parameters. The functions and how they affect the parameters are described further below. - Page 84 Programming Commander DELTA Fig. 54: Setting the parameters ⑤ ⑥ ① ② ③ ④ (1) - Search (4) - Parameters Segment (2) - Parameters cross-segment (5) - Parameters Segment Begin (3) - Parameters Segment End (6) - Context-sensitive help Operating Instructions M-TYPE DELTA - 01.0 - 08/2019...
-
Page 85: Setting Cross-Segment Parameters
Programming Commander DELTA 5.6.3 Setting cross-segment parameters There are various options for setting the cross-segment parameters. The following table lists all possible options. Settings that are more complex and therefore require further explanation are described in more detail after the table. Icon Parameter Setting... - Page 86 Programming Commander DELTA Icon Parameter Setting Value range Value for the gap between the motor driven 1.0 - 45.0 edge guide and the needle (factoring in the (depends on the sewing defined safety distance to the sewing feet). equipment) Correction speed effect Value range Correction speed effect On/Off...
- Page 87 Programming Commander DELTA Icon Parameter Setting Depending on the material Needle thread tension thickness, the needle thread tension can be adjusted to different material thicknesses by the software. The sewing foot pressure can Sewing foot pressure be adjusted to different material thicknesses by the software.
- Page 88 Programming Commander DELTA 5.6.3.1 Setting the Bobbin monitor mode parameters The amount of remaining thread on the bobbin can be monitored optically or by software using this setting. Menu item Setting option 1 Setting option 2 Value range Monitor Sewing stop Monitor mode can only be used if On/Off the additional equipment of the...
- Page 89 Programming Commander DELTA Menu item Setting option 1 Setting option 2 Value range Software / Stitch Counter Counter Type In Software mode, the bobbin is A/B/C/D monitored by the software based on the number of stitches sewn. 4 different counters can be applied. The following 3 subitems can be set for each of the counters.
- Page 90 Programming Commander DELTA 5.6.3.2 Setting the Correction speed effect parameters Some parameters are affected by high speeds because of the resulting physical effects. To counteract these effects and to achieve consistent results, even at high speeds, adjustment factors can be set depending on the speed. Overview of settings modes The correction of the effects of high speeds can be identified in various modes and responded to depending on the setting.
- Page 91 Programming Commander DELTA Setting options Stitch length Menu item Setting 1 Setting 2 Maximum stitch length linear Stitch length Value range -50 – 50 [%] variation reached at the upper speed limit. Speed at which the Min. increase/reduction of stitch sewing speed Value range length should start.
- Page 92 Programming Commander DELTA Setting options Needle thread tension Menu item Setting 1 Setting 2 Maximum needle thread linear Needle thread tension reached at the tension Value range 00 – 99 upper speed limit. Speed at which the Min. increase in needle thread sewing speed Value range tension should start.
- Page 93 Programming Commander DELTA Setting options Sewing foot pressure Menu item Setting 1 Setting 2 Maximum sewing foot linear Sewing foot pressure Value range 00 – 20 pressure reached at the upper speed limit. Speed at which the Min. increase in sewing foot sewing speed Value range pressure should start.
- Page 94 Programming Commander DELTA 5.6.3.3 Setting the Material thickness detection parameters To achieve consistently good sewing results for different material thicknesses, some parameters can be adjusted specifically to the material thickness. Overview of settings modes The material thickness can be identified in various modes and responded to depending on the setting.
- Page 95 Programming Commander DELTA Setting options Sewing foot stroke Menu item Setting 1 Setting 2 Maximum sewing foot linear Sewing foot stroke Value range 00 – 09 [mm] stroke reached at the upper material thickness limit. Material thickness at which Min. Material the increase in sewing foot thickness Value range 00.0 –...
- Page 96 Programming Commander DELTA Setting options Stitch length Menu item Setting 1 Setting 2 Maximum stitch length linear Stitch length Value range -50 – 50 [%] variation reached at the upper material thickness limit. Material thickness at which Min. Material the increase/reduction of thickness Value range 00.0 –...
- Page 97 Programming Commander DELTA Setting options Needle thread tension Menu item Setting 1 Setting 2 Maximum needle thread linear Needle thread tension Value range 00 – 99 tension reached at the upper material thickness limit. Material thickness at which Min. Material the increase in needle thickness Value range 00.0 –...
- Page 98 Programming Commander DELTA Setting options Max. sewing speed Menu item Setting 1 Setting 2 Maximum speed reached linear Max. at the upper material sewing speed Value range 0000 – 4000 thickness limit. Material thickness at which Min. Material the increase in sewing thickness Value range 00.0 –...
-
Page 99: Setting The Segment Begin Parameters
Programming Commander DELTA 5.6.4 Setting the Segment Begin parameters There are various options for setting the Segment Begin parameters. The following table lists all possible options. Settings that are more complex and therefore require further explanation are described in more detail after the table. Icon Parameter Setting... - Page 100 Programming Commander DELTA Icon Parameter Setting On/Off Stitch length default If this function is active, the same stitch length is used for the bartack as the one Stitch length of stitches set in Manual mode. If this function is forward deactivated, a custom input can be Value range entered.
- Page 101 Programming Commander DELTA Icon Parameter Setting On/Off First bartack section The 1 section of the bartack can be Number of stitches programmed with a different number of Value range stitches. All subsequent sections have 01 - 50 the preset number of stitches from the settings for the start bartack.
-
Page 102: Setting The Segment Parameters
Programming Commander DELTA 5.6.5 Setting the Segment parameters There are various options for setting the parameters in the segment. The following table lists all possible options. Settings that are more complex and therefore require further explanation are described in more detail after the table. Icon Parameter Setting... -
Page 103: Setting The Segment End Parameters
Programming Commander DELTA 5.6.6 Setting the Segment End parameters There are various options for setting the parameters at the segment end. The following table lists all possible options. Settings that are more complex and therefore require further explanation are described in more detail after the table. Icon Parameter Setting... - Page 104 Programming Commander DELTA Icon Parameter Setting On/Off Stitch length default If this function is active, the same stitch length is used for the bartack as the one set in Manual Stitch length of mode. If this function is deactivated, a custom stitches forward input can be entered.
-
Page 105: Using Bobbin Wind Mode
Programming Commander DELTA Icon Parameter Setting On/Off First bartack section The 1 section of the bartack can be programmed Number of stitches with a different number of stitches. All subsequent Value range sections have the preset number of stitches from 01 - 50 the settings for the start bartack. -
Page 106: Using Automatic Mode
Programming Commander DELTA Using Automatic mode Automatic mode is comprised of all stored programs. To access the Automatic mode: Tap the symbol to bring up the navigation pane. This opens the navigation interface. Fig. 55: Using Automatic mode (1) ①... - Page 107 Programming Commander DELTA Fig. 56: Using Automatic mode (2) Explanations of icons/symbols in Automatic mode: Symbol/Icon Meaning Selected program Move to the next or previous step in seams/ segments - also during the seam Abort a seam program Seam/segment including information on the settings for seam beginning, seam and seam Display of the entire program including its seams and segments.
-
Page 108: Sewing In Automatic Mode
Programming Commander DELTA Symbol/Icon Meaning Adjustment factors that can still be adjusted during the seam Grayed-out tiles for information on the set parameters can be adjusted by programming ( p. 108). Dark gray tiles can only be activated or deacti- vated. -
Page 109: Canceling A Program In Automatic Mode
Programming Commander DELTA Possible actions in the course of the seam The following table lists the functions that can be performed in the course of the seam. Button/Pedal Function Go to the next or previous step in the seams/ segments Push the Lift sewing foot. -
Page 110: Using Programming Mode
Programming Commander DELTA Using Programming mode Programming mode allows you to create new programs and copy and adjust existing programs. To access Programming mode: Tap the symbol to bring up the navigation pane. This opens the navigation interface. Fig. 58: Using Programming mode (1) ①... -
Page 111: Managing Programs
Programming Commander DELTA 5.8.1 Managing programs You can create, delete and copy programs. Managing the items is quick and easy thanks to the buttons listed below. Create a new program Delete a selected program Copy and insert a program Search for a program name 5.8.2 Managing seams You can create, delete and copy seams. -
Page 112: Editing The Segments Of A Seam
Programming Commander DELTA 5.8.3 Editing the segments of a seam This section allows you to set the parameters for the current seam. To edit the segments of a seam: Tap on the desired seam. The seam is highlighted in blue. Fig. -
Page 113: Managing Segments
Programming Commander DELTA 5.8.4 Managing segments You can create, delete and copy segments. Managing the items is quick and easy thanks to the buttons listed below. Edit segments Add segment Delete segment Copy and insert a segment 5.8.5 Setting program parameters There are various options for setting the cross-program parame- ters. - Page 114 Programming Commander DELTA Icon Parameter Setting Value range Gap (2 value) 01.0 – 45.0 [mm] The 2 value for the gap can be switched on using a button on the push button panel or the tile on the control panel. Program Cycle Next program A subsequent program can be defined.
- Page 115 Programming Commander DELTA Icon Parameter Setting Counter mode Off/Up/Down Daily piece counter, can be set to count either up or down. Reset When the daily piece counter is activated, it must be reset once after entering a value to ensure it counts correctly.
- Page 116 Programming Commander DELTA Icon Parameter Setting The stitch length changes slightly Stitch length depending on the material thickness. For this reason, the stitch length can be adjusted to different material thicknesses by the software. Depending on the material thickness, Needle thread tension the needle thread tension can be adjusted to different material thicknesses by the software.
- Page 117 Programming Commander DELTA 5.8.5.1 Setting the Bobbin monitor mode parameters The amount of remaining thread on the bobbin can be monitored optically or by software using this setting. Menu item Setting 1 Setting 2 Value range Monitor Sewing stop Monitor mode can On/Off only be used if the additional equipment...
- Page 118 Programming Commander DELTA Menu item Setting 1 Setting 2 Value range Software / Counter Type A/B/C/D Stitch Counter In Software mode, the bobbin is moni- tored by the software 4 different counters can be based on the num- applied. The following 3 sub- ber of stitches sewn.
- Page 119 Programming Commander DELTA 5.8.5.2 Setting the Correction speed effect parameters Some parameters are affected by high speeds because of the resulting physical effects. To counteract these effects and to achieve consistent results, even at high speeds, adjustment factors can be set depending on the speed. Overview of settings modes The correction of the effects of high speeds can be identified in various modes and responded to depending on the setting.
- Page 120 Programming Commander DELTA Setting options Stitch length Menu item Setting 1 Setting 2 Maximum stitch length linear Stitch length Value range -50 – 50 [%] variation reached at the upper speed limit. Speed at which the Min. sewing speed Value range increase/reduction of stitch 0000 –...
- Page 121 Programming Commander DELTA Setting options Needle thread tension Menu item Setting 1 Setting 2 Maximum needle thread linear Needle thread tension reached at the tension Value range 00 – 99 upper speed limit. Speed at which the Min. sewing speed Value range increase in needle thread 0000 –...
- Page 122 Programming Commander DELTA Setting options Sewing foot pressure Menu item Setting 1 Setting 2 Maximum sewing foot linear Sewing foot pressure Value range 00 – 20 pressure reached at the upper speed limit. Speed at which the Min. sewing speed Value range increase in sewing foot 0000 –...
- Page 123 Programming Commander DELTA 5.8.5.3 Setting the Material thickness detection parameters To achieve consistently good sewing results for different material thicknesses, some parameters can be adjusted specifically to the material thickness. Overview of settings modes The material thickness can be identified in various modes and responded to depending on the setting.
- Page 124 Programming Commander DELTA Setting options Sewing foot stroke Menu item Setting 1 Setting 2 Maximum sewing foot linear Sewing foot stroke Value range 00 – 09 [mm] stroke reached at the upper material thick- ness limit. Material thickness at Min. Material thickness Value range 00.0 –...
- Page 125 Programming Commander DELTA Setting options Stitch length Menu item Setting 1 Setting 2 Maximum stitch length linear Stitch length Value range -50 – 50 [%] variation reached at the upper material thick- ness limit. Material thickness at Min. Material thickness Value range 00.0 –...
- Page 126 Programming Commander DELTA Setting options Needle thread tension Menu item Setting 1 Setting 2 Maximum needle linear Needle thread tension Value range 00 – 99 thread tension reached at the upper material thickness limit. Material thickness at Min. Material thickness Value range 00.0 –...
-
Page 127: Setting The Seam Begin/Segment Begin Parameters
Programming Commander DELTA Setting options Max. sewing speed Menu item Setting 1 Setting 2 Maximum speed reached linear Max. at the upper material sewing speed Value range 0000 – 4000 thickness limit. Material thickness at Min. Material thickness Value range 00.0 – 10.0 [mm] which the increase in sewing speed should start. - Page 128 Programming Commander DELTA Icon Parameter Setting Value range Stop-Time for direction change The waiting time at the turning points (for 0000 – 1000 [ms] example for a change of sewing direction) is set at this point. A short waiting time in milliseconds should ensure consistent seam quality (ornamental-stitch bartack).
- Page 129 Programming Commander DELTA Icon Parameter Setting On/Off Catch bartack To ensure a safe sewing start and complete sewing of the start bartack, an Number of stitches backwards Value range additional bartack can precede the start 01 - 50 bartack. Only the number of forward and backward Number of stitches forward stitches can be selected.
-
Page 130: Setting The Segment Parameters
Programming Commander DELTA 5.8.7 Setting the Segment parameters There are various options for setting the parameters in the segment. The following table lists all possible options. Settings that are more complex and therefore require further explanation are described in more detail after the table. Icon Parameter Setting... - Page 131 Programming Commander DELTA Icon Parameter Setting Value range Height of sewing foot lift at 00 – 20 [mm] Sewing stop (depending on subclass) Value range Backwards When the parameter is activated, the On/Off section is sewn backwards. Value range Seam Center Guide (only on 2-needle machines, optional On/Off additional equipment)
- Page 132 Programming Commander DELTA 5.8.7.1 Setting the Light barrier parameters The light barrier detects the beginning and the end of the material. After a signal was detected, sewing can continue automatically with the specifically set parameters. Icon Menu item Setting Value range Distance Distance from the detection of the 0 - 255...
-
Page 133: Setting The Segment End/Seam End Parameters
Programming Commander DELTA 5.8.7.2 Setting the Outputs (Output) parameter This parameter provides virtual outputs that can be assigned customer-specific functions. They can be used when customer- specific applications require a signal from the control of the machine. These parameters cannot be used unless the virtual outputs have been assigned to a physical output at the Technician level. - Page 134 Programming Commander DELTA Icon Parameter Setting Value range Number of bartack sections A bartack consists of several sections. 01 - 99 If the sewing direction is changed, a new section is started. The number of sections in a bartack can be set here. Value range Stop-Time for direction change The waiting time at the turning points (for...
- Page 135 Programming Commander DELTA Icon Parameter Setting On/Off Catch bartack To ensure a safe sewing start and complete sewing of the start bartack, an additional Number of stitches backwards Value range bartack can precede the start bartack. 01 - 50 Only the number of forward and backward stitches can be selected.
-
Page 136: Importing/Exporting Programs
Programming Commander DELTA 5.8.8.1 Setting the Sewing stop parameters You can set additional parameters for the Sewing stop. Possible settings and the corresponding value ranges are listed in the table. Icon Menu item Setting option Value range Needle up position On/Off Value range Thread trimmer... -
Page 137: Performing A Software Update
Programming Commander DELTA 5.10 Performing a software update A software update - for control panel or control - is always performed on the control panel. The software of the control is updated automatically whenever a software update is performed for the control panel. The files necessary for updating the control are already included in the file updates of the control panel. - Page 138 Programming Commander DELTA Operating Instructions M-TYPE DELTA - 01.0 - 08/2019...
-
Page 139: Maintenance
Maintenance Maintenance WARNING Risk of injury from sharp parts! Punctures and cutting possible. Prior to any maintenance work, switch off the machine or set the machine to threading mode. WARNING Risk of injury from moving parts! Crushing possible. Prior to any maintenance work, switch off the machine or set the machine to threading mode. -
Page 140: Cleaning
Maintenance Work to be carried out Operating hours Servicing the pneumatic system Setting the operating pressure Draining the water condensation Cleaning the filter element Cleaning WARNING Risk of injury from flying particles! Flying particles can enter the eyes, causing injury. - Page 141 Maintenance Fig. 62: Areas requiring special cleaning ④ ③ ① ② (1) - Area around the needle (3) - Area under the throat plate (2) - Hook (4) - Cutter on the winder Areas particularly susceptible to soiling: • Cutter on the winder for the hook thread (4) •...
-
Page 142: Lubricating
Maintenance Lubricating CAUTION Risk of injury from contact with oil! Oil can cause a rash if it comes into contact with skin. Avoid skin contact with oil. If oil has come into contact with your skin, wash the affected areas thoroughly. NOTICE Property damage from incorrect oil! Incorrect oil types can result in damage to the machine. -
Page 143: Lubricating The Machine Head
Maintenance You can order the lubricating oil from our sales offices using the following part numbers. Container Part no. 250 ml 9047 000011 9047 000012 9047 000013 9047 000014 6.2.1 Lubricating the machine head Proper setting The oil level is between the minimum level marking and the maximum level marking. -
Page 144: Lubricating The Hook
Maintenance 6.2.2 Lubricating the hook CAUTION Risk of injury! Crushing and puncture possible. Only lubricate the hook when the machine is switched off. Carry out function tests with utmost caution when the sewing machine is switched on. The approved oil quantity for hook lubrication is a factory specification. -
Page 145: Servicing The Pneumatic System
Maintenance To lubricate the hook: Turn the screw (1): • counterclockwise: more oil is released • clockwise: less oil is released Important The released amount of oil does not change until the operating time has run a few minutes. Sew for several minutes before you check the setting again. -
Page 146: Draining The Water-Oil Mixture
Maintenance Fig. 65: Setting the operating pressure ① ② (1) - Pressure controller (2) - Pressure gage To set the operating pressure: Pull the pressure controller (1) up. Turn the pressure controller until the pressure gage (2) indicates the proper setting: •... - Page 147 Maintenance Fig. 66: Draining the water-oil mixture ① ② ③ (1) - Filter element (3) - Drain screw (2) - Collection tray To drain the water-oil mixture: Disconnect the machine from the compressed air supply. Place the collection tray under the drain screw (3). Loosen the drain screw (3) completely.
-
Page 148: Cleaning The Filter Element
Maintenance 6.3.3 Cleaning the filter element NOTICE Damage to the paintwork from solvent-based cleaners! Solvent-based cleaners damage the filter. Use only solvent-free substances for washing out the filter tray. Fig. 67: Cleaning the filter element ① ② ③ (1) - Filter element (3) - Drain screw (2) - Collection tray To clean the filter element:... -
Page 149: Parts List
Maintenance Parts list A parts list can be ordered from Dürkopp Adler. Or visit our website for further information at: www.duerkopp-adler.com Operating Instructions M-TYPE DELTA - 01.0 - 08/2019... - Page 150 Maintenance Operating Instructions M-TYPE DELTA - 01.0 - 08/2019...
-
Page 151: Setup
Setup Setup WARNING Risk of injury from cutting parts! Cutting injuries may be sustained while unpacking and setting up the machine. Only qualified specialists may set up the machine. Wear safety gloves WARNING Risk of injury from moving parts! Crushing injuries may be sustained while unpacking and setting up the machine. -
Page 152: Assembling The Stand
Setup Assembling the stand Fig. 68: Assembling the stand ⑧ ① ① ④ ② ⑦ ⑤ ③ ⑥ ④ ⑤ (1) - Inner bar (5) - Foot strut (2) - Holder for oil can (6) - Cross strut (3) - Adjusting wheel (7) - Cross bar (4) - Stand bar (8) - Head section - inner bar... -
Page 153: Assembling The Pedal And Setpoint Device
Setup Assembling the pedal and setpoint device Fig. 69: Assembling the pedal and setpoint device ⑥ ⑤ ① ② 10° ③ ④ (1) - Pedal rod (4) - Pedal (2) - Screw (5) - Setpoint device (3) - Cross strut (6) - Bracket To assemble pedal and setpoint device: Fit the pedal (4) on the cross strut (3) and align it in such... -
Page 154: Tabletop
Setup Tabletop Ensure that the tabletop has sufficient load-bearing capacity and strength. If you want to make your own tabletop, use the dimen- sions given in the diagram Appendix ( p. 197) as a template. 7.5.1 Completing the tabletop The tabletop is optional. Drawings are provided in the appendix to allow you to independently assemble a tabletop (... -
Page 155: Assembling The Tabletop To The Stand
Setup Screw the cable duct (1) to the underside of the tabletop. Insert the reel stand (7) into the hole. Assemble the reel stand (7) with nut and washer. Tighten the thread reel holder and the unwinding bracket on the reel stand (7) in such a way that they are exactly opposite each other. -
Page 156: Setting The Working Height
Setup Setting the working height WARNING Risk of injury from moving parts! The tabletop can sink under its own weight when the screws on the stand bars are loosened. Crushing possible. Ensure that your hands are not jammed when loosening the screws. CAUTION Risk of musculoskeletal damage from incorrect setting! -
Page 157: Assembling The Control
Setup To set the working height: Loosen the screws (1) on the stand bars. Set the tabletop to the desired height. Important Pull out or push in the tabletop evenly at both sides to prevent it from jamming. Tighten the screws (1) on the stand bars. Assembling the control Fig. -
Page 158: Inserting The Machine Head
Setup Inserting the machine head WARNING Risk of injury from moving parts! The machine head is very heavy. Crushing possible. Ensure that your hands are not jammed when inserting the machine head. NOTICE Property damage may occur! Cable may sustain damage and impair the operation of the machine. - Page 159 Setup Fig. 75: Inserting the machine head (2) ③ (3) - Locking mechanism Assemble the locking mechanism (3) to tabletop and machine. Tilt the machine head forward and insert it into the slot in the tabletop. Operating Instructions M-TYPE DELTA - 01.0 - 08/2019...
-
Page 160: Assembling The Tilt Sensor
Setup Assembling the tilt sensor Fig. 76: Assembling the tilt sensor (1) ③ ① ② 1 mm (1) - Sensor (3) - Edge (2) - Magnet Install the tilt sensor as follows: Tilt the machine head. The sensor (1) has been pre-assembled on the machine head. -
Page 161: Changing The Handwheel
Setup Fig. 77: Assembling the tilt sensor (2) The magnet and the sensor face one another when the machine head is erected. 7.10 Changing the handwheel The handwheel that ships with the machine is the large handwheel. The large handwheel can be replaced with the included small handwheel. - Page 162 Setup Fig. 78: Changing the handwheel ① ② ③ ④ ⑤ ⑥ ⑦ (1) - Large handwheel (5) - Small handwheel (2) - Hole (6) - Cover (3) - Screws (7) - Screws (4) - Pin To change the handwheel: Loosen the screws (3).
-
Page 163: Assembling The Knee Button
Setup 7.11 Assembling the knee button Fig. 79: Assembling the knee button ② ① (1) - Knee button (3) - Plug (2) - Connecting cable To assemble the knee button: Screw the knee button (1) in front of the oil pan firmly in place under the tabletop. -
Page 164: Assembling The Oil Extraction Line
Setup 7.12 Assembling the oil extraction line Fig. 80: Assembling the oil extraction line ② ① (1) - Filter (2) - Hose To assemble the oil extraction line: Tilt the machine head. Tighten the filter (1) inside the oil pan with the plastic adapter to the right. -
Page 165: Electrical Connection
Setup 7.13 Electrical connection DANGER Risk of death from live components! Unprotected contact with electricity can result in serious injuries or death. Only qualified specialists may perform work on electrical equipment. Important The voltage on the type plate of the sewing motor must correspond to the mains voltage. -
Page 166: Connecting The Control
Setup Fig. 81: Establishing equipotential bonding ① ② (1) - Control connection (2) - Base plate connection To establish equipotential bonding: Tilt the machine head. Feed the equipotential bonding cable from the connection (1) on the rear side of the control through the slot in the tabletop and fix it in place at the connection of the base plate (2). -
Page 167: Pneumatic Connection (Optional)
Setup 7.14 Pneumatic connection (optional) NOTICE Property damage from oily compressed air! Oil particles in the compressed air can cause malfunctions of the machine and soil the sewing material. Ensure that no oil particles enter the compressed air supply. NOTICE Property damage from incorrect setting! Incorrect system pressure can result in damage to the machine. -
Page 168: Assembling The Compressed Air Maintenance Unit
Setup 7.14.1 Assembling the compressed air maintenance unit Fig. 82: Assembling the compressed air maintenance unit ④ ① ③ ② (1) - Cross bar (3) - Maintenance unit (2) - System connection hose (4) - Machine hose To assemble the compressed air maintenance unit: Assemble the maintenance unit (3) to the upper cross bar (1) of the stand using the bracket, screws and clip. -
Page 169: Setting The Operating Pressure
Setup 7.14.2 Setting the operating pressure NOTICE Property damage from incorrect setting! Incorrect operating pressure can result in damage to the machine. Ensure that the machine is only used when the operating pressure is set correctly. Proper setting Refer to the Technical data ( p. 195) chapter for the permissi- ble operating pressure. -
Page 170: Checking The Lubrication
Setup 7.15 Checking the lubrication All wicks and felt bits of the machine head are soaked in oil at the factory. This oil is conveyed to the reservoir during use. This is why you should avoid filling too much oil during initial filling. Fig. -
Page 171: Decommissioning
Decommissioning Decommissioning WARNING Risk of injury from a lack of care! Serious injuries may occur. ONLY clean the machine when it is switched off. Allow ONLY trained personnel to disconnect the machine. CAUTION Risk of injury from contact with oil! Oil can cause a rash if it comes into contact with skin. - Page 172 Decommissioning Operating Instructions M-TYPE DELTA - 01.0 - 08/2019...
-
Page 173: Disposal
Disposal Disposal CAUTION Risk of environmental damage from improper disposal! Improper disposal of the machine can result in serious environmental damage. ALWAYS comply with the national regulations regarding disposal. The machine must not be disposed of in the normal household waste. - Page 174 Disposal Operating Instructions M-TYPE DELTA - 01.0 - 08/2019...
-
Page 175: Troubleshooting
Troubleshooting 10 Troubleshooting 10.1 Customer Service Contact for repairs and issues with the machine: Dürkopp Adler AG Potsdamer Str. 190 33719 Bielefeld, Germany Tel. +49 (0) 180 5 383 756 Fax +49 (0) 521 925 2594 Email: service@duerkopp-adler.com Internet: www.duerkopp-adler.com 10.2 Messages of the software Code Type Possible cause... - Page 176 Troubleshooting Code Type Possible cause Remedial action 1004 Error Incorrect sewing motor • Replace encoder direction of rotation • Check motor plug assignment and change it if necessary • Check wiring in machine distributor and change it, if necessary • Test motor phases and check for correct value 1005 Error Motor blocked...
- Page 177 Troubleshooting Code Type Possible cause Remedial action 1120 Error Sewing motor Init fault • Perform a software update • Check selection of class 1121 Error Sewing motor watchdog • Perform a software update • Check selection of class 1203 Error Position not reached (during •...
- Page 178 Troubleshooting Code Type Possible cause Remedial action 2173 Error Stepper motor card X30 • Replace control Sewing motor encoder not connected (Stitch length) 2174 Error Stepper motor card X30 • Perform a software update Sewing motor encoder not init • Check selection of class (Stitch length) 2175 Error Stepper motor card X30 Init...
- Page 179 Troubleshooting Code Type Possible cause Remedial action 2187 Error Stepper motor card X30 • Perform a software update transport interval failure • Check selection of class (Stitch length) 2188 Error Stepper motor card X30 • Check for stiff movement Reference drive failure •...
- Page 180 Troubleshooting Code Type Possible cause Remedial action 2274 Error Stepper motor card X40 • Perform a software update Sewing motor encoder not init • Check selection of class (Foot lifting) 2275 Error Stepper motor card X40 Init • Check for stiff movement Position not found (Foot lifting) •...
- Page 181 Troubleshooting Code Type Possible cause Remedial action 2288 Error Stepper motor card X40 • Check for stiff movement Reference drive failure • Replace encoder (Foot lifting) • Replace motor 2301 Error Stepper motor card X50 • Check reference sensor Reference drive failure (Stitch length) 2305 Error Stepper motor card X50...
- Page 182 Troubleshooting Code Type Possible cause Remedial action 2377 Error Stepper motor card X50 • Check for stiff movement Overload (Foot stroke) • Replace encoder • Replace motor 2378 Error Stepper motor card X50 • Replace encoder Encoder failure (Foot stroke) 2379 Error Stepper motor card X50 •...
- Page 183 Troubleshooting Code Type Possible cause Remedial action 2405 Error Stepper motor card X60 • Check for stiff movement stepper motor blockage (Edge guide) 2421 Error Stepper motor card X60 • Connect encoder cable to the control, encoder plug (Sub-D, 9-pin) use the correct interface not connected 2422 Error...
- Page 184 Troubleshooting Code Type Possible cause Remedial action 2479 Error Stepper motor card X60 • Replace control Current sensor failure (Edge guide) 2480 Error Stepper motor card X60 • Replace encoder Incorrect stepper motor • Check if plugs have been mixed up direction of rotation •...
- Page 185 Troubleshooting Code Type Possible cause Remedial action 2521 Error Stepper motor card X70 • Connect encoder cable to the control, encoder plug (Sub-D, 9-pin) use the correct interface not connected 2522 Error Stepper motor card X70 • Check stepper motor 1 for stiff flywheel position not found movement 2530 Error...
- Page 186 Troubleshooting Code Type Possible cause Remedial action 2580 Error Stepper motor card X70 • Replace encoder Incorrect stepper motor • Check if plugs have been mixed up direction of rotation • Check the wiring in the machine (upper Puller) distributor and change it if necessary 2581 Error Stepper motor card X70 •...
- Page 187 Troubleshooting Code Type Possible cause Remedial action 2622 Error Stepper motor card X80 • Check stepper motor 6 for stiff flywheel position not found movement (bottom puller) 2630 Error Stepper motor card X80 not • Perform a software update responding (bottom puller) •...
- Page 188 Troubleshooting Code Type Possible cause Remedial action 2680 Error Stepper motor card X80 • Replace encoder Incorrect stepper motor • Check if plugs have been mixed up direction of rotation • Check the wiring in the machine (bottom puller) distributor and change it if necessary 2681 Error Stepper motor card X80 •...
- Page 189 Troubleshooting Code Type Possible cause Remedial action 3021 Error U24 V short circuit • Disconnect magnet plug; replace control if error is not corrected: Replace control 3022 Error U24 V (I²T) overload • One or several magnets defective 3030 Error Motor phase failure •...
- Page 190 Troubleshooting Code Type Possible cause Remedial action 4430 Warning OP3000: Connection lost • Check connection to OP3000 • Replace OP3000 • Replace control 4440 Error OP3000: DAC receive buffer • Check connection to OP3000 exceeded • Replace OP3000 • Replace control 4441 Warning OP3000: DAC receiver •...
- Page 191 Troubleshooting Code Type Possible cause Remedial action 4456 Warning OP3000: DAC no response • Check connection to OP3000 • Replace OP3000 • Replace control 4460 Warning OP7000 connection lost • Check connection to OP7000 • Replace OP7000 • Replace control 4906 Information Not in translation table •...
- Page 192 Troubleshooting Code Type Possible cause Remedial action 5002 Information Incorrect class or machine ID • Change class connection error • Perform reset 5003 Information Data version is too old • Perform reset 5004 Information Checksum is incorrect • Perform reset 6360 Information No valid data on external •...
- Page 193 Troubleshooting Code Type Possible cause Remedial action 7270 Information External CAN • Check connection cables • Perform a software update • Replace CAN slaves 9310 Error Tape feeder not connected • Check connection cables • Perform a software update • Replace the control of the tape feeder 9320 Error Tape feeder in lowered •...
- Page 194 Troubleshooting Code Type Possible cause Remedial action 9922 Warning Service Stop • Check the Service Stop button • Check 24V • Replace control 9923 Warning Update required • Press OK for Restart or ESC for cancel 9924 Warning Security key generated •...
-
Page 195: Errors In Sewing Process
Troubleshooting 10.3 Errors in sewing process Error Possible causes Remedial action Unthreading Needle thread pretension Check needle thread at seam is too firm pretension ( p. 40). beginning Thread Needle thread and hook Check threading path breaking thread have not been (... - Page 196 Troubleshooting Error Possible causes Remedial action Skip stitches Needle thread and hook Check threading path thread have not been ( p. 25, p. 38). threaded correctly Needle is blunt or bent Replace the needle ( p. 22). Needle is not inserted Insert the needle correctly correctly into the needle into the needle bar...
-
Page 197: Technical Data
Technical data 11 Technical data 11.1 Data and characteristic values Technical data Unit Type of stitches Double lockstitch 301 Hook type vertical (XL), vertical (XXL), vertical vertical (XXL), large extra large (XL), large extra large Number of needles Needle system 134-35 Needle strength [Nm]... -
Page 198: Requirements For Trouble-Free Operation
Technical data 11.2 Requirements for trouble-free operation Compressed air quality must be ensured in accordance with ISO 8573-1: 2010 [7:4:4]. Operating Instructions M-TYPE DELTA - 01.0 - 08/2019... -
Page 199: Appendix
Appendix 12 Appendix 12.1 Wiring diagram Fig. 85: Wiring diagram Operating Instructions M-TYPE DELTA - 01.0 - 08/2019... - Page 200 Appendix Fig. 86: Wiring diagram Operating Instructions M-TYPE DELTA - 01.0 - 08/2019...
- Page 201 Appendix Fig. 87: Wiring diagram Operating Instructions M-TYPE DELTA - 01.0 - 08/2019...
- Page 202 Appendix Fig. 88: Wiring diagram Operating Instructions M-TYPE DELTA - 01.0 - 08/2019...
- Page 203 Appendix Fig. 89: Wiring diagram Operating Instructions M-TYPE DELTA - 01.0 - 08/2019...
- Page 204 Appendix Fig. 90: Wiring diagram " Operating Instructions M-TYPE DELTA - 01.0 - 08/2019...
- Page 205 Appendix Fig. 91: Wiring diagram Operating Instructions M-TYPE DELTA - 01.0 - 08/2019...
- Page 206 Appendix Fig. 92: Wiring diagram Operating Instructions M-TYPE DELTA - 01.0 - 08/2019...
- Page 207 Appendix Fig. 93: Wiring diagram Operating Instructions M-TYPE DELTA - 01.0 - 08/2019...
- Page 208 Appendix Fig. 94: Wiring diagram Operating Instructions M-TYPE DELTA - 01.0 - 08/2019...
- Page 209 Appendix Fig. 95: Wiring diagram Operating Instructions M-TYPE DELTA - 01.0 - 08/2019...
- Page 210 Appendix Fig. 96: Wiring diagram Operating Instructions M-TYPE DELTA - 01.0 - 08/2019...
- Page 211 Appendix Fig. 97: Wiring diagram Operating Instructions M-TYPE DELTA - 01.0 - 08/2019...
- Page 212 Appendix Fig. 98: Wiring diagram Operating Instructions M-TYPE DELTA - 01.0 - 08/2019...
- Page 213 Appendix Fig. 99: Wiring diagram Operating Instructions M-TYPE DELTA - 01.0 - 08/2019...
-
Page 214: Tabletop Drawings
Appendix 12.2 Tabletop drawings Fig. 100: Tabletop Operating Instructions M-TYPE DELTA - 01.0 - 08/2019... - Page 215 Appendix Fig. 101: Tabletop Operating Instructions M-TYPE DELTA - 01.0 - 08/2019...
- Page 216 Appendix Fig. 102: Tabletop Operating Instructions M-TYPE DELTA - 01.0 - 08/2019...
- Page 217 Appendix Fig. 103: Tabletop Operating Instructions M-TYPE DELTA - 01.0 - 08/2019...
- Page 218 Appendix Fig. 104: Tabletop cutout Operating Instructions M-TYPE DELTA - 01.0 - 08/2019...
- Page 220 DÜRKOPP ADLER AG Potsdamer Straße 190 33719 Bielefeld GERMANY Phone +49 (0) 521 / 925-00 E-mail @duerkopp-adler.com www.duerkopp-adler.com...
Need help?
Do you have a question about the M-Type Delta D867 and is the answer not in the manual?
Questions and answers