Polycom RealPresence Group Series User Manual
Hide thumbs
Also See for RealPresence Group Series:
- Reference manual (425 pages) ,
- Administrator's manual (369 pages) ,
- User manual (58 pages)

Subscribe to Our Youtube Channel
Related Manuals for Polycom RealPresence Group Series


Summary of Contents for Polycom RealPresence Group Series
- Page 1 USER GUIDE 5.1.0 | February 2016| 3725-63715-008A Polycom RealPresence Group Series...
- Page 2 Polycom up to three (3) years after the distribution date of the applicable product or software at a charge not greater than the cost to Polycom of shipping or distributing the software to you. To receive software information, as well as the open source software code used in this product, contact Polycom by email at OpenSourceVideo@polycom.com.
-
Page 3: Table Of Contents
Polycom Partner and Solution Resources ........ - Page 4 Polycom People+Content IP ........
- Page 5 Locate the System Serial Number ........34 Polycom, Inc.
- Page 6 Hang Up All Calls ........... . .42 Polycom, Inc.
- Page 7 Polycom People+Content IP ........
- Page 8 Locate the LAN Status ..........61 Polycom, Inc.
- Page 9 Contents Using a Polycom RealPresence Touch Device ......62 Power On the RealPresence Touch ..........62 Wake a RealPresence Group System .
- Page 10 View Call Statistics ............78 Using a Polycom Touch Control Device ....... . .79 Power On the Polycom Touch Control .
- Page 11 View Scheduled Meetings on the Calendar ....... . .85 Contact Presence States on the Polycom Touch Control ..... . .85 Content .
- Page 12 Move the Camera to a Stored Preset ........98 Using a Polycom SoundStation IP 7000 Conference Phone ....99 Answer a Call with a Connected SoundStation IP .
-
Page 13: Before You Begin
RealPresence Group systems. Please read the Polycom RealPresence Group Series documentation before you operate the system. The following related documents for RealPresence Group Series systems are available from Polycom Support: ● Polycom RealPresence Group Series Software, Options, and Accessories Installation Guide which describes how to install Polycom RealPresence Group systems and accessories ●... -
Page 14: The Polycom Community
Participate in discussion forums to share ideas and solve problems with your colleagues. To register with the Polycom Community, simply create a Polycom online account. When logged in, you can access Polycom support personnel and participate in developer and support forums to find the latest information on hardware, software, and partner solutions topics. -
Page 15: Getting Started With Polycom Realpresence Group Series
RealPresence Group system. It is important to note that RealPresence Group Series systems do not have what you might think of as a power button—they have a power proximity sensor. Instead of pressing an actual button that moves, touch the sensor (or near the sensor) that indicates power on the front of the system. -
Page 16: System Health Check
Getting Started with Polycom RealPresence Group Series System Health Check After being powered on, the system automatically performs a system health check. This process is known as a power on self test (POST). The status of the POST sequence is shown using the LED indicator light on the front of the device, or in the text field display on the front of the system. -
Page 17: Using A Polycom Realpresence Group Series Remote Control
Using a Polycom RealPresence Group Series Remote Control The infrared RealPresence Group Series remote control allows you to operate a RealPresence Group Series system. This includes placing calls, adjusting the volume, zooming the camera, navigating screens, and more. RealPresence Group Series systems and EagleEye cameras have infrared receivers. You can control your RealPresence Group Series system by pointing the remote control toward a RealPresence Group Series system or a connected EagleEye camera. -
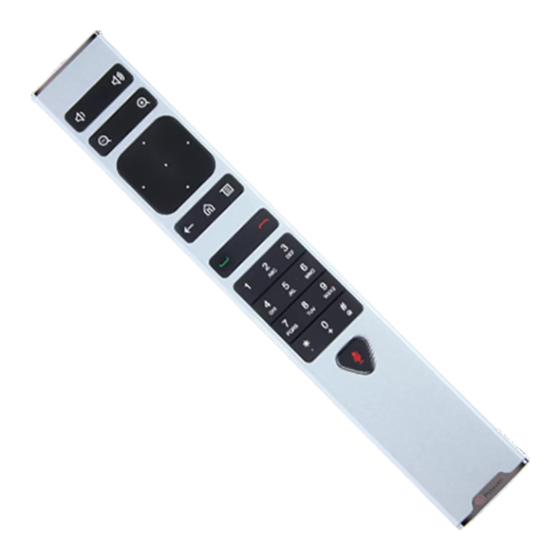
Page 18: Remote Control Buttons And Descriptions
Using a Polycom RealPresence Group Series Remote Control Remote Control Buttons and Descriptions Descriptions of the remote control parts are shown next. Remote Control Button Descriptions Parts of the Remote Control Number Description LED IR emitter Decrease speaker volume. Increase speaker volume. -
Page 19: Recharge The Remote Control Battery
Using a Polycom RealPresence Group Series Remote Control Recharge the Remote Control Battery Your system setup sheet shows how to charge the battery in the remote control the first time. When the remote control battery power is at 10% or less, a notification displays on the RealPresence Group system Home screen. -
Page 20: Contact Presence States
LDAP group members and up to 200 global contacts stored by the presence service. Polycom systems registered to Microsoft Lync 2013 or Skype for Business Server 2015 in an integrated environment use the following colors to indicate presence states. -
Page 21: Calling
Using a Polycom RealPresence Group Series Remote Control 1 With your remote control, press , then select 2 To enter a name in the search field, do one of the following: Enter the name using the onscreen keyboard. Use the text-entry method commonly used with cell phones to select letters directly on your remote control. -
Page 22: Call From The Contacts Screen
Using a Polycom RealPresence Group Series Remote Control 2 In the dialing field, enter the dialing information as follows: Numbers: To enter numbers, select each number on the keypad with the remote control or enter numbers. Letters: To enter letters, select Keyboard. Then use your remote control to select each letter on the onscreen keyboard. -
Page 23: Ignore A Call
Using a Polycom RealPresence Group Series Remote Control If the Polycom RealPresence Group system is not configured to answer incoming calls automatically, you are prompted to answer manually. » Using your remote control, select Answer or press Ignore a Call If the Polycom RealPresence Group system does not answer incoming calls automatically, you are prompted to answer manually. -
Page 24: Hang Up All Calls And Answer A Call
Using a Polycom RealPresence Group Series Remote Control Hang Up All Calls and Answer a Call When Auto Answer Point-to-Point Video is set to No, you can add an incoming call to the conference. » Select Hang Up + Answer to hang up all active and held calls and establish a point-to-point call with the incoming call. -
Page 25: Hold And Answer A Call In A Conference
Using a Polycom RealPresence Group Series Remote Control ● Automatically answered: The incoming call is automatically added to the conference call. No notification appears. ● Manually answered: You can select Ignore, Hold+Answer, or Hang up+Answer. ● Declined: The system declines incoming calls. No notification appears, but the declined system receives a notification. -
Page 26: Hang Up All Calls
Using a Polycom RealPresence Group Series Remote Control Hang Up All Calls When you are in a conference call, you can hang up one call at a time or hang up all calls at once. 1 Using your remote control, press 2 Select Leave Conference. -
Page 27: Microsoft Meetings
Using a Polycom RealPresence Group Series Remote Control Microsoft Meetings If your system is deployed in a Lync Server 2013 or Skype for Business 2015 environment, you can place and participate in multipoint calls that are hosted by Microsoft audio and video servers. -
Page 28: Content Connections Of Realpresence Group Systems
● Any information stored on a computer connected directly to a RealPresence Group system or a Polycom touch device ● A DVD or DVR player connected directly to a Polycom system ● Content from the Polycom People+Content™ IP application (installed on a computer and connected to the Polycom RealPresence Group system) ● VisualBoard This section describes how to share content using a connected computer or People+Content IP. - Page 29 Using a Polycom RealPresence Group Series Remote Control Figure 2: Connections for RealPresence Group 310 and 500 systems Figure 3: Connections for a RealPresence Group 700 system Polycom, Inc.
-
Page 30: Show Content From A Computer Connected To Realpresence Group System
● Your computer resolution can be set to anything, but People+Content IP scales the image to 1024x768 or 1280x720. Note: For a computer connected directly to the RealPresence Group system, Polycom recommends using the Send Computer button or Content button instead of People+Content IP. -
Page 31: Download And Install People+Content Ip
You need to download and install the People+Content IP application on a computer before you can use it to show content. 1 On a computer, go to the Polycom People+Content IP page. 2 Under Resources, download the People+Content IP software for Mac or PC. -
Page 32: Control Microsoft Content
Depending on how your system is configured, you can record calls in one or more ways. RealPresence Group 700 systems allow you to record calls using monitor 3. If you have a different RealPresence Group system, you can record calls using Polycom RealPresence Media Suite. -
Page 33: Realpresence Media Suite Connection Methods
Using a Polycom RealPresence Group Series Remote Control ● Dial a RealPresence Media Suite Video Recording Room (VRR): A VRR is a virtual Capture Server with a specific recording profile that is defined by a RealPresence Media Suite administrator. Before recording a call using this method, you need the VRR number and the IP address, H.323 ID, or SIP address of the RealPresence Media Suite. -
Page 34: Record On Realpresence Media Suite
Using a Polycom RealPresence Group Series Remote Control TVUI State Operation Touch Tone Code Menu display state Pause recording Start a recording Resume a paused recording Stop a recording Playback a recording Video playback state Pause the video Start the video... -
Page 35: Use The Remote Control To Manage The Realpresence Media Suite
Using a Polycom RealPresence Group Series Remote Control Use the Remote Control to Manage the RealPresence Media Suite 1 Point the remote control toward the RealPresence Group system. 2 Using the remote control, press the appropriate selection button (Left, Up, or Right) that corresponds to the far end control shown on the TVUI (Record Start/Stop, Confirm/Pause, or Play) that you want to activate. -
Page 36: Video Adjustments
RealPresence Group system. Use backlight compensation in situations where the subject appears darker than the background. Enabling this setting helps to darken a bright background, which can impact the tracking performance of the Polycom EagleEye Director. -
Page 37: Stop Video
Using a Polycom RealPresence Group Series Remote Control 3 Select Backlight Compensation. Stop Video Sometimes, you want to stop sharing your video whether in or out of a call. Stopping your video allows you to stop sending your near-end camera-encoded video while still remaining connected to the conference. -
Page 38: Multipoint Viewing Modes
Using a Polycom RealPresence Group Series Remote Control Multipoint Viewing Modes The multipoint viewing mode configured on the host system is the one used in the call for all endpoints in the call. The default mode is Discussion, however, your administrator might have configured one of the other modes for your system. -
Page 39: Change Multipoint Viewing Layout
● Muting the microphone does not mute audio coming from any device connected to the content audio inputs. ● The red mute indicator on the front of the Polycom EagleEye View camera is lit when the system is muted or when a Polycom microphone is connected and muted. -
Page 40: Cameras
After you select a camera, you can make some adjustments to enhance the view. Note: Before you can adjust the EagleEye Director camera, you must turn camera tracking off. To adjust a Polycom EagleEye III, Polycom EagleEye IV, Polycom EagleEye Acoustic, or Polycom EagleEye Director using the remote control: 1 Select either a near-end or far-end video source to control. -
Page 41: Disable Eagleeye Director Tracking In A Call
Using a Polycom RealPresence Group Series Remote Control Note: Changing this setting takes effect immediately, even if a call is in progress. 1 From the Home screen, press 2 Do one of the following: While in a call, select More >... -
Page 42: View Stored Camera Presets
Using a Polycom RealPresence Group Series Remote Control ● Quickly point a camera at pre-defined locations in a room. ● Select a video source such as a document camera or an auxiliary camera. If your system camera supports pan, tilt, and zoom movement, you can create up to 10 preset camera positions for the near-end camera. -
Page 43: Move The Camera To A Stored Preset
Using a Polycom RealPresence Group Series Remote Control Move the Camera to a Stored Preset After you have your presets stored, move the camera to one of the stored presets. 1 If you are in a call, press Select on the remote control to switch between a near-end site (Your Camera) or far-end site (Their Camera) camera. -
Page 44: Encryption And Security
If encryption is required on your system, the far end must support encryption or the call will not be completed. Note: To avoid security risks, Polycom recommends that all participants communicate the state of their padlock icons verbally at the beginning of a call. -
Page 45: Change The Call Security Level
Make a Test Call To troubleshoot any issues making video calls, call a Polycom video site to test your setup. A list of worldwide test numbers is available at www.polycom.com/videotest. When placing test calls, try these ideas: ●... -
Page 46: System Information
System Information > Status > Active Alerts. For more details, use the remote control to select More Information. If a severe error occurs during startup, the system does not power on. Contact Polycom your administrator. Locate the Software Version You can view the software version on the local interface of the RealPresence Group system. -
Page 47: Locate The Ip Address And H.323 Extension Settings
● Polycom RealPresence Group 500 System (Model: Group 500; Type: P001) ● Polycom RealPresence Group 700 System (Model: Group 700; Type: P002) For more regulatory information, refer to Polycom RealPresence Group Series Regulatory Notices at support.polycom.com. Caution: If you have an EagleEye Acoustic camera, be sure to use it only with UL-approved Information Technology Equipment (ITE) or similarly approved equipment. -
Page 48: Using The Touch User Interface
RealPresence Group systems now have touch user interface capability when connected to touch-capable monitors. This interface works with both your RealPresence Group series remote control and by touch. You can use the touch interface to control the RealPresence Group system, the VisualBoard application, or to manage Microsoft Lync or Skype for Business remote desktop content. -
Page 49: Contacts
LDAP group members and up to 200 global contacts stored by the presence service. Polycom systems registered to Microsoft Lync 2013 or Skype for Business Server 2015 in an integrated environment use the following colors to indicate presence states. -
Page 50: Calling
● IPv4 address: 10.11.12.13 ● E.164 extension for H.323 or SIP: 2555 ● Host name: stereo.polycom.com ● SIP address: user@domain.com 1 On the Home screen, tap Place a Call. The Place a Call screen displays with the onscreen numeric keyboard. -
Page 51: Call From The Recent Calls List
Tap Hang Up + Answer. Ignore a Call If you do not want to answer an incoming call when you are in a call or not in a call, you can choose to ignore the incoming call. Polycom, Inc. -
Page 52: Hold A Call And Place A Call
When Auto Answer Point-to-Point Video is set to No, you can end an active call and answer an incoming call. Held calls will remain on hold until resumed. » From the incoming call options, select Hang Up + Answer. Polycom, Inc. -
Page 53: Multipoint Conference Calls
When the system is in a call, regardless of whether the system has multipoint capability, incoming calls are handled in one of three ways. ● Automatically answered: The incoming call is automatically added to the conference call. No notification appears. Polycom, Inc. -
Page 54: Answer An Incoming Call During A Multipoint Call
In a multipoint conference call, you can hang up all of the calls at once. 1 Tap to open the Quick Access menu then tap Hang Up. 2 On the Active Call screen, tap Hang Up at the top of the screen above the list of individual calls. Polycom, Inc. -
Page 55: Enter A Meeting Password
Microsoft Exchange Server. Contact your administrator to register the system. Note: Endpoints using Microsoft Office 365 accounts must be SIP-registered to Microsoft Lync 2013 or Skype for Business Server 2015 in order to join calendar meetings. Polycom, Inc. -
Page 56: View Meeting Details
Contacts, Speed Dials, or Recent contacts. 1 From the Call screen, tap to open the Quick Access menu then tap More > Add Partici- pant. 2 Enter a number to call, or choose a contact from Recent, Speed Dial, or Contacts. Polycom, Inc. -
Page 57: Content
You need to download and install the People+Content IP application on a computer before you can use it to show content. 1 On a computer, go to the Polycom People+Content IP page. 2 Under Resources, download the People+Content IP software for Mac or PC. -
Page 58: Visualboard
You can use the VisualBoard application in a call and out of a call. When using a touchscreen monitor, you can annotate content using your finger, a stylus, or a connected USB mouse. Refer to the Polycom VisualBoard Technology Application User Guide for more information on using the VisualBoard application. -
Page 59: Undo Annotations
800 x 600 56, 60, 72, 75, 85 1024 x 768 60, 70, 75, 85 1280 x 720 50, 60 1280 x 768 1280 x 1024 60, 75 1600 x 1200 1680 x 1050 1920 x 1080 1920 x 1200 Polycom, Inc. -
Page 60: Stop Content From A Laptop Or Tablet
Stop Content from a USB Flash Drive When you done showing content, make sure to stop sharing content before disconnecting the USB drive. 1 Tap to open the Quick Access menu. 2 Tap Content, and tap Stop Content. Polycom, Inc. -
Page 61: Scroll And Zoom Microsoft Content
Depending on how your system is configured, you can record calls in one or more ways. RealPresence Group 700 systems allow you to record calls using monitor 3. If you have a different RealPresence Group system, you can record calls using Polycom RealPresence Media Suite. -
Page 62: Realpresence Media Suite Connection Methods
Using the Touch User Interface Manage Recordings with Polycom RealPresence Media Suite ® ® Polycom RealPresence Media Suite is an enterprise recording, streaming, and video content management solution. This solution offers you a self-service portal for recording calls on a room system, or for turning a room system into a web-cast studio. -
Page 63: Record Calls With Realpresence Media Suite
Before ending a call, make sure to stop the recording. » Do one of the following: Press *3 on the remote control. Tap to open the Quick Access menu, tap More > Touch Tones, and enter *3 on the onscreen dial pad. Polycom, Inc. -
Page 64: Record Calls With A Laptop Or Tablet
The layout option for the recorded video is the layout that your administrator configured for Monitor 3. Settings Before or during calls, you can adjust audio and video settings, including adjusting the volume, muting the microphone, turning off the camera, and changing the video layout. Polycom, Inc. -
Page 65: Adjust For Room Lighting
1 Tap to open the Quick Access menu, tap More > Settings then tap User Settings > Meetings. 2 Set Auto Answer Point-to-Point Video or Auto Answer Multipoint Video to Yes. Polycom, Inc. -
Page 66: Configure Automatic Self View Control
Note: The default setting is to not allow video display on the web. Be sure to verify whether your system administrator wants the setting to be changed. 1 Tap to open the Quick Access menu, tap More > Settings then tap User Settings > Meetings. 2 Tap Allow Video Display on Web. Polycom, Inc. -
Page 67: Start Sending Video
Home screen during a call if, for example, you need to adjust a user setting and your system is configured to allow you to do so. 1 Press the Home key on the remote control to go to the Home screen. 2 Press the Back key on the remote control to see the full screen. Polycom, Inc. -
Page 68: Multipoint Viewing Modes
● Select a video source such as a document camera or an auxiliary camera. If your system camera supports pan, tilt, and zoom movement, you can create up to 10 preset camera positions for the near-end camera. Each preset stores the following information: ● Camera number Polycom, Inc. -
Page 69: View Stored Presets
Quick Access menu, then tap Presets. Tap and hold a preset for one second. After five seconds, a snap shot is taken and set for the camera preset. Audio Adjustments You can control several audio settings on the system, including adjusting the volume and muting the microphone. Polycom, Inc. -
Page 70: Adjust The Volume
Quick Access menu. 2 Tap Mute. Unmute the Microphone You can resume your microphone audio after muting it in order to be heard in a call. 1 Tap to open the Quick Access menu. » Tap Unmute to resume audio. Polycom, Inc. -
Page 71: Encryption And Security
Note that in externally-hosted multipoint calls, check code numbers do not match any other numbers in the call.Polycom recommends verifying check codes at each site to protect against third-party eavesdropping on H.323 point-to-point calls. -
Page 72: Change The Call Security Level
Make a Test Call To troubleshoot any issues making video calls, call a Polycom video site to test your setup. A list of worldwide test numbers is available at www.polycom.com/videotest. When placing test calls, try these ideas: ●... -
Page 73: Locate The Ip Address And H.323 Extension Settings
Quick Access menu, then tap Settings > System Information > Status > Active Alerts for messages generated by your system. Locate the LAN Status You can view the LAN status on the local interface. » Tap to open the Quick Access menu, then tap Settings >System Information >Status > LAN. Polycom, Inc. -
Page 74: Using A Polycom Realpresence Touch Device
Besides all of the expected call controls, RealPresence Touch offers a USB port for content input and the ability to activate the VisualBoard application. For more information about usingRealPresence Touch for basic tasks, refer to the Polycom RealPresence Group Series Quick Tips. Your administrator configures and pairs the RealPresence Touch. For assistance with pairing or other administration tasks, contact your administrator. -
Page 75: Power On The Realpresence Touch
If you want to use a RealPresence Touch with your RealPresence Group system, you must first power it on. For detailed instructions, refer to the Polycom RealPresence Touch Control Setup Sheet. » Connect the Ethernet cable to the RealPresence Touch. The splash screen displays first, and then the Home screen displays. -
Page 76: Call Using Recent Calls
Using a Polycom RealPresence Touch Device Call by Entering a Name or Number You can place a direct call by entering the name or number using the RealPresence Touch. 1 From the Home screen, tap Place a Call. 2 On the Place a Call screen, enter the number or name to call in the input field. To use a keyboard to... -
Page 77: Decline A Call
Using a Polycom RealPresence Touch Device » Touch Answer to answer an incoming call. Decline a Call You can choose to decline an incoming call using the RealPresence Touch. If your administrator has configured your room system to automatically answer point-to-point calls, no action is required. -
Page 78: End A Call
Using a Polycom RealPresence Touch Device End a Call You can end a call using the RealPresence Touch. » To end a call, tap Hang Up. Multipoint Conference Calls Conference, or multipoint, calls involve at least three different endpoints. During a multipoint call, multiple sites can see and hear each other. You can also share content in a multipoint call, just as you can in a point-to-point call. -
Page 79: Incoming Call Handling Of Multipoint Conference Calls
Using a Polycom RealPresence Touch Device Place a Multipoint Call by Adding Participants You can add participants to a multipoint conference call. 1 Using your preferred dialing method, call the first site. 2 To dial the next site, do one of the following: ... -
Page 80: Switch Between Calls In A Multipoint Call
Using a Polycom RealPresence Touch Device Hang Up All Calls You can hang up all calls in a multipoint conference. » From the Manage Conference screen, tap Hang Up. From any other screen, tap Menu, tap Active Call, and then Hang Up. -
Page 81: View Scheduled Meetings On The Calendar
● Any information stored on a computer connected directly to a RealPresence Group system or a Polycom touch device ● A DVD or DVR player connected directly to a Polycom system ● Content from the Polycom People+Content™ IP application (installed on a computer and connected to the Polycom RealPresence Group system) ● VisualBoard This section describes how to share content using a connected computer or People+Content IP. -
Page 82: Content Connections Of Realpresence Group Systems
Using a Polycom RealPresence Touch Device When you are showing content, a message appears on your main monitor. Whether you also see the content on your monitor depends on how your system is configured. Note: To show content on a RealPresence Group 300 system, you must use the People+Content IP appli- cation. -
Page 83: Show Content From A Connected Computer
Using a Polycom RealPresence Touch Device Figure 2: Connections for a RealPresence Group 700 system Show Content from a Connected Computer After you connect a USB cable from your computer to the RealPresence Touch, you can share content from the computer to the RealPresence Group system monitor display. -
Page 84: Stop Sharing Content From A Connected Computer
Out of a Call: On the RealPresence Touch, from the Home screen, tap Show Content. 2 Under VisualBoard, tap Show Content. The VisualBoard application displays on the paired room system monitor. For information on using ® the VisualBoard application to annotate content, refer to Polycom VisualBoard™ Technology ® ® Application with Polycom RealPresence Group Series User Guide. -
Page 85: Mute The Microphone
Using a Polycom RealPresence Touch Device Mute the Microphone You can mute your microphone and listen to the far-end call audio using the RealPresence Touch. 1 From the Home screen, tap the Control bar at the bottom of the RealPresence Touch screen. -
Page 86: Control The Brightness
Using a Polycom RealPresence Touch Device 4 Select a layout from the available choices. Any layout changes are made immediately. ® ® Note: If you are not in a RealPresence Collaboration Server (RMX ) system call, your only layout screen option is PIP Layout. -
Page 87: Turn On Camera Tracking
Using a Polycom RealPresence Touch Device 3 On the Camera Control screen, tap the arrow buttons to pan the camera up, down, left, or right. Tap the plus sign to zoom the camera in; tap the minus sign to zoom the camera out. -
Page 88: Stop Video
Make a Test Call To troubleshoot any issues making video calls, call a Polycom video site to test your setup. A list of worldwide test numbers is available at www.polycom.com/videotest. When placing test calls, try these ideas:... -
Page 89: View Device Details For A Realpresence Touch
Using a Polycom RealPresence Touch Device ● Make sure the number you dialed is correct, then try the call again. For example, you might need to dial 9 for an outside line or include a long distance access or country code. -
Page 90: View Call Statistics
Using a Polycom RealPresence Touch Device View Call Statistics During a call, you can view certain call statistics, such as bitrates, compression formats, and packet loss on the RealPresence Touch. 1 During a call, on any screen, tap Call Statistics (located at the top left of your screen). Call statistics for each stream in the current call are now displayed. -
Page 91: Using A Polycom Touch Control Device
Power On the Polycom Touch Control If you want to use a Polycom Touch Control with your RealPresence Group system, you must first power it » To power on the Polycom Touch Control, connect the LAN cable to the underside of the device. -
Page 92: Using The Polycom Touch Control As A Virtual Remote Control
Polycom Touch Control screen. After you are disconnected, you can use a virtual remote control on the Polycom Touch Control to access the RealPresence Group system until the connection is restored. The virtual remote control sends IR signals across the room, so make sure the back of the Polycom Touch Control is facing the RealPresence Group system camera. -
Page 93: Calling
Using a Polycom Touch Control Device Disconnect a Polycom Touch Control from a RealPresence Group System The connection pairing with the Polycom Touch Control persists until you either disconnect or power off the RealPresence Group system. 1 On the Home screen, touch then touch the RealPresence Group Series System tab. -
Page 94: Call From The Recent Calls List
After you complete a call, you can resume the call you had on hold. » On the Polycom Touch Control, touch Hold. When a call is on hold, On Hold appears on the RealPresence Group system screen for 5 seconds. -
Page 95: Switch Between Calls
Using a Polycom Touch Control Device Hold a Call and Answer a Call At times, you might need to place a call on hold and answer an incoming call. » Touch Hold + Answer. Hold a Call and Place a Call To make an individual outgoing call while you are on a call, you must place the active call on hold. -
Page 96: Place A Multipoint Call By Adding Participants
You can set up a meeting password to ensure only the desired participants can join a call. 1 From the Home screen, touch 2 Touch the RealPresence Group Series System tab. 3 Enter the password in the Meeting Password field by using the on-screen keypad. -
Page 97: Microsoft Meetings
If a prompt appears on the screen, use the on-screen keypad to enter the password. • If you need to generate touch tones (DTMF tones) with the Polycom Touch Control, touch Keypad from the Call screen. Then use the keypad number buttons. -
Page 98: Content Connections Of Realpresence Group Systems
● Any information stored on a computer connected directly to a RealPresence Group system or a Polycom touch device ● A DVD or DVR player connected directly to a Polycom system ● Content from the Polycom People+Content™ IP application (installed on a computer and connected to the Polycom RealPresence Group system) ● VisualBoard This section describes how to share content using a connected computer or People+Content IP. - Page 99 Using a Polycom Touch Control Device Figure 2: Connections for RealPresence Group 310 and 500 systems Figure 3: Connections for a RealPresence Group 700 system Polycom, Inc.
-
Page 100: Share Content From A Connected Computer
Using a Polycom Touch Control Device Share Content from a Connected Computer Before you show content, check that the computer video output is configured to use one of these supported resolutions and refresh rates. For best video quality, use refresh rates of 60 Hz or less. -
Page 101: Download And Install People+Content Ip
People+Content IP application. Share Content from a USB Drive A Polycom Touch Control can show content stored on a USB drive. 1 Connect the USB device to the USB port on the right side of the Polycom Touch Control. Polycom, Inc. - Page 102 USB drive. 4 Navigate to the file that you want to show. The Polycom Touch Control can open slideshows (.pptx), documents (.pdf), and images (.bmp, .gif, .jpg, .png).
-
Page 103: Annotate Content On A Usb Drive With Polycom Touch Control
Media Suite. Record and Stream with the RealPresence Media Suite You can use the Polycom Touch Control system to start, pause, resume, stop, and playback a RealPresence Media Suite recording. The FECC keys shown in the table below are supported for activating the controls on the TVUI using a system. -
Page 104: Settings
● Muting the microphone does not mute audio coming from any device connected to the content audio inputs. ● The red mute indicator on the front of the Polycom EagleEye View camera is lit when the system is muted or when a Polycom microphone is connected and muted. -
Page 105: Adjust The Polycom Touch Control Ring Tone And Alert Volume
RealPresence Group system. Use backlight compensation in situations where the subject appears darker than the background. Enabling this setting helps to darken a bright background, which can impact the tracking performance of the Polycom EagleEye Director. -
Page 106: Allow Video Display On The Web
Caution: The default setting is to not allow video display on the web. Be sure to verify whether your system administrator wants the setting to be changed. 1 From the Home screen, touch 2 Touch the RealPresence Group Series System tab. 3 Under Meetings, touch Allow Video Display on Web. Call Answering Settings To change the way calls are answered, you might want to change the default settings of your system. -
Page 107: Temporarily Refuse Calls
You can adjust available cameras in several ways. Select a Camera You can use the Polycom Touch Control to select and adjust the main camera or other near-end or far-end video sources. You might be able to adjust other auxiliary cameras or far-end cameras that support pan, tilt, and zoom movement. -
Page 108: Allow The Far-End System To Control Your Camera
You must start camera tracking using the menu before the Mute and Unmute buttons will again affect tracking. After the call is complete, EagleEye Director returns to its default setting. Figure 5: EagleEye Director 1 On the Polycom Touch Control Home or Call screen, touch Cameras. 2 Select Start Camera Tracking. -
Page 109: Camera Presets
Using a Polycom Touch Control Device Camera Presets Camera presets are stored camera positions that you can create before or during a call. The system uses preset 0 as the default camera position for all preset camera positions. This default camera position is zoomed out, panned straight ahead with horizontal tilt. -
Page 110: Move The Camera To A Stored Preset
Using a Polycom Touch Control Device 3 Touch Select Camera to choose a camera or other video source. 4 Touch Control Camera to move the camera to the desired position. 5 Touch View Presets, then touch and hold a number to store the preset position. -
Page 111: Using A Polycom Soundstation Ip 7000 Conference Phone
Group system, the conference phone becomes another interface to dial audio or video calls. The conference phone operates as a microphone and as a speaker in audio-only calls. For more information, refer to the SoundStation IP 7000 documentation available on the Polycom web site. This section includes the following topics: Answer a Call with a Connected SoundStation IP Use a connected SoundStation IP 7000 conference phone to answer incoming calls. -
Page 112: Place A Multipoint Call With A Connected Soundstation Ip
Using a Polycom SoundStation IP 7000 Conference Phone Place a Multipoint Call with a Connected SoundStation It is simple to place a multipoint call by using a SoundStation IP 7000 conference phone that is connected to a RealPresence Group system. -
Page 113: Display Content With A Connected Soundstation Ip
Using a Polycom SoundStation IP 7000 Conference Phone Display Content with a Connected SoundStation IP Showing content with a SoundStation IP 7000 conference phone connected to a RealPresence Group system is a simple task. » Press the Content soft key on the conference phone.
Need help?
Do you have a question about the RealPresence Group Series and is the answer not in the manual?
Questions and answers