
Related Manuals for Extron electronics DSC 301 HD


Summary of Contents for Extron electronics DSC 301 HD
- Page 1 User Guide Scalers and Signal Processors DSC 301 HD Digital Scaling Converter 68-2338-01 Rev. B 03 16...
-
Page 2: Safety Instructions
Safety Instructions Safety Instructions • English Инструкция по технике безопасности • Русский WARNING: This symbol, , when used on the product, is intended to ПРЕДУПРЕЖДЕНИЕ: Данный символ, , если указан alert the user of the presence of uninsulated dangerous voltage within the на... - Page 3 , and trademarks are the property of (SM) (TM) RGB Systems, Inc. or Extron Electronics: (®) Registered Trademarks Extron, AVTrac, Cable Cubby, CrossPoint, DTP, eBUS, EDID Manager, EDID Minder, Flat Field, FlexOS, Global Configurator, GlobalViewer, Hideaway, Inline, IP Intercom, IP Link, Key Minder, LinkLicense, LockIt, MediaLink, NetPA, PlenumVault, PoleVault, PowerCage, PURE3, Quantum, SoundField, SpeedMount, SpeedSwitch, System INTEGRATOR, TeamWork, TouchLink, V-Lock, VersaTools, VN-Matrix, VoiceLift,...
- Page 4 Conventions Used in this Guide Notifications The following notifications are used in this guide: ATTENTION: • Risk of property damage. • Risque de dommages matériels. NOTE: A note draws attention to important information. Software Commands Commands are written in the fonts shown here: ^AR Merge Scene,,Op1 scene 1,1 ^B 51 ^W^C [01] R 0004 00300 00400 00800 00600 [02] 35 [17] [03] *X1&* X2)* X2#*...
-
Page 5: Table Of Contents
..............8 AV Controls Panel ..........47 Front Panel Overview .......... 8 Configuration Pages ......... 48 DSC 301 HD OSD Menu System — Input and Output Configuration Page .... 48 Configuration and Adjustments ......9 EDID Minder Page ........51 OSD Menu Navigation Using Image Settings Page........ - Page 6 DSC 301 HD • Contents...
-
Page 7: Introduction
In this guide the terms “digital scaler” and “scaler” are used interchangeably and refer to the DSC 301 HD scaler. This section gives a basic description and the key features of the DSC 301 HD scaler. • DSC 301 HD Description Key Features •... -
Page 8: Key Features
• Audio — The DSC 301 HD has the following connectors: three 3.5 mm stereo mini jacks for analog audio input, and an embedded HDMI digital audio input. •... -
Page 9: General
User presets — Memory presets are available for each input to store and recall optimized image settings. • Internal test patterns for calibration and setup — The DSC 301 HD offers a crop pattern, crosshatch, grayscale, color bars, alternating pixels, blue mode, and audio pink noise. - Page 10 Si ce produit ne dispose pas de sa propre source d’alimentation électrique, il doit être alimenté par une source d’alimentation certifiée UL de classe 2 ou LPS et paramétré à 12 V et 0,5 A minimum DSC 301 HD • Introduction...
-
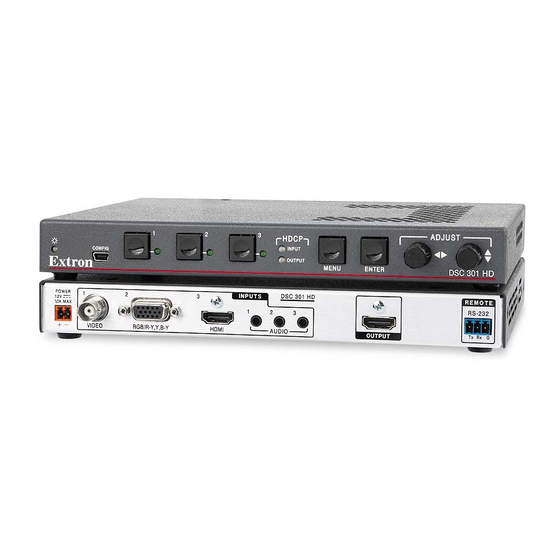
Page 11: Rear Panel Connections
Rear Panel Connections This section describes how to connect cables to a DSC 301 HD scaler. Rear Panel Cabling The illustration below shows the rear panel features of the DSC 301 HD. DSC 301 HD DSC 301 HD INPUTS REMOTE... - Page 12 Tip (+) Audio inputs 1-3 — Connect audio sources to these Ring (-) three 3.5 mm stereo mini jack TRS connectors (see connector image on the right). Sleeve ( ) 3.5 mm Stereo Plug Connector (balanced) DSC 301 HD • Introduction...
- Page 13 2-pole connector. The front panel control and input 0.4A MAX selection buttons light in sequence during power-up (see wiring in image on the right). 3/16" (5 mm) Max. Ridges Smooth SECTION A–A DSC 301 HD • Introduction...
-
Page 14: Operation
Operation This section of the manual discusses the operation of a DSC 301 HD device, and is divided into the following sections: Front Panel Overview • • DSC 301 HD Menu System — Configuration and Adjustments • Front Panel Lockout (Executive Modes) -
Page 15: Dsc 301 Hd Osd Menu System - Configuration And Adjustments
Using each of the submenus, the video and audio inputs and the HDMI output of the DSC 301 HD can be configured. In addition, the user can save and recall the input configuration as a User Preset. The Advanced submenu allows the user to choose a test pattern to aid in the system setup, as well as set up a screen saver display when there are no active input signals. - Page 16 NOTES: • “INx” refers to the selected input; for example “Input 2”, as shown in figure 3. • View only for inputs 1 (composite video) and 3 (HDMI), selectable for input 2 (RGB or YUV). DSC 301 HD • Operation...
- Page 17 INVALID PRESET An additional 128 global input presets are available via SIS commands (see the Communication and Controls section, starting on page 22, for commands), or PCS (see Preset Management on page 60). DSC 301 HD • Operation...
- Page 18 ) to adjust the color and tint (range is 0 to 127, Color and Tint default is 64). NOTE: Color and Tint only apply to NTSC inputs. — Select this ( ) to adjust the detail (range is 0 to 127, default is 64). Detail DSC 301 HD • Operation...
- Page 19 (default) or off. NOTE: Applicable to HDMI input 3 only. When disabled (off) the DSC 301 HD will not display content that requires HDCP, and displays ether a blank screen or a warning message from the input source. — Select this (...
- Page 20 The HDCP Notification provides a means of determining if HDCP content restrictions are preventing a video signal from passing. The DSC 301 HD has the ability to notify the user that they are currently trying to view HDCP protected content through a non-HDCP compliant HDMI or DVI display.
- Page 21 DSC 301 HD locks to the new vertical refresh rate.
- Page 22 Configure input 3 to LPCM-2Ch Auto to use digital audio when present, or when not • present, to use analog TRS 3. Advanced submenu This submenu allows the user to configure the global settings for the unit (see figure 11). Figure 11. OSD Menu — Advanced Submenu DSC 301 HD • Operation...
- Page 23 ) to turn the per-input Auto Memory on or off. Input x: Auto Memory The DSC 301 HD has 32 auto memory locations per input, for RGB/YUV and HDMI inputs. YUV and RGB signals on the same input have unique auto memories; for example 720p YUV and 720p RGB are stored with unique Auto Memory settings.
- Page 24 DSC 301 HD output. To reset the DSC 301 HD to factory setting, including original shipped firmware, press and hold the Enter button for 20 seconds while applying power. The message FIRMWARE RESET is displayed on the OSD to indicate the reset is completed.
- Page 25 Output resolution and refresh rate and output format • • AFL status (locked or disabled) • HDCP status (input status and HDMI output status) • Display Info (resolution and refresh rate) • Firmware build details DSC 301 HD • Operation...
-
Page 26: Resolutions And Refresh Rates
480p EDID is uploaded to slot C1, the LCD reads “C1: 720x480”. These three custom slots are shared between custom output resolutions (based on preferred timings 1 block) and custom EDID tables, which can be assigned to any input. DSC 301 HD • Operation... -
Page 27: Custom Edid Or Custom Output Resolution
20). Power Save The DSC 301 HD has a power save mode that allows the user the ability to put the unit into a low power state, via SIS command (see Power save mode on page 33). This state effectively cuts the power consumption of the scaler. -
Page 28: Sis Communication And Control
SIS Communication and Control The DSC 301 HD can be configured and controlled via a host computer or other device (such as a control system) attached to the rear panel RS-232 connector or the front panel USB port. Control is made using the Extron SIS commands. -
Page 29: Error Responses
(beginning on page 28) for SIS commands later in this chapter lists the commands that the DSC 301 HD scaler recognizes as valid, the responses that are returned to the host, a description of the function of the command or the results of executing the command, and an example of each command in ASCII (Telnet) and URL encoded (Web). -
Page 30: Symbol Definitions
= Picture adjustment — 0 to 127 (default 64 = Horizontal and vertical position, range depends on resolution with leading “+” or “-”, for example, “-1075” X1^ = Horizontal and vertical size, range range depends on resolution DSC 301 HD • SIS Communication and Control... - Page 31 7 = Audio Test (crop pattern, OSD text “Audio Test”, pink noise; Ch 1/2, 48 kHz, 24 bit) = User presets — 1 to 3 (for each input) = Input presets — 1 to 128 (global for device) DSC 301 HD • SIS Communication and Control...
- Page 32 1 = Gives priority to the highest input (3 then 2 then 1) 2 = Gives priority to the lowest input (1 then 2 then 3) X3# = Audio gain and attenuation: -18 through + 12 dB, (with leading “+” or “–“) DSC 301 HD • SIS Communication and Control...
- Page 33 DVI sink devices initially pass HDCP encrypted content, but intermittently display a green HDCP notification screen after a power cycle or resuming from sleep mode. The Command and Response tables for SIS commands start on the next page. DSC 301 HD • SIS Communication and Control...
-
Page 34: Sis Command And Response Table
= Custom EDID or output rate #2, = Custom EDID or output rate #3. 10-92 For variables , see the SIS EDID table on page X2& = Auto-Image threshold value: (black) though (white), default = DSC 301 HD • SIS Communication and Control... - Page 35 X% = Pixel phase: (default = X^ = Total pixels: ±512 of the default value X& = Active pixels: ±512 of the default value X* = Active lines: ±256 of the default value DSC 301 HD • SIS Communication and Control...
- Page 36 X! = Input selection: X( = Enable/disable: = Off/disable, = On/enable X1$ = Picture adjustment: (default 64) X2^ = Video mute: = Off/disable, = On/enable (mute to black), = mute output sync and video DSC 301 HD • SIS Communication and Control...
- Page 37 X1# = Text label/preset name, up to 16 characters -2200 +2200 X1% = Horizontal or vertical position: 0000 4400 X1^ = Horizontal or vertical size: X1( = User preset, for each input DSC 301 HD • SIS Communication and Control...
- Page 38 X! = Input selection: X( = Enable or disable: = Off or disable, = On or enable (default) X1# = Text label or preset name, up to 16 characters 1-128 X2) = Input presets, (global) DSC 301 HD • SIS Communication and Control...
-
Page 39: Output Configuration
X3& = Screen saver status: = Active input detected; timer not running, = No active input; timer is running; output sync still active, = No active input; timer has expired; output sync disabled DSC 301 HD • SIS Communication and Control... - Page 40 3, 4 = None, = Analog TRS = Analog TRS = Analog TRS = LPCM-2Ch, = Multi-Ch, = LPCM-2Ch Auto, = Multi-Ch Auto. See the command description on page 27 for variable details. DSC 301 HD • SIS Communication and Control...
- Page 41 X2( = Video switching effect: = Cut, = Fade through black (default) X3@ = Auto switch mode: = Disable (default), = Priority to highest numbered input, = Priority to lowest numbered input DSC 301 HD • SIS Communication and Control...
- Page 42 X4! = HDCP mode (see for details): = Follow the input (default) = Always encrypt HDMI outputs = Follow the input with continuous DVI trials = Always encrypt HDMI outputs with continuous DVi trials DSC 301 HD • SIS Communication and Control...
- Page 43 X3( = Input AFL status: 0 = Input signal lock disabled, 1 = Input signal lock enabled, but cannot lock to applied input signal. 2 = Input signal lock enabled, output locked to applied input signal. See command description on page 27 for variable details. DSC 301 HD • SIS Communication and Control...
-
Page 44: Product
The Extron Product Configuration Software (PCS version 2.1 or later) offers another way to control the DSC 301 HD via USB connection. This section describes the software installation and communication (see the DSC 301 HD Product Configuration Software help file for detailed control information). Topics in this section include: •... -
Page 45: Starting The Software
NOTE: PCS versions prior to version 2.1 do not have the configuration pages for the DSC 301 HD device. Ensure you download the latest PCS version. On the Extron website, select the Download tab (see figure on page 38 ). -
Page 46: Tcp/Ip Panel
This feature is not applicable to DSC 301 HD devices. Offline Device Preview It is possible to open the DSC 301 HD pages to be viewed without connecting directly to a device, but the settings cannot be changed or saved. -
Page 47: Using The Software
Using the Software NOTE: For general software navigation, see the DSC 301 HD Product Configuration Software Help file, embedded in the PCS software. When connected to an online device, a connection status icon shows green on the device name tab. -
Page 48: Device Menu
From the Device drop-down menu ( ), select Settings > Hardware The Hardware Settings dialog box opens showing Unit Settings..Information For configuration details, see the DSC 301 HD PCS Help file. Figure 25. Hardware Settings Dialog Box DSC 301 HD • Product Configuration Software... -
Page 49: Reset Device
Clicking the Cancel button closes the dialog box without resetting the device. Backup This menu option allows the user to save all audio and video settings from a DSC 301 HD to a connected PC. This exported configuration is saved as a backup which can later be restored to a single connected device if desired. -
Page 50: Update Firmware
The saved configuration can be restored to a single device. To restore a configuration to a single device: Connect to the DSC 301 HD device via front panel USB to a PC where the backup configuration file resides. Select Restore... from the Device menu (see... -
Page 51: Software Menu
Click the Open Firmware File button. An explorer window opens. Navigate to the desired firmware file and select the device-specific firmware file. Valid firmware files for the DSC 301 HD have an .S19 file extension. Click the Open button. This returns you to the Update Firmware dialog box. - Page 52 About - Extron PCS Dialog Box Click the Details button (see figure 33, ) for more information about the software and embedded modules. Click the OK button ( ) to close the dialog box. DSC 301 HD • Product Configuration Software...
-
Page 53: Av Controls Panel
NOTE: The signal status indicators on the AV input buttons display green when a signal is present on the corresponding input or gray when there is no signal present. DSC 301 HD • Product Configuration Software... -
Page 54: Configuration Pages
The Input Configuration panel (see figure 37) consists of user configurable fields for each input. These include Input , Signal Type , Aspect Ratio , Auto-Image , Auto Memory , HDCP Authorized , and Film Detect . Figure 37. Input Configuration panel DSC 301 HD • Product Configuration Software... -
Page 55: Aspect Ratio
Film Detect Select the Film Detect check box ( ) of the desired input to enable automatic 3:2, 2:2, and 24:1 film pulldown detection for NTSC, PAL, SECAM, and 1080i input signals. DSC 301 HD • Product Configuration Software... -
Page 56: Output Format
— Frame lock is enabled. Input AFL NOTE: AFL is a patented technology exclusive to Extron that locks the output frame rate to a designated input to eliminate stuttering caused by frame rate conversion. DSC 301 HD • Product Configuration Software... -
Page 57: Edid Minder Page
Click the EDID Minder icon (see figure , on page 48) on the global navigation bar to open the EDID Minder page (see figure 40). Figure 40. EDID Minder Page DSC 301 HD • Product Configuration Software... - Page 58 Matching the output resolution is the default value for all inputs. From the Inputs group box (table of inputs, ) on the right, select the check boxes for the desired inputs. In the Output Resolution panel, click the Match Output button ( DSC 301 HD • Product Configuration Software...
- Page 59 Select Save to EDID Library . Click the OK button to save the file. Saving a factory EDID exports an HDMI, LPCM-2Ch EDID to the PC. The NOTE: file is saved as a .bin file. DSC 301 HD • Product Configuration Software...
-
Page 60: Image Settings Page
(ignores aspect ratio setting). • Click the Auto-Image & Follow button ( ) to perform a one-time Auto-Image and to maintain the aspect ratio of the input signal (ignores aspect ratio setting). DSC 301 HD • Product Configuration Software... - Page 61 To adjust overscan settings, choose 0%, 2.5%, or 5% from the drop down menu specific to each signal type. Presets Panel When configuring the DSC 301 HD, a total of 128 global input presets and up to 3 user presets per input channel are available (see figure 46). Figure 46.
-
Page 62: Input Presets
Input Presets Click the Recall Preset button ( ). The dialog box opens. Presets Click the Recall button to recall the preset. Click the Cancel button to return to the page. Image Settings DSC 301 HD • Product Configuration Software... -
Page 63: User Presets
Click the Clear button ( ). The Presets dialog box opens. Click the Clear button to erase saved data. Click the Cancel button to return to the page (see figure 42). Image Settings DSC 301 HD • Product Configuration Software... -
Page 64: Size And Position Page
(ignores aspect ratio settings). • Click the Auto-Image & Follow button ( ) to perform a one-time Auto-Image and to maintain the aspect ratio of the input signal (ignores aspect ratio settings). DSC 301 HD • Product Configuration Software... -
Page 65: Audio Configuration Page
2-channel LPCM if multi-channel audio is not available. If neither multi-channel audio nor 2-channel LPCM audio is detected, the input switches to the corresponding analog input to send to the output. DSC 301 HD • Product Configuration Software... -
Page 66: Preset Management
(for example saved on 480p) and later recalled onto another resolution (for example, recalled onto 1080p). Select Save Preset , Recall Preset , or Clear to select the applicable input preset or user preset. DSC 301 HD • Product Configuration Software... -
Page 67: General Settings Page
To set the OSD (On-Screen Display) Configuration Menu , select the check box ( and set the duration in seconds (0-500) to determine the time allotment for an OSD message to display on the screen. DSC 301 HD • Product Configuration Software... - Page 68 HDCP status of the selected input source. Use this setting when DVI sink devices initially pass HDCP encrypted content, but intermittently display a green HDCP notification screen after a power cycle or resuming from sleep mode. DSC 301 HD • Product Configuration Software...
-
Page 69: Extron Warranty
Extron Electronics makes no further warranties either expressed or implied with respect to the product and its quality, performance, merchantability, or fitness for any particular use. In no event will Extron Electronics be liable for direct, indirect, or consequential damages resulting from any defect in this product even if Extron Electronics has been advised of such damage.
Need help?
Do you have a question about the DSC 301 HD and is the answer not in the manual?
Questions and answers