Advertisement
Quick Links
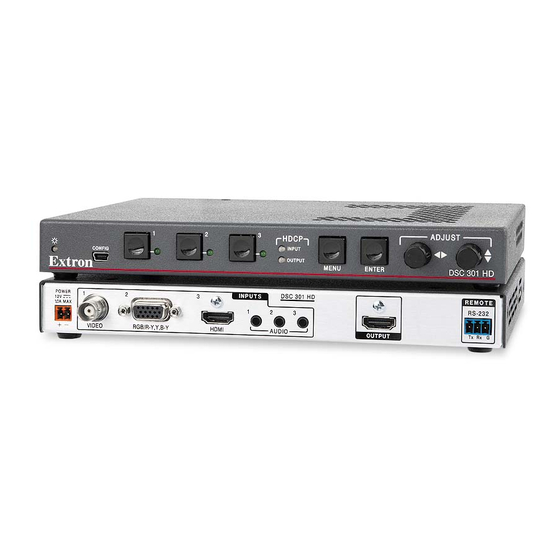
DSC 301 HD • Setup Guide
The Extron DSC 301 HD Digital Scaling Converter is a scaling product that accepts the most common video signal formats to be
processed, scaled, and output as HDMI. This setup guide allows an experienced user to easily and quickly set up and configure a
DSC 301 HD using step by step instructions. It covers how to perform basic operations using the front panel controls and selected
Simple Instruction Set (SIS
NOTE:
For full installation, configuration, menus, connector wiring, and operation details, see the DSC 301 HD User Guide, available
at
www.extron.com
Installation
Rear Panel Features
DSC 301 HD
POWER
POWER
12V
12V
1.0A MAX
1.0A MAX
a
b
c
d
e
Mounting and Cabling
Step 1 — Mounting
Turn off or disconnect all equipment power sources and rack mount the
DSC 301 HD unit with either an optional shelf mounting brackets (RSU 126 or
129, RSB 126 or 129) or optional furniture mounting brackets (MBU 125); see
figures 1 and 2 at right. When rack mounting, an optional rack false face plate
(RFF 052) can be fitted on top of the low profile DSC, improving the overall look
within the rack.
Step 2 — Connecting inputs
Connect inputs from video sources to the applicable connectors marked "Inputs":
b
Composite video,
digital audio).
Connect inputs from analog audio sources to the TRS inputs
Step 3 — Connecting outputs
Connect a suitable output display device to the connector marked "Output"
f
(see
above) for HDMI output with embedded audio.
Step 4 — Connecting control devices
RS-232 — For serial RS-232 control, connect a host computer or control
system to the 3-pole captive screw connector
RS-232 protocol (default values): 9600 baud, 1 stop bit, no parity, 8 data bits,
no flow control.
USB — Connect a host computer or control system to the front panel mini USB
port for configuration and control via Extron Configurator software.
Step 5 — Connecting power
DC power connector — Plug in a 12 VDC, 1A max power source into this
2-pole captive screw connector a .
) commands.
™
1
2
3
1
2
VIDEO
RGB/R-Y,Y,B-Y
VIDEO
RGB/R-Y,Y,B-Y
2
1
3
Power and video input connections
DC power connector
Composite video connector
RGB, R-Y, Y, B-Y via 15-pin HD connector
HDMI connector
Audio 3.5 mm TRS (tip-ring-sleeve) connectors
c
d
HDMI (with or without embedded
RGB, R-Y, Y, B-Y,
g
.
DSC 301 HD
INPUTS
DSC 301 HD
INPUTS
3
1
2
3
1
2
3
HDMI
AUDIO
HDMI
AUDIO
4
5
Output and control connections
f
HDMI connector
g
RS-232 captive screw connector
RFF 052
e
.
REMOTE
REMOTE
RS-232
RS-232
Tx Rx G
OUTPUT
Tx Rx G
OUTPUT
6
7
Universal Rack Shelf
1/2 Rack Width
Front False
Faceplate
Front false
faceplate
uses 2 screws.
Use 2 mounting holes on
opposite corners.
Rack mount
Figure 1.
#8 Screw
(4) Places
Each Side
MBU 125
Mounting Bracket
Furniture Mount
Figure 2.
(2) 4-40 x 3/16"
Screws
Mounting Screws
(2) Places
Each Side
1
Advertisement

Related Manuals for Extron electronics DSC 301 HD


Summary of Contents for Extron electronics DSC 301 HD
-
Page 1: Rear Panel Features
DSC 301 HD • Setup Guide The Extron DSC 301 HD Digital Scaling Converter is a scaling product that accepts the most common video signal formats to be processed, scaled, and output as HDMI. This setup guide allows an experienced user to easily and quickly set up and configure a DSC 301 HD using step by step instructions. -
Page 2: Front Panel Overview
Setting the Front Panel Locks (Executive Modes) The DSC 301 HD has three modes of front panel security lock that limit the operation of the unit from the front panel. Executive mode 0 (disabled) — The front panel is fully unlocked. This is the default setting. -
Page 3: Upgrading The Firmware
1080p Output Rate Reset If an output image cannot be displayed due to an incompatible output rate, the DSC 301 HD can be reset via the front panel to either 1024x768 @ 60 Hz or 720p @ 60 Hz. To set the rate, or to toggle between 1024x768 @ 60 Hz and 720p @ 60 Hz: Press and hold input buttons 1 and 3 simultaneously for approximately 3 seconds. - Page 4 Basic SIS Commands Table The DSC 301 HD can be configured with specific SIS commands via RS-232 or USB connection. This table lists a selection of the commands. For a full list of SIS commands and variables see the DSC 301 HD User Guide, online at www.extron.com.
Need help?
Do you have a question about the DSC 301 HD and is the answer not in the manual?
Questions and answers