Table of Contents
Advertisement
Advertisement
Table of Contents

Related Manuals for Korg microX


Summary of Contents for Korg microX
- Page 1 Operation Guide Operation Guide...
-
Page 2: Precautions
Be careful not to let metal objects get into the equipment. If something does slip into the equipment, unplug the AC adapter from the wall outlet. Then contact your nearest Korg dealer or the store where the equipment was pur- chased. THE FCC REGULATION WARNING (for U.S.A.) -
Page 3: About This Manual
Thank you for purchasing the Korg microX Synthesizer/Controller. To help you get the most out of your new instrument, please read this manual carefully. About this manual The owner’s manuals and how to use them The microX come with the following owner’s manuals. -
Page 4: Table Of Contents
Front and rear panel ... 11 Front panel ...11 Rear panel...14 Objects in the Display and their functions ...15 Basic Information... 17 About the microX’ modes ...17 Basic operations...19 Setup...23 Turning the power on/off... 23 Connecting the AC adapter ...23 Turning the power on...23... - Page 5 Using and Editing Multi sets... 69 MIDI considerations ... 69 Selecting a multi set ...69 Assigning a program to a track, and setting the volume and pan ...70 Copying the settings of a combination to a multi set ...72 What you can do in Multi mode ...73 Using Controllers ...74 Altering Programs to fit within a Multi set...74 Layers, Splits, and Velocity Switches...75...
-
Page 7: Quick Start
This Quick Start is provided for those who just want to get started trying out the sounds right away. It explains how to set up the microX, how to select programs and control the sound, and how to listen to the demo songs. -
Page 8: Playing Programs And Combinations
“basic” sounds of the microX – programs. Note: If you don’t hear any sound when you play the keyboard: Check the connections once again. Also make sure that the microX’s VOLUME and the volume of your powered speakers or stereo amp are turned up appropriately. - Page 9 You can also press the [AUDITION] button (it will light) and a riff (phrase) suitable for that program will play automatically. Using the [CATEGORY] and PROGRAM/COMBINATION buttons to select a cat- egory The microX lets you choose programs from categories such as “synthesizer,” “bass,” or “drums.” 1. Press the [CATEGORY] button. The category menu will appear.
- Page 10 Quick Start For example if you press the [CATEGORY] button and then press the PROGRAM [E] button, you’ll be able to choose only from programs in the Keyboard category. The Keyboard category contains programs such as acoustic piano, and electric piano etc. You can also use the [PAGE+][PAGE–] buttons to step through the categories one by one.
-
Page 11: Using Controllers To Modify The Sound
“Using the [CATEGORY] and PROGRAM/COMBINATION buttons to select a category” ( ☞ p.3). Using controllers to modify the sound You can operate the microX’s joystick, OCTAVE [ † ][ π ], and realtime controllers to add expres- sive variation to your performances. Joystick You can use the joystick to vary the pitch or adjust the depth of modulation. - Page 12 Quick Start REALTIME CONTROLS [1], [2], [3], [4], [SELECT] Use the [SELECT] button to select realtime controller mode A/B/C, and use knobs [1]–[4] to control the tone, effects, MIDI control changes, and arpeggiator etc. while you perform. Use these knobs when you want to modify the sound while performing, or to make simple edits. Here we’ll explain how to use the realtime controllers in Program mode.
-
Page 13: Using The Arpeggiator
Most arpeggiators produce an arpeggio when you play a chord on the keyboard. In addition to this, the microX’s arpeggiator is a polyphonic arpeggiator that is able to produce a variety of chordal transformations or phrases based on the pitch or timing of the notes you play on the keyboard. -
Page 14: Listening To The Demo Songs
Quick Start Listening to the demo songs The microX contains demonstration songs. Take a moment to listen to these demo songs to experience the diverse sounds and rich expres- sive potential of the microX. 1. Hold down the [CATEGORY] button and press the [AUDITION] button. -
Page 15: Introduction
A great selection of 640 programs In the Program mode, the microX provides 640 user programs, plus 128 programs + 9 drum sets for GM compatibility. When shipped from the factory, it is loaded with high-quality programs that cover a wide range of musical needs. - Page 16 Multi mode plays multiple tracks of data from an external sequencer In Multi mode, the microX can operate as a 16- track MIDI multi-timbral sound module, receiving multiple tracks of performance data from an exter- nal sequencer or similar device.
-
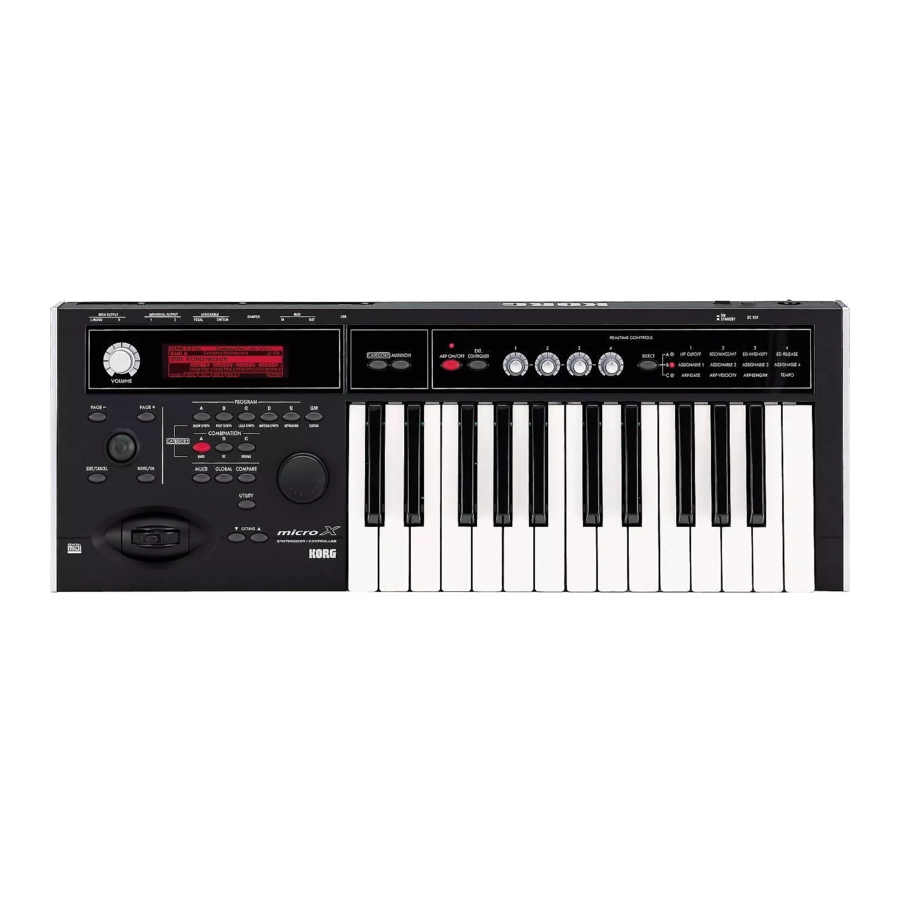
Page 17: Front And Rear Panel
Front and rear panel Front panel Front and rear panel... -
Page 18: Realtime Controls
(lit), External Control will be on, and the REAL- TIME CONTROLS [1]–[4] knobs will transmit MIDI messages to external MIDI devices. (☞p.111) 3. Arpeggiator The microX’s arpeggiator is a polyphonic arpeg- giator. [ARP ON/OFF] button This button turns the arpeggiator on/off. When on, the button will light. - Page 19 10. PAGE, CURSOR [PAGE+][PAGE–] buttons You can use these buttons to move forward or backward through the different tabs in a page. By holding down the [MENU/OK] button and pressing these same buttons you can move for- ward or backward through the pages themselves, such as page 0, 1, 2, etc.
-
Page 20: Rear Panel
USB stands for Universal Serial Bus, and is an interface for transferring data between a com- puter, a keyboard and/or peripheral devices. Note: The USB connector of the microX is only able to transmit and receive MIDI data. 5. Power supply Be sure to see “Turning the power on/off”... -
Page 21: Objects In The Display And Their Functions
Objects in the Display and their functions a: Current page d: Edit cell c: Parameters b: Tab a: Current page This indicates the current page within the selected mode. From the left, this area shows the mode name, page number: name, tab name, and the parameter name of the edit cell. - Page 22 Introduction * Scroll bar This indicates that the list contains more selections or parameters than can be shown in the screen at one time. Use the ClickPoint [π][†] to move within the list. Scroll bar * Page menu In Combination, Program, Global, or Multi modes, pressing the [MENU/OK] button will display a list of the pages in that mode.
-
Page 23: Basic Information
Basic Information About the microX’ modes The microX has a wide range of capabilities; it lets you play programs/combinations, edit them, play the microX’s sound generator using musical per- formance data from an external MIDI sequencer, and make settings that affect the entire microX, such as transposition and tuning. -
Page 24: Combination Mode
Introduction GLOBAL MODE DRUM KIT Drum Sample / Sample - H Assign Drum Sample / Sample - L ARPEGGIATOR PATTERN User Pattern: Preset-0 - 4 User Pattern: U000 - 250 PROGRAM MODE OSC 1 Insert / Master Effect Multi Sample - H Drum Kit Multi Sample - L PITCH1 FILTER1 AMP1... -
Page 25: Basic Operations
Basic operations After you’ve powered-on the microX, here’s how to perform basic operations such as selecting modes and pages. 1. Selecting modes • In order to use a particular function on the microX, you must first select the appropriate mode. -
Page 26: Selecting A Parameter And Editing The Value
Introduction 2. Use the ClickPoint [√][®][π][†] to select the page you want to view. 3. When you’ve made your selection, press the center of the ClickPoint. You will jump to the selected page, and that page will appear. As an example here, try selecting “Key Zone.” The 5: Ed–Key Zone page will appear. - Page 27 dark and you will return to the settings that you were editing. If you edit the settings that are recalled by press- ing the [COMPARE] button (i.e., the settings that are written into memory), the LED will go dark, and it will not be possible to return to the previous edits by pressing the [COMPARE] button again.
- Page 28 Introduction...
-
Page 29: Setup
4. To prevent the plug from being pulled out accidentally, wrap the AC adapter cable through the cable hook located on the rear of the microX. Be careful not to bend the base of the plug unnecessarily. Connecting the AC adapter... -
Page 30: Turning The Power Off
The settings you edit in Global mode are remembered as long as the power is on, but will be lost when you turn off the power. 1. Turn the microX’s [VOLUME] knob toward the left. Also turn the volume of your powered monitor speakers or stereo amp down to zero. -
Page 31: Connections
If desired, you can connect these two individual (independent) outputs. They are unbalanced phone output jacks. These jacks allow you to send the microX’s sounds to external equipment independent of the (MAIN OUTPUT) L/MONO and R jacks. This can be con- venient when recording, or when using a complex live performance setup. -
Page 32: Connecting A Damper Pedal, Foot Switch, Or Foot Pedal
Connecting a damper pedal This pedal can provide a damper effect as you play. This instrument also supports half-damping. Here’s how to connect an optional Korg DS-1H damper pedal to the DAMPER jack and use it to control the half-damper effect. -
Page 33: Connecting A Foot Pedal
(☞p.89) Connecting a computer Connecting a computer You can connect the microX to your computer and use it as both an input keyboard and a MIDI sound module. You can also use the included editor to edit the microX from your computer. - Page 34 Editor/Plug-In Editor operating requirements You must install the KORG USB-MIDI Driver if you want to connect the microX to your computer via USB and use the microX Editor/ Plug-In Editor. It is not possible to run multiple instances of microX Editor/Plug-In Editor on the operating system.
- Page 35 6. When all the selected applications have been installed, click [Finish] to exit the installer. 7. The first time you connect the microX to the USB port of your computer, the standard USB- MIDI driver provided by Windows will be installed automatically.
- Page 36 The lower area will show the version of the KORG USB-MIDI Driver that you will be installing. Select microX in the list above, and click [Install]. Driver installation will begin.
- Page 37 Installing the KORG USB-MIDI Driver Note: Use the KORG USB-MIDI Driver if you are connecting the microX via USB to a computer that satisfies the conditions listed in “KORG USB-MIDI Driver operating requirements” (☞p.27). 1. Insert the included CD-ROM into your CD- ROM drive.
- Page 38 MIDI messages. Note: The USB connector of the microX is only able to transmit and receive MIDI data. Note: Use the KORG USB-MIDI Driver if you’re connecting the microX via USB to a computer that meets the requirements described in “KORG USB-...
- Page 39 BAL 1: MIDI page) check box to uncheck it (☞PG p.82). When using the microX by itself, leave Local Con- trol turned on. (If this is off when microX is used by itself, playing the keyboard will not produce sound.) Note: The microX’s Local Control setting can be...
- Page 40 Example connections when using the microX Editor/Plug-In Editor If you want to mix the microX’s audio signals with the audio signals sent from your host application via your audio interface, or with audio signals from another sound module, make connections as shown below.
-
Page 41: Connecting Midi Devices
MIDI connectors MIDI IN: This connector receives MIDI data. Use this to play the microX from another MIDI device, or from an external sequencer. MIDI OUT: This connector transmits MIDI data. Use this to control external MIDI devices, or to record into an external sequencer. - Page 42 Setup...
-
Page 43: Playing And Editing Programs
Playing and Editing Programs What’s a Program? Programs are the basic sounds of the microX. Programs are important elements of other modes as well. In Combination mode you can combine multiple programs to create complex sounds, and in Multi mode you can play multiple programs by... -
Page 44: Selecting By Category
5. Play a note on the keyboard to hear the sound you selected. Alternatively, you can press the [AUDITION] button (the button will light) to turn on the Audition function and the microX will automatically play a riff (phrase) suitable for the selected program. Overview: Program Banks When shipped from the factory, it is loaded with 640 Programs. -
Page 45: Midi Channel Setting
DAW. For more details, see “Editor/Plug-In Editor Manual” (PDF). MIDI channel setting In order to play the microX via MIDI, the transmit- ting device (MIDI sequencer or computer) and receiving device (the microX) must be set to the matching MIDI channel. -
Page 46: Using Controllers
GLOBAL 1: MIDI page MIDI Filter “Bank” is unchecked. Note: The table above describes the operation with “Bank Map” set to GM. For details on the KORG mapping (☞PG p.78). Using Controllers The microX provides realtime controllers such as a joystick and OCTAVE [†][π] buttons that let you... - Page 47 Corresponds to pitch range You can use either a standard footswitch (such as the Korg PS-1) or a special half-damper pedal (such as the Korg DS-1H) as the Damper. If you use a footswitch, it will work like a normal synthesizer sustain pedal: notes will sustain for- ever, as long as the pedal is held down.
-
Page 48: External Control
[SELECT] but- ton, giving you a total of twelve different control changes. These twelve assignments (four knobs x three sets) are one “set,” and the microX provides 64 such sets. (☞p.111) [EXT. CONTROLLER] button This switches the external function on/off. -
Page 49: Simple Program Editing
Pro- gram to create sounds from scratch. On the microX, you can use the eight sliders in the Performance Editor display and the realtime con- troller knobs and switches of the front panel to... - Page 50 Playing and Editing Programs Note: If CC#70–79 are assigned to REALTIME CONTROLS A-mode or B-mode, the sound edited by knobs [1]–[4] can be saved by the Program Write operation (☞p.45). [SELECT] button Knobs [1]–[4] 2. Rotate the desired knob to control the sound, etc.
-
Page 51: B/C-Mode Control
note-on Attack Level Break Level Level Sustain Level Slope Time Decay Time Attack Time Start Level B-mode controls You can control parameters such as volume, porta- mento time, pan or filter and amp EG, pitch LFO, and master effect send levels etc. The B-mode function settings are made for each individual program, combination, or multi set. -
Page 52: Detailed Editing With Programs
Insert Effect Master Effect Individual- Output Amp1 EG : 6-3 OSC 1 OSC 2 Amplifier 1–1, 9–4, etc. indicate the microX on-screen pages and tabs. Controller Setup: Arpeggiator : 7-1, 2 Master Effect 1, 2: 9-1...3 AUDIO OUTPUT MasterEQ : 9-4... - Page 53 For the one insert effect and the two master effects, you can choose from 89 effect types. The master EQ is a stereo three-band EQ. ARPEGGIATOR A program can use one arpeggiator. You can select an arpeggio pattern, specify the range in which the arpeggio will be generated, and specify the range of notes (keys) and velocities that will trig- ger the arpeggiator.
-
Page 54: Basic Oscillator Settings
Playing and Editing Programs Basic oscillator settings Program type setting (single, dou- ble, drum kit) Here you can specify the type of program (whether to use one oscillator, two oscillators, or a drum kit). Use the PROG 1: Ed–Basic, Prog Basic “Oscillator Mode”... - Page 55 • Alternatively, you can select a multisample by category. With “High Multisample” highlighted, press the [CATEGORY] button to access the category menu. (☞p.38) Use the [PAGE+][PAGE–] buttons to select a category. Then use the [VALUE] dial to select a multisample. Press the [MENU/OK] button to finalize your selection.
-
Page 56: Using Lfos And Envelopes (Egs)
Playing and Editing Programs Copying settings between OSC1 & OSC2 Many of the Program parameters can be set differ- ently for OSC1 and OSC2. These include all of the parameters on: • All of the tabs on the Ed–Pitch page, except for the Pitch EG •... -
Page 57: Frequency Modulation
Slope Time Attack Time Start Level Using Alternate Modulation AMS (Alternate Modulation Source) refers to any of the assignable modulation sources in microX, including: • Built-in physical controllers, such as the Joy- stick, and Real-Time Knobs • Incoming MIDI controllers •... -
Page 58: Controlling Pitch
Mod1: CC#17), and raise the “AMS Intensity.” If Knob B Assign “Knob 1-B” is set to Knob Mod.1 (CC#17), vibrato will be applied when you turn the microX’s knob [1] or when CC#17 is received. Pitch EG When the Intensity value is set to +12.00, the pitch EG specified in the Pitch EG page will produce a... -
Page 59: Using Filters
The tone of the sound will depend significantly on the filter settings. microX provides Filter1 for OSC1 and Filter2 for OSC2. For each of these filters, you can select from two types (Low Pass Resonance or Low Pass &... -
Page 60: Keyboard Track
Playing and Editing Programs “Resonance” specifies the resonance level. This boosts the overtones in the region of the specified “Frequency,” giving the sound a distinctive character. If you’ve selected Low Pass & High Pass as the filter type, you can use the Filter A parameters to adjust the low pass filter and the Filter B parameters to adjust the high pass filter. -
Page 61: Using The Amp Section
AMS modulation In addition to the EG, LFOs, and Key Track, you can use two AMS sources to modulate the filters. For instance, you could use the joystick to change the brightness. Using the Amp section The Amp section includes controls for volume and pan. -
Page 62: Adjusting The Pan (Stereo Position)
Amp2 “Pan” R127. This will make OSC1 go to the left speaker, and OSC2 go to the right speaker. With a setting of Random, the pan will change randomly each time you play a note on microX, producing an interesting effect. Pan AMS and Intensity “Intensity”... -
Page 63: Playing And Editing Combinations
Playing and Editing Combinations What’s a Combination? Combinations, or “Combis” for short, let you split and layer up to 8 Programs at once. A Combi is made up of 8 Timbres. Each Timbre has a Program, along with parameters for key and velocity zones, mixer settings, MIDI channel and Playing combinations Selecting combinations... - Page 64 MIDI program change messages from your external MIDI device (DAW software or other sequencer, or MIDI controller) to the microX. If you’ve installed the included “microX Plug-In Editor” into your DAW program as a plug-in, you can easily select microX programs or combinations from a list within your DAW software.
-
Page 65: Using Controllers
Sending MIDI information from the various controllers When you select a combination on microX, a MIDI program change for the selected combination number will be transmitted on the global MIDI channel. At the same time, bank select, program change, and volume (CC#7) messages will be transmitted on the MIDI channel specified for... -
Page 66: Simple Combination Editing
Program to create sounds from scratch. On the microX, you can use the edit of COMBI 0: Play page and the realtime controller knobs and switches of the front panel to make simple... -
Page 67: Adjusting The Volume
Adjusting the volume Here’s how to adjust the volume of each timbre. 1. Access the COMBI 0: Play, Mixer page. 2. Use the ClickPoint [√][®][π][†] to highlight the “Volume” of the timbre whose volume setting you want to adjust, and use the [VALUE] dial etc. -
Page 68: Detailed Editing With Combinations
(keys) or velocities that will trigger the arpeggiator. Insert Effect : Master Effect 1, 2 : 9-1...3 Insert Effect : 8-2, 3 1–1, 9–4, etc. indicate the microX on-screen pages and tabs. Controller Setup : 7-5 Arpeggiator: 7-1...4 MasterEQ :9-4 AUDIO OUTPUT L/MONO, R AUDIO OUTPUT... -
Page 69: Selecting A Program For Each Timbre
MIDI Bank Select messages for changing banks on external MIDI devices. MIDI Channel Timbres that you wish to play from microX’s key- board must be set to the global MIDI channel. Your playing on the keyboard is transmitted on the global MIDI channel, and will sound any tim- bre that matches this channel. -
Page 70: Midi Filter Settings
“Status” is EXT or EX2, movements of the microX’s controllers will transmit MIDI data on the channel of that timbre. MIDI transmit/receive settings for the entire microX are made in “MIDI Filter” (GLOBAL 1). If a check box is unchecked, the corresponding MIDI data will not be sent or received. - Page 71 Keyboard X-Fade (keyboard Program A Program B crossfade): As you play from low notes to high notes, the volume of A will fade out, and the volume of B will fade in. Creating Key Splits and Layers Let’s create a Combi which combines both splits and layers, like the diagram below: Timbre 1 Brass...
-
Page 72: Altering Programs To Fit Within A Combination
Playing and Editing Combinations Velocity Zone Slope Similar to Key Zone Slopes, as described above, these let you fade in and fade out sounds gradu- ally over a velocity range, instead of a simple hard switch. We’ll assume that you are continuing to edit from the preceding example. -
Page 73: Adjusting The Pitch
Adjusting the pitch You can make these settings in COMBI 2: Ed–Tim- bre Param, Pitch. Transpose, Detune (BPM Adjust) These parameters adjust the pitch of the timbre. • In a layer-type combination, you can set two or more timbres to the same program, and create a richer sound by using “Transpose”... -
Page 74: Effects
Playing and Editing Combinations Reso.HP: Adjusts the resonance level of the low pass filter or the cutoff frequency of the high pass filter for program OSC 1/2. The parameter that is controlled will depend on the filter type specified for the program. F EG Int: Adjusts the filter EG intensity (the depth of the filter EG) for program OSC1/2. -
Page 75: Using And Editing Multi Sets
Using and Editing Multi sets Multi mode is great when you want the microX to simultaneously play multiple tracks of data from your external MIDI sequencer. This section explains how to use the Multi mode. You can use the microX as a sixteen-channel multi- timbral sound module. -
Page 76: Assigning A Program To A Track, And Setting The Volume And Pan
Receiving MIDI data from an external sequencer to play the microX By default, the microX’s tracks 1 through 16 are set to MIDI channels 1 through 16, with track 1 receiv- ing channel 1, track 2 receiving channel 2, and so 1. -
Page 77: Adjusting The Volume
This specifies the MIDI status of the internal tone generator for each track. If you want the microX’s internal tone generator to sound, choose the INT or BTH setting. These set- tings let you use your external MIDI sequencer to play the microX as a multi-track sound module. -
Page 78: Copying The Settings Of A Combination To A Multi Set
MIDI channel. Play the keyboard, and you will hear the same sounds as when playing the combination. 9. Begin multi-track recording on your external MIDI sequencer, and operate the microX’s keyboard and controllers. When you perform multi-track recording, the multiple channels sounded by the arpeggiator will also be recorded at the same time. -
Page 79: What You Can Do In Multi Mode
9–1...3 Insert Effect : 8–3, 4 Track Insert Effect Master Effect Individual Outputs 1–1, 9–4, etc. indicate the microX on-screen pages and tabs. Controller Setup : 7–5 Arpeggiator: 7–1…5 (A, B) AUDIO OUTPUT MasterEQ : 9–4 L/MONO, R AUDIO OUTPUT... -
Page 80: Using Controllers
Overview of editing pages The following pages let you edit a multi set in detail. • Select a multi set and play the microX’s keyboard. • Receive and play performance data from 0: Play an external MIDI sequencer. -
Page 81: Layers, Splits, And Velocity Switches
MIDI tone generator that is controlled from the connected computer to play ensemble music con- sisting of multiple instrument parts. This mode also permits you to use the microX as a GM tone generator. Parameters and performance data A multi set consists of tracks 1–16, parameters such as the multi set name, effect and arpeggiator parameters, and a tempo setting. -
Page 82: Midi Tracks
Using and Editing Multi sets You can store 128 of these multi sets in the microX. Tracks 1–16 consist of the following “setting parameters,” and will transmit and receive the “performance data” listed below. MIDI tracks 1–16 Setup parameters Bank/Program No.*, Pan*, Volume*, Status, MIDI... - Page 83 MIDI message, see “MIDI transmission when the X50/microX’s controllers are operated” (☞PG p.166). Other MIDI control For details on how the microX operates when transmitting or received control change messages, see “MIDI transmission when the X50/microX’s controllers are operated” (☞PG p.166). For more about MIDI in general, see “MIDI applications”...
- Page 84 Using and Editing Multi sets...
-
Page 85: Effects Settings
Effects settings The effect section of the microX provides one insert effect, two master effects, one master EQ (stereo 3-band EQ), and a mixer that controls the routing of these components. Effects in each mode Program mode In Program mode, the insert effect can be used as... -
Page 86: Reverb Effects
Effects settings Limiters (03: St.Limiter–04: Mltband Limit) limit the level of the input signal to a maximum level that you specify. Exciters (11: St.Exct/Enhcr) give the sound greater clarity and definition. Enhancers sharpen the out- line of the sound, bringing it to the front of the mix. -
Page 87: Effect Settings For A Program
Effect settings for a program Routing The structure of the insert effect, master effects, and master EQ is the same in each mode. How- ever, the routing will determine how the oscillator output of the program is sent to the insert effect and the master effects. - Page 88 Effects settings BUS Select (All OSCs) = 1/2 IFX / Indiv.Out BUS Select OSC 1 BUS Select = 1/2 OSC 2 Select from: IFX BUS mono x 2 BUS Select (All OSCs) = Off IFX / Indiv.Out BUS Select OSC 1 BUS Select = Off OSC 2...
- Page 89 5. Move to the IFX page, and set the parameters of the effect that you selected for the insert effect. For details on the parameters of each effect, see PG p.104–. Selecting master effects, and chain settings The input level of the master effect is determined by the send level 1 and 2 settings (routing step 3, or insert effect step 4).
-
Page 90: Effect Settings In Combination, And Multi
Effects settings Effect settings in combina- tion, and Multi Routing In Combination and Multi modes, you can specify the routing of each timbre/track to the insert effect and master effects. These settings are made in the same way in each of these modes. We will be using the example of Combination mode in our explana- tion here. -
Page 91: Dynamic Modulation And Bpm/Midi Sync
Dynamic modulation and BPM/MIDI Sync. Dynamic modulation (Dmod) is a function that lets you use MIDI messages or the microX’s controllers to control specific effect parameters in realtime. BPM/MIDI Sync. is another function that controls effect parameters, and is used to synchronize the LFO speed of modulation-type effects or the delay time etc. -
Page 92: Saving Edited Effect Settings
1. Press the [GLOBAL] button to enter Global mode. -
Page 93: Global Mode
How Global mode is struc- tured In Global mode you can make overall settings that apply to the entire microX, such as master tuning, key transpose, effect global switch, global MIDI channel, and system clock. In addition, you can create user drum kits, arpeg-... -
Page 94: Protecting The Memory
Preference Page Recalling the last-selected mode and page at power-on The state of microX when the power is turned on will depend on the setting of “Power On Mode”. If “Power On Mode” is set to Reset (factory set- ting), microX will automatically select the Combi- nation mode 0: Play. -
Page 95: Midi-Related Settings 1: Midi
MIDI-related settings 1: MIDI MIDI Setup, MIDI Filter Here you can make MIDI-related settings for the entire microX, such as the global MIDI channel and the MIDI clock setting. You can also use the utility commands of this page to transmit MIDI System Exclusive data dumps. -
Page 96: Setting Category Names 3: Category Name
Global Mode 4. If you want the Track to use the scale saved with its individual Program, check the track’s “Use Prog’s Scale” check box. Tracks that are not checked will use the scale specified by Scale “Type” (Multi’s Scale). 5. -
Page 97: Arpeggiator Settings
(individual notes) In addition to this, the microX’s arpeggiator is a polyphonic arpeggiator that is able to produce a variety of chordal transformations or phrases based on the pitch or timing of the notes you play on the keyboard. - Page 98 EXT. This lets you synchronize the tempo with an external MIDI device. In this case you won’t be able to adjust the tempo on the microX. Adjusting the length of the arpeggiated notes (ARP–GATE) 1. Press the REALTIME CONTROLS [SELECT] button to make the right “C”...
- Page 99 Editing in the PROG 0: Play, Arp. Play page • Access the PROG 0: Play, Arp. Play page. Selecting an arpeggio pattern (Pattern) An arpeggio pattern can be selected from preset arpeggio patterns Preset-0–Preset-4 and user arpeggio patterns U000–250. With the factory set- tings, U000–250 contain a wide variety of preload user arpeggio patterns.
- Page 100 Arpeggiator settings Selecting the playback order of the arpeggiated notes (Sort) “Sort” is different than selecting the arpeggiator pattern. “Sort” specifies whether the notes of the arpeggio will be sounded in order of their pitch (regardless of the order in which they were played) or in the order in which you played them.
-
Page 101: The Arpeggiator In Combination And Multi Modes
“Auto Arp” (GLOBAL 0: System, Basic page). The arpeggiator in Combina- tion and Multi modes In Combination and Multi mode, the microX pro- vides dual polyphonic arpeggiator functionality that lets you use two arpeggio patterns simulta- neously. The settings in each of these modes are made in the similar way. - Page 102 Arpeggiator settings Note: The [ARP ON/OFF] button and the REALTIME CONTROLS C-mode [1] (ARP-GATE), [2] (ARP-VELOCITY), [3] (ARP-LENGTH), and [4] (TEMPO) knobs are valid for both arpeggiators A and B. Their state will be memorized when the combination is written. Editing arpeggio settings that appear in the display You can make arpeggiator-related settings in the...
-
Page 103: Arpeggiator On/Off
• Select an arpeggio pattern and set parameters independently for A and B. ☞step 7 • Make Scan Zone page settings so that you can use keyboard range or playing velocity to switch between normal playing and arpeggi- ated playing, or to switch between arpeggiators A and B. -
Page 104: Setting Examples
Arpeggiator settings Setting examples Although this is a somewhat sophisticated editing technique, we will describe the settings of one of the preset combinations as an example. Combination B021: Urban Nature RnB Select combination B021: Urban Nature RnB, and play it. Before you play, make sure that the global MIDI channel (GLOBAL 1: MIDI “MIDI Channel”) is set to 01. -
Page 105: Creating A User Arpeggio Pattern
Program, Com- bination, or Multi set that uses this same pattern. Initializing an arpeggio pattern With the factory settings, all of the microX’s user arpeggio patterns U000–U250 contain preloaded data. If you want to create a new arpeggio pattern, choose an appropriate arpeggio pattern and ini- tialize it. - Page 106 Arpeggiator settings Editing a user arpeggio pattern in Program mode If you enter this mode from the Program mode, your editing will apply to the arpeggio pattern specified for the selected program. 1. In Program mode, select a program for which the arpeggio pattern you wish to edit is selected, or a program that you wish to use as a basis for editing the arpeggio pattern.
- Page 107 Tone No. Lgth(Length) Creating an example pattern 1. Set “Step (Step No.)” to 01, and press the center of the ClickPoint. 2. Select Tone 0, and press the center of the ClickPoint. 3. Use the ClickPoint [®] to change “Step” to 02, and enter Tone 1.
- Page 108 Arpeggiator settings Other examples of creating a user arpeggio pattern Melody pattern 1. Set “Step (Step No.)” to 01, and press the center of the ClickPoint. 2. Select Tone 0, and press the center of the ClickPoint. 3. Use the ClickPoint [®] to change “Step” to 02, and enter Tone 0.
- Page 109 2. Select the GLOBAL 5: Arp.Pattern, Setup page, and set the parameters. Check “Fixed Note.” If this is checked, tones will always sound at the specified pitch. If you set “Mode (Fixed Note Mode)” to Trigger All Tones, playing a single note will cause all Tones to sound.
-
Page 110: Assigning A Name
Arpeggiator settings Dual polyphonic arpeggiator editing in Combi and Multi modes Here we will use a combination as an example in our explanation. The same procedure applies when editing an arpeggio pattern in Multi mode. If you have entered this mode from the Combina- tion mode, the arpeggio pattern selected by the combination will be affected by your editing. -
Page 111: Synchronizing The Arpeggiator
Synchronization with an external sequencer in Program, Combination, or Multi modes When the microX is the master If “ (Tempo)” is INT, the arpeggiator will operate based on the timing of the internal MIDI clock. “ (Tempo)” will be INT if GLOBAL 1: MIDI “MIDI Clock”... - Page 112 Arpeggiator settings...
-
Page 113: Using Drum Kits
You can use Drum Kits only in Programs whose “Oscillator Mode” is set to “Drums.” Drum Kit memory structure The microX has 49 Drum Kits, divided into Inter- nal, User, and GM (General MIDI) groups as shown below. You can edit or write into any of the locations except for the GM bank, which cannot be erased. -
Page 114: Editing Drum Kits
Using Drum Kits Saving and comparing data • The edits you make in Global mode will be lost when the power is turned off, so you need to write (save) your edits if you want to keep these changes. Four types of data are handled in Global mode: user drumkit settings (GLO- BAL 4), arpeggiator settings (GLOBAL 5), external control settings (GLOBAL 6), and all... -
Page 115: Using Hold
details on how to make a selection, see “Selecting by Category” (☞p.38). 3. Select a drum sample name in the list so that it is highlighted. 4. Press the [MENU/OK] button to confirm the selection. 5. Press the [PAGE+] button to access the GLOBAL 4: DKit- Low Sample page. -
Page 116: Saving A Drum Kit
Using Drum Kits Controlling effects for each key A drum kit lets you set the insert effect and master effect send for each key. 1. Access the PROG 8: Ed–InsertFX, BUS page. 2. Make sure that the “Use DKit Setting” check box is checked. -
Page 117: External Control Settings
Using external controls Selecting external controls Note: Before you continue, adjust your settings so that the microX can send MIDI data to your computer application or MIDI device. 1. Press a PROGRAM [A]–[GM] button. (The button will light.) We’ve selected Program mode as an example... -
Page 118: External Control Setups
External control settings External control setups You will use Global mode to create external con- trol setups. • The content that you edit in Global mode is preserved until you turn off the power, but will be lost when the power is turned off. There are four types of data that you manage in Global mode;... -
Page 119: Other Functions
Other functions Restoring the factory set- tings (Loading the preloaded data) If desired, you can restore the microX’s programs, combinations, multi sets and Global mode settings to their factory-set state. You can do this by reload- ing the preloaded data. -
Page 120: Assigning A Name (Rename)
Other functions Assigning a name (Rename) You can modify the name of any program, combi- nation, multi set, category, arpeggio pattern, etc. The following table shows the items that you can rename, and the corresponding page. Item to rename Program name PROG 0...9 Utility: Write Program COMBI 0...9 Utility: Write Combination name... -
Page 121: Assigning Functions To Realtime Controls B-Mode Knobs [1]
Assigning functions to REALTIME CONTROLS B-mode knobs [1]–[4] Assigning functions to REAL- TIME CONTROLS B-mode knobs [1]–[4] Here’s how you can assign functions to REAL- TIME CONTROLS B-mode knobs [1]–[4]. The functions of these knobs in B-mode can be separately assigned for each program, combina- tion, and multi set. - Page 122 Other functions...
-
Page 123: Saving Data
You can save data in the following ways. • Write the data into the microX • Save the data using the included “microX Edi- tor/Plug-In Editor” software • Send a MIDI data dump to a MIDI data filer or... -
Page 124: About The Edit Buffer
PROG 0: Play, COMBI 0: Play, and MULTI 0: Play, the data of the selected program, combina- tion, or multi set is called into the microX’s edit buffer. When you edit the parameters in pages such as 0: Play, your editing will modify the data in the edit buffer. -
Page 125: Troubleshooting
Then turn the power of the microX off and on again, and repeat this procedure from step 1. 2. Use the [VALUE] dial to adjust the LCD contrast. -
Page 126: Programs And Combinations
Appendices In GLOBAL 0: System, Foot page, make sure that “Damper Polarity” or “Foot SW Polarity” is set correctly. ☞PG p.80 Noise or oscillation is heard When using the BPM/MIDI Sync. function to control the delay time of an effect, noise may occur in the delay sound. -
Page 127: Included Cd-Rom
Is the MIDI driver installed for the USB port you’ve connected? → The driver must be installed for each USB port you use. If you connect the microX to a USB port other than the port you used when install- ing the KORG USB-MIDI Driver for Windows XP, you’ll need to reinstall the KORG USB-... -
Page 128: Specifications And Options
Appendices Specifications and options Specifications Operating temperature +0 – +40 °C (do not allow condensation) System HI (Hyper Integrated) Synthesis System Keyboard 25 key Synthesis types Sound Engine Maximum polyphony Waveform memory Oscillator Filters Programs Modulation Number of timbres, Combinations master keyboard functionality Number of tracks, master... -
Page 129: Operating Requirements For Connection To A Computer
Weight 2.4 kg Power supply DC 12V voltage Power Consumption AC adapter, Operation guide, CD-ROM (microX Editor/Plug-In Editor, KORG USB-MIDI driver, Parameter Accessories guide, External Control Template) Operating requirements for connection to a computer KORG USB-MIDI Driver operating requirements Computer A computer with a USB port, that satisfies the requirements of Microsoft Windows XP... -
Page 130: Midi Implementation Chart
Appendices MIDI Implementation Chart... - Page 131 MIDI Implementation Chart...
-
Page 132: Index
Appendices Index Alternate modulation 51 Amp 55 Amp EG 55 AMS 51 ARP ON/OFF 91 Arpeggiator 91 Adjusting the tempo 92 Link 88 On/Off 91, 97 Arpeggio pattern 93 Initialization 99 User arpeggio pattern 99 ASSIGNABLE PEDAL 27, 89 ASSIGNABLE SWITCH 26, 88 Assigning a name 114 Audio output 25 AUDITION 38... - Page 133 Mode 17 Combination mode 57 Global mode 87 Multi mode 69 Program mode 37 Select 19 Modulation Amp 55 Filter 54 Pitch 52 Monophony 48 Multi mode 69 Multi Mode (Global) 33 Multi set 69 Multisample 48 Multi-timbre 33 Mute 70 Note Number 40 OCTAVE 41, 88 Oscillator 48...
- Page 134 Please also retain your receipt as proof of purchase otherwise your product may be disqualified from the manufacturer’s or distributor’s warranty. 4015-2 Yanokuchi, Inagi-city, Tokyo 206-0812 Japan 2006 KORG INC.
Need help?
Do you have a question about the microX and is the answer not in the manual?
Questions and answers