Advertisement
Available languages
Available languages
Quick Links
Download this manual
See also:
Owner's Manual
Thank you for purchasing the Korg minilogue polyphonic analog synthesizer. To help
you get the most out of your new instrument, please read this manual carefully.
Merci d'avoir choisi le synthétiseur analogique polyphonique minilogue de Korg. Afin de
pouvoir exploiter au mieux toutes les possibilités offertes par l'instrument, veuillez lire
attentivement ce manuel.
Vielen Dank, dass Sie sich für einen minilogue polyphonic analog synthesizer von Korg
entschieden haben. Bitte lesen Sie sich diese Anleitung vollstädig durch, um bei der
Bedienung alles richtig zu machen.
About the owner's manual
The documentation for this product consists of the following:
- Precautions (Exhibit)
- Quick Start Guide (what you're reading)
- Owner's Manual (you can download it from the Korg website. www.korg.com/ )
La documentation pour ce produit comprend les manuels suivants.
La documentation pour ce produit comprend les manuels suivants:
- Précautions (Exposition)
- Guide de prise en main (ce que vous lisez)
- Manuel d'utilisation (que vous pouvez télécharger sur le site internet de Korg. www.korg.com/ ).
Hinweise zur Bedienungsanleitung
Für dieses Produkt existieren folgende Dokumente:
- Vorsichtsmaßnahmen (Zeigen)
- Blitzstart (die halten Sie gerade in der Hand)
- Bedienungsanleitung (als Download von der Korg-Website erhältlich. www.korg.com/ )
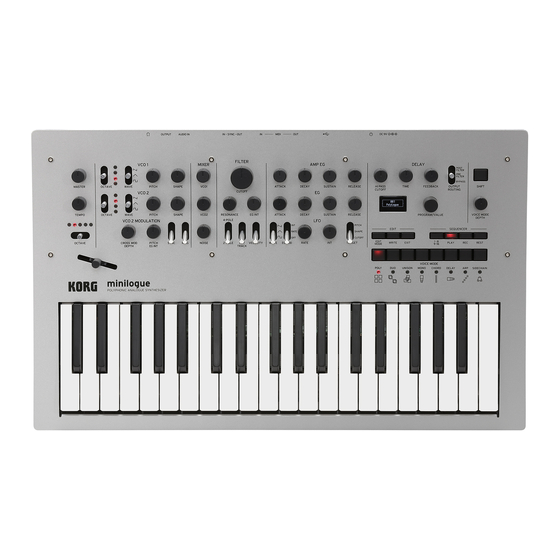
Front panel and Rear panel
Description des panneaux et fonctions
Oberseite und Rückseite
1
1. MASTER controls
2. VCO1 / VCO2 / VCO2 MODULATION section
3. MIXER section
4. FILTER section
2
3
4
5. AMP EG / EG / LFO section
6. DELAY section
7. EDIT and SEQUENCER section
8. VOICE MODE section
9
10 11
12
Gracias por comprar el sintetizador analógico polifónico Korg minilogue. Por favor, lea
este manual atentamente y gu delo para futuras consultas.
このたびは、コルグ・ポリフォニック・アナログ・シンセサイザーminilogueをお買い上げいただきまして、
まことにありがとうございます。本製品を末永くご愛用いただくためにも、取扱説明書をよくお読みになって
正しい方法でご使用ください。
Acerca del manual del usuario
La documentación de este producto incluye lo siguiente:
- Precauciones (Exposición)
- Guía de inicio rápido (el que está leyendo en este momento)
- Manual del usuario (puede descargarla del sitio web de Korg. www.korg.com/ )
取扱説明書について
本機の取扱説明書は以下のように構成されています。
• 安全上のご注意/保証規定/アフターサービス (別紙)
• クイック ・ スタート ・ ガイド (本書)
• 取扱説明書 (
www.korg.com/
5
9. Cable hook
10. DC 9V jack
11. Power switch
12. USB B port
13
14
15 16 17
よりダウンロードしてください。 )
Panel frontal y panel posterior
各部の名称
6
7
13. MIDI IN and OUT connectors
14. SYNC IN and OUT jacks
15. AUDIO IN jack
16. OUTPUT jack
17. Headphones jack
8
Advertisement

Related Manuals for Korg minilogue


Summary of Contents for Korg minilogue
- Page 1 • 安全上のご注意/保証規定/アフターサービス (別紙) - Guide de prise en main (ce que vous lisez) • クイック ・ スタート ・ ガイド (本書) - Manuel d’utilisation (que vous pouvez télécharger sur le site internet de Korg. www.korg.com/ ). • 取扱説明書 ( www.korg.com/ よりダウンロードしてください。 )...
- Page 2 Block diagram Schéma de principe Blockschaltbild Diagrama de bloques ブロック図 AUDIO INPUT enable bypass VOICE 4 pre VCF mix pre lter OUTPUT post lter VOICE 3 pre VCF mix DELAY VOICE 2 pre VCF mix VOICE 1 pre VCF mix VOICE pre VCF mix VCO1...
- Page 3 Connections Connexions Anschlüsse Conexiones 接続図 AC adapter (included) Headphones Computer Monitor speakers (with internal amp) Mixer Sound module, rhythm machine, etc. Microphone MIDI keyboard, rhythm machine, etc. Groove machine...
-
Page 4: Specifications
10. DC9V jack 3. Press the WRITE button, and then use the First, connect the DC end of the AC adapter to the minilogue; next connect the adapter to a suitable AC outlet. PROGRAM/VALUE knob to select “YES.” 11. Power switch 4. - Page 5 à tout moment. Prise DC9V 2, 3 Branchez la fiche 9V de l’adaptateur secteur à cette prise du minilogue, puis raccordez l’adaptateur à une prise de 1. Maintenez les boutons WRITE et EXIT enfoncés tout 1, 3, 4 courant de tension appropriée.
- Page 6 Tipp SYNC IN- und OUT-Anschlüsse ßend die WRITE-Taste. Dies Buchsen dienen dazu, die Schritte des minilogue mit anderen Geräten zu synchronisieren. An der SYNC IN-Buchse kann ein von einem anderen Gerät oder einer DAW ausgegebener Impuls empfangen Analogschaltkreis und Stimmen werden.
-
Page 7: Master Volume
Los ajustes de fábrica predeterminados del minilogue se pueden restablecer en cualquier momen- Jack DC 9V Conecte primero el extremo de CC del adaptador de CA al minilogue; a continuación, conecte el adaptador 1. Con los botones WRITE y EXIT pulsados, pulse el a una toma de CA adecuada. - Page 8 DELAYセクション フィードバック ・ ループにハイパス ・ フィルターが組み合わされたディレイのセクションです。 EDIT MODEボタンと1-8/9-16ボタンが消灯していること 原音 (ドライ音) にハイパス ・ フィルターをかけるかどうかを選択できます。また、 エフェク ト全体をバイパスすることも可 を確認します。 能です。詳しくはブロック図、 取扱説明書 ( www.korg.com/ ) をご覧ください。 WRITEボタンを押します。 2, 4 EDIT、 SEQUENCERセクション WRITE ボタンが点滅し、 プログラム保存の待機状態になり プログラムの選択や保存、 詳細なエディ ッ トを行います。ボタン1 ~ 8はボイス ・ モードの選択や、 ステップ ・ シーケンサー...
Need help?
Do you have a question about the minilogue and is the answer not in the manual?
Questions and answers