Table of Contents
Advertisement
Advertisement
Table of Contents

Related Manuals for Korg Minilogue XD


Summary of Contents for Korg Minilogue XD
-
Page 2: Table Of Contents
Controls and connections ............ 5 Front panel controls ..............5 Rear panel connections ..............6 Turning the power on/off .............7 Playing the minilogue xd ............9 Selecting and playing a program ..........9 Using Favorites .................10 Playing the sequencer .............. 11 Programs ................12 Program architecture ..............12... -
Page 3: Introduction
These symbols respectively indicate a caution, a supplementary note, or a tip. Main features • The minilogue xd features an analog signal path with four voices that takes after the Korg pro- logue analog synthesizer. • Each voice includes a MULTI ENGINE providing a noise generator, a VPM oscillator, and the possibility to load user programmed oscillators. -
Page 4: Block Diagram
Block diagram VOICE 1 VOICE 2 OUTPUT L Voice Mixer VOICE 3 DIGITAL VOICE 4 EFFECTS OUTPUT R VOICE VCO1 level WAVE SHAPE VCO 1 PITCH AMP EG gate CROSS MOD depth velocity RING SYNC WAVE SHAPE VCO 2 PITCH VCO2 level MULTI ENGINE MULTI level... -
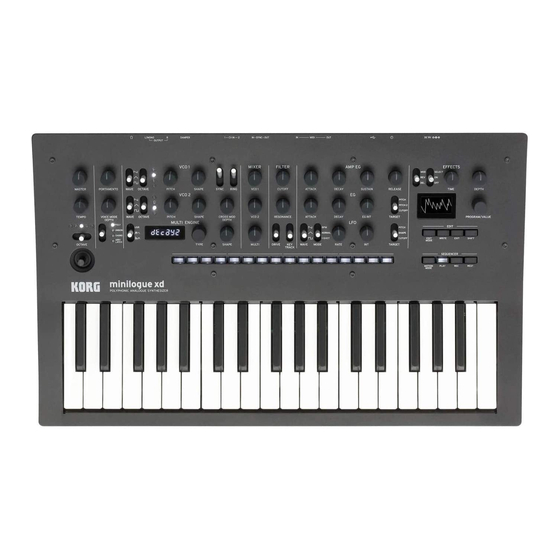
Page 5: Controls And Connections
Controls and connections Front panel controls This diagram shows the layout of the front panel knobs, switches, and buttons. 2. VOICE MODE section 3. VCO 1/VCO 2/MULTI ENGINE section 6. AMP EG/EG/LFO section 1. MASTER controls 4. MIXER section 5. FILTER section 7. -
Page 6: Rear Panel Connections
Rear panel connections The illustration below shows a typical example of connections for the minilogue xd. Connect the minilogue xd as appropriate for your own sound system. (Power) switch 9. OUTPUT L/MONO, R jacks 1. DC 9V jacks 5. MIDI IN, OUT connectors 7. -
Page 7: Turning The Power On/Off
Hold down the Power switch on the rear panel of the minilogue xd; once the “minilogue xd” logo appears in the display, take your finger off the Power switch. - Page 8 Turning the minilogue xd off Any program data in the minilogue xd that has not been saved will be lost when the power is turned off. Be sure to save any programs and other important data that you have edited (p.14 “Saving a program”).
-
Page 9: Playing The Minilogue Xd
Playing the minilogue xd Selecting and playing a program The minilogue xd features 500 program memories. When the unit is shipped from the factory, preset programs are assigned to program numbers 1–200. Programs 201–500 contain init programs (programs that have been initialized). -
Page 10: Using Favorites
Using Favorites You can use the favorites to register up to 16 programs that you like, to easily call them back later. Recalling your favorite programs In Play mode, press one of the buttons from 1–16 while holding down the SHIFT button. The favorite program previously registered to that button will be recalled, and the program name will be shown in the display. -
Page 11: Playing The Sequencer
Playing the sequencer Each program in the minilogue xd includes sequence data. In this section, we’ll play the sequence data saved as part of the preset programs. Turn the PROGRAM/VALUE knob to select a program. The display will indicate the program name. -
Page 12: Programs
A program includes settings for sounds, voice mode and effects, as well as sequence data and so on. (MASTER knob and joystick settings are not included in programs.) Try editing each related parameter, and enjoy the sounds of the minilogue xd. Basic parametres... -
Page 13: Creating Sounds
As you explore the front panel controls, you can see how each parameter will affect the sound, making it easier to understand how each section of the minilogue xd functions and how the pa- rameters interact. You can also create programs after initializing them (p.37 “Initialize Program”). -
Page 14: Saving A Program
Saving a program We recommend that you save your program on the minilogue xd after editing the sound to your liking. Any edits that you make will be lost if you turn off the power or recall a different program before saving the program. -
Page 15: Basic Parameters
The further the knob is turned to the right, the longer the portamento time will be. VOICE MODE section The minilogue xd features four analog synthesizer voices. By chang- ing the Voice mode, you can combine and allocate the voices in different ways. -
Page 16: Vco 1/Vco 2/Multi Engine Section
VCO 1/VCO 2/MULTI ENGINE section VCO 1, VCO 2 VCO: Voltage Controlled Oscillator There are two oscillators in the minilogue xd. Here, we will adjust the basic settings for the sound, including pitch (OC- TAVE, PITCH), waveform (WAVE, SHAPE) and so on. - Page 17 SYNC switch [OFF/ON] This switch lets you sync the oscillators. Oscillator sync is a popular effect for creating edgy synth leads. ON (up position): With this type of modulation, the phase of oscillator 2 is forcibly synchronized to the phase of oscillator 1. This adds harmonic overtones to the frequency of oscillator 2, making a complex waveform.
- Page 18 NOISE Noise is used to create percussion instrument sounds, or sound effects such as surf. Select one of the four noise generators using the TYPE knob. Move the SHAPE knob to make changes in the sound. TYPE knob [High/Low/Peak/Decim] Select the noise generator to use. The noise generator name will be indicated on the MULTI ENGINE display.
- Page 19 This engine is a VPM (Variable Phase Modulation) oscillator. The engine features a simple struc- ture with one carrier and one modulator, but allows you to create a wide range of sounds. Sixteen oscillator types are available for this VPM oscillator. mod attack mod decay pitch...
-
Page 20: Mixer Section
You can load your own oscillator programs into a user oscillator to make sounds on the minilogue Up to 16 user oscillators can be saved. One factory-set default user oscillator is included with the minilogue xd for demo purposes. See the “logue SDK” (www.korg.com) for details. TYPE knob Selects a user oscillator. -
Page 21: Filter Section
FILTER section VCF: Voltage Controlled Filter The low-pass filter creates a brighter or darker sound by selectively filtering certain parts of the harmonic spectrum of the sound generated by the oscillators and the noise generator. CUTOFF knob [0...1023] This knob is used to set the cutoff frequency (the frequency at which the filter is applied). -
Page 22: Eg/Lfo Section
EG/LFO section AMP EG VCA: Voltage Controlled Amplifier / EG: Envelope Generator These are the settings for the envelope generator (EG), which controls changes in the signal volume of the VCA over time. Level Note on Note o Attack Level Sustain Level Time... - Page 23 LFO: Low Frequency Oscillator The LFO is a low frequency oscillator that creates a repeating cyclical signal to modulate the pitch, sound and so on. Depending on its target, the LFO can provide vibrato (PITCH); tonal changes to the Oscillators (SHAPE);...
-
Page 24: Effects Section
USER (user effects) are not installed as factory-set default effects, so they cannot be select- Tip: ed, but you can load them into the minilogue xd to make them selectable. See the “logue SDK” (www.korg.com) for details. Both delay and reverb user effects cannot be used at the same time. The effect last se- Note: lected will be enabled. -
Page 25: Sequencer
(step edit). We recommend that you save the sequences you have recorded on the minilogue xd. The sequence data that you record will be lost if you turn off the power or recall a different program before saving. - Page 26 Real-Time recording This feature allows you to record your keyboard performance on the minilogue xd and add over- dubs (recording while adding performance data) in real time. Press the PLAY button in the SE- QUENCER section while the sequenc- er is stopped.
- Page 27 After the set number of steps have finished recording, the Motion Sequence will automati- cally finish recording as well. Follow steps 2 and on to record motion sequences for other knobs and switches. The number of steps is set for each program. You can change the number of steps using the “Step Length” (p.37) function in the SEQ EDIT mode.
- Page 28 Editing sequence data (step edit) Using Step Edit, you can edit the notes and motion sequences that you previously recorded into sequence data. Select a program that includes the sequence data you wish to edit. The MOTION MODE button and buttons 1–16 will light and go dark to show the status for each step.
- Page 29 Enable or disable the steps. • Press buttons 1–16 to enable (the button will light) or disable (the button will go dark) the steps. If a note or motion sequence is not recorded for a step, you cannot enable that step. Note: After you finish step editing, press the PLAY button to check your sequence data.
-
Page 30: Edit Mode
Edit mode Although nearly all of the minilogue xd’s main parameters can be edited using the knobs and switches on the panel, the other detailed parameters are accessed using the Edit mode. There are three sub-modes within the Edit mode: PROGRAM EDIT mode, SEQ EDIT mode, and GLOBAL EDIT mode. -
Page 31: Edit Mode Parameter List
Edit mode parameter list Button JOYSTICK CV INPUT PITCH MODULATION OTHER MULTI PROGRAM INITIALIZE DUMP (p.32) (p.33) SETTING (p.34) (p.35) SETTINGS ENGINE NAME (p.37) (p.37) (p.33) (p.35) (p.36) (p.36) X+ Bend CV IN Mode Microtuning LFO Target EG Velocity Multi Parameter 1 PROGRAM Initialize... -
Page 32: Program Edit Mode
PROGRAM EDIT mode Button 4 (JOYSTICK) This configures the joystick settings. X+ Bend Range [Off, 1 Note...12 Note] Specifies how much pitch bend will be applied when moving the joystick to the right. X– Bend Range [Off, 1 Note...12 Note] Specifies how much pitch bend will be applied when moving the joystick to the left. - Page 33 Button 5 (CV INPUT) Two CV IN jacks are available on the minilogue xd. These jacks let you control the internal param- eters via CV (control voltage) input, by connecting a modular synthesizer or other device to the minilogue xd. CV/Gate signals are also supported.
- Page 34 Minor Penta: This is a minor pentatonic scale. Reverse: This is a scale that symmetrically inverts the notes on the keyboard, with C4 as the center. AFX 001...006: These are an original scale created by Aphex Twin, set for the entire note range. USER SCALE 1...6: These are a user-defined scale based on equal temperament tuning, which lets you alter the pitches of each note over the entire keyboard range in semitones and cents.
- Page 35 Button 8 (MODULATION) EG Velocity [0..127] Sets the strength of the Cutoff EG Int using velocity. EG Velocity is used to specify how much the EG Int will change according to the keyboard velocity. If EG Int is set to any other value besides “0”, the keyboard velocity can be used to soften the EG Int.
- Page 36 Adjusts the depth of the modulator effect via keyboard tracking. The higher the sound frequency, the less noticeable the effect becomes. When the user oscillator is selected See the “logue SDK” (www.korg.com) for details. Button 12 (PROGRAM NAME) PROGRAM NAME You can create a program name up to 12 characters in length.
-
Page 37: Seq Edit Mode
Turn the PROGRAM/VALUE knob until “Press WRITE” is indicated in the display. Press the WRITE button to send a SysEx program dump from the minilogue xd’s MIDI OUT and USB B port. The message “Transmitting” will be shown in the display during data transmission. - Page 38 Button 7 (SEQ CLEAR) This function provides a convenient way to delete all data within a specific sequence. All Clear When using All Clear, all notes and motion sequences contained within the sequence data will be deleted. Turn the PROGRAM/VALUE knob until “Press WRITE” is indicated in the display. Press the WRITE button to delete.
-
Page 39: Global Edit Mode
Master Tune [–50 Cent...0 Cent...+50 Cent] This adjusts the overall tuning of the entire minilogue xd in one-cent units (semitone = 100 cents), over a range of ±50 cents. 0: A4 is equal to 440 Hz. - Page 40 Type 1 This curve requires you to play strongly in order to produce an ef- fect. Type 2, 3 Type 4 This is a typical curve. Type 5 Type 6 This curve produces an effect without requiring you to play very strongly.
- Page 41 Rise: The minilogue xd will create a sync pulse as it rises to its crest (the highest point) of the waveform. Fall: The minilogue xd will create a sync pulse as it falls to its trough (the lowest point) of the waveform.
- Page 42 LED may not show up in the display. Brightness [1...10] Adjusts the display brightness. Continuous use of the minilogue xd while the brightness is set to a high value will have an adverse effect on the overall life of the display. Auto Power Off [Off, On] Sets whether the auto power off feature is enabled.
- Page 43 SHIFT button to adjust the tuning value in semitones (100 cents). See “Microtuning” (p.45) for details. When this parameter is displayed, the minilogue xd can receive SysEx microtuning mes- sages. This will overwrite the scale contents you are currently editing, regardless of the numbers specified in the messages.
- Page 44 Button 15 (ALL DUMP) This button transmits the programs, live set and global SysEx data of this instrument to another minilogue xd, MIDI data filer, computer or other compatible device that is connected. All Dump (USB) Turn the PROGRAM/VALUE knob until “Press WRITE” is indicated in the display.
-
Page 45: Other Functions
Auto-tuning will be done when the minilogue xd is not producing a sound. As you continue to play the minilogue xd for a while right after you’ve turned it on, the pitch and tone may gradually drift. If the pitch drift becomes noticeable, use the steps below to tune the minilogue xd. - Page 46 Play the note on the keyboard that you want to edit. The note name will be indicated in the display. While this screen is displayed, the minilogue xd will play use the microtuning you are cur- rently editing. You can play up to four notes at the same time to edit their tunings together.
-
Page 47: Restoring The Factory Settings
The display will indicate the message “Are you sure?”. Turn the PROGRAM/VALUE knob to select “Yes”, and press the WRITE button. The factory-set default data will be reloaded, and the minilogue xd will be restored to its fac- tory default state. - Page 48 Function SHIFT button + MULTI ENGINE Play mode This adjusts the modulator ratio. parameter settings When selecting “VPM” for (ALT) the MULTI ENGINE us- ing the NOISE/VPM/USR switch SHAPE knob (MULTI EN- GINE) Play mode Adjusts the depth of the sample rate via key- When selecting “Decim”...
-
Page 49: Using With Other Devices
When controlling an external device from the minilogue xd To synchronize the minilogue xd to other devices such as the volca, use a stereo mini cable to con- nect the SYNC OUT jack of this instrument to the SYNC IN jack of the external device. -
Page 50: Making Connections With The Cv In Jacks
Connect these jacks to a external device that can output CV signals to control the minilogue xd. Connect the CV IN jack of the minilogue xd to the CV OUT jack of the external device using a monaural mini cable (or a stereo mini cable). - Page 51 MIDI tone generator. In either case, you’ll need to connect the MIDI OUT connector to the MIDI IN connector on both the minilogue xd and the external MIDI sequencer or computer.
- Page 52 MIDI. The minilogue xd will act as the master, and the tempo that is set using the TEMPO knob on the minilogue xd will be sent as MIDI timing clock data to oper- ate the external MIDI device (sequencers, rhythm machines, and so on).
-
Page 53: Data List
Data list Effects list EFFECT TYPE: DELAY SUB TYPE Delay Stereo A stereo delay with an expansive left-right field. Mono A straight monaural delay. Ping Pong A ping-pong delay that bounces back and forth from left to right. Hipass A delay with a high-pass filter on which the low frequency band fades out. Tape Simulates a tape echo. One Tap A delay without feedback, on which the delay sounds only once. - Page 54 A phaser derived from the sound of the human voice. Twinkle A phaser that creates a twinkling (sparkly) sound. FLANGER Stereo An effect that creates a thick swelling sound and a sense of motion in pitch. Light A flanger with a thinner effect than the stereo type. Mono A monaural flanger. High Sweep A flanger that sweeps through the high-frequency bands. Mid Sweep A flanger that sweeps through the mid-frequency bands. Pan Sweep A flanger that pans from left to right. Mono Sweep A monaural sweeping flanger. Triphase A flanger featuring the effect of three LFOs. (USER) This effect is not installed at factory-set default, so it cannot be selected. Upload a user effect in order to select. See the “logue SDK” (www.korg.com) for details.
-
Page 55: Program List
Tomohiro Nakamura Sharp Fifth Poly Synth POLY Artemiy Pavlov Quarra Poly Synth POLY Tomohiro Nakamura Terror Key Poly Synth POLY KORG Inc. PWM Cloud Poly Synth POLY Artemiy Pavlov Pump SAW Poly Synth POLY Tomohiro Nakamura Orchestra xD Poly Synth POLY... - Page 56 POLY Artemiy Pavlov Gaia Dawn POLY Tomohiro Nakamura Swollen Pad POLY Dorian Concept Xtra Fat POLY Artemiy Pavlov Sacred Wall POLY KORG Inc. Ring PWM POLY Artemiy Pavlov BrightStrngs POLY Artemiy Pavlov Square Drone POLY Artemiy Pavlov Boombastic Bass CHORD...
- Page 57 Program Name Category Voice Mode Author EvilSyncLead Lead UNISON Tomohiro Nakamura OvrdriveLead Lead UNISON KORG Inc. Hybrid Lead POLY Artemiy Pavlov Hoover Cloud Lead UNISON Artemiy Pavlov Dense Lead Lead CHORD Taylor McFerrin The Blob Lead CHORD Dorian Concept WaveringLead...
- Page 58 Program Name Category Voice Mode Author TPL BasicSqr Template POLY KORG Inc. TPL BasicSin Template POLY KORG Inc. TPL LayerOct Template POLY KORG Inc. TPL Layer5th Template POLY KORG Inc. TPL 3sawPoly Template POLY KORG Inc. TPL 4sawDuo Template POLY KORG Inc.
- Page 59 Voice Mode Author (Init Program) All Programs were made by Artemiy Pavlov, Dorian Concept, Ian Bradshaw, Luke Edwards, Nick Kwas, Taylor McFerrin, Tomohiro Nakamura and KORG Inc. For more information about the authors please visit: Artemiy Pavlov https://www.sinevibes.com/ Dorian Concept https://www.dorianconcept.com/...
-
Page 60: Specifications
Specifications Keyboard 37 keys (slim keyboard, velocity sensitive) Sound generator Analog sound generator + Multi digital sound generator Maximum polyphony 4 voices Programs 500 (200 preset programs and 300 user programs as the factory-set de- fault) Each program includes Voice mode settings. Programs can be set as favorites. -
Page 61: Midi Implementation Chart
*5: When the Global setting is "Clock Source=Internal", the prologue will not receive signals. The prologue will receive signals when set to "Auto (MIDI)" or "Auto (USB)". Mode 1: Omni On, Poly Mode 2: Omni On, Mono O: Yes Mode 3: Omni Off, Poly Mode 4: Omni Off, Mono X: No Consult your local Korg distributor for more information on MIDI implementation. - Page 62 © 2018 KORG INC. Published 1/2019...
Need help?
Do you have a question about the Minilogue XD and is the answer not in the manual?
Questions and answers