Table of Contents
Advertisement
Quick Links
- 1 Chapter 3 - Introduction to Your Onetouch
- 2 Chapter 4 - Getting Your Pump Ready
- 3 Chapter 6 - Using Basal Program Features
- 4 Chapter 10 - Advanced Features/Setup and Activation
- 5 Chapter 1 - Setting up Your Onetouch
- 6 Unlocking Meter Remote Buttons
- 7 Lock Buttons
- 8 Chapter 10 - Understanding Meter Remote Error and Other Messages
- Download this manual
Advertisement
Table of Contents
Troubleshooting

Subscribe to Our Youtube Channel
Related Manuals for Animas OneTouch Ping

Summary of Contents for Animas OneTouch Ping
- Page 1 Glucose Management System Owner’s Booklet...
- Page 3 Welcome Congratulations. You have chosen one of the most advanced diabetes management systems available ® ™ today. Your OneTouch Ping Glucose Management System will play an integral part in the blood glucose management and continuous insulin delivery regimen that you have established with your health care professional.
-
Page 4: Table Of Contents
TABLE OF CONTENTS BEFORE YOU BEGIN SECTION I : ONETOUCH ® PING ™ INSULIN PUMP CHAPTER 1 - Important Information CHAPTER 2 - Explanation of symbols ® ™ CHAPTER 3 - Introduction to your OneTouch Ping Insulin Pump CHAPTER 4 - Getting your pump ready CHAPTER 5 - Using the Normal Bolus feature CHAPTER 6 - Using Basal Program features CHAPTER 7 - Suspend/Resume feature... - Page 5 SECTION II : ONETOUCH ® PING ™ METER REMOTE CHAPTER 1 - Setting up your OneTouch ® Ping ™ Meter Remote CHAPTER 2 - Setting up and using the Food Database CHAPTER 3 - Estimating bolus insulin amounts with the bolus calculator CHAPTER 4 - Testing your blood glucose CHAPTER 5 - Adding comments to glucose test results CHAPTER 6 - Making logbook entries...
-
Page 6: Before You Begin
• Food Database Reference Guide OneTouch ® Ultra ® Control Solution • and Instructions for Use for: • Animas ® IR 1200/2000 Series Cartridges • Infusion Sets • ezManager ® Software While reading this Owner’s Booklet, please note the following: Display screens throughout the Owner’s Booklet are examples only. -
Page 7: Intended Use
BEFORE YOU BEGIN Intended use Your OneTouch ® Ping ™ Glucose Management System is indicated for the treatment of insulin-requiring diabetes and for the quantitative measurement of glucose in fresh capillary whole blood. Your OneTouch ® Ping ™ Insulin Pump is indicated for continuous subcutaneous infusion of insulin for the treatment of insulin-requiring diabetes. - Page 8 Alternatively, you may turn off RF communication between the meter remote and pump and perform insulin delivery functions directly from your pump (see Chapter 2 in Section III, pages 182–184). Changes or modifications not expressly approved by the manufacturer (Animas ® Corporation) could void the user’s authority to operate the equipment.
- Page 9 Insulin Pump b. One Energizer ® Lithium L91 AA battery (1.5V) for your pump c. Owner’s Booklet d. Envelope that includes Instructions for Use for Animas ® IR 1200/2000 Series Cartridges ® e. Sample Animas IR 1200/2000 Series (200 U/2ml) Cartridge f.
- Page 10 BEFORE YOU BEGIN The OneTouch ® Ping ™ Meter Remote kit which includes: • ® ™ a. OneTouch Ping Meter Remote ® ® b. OneTouch Ultra Control Solution c. OneTouch ® Lancing Device If another type of lancing device is included, see the separate instructions for that lancing device. d.
-
Page 11: Emergency Kit
An extra pump battery cap • An extra pump cartridge cap (In the U.S., Canada and Puerto Rico, call 1 877 937-7867 to order an extra cartridge cap. All other customers contact your local Animas ® distributor.) Glucagon Emergency Kit ®... - Page 12 BEFORE YOU BEGIN...
-
Page 13: Section I
Section I OneTouch ® Ping ™ Insulin Pump... - Page 15 Welcome and Congratulations You have begun a new way of life with your OneTouch ® Ping ™ Insulin Pump. Your choice of pump therapy is a sign that you are committed to taking excellent care of yourself. Your pump has been specially designed to help you manage your diabetes, using advanced technology and sophisticated safety systems.
-
Page 17: Chapter 1 - Important Information
CHAPTER 1 - IMPORTANT INFORMATION This section of the Owner’s Booklet contains information about how to use, program and maintain your new pump. It is important to read it carefully. Even if you are an experienced pumper, keep your Owner’s Booklet handy for reference. - Page 18 CHAPTER 1 - IMPORTANT INFORMATION Medical Procedures and Equipment Health Care Procedure Patient is Pumper Professional/Technician is Pumper Pacemaker/ Disconnect pump and leave outside Follow normal safety practices and Automatic Implantable room during insertion of device and proceed to the designated safe Cardioverter- reprogramming.
- Page 19 CHAPTER 1 - IMPORTANT INFORMATION Medical Procedures and Equipment Health Care Professional/Technician Procedure Patient is Pumper is Pumper No need to disconnect. No need to disconnect. • • Pump should remain covered by lead apron Follow normal X-ray safety practices and •...
- Page 20 Your pump is a sealed device that should be opened ONLY by the manufacturer. If your pump seal ® is broken by anyone other than an authorized Animas factory technician, the warranty is voided and your pump is no longer waterproof. If the back label on your pump is removed or damaged, the warranty is voided and your pump is no longer waterproof.
-
Page 21: Safety Information
• If using the upload or download feature, keep the communication window free of obstructions and refer to the Instructions for Use included with the IR (infra-red) Accessory Kit. Contact your local Animas ® distributor for information on ezManager ®... - Page 22 CHAPTER 1 - IMPORTANT INFORMATION • Before Bedtime Try to arrange infusion set changes at meals or one to two hours before bedtime. If a change ˚ is needed at bedtime, then check BG in one to two hours. Always check BG one to two hours after infusion set change.
-
Page 23: Chapter 2 - Explanation Of Symbols
CHAPTER 2 - EXPLANATION OF SYMBOLS CHAPTER 2 - EXPLANATION OF SYMBOLS ® ™ Shown below are symbols you will find on your OneTouch Ping Insulin Pump and its packaging. On the front of your pump: Up Arrow button Down Arrow button OK button On the top of your pump: Contrast button... - Page 24 CHAPTER 2 - EXPLANATION OF SYMBOLS...
-
Page 25: Display Screen
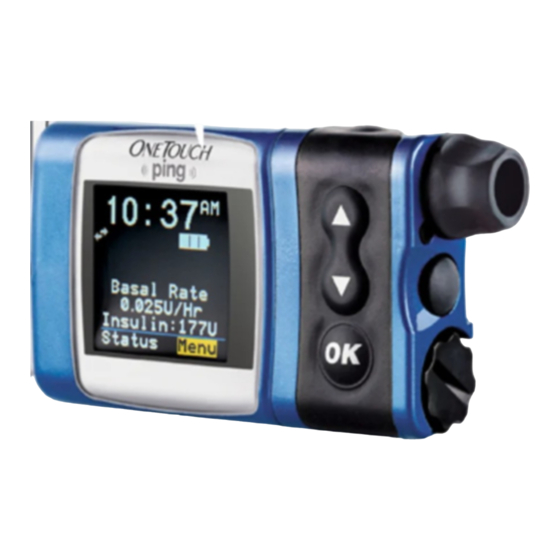
CHAPTER 3 - INTRODUCTION TO YOUR ONETOUCH ® PING ™ INSULIN PUMP CHAPTER 3 - INTRODUCTION TO YOUR ONETOUCH ® PING ™ INSULIN PUMP An insulin pump is a tool to allow you to better manage your diabetes by mimicking the way a healthy pancreas delivers insulin. - Page 26 Doing so will compromise your pump’s waterproof capabilities. If ® at any time you suspect the vent openings are clogged, replace the battery cap or call Animas Customer Service for questions about the Primary Vent.
- Page 27 CHAPTER 3 - INTRODUCTION TO YOUR ONETOUCH ® PING ™ INSULIN PUMP Cartridge Compartment Cap This cap secures your cartridge and infusion set in your pump. WARNING: Never tighten the cartridge cap when your infusion set is attached to your body. Tightening the cartridge cap while your infusion set is attached to your body may result in unwanted insulin delivery, which can result in serious injury or death.
- Page 28 CHAPTER 3 - INTRODUCTION TO YOUR ONETOUCH ® PING ™ INSULIN PUMP NOTE: When the RF feature is activated on your pump, an RF ( ) symbol will 2 : 27 appear on the top left of your pump Home screen. After a set amount of time with no button presses, your pump display screen Basal Rate will “time out”...
-
Page 29: Chapter 4 - Getting Your Pump Ready
• Battery cap tool or coin • • Infusion set with standard Luer connector • Animas ® IR 1200/2000 Series (200 unit/2ml) Cartridge • Alcohol wipe (to clean top of insulin vial) • Vial of U100 insulin (rapid-acting) at room temperature ™... -
Page 30: Changing The Battery
CHAPTER 4 - GETTING YOUR PUMP READY NOTE: Your pump uses battery power to notify you of alerts, warnings, and alarms. If you do not confirm the notification, your pump will continue to use battery power as the notifications repeat and progress. This will result in reduced battery life and the Replace Battery Alarm screen appearing sooner than expected. - Page 31 CHAPTER 4 - GETTING YOUR PUMP READY Check the displayed time/date, battery type and language. If correct, scroll 2 : 27 down to highlight “Confirm” and press the button. The Home screen will be displayed. For more details on changing the time and date, see Setup - Basics, Setting/Changing Time and Date, pages 17–18 in this chapter.
- Page 32 CHAPTER 4 - GETTING YOUR PUMP READY Use the buttons to select the next field. Repeat the above process. Scroll to highlight “Main Menu” and press button when finished. The MAIN MENU screen will be displayed. NOTE: • If you select the 12-hour time format, the AM/PM indicators will change as you scroll to set the time. Be sure the desired AM or PM selection is correctly displayed when setting the time.
- Page 33 CHAPTER 4 - GETTING YOUR PUMP READY The Remote Bolus Sound on your pump signals you when you use your meter remote to deliver a bolus from your pump. This setting applies only when you begin using your meter remote and pump together as a system (see Section III).
- Page 34 • Skin prep such as IV Prep WARNING: The efficacy of your pump cannot be guaranteed if cartridges other than those manufactured by Animas ® Corporation are used. Only infusion sets marketed for use with insulin infusion pumps using insulin-compatible ®...
- Page 35 CHAPTER 4 - GETTING YOUR PUMP READY Remove cap from the filled cartridge tip. To avoid Connect infusion set to insulin spillage and introduction of air in the cartridge here cartridge, it should never be filled beyond the 2.0 mL mark. The plunger is properly positioned for maximum fill when the black o-ring nearest the plunger tip is centered on the 2.0 mL mark.
- Page 36 CHAPTER 4 - GETTING YOUR PUMP READY Priming your Pump and Infusion Set NOTE: As each step is completed, the check box on the ezPrime menu will be shaded. WARNING: Never prime the tubing or tighten the cartridge cap while infusion set is connected to your body.
- Page 37 CHAPTER 4 - GETTING YOUR PUMP READY Insert your filled cartridge. Secure cartridge compartment cap to pump by turning in a clockwise motion until finger tight but Do Not over tighten. WARNING: Never tighten the cartridge cap while the infusion set is connected to your body. Tightening the cartridge cap while the infusion set is connected to your body can result in serious injury or death.
- Page 38 CHAPTER 4 - GETTING YOUR PUMP READY Make sure “Go Prime” is highlighted. Press PRIMING PRIMING ACTIVE DONE and hold the button until you see 5 drops of Press AND HOLD insulin come out the end of your infusion set. This Primed OK button means your tubing is primed.
-
Page 39: Changing The Cartridge And Infusion Set
CHAPTER 4 - GETTING YOUR PUMP READY Selecting the Infusion Site and Inserting the Infusion Set Your health care team will review appropriate site selections and techniques for insertion based on your body type. Refer to the Instructions For Use included with your infusion set for proper insertion guidelines. - Page 40 CHAPTER 4 - GETTING YOUR PUMP READY...
- Page 41 CHAPTER 5 - USING THE NORMAL BOLUS FEATURE CHAPTER 5 - USING THE NORMAL BOLUS FEATURE This chapter covers the basics of a Normal bolus, which is used to cover food you have eaten and high BG. Your pump also offers advanced bolus features. See Chapter 10 in Section I, pages 49–58. MAIN MENU From the MAIN MENU, select “Bolus”.
-
Page 42: Chapter 5 - Using The Normal Bolus Feature
CHAPTER 5 - USING THE NORMAL BOLUS FEATURE NOTE: If you have Advanced Bolus and Reminders features turned on, the BOLUS MENU BOLUS MENU at right will be displayed when you select “Bolus” from the Normal ezCarb MAIN MENU. Select Normal and press . -
Page 43: Chapter 6 - Using Basal Program Features
CHAPTER 6 - USING BASAL PROGRAM FEATURES CHAPTER 6 - USING BASAL PROGRAM FEATURES You can program your pump to display either 1 or 4 basal program options. Basal insulin is delivered continuously to help keep your BG in target between meals. Having more than one pre-set basal program makes it easy for you to switch based on your needs including weekends, weekdays, shift work, and menstruation. - Page 44 CHAPTER 6 - USING BASAL PROGRAM FEATURES BASAL MENU Scroll to select the program “1-WEEKDAY” and press Total 0.00U Temp NOTE: You do not have to Suspend your pump to edit an active program. A1-WEEKDAY When you select “Edit” from the BASAL MENU, your pump automatically suspends delivery.
- Page 45 CHAPTER 6 - USING BASAL PROGRAM FEATURES Continue until basal segments have been set as recommended by your health care team. . If you have edited the active program, it is When finished, scroll to “Save/Review” and press now resumed automatically. The BASAL OPTIONS screen is displayed. Warning Basal edit NOTE: If your screen display has timed out (gone to sleep) before you have...
- Page 46 CHAPTER 6 - USING BASAL PROGRAM FEATURES NOTE: • If you program a segment to start at the same time as an existing segment, the previously entered segment is deleted. • If you program a segment to start at a time that precedes an existing segment, the new segment is automatically inserted in the correct place.
- Page 47 CHAPTER 6 - USING BASAL PROGRAM FEATURES Clearing Basal Programs BASAL OPTIONS A1-WEEKDAY This feature allows you to clear all information from a basal program. Total 13.60U Clear From the BASAL MENU, scroll to desired program. Edit Review Main Menu From the BASAL OPTIONS screen, scroll to “Clear”.
- Page 48 CHAPTER 6 - USING BASAL PROGRAM FEATURES The “Change” % field will flash to indicate Edit A1-WEEKDAY A1-WEEKDAY TEMP BASAL TEMP BASAL mode. Use the buttons to enter the percentage change desired. Press the button to Change: Change: exit Edit mode. -40% Duration: Duration:...
- Page 49 CHAPTER 6 - USING BASAL PROGRAM FEATURES Canceling a Temporary Basal Program From the BASAL MENU, select “TEMP BASAL”. Press A1-WEEKDAY Details of the current active Temp Basal program will be displayed. Scroll up TEMP ACTIVE 0.675 U/Hr to “CANCEL” and press -40% = 0.405 U/Hr Your previously active basal program will be activated and the Home screen...
- Page 50 CHAPTER 6 - USING BASAL PROGRAM FEATURES...
-
Page 51: Chapter 7 - Suspend/Resume Feature
CHAPTER 7 - SUSPEND/RESUME FEATURE CHAPTER 7 - SUSPEND/RESUME FEATURE This feature allows you to stop and restart delivery quickly and easily. It also cancels delivery of any Temp Basal or Bolus, including Combo Bolus that may be currently active. The Combo Bolus feature is covered in Chapter 10 in Section I, pages 49–58. Suspending Delivery From the MAIN MENU, scroll to “Suspnd/Resum”... - Page 52 CHAPTER 7 - SUSPEND/RESUME FEATURE Resuming Delivery MAIN MENU Bolus Suspnd/Resum History Basal From the MAIN MENU, scroll down to “Suspnd/Resum” and press Setup Prime/Rewind Status Home Pump Suspended at 1:13PM Oct 2, 2007 “ Resume” is highlighted. Press Resume Main Menu 2 : 27 The Home screen is displayed to show you that your pump is no longer in...
-
Page 53: Chapter 8 - History Feature
CHAPTER 8 - HISTORY FEATURE CHAPTER 8 - HISTORY FEATURE Your pump stores important records for your review. You can access your pump’s history and view it directly on your pump screen or download it onto your computer using ezManager ®... - Page 54 CHAPTER 8 - HISTORY FEATURE Scroll up to highlight the record field. Press to activate Review Mode (indicated by flashing cursor). Record 1 indicates the most recent record. Use the buttons to scroll BOLUS to other records. Record Mar 23, 2007 12:13PM NORMAL 0.80U of 3.80U...
- Page 55 CHAPTER 8 - HISTORY FEATURE Alarm History Your pump displays the last 30 Alarm records. From the HISTORY menu, select “Alarm”. The HISTORY ALARM screen displays the following: Record Bolus Total Daily Mar 23, 2007 Dose (TDD) 01:13PM Record number •...
- Page 56 CHAPTER 8 - HISTORY FEATURE When finished reviewing, press to exit Review Mode. “ History Menu” is highlighted. Press to return to the HISTORY menu. Suspend History Your pump displays the last 30 Suspend records. From the HISTORY menu, select “Suspend”. The HISTORY SUSPEND Record...
- Page 57 CHAPTER 8 - HISTORY FEATURE NOTE: The History records each basal rate change. When no basal is being delivered, the Basal History Record will show 0 units delivered. This can happen for the following reasons: • Cartridge change • Battery change Suspend •...
- Page 58 CHAPTER 8 - HISTORY FEATURE...
-
Page 59: Chapter 9 - Status Feature
CHAPTER 9 - STATUS FEATURE CHAPTER 9 - STATUS FEATURE This feature gives you easy access to a summary of information about your pump’s current programming and performance. There are six Status screens. From the MAIN MENU or from the Home screen, scroll to “Status” and press MAIN MENU 2 : 27 Bolus... - Page 60 CHAPTER 9 - STATUS FEATURE Status Screen 3 – Delivery Today The screen displays the following information since midnight and up to the STATUS current time: DELIVERY TODAY U100 Temp Insulin type • Suspend • If Temp Basal has been active Bolus 9.400U Basal...
- Page 61 CHAPTER 9 - STATUS FEATURE Status Screen 6 – Codes The screen displays the following information: STATUS CODES • Software revision REV M=XXX.XX.XX D=XXX P=XXX Last seven digits of the serial number of your pump • S/N# 76543-21 • Codes for manufacturer’s use The cursor is flashing on the STATUS 6 screen.
- Page 62 CHAPTER 9 - STATUS FEATURE...
-
Page 63: Chapter 10 - Advanced Features/Setup And Activation
CHAPTER 10 - ADVANCED FEATURES / SETUP AND ACTIVATION CHAPTER 10 - ADVANCED FEATURES / SETUP AND ACTIVATION Now you’ve made it through the basics! Your pump offers many advanced features that you may find helpful in managing your diabetes. Consult with your health care team to determine which advanced features are appropriate for you. - Page 64 CHAPTER 10 - ADVANCED FEATURES / SETUP AND ACTIVATION Setup Advanced Screen 2 – Advanced Bolus Features and Multiple Basal Programs SETUP ADV 2 This screen allows you to: BOLUS Adv. Bolus • Turn Advanced Bolus Features (ezCarb, ezBG, Combo Bolus) on or off Reminders Delivery NRML...
- Page 65 CHAPTER 10 - ADVANCED FEATURES / SETUP AND ACTIVATION To move to the next Setup Advanced screen, scroll to the bottom of the screen and highlight “Next”. Press To return to the Home screen, scroll to “Home” and press CAUTION: Should you attempt a delivery that exceeds the limits you have set, your pump will alert you and display a text message.
- Page 66 CHAPTER 10 - ADVANCED FEATURES / SETUP AND ACTIVATION To return contrast setting to original factory default, press the button and button at the same time. When the word “Contrast” is displayed on the screen, press any button to return to the default contrast setting.
- Page 67 CHAPTER 10 - ADVANCED FEATURES / SETUP AND ACTIVATION NOTE: • The Low Cartridge Warning only alerts you one time. For example, if you Warning have it set to 30U and receive an alert, and then change the setting to 20U, it will not alert at 20U until after the next cartridge has been primed.
- Page 68 CHAPTER 10 - ADVANCED FEATURES / SETUP AND ACTIVATION Scroll to the “1U:” (grams) field and press to change to flashing cursor for Edit mode. Use the buttons to change the “1U:” (grams) field as desired. Press . Repeat to set remaining segments per your health care team’s recommendations.
- Page 69 CHAPTER 10 - ADVANCED FEATURES / SETUP AND ACTIVATION Use the buttons to change the segment start time. Press Scroll to the “1U:” (mg/dL units) field and press to change to flashing cursor for Edit Mode. Use the buttons to change the “1U:” (mg/dL units) field as desired. Press .
- Page 70 CHAPTER 10 - ADVANCED FEATURES / SETUP AND ACTIVATION NOTE: By setting a range (+/-) your pump will not calculate a BG correction dose if your actual BG is within that range. If you prefer to correct to one target number rather than a range, simply set your range to +/- 0.
- Page 71 CHAPTER 10 - ADVANCED FEATURES / SETUP AND ACTIVATION This screen allows you to: SETUP ADV 8 Insulin on Board • Turn the IOB feature on or off IOB-2 Select the duration • Duration 4.0 Hr Use the buttons to scroll to the desired field. Home Next Press...
- Page 72 CHAPTER 10 - ADVANCED FEATURES / SETUP AND ACTIVATION Setup Advanced Screen 9 – Sick Day Guidelines During your pump training, your health care team will discuss guidelines to use when you’re sick. This is a convenient way to store your basic sick day guidelines as recommended by your health care team. For more information on sick day guidelines, refer to Chapter 16 in Section I, pages 93–94, and contact your health care team.
-
Page 73: Chapter 11 - Using Advanced Features
CHAPTER 11 - USING ADVANCED FEATURES CHAPTER 11 - USING ADVANCED FEATURES CAUTION: Using the features in this chapter requires an advanced understanding of insulin pump therapy and should not be used without training and advice from your health care team. In order to achieve optimal results, some of these features should only be used once you have tested and fine-tuned your basal rates and your health care team has determined your individual targets and ratios. - Page 74 CHAPTER 11 - USING ADVANCED FEATURES Within 5 seconds, your pump will beep twice to “ask” you to confirm that Audio Bolus you wish to activate delivery and “Confirm” is displayed on the Audio Bolus screen. Confirm 3.00 Press any other key to CANCEL DELIVERING Within 5 seconds, press the button again to activate delivery.
- Page 75 CHAPTER 11 - USING ADVANCED FEATURES ezBolus ™ NORMAL BOLUS If you do not have your Audio Bolus feature turned on, the button on the end Amount of your pump will function as a shortcut to the Normal Bolus screen. 0.00 Press the button on the end once.
- Page 76 CHAPTER 11 - USING ADVANCED FEATURES Entering Carbs Manually BOLUS MENU From the BOLUS MENU, scroll to “ezCarb”. Press . The ezCarb Home Normal ezCarb screen is displayed. ezBG Combo Bolus Reminders Main Menu ezCarb Home Carbs: The cursor will flash on the “Carbs” field to indicate that you can edit the total number of carbs eaten.
- Page 77 CHAPTER 11 - USING ADVANCED FEATURES “Go” is highlighted. If you wish to give a Normal Bolus Total DELIVERING Bolus, press to deliver. Carb 2.26U 0.00U - -.- - U 2.25 Total = 2.25U 2.25U Press any function button Type Normal Bolus Total to cancel.
- Page 78 CHAPTER 11 - USING ADVANCED FEATURES The “Actual” field is highlighted and flashing to BG CORRECT BG CORRECT indicate Edit mode. Use the buttons to enter mg/dL mg/dL Actual Actual your BG value. Press . “Show Result” is Target Target highlighted.
- Page 79 CHAPTER 11 - USING ADVANCED FEATURES ezBG This feature allows you to enter your BG reading and your pump will automatically calculate a BG correction bolus based on the ISF and BG Target range for the current time of day. If the IOB feature is activated, your pump will calculate a reduced dose for high BG correction boluses.
- Page 80 CHAPTER 11 - USING ADVANCED FEATURES The ezBG Total screen is displayed with a suggested bolus amount. The bolus amount field is highlighted and flashing to indicate you can enter the total amount as shown or adjust as needed. Enter your bolus amount. Press to deliver.
- Page 81 CHAPTER 11 - USING ADVANCED FEATURES Combo Bolus The Combo Bolus feature is used to give both a Normal and Extended Bolus. This feature is useful for consumption of high fat meals such as pizza, if you will be “grazing” over a few hours or if you have gastroparesis.
- Page 82 CHAPTER 11 - USING ADVANCED FEATURES Scroll to “Go” and press to activate. The Home Combo Bolus 2 : 27 Total 8.50U screen shows Combo Bolus active. Duration 4.0Hr BOLUS ACTIVE Normal: Extend Basal Rate 0.675U/Hr 2.55: 5.95U Insulin: 105U Status Menu Main Menu...
- Page 83 CHAPTER 11 - USING ADVANCED FEATURES The “Time” field for this reminder will be REMINDERS highlighted. Press to activate Edit mode. Use the Reminder Reminder-1 Time = 12:00 buttons to enter the time you wish a reminder Reminder-2 12:00PM to sound (or vibrate, if that is the setting you selected Time = 12:00PM in the SETUP SOUND menu).
- Page 84 CHAPTER 11 - USING ADVANCED FEATURES Delivery Speed - Bolus On rare occasions, usually with very large boluses, users may experience a slight stinging sensation with rapid bolus delivery. If this is a concern, you can set the bolus delivery speed to slow to accommodate your needs.
- Page 85 CHAPTER 11 - USING ADVANCED FEATURES In the examples shown here, the IOB amount is subtracted from the BOLUS ezBG Total TOTAL screen and the ezBG Total screen. 2.81U 1.00U Total = 1.80U 1.80U Main Menu NOTE: • When you replace the battery, the IOB amount is cleared. •...
- Page 86 CHAPTER 11 - USING ADVANCED FEATURES...
-
Page 87: Chapter 12 - Care And Maintenance
If you work in a dusty environment such as a construction site, mill, cement factory, etc., or if you are a frequent swimmer, you should change your battery cap every 3 months. You can call Animas ®... - Page 88 CHAPTER 12 - CARE AND MAINTENANCE Disposal International and US regulations require controlled disposal of devices such as insulin pumps. Dispose of batteries according to your local environmental regulations.
- Page 89 CHAPTER 13 - SAFETY SYSTEM AND ALARMS CHAPTER 13 - SAFETY SYSTEM AND ALARMS Alerts, Warnings and Alarms Your pump has a progressive warnings and alarms safety system. This means if you do not confirm the warning or alarm, it will progress to the sweep alarm with vibrate within one hour. At the high volume stage, if you do not confirm the warning or alarm, the sweep alarm will begin and will not stop until appropriate action is taken.
-
Page 90: Chapter 13 - Safety System And Alarms
CHAPTER 13 - SAFETY SYSTEM AND ALARMS Alerts, Warnings and Alarms Alert: Temp Basal Minimum Rate Alert Cause Temp Active Negative Temp Basal activated. Minimum Effect Basal rate limited to Basal delivery will not go below 0.025U/Hr. 0.025U/Hr Message Displayed once for 3 seconds. Action None required. - Page 91 CHAPTER 13 - SAFETY SYSTEM AND ALARMS Alerts, Warnings and Alarms Alert: High BG Alert Cause HIGH BG Treat high BG entry above 250 mg/dL. Effect Check site. Check Requires user confirmation to continue. ketones. Monitor BG. Message Confirm Displayed until confirmed or until pump goes to sleep. Action Press to confirm.
- Page 92 CHAPTER 13 - SAFETY SYSTEM AND ALARMS Alerts, Warnings and Alarms Warning: Basal Delivery Suspended Warning Cause Basal edit not saved. Basal Edit was not saved. Basal Effect delivery suspended. Basal delivery stopped. Message Edit Basal Displayed when manually awakened until confirmed. Action Press to select “Edit Basal”.
- Page 93 CHAPTER 13 - SAFETY SYSTEM AND ALARMS Alerts, Warnings and Alarms Warning: Low Battery Warning Cause Battery life will only last a minimum of 30 minutes. battery. Effect Deliveries continue. Message Displays when pump is awake until confirmed. Displays Confirm when triggered by event (such as bolus) &...
- Page 94 CHAPTER 13 - SAFETY SYSTEM AND ALARMS Alerts, Warnings and Alarms Warning: Exceeds Max TDD Warning Cause Exceeds max TDD Bolus delivery exceeds user-set maximum. XXX U. Effect All deliveries stop until action is taken. Any Combo No delivery. Bolus or Temp Basal is temporarily suspended. Message Confirm Displayed when manually awakened until confirmed.
- Page 95 CHAPTER 13 - SAFETY SYSTEM AND ALARMS Alerts, Warnings and Alarms Warning: Exceeds Max 2-hour Delivery Warning Exceeds Cause max 2 Hr Combined basal and bolus delivery exceeds user-set XX U. 2-hour maximum. Effect No delivery. Insulin delivery stops. Message Confirm Displayed when manually awakened until confirmed.
- Page 96 CHAPTER 13 - SAFETY SYSTEM AND ALARMS Alerts, Warnings and Alarms Warning: Bolus Delivery Canceled Warning Bolus Cause delivery User pressed function button on pump during bolus canceled by user button delivery. press. Effect Delivered: Bolus delivery stopped. X.XX U of X.XX U Confirm Message Every 3 minutes or when awakened manually.
- Page 97 CHAPTER 13 - SAFETY SYSTEM AND ALARMS Alerts, Warnings and Alarms Alarm: Empty Cartridge ALARM Cause EMPTY CARTRIDGE Cartridge empty. Effect No delivery. Replace All deliveries stop. Message cartridge. Continuous until confirmed. Suspend Confirm Action Press to confirm. Replace with full cartridge. Option to select “Suspend”...
- Page 98 CHAPTER 13 - SAFETY SYSTEM AND ALARMS Alerts, Warnings and Alarms Alarm: Call Service ALARM CALL SERVICE Cause No delivery. Hardware or software problem detected. 054-0108 Effect Remove battery All deliveries stop. to silence Message the alarm. Continuous until battery is removed. Action Press to silence alarm for 30 minutes (alarm can only...
-
Page 99: Chapter 14 - Troubleshooting Guidelines
CHAPTER 14 - TROUBLESHOOTING GUIDELINES CHAPTER 14 - TROUBLESHOOTING GUIDELINES It’s a good idea to set up a troubleshooting procedure to use anytime you suspect something might be wrong. Work with your health care team to establish guidelines* in the event of a problem. Hypoglycemia WARNING: Low blood glucose is a risk for anyone using insulin therapy. - Page 100 CHAPTER 14 - TROUBLESHOOTING GUIDELINES Troubleshooting hypoglycemia: FOOD INTAKE POSSIBLE CAUSE OF LOW BG SUGGESTED SOLUTION Bolus too large Check bolus amounts and times. Bolus only enough to lower your BG to normal level. Low carbohydrate intake for bolus Measure carbohydrates accurately. See dietitian for carb counting review.
- Page 101 CHAPTER 14 - TROUBLESHOOTING GUIDELINES Preventing hypoglycemia: • Check BG a minimum of four times a day, and more frequently with exercise. • Keep accurate track of carbohydrates in the foods you eat. • Consult your health care professional if you are experiencing frequent hypoglycemia. If you experience frequent or severe episodes of hypoglycemia, contact your health care team.
- Page 102 CHAPTER 14 - TROUBLESHOOTING GUIDELINES Troubleshooting hyperglycemia: INFUSION SET POSSIBLE CAUSE OF HIGH BG SUGGESTED SOLUTION Redness, irritation, inflammation, Change infusion set tubing and site. Contact health care swelling, discharge or discomfort team. Bump or nodule at infusion site Change infusion set and rotate sites. Avoid this area for site selection.
- Page 103 CHAPTER 14 - TROUBLESHOOTING GUIDELINES Troubleshooting hyperglycemia: ACTIVITY POSSIBLE CAUSE OF HIGH BG SUGGESTED SOLUTION Less activity Use Temp Basal increase. Consult health care team. Overuse of Temp Basal reduction Record amount of time for changes. Frequent BG testing to document changes. BG will increase with exercise when ketones are present.
- Page 104 CHAPTER 14 - TROUBLESHOOTING GUIDELINES WARNING: Consult your health care team before making any changes in your basal rates, bolus ratios or correction factor. When in doubt, change it out! 1. Follow guidelines provided by your health care team. 2. Change infusion set. 3. Check for ketones. 4. Take rapid-acting insulin by injection. Problems with Infusion Sets, Sites and Cartridge A number of problems can occur with infusion sets and sites, the most common of which are listed in the following table, along with some suggested solutions.
-
Page 105: Chapter 15 - Sick Day Guidelines
CHAPTER 15 - SICK DAY GUIDELINES CHAPTER 15 - SICK DAY GUIDELINES During periods of minor illness*, it may be more difficult to maintain good control of your diabetes. Examples of minor illness are: dental surgery, colds, nausea/vomiting, sore throat, mild infections, diarrhea, fever. - Page 106 CHAPTER 15 - SICK DAY GUIDELINES...
-
Page 107: Chapter 16 - Lifestyle Issues
CHAPTER 16 - LIFESTYLE ISSUES CHAPTER 16 - LIFESTYLE ISSUES Exercise and Sports There are many options for wearing your pump during exercise and sports activities. During “low-contact” sport activities, such as walking, biking or aerobics, your pump can be clipped to the waistband, or for added security, placed in a “sport case.”... - Page 108 CHAPTER 16 - LIFESTYLE ISSUES Pack your pump supplies in carry-on luggage when traveling by air or train. Do Not pack your supplies • in checked luggage. Contact the Federal Aviation Administration (or your country equivalent) or your local airport security office before traveling by air to obtain prescription/medical supply carry-on regulations.
- Page 109 CHAPTER 17 - MY INFORMATION CHAPTER 17 - MY INFORMATION This chapter provides tables to record information needed for programming your personal settings into your pump. Consult your health care team for correct information for your personal treatment plan. Insulin to Carb Ratios (I:C) Insulin Sensitivity Factor (ISF) Daily Time Slot My I:C ratio...
-
Page 110: Chapter 17 - My Information
CHAPTER 17 - MY INFORMATION Temp Basal Rate Decrease for Activity Set Temp in advance Minutes to Activity Type % Decrease of activity (yes or no) set in advance Light (gardening, walking, shopping) Moderate (leisurely biking, golf {no cart}) Strenuous (basketball, jogging, swimming) Sustained (ice skating, rowing, hiking) My duration for Insulin on Board (IOB) is: Basal Programming... - Page 111 CHAPTER 17 - MY INFORMATION Basal Programming Date Program 1 Program 2 Program 3 Program 4 Segment Weekday Other Weekend Exercise Start Time Units/Hr Units/Hr Units/Hr Units/Hr Basal Programming Date Program 1 Program 2 Program 3 Program 4 Segment Weekday Other Weekend Exercise...
- Page 112 CHAPTER 17 - MY INFORMATION Basal Programming Date Program 1 Program 2 Program 3 Program 4 Segment Weekday Other Weekend Exercise Start Time Units/Hr Units/Hr Units/Hr Units/Hr...
- Page 113 • changes or modifications to your pump by the user or any other third person after the date of manufacture; • service or repairs performed by any person or entity other than an Animas ® -authorized service person; ® •...
-
Page 114: Chapter 18 - Warranty And Other Technical Information
20% to 90% relative humidity, including condensing Ambient pressure: 70 kPa to 106 kPa Pump Disposal: Contact Animas ® Corporation for pump disposal information. Audio Bolus Range: 0.1–2.0U in 0.1U step 0.5–10.0U in 0.5U step 1.0–20.0U in 1.0U step... - Page 115 CHAPTER 18 - WARRANTY AND OTHER TECHNICAL INFORMATION Flow Rate Accuracy Delivery Mode Accuracy Bolus +/- 5% Basal +/- 5% Occlusion Detection time to alarm* Typical Maximum Bolus 3 units or more 8 sec. 30 sec. 0.025U/Hr basal 72 hrs. 120 hrs.
- Page 116 ® • The Animas Patient Administration Representative will discuss billing of co-pays and deductibles as well as determination of whether the patient has on going ability to pay for supplies. Animas ® will also address patients who lose insurance coverage.
- Page 117 ® 4. Animas will answer questions or complaints an end-user has about an item or use of an item that is sold or rented to the end-user. If the end-user has questions about Medicare, Animas ® will refer the end-user to the appropriate carrier.
- Page 118 CHAPTER 18 - WARRANTY AND OTHER TECHNICAL INFORMATION...
-
Page 119: Section Ii
Section II OneTouch ® Ping ™ Meter Remote... -
Page 121: Chapter 1 - Setting Up Your Onetouch
CHAPTER 1 - SETTING UP YOUR ONETOUCH ® PING ™ METER REMOTE ® ™ Getting to know your OneTouch Ping Meter Remote and Test Strips FRONT LED Indicator Light Test Strip Port Flashes green during normal Insert test strip here to turn operation and red when there is meter remote display on for an alarm or warning. -
Page 122: Display Symbols
® ™ CHAPTER 1 - SETTING UP YOUR ONETOUCH PING METER REMOTE Display symbols These symbols guide you while using your meter remote: NAVIGATION SYMBOLS BATTERY POWER SYMBOLS SYMBOL MEANING SYMBOL MEANING Power remaining in your meter Scroll (move) up only. or pump batteries Scroll (move) down only. - Page 123 CHAPTER 1 - SETTING UP YOUR ONETOUCH ® PING ™ METER REMOTE Turning your meter remote display on You will first need to install the batteries before your meter remote display will turn on. See Chapter 9 in Section II, pages 163–166. Meter Home 10:32 am To turn your meter remote display on, press...
- Page 124 ® ™ CHAPTER 1 - SETTING UP YOUR ONETOUCH PING METER REMOTE Main Menu screen The Main Menu screen provides access to all meter remote operations. Main Menu Bolus Main Menu screen options are as follows: FastFacts Meter Settings Bolus - Once you activate RF communication on your meter remote and •...
- Page 125 CHAPTER 1 - SETTING UP YOUR ONETOUCH ® PING ™ METER REMOTE Customize • Personalize features such as time and date formats, averages, meal schedule, “Before Meal” and “After Meal” glucose ranges, hypoglycemia level, and bolus calculator. Lock Buttons • Disable your meter remote buttons/functions to protect against unintentional use.
- Page 126 ® ™ CHAPTER 1 - SETTING UP YOUR ONETOUCH PING METER REMOTE OPTION FACTORY SETTINGS CUSTOM SETTINGS Advanced Features: Averages 14 Day 7, 30, 60, 90 Day Schedule Pre-set (see Advanced Features, pages Personal 114–116 in this chapter) Glucose Range 90–130 mg/dL Personal Before Meal...
- Page 127 CHAPTER 1 - SETTING UP YOUR ONETOUCH ® PING ™ METER REMOTE Go to Meter Settings mode Main Menu Bolus On the Main Menu screen press to highlight “Meter Settings”. Press FastFacts confirm your selection and go to the Meter Settings screen. Meter Settings Add Logbook Entry System Status...
- Page 128 ® ™ CHAPTER 1 - SETTING UP YOUR ONETOUCH PING METER REMOTE Date/Time Set-up “am” or “pm” is now highlighted next to minutes. Press to scroll to the correct am or pm setting. Press to confirm your selection. Time 10:32 Date Jan 1-07 Date/Time Set-up...
- Page 129 CHAPTER 1 - SETTING UP YOUR ONETOUCH ® PING ™ METER REMOTE Customize When you choose “Customize” on the Meter Settings screen, an additional menu of options appears. You must review all the menu options and make Settings selections for each for your settings to be saved. Press to begin with Advanced Features “Settings”.
- Page 130 ® ™ CHAPTER 1 - SETTING UP YOUR ONETOUCH PING METER REMOTE To change the volume, press to select the desired level. Press to confirm your selection. You will return to the Customize screen. NOTE: • You cannot turn the beep completely off. •...
- Page 131 CHAPTER 1 - SETTING UP YOUR ONETOUCH ® PING ™ METER REMOTE Personal Schedule To personalize your schedule, press , choose “Personal”, and press 6:00 a- 9:00 a Bef Brkft 9:00 a- 11:00 a Aft Brkft Bef Lunch 11:00 a- 2:00 p 2:00 p- 5:00 p Aft Lunch 5:00 p- 8:00 p...
- Page 132 ® ™ CHAPTER 1 - SETTING UP YOUR ONETOUCH PING METER REMOTE There is no pre-set “After Meal” glucose range. If you have an “After Meal” Advanced Features Averages 14 Day glucose range recommended by your health care professional, press Schedule Personal then...
- Page 133 CHAPTER 1 - SETTING UP YOUR ONETOUCH ® PING ™ METER REMOTE Set your default BG Target Calculator Set-up Your BG target represents your goal for achieving good glycemic (BG) control. To choose a different target, press to select the desired BG Target and I:C Ratio 1U:15 g press...
-
Page 134: Lock Buttons
® ™ CHAPTER 1 - SETTING UP YOUR ONETOUCH PING METER REMOTE Lock Buttons The Lock Buttons feature lets you protect your meter remote from unintentional use. For example, locking your meter remote buttons can help prevent unintended insulin delivery once you begin using your meter remote and pump together as a system. - Page 135 CHAPTER 1 - SETTING UP YOUR ONETOUCH ® PING ™ METER REMOTE When you are ready to begin using your meter remote to access pump functions, see Chapter 1 in Section III, pages 175–176. Alerts Your OneTouch ® Ping ™ Meter Remote will alert you to specific alarms and warnings that result from meter remote operation.
- Page 136 ® ™ CHAPTER 1 - SETTING UP YOUR ONETOUCH PING METER REMOTE Set the LED mode Your meter remote has an LED indicator light located Alerts on the top of your meter remote. You may use the LED Warning Cue to visually signal you if there is an alarm, warning, or notification on your meter remote.
-
Page 137: Chapter 2 - Setting Up And Using The Food Database
CHAPTER 2 - SETTING UP AND USING THE FOOD DATABASE Food Database Your meter remote comes from the factory with a basic Food Database pre-loaded. A reference sheet for your pre-loaded Food Database is included in your system kit contents. You should keep this reference sheet with you to ensure you understand the abbreviated food names and serving sizes. - Page 138 CHAPTER 2 - SETTING UP AND USING THE FOOD DATABASE Beans Choose a food brand/type Carbs(g) An additional menu of brand choices appears along with the carb totals for a Bushs Baked Beans Chickpeas Canned typical serving size. Press to highlight the desired brand/type, and then Kidney Beans Can press to display nutritional information for that food brand/type.
-
Page 139: Chapter 3 - Estimating Bolus Insulin Amounts With The Bolus Calculator
CHAPTER 3 - ESTIMATING BOLUS INSULIN AMOUNTS WITH THE BOLUS CALCULATOR Your meter remote includes an ezCarb and ezBG Bolus calculator feature. This feature lets you calculate a bolus to cover carbs eaten and/or correct a high BG. ezCarb and ezBG Bolus calculations on your meter remote work much like the calculations on your pump with a few differences: •... - Page 140 CHAPTER 3 - ESTIMATING BOLUS INSULIN AMOUNTS WITH THE BOLUS CALCULATOR...
-
Page 141: Chapter 4 - Testing Your Blood Glucose
CHAPTER 4 - TESTING YOUR BLOOD GLUCOSE BG test principle When using your meter remote to test your BG, glucose in the blood sample mixes with special chemicals in the test strip and a small electric current is produced. The strength of this current changes with the amount of glucose in the blood sample. - Page 142 CHAPTER 4 - TESTING YOUR BLOOD GLUCOSE Insert a test strip Remove the test strip from its vial and immediately replace the vial cap and close it tightly. With clean, dry hands, you may touch the test strip anywhere on its surface. Do Not bend, cut or modify the test strips in any way. Use each test strip immediately after removing it from the vial.
-
Page 143: Getting A Blood Sample
CHAPTER 4 - TESTING YOUR BLOOD GLUCOSE Test “Test/Control Solution” for a control solution test. If you are performing a Control Solution control solution test, press to scroll to the Test/Control Solution screen. See Chapter 8 in Section II, pages 159–162. NOTE: •... - Page 144 CHAPTER 4 - TESTING YOUR BLOOD GLUCOSE Choosing the right sampling site at the right time Your meter remote allows you to sample blood from your fingertip, forearm, or palm. Forearm and palm testing is also referred to as “alternate site testing” (AST). At times, BG test results obtained at the forearm or palm may be different from a fingertip measurement.
- Page 145 CHAPTER 4 - TESTING YOUR BLOOD GLUCOSE Preparing your sample site Before you test your BG, wash your hands and forearm (if applicable) thoroughly with warm, soapy water. Rinse and dry. Lancing and sampling from your fingertip Remove the blue (or black) cap by snapping it off Install a sterile lancet into the OneTouch ®...
- Page 146 CHAPTER 4 - TESTING YOUR BLOOD GLUCOSE Puncture your finger Hold the OneTouch ® Lancing Device firmly against the side of your finger. Press ® the release button. Remove the OneTouch Lancing Device from your finger. Get a round drop of blood Gently squeeze and/or massage your fingertip until a round drop of blood sufficient for testing forms ( sample size) on your fingertip.
- Page 147 CHAPTER 4 - TESTING YOUR BLOOD GLUCOSE Blue (or black) ® ™ The OneTouch Clear Cap is used cap for fingertip for forearm and palm sampling only. sampling only Replace the blue (or black) cap with the OneTouch ® ™ Clear Cap.
-
Page 148: Applying Blood/Reading Bg Test Results
CHAPTER 4 - TESTING YOUR BLOOD GLUCOSE Puncture your forearm or palm Firmly press and hold the lancing device against your forearm or palm for a few seconds. Wait until the skin ® ™ surface under the OneTouch Clear Cap changes color (as blood collects beneath the skin). - Page 149 CHAPTER 4 - TESTING YOUR BLOOD GLUCOSE When applying a drop of blood from your forearm or palm, keep your palm or forearm steady and bring the top edge of the test strip to the drop of blood with your other hand. Forearm Palm Apply the sample...
-
Page 150: Error Messages
CHAPTER 4 - TESTING YOUR BLOOD GLUCOSE Wait for the confirmation window to fill completely The blood drop will be drawn into the narrow channel and the confirmation window should fill completely. Confirmation Window Full Not Full When the confirmation window is full, this means you have applied enough blood. Now you can move the test strip away from the blood drop and wait for your meter remote to count down from 5 to 1. - Page 151 CHAPTER 4 - TESTING YOUR BLOOD GLUCOSE Unexpected BG test results Refer to these cautions whenever your BG test results are lower than, higher than, or not what you expect. CAUTION: Dehydration and low BG test results You may get false low BG test results if you are severely dehydrated. If you think you are severely dehydrated, contact your health care professional immediately.
- Page 152 CHAPTER 4 - TESTING YOUR BLOOD GLUCOSE After getting a BG test result Once you have read your BG test result, you may: Go directly to the Bolus Menu screen where you can calculate a bolus Jun 19-06 10:32 am “Bolus”...
- Page 153 CHAPTER 4 - TESTING YOUR BLOOD GLUCOSE Compare your previous BG test result and average with your current BG test result Press to highlight “Compare Result” and press Jun 19-06 10:32 am Your Result: . Your last BG test result and your average for Previous Aft Brkft the current meal period will appear on the...
- Page 154 CHAPTER 4 - TESTING YOUR BLOOD GLUCOSE...
-
Page 155: Chapter 5 - Adding Comments To Glucose Test Results
CHAPTER 5 - ADDING COMMENTS TO GLUCOSE TEST RESULTS You may add comments to specific BG test results at the time of the test or at a later time. A food comment (indicating before-meal or after-meal testing) is automatically added to every BG test result. You may also add comments to note if the test was taken before, during, or after exercise, and how you were feeling at the time of the test. - Page 156 CHAPTER 5 - ADDING COMMENTS TO GLUCOSE TEST RESULTS How to add a comment Following are the steps you take to add a comment. In this example, we will add a food, exercise, and health comment to a BG test result. Jun 19-06 10:32 am With any BG test result on the display, highlight “Comment”...
- Page 157 CHAPTER 5 - ADDING COMMENTS TO GLUCOSE TEST RESULTS Health comments Jun 19-06 10:32 am You can comment on a BG test result with notes about your overall health at Gluc.105 Comment the time of the test. Press with “Health” highlighted. You may add up to Food --------- six descriptors from this menu:...
- Page 158 CHAPTER 5 - ADDING COMMENTS TO GLUCOSE TEST RESULTS Editing or deleting comments (example) Logbook Jun 19-06 10:32am To edit or delete a comment from a BG test result, first display that BG Glucose 105 mg/dL test result in your meter remote logbook (see Chapter 7 in Section II, pages Bef Lunch 149–158).
-
Page 159: Chapter 6 - Making Logbook Entries
CHAPTER 6 - MAKING LOGBOOK ENTRIES Logbook entries let you store separate records concerning exercise, health, and food that are not associated with a BG test result. Logbook entries are different than comments, which are added to a specific BG test result. You do not have to perform a BG test in order to add valuable information to your meter remote logbook. - Page 160 CHAPTER 6 - MAKING LOGBOOK ENTRIES Entering the date and time for an entry Add New Entry A date and time must be selected after choosing an entry type. In this example, the date and time will be selected for an Exercise entry. Exercise Health Food...
- Page 161 CHAPTER 6 - MAKING LOGBOOK ENTRIES Jun 19-06 3:18 pm Press to rate the exercise you performed as Mild, Moderate, or Hard. Exercise Entry Press Exercise ---------- Duration Mild Moderate Hard Jun 19-06 3:18 pm Exercise Entry Exercise Moderate Then press to record the duration of the exercise to the nearest five Duration 00:45...
- Page 162 CHAPTER 6 - MAKING LOGBOOK ENTRIES Food entries Food and BG levels are closely linked. Food entries let you keep track of carb amounts either entered manually, or selected from the Food Database. Add New Entry Exercise Press to highlight “Food” on the Add New Entry screen and press Health Follow the same steps to select the correct time and date of the new entry.
- Page 163 CHAPTER 6 - MAKING LOGBOOK ENTRIES Food Database carb entry To add a carb amount from the Food Database, highlight “Food List” and press . Then follow the instructions in the Food Database chapter (see Chapter 2 in Section II, pages 121–122) for making selections.
- Page 164 CHAPTER 6 - MAKING LOGBOOK ENTRIES To edit an entry, highlight the descriptor you would like to change and press . Press to change the entry and press Logbook Jun 19-06 3:18 pm For example, the edited entry will appear this way in your logbook if you Illness choose to select “Illness”...
- Page 165 CHAPTER 7 - FASTFACTS ® / USING YOUR METER REMOTE LOGBOOK The FastFacts screen lets you review and edit data records stored in your meter remote memory. You can also perform on-screen trending of BG, and other health-related data. Main Menu To get to the FastFacts screen, press to highlight Bolus...
- Page 166 ® CHAPTER 7 - FASTFACTS / USING YOUR METER REMOTE LOGBOOK Food Averages Average your daily intake of carbohydrates, for the last 7, 14, 30, 60, and 90 days. Logbook Your meter remote logbook stores at least 20,000 logbook records. Logbook records are created whenever data are saved for a particular time and date.
-
Page 167: Glucose Analysis
CHAPTER 7 - FASTFACTS ® / USING YOUR METER REMOTE LOGBOOK NOTE: • You cannot delete or edit a BG test result, but you can edit any comment associated with those types of records. You can, however, delete any logbook record that is not associated with a BG test result. •... - Page 168 ® CHAPTER 7 - FASTFACTS / USING YOUR METER REMOTE LOGBOOK Graph of All Results Glucose Analysis To view an interactive graph of three days (at a time) of BG test results, Graph of All Results press to highlight “Graph of All Results” on the Glucose Analysis screen Graph by Time of Day and press Average of All Results...
- Page 169 CHAPTER 7 - FASTFACTS ® / USING YOUR METER REMOTE LOGBOOK Graph by Time of Day Glucose Analysis Graph of All Results You may view BG test results on a graph by time of day when you select Graph by Time of Day “Graph by Time of Day”...
- Page 170 ® CHAPTER 7 - FASTFACTS / USING YOUR METER REMOTE LOGBOOK Average by Time of Day Glucose Analysis To view your BG test result averages by time of day, press to highlight Graph of All Results “Average by Time of Day” on the Glucose Analysis screen and press Graph by Time of Day Average of All Results Average by Time of Day...
- Page 171 CHAPTER 7 - FASTFACTS ® / USING YOUR METER REMOTE LOGBOOK Glucose Range Info Glucose Analysis To review the percentage of your BG test results that are above, below, and Graph of All Results within your target ranges, press to highlight “Glucose Range Info” on the Graph by Time of Day Glucose Analysis screen and press Average of All Results...
-
Page 172: Hypoglycemia Information
® CHAPTER 7 - FASTFACTS / USING YOUR METER REMOTE LOGBOOK Hypoglycemia Information FastFacts If you select “Hypo Info” on the FastFacts screen, your meter remote will Logbook display the actual number of hypoglycemic events by time of day, defined by Glucose by Meals the hypo level set in Advanced Features (see Chapter 1 in Section II, pages Glucose Analysis... - Page 173 Transferring BG test results to your PC for storage or home viewing requires ezManager ® Software from ® Animas and a USB 2.0 compliant Type ‘A’ to Mini ‘B’ Interface Cable. The USB Interface Cable is ® ™ included with your OneTouch Ping System Kit.
- Page 174 ® CHAPTER 7 - FASTFACTS / USING YOUR METER REMOTE LOGBOOK Transfer data Follow the instructions provided with ezManager ® Software to download the BG test results from your meter remote. Once you begin using your meter remote and pump together as a system, you can use ®...
-
Page 175: Chapter 8 - Control Solution Testing
CHAPTER 8 - CONTROL SOLUTION TESTING CHAPTER 8 - CONTROL SOLUTION TESTING Control solution testing ® ® OneTouch Ultra Control Solution contains a known amount of glucose and is used to check that your meter remote and the test strips are working properly. Do a control solution test: To practice the test process instead of using blood. -
Page 176: Performing A Control Solution Test
CHAPTER 8 - CONTROL SOLUTION TESTING Performing a control solution test Check the code on the test strip vial before inserting the test strip. Insert a test strip to turn on your meter remote. Make sure the three contact bars are facing you. Push the test strip in as far as it will go. - Page 177 CHAPTER 8 - CONTROL SOLUTION TESTING WARNING: It is important that your control solution tests are marked correctly, as test results on your meter remote are used in ezCarb and ezBG Bolus calculations. Control solution tests that are not correctly marked can be used in bolus calculations. This may result in suggested bolus amounts that may be too high or too low, which can cause serious injury or death.
- Page 178 CHAPTER 8 - CONTROL SOLUTION TESTING Out-of-range results may be due to: • Not following the instructions detailed in this chapter. Expired or contaminated control solution. • Expired or damaged test strip. • Use of a test strip or control solution past its discard date. •...
-
Page 179: Chapter 9 - Caring For Your Meter Remote And Test Strips
CHAPTER 9 - CARING FOR YOUR METER REMOTE AND TEST STRIPS CHAPTER 9 - CARING FOR YOUR METER REMOTE AND TEST STRIPS Your meter remote does not need any special maintenance. Storing your system Store your meter remote, test strips, control solution and other items in your carrying case after each use. - Page 180 CHAPTER 9 - CARING FOR YOUR METER REMOTE AND TEST STRIPS Low meter remote battery WARNING When this message appears on the screen, the batteries are low and should Low Meter Batteries! be replaced as soon as possible. The backlight will no longer turn on. You can complete about 100 more BG tests from the time this symbol first You should replace the batteries soon.
- Page 181 CHAPTER 9 - CARING FOR YOUR METER REMOTE AND TEST STRIPS Locate the plus (+) signs inside the battery compartment and on your fresh AAA alkaline batteries. Take the plus (+) end of one battery and insert it underneath the plastic tab that sticks out at the top of the compartment.
- Page 182 CHAPTER 9 - CARING FOR YOUR METER REMOTE AND TEST STRIPS...
-
Page 183: Chapter 10 - Understanding Meter Remote Error And Other Messages
CHAPTER 10 - UNDERSTANDING METER REMOTE ERROR AND CHAPTER 10 - UNDERSTANDING METER REMOTE ERROR AND OTHER MESSAGES OTHER MESSAGES Your meter remote displays messages when there are problems with the test strip, with your meter remote, and when your BG levels are beyond the measurement limits (higher than 600 mg/dL or lower than 20 mg/dL). - Page 184 CHAPTER 10 - UNDERSTANDING METER REMOTE ERROR AND OTHER MESSAGES WHAT TO DO INDICATES WARNING There is a problem with your meter Do Not use your meter remote. Contact Customer Service at remote. Error 1 1 877 937-7867 for a Meter problem.
- Page 185 CHAPTER 10 - UNDERSTANDING METER REMOTE ERROR AND OTHER MESSAGES WHAT TO DO INDICATES WARNING Your meter remote has detected a Repeat the test with a new test strip. Refer to Chapter 4 in Section problem with the test strip. Error 5 II, pages 125–138.
- Page 186 CHAPTER 10 - UNDERSTANDING METER REMOTE ERROR AND OTHER MESSAGES WHAT TO DO INDICATES Notification Press to confirm the Notification. You have accessed your meter Repeat the procedure after data remote memory (logbook) but records have been stored. there are currently no data No Data.
-
Page 187: Chapter 11 - Detailed Information About Your Meter Remote And Test Strips
CHAPTER 11 - DETAILED INFORMATION ABOUT YOUR METER REMOTE AND TEST STRIPS Comparing meter remote and lab results BG test results with your meter remote are plasma-calibrated. This helps you and your health care professional compare your meter remote results with laboratory tests. If you have been using another type of meter—one that provides whole-blood-calibrated BG test results—you may notice that BG test results with your meter remote are approximately 12% higher. - Page 188 CHAPTER 11 - DETAILED INFORMATION ABOUT YOUR METER REMOTE AND TEST STRIPS Technical Specifications Reported BG Test Result Range: 20 to 600 mg/dL Calibration: Plasma-equivalent Sample: Fresh capillary whole blood Test Time: 5 seconds Assay Method: Glucose oxidase biosensor Power Source: Two 1.5V AAA alkaline batteries Unit of measure: mg/dL...
- Page 189 CHAPTER 11 - DETAILED INFORMATION ABOUT YOUR METER REMOTE AND TEST STRIPS Analytical Performance Characteristics System Accuracy The accuracy of the blood glucose monitoring function of the OneTouch ® Ping ™ Meter Remote was assessed by comparing blood glucose test results on 141 subjects with those obtained using a YSI Model 2300 Glucose Analyzer.
- Page 190 CHAPTER 11 - DETAILED INFORMATION ABOUT YOUR METER REMOTE AND TEST STRIPS Precision Within Run Precision Within Run Precision (100 venous blood tests) Target Mean Standard Coefficient of Glucose Glucose Deviation Variation (%) (mg/dL) (mg/dL) (mg/dL) Total Precision Total Precision (200 control solution tests) Glucose Mean Standard...
-
Page 191: Section Iii
Section III OneTouch ® Ping ™ System Using your OneTouch ® Ping ™ Meter Remote and OneTouch ® Ping ™ Insulin Pump together... - Page 193 Ping Insulin Pump are designed to communicate via RF only with each other. They will not communicate with any other devices. WARNING: You must complete the Animas ® pump training before using your meter remote to access pump functions. During pump training, your health care professional will assist you in making the appropriate selections for your pump settings.
- Page 194 CHAPTER 1 - OVERVIEW OF YOUR ONETOUCH ® PING ™ SYSTEM...
-
Page 195: Chapter 2 - Establishing Communication Between Your
CHAPTER 2 - ESTABLISHING COMMUNICATION BETWEEN YOUR METER REMOTE AND YOUR PUMP Establishing communication between your meter remote and pump requires that the RF feature is activated on both devices, and the devices are paired. Activating RF opens a line of communication on both devices, and pairing ensures communication will take place only between one meter remote and one pump. - Page 196 CHAPTER 2 - ESTABLISHING COMMUNICATION BETWEEN YOUR METER REMOTE AND YOUR PUMP Activate the RF feature on your pump SETUP ADV 10 METER Select “Setup” from the Main Menu screen on your pump display and press Search – – – – Select “Advanced”...
- Page 197 CHAPTER 2 - ESTABLISHING COMMUNICATION BETWEEN YOUR METER REMOTE AND YOUR PUMP Pairing Pairing Highlight “Start Pairing” on the meter remote Searching for insulin pump 1. Activate Pairing- Mode display and press . The meter remote will on pump automatically search for a pump within RF range. 2.
- Page 198 CHAPTER 2 - ESTABLISHING COMMUNICATION BETWEEN YOUR METER REMOTE AND YOUR PUMP Notification After your devices are paired, the ezCarb and ezBG Bolus screens on your meter remote display will retrieve the bolus calculator values (settings) that Stored meter calculator settings will be are set and saved on your pump.
- Page 199 CHAPTER 2 - ESTABLISHING COMMUNICATION BETWEEN YOUR METER REMOTE AND YOUR PUMP Go to Pairing on your meter remote display RF Set-up Pairing Meter is already paired Press on your meter remote to highlight RF on/off with pump SN: 123456789. “Pairing”...
- Page 200 CHAPTER 2 - ESTABLISHING COMMUNICATION BETWEEN YOUR METER REMOTE AND YOUR PUMP Confirm the unpairing Notification Press on your meter remote to confirm the Notification on your meter remote. Pump unpaired. A second Notification screen will appear on your meter remote display to let you know that your meter remote and pump are now unpaired.
- Page 201 CHAPTER 2 - ESTABLISHING COMMUNICATION BETWEEN YOUR METER REMOTE AND YOUR PUMP Reactivating RF communication on your meter remote Follow these instructions to reactivate the RF feature on your meter remote if it is deactivated. RF Set-up Go to RF on/off on your meter remote display Highlight “RF on/off”...
- Page 202 CHAPTER 2 - ESTABLISHING COMMUNICATION BETWEEN YOUR METER REMOTE AND YOUR PUMP Reactivating/deactivating the RF feature on your pump Deactivating RF communication on your pump There are times when you might want or need to deactivate the RF feature on your pump. One situation is when you are on an airplane.
- Page 203 CHAPTER 2 - ESTABLISHING COMMUNICATION BETWEEN YOUR METER REMOTE AND YOUR PUMP Troubleshooting RF communication between your meter remote and pump Certain conditions may cause RF communication between your meter remote and pump to be lost or interrupted. One situation is when your devices are not within RF range of each other (about 10 feet/3.0 meters).
- Page 204 CHAPTER 2 - ESTABLISHING COMMUNICATION BETWEEN YOUR METER REMOTE AND YOUR PUMP Changing the RF channel on your meter and pump The RF channel on your meter remote must always match the RF channel on your pump. When you pair your meter remote and pump, the RF channel is automatically set to match on both devices.
- Page 205 CHAPTER 3 - PUMP HOME AND METER HOME SCREENS NOTE: Unless otherwise specified, all references to screens and buttons apply to your meter remote from this chapter forward. Once RF communication is activated on your meter remote and pump and the devices are paired, you are ready to begin using the devices together as a system.
- Page 206 CHAPTER 3 - PUMP HOME AND METER HOME SCREENS Meter Home screen on your meter remote Meter Home The Meter Home screen displays the current time of day stored in your meter 3:18 pm remote, RF signal strength, and battery power remaining in your meter remote.
-
Page 207: Chapter 4 - Insulin Delivery Functions On Your Meter Remote
CHAPTER 4 - INSULIN DELIVERY FUNCTIONS ON YOUR METER REMOTE Calculating and delivering a bolus You can use your meter remote to deliver any bolus type that is available with your pump. The procedures for delivering boluses from your meter remote are very similar to delivering boluses from your pump. - Page 208 CHAPTER 4 - INSULIN DELIVERY FUNCTIONS ON YOUR METER REMOTE Main Menu The second way is to press to highlight “Bolus” on the Main Menu screen Bolus and press . FastFacts Meter Settings Add Logbook Entry System Status Bolus Menu In this example, all bolus options are available on the screen.
-
Page 209: Normal Bolus
CHAPTER 4 - INSULIN DELIVERY FUNCTIONS ON YOUR METER REMOTE Normal Bolus NOTE: Bolus delivery speed can be adjusted in the Setup Advanced menu on your pump. Select a Normal Bolus To deliver a Normal Bolus, press to highlight “Normal” on the Bolus Menu Bolus Menu JLSmith screen and press... - Page 210 CHAPTER 4 - INSULIN DELIVERY FUNCTIONS ON YOUR METER REMOTE Special messages during Normal Bolus Delivery Certain messages may appear at the top of the Normal Bolus screen (or as separate screens) after you press to confirm the desired bolus units. “COMBO ACTIVE”...
- Page 211 CHAPTER 4 - INSULIN DELIVERY FUNCTIONS ON YOUR METER REMOTE ezCarb Bolus The ezCarb feature allows you to enter the number of carbs eaten, and then have your meter remote automatically calculate and deliver a bolus from your pump. The calculator is based on the I:C ratios that you have set and stored in your pump, and the number of carbs you plan to consume.
- Page 212 CHAPTER 4 - INSULIN DELIVERY FUNCTIONS ON YOUR METER REMOTE Enter a carb amount ezCarb Home To enter carbs manually, press to enter the number of carbs you have Carbs: eaten and press . You will go to step 3 and “Add BG” will be highlighted. I:C= 1U : 15g Food List...
- Page 213 CHAPTER 4 - INSULIN DELIVERY FUNCTIONS ON YOUR METER REMOTE The I:C ratio that appears on the screen is the one that you stored in ezCarb Home Carbs: your pump for this time of the day. To change your I:C ratio, press I:C= 1U :15g highlight the “I:C=”...
- Page 214 CHAPTER 4 - INSULIN DELIVERY FUNCTIONS ON YOUR METER REMOTE If all your entries are correct, press with “Show Result” highlighted on the BG Correct screen. If you need to adjust any entry, press to first highlight it, and then press .
- Page 215 CHAPTER 4 - INSULIN DELIVERY FUNCTIONS ON YOUR METER REMOTE To deliver your ezCarb Bolus as a Normal Bolus, make sure “Normal” appears in the “Type” field. With “Go” highlighted, press . This will begin delivery of the units as a Normal Bolus. Bolus Total To deliver an ezCarb Bolus as a Combo Bolus, Bolus Total...
- Page 216 CHAPTER 4 - INSULIN DELIVERY FUNCTIONS ON YOUR METER REMOTE Combo Bolus A Combo Bolus is used to deliver both a Normal and an Extended Bolus. Bolus Menu JLSmith See Chapter 11 in Section I, pages 59–72 for information on Combo Boluses. Normal ezCarb Select a Combo Bolus...
- Page 217 CHAPTER 4 - INSULIN DELIVERY FUNCTIONS ON YOUR METER REMOTE If all your entries are correct, press with “Go” highlighted. If you need to adjust any entry, press to highlight it, and then press . Use to make the change and press again.
- Page 218 CHAPTER 4 - INSULIN DELIVERY FUNCTIONS ON YOUR METER REMOTE ezBG Bolus ezBG Bolus lets you calculate and deliver a BG correction bolus. The steps for ezBG Boluses are the same as for adding a BG correction bolus under the ezCarb feature. All ezBG Boluses are delivered as Normal boluses.
- Page 219 CHAPTER 4 - INSULIN DELIVERY FUNCTIONS ON YOUR METER REMOTE Use the same steps to go back and change your glucose target or your Actual BG. When all changes have been made and “Show Result” is highlighted, press to go to the ezBG Total screen in step 4. NOTE: Changes made to your IS Factor or BG Target during ezBG calculations apply to this bolus only and will not affect the IS Factor or BG Target you have stored in your pump.
- Page 220 CHAPTER 4 - INSULIN DELIVERY FUNCTIONS ON YOUR METER REMOTE Using the ezCarb and ezBG calculator feature when your devices are not paired When you use the bolus calculator feature, your meter remote gets important information from your pump. If your meter remote is not currently paired with your pump, the meter remote cannot get that data. There may be times when the two devices are not paired but you would still like to use the calculator feature on your meter remote.
- Page 221 CHAPTER 4 - INSULIN DELIVERY FUNCTIONS ON YOUR METER REMOTE Notification Unless you re-set/save the calculator settings on your meter remote using Current calculator the Calculator Set-up screen, a Notification screen will appear every time settings may not be appropriate for you use the ezCarb or ezBG calculator feature while the devices are time of day.
- Page 222 CHAPTER 4 - INSULIN DELIVERY FUNCTIONS ON YOUR METER REMOTE...
-
Page 223: Chapter 5 - Checking The Status Of Your Onetouch
® CHAPTER 5 - CHECKING THE STATUS OF YOUR ONETOUCH PING ™ SYSTEM You may review the status of various pump functions and features directly on your meter remote display. You may also verify your meter remote serial number and software version number. Your meter remote and pump must be paired, and RF activated, in order to access pump status screens on your meter remote display. - Page 224 CHAPTER 5 - CHECKING THE STATUS OF YOUR ONETOUCH ® PING ™ SYSTEM Status Screen 2 - IOB, Last Bolus Status IOB= 00U Last Bolus The second status screen displays the current IOB amount, even if the IOB 3.30U feature on your pump is disabled. This screen also shows the type (“N” 8:35 am = Normal, “C”...
- Page 225 CHAPTER 5 - CHECKING THE STATUS OF YOUR ONETOUCH ® PING ™ SYSTEM Checking Meter Remote Status System Status To check your meter remote serial number and the current version of the Pump Status software loaded inside your meter remote, press to highlight “Meter Meter Status Status”...
- Page 226 CHAPTER 5 - CHECKING THE STATUS OF YOUR ONETOUCH ® PING ™ SYSTEM...
-
Page 227: Chapter 6 - Troubleshooting Your Onetouch
CHAPTER 6 - TROUBLESHOOTING YOUR ONETOUCH ® PING ™ SYSTEM Once you activate RF communication and pair the devices, your meter remote will display additional special messages. These include messages regarding communication problems between the devices or if your intended actions might require additional attention. IMPORTANT: If a message is displayed on your meter remote and is not included in the list that follows, it may be due to an error specific to your meter remote (see Chapter 10 in Section II, pages 167–170) or a pump related message that appears on both your pump and meter remote displays... - Page 228 CHAPTER 6 - TROUBLESHOOTING YOUR ONETOUCH ® PING ™ SYSTEM WHAT TO DO INDICATES WARNING Bolus was canceled because RF Press to confirm the Warning. communication was lost during Make sure your meter remote and Bolus canceled. Move devices bolus delivery, and has not been pump are within RF range, and/or closer, or re-established.
- Page 229 CHAPTER 6 - TROUBLESHOOTING YOUR ONETOUCH ® PING ™ SYSTEM WHAT TO DO INDICATES Notification Press to confirm the Notification. Your meter remote and pump are See if your meter remote and pump unable to communicate. Possible Unable to communicate are within RF range (about 10 feet/ causes are that the devices are not with pump!
- Page 230 CHAPTER 6 - TROUBLESHOOTING YOUR ONETOUCH ® PING ™ SYSTEM WHAT TO DO INDICATES Notification You have chosen to unpair your Press to confirm the Notification. Current calculator meter remote and pump. The It is important that you review settings may not be current calculator settings last these settings before using the appropriate for...
-
Page 231: Pump Alarms/Warnings/Alerts On Devices
CHAPTER 6 - TROUBLESHOOTING YOUR ONETOUCH ® PING ™ SYSTEM There are a series of pump alarms, warnings, and alerts that display and/or sound both on your meter remote and pump. It is possible that pump warnings, alarms, or alerts may sound and display first on your pump before doing so on your meter remote. - Page 232 CHAPTER 6 - TROUBLESHOOTING YOUR ONETOUCH ® PING ™ SYSTEM WHAT TO DO PUMP DISPLAY METER REMOTE DISPLAY INDICATES PUMP WARNING Your pump battery is Press on your meter Warning very low and will only remote or on your last a minimum of pump to confirm the battery.
- Page 233 CHAPTER 6 - TROUBLESHOOTING YOUR ONETOUCH ® PING ™ SYSTEM WHAT TO DO PUMP DISPLAY METER REMOTE DISPLAY INDICATES PUMP WARNING The insulin units Press on your meter Warning remote or on your remaining in your Low cartridge. pump to confirm the pump cartridge are cartridge.
- Page 234 CHAPTER 6 - TROUBLESHOOTING YOUR ONETOUCH ® PING ™ SYSTEM WHAT TO DO PUMP DISPLAY METER REMOTE DISPLAY INDICATES PUMP WARNING Press on your meter The bolus was Warning Bolus remote or on your canceled because you Bolus delivery delivery pump to confirm the canceled by canceled...
- Page 235 CHAPTER 6 - TROUBLESHOOTING YOUR ONETOUCH ® PING ™ SYSTEM WHAT TO DO PUMP DISPLAY METER REMOTE DISPLAY INDICATES PUMP ALARM Press on your pump There is a problem ALARM CALL CALL SERVICE to confirm the Alarm and with your pump CUSTOMER SERVICE silence it for the next 30 hardware or software.
- Page 236 CHAPTER 6 - TROUBLESHOOTING YOUR ONETOUCH ® PING ™ SYSTEM WHAT TO DO PUMP DISPLAY METER REMOTE DISPLAY INDICATES PUMP ALARM Your pump battery has Replace your pump ALARM REPLACE REPLACE only enough power for battery immediately. BATTERY PUMP BATTERY about another three No delivery.
-
Page 237: Chapter 7 - Onetouch
CHAPTER 7 - ONETOUCH ® PING ™ SYSTEM COMMUNICATION TECHNICAL SPECIFICATIONS Separation Distance Because there are many devices that use RF technology, it is possible to experience communication interference between your pump and meter remote from other RF devices. Examples of devices that use RF technology and may cause communication interference with your OneTouch ®... - Page 238 CHAPTER 7 - ONETOUCH ® PING ™ SYSTEM COMMUNICATION TECHNICAL SPECIFICATIONS...
-
Page 239: Appendix A: Glossary
Appendix A: Glossary... - Page 241 APPENDIX A: GLOSSARY Glossary diabetic ketoacidosis (DKA) - DKA results when there is not enough insulin available to help alpha cells - Alpha cells are found in the glucose enter the cells where it is used for energy. The body, in turn, burns muscle and fat for energy. pancreas.
- Page 242 APPENDIX A: GLOSSARY hypoglycemia - Hypoglycemia is also known as ketones - Ketones, or ketone bodies, are low blood glucose. It occurs when BG levels drop substances produced by normal liver activity, and to below 70 mg/dL. This can happen if a person used by muscle tissue.
- Page 243 APPENDIX A: GLOSSARY subcutaneous - Subcutaneous means beneath the skin. The infusion set needle is placed subcutaneously. type 1 diabetes - Type 1 diabetes results from destruction of the beta cells in the pancreas. People with type 1 diabetes mellitus must use insulin to regulate their BG levels.
- Page 244 APPENDIX A: GLOSSARY...
-
Page 245: Index
Index... - Page 247 INDEX INDEX BG/check reminder, meter remote ....192 BG targets/ranges, insulin pump....55 BG targets/ranges, meter remote .
- Page 248 INDEX Contrast, meter remote ....109, 113 Expiration date, control solution ....163 Control solution .
- Page 249 INDEX Low battery warning, insulin pump... . 16, 79 Home screens, meter remote ....107, 188 Hyperglycemia ......87, 90, 135 Low BG alert, insulin pump .
- Page 250 INDEX Set-up, basic, meter remote ....109, 110 Prime history ....... . . 41 Prime/rewind .
- Page 251 INDEX Unexpected BG test results ....135 Unit of measure ....105, 134, 161, 180 Unpairing .
- Page 252 Patent information This blood glucose monitoring system described herein is covered by one or more of the following U.S. patents: 5,708,247; 5,951,836; 6,241,862; 6,284,125 and 7,112,265. Use of the monitoring device described herein is protected under one or more of the following U.S. patents: 6,413,410; 6,733,655;...
- Page 254 Visit us at www.animascorp.com CAUTION: Federal (U.S.) law restricts this device to sale by, or on the order of a physician. ® © 2008, Animas Corporation. All rights reserved. This product is covered by one, or more, U.S. patents including 6,656,148.
Need help?
Do you have a question about the OneTouch Ping and is the answer not in the manual?
Questions and answers