Oce ColorWave 600 User Manual
Hide thumbs
Also See for ColorWave 600:
- User manual (440 pages) ,
- User manual (24 pages) ,
- User manual (24 pages)

Related Manuals for Oce ColorWave 600


Summary of Contents for Oce ColorWave 600
- Page 1 Océ User manual ™ Océ ColorWave Operating information...
- Page 2 Océ-Technologies B.V. Océ-Technologies B.V. Copyright © 2007, Océ-Technologies B.V. Venlo, The Netherlands. All rights reserved. No part of this work may be reproduced, copied, adapted, or transmitted in any form or by any means without written permission from Océ. Océ-Technologies B.V. makes no representation or warranties with respect to the contents hereof and specifically disclaims any implied warranties of merchantability or fitness for any particular purpose.
- Page 3 Trademarks Trademarks ™ Océ, Océ ColorWave 600 and the Océ Express WebTools are registered trademarks of Océ-Technologies B.V. ® ® ™ ® Adobe and PostScript are registered trademarks of Adobe Systems Incorporated. ® ® Macintosh is a registered trademark of Apple Computer, Inc.
- Page 4 Trademarks...
-
Page 5: Table Of Contents
Contents Contents Chapter 1 Introduction ............11 Notes for the reader . - Page 6 Contents Complete the printer configuration in the Océ Express WebTools ..73 ™ Configure the regional settings of the Océ ColorWave 600 ..77 Print the Customer Acceptance Test (CAT) demo print ... . . 78 Chapter 4 Configure the printing system .
- Page 7 Contents Unpack the media roll ....... . . 128 Load a media roll ........130 Define the media type and the core size .
- Page 8 Contents Replace a media roll ........195 The 'Media drawer' .
- Page 9 Contents Print examples ..........253 Your Océ...
- Page 10 Contents Appendix C Addresses of local Océ organizations....... . 311 Addresses of local Océ...
-
Page 11: Introduction
Chapter 1 Introduction... -
Page 12: Notes For The Reader
Notes for the reader Notes for the reader Introduction ™ This manual helps you to use the Océ ColorWave 600. The manual contains a ™ description of the product and guidelines to use and operate the Océ ColorWave 600. Definition Attention Getters Parts of this manual require your special attention. - Page 13 Notes for the reader [1] Overview of the attention getters Word Icon Indicates Note Tips or additional information about the correct operation of the product. Attention Information to prevent property damage, for example damage to the product, documents or files. Caution Information to prevent personal injuries.
-
Page 14: How To Use This Manual
How to use this manual How to use this manual Introduction You can access a topic quickly with the following methods. Refer to the alphabetical index at the end of the manual. ■ Refer to the table of contents at the beginning of this manual. ■... - Page 15 How to use this manual Chapters Section Topics Print quality and Print Settings that influence the print ■ productivity quality / print productivity. Color management settings. ■ Print examples. ■ Check, analyze and solve output ■ quality problems of print jobs. License management Manage licenses.
-
Page 16: Available Documentation
On-line Help Embedded in the application, as an on-line help file in multiple languages. Océ TDS-TCS connectivity manual CD-ROM, as a PDF file in English only. Note: Visit Océ on the internet at www.oce.com for the latest information. Chapter 1 Introduction... -
Page 17: Get To Know The Printing System
Chapter 2 Get to know the printing system... -
Page 18: The Océ Colorwave ™ 600 Printing System
™ The Océ ColorWave 600 printing system ™ The Océ ColorWave 600 printing system Introduction ™ The Océ ColorWave 600 is the first wide format TonerPearl printer in the world and consequently also the first of a new family of color wide format printers that use the ™... - Page 19 ™ The Océ ColorWave 600 printing system Illustration ™ The main components of the Océ ColorWave 600 printing system Component Description / Function ™ The 'Océ ColorWave Creates the printed output. Printer' The 'Océ Express The 'Océ Express WebTools' provide multiple users WebTools' a remote view on the system and control on the system's workflow, without any need to install...
-
Page 20: The Océ Colorwave ™ 600 Printing System Consumables
™ The Océ ColorWave 600 printing system consumables ™ The Océ ColorWave 600 printing system consumables Consumable Consumable part Description 'Media' 'Roll' Roll that caries the media. A roll can have a 2" core or a 3" core. 'Core' The core of the media roll is the cardboard inner part of the roll. -
Page 21: The Océ Colorwave ™ 600 Printer
Printer working area [Footprint] ™ The Océ ColorWave 600 printer Printer working area [Footprint] ™ The Océ ColorWave 600 requires a floor space / working area of at least 3100 mm x 2270 mm (122 inch x 90 inch). [10]... -
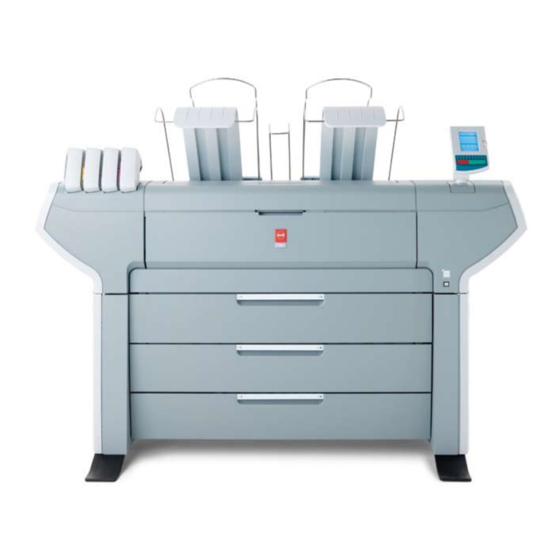
Page 22: The Printer Hardware Components (Front)
The printer hardware components (front) The printer hardware components (front) Illustration [11] Component - function table Component Description / Function 'Lower left cover' 'Media drawer' Media drawer that contains the media roll 5 and/or 6. The 'Media drawer' on page 26 'Media drawer' Media drawer that contains the media roll 3 and/or 4. - Page 23 The printer hardware components (front) Component Description / Function ™ 'Toner cartridge' (cyan) Toner cassette for cyan 'Océ TonerPearls ™ 'Toner cartridge' (yellow) Toner cassette for yellow 'Océ TonerPearls ™ 'Toner cartridge' (black) Toner cassette for black 'Océ TonerPearls ™ 'Toner cartridge' (magenta) Toner cassette for magenta 'Océ...
-
Page 24: The Printer Hardware Components (Back)
The printer hardware components (back) The printer hardware components (back) Illustration [12] Component - function table Component Description / Function 'Wheel' 'Left cover of the media drawer' 'Back cover of the media drawer' 'Connection panel' The connection panel of the 'Océ PowerM controller' ■... - Page 25 The printer hardware components (back) Component Description / Function 'Top back left cover' 'Top back cover' Used for error recovery. Note: It is possible to install an optional 'Receiving rack (basket)' or a folder. Note: If you select 'External output (back)', the printed output is lead through the slot below the 'Top back cover'.
-
Page 26: The 'Media Drawer
The 'Media drawer' The 'Media drawer' Illustration [13] Component - function table Attention: Only use intact media rolls. Dented media rolls can damage the 'Imaging devices'. Number Component Description / Function 'Roll' 1 Media roll 3 or 5 in other media drawers 'Roll' 2 Media roll 4 or 6 in other media drawers 'Roll holder'... - Page 27 The 'Media drawer' Number Component Description / Function 'Roll loading station' Groove integrated behind the front cover of the media drawer. To load new media on the printer, the operator must proceed as follows place the new media roll temporarily on ■...
-
Page 28: The 'Imaging Section
The 'Imaging section' The 'Imaging section' Illustration [14] [14] When you open the 'Top cover' you get access to the 'Imaging section'. Component - function table Component Description / Function 'Print surface' The print surface is designed to keep the media that is printed on flat. -
Page 29: The Printer Operator Panel
The hardware of the printer operator panel The printer operator panel The hardware of the printer operator panel Illustration [15] Component - function table [10] Component Description / Function 'Numeric keys' Keys with the numeric values 0-9 in the lower part of the 'Printer operator panel', that allow the operator to enter a numeric value, for example the number of prints. - Page 30 The hardware of the printer operator panel Component Description / Function 'Status light' The status light indicates the status of the printer. A green light indicates that the printer is ■ ready. A blinking green light indicates that the ■ printer is busy.
- Page 31 The hardware of the printer operator panel Component Description / Function 'Green start key' The green key on the printer operator panel that allows the operator to start a print job from the 'Queue' or 'Mailbox' 'Red stop key' The red key on the 'Printer operator panel' that allows the operator to immediately stop the print job that is currently printed.
-
Page 32: The Main Screens On The Printer Operator Panel
The main screens on the printer operator panel The main screens on the printer operator panel [11] Screen Function Screen dump [16] 'Home' Basic screen that displays only the most relevant information: the condition of the system and what it is doing now. - Page 33 The main screens on the printer operator panel Screen Function Screen dump [18] 'Queue' Monitor and control the progress of print jobs. Tasks (performed by 'Any user'): Monitor print jobs - what is the ■ progress (= the 'Queue' pane). Solve problems with jobs - media ■...
- Page 34 The main screens on the printer operator panel Screen Function Screen dump [20] 'Maintenance' Maintenance and troubleshooting tasks. Tasks (performed by 'Any user', but most likely by the 'Key operator') to solve problems with the printer: 'Calibration' ■ 'Calibrate the printer' 'Clear system' - ■...
-
Page 35: The Finishing Options
The finishing options The finishing options Introduction ™ The Océ ColorWave 600 is delivered with a 'Top delivery tray' to collect your printed output. [22] The 'Top delivery tray' can collect 50 - 100 A0 plain paper prints with a maximum length of 48"... - Page 36 The finishing options The finishing options [12] 'Receiving rack (basket)' Illustration [23] The 'Receiving rack (basket)' is hooked at the rear side of the printer. It can collect 2 - 5 prints. The 'Receiving rack (basket)' bends the printed output. Not all media types are appropriate for this finishing option.
-
Page 37: Prepare The Printing System For Use And Get Started
Chapter 3 Prepare the printing system for use and get started... -
Page 38: Introduction
Introduction Introduction ™ This chapter contains all the information you need to prepare your Océ ColorWave 600 for use. You can learn more about the following. How to move the printer. ■ How to connect the power supply cable and the network cable. ■... -
Page 39: How To Move The Océ Colorwave
™ How to move the Océ ColorWave 600 printer ™ How to move the Océ ColorWave 600 printer Introduction [25] Attention: If connected you must first switch off and disconnect the Océ ™ ColorWave 600. Switch on or switch off the printer on page 149. - Page 40 ™ How to move the Océ ColorWave 600 printer Step Action Remarks [26] Use both hands to pull at the 'Lower left cover'. Remove the 'Lower left cover'. [27] Pull at the Foot cover. Remove the 'Foot' cover. [28] Push the handle [1]. The 'Foot' snaps up [2].
- Page 41 ™ How to move the Océ ColorWave 600 printer Step Action Remarks ™ [29] Move the Océ ColorWave printer. Note: Be aware of the printer working area. [30] Pull out the left 'Foot' [1] until it touches the ground and locks [2]. You should hear a click as it locks.
- Page 42 ™ How to move the Océ ColorWave 600 printer Step Action Remarks [31] Replace the 'Foot' covers. Place the pin into the notch. [31] Pin [32] [32] Notch [33] Chapter 3 Prepare the printing system for use and get started...
- Page 43 ™ How to move the Océ ColorWave 600 printer Step Action Remarks [34] Replace the 'Lower left cover'. Place the pin into the notch. [34] Pin [35] [35] Notch [36] Repeat action 6 till 8 at the right hand side. Replace the 'Lower right cover'...
-
Page 44: Connect The Océ Colorwave
How to connect the network cable ™ Connect the Océ ColorWave printer How to connect the network cable [15] Step Action Remarks [37] Remove the cover of the 'Connection panel' at the rear side of the printer. [38] Lead the connection cable through the cover. - Page 45 How to connect the network cable Step Action Remarks [39] Connect one side of the data cable (UTP cable with a RJ45 connector) to the indicated network connection on the connection panel of the 'Océ PowerM controller'. Connect the other side of the network cable to your company network.
-
Page 46: How To Connect The Mains Supply Cable
How to connect the mains supply cable How to connect the mains supply cable [16] Step Action Remarks [41] Plug in the 'Power' cable at the power connection on the 'Connection panel' at the back of the printer. Note: Make sure the main power switch is in 'off' position. -
Page 47: How To Switch On The Printer
How to switch on the printer How to switch on the printer [17] Step Action [42] Switch on the green main switch at the rear side of the Océ ™ ColorWave 600. ™ Switch on the Océ ColorWave 'On / Off switch' [19] 600 at the front side of the [43] printer. -
Page 48: The Installation Procedure
Introduction The installation procedure Introduction ™ To install the printer and integrate the Océ ColorWave 600 system in your company network you must follow four main steps. Run the installation wizard from the printer operator panel. ■ If you connect the network cable of your company network and you switch on ™... -
Page 49: Run The Installation Wizard From The Printer Operator Panel
Run the installation wizard from the printer operator panel Run the installation wizard from the printer operator panel Introduction If you integrate the printer according to a network policy, please contact your network administrator to get information about the network infrastructure and parameters. - Page 50 Run the installation wizard from the printer operator panel How to run the installation wizard [18] Step Action Remarks [45] If you connect the network cable to your company ™ network and you switch on your Océ ColorWave 600 for the first time, an installation wizard starts automatically.
- Page 51 Run the installation wizard from the printer operator panel Step Action Remarks [49] The printer operator panel displays the number of rolls detected. Use the 'Upper right softkey' to go to the next step. [50] Use the 'Scroll wheel' to select 'Yes' when asked if you want to configure the network settings now.
- Page 52 Run the installation wizard from the printer operator panel Step Action Remarks [52] Select one of the following options. 'Auto detect' ■ Use the 'Scroll wheel' to select 'Auto detect' if the system must automatically detect your network settings. Confirm your entry with the 'Confirmation key' above the 'Scroll wheel'.
- Page 53 Run the installation wizard from the printer operator panel Step Action Remarks [54] The printer operator panel now displays the network settings. Record the IP address (for example, 134.188.26.173). You need this IP address to access the 'Océ Express WebTools' later in order to complete the printer configuration.
-
Page 54: Configure The Network Settings Manually
Configure the network settings manually Configure the network settings manually Introduction If you want configure the network settings manually, please contact your network administrator to get information about the network infrastructure and parameters. How to configure the network settings manually [19] Step Action... - Page 55 Configure the network settings manually Step Action Remarks [59] Enter your IP address. Use the 'Scroll wheel' to select the first numeric field. Confirm your selection with the 'Confirmation key' above the 'Scroll wheel'. Use the 'Numeric keys' to enter the first value of your IP address.
- Page 56 Configure the network settings manually Step Action Remarks [61] Enter your default gateway. Use the 'Scroll wheel' to select the first numeric field. Confirm your selection with the 'Confirmation key' above the 'Scroll wheel'. Use the 'Numeric keys' to enter the first value of your default gateway.
-
Page 57: Load Or Replace A Toner Cartridge
Load or replace a toner cartridge Load or replace a toner cartridge Illustration [63] [20] Number Component Description / Function ™ 'Toner cartridge' (cyan) Toner cassette for cyan 'Océ TonerPearls ™ 'Toner cartridge' Toner cassette for yellow 'Océ TonerPearls (yellow) ™... - Page 58 Load or replace a toner cartridge How to load or replace a toner cartridge [21] Step Action Remarks [64] The printer operator panel displays a request when you must load or replace a toner cartridge. [65] Unpack the toner cartridge. Note: Please do not throw away the empty packaging of...
- Page 59 Load or replace a toner cartridge Step Action Remarks [67] Place the new toner cartridge. Note: You must place the toner cartridge in the correct color position. The toner cartridges have fixed positions. [68] When the new toner cartridge is placed correctly, the following message is displayed on the printer operator panel.
-
Page 60: Replace The Maintenance Tray
Replace the maintenance tray Replace the maintenance tray Illustration [69] [22] Number Component Description / Function 'Maintenance tray drawer' How to replace the maintenance tray Attention: Always replace the maintenance tray when the 'Toner cartridge' is replaced. [23] Chapter 3 Prepare the printing system for use and get started... - Page 61 Replace the maintenance tray Step Action Remarks [70] The printer operator panel displays a request when you must replace the maintenance tray. [71] Follow the instructions in the wizard. Note: Please note that the 'Maintenance tray drawer' is located at the rear side of the Océ...
- Page 62 Replace the maintenance tray Step Action Remarks [73] Lift the old maintenance tray out. [74] Place the empty maintenance tray. [75] Push the 'Maintenance tray drawer' shut. [76] When the new maintenance tray is placed correctly, press 'Finish' on the 'Printer operator panel' to continue.
-
Page 63: Load A Media Roll
The 'Media drawer' Load a media roll The 'Media drawer' Illustration [77] Component - function table Attention: Only use intact media rolls. Dented media rolls can damage the 'Imaging devices'. [24] Number Component Description / Function 'Roll' 1 Media roll 3 or 5 in other media drawers 'Roll' 2 Media roll 4 or 6 in other media drawers 'Roll holder'... - Page 64 The 'Media drawer' Number Component Description / Function 'Roll loading station' Groove integrated behind the front cover of the media drawer. To load new media on the printer, the operator must proceed as follows place the new media roll temporarily on ■...
-
Page 65: Unpack The Media Roll
Unpack the media roll Unpack the media roll How to unpack the media roll Attention: Handle the media roll with care. A dented media roll can damage the imaging devices. Attention: Please note down the media code (for example LFM090) indicated on the sticker on the media box. - Page 66 Unpack the media roll Step Description Illustration [78] Place the media box on a table and open it. [79] Remove the plug from the media roll. [80] Carefully remove the media roll from the box. Remove the other plug and plastic around the media roll.
-
Page 67: Load A Media Roll
Load a media roll Load a media roll How to load a media roll Attention: Do not use dented media rolls to prevent damage to the imaging devices. Attention: Do not open the media drawer during the print process. Attention: Do not open more than one media drawer at the same time to prevent overbalance of the printer. - Page 68 Load a media roll Step Description Illustration [81] Open the correct media drawer to load the new media roll. [82] Place the new media roll on the roll loading station. [83] Pull the handle of the roll holder locking mechanism towards you. [84] Slide the roll holder in the core of the new media roll.
- Page 69 Load a media roll Step Description Illustration [85] Align the roll with the correct size indicator on the roll holder (At the left and right hand side). Release the handle of the locking mechanism. [86] Remove the two tapes from the new media roll.
- Page 70 Load a media roll Step Description Illustration [89] Close the media drawer. Note: Do not open the 'Media drawer' during loading. [90] The next screen appears on the printer operator panel. Chapter 3 Prepare the printing system for use and get started...
-
Page 71: Define The Media Type And The Core Size
Define the media type and the core size Define the media type and the core size How to define the media type and the core size [27] Step Screen Screen dump [91] If the displayed media type and core size is correct you can press 'Next ' and go to step 4. - Page 72 Define the media type and the core size Step Screen Screen dump [94] Use the 'Scroll wheel' to select the clean-cut length for your new media roll and confirm your entry with the 'Confirmation key' Note: Select 'Long strip' for new media. [95] Press 'Finish' and return to the 'Home' screen.
-
Page 73: Complete The Printer Configuration In The Océ Express Webtools
Complete the printer configuration in the Océ Express WebTools Open a web browser on a customer workstation connected to the network. Enter the following address: 'http://<Océ ColorWave 600 IP address>' (for example http://134.188.26.173) to access the Océ Express WebTools. [96] Note: If the Océ... - Page 74 Complete the printer configuration in the Océ Express WebTools [98] Use the password 'SysAdm' or the new password to logon as System administrator. Change the password on page 91 Chapter 3 Prepare the printing system for use and get started...
- Page 75 600 printing system. Wait until the system is ready again. Enter the following address: 'http://<Océ ColorWave 600 Hostname>' (for example http://OceColorWave600) in the workstation web browser: If the Océ Express WebTools appear the printer is integrated in the network and...
- Page 76 Complete the printer configuration in the Océ Express WebTools [101] If an error page ('Page cannot be displayed') appears, contact the network administrator. Check the Host name and the other web browser security and network settings. Refer to the Océ TDS/TCS Connectivity Manual, 'Chapter 2 - Windows TCP/IP ™...
-
Page 77: Configure The Regional Settings Of The Océ Colorwave ™ 600
™ Configure the regional settings of the Océ ColorWave ™ Configure the regional settings of the Océ ColorWave Purpose ™ The regional settings are configured during the installation of your Océ ColorWave 600. If you want to change the initial configuration, you can do so in the 'Regional settings'. -
Page 78: Print The Customer Acceptance Test (Cat) Demo Print
Print the Customer Acceptance Test (CAT) demo print Print the Customer Acceptance Test (CAT) demo print When to do When you installed the printer and prepared the printer for use, you can print the Customer Acceptance Test demo print. You can use this demo print to check if the ™... - Page 79 Print the Customer Acceptance Test (CAT) demo print How to print the Customer Acceptance Test (CAT) demo print [28] Step Action Remarks [102] From the 'Home' screen on the printer operator panel select the 'System' tab. [103] Select the 'Maintenance' tab with the upper left softkey.
- Page 80 Print the Customer Acceptance Test (CAT) demo print Step Action Remarks [106] Press 'Finish' to print the Customer Acceptance Test. [107] Select ' Back' and 'Home' to return to the 'Home' screen. Result Evaluate the Customer Acceptance Test print. Check if the print does not show any of the following output quality problems: Banding across the print with differences in color and gloss on page 268 ■...
-
Page 81: Configure The Printing System
Chapter 4 Configure the printing system... -
Page 82: Introduction To The Océ Express Webtools
Purpose of the Océ Express WebTools Introduction to the Océ Express WebTools Purpose of the Océ Express WebTools Definition The Océ Express WebTools is an application that runs on the embedded Océ ™ ® ColorWave 600 web server. You can use an Internet browser (Microsoft Internet ™... - Page 83 Purpose of the Océ Express WebTools Illustration [108] 'Jobs' tab Editable for any user. When you access the 'Jobs' tab you can do the following. Get an overview of job queue. ■ Delete jobs in the queue. ■ Move jobs in the queue to the top of the queue (increase priority). ■...
- Page 84 Purpose of the Océ Express WebTools [29] Groups 'Preferences' 'Overview' ■ Summary of the settings organized in different groups. 'System defaults' ■ 'Print job defaults' ■ 'Color management' ■ 'Pen settings' ■ 'Configuration' tab Editable for System administrator and Power user User roles and authorizations on page The 'Configuration' tab contains the settings to install the system in your...
- Page 85 Purpose of the Océ Express WebTools [31] Groups 'Support' 'About' ™ Information about the Océ ColorWave 600 system ■ software version. View Total Area Click counter. ■ The Total Area Click or 'TAC' is a new click that is a function of print volume (square meter) and of toner coverage (grams /square meter).
-
Page 86: Set Another Language For The Océ Express Webtools
Set another language for the Océ Express WebTools Set another language for the Océ Express WebTools Introduction The language setting of the internet browser you use defines the language in which the user interface of the Océ Express WebTools is displayed. Note: This language setting does not influence the language on the printer operator panel. - Page 87 Set another language for the Océ Express WebTools Click OK to confirm or Cancel to close both windows again. Click Reload in the toolbar or open another page. The language of the application will be changed.
-
Page 88: User Roles And Authorizations
User roles and authorizations User roles and authorizations Introduction The settings in the Océ Express WebTools must be configured and managed to ™ enable the optimal performance of the Océ ColorWave 600. You can view all the settings in the Océ Express WebTools but when you want to edit a setting, a message appears. -
Page 89: Log In As An Authorized User
Log in as an authorized user Log in as an authorized user Purpose In order to have write access for certain groups of settings, you must log in as an authorized user. There are 3 user roles, System administrator, Key operator and Power user who have authorization to edit specific groups of settings. -
Page 90: Log Out After Your Session
Log out after your session Log out after your session Purpose When you have finished the modification of a setting, it is advised to log out again. This way, it is not possible for another user to access and change the settings. How to log out after you have finished your session Click the log out hyperlink in the top right-hand corner of the screen. -
Page 91: Change The Password
Change the password Change the password When to do For security reasons it is advised to periodically change the password for the 3 access modes (Key operator, System administrator, Power user) to the Océ Express WebTools. How to change the password Click 'Preferences' - 'System defaults' - 'Passwords'. -
Page 92: Update The Océ Colorwave
™ Update the Océ ColorWave 600 software ™ Update the Océ ColorWave 600 software Introduction The Océ Express WebTools allow you to update your system software. Before you begin This setting is editable for the System administrator or Power user. ™... -
Page 93: View And Check The Settings
View and check the settings View and check the settings Purpose View and check the settings and the values that are stored when you create a back-up file. When to do Before you create a back-up file of the data in the Océ Express WebTools. ■... -
Page 94: Create A Back-Up File Of The Settings
Create a back-up file of the settings Create a back-up file of the settings Purpose Create a back-up file with the settings and the values that you configured in the Océ Express WebTools. When to do Duplicate the settings very easily to another printer. ■... -
Page 95: Restore A Back-Up File
Restore a back-up file Restore a back-up file When to do Duplicate the settings to another printer. ■ Go back to the settings that you have saved in a previous back-up file. ■ Note: Not all settings are restored in the back-up file. The network settings and the passwords are excluded from the back-up file for security reasons. -
Page 96: Restore The Factory Defaults
Restore the factory defaults Restore the factory defaults When to do When you want to restore the factory default settings and values of your Océ ■ Express WebTools. How to restore the factory defaults Click the 'Configuration' tab or the 'Preferences' tab. Click 'Restore defaults' in the top-right hand corner of the screen. -
Page 97: Check Your Licenses
Check your licenses Check your licenses About the licenses The 'Support' - 'Licenses' tab in the Océ Express WebTools allows you to manage the licenses that are active on your system. A license is needed to activate certain ™ functions on your Océ ColorWave 600. - Page 98 Check your licenses [33] Information Description 'Option' This field displays the name of the option. ™ For Océ ColorWave 600 the following licenses are available. ™ Océ ColorWave 600 base license. ■ ® Adobe PostScript 3 / PDF. ■ Japanese PostScript fonts. ■...
-
Page 99: Save The Currently Active Licenses
Save the currently active licenses Save the currently active licenses Introduction You can save all current active licenses of different licenses types into one single file. Purpose Save the current active licenses for the following purposes. Collect and save all active licenses of different types into one single file ■... -
Page 100: Get A New License
Get a new license Get a new license Introduction The Océ applications and optional functions are protected against unauthorized use. You need to activate the license to enable an application or optional function for use. The 'Licenses' tab enables you to upload new license files to activate a license. Purpose Upload a new license file. - Page 101 Get a new license Result If you have updated an expired license, the new license file overwrites the ■ previous license file. If you have uploaded a new license, the license state in the overview is changed ■ from 'Not authorized' to 'Authorized'.
-
Page 102: Configure The Printer
™ Configure the regional settings of the Océ ColorWave Configure the printer The 'System defaults' tab in the Océ Express WebTools ™ Configure the regional settings of the Océ ColorWave Purpose ™ The regional settings are configured during the installation of your Océ ColorWave 600. -
Page 103: Define The Display Languages Of The Printer
Define the display languages of the printer Define the display languages of the printer Introduction The Océ Express WebTools allows you to define the 'First language' (the default display language) and the 'Second language' (the alternative display language) for the printer operator panel. The 'First language' and the 'Second language' you defined in the Océ... -
Page 104: Configure The 'Media Request Time-Out
Configure the 'Media request time-out' Configure the 'Media request time-out' Introduction The Printer operator panel displays a media request when a media is requested that is not available. When this setting is disabled, the media request will be displayed until it is resolved. Note: When enabled, the 'Action after media request time-out' setting determines if the printer either deletes the job or puts the job in attention state when the media request is not resolved within a given period. -
Page 105: Configure The 'Printer Panel Time-Out
Configure the 'Printer panel time-out' Configure the 'Printer panel time-out' Introduction The printer operator panel can automatically return to the Home screen. When this setting is disabled, the panel never returns to the Home screen automatically. Note: When enabled, the printer operator panel returns to the Home screen when the keys and the scroll wheel are not activated during the specified time-out period. -
Page 106: Configure The Energy Save Modes Of The Océ Colorwave
™ Configure the energy save modes of the Océ ColorWave ™ Configure the energy save modes of the Océ ColorWave Introduction ™ The Océ ColorWave 600 offers two energy save modes that you can set if the printer is idle for a defined period. The configuration of the timers prevents unnecessary power consumption. -
Page 107: Define The Media Configuration Of The Océ Colorwave ™ 600
™ Define the media configuration of the Océ ColorWave ™ Define the media configuration of the Océ ColorWave Introduction You must indicate in the Océ Express WebTools the following settings. The core size of the media rolls ■ The folder value ■... - Page 108 ™ Define the media configuration of the Océ ColorWave How to define the media series Attention: Access the Océ Express WebTools. This setting is editable for the Key operator and the Power user. Navigate to 'Preferences' - 'System defaults' - 'Hardware configuration'. Click the value for 'Media series' to access the edit window and select the correct media series.
-
Page 109: The 'Configuration' Tab In The Océ Express Webtools
Configure the network settings in the Océ Express WebTools The 'Configuration' tab in the Océ Express WebTools Configure the network settings in the Océ Express WebTools How to configure the network settings in the Océ Express WebTools Click 'Configuration' - 'Network' - 'Adapter 1, TCP/IP'. Click 'Edit' in the group bar to access the 'Edit' window. -
Page 110: Relevant Settings On The Printer Operator Panel
Change the display language of the printer Relevant settings on the printer operator panel Change the display language of the printer Introduction The Océ Express WebTools allows you to define the 'First language' (the default display language) and the 'Second language' (the alternative display language) for the printer operator panel. - Page 111 Change the display language of the printer Step Action Illustration [111] Use the upper right softkey to select the 'Configuration' tab. [112] Press the lower left softkey to toggle between the first language and the second language. Note: Only the first language (default language) and the second language (alternative language) defined in the Océ...
-
Page 112: Configure The Network Settings On The Printer Operator Panel
Configure the network settings on the printer operator panel Configure the network settings on the printer operator panel When to do ™ When you have no connection to the Océ ColorWave 600 printer you cannot use the Océ Express WebTools to edit the network settings. This situation can occur at first installation or when there is no network connection due to invalid network settings. - Page 113 Configure the network settings on the printer operator panel Step Action Illustration [115] Use the scroll wheel to select 'Configure network settings' and press the confirmation key. [116] The printer operator panel displays the current network settings. To change these settings press 'begin' - lower right softkey - to start the network connection procedure.
- Page 114 Configure the network settings on the printer operator panel Step Action Illustration [118] Select one of the following options. 'Auto detect' ■ Use the 'Scroll wheel' to select 'Auto detect' if the system must automatically detect your network settings. Confirm your entry with the 'Confirmation key' above the 'Scroll wheel'.
- Page 115 Configure the network settings on the printer operator panel Step Action Illustration [120] The printer operator panel now displays the network settings. Record the IP address (for example, 134.188.26.173). You need this IP address to access the 'Océ Express WebTools' later in order to complete the printer configuration.
-
Page 116: Configure Print Jobs
Set the default print job settings Configure print jobs Relevant settings in the Océ Express WebTools Set the default print job settings Definition You can use the Océ Express WebTools to configure the default values for the print job settings. The print job settings are grouped under the 'Preferences' - 'Print job defaults'. - Page 117 Set the default print job settings 'Preferences' - 'Print job defaults' - 'Basic' [37] Setting Description 'Number of sets' Enter the default value for the number of times you want your jobs to be printed. 'Collate' Select 'On (sort by set)' if your printed output must be ■...
- Page 118 Set the default print job settings [38] Setting Description 'Media source' The 'Media source' setting can be used to select the default output material and format. The 'System' screen of the printer operator panel will show you what rolls are currently loaded.
- Page 119 Set the default print job settings [39] Setting Description 'Scale' 'Scales the image to the defined percentage.' (100% is no scaling) 'Mirror' 'When 'on', the image is mirrored along the vertical axis [127] (the media transport direction).' 'Rotation' 'Rotates the image.'Set the 'Rotation' mode on page 225.
-
Page 120: Set The Color Management Settings
Set the Color management settings Set the Color management settings Introduction In most cases, you define the color management settings for a print job during the job submission process. You can select the color management settings in your print ® job submission application (Océ... - Page 121 Set the Color management settings [41] Setting group Setting Description 'For HP-GL, HP-GL/2 'Color feel' Use this setting to define the default and HP-RTL files' 'look and feel' for print files if you ® use the Océ Windows printer driver to send your print jobs. If you select 'Océ...
- Page 122 Set the Color management settings Predefined color management settings per input file type [42] [42] Color management settings Input file type Color feel 'Océ enhanced colors' 'For HP-GL, HP-GL/2 'Océ CAD colors' N.A. and HP-RTL files' 'For TIFF and JPEG 'Océ...
-
Page 123: Use The Printing System
Chapter 5 Use the printing system... -
Page 124: Work With The Océ Colorwave
The 'Media drawer' ™ Work with the Océ ColorWave printer Set up the printer The 'Media drawer' Illustration [130] Component - function table Attention: Only use intact media rolls. Dented media rolls can damage the 'Imaging devices'. [43] Number Component Description / Function 'Roll' 1 Media roll 3 or 5 in other media drawers... - Page 125 The 'Media drawer' Number Component Description / Function 'Roll loading station' Groove integrated behind the front cover of the media drawer. To load new media on the printer, the operator must proceed as follows place the new media roll temporarily on ■...
-
Page 126: Remove A Media Roll
Remove a media roll Remove a media roll How to remove a media roll Attention: Do not open the media drawer during the print process. Attention: Do not open more than one media drawer at the same time to prevent overbalance of the printer. - Page 127 Remove a media roll Step Description Illustration [133] Put the roll holder with the media roll on the roll loading station. [134] Pull the handle of the roll holder locking mechanism towards you. [135] Remove the roll holder from the core of the media roll.
-
Page 128: Unpack The Media Roll
Unpack the media roll Unpack the media roll How to unpack the media roll Attention: Handle the media roll with care. A dented media roll can damage the imaging devices. Attention: Please note down the media code (for example LFM090) indicated on the sticker on the media box. - Page 129 Unpack the media roll [45] Step Description Illustration [136] Place the media box on a table and open it. [137] Remove the plug from the media roll. [138] Carefully remove the media roll from the box. Remove the other plug and plastic around the media roll.
-
Page 130: Load A Media Roll
Load a media roll Load a media roll How to load a media roll Attention: Do not use dented media rolls to prevent damage to the imaging devices. Attention: Do not open the media drawer during the print process. Attention: Do not open more than one media drawer at the same time to prevent overbalance of the printer. - Page 131 Load a media roll Step Description Illustration [139] Open the correct media drawer to load the new media roll. [140] Place the new media roll on the roll loading station. [141] Pull the handle of the roll holder locking mechanism towards you. [142] Slide the roll holder in the core of the new media roll.
- Page 132 Load a media roll Step Description Illustration [143] Align the roll with the correct size indicator on the roll holder (At the left and right hand side). Release the handle of the locking mechanism. [144] Remove the two tapes from the new media roll.
- Page 133 Load a media roll Step Description Illustration [147] Close the media drawer. Note: Do not open the 'Media drawer' during loading. [148] The next screen appears on the printer operator panel.
-
Page 134: Define The Media Type And The Core Size
Define the media type and the core size Define the media type and the core size How to define the media type and the core size [47] Step Screen Screen dump [149] If the displayed media type and core size is correct you can press 'Next ' and go to step 4. - Page 135 Define the media type and the core size Step Screen Screen dump [152] Use the 'Scroll wheel' to select the clean-cut length for your new media roll and confirm your entry with the 'Confirmation key' Note: Select 'Long strip' for new media. [153] Press 'Finish' and return to the 'Home' screen.
-
Page 136: The Output Delivery
The output delivery The output delivery Introduction There are three factors that can influence the delivery destination of the printed output. The media profile of the media you use. Some media profiles require a specific output delivery. If the correct media profile is ™... - Page 137 The output delivery [154] The output delivery Attention: The table below gives an overview of the common output delivery destination. If the media profile of the media you use requires a specific output delivery, the common delivery destination will be overruled. [48]...
- Page 138 The output delivery When the and the default 'Delivery Then the printed output media roll destination' is you use has a 3" roll core 'Top delivery tray' is delivered at the 'Top delivery tray' [155] 3" roll core 'External output (back)' is lead through the slot below the 'Top back cover' at the back of the printer.
-
Page 139: Make A New Media Profile Available On The Printer Operator Panel
Make a new media profile available on the printer operator panel Make a new media profile available on the printer operator panel How to make a new media profile available on the printer operator panel download the correct media profile from the Océ website (Download a media profile from the Océ... -
Page 140: Load Or Replace A Toner Cartridge
Load or replace a toner cartridge Load or replace a toner cartridge Illustration [157] [49] Number Component Description / Function ™ 'Toner cartridge' (cyan) Toner cassette for cyan 'Océ TonerPearls ™ 'Toner cartridge' Toner cassette for yellow 'Océ TonerPearls (yellow) ™... - Page 141 Load or replace a toner cartridge How to load or replace a toner cartridge [50] Step Action Remarks [158] The printer operator panel displays a request when you must load or replace a toner cartridge. [159] Unpack the toner cartridge. Note: Please do not throw away the empty packaging of the new...
- Page 142 Load or replace a toner cartridge Step Action Remarks [161] Place the new toner cartridge. Note: You must place the toner cartridge in the correct color position. The toner cartridges have fixed positions. [162] When the new toner cartridge is placed correctly, the following message is displayed on the printer operator panel.
-
Page 143: Replace The Maintenance Tray
Replace the maintenance tray Replace the maintenance tray Illustration [163] [51] Number Component Description / Function 'Maintenance tray drawer' How to replace the maintenance tray Attention: Always replace the maintenance tray when the 'Toner cartridge' is replaced. [52]... - Page 144 Replace the maintenance tray Step Action Remarks [164] The printer operator panel displays a request when you must replace the maintenance tray. [165] Follow the instructions in the wizard. Note: Please note that the 'Maintenance tray drawer' is located at the rear side of the Océ...
- Page 145 Replace the maintenance tray Step Action Remarks [168] Place the empty maintenance tray. [169] Push the 'Maintenance tray drawer' shut. [170] When the new maintenance tray is placed correctly, press 'Finish' on the 'Printer operator panel' to continue.
-
Page 146: Monitor The Printer
The system monitor and the system states Monitor the printer The system monitor and the system states Introduction You can activate the system monitor to get an overview of the current status of the printing system. How to activate the system monitor [53] Chapter 5 Use the printing system... - Page 147 The system monitor and the system states If you use the Then Printer From the 'Home' screen select 'System' with the 'Lower left softkey'. operator panel [171] Océ Express Click on the 'System' tab in the lower left corner of the screen. The system WebTools monitor pops-up.
- Page 148 The system monitor and the system states How to view the system states The system states provide you with additional information about the printer. The system state messages are displayed on the printer operator panel and in the Océ Express WebTools. On the printer operator panel.
-
Page 149: Control The Printer
Switch on or switch off the printer Control the printer Switch on or switch off the printer How to switch on or switch off the printer [55] On / off switch. Illustration The 'On / Off switch' at the front side of the 'On / Off switch' [19] printer. -
Page 150: Pause Or Resume The Printer
Pause or resume the printer Pause or resume the printer Introduction If you do not want the printer to start printing you can pause the printer. If the printer can start printing again you can resume the printer. How to 'Pause' or 'Resume' the printer [56] Action Remarks... -
Page 151: Solve Problems With The Printer
Introduction Solve problems with the printer Introduction Introduction If there is a problem with the printer that the operator can solve, the printer operator panel displays the following message. [178] Please follow the instructions on the printer operator panel step by step. For additional information about some instructions or the location of specific covers or doors, please refer to the following modules: Cover or drawer opened on page... -
Page 152: Cover Or Drawer Opened
Cover or drawer opened Cover or drawer opened Introduction The media drawers and certain covers must only be opened if you are asked to do so in a wizard on the printer operator panel. Attention: When you open one of the indicated covers or drawers while you are not in a wizard, the system produces a warning signal. - Page 153 Cover or drawer opened Displayed warning Position of the component [179] 'Media drawer' [2, 3, 4] [180] Note: Normally you open a media drawer to load or replace a media roll or in case of a media jam. [181] 'Front cover' [6] [182] Note: Normally you open the front cover in case of a media jam.
- Page 154 Cover or drawer opened Displayed warning Position of the component [183] 'Top cover' [14] [184] Note: Normally you open the top cover in case of a media jam, to check the guide flap Check and clean the guide flap on page 161 or to check the print surface Check and clean the print surface on...
-
Page 155: Remove The 'Top Delivery Tray' And Open The 'Top Cover
Remove the 'Top delivery tray' and open the 'Top cover' Remove the 'Top delivery tray' and open the 'Top cover' How to remove the 'Top delivery tray' and open the 'Top cover' [58] Step Action Remarks [187] Pull up the left part of the top delivery tray. - Page 156 Remove the 'Top delivery tray' and open the 'Top cover' Step Action Remarks [189] Open the 'Top cover'. [190] Check and clean the print surface on page 158 [1] or Check and clean the guide flap on page 161 [2]. Chapter 5 Use the printing system...
-
Page 157: Close The 'Top Cover' And Replace The 'Top Delivery Tray
Close the 'Top cover' and replace the 'Top delivery tray' Close the 'Top cover' and replace the 'Top delivery tray' If you are ready [59] Step Action Remarks [191] Close the 'Top cover'. [192] Unlock the metal locking mechanisms of the left and the right part of the top delivery tray. -
Page 158: Check And Clean The Print Surface
Check and clean the print surface Check and clean the print surface Introduction This document describes how to check and clean the print surface. When to do When a media jam occurs or when there is pollution on your printed output, one of the steps to solve the problem is to clean the print surface. - Page 159 Check and clean the print surface How to check and clean the print surface [60] Step Action Remarks [195] Remove the top delivery tray and open the 'Top cover'. Remove the 'Top delivery tray' and open the 'Top cover' on page 155 [196] Check if toner drops are on the print surface.
- Page 160 Check and clean the print surface Step Action Remarks [198] Check if the holes in the print surface are open. If not: Use the edge of the clean card to open the holes. Place back the clean card in the clean card holder. [199] Close the top cover and replace the top delivery tray.
-
Page 161: Check And Clean The Guide Flap
Check and clean the guide flap Check and clean the guide flap Introduction This document describes how the check and clean the guide flap. When to do When a media jam occurs or when there is pollution on your printed output, one of the steps to solve the problem is to clean the guide flap. - Page 162 Check and clean the guide flap Step Action Remarks [201] Remove the top delivery tray and open the 'Top cover'. Remove the 'Top delivery tray' and open the 'Top cover' on page 155 [202] Check if the guide flap is polluted with toner.
- Page 163 Check and clean the guide flap Step Action Remarks Place back the clean card in the clean card holder. [204] Close the top cover and replace the top delivery tray. Close the 'Top cover' and replace the 'Top delivery tray' on page 157...
-
Page 164: Adjust The 'Top Delivery Tray
Adjust the 'Top delivery tray' Adjust the 'Top delivery tray' Introduction This document describes how to adjust the 'Top delivery tray'. When to do When you want to increase the distance between the guides of the Top delivery tray in order to collect more printed output. Required tool Cross screwdriver Illustration... - Page 165 Adjust the 'Top delivery tray' How to adjust the Top delivery tray [62] Step Action Remarks [206] Pull up the metal guide of the 'Top delivery tray'. [207] Use your finger or the cross screwdriver to adjust the position of the metal guide (both sides).
- Page 166 Adjust the 'Top delivery tray' Step Action Remarks [209] Repeat step 1 to 3 for the second metal guide. [210] Check if both metal guides are in the same position. Correct the position if necessary. Chapter 5 Use the printing system...
-
Page 167: Handle A Media Jam
Handle a media jam Handle a media jam Introduction When a media jam occurs, one of the steps to solve the problem is to cut the jammed media. The printer operator panel displays the following message. [211] How to cut the media [63] Step Action... -
Page 168: Create Print Jobs
Create, manage and print jobs Create print jobs Create, manage and print jobs Introduction In a normal workflow environment you can identify several components that enable you to create, manage and print jobs. Illustration [213] [64] Number Function Component Application Create Océ... - Page 169 Create, manage and print jobs the 'Océ Publisher Select' Online Help ■ the 'Océ Publisher Select' User manual ■...
-
Page 170: Set Up Print Jobs
What you need to know before you send your print jobs Set up print jobs What you need to know before you send your print jobs Definition ™ Before you send print jobs to the Océ ColorWave 600, remember the following. The values defined in the Océ... -
Page 171: Use 'Océ Publisher Express' To Send A Print Job
Use 'Océ Publisher Express' to send a print job Use 'Océ Publisher Express' to send a print job Introduction 'Océ Publisher Express' is a job submitter that is integrated in the 'Océ Express WebTools'. Illustration [214]... - Page 172 Use 'Océ Publisher Express' to send a print job How to use 'Océ Publisher Express' to send a print job [65] Step Action Remarks Open your web browser. Use one of the following web browsers ® Microsoft Internet Explorer 6.0 (or higher) ■...
-
Page 173: Use Océ Publisher Select To Send A Print Job
Use Océ Publisher Select to send a print job Use Océ Publisher Select to send a print job Introduction Océ provides Océ Publisher Select as a Job Submission software application that ™ allows you to send print jobs to your Océ ColorWave 600. - Page 174 Use Océ Publisher Select to send a print job Step Action Remarks If you want to change the job A separate window opens where you can adjust settings of documents in the the job settings of the selected documents. You Queue, select the documents can change the settings per document and click and click 'Edit'.
-
Page 175: Use The Océ Windows ® Printer Driver To Send A Print Job
® Use the Océ Windows Printer Driver to send a print job ® Use the Océ Windows Printer Driver to send a print job Introduction ® Océ provides the Océ Windows Printer Driver that allows you to send print jobs to ™... - Page 176 Printer Driver User manual ■ ™ Note: The Océ ColorWave 600 is delivered with a driver pack CD-ROM. You can also download the latest Océ drivers, free of charge, from our Web site www.oce.com. Chapter 5 Use the printing system...
-
Page 177: Use The Océ Postscript ® 3 Driver To Send A Print Job
® Use the Océ PostScript 3 Driver to send a print job ® Use the Océ PostScript 3 Driver to send a print job Introduction ® Océ provides the Océ PostScript 3 Driver that allows you to send print jobs to your ™... - Page 178 3 Driver Installation manual ■ ™ Note: The Océ ColorWave 600 is delivered with a driver pack CD-ROM. You can also download the latest Océ drivers, free of charge, from our Web site www.oce.com. Chapter 5 Use the printing system...
-
Page 179: Use Ftp To Send A Print Job To The Océ Colorwave ™ 600
™ Use FTP to send a print job to the Océ ColorWave ™ Use FTP to send a print job to the Océ ColorWave Introduction ™ The Océ ColorWave 600 supports printing through FTP. If you send your print job through FTP the default Océ Express WebTools settings are leading. -
Page 180: Use Lpr To Send A Print Job To The Océ Colorwave ™ 600
™ Use LPR to send a print job to the Océ ColorWave ™ Use LPR to send a print job to the Océ ColorWave Introduction ™ The Océ ColorWave 600 supports printing through LPR. If you send your print job through LPR the default Océ Express WebTools settings are leading. -
Page 181: Monitor Print Jobs
The job states Monitor print jobs The job states [70] State Description 'Active job' The active job that the system is currently printing. 'Waiting job' The waiting jobs are all not-active jobs, regardless of their state. 'Processing job' The system is processing the job data. 'Attention job' A job that requires user intervention before it can be printed (load media, enter accounting info, password…... -
Page 182: Control Print Jobs
Pause, resume or delete an active job Control print jobs Pause, resume or delete an active job Introduction This section describes how to pause, resume or delete an active job. How to 'Pause' or 'Resume' an active print job [71] Action Remarks [218]... -
Page 183: Solve Problems With Print Jobs
How to solve problems with print jobs Solve problems with print jobs How to solve problems with print jobs Introduction If there is a problem with a print job, the color of the green 'Jobs - Queue' bar in the Océ... - Page 184 How to solve problems with print jobs Chapter 5 Use the printing system...
-
Page 185: Manage Media On The Océ Colorwave
Chapter 6 Manage media on the Océ ™ ColorWave 600 printing system... -
Page 186: 600 Printing System
Overview of the media related settings Overview of the media related settings Introduction It is important to make sure that the media related settings of your system are set to generate an optimal print result. You can set media related settings in the following places. [73] ™... - Page 187 Overview of the media related settings Media related settings Description in the Océ Express The Océ Express WebTools allow you to manage the media WebTools profiles on the printer. In the 'Support' - 'Media' tab your can download new media profiles, upload media profiles to the 'Océ...
-
Page 188: Define The Media Configuration Of The Océ Colorwave
™ Define the media configuration of the Océ ColorWave ™ Define the media configuration of the Océ ColorWave Introduction You must indicate in the Océ Express WebTools the following settings. The core size of the media rolls ■ The folder value ■... - Page 189 ™ Define the media configuration of the Océ ColorWave How to define the media series Attention: Access the Océ Express WebTools. This setting is editable for the Key operator and the Power user. Navigate to 'Preferences' - 'System defaults' - 'Hardware configuration'. Click the value for 'Media series' to access the edit window and select the correct media series.
-
Page 190: Manage The Media Profiles
Manage the media profiles Manage the media profiles Introduction The Océ Express WebTools allow you to manage the media profiles on the printer. Before you begin This setting is editable for the Key operator or Power user. How to manage the media profiles Click the 'Support' - 'Media' tab in the Océ... - Page 191 Manage the media profiles Click the media type, for example 'Océ Red Label 75gr', to check the media profile information. Click the check box of a media profile and click the 'Enable' button in the toolbar above the media profiles list to make the media profile available on the printer operator panel and in the print job submission applications.
-
Page 192: Download A Media Profile From The Océ Web Site
How to download a media profile from the Océ web site Click 'Support' - 'Media', click on the link http://sdds.oce.com and select the Océ corporate site [224] Click Support and Downloads - Go to the Océ... - Page 193 Download a media profile from the Océ web site [225] [226] Download the correct zip file to a location on your workstation. Extract the files in the zip file. The zip file contains at least an instruction file how to handle the media profiles. Follow the steps described in the instruction file.
-
Page 194: Upload A Media Profile
Upload a media profile Upload a media profile When to do When you have downloaded the zip file of a new or updated media profile from the ™ corporate web site you need to upload this media profile to the Océ ColorWave embedded controller. -
Page 195: Replace A Media Roll
The 'Media drawer' Replace a media roll The 'Media drawer' Illustration [227] Component - function table Attention: Only use intact media rolls. Dented media rolls can damage the 'Imaging devices'. [75] Number Component Description / Function 'Roll' 1 Media roll 3 or 5 in other media drawers 'Roll' 2 Media roll 4 or 6 in other media drawers 'Roll holder'... - Page 196 The 'Media drawer' Number Component Description / Function 'Roll loading station' Groove integrated behind the front cover of the media drawer. To load new media on the printer, the operator must proceed as follows place the new media roll temporarily on ■...
-
Page 197: Remove A Media Roll
Remove a media roll Remove a media roll How to remove a media roll Attention: Do not open the media drawer during the print process. Attention: Do not open more than one media drawer at the same time to prevent overbalance of the printer. - Page 198 Remove a media roll Step Description Illustration [230] Put the roll holder with the media roll on the roll loading station. [231] Pull the handle of the roll holder locking mechanism towards you. [232] Remove the roll holder from the core of the media roll.
-
Page 199: Unpack The Media Roll
Unpack the media roll Unpack the media roll How to unpack the media roll Attention: Handle the media roll with care. A dented media roll can damage the imaging devices. Attention: Please note down the media code (for example LFM090) indicated on the sticker on the media box. - Page 200 Unpack the media roll Step Description Illustration [233] Place the media box on a table and open it. [234] Remove the plug from the media roll. [235] Carefully remove the media roll from the box. Remove the other plug and plastic around the media roll.
-
Page 201: Load A Media Roll
Load a media roll Load a media roll How to load a media roll Attention: Do not use dented media rolls to prevent damage to the imaging devices. Attention: Do not open the media drawer during the print process. Attention: Do not open more than one media drawer at the same time to prevent overbalance of the printer. - Page 202 Load a media roll Step Description Illustration [236] Open the correct media drawer to load the new media roll. [237] Place the new media roll on the roll loading station. [238] Pull the handle of the roll holder locking mechanism towards you.
- Page 203 Load a media roll Step Description Illustration [240] Align the roll with the correct size indicator on the roll holder (At the left and right hand side). Release the handle of the locking mechanism. [241] Remove the two tapes from the new media roll.
- Page 204 Load a media roll Step Description Illustration [244] Close the media drawer. Note: Do not open the 'Media drawer' during loading. [245] The next screen appears on the printer operator panel. ™ Chapter 6 Manage media on the Océ ColorWave 600 printing system...
-
Page 205: Define The Media Type And The Core Size
Define the media type and the core size Define the media type and the core size How to define the media type and the core size [79] Step Screen Screen dump [246] If the displayed media type and core size is correct you can press 'Next ' and go to step 4. - Page 206 Define the media type and the core size Step Screen Screen dump [249] Use the 'Scroll wheel' to select the clean-cut length for your new media roll and confirm your entry with the 'Confirmation key' Note: Select 'Long strip' for new media. [250] Press 'Finish' and return to the 'Home' screen.
-
Page 207: The Output Delivery
The output delivery The output delivery Introduction There are three factors that can influence the delivery destination of the printed output. The media profile of the media you use. Some media profiles require a specific output delivery. If the correct media profile is ™... - Page 208 The output delivery [251] The output delivery Attention: The table below gives an overview of the common output delivery destination. If the media profile of the media you use requires a specific output delivery, the common delivery destination will be overruled. [80] ™...
- Page 209 The output delivery When the and the default Then the printed output media roll you 'Delivery destination' is use has a 3" roll core 'Top delivery tray' is delivered at the 'Top delivery tray' [252] 3" roll core 'External output (back)' is lead through the slot below the 'Top back cover' at the back of the printer.
-
Page 210: Make A New Media Profile Available On The Printer Operator Panel
Make a new media profile available on the printer operator panel Make a new media profile available on the printer operator panel How to make a new media profile available on the printer operator panel download the correct media profile from the Océ website (Download a media profile from the Océ... -
Page 211: Define The Correct Media For Your Jobs
Define the correct media for your jobs Define the correct media for your jobs Definition To achieve optimal output quality, make sure that you load and define the correct media type on the printer. Make sure you define the correct media type for your job. Check if the media type (with the correct media format) that you defined in your job is available on the printer. -
Page 212: Laminate The Media
Laminate the media Laminate the media Introduction For durability or protection purposes you can decide to laminate your printed output. Please refer to Preferred Océ laminates on page 305 to find an overview of the advised Océ Laminates and the advised setting for your laminating device. ™... -
Page 213: Handle A Media Jam
Handle a media jam Handle a media jam Introduction When a media jam occurs, one of the steps to solve the problem is to cut the jammed media. The printer operator panel displays the following message. [254] How to cut the media [83] Step Action... - Page 214 Handle a media jam ™ Chapter 6 Manage media on the Océ ColorWave 600 printing system...
-
Page 215: Print Quality And Print Productivity
Chapter 7 Print quality and Print productivity... -
Page 216: Main Settings That Influence The Print Quality
Main settings that influence the print quality Main settings that influence the print quality Overview table print quality settings To increase the print quality of your system, you can define the following default settings to configure the system to get optimal results. [84] Click To go to... -
Page 217: Main Settings That Influence The Print Productivity
Main settings that influence the print productivity Main settings that influence the print productivity Overview table of print productivity settings To increase the print productivity of your system, you can change the following settings to let the printer print faster and more efficiently. Bear in mind that when you increase the print speed of your system, this can influence the print quality of you printer. -
Page 218: Set The 'Color Mode
Set the 'Color mode' Set the 'Color mode' Introduction Use the Océ Express WebTools to set the printer's default setting for the 'Color mode' for a print job. Note: If you select this setting in your print job submission application (Océ ®... -
Page 219: Set The 'Print Setting
Set the 'Print setting' Set the 'Print setting' Introduction The 'Print setting' in the 'Print job defaults' section allows you to set the printer's default value if no quality mode has been set in the print job. Note: If you select this setting in your print job submission application (Océ ®... - Page 220 Set the 'Print setting' Before you begin This setting is editable for the Key operator or Power user. How to set the 'Print setting' Click 'Preferences'- 'Print job defaults' - 'Basic'. Click 'Edit' in the 'Basic' bar or click the value of the 'Print setting' setting. Select 'Economy' if the print productivity is the most important factor.
-
Page 221: Set The 'Océ Print Assistant Behavior
How to set the 'Oce Print Assistant Behavior' Click 'Preferences' - 'Print job defaults' - 'Basic'. Click 'Edit' in the 'Basic' bar or click the value of the 'Oce Print Assistant Behavior' setting. Set the 'Océ Print Assistant Slider' to '0' if the print productivity is the most important factor. -
Page 222: Set The 'Production Plus' Setting
Set the 'Production Plus' setting Set the 'Production Plus' setting Introduction ™ With this setting you can define how the Océ ColorWave 600 must interpret the 'Print setting''Production'. Before you begin This setting is editable for the Key operator or Power user. How to set the 'Production Plus' setting Click 'Preferences' - 'Print job defaults' - 'Basic'. -
Page 223: Set The 'Automatic Roll Switch
Set the 'Automatic roll switch' Set the 'Automatic roll switch' Introduction You can choose one of following values. 'Enable' ■ Select this value if you have two or more media rolls that contain identical media (the same media type and media size). In that case, the printer can automatically switch to an alternative media roll when a roll runs out of media and continue printing. -
Page 224: Set The 'Spool Threshold
Set the 'Spool threshold' Set the 'Spool threshold' Introduction When the job memory is full the printer can not receive new jobs. You can tune the 'Spool threshold' to define the spool capacity for specific job types. Allow a higher capacity for small jobs if you select Low. -
Page 225: Set The 'Rotation' Mode
Set the 'Rotation' mode Set the 'Rotation' mode Introduction The 'Rotation' setting allows you to rotate the image according to predefined rotation values or you can let the printer perform the rotation automatically. Choose one of the following values. 'No rotation' ■... -
Page 226: Set The 'Alignment' Mode
Set the 'Alignment' mode Set the 'Alignment' mode Introduction You can optimize the print productivity by reducing the distance the print carriage needs to travel to print the output. To do so you can align the image to the top-right hand corner of the sheet. -
Page 227: Set The 'Network Duplex Mode
Set the 'Network duplex mode' Set the 'Network duplex mode' Introduction Use the Océ Express WebTools to set 'Network duplex mode' for your network adapter. The list of values you can select depends on the type of network card. Before you begin This setting is editable for the System administrator or the Power user. -
Page 228: Set The 'Network Speed
Set the 'Network speed' Set the 'Network speed' Introduction Use the Océ Express WebTools to set 'Network speed' for your network adapter. The list of values you can select depends on the type of network card. Before you begin This setting is editable for the System administrator or the Power user. How to set the 'Network speed' Click 'Configuration' - 'Network' - 'Adapter 1, hardware settings'. -
Page 229: Color Management
What is Color Management? Color Management What is Color Management? Definition The 'Color management' settings help you to reproduce the colors of your input as precisely as possible on the printed output. With the 'Color management' settings you define how to convert the color-information of the file you want to print (input color space;... -
Page 230: What Is An Input Profile / Standardization
What is an input profile / standardization? What is an input profile / standardization? Definition An input profile / standardization defines what color space you must use to interpret the color information of the file you want to print in a correct manner. The two main input profiles (color spaces) are the following. - Page 231 What is an input profile / standardization? [257] You can define the input profile if you use the 'Color feel' setting 'Océ enhanced colors'. The table below gives an overview of the possible input profiles / standardization settings. [88] Input profile / Description standardization RGB - 'sRGB'...
- Page 232 What is an input profile / standardization? Input profile / Description standardization CMYK - 'US Web coated This setting indicates an offset press standard, (SWOP)' frequently used in the US to print separations and proofs on coated media. CMYK - 'US Web This setting indicates an offset press standard, uncoated' frequently used in the US to print separations and...
-
Page 233: What Is Color Feel
What is Color feel? What is Color feel? Definition With the 'Color feel' setting you can fine-tune the look and feel of the printed colors. The 'Color feel' setting defines the color space conversion method. - Page 234 What is Color feel? [89] 'Color feel' Description 'Océ CAD colors' Use this setting to get a print with bright, saturated colors. Advised for vector drawings (like HP-GL). All primary and secondary colors are clean, because they are printed with pure inks. This is clearly visible if you look at the color yellow that is printed with yellow ink only.
- Page 235 What is Color feel? 'Color feel' Description 'Simulated non-Océ printer: no Use this setting to get a print with colors similar color correction' to a non-Océ printer that prints without color correction. 'None, managed by Use this setting if your color management is application' completely done by the application that generated the print file.
-
Page 236: What Is Rendering Intents
Introduction What is Rendering intents? Introduction ™ Normally the color space of a print file is larger than the Océ ColorWave 600 color space. In other words, the input color space is larger than the output color space. ™ Consequently some of the defined input colors will be outside the Océ ColorWave 600 color space. -
Page 237: Rendering Intents: 'Perceptual (Photo)
Rendering intents: 'Perceptual (photo)' Rendering intents: 'Perceptual (photo)' [90] This setting optimizes the output to produce best results for photos, artwork, GIS or images. Perceptual rendering tries to preserve some relationship between out of gamut colors, even if this results in inaccuracies for in-gamut colors. [258] [259]... -
Page 238: Rendering Intents: 'Saturation (Business Graphics)
Rendering intents: 'Saturation (business graphics)' Rendering intents: 'Saturation (business graphics)' [91] This setting optimizes the output of bright, saturated colors. Saturation rendering intent preserves saturated colors, and is advised if you try to keep color purity in computer graphics. Pure saturated colors in the original RGB device will still be saturated colors in the output color space, even if this results in relatively more extreme colors. -
Page 239: Rendering Intents: 'Relative Colorimetric
Rendering intents: 'Relative colorimetric' Rendering intents: 'Relative colorimetric' [92] Relative colorimetric keeps an almost exact relationship between in gamut colors, even if this clips out of gamut colors. The relative colorimetric rendering method replaces the colors to align the old white point (the location of the most pure and light white in a color space) with the new white point and to keep the relative positions of the colors. -
Page 240: Rendering Intents: 'Absolute Colorimetric
Rendering intents: 'Absolute colorimetric' Rendering intents: 'Absolute colorimetric' [93] Absolute colorimetric is similar to relative colorimetric, but uses a different method to handle the white point. Absolute and relative colorimetric both keep gamut colors and clip those out of gamut, but absolute colorimetric also keeps the white point. Absolute colorimetric is advised for "proofing"... -
Page 241: What Is An Output Profile
What is an output profile? What is an output profile? The output profile is used to adjust the converted CMYK color space, depending on ™ the output device (via the Océ ColorWave 600 Printer Calibration Module) and the media type you select (via the OMP Océ Media Profile file). The output profile is applied automatically, but it is important that you load the ™... -
Page 242: Color Management' Settings In The Océ Express Webtools
'Color management' settings in the Océ Express WebTools 'Color management' settings in the Océ Express WebTools ™ Depending on the type of file you want to print, the Océ ColorWave 600 offers different color-information conversions. You can select the 'Color management' settings, that give the best results for the color-information conversion. -
Page 243: Color Management Settings And Job Submission
Color management settings and job submission Color management settings and job submission The way in which you submit a print job to the printer defines in most cases the file type of the document. If you use a printer driver, the original file type will be changed by the driver into a standard file type. - Page 244 Color management settings and job submission [94] Job submission File type Color management settings method ® Océ Windows Printer The driver converts all You can define the color Driver files into HP-GL/2 settings in: The printer driver. ■ The Océ Express WebTools, ■...
-
Page 245: Priorities In The Color Management Settings
Priorities in the color management settings Priorities in the color management settings ™ When you want to print a document in color on the Océ ColorWave 600 the color information that is defined in the files can be set in the different steps of the process from document creation to document production. - Page 246 Priorities in the color management settings [95] Stages in the process of making a color print Priority Document The color settings are already embedded in the document (only applicable for PDF files). Application The color settings can be defined in the application that you use to create or edit the document.
- Page 247 Priorities in the color management settings Note: It is advised to align the color management settings that have been made in the different stages before you start the print job. The color space of the document and the settings for the print have to match. This means that if you have set the color settings in more than 1 stage of the process described above, you must check if the color settings do not counteract with each other.
-
Page 248: Default Settings 'For Hp-Gl, Hp-Gl/2 And Hp-Rtl Files
Default settings 'For HP-GL, HP-GL/2 and HP-RTL files' Default settings 'For HP-GL, HP-GL/2 and HP-RTL files' The default settings are emphasized. [96] Input profile Color Management settings Input Standardization 'Color feel' Rendering intents data 'sRGB' 'Océ CAD colors' ■ 'AdobeRGB' ■... -
Page 249: Default Settings 'For Tiff And Jpeg Files' (Rgb Input)
Default settings 'For TIFF and JPEG files' (RGB input) Default settings 'For TIFF and JPEG files' (RGB input) The default settings are emphasized. [97] Input profile Color Management settings Input Standardization 'Color feel' Rendering intents data 'sRGB' 'Océ CAD colors' ■... -
Page 250: Default Settings 'For Tiff And Jpeg Files' (Cmyk Input)
Default settings 'For TIFF and JPEG files' (CMYK input) Default settings 'For TIFF and JPEG files' (CMYK input) The default settings are emphasized. [98] Input profile Color Management settings Input Standardization 'Color feel' Rendering intents data 'sRGB' 'Océ CAD colors' ■... -
Page 251: Default Settings 'For Postscript And Pdf Files' (Rgb Input)
Default settings 'For PostScript and PDF files' (RGB input) Default settings 'For PostScript and PDF files' (RGB input) The default settings are emphasized. [99] Input profile Color Management settings Input Standardization 'Color feel' Rendering intents data 'sRGB' 'Océ CAD colors' ■... -
Page 252: Default Settings 'For Postscript And Pdf Files' (Cmyk Input)
Default settings 'For PostScript and PDF files' (CMYK input) Default settings 'For PostScript and PDF files' (CMYK input) The default settings are emphasized. [100] Input profile Color Management settings Input Standardization 'Color feel' Rendering intents data 'sRGB' 'Océ CAD colors' ■... -
Page 253: Print Examples
Your Océ Print Quality Advisor Print examples Your Océ Print Quality Advisor Introduction ™ Get the best out of your Océ ColorWave 600! Your Océ Print Quality Advisor is available as a demo print on the printer operator panel. The Océ Print Quality Advisor gives an overview of different types of print files and what print settings and color management settings give the best output result for these print files. - Page 254 Your Océ Print Quality Advisor How to print the Océ Print Quality Advisor [101] Step Action Remarks [269] From the 'Home' screen on the printer operator panel select the 'System' tab. [270] Select the 'Maintenance' tab with the upper left softkey.
- Page 255 Your Océ Print Quality Advisor Step Action Remarks [273] Press 'Finish' to print the Océ Print Quality Advisor. [274] Select ' Back' and 'Home' to revert to the 'Home' screen. Result The Océ Print Quality Advisor is printed on A1 format.
-
Page 256: 2D Cad Monochrome
2D CAD monochrome 2D CAD monochrome [275] Océ Print Quality Advisor Note: For optimal print quality please verify that the name of the loaded media corresponds with the media name on the printer operator panel. [102] Setting Advised value Advised rendering intent value 'Color mode' 'Grayscale'... -
Page 257: 2D Cad Color
2D CAD color 2D CAD color [276] Océ Print Quality Advisor Note: For optimal print quality please verify that the name of the loaded media corresponds with the media name on the printer operator panel. [103] Setting Advised value Advised rendering intent value 'Color mode' 'Color'... -
Page 258: 2D Cad And Rendering
2D CAD and rendering 2D CAD and rendering [277] Océ Print Quality Advisor Note: For optimal print quality please verify that the name of the loaded media corresponds with the media name on the printer operator panel. [104] Setting Advised value Advised rendering intent value 'Color mode'... -
Page 259: Map
[278] Océ Print Quality Advisor Note: For optimal print quality please verify that the name of the loaded media corresponds with the media name on the printer operator panel. [105] Setting Advised value Advised rendering intent value 'Color mode' 'Color' 'Print setting' 'Océ... -
Page 260: Logo And Business Colors
Logo and business colors Logo and business colors [279] Océ Print Quality Advisor Note: For optimal print quality please verify that the name of the loaded media corresponds with the media name on the printer operator panel. [106] Setting Advised value Advised rendering intent value 'Color mode'... -
Page 261: Point Of Sales Graphics
Point of sales graphics Point of sales graphics [280] Océ Print Quality Advisor Note: For optimal print quality please verify that the name of the loaded media corresponds with the media name on the printer operator panel. [107] Setting Advised value Advised rendering intent value 'Color mode'... -
Page 262: Consumer Graphics
Consumer graphics Consumer graphics [281] Océ Print Quality Advisor Note: For optimal print quality please verify that the name of the loaded media corresponds with the media name on the printer operator panel. [108] Setting Advised value Advised rendering intent value 'Color mode' 'Color'... -
Page 263: Photo
Photo Photo [282] Océ Print Quality Advisor Note: For optimal print quality please verify that the name of the loaded media corresponds with the media name on the printer operator panel. [109] Setting Advised value Advised rendering intent value 'Color mode' 'Color' 'Print setting' 'Océ... -
Page 264: Photo Realistic Impression
Photo realistic impression Photo realistic impression [283] Océ Print Quality Advisor Note: For optimal print quality please verify that the name of the loaded media corresponds with the media name on the printer operator panel. [110] Setting Advised value Advised rendering intent value 'Color mode' 'Color'... -
Page 265: Mixed Content
Mixed content Mixed content [284] Océ Print Quality Advisor Note: For optimal print quality please verify that the name of the loaded media corresponds with the media name on the printer operator panel. [111] Setting Advised value Advised rendering intent value 'Color mode' 'Color'... -
Page 266: Business Graphics
Business graphics Business graphics [285] Océ Print Quality Advisor Note: For optimal print quality please verify that the name of the loaded media corresponds with the media name on the printer operator panel. [112] Setting Advised value Advised rendering intent value 'Color mode' 'Color'... -
Page 267: 3D Cad
3D CAD 3D CAD [286] Océ Print Quality Advisor Note: For optimal print quality please verify that the name of the loaded media corresponds with the media name on the printer operator panel. [113] Setting Advised value Advised rendering intent value 'Color mode' 'Color'... -
Page 268: Check, Analyze And Solve Output Quality Problems Of Print Jobs
Banding across the print with differences in color and gloss Check, analyze and solve output quality problems of print jobs Banding across the print with differences in color and gloss Description of the problem Your print contains a banding across the media with a difference in color and gloss. The intensity of the banding can vary from left to right or vice versa. - Page 269 Banding across the print with differences in color and gloss How to solve the problem Check if the media name on the 'Printer operator panel' matches the media that you currently use. Activate the 'Production Plus ' setting for the Production mode or switch from the 'Production' mode to the 'Presentation' mode.
-
Page 270: Horizontal, Wavy Lines Across Your Print
Horizontal, wavy lines across your print Horizontal, wavy lines across your print Description of the problem Your print contains horizontal, wavy lines across the media. These light or dark lines appear in all colors ■ can vary in thickness from left to right or vice versa ■... - Page 271 Horizontal, wavy lines across your print [116] [116] The relation between the paper steps and the lines When Then The paper steps are too big The print will show light lines The paper steps are too small The print will show dark lines Illustration [288] [288] Example of horizontal, wavy lines across the Customer Acceptance Test...
-
Page 272: Thin Horizontal, Colored Or White Lines Across Your Print
Thin horizontal, colored or white lines across your print Thin horizontal, colored or white lines across your print Description of the problem Your print has one of the following problems. Thin horizontal, colored lines in the multiple color areas ■ Thin horizontal, white lines in the CMYK mono color areas. - Page 273 Thin horizontal, colored or white lines across your print [117] [117] Nozzle dropout Number Nozzle dropout Magenta Cyan Black Yellow How to solve the problem Check if the system compensates for the nozzle dropout during the next swath. If the system does not compensate for the nozzle dropout, you must print the Customer Acceptance Test.
-
Page 274: Calibrate The Océ Colorwave
™ Calibrate the Océ ColorWave 600 printer ™ Calibrate the Océ ColorWave 600 printer When to do Note: Only roll position 1 can be used for calibrations. Note: Use only Océ 'Media' for reliable calibrations. Note: The printer will do the calibration automatically. You do not need to keep this printed calibration chart. - Page 275 ™ Calibrate the Océ ColorWave 600 printer Step Action Remarks [292] Use the 'Scroll wheel' to select 'Calibration' and confirm with the 'Confirmation key' (above the 'Scroll wheel'). [293] The wizard assists you to do a calibration. Press 'Next ' to start the calibration. [294] Now you can select: paper length calibration...
- Page 276 ™ Calibrate the Océ ColorWave 600 printer Step Action Remarks [296] Select 'System'. [297] Select 'Home' to return to the 'Home' screen. [298] 'Home' screen. Result Evaluate the Customer Acceptance Test print. Check if the print does not show any of the following output quality problems: Banding across the print with differences in color and gloss on page 268 ■...
-
Page 277: Error Codes
Error codes Error codes When to do Note: Error-codes are only displayed at the 'Printer operator panel'. Before or during the calibration, it is possible that the calibration failed. In that case, you will be informed immediately through an error code on the 'Printer operator panel'. - Page 278 Error codes Chapter 7 Print quality and Print productivity...
-
Page 279: License Management
Chapter 8 License management... -
Page 280: Introduction To Managing Licenses
Introduction to managing licenses Introduction to managing licenses Introduction The Océ applications and options are protected against unauthorized use. You need to activate the license to enable an application or option for use. The 'Support' - 'Licenses' tab in the Océ Express WebTools enables you to manage the licenses very easily. -
Page 281: The 'Licenses' Tab In The Océ Express Webtools
The 'Licenses' tab in the Océ Express WebTools The 'Licenses' tab in the Océ Express WebTools Introduction The 'Support' - 'Licenses' tab has the following possibilities. Possibilities View the current active licenses ■ Get the host id of the Océ system ■... -
Page 282: The Basic Workflow Of 'Support' - 'Licenses' Activation
The basic workflow of 'Support' - 'Licenses' activation The basic workflow of 'Support' - 'Licenses' activation Introduction Before you can work with licenses, you must access the home page of the Océ Express WebTools. The following workflow describes per step when to use which possibility. -
Page 283: Océ License Logic
Océ License Logic Océ License Logic Introduction When you navigate to the 'Support' - 'Licenses' tab in the Océ Express WebTools, you get access to the Océ License Logic application. Before you can work with licenses, you must access the home page of the Océ. The following workflow describes per step when to use which possibility. -
Page 284: The Structure Of License Files And Licenses
The structure of license files and licenses The structure of license files and licenses Introduction A license file contains a license per option of your Océ system. You can view the current active licenses with Océ 'Support' - 'Licenses' tab in the Océ Express WebTools. - Page 285 The structure of license files and licenses [121] What you see depends on the situation (2 – 2) Situation What do you see Preview the resale licenses You see the following. during the license activation job All current active resale licenses ■...
-
Page 286: Check Your Licenses
Check your licenses Check your licenses About the licenses The 'Support' - 'Licenses' tab in the Océ Express WebTools allows you to manage the licenses that are active on your system. A license is needed to activate certain ™ functions on your Océ ColorWave 600. - Page 287 Check your licenses [122] Information Description 'Option' This field displays the name of the option. ™ For Océ ColorWave 600 the following licenses are available. ™ Océ ColorWave 600 base license. ■ ® Adobe PostScript 3 / PDF. ■ Japanese PostScript fonts. ■...
-
Page 288: Save The Currently Active Licenses
Save the currently active licenses Save the currently active licenses Introduction You can save all current active licenses of different licenses types into one single file. Purpose Save the current active licenses for the following purposes. Collect and save all active licenses of different types into one single file ■... -
Page 289: Get A New License
Get a new license Get a new license Introduction The Océ applications and optional functions are protected against unauthorized use. You need to activate the license to enable an application or optional function for use. The 'Licenses' tab enables you to upload new license files to activate a license. Purpose Upload a new license file. - Page 290 Get a new license Result If you have updated an expired license, the new license file overwrites the ■ previous license file. If you have uploaded a new license, the license state in the overview is changed ■ from 'Not authorized' to 'Authorized'. Chapter 8 License management...
-
Page 291: Specifications Of The Océ Colorwave
Appendix A Specifications of the Océ ™ ColorWave... -
Page 292: Specifications 'Océ Powerm Controller'/'Océ Powerm Plus Controller
Specifications 'Océ PowerM controller'/'Océ PowerM Plus controller ' Specifications 'Océ PowerM controller'/'Océ PowerM Plus controller ' 'Océ PowerM controller' hardware [123] Topic 'Océ PowerM 'Océ PowerM Plus controller' controller ' (standard embedded (high-end embedded controller) controller) Hardware Processor Celeron D 440 E6400 2.13 GHz Core (Conroe) 2.0 GHz 2 Duo... - Page 293 Specifications 'Océ PowerM controller'/'Océ PowerM Plus controller ' [124] Platform Océ controller with real-time OS Standard interface 10/100/1000Base-T with RJ45 Network protocols TCP/IP, FTP, LPD ® Applicable software 'Océ PowerM controller' software 'Océ PowerM controller' software The Océ PowerM controller software consists of a basic module and a print module. [125] [125] Basic module Basic functions...
- Page 294 Specifications 'Océ PowerM controller'/'Océ PowerM Plus controller ' [126] Print module (2 – 2) Color management Supported on the controller (Océ Express WebTools). 'Color feel' 'Océ CAD colors' ■ 'Océ enhanced colors' ■ Simulated printer (simulation of Océ and ■ non- Océ...
-
Page 295: Specifications Océ Colorwave
™ Specifications Océ ColorWave 600 printer ™ Specifications Océ ColorWave 600 printer [127] ™ Technology 'Océ CrystalPoint ' technology. ™ Océ own developed 'Imaging devices' and 'Océ TonerPearls Instant dry print technology. 'Imaging carriage' and Carriage that contains the 8 imaging devices. 'Imaging devices' 2 Cyan 'Imaging devices' ■... - Page 296 ™ Specifications Océ ColorWave 600 printer Demofiles The system will standard have 3 demofiles on the 'Océ PowerM controller'. One for 'Economy', one for 'Production' and one for 'Presentation'. The files are designed to show both quality of output in the different print modes as well as give a clear signal as to the applications a customer can print with that mode.
- Page 297 ™ Specifications Océ ColorWave 600 printer Media sources / Multiple front loadable rolls. ergonomics Multi-roll media feeding. 1 - 6 rolls (Free configurable). [299] [299] Media drawer that contains the media roll 1 and/or 2. Roll Maximum load weight per Roll Maximum load weight position per position...
- Page 298 ™ Specifications Océ ColorWave 600 printer Output delivery 'Top delivery tray' (standard) 'Receiving rack (basket)' (option) Folder (option) Output sizes Width DIN: From A4 (landscape) to A0, 42", 36", A1 and B2 ■ ANSI: From 11" to 42" ■ (including 30") Length 200 - 5000 mm.
-
Page 299: Preferred Océ Media Types And Sizes
Preferred Océ media types and sizes Preferred Océ media types and sizes Introduction Océ machines and media are matched for the best quality and performance. Océ advises only approved Océ media. You can receive a full list of the Océ media that you can use in your printer (that includes plain paper, transparent paper, colored papers and different polyester films) from your Océ... - Page 300 Océ Outdoor 'Top delivery Paper Paper tray' IJM563 Océ Outdoor 2" Océ Outdoor 'External output Backlit Film Backlit Film (back)' Note: Visit Océ on the internet at www.oce.com for the latest information. ™ Appendix A Specifications of the Océ ColorWave...
- Page 301 'Top delivery tray' Note: Visit Océ on the internet at www.oce.com for the latest information. Note: To make sure that your print quality is optimal you can download the OMP-file (Océ Media Profiles-file) with the right media code from the Océ website for all media types.
-
Page 302: Supported Non-Océ Media Types And Sizes
Supported non-Océ media types and sizes Supported non-Océ media types and sizes Introduction Océ machines and media are matched for the best quality and performance. However, Océ provides a limited number of Media profiles for non-Océ media types. Attention: Do not store the paper in rooms where temperature and humidity are high. - Page 303 'External output (back)' Note: Visit Océ on the internet at www.oce.com for the latest information. Note: The media profiles for non-Océ media types are generic media profiles that give the best possible result for a variety of the specified non-Océ media types.
- Page 304 Supported non-Océ media types and sizes Media sizes [137] Maximum Minimum Media width 42 inch 297 millimeters 11 inch Roll length 200 meters Not applicable ™ Appendix A Specifications of the Océ ColorWave...
-
Page 305: Preferred Océ Laminates
Avoid dust and direct sunlight. Wrap not used paper in the plastic to prevent it absorbing moisture. Laminates The following preferred Océ laminates are available: [138] [138] Preferred Océ laminates Laminate code Laminate label Note: Visit Océ on the internet at www.oce.com for the latest information. -
Page 306: Specifications Drivers And Job Submission Software
® Windows XP , Macintosh MacOS 8.6/9.x or Macintosh Mac OS X application to Océ printers. Note: Visit Océ on the internet at www.oce.com for the latest information. Optional application software [140] Function Application software Job submission Océ Repro Desk ■... -
Page 307: Reader's Comment Sheet
Appendix B Reader's comment sheet... -
Page 308: Reader's Comment Sheet
Reader's comment sheet Reader's comment sheet Questions Have you found this manual to be accurate? O Yes O No Were you able to operate the product, after reading this manual? O Yes O No Does this manual provide sufficient background information? O Yes O No Is the format of this manual convenient in size, readability and arrangement (page... - Page 309 City: Country: Please return this sheet to: Océ-Technologies B.V. For the attention of ITC User Documentation. P.O. Box 101, 5900 MA Venlo The Netherlands Send your comments by E-mail to: itc-userdoc@oce.com For the addresses of local Océ organizations see: http://www.oce.com...
- Page 310 Reader's comment sheet Appendix B Reader's comment sheet...
-
Page 311: Addresses Of Local Océ Organizations
Appendix C Addresses of local Océ organizations... -
Page 312: Addresses Of Local Océ Organizations
Océ-Australia Ltd. Océ-Österreich GmbH P.O. Box 363 Postfach 95 Ferntree Gully MDC 1233 Vienna Vic 3165 Austria Australia http://www.oce.at/ http://www.oce.com.au/ Océ-Belgium N.V./S.A. Océ-Brasil Comércio e Indústria Ltda. J. Bordetlaan 32 Av. das Nações Unidas, 11.857 1140 Brussel Brooklin Novo Belgium São Paulo-SP 04578-000... - Page 313 Addresses of local Océ organizations Océ-Hungaria Kft. Océ-Ireland Ltd. 1241 Budapest 3006 Lake Drive Pf.: 237 Citywest Business Campus Hungary Saggart http://www.oce.hu/ Co. Dublin Ireland http://www.oce.ie/ Océ-Italia S.p.A. Océ Japan Corporation Strada Padana Superiore 2/B 3-25-1, Nishi Shinbashi 20063 Cernusco sul Naviglio (MI)
- Page 314 5450 North Cumberland Avenue Chicago, IL 60656 http://www.oceusa.com/ Note: The web site http://www.oce.com gives the current addresses of the local Océ organizations and distributors. Note: The addresses of local Océ organizations for information about the Wide Format Printing Systems and the Production Printing Systems can be different from the addresses above.
- Page 315 Index Index how to ......274 cartridge about toner ....... 22 licenses .
- Page 316 Index media request time out ....104 network settings ..... 112 date format .
- Page 317 Index calibrate the printer ....274 change the language setting in Microsoft‚ economy Internet Explorer ..... 86 print setting .
- Page 318 'Oce Print Assistant Behavior' ..221 create ......168 set the alignment mode .
- Page 319 ..... . 177 media source ......117 Oce Print Assistant...
- Page 320 Preferred media types ....299 Oce Print Assistant ....219 prepare for use presentation .
- Page 321 Index print the Customer Acceptance Test (CAT) demo relative colorimetric print rendering intents ..... 239 how to ......79 remove print the Océ...
- Page 322 Oce Print Assistant Behavior ..221 how to ......47 set the print setting system .
- Page 323 Index back-up file ......93 view and check the settings before they are stored in TAC .
- Page 324 Index...
Need help?
Do you have a question about the ColorWave 600 and is the answer not in the manual?
Questions and answers