Table of Contents
Advertisement
Quick Links
Advertisement
Table of Contents

Related Manuals for Intel Remote Management Module 3


Summary of Contents for Intel Remote Management Module 3
- Page 1 Intel Remote Management Module 3 ® User Guide Revision 1.3 June, 2012...
- Page 2 Revision History Intel® Remote Management Module 3 User Guide Revision History Date Revision Modifications Number August 2009 Updated document for feature updates (international keyboard support and soft keyboard) and review feedback. Added RMM3 variations –RMM3 Lite and RMM3 Lite-V. September 2010 ...
- Page 3 Intel product could create a situation where personal injury or death may occur. Intel may make changes to specifications and product descriptions at any time, without notice.
-
Page 4: Table Of Contents
RMM3 through BIOS setup ..........16 ® ® Configuring Your Intel RMM3 Using the Intel Deployment Assistant (IDA) ..17 Configuring Your Server Using Intel System Configuration Utility (SysConfig) ..25 4.3.1 Running the Sysconfig ..................25 4.3.2 Configuring IP address ..................25 4.3.3 Configuring Users .................... - Page 5 Intel® Remote Management Module 3 User Guide Table of Contents Remote Console Control Bar ................34 6.3.1 Remote Console Video Menu ................35 6.3.2 Remote Console Keyboard Menu ................. 35 6.3.3 Remote Console Mouse Menu ................39 6.3.4 Remote Console Options Menu ................40 6.3.5...
- Page 6 Table of Contents Intel® Remote Management Module 3 User Guide 8.5.2 Supported Verbs ....................67 SOL1 ........................68 8.6.1 Supported Properties ................... 68 8.6.2 Supported Verbs ....................69 8.6.3 Terminating an SOL Session ................70 Enetport1 ......................70 8.7.1 Supported Properties ................... 70 8.7.2...
- Page 7 Figure 8: Server Management ....................16 Figure 9: IDA Configure Server: Communication Options Window ..........17 ® Figure 10: IDA Configure Server: Configure LAN Channel 3 (Intel RMM3) settings window 1 . 19 ® Figure 11: IDA Configure Server: Configure LAN Channel 3 (Intel RMM3) Static IP Address window ..........................
- Page 8 List of Figures Intel® Remote Management Module 3 User Guide Figure 30: RMM3 Soft Keyboard ....................38 Figure 31: Remote Console Mouse Menu ................. 39 Figure 32: Remote Console Options Menu ................40 Figure 33: Remote Console Device Menu ................. 40 Figure 34: Status Line .......................
- Page 9 Intel® Remote Management Module 3 User Guide List of Figures Figure 66: REMOTESAP2 Target ..................... 79 Figure 67: ACCOUNT1 Target ....................81 Figure 68: LOGS1 Target ......................82 Figure 69: RECORD1 Target ....................84 Figure 70: SENSOR2 Target ..................... 86...
- Page 10 List of Tables Intel® Remote Management Module 3 User Guide List of Tables Table 1: Terminology ........................1 ® Table 2: Intel RMM3 home page tabs ..................28 Table 3: Horizontal Toolbar Buttons ..................29 Table 4: System Information Details ..................43 Table 5: Server Health (Sensor Readings) Options ..............
- Page 11 Intel® Remote Management Module 3 User Guide List of Tables Table 34: Remotesap2 - Supported Properties ................. 78 Table 35: Remotesap2 - Supported Verbs ................78 Table 36: Account - Supported Properties ................. 79 Table 37: Account - Supported Verbs ..................80 Table 38: Logs1 - Supported Properties ..................
-
Page 12: Introduction
Intel RMM3). It provides an overview of the features of the module and ® instructions on how to set up and operate the Intel RMM3. Target Audience This Guide is intended for system technicians who are responsible for installing, ®... -
Page 13: Safety Information
Introduction Intel® Remote Management Module 3 User Guide Word/Acronym Definition Out Of Band- No operating system interaction on Server PBDE Polybrominated Biphenyls Diphenyl Ethers RMII Reduced Media Independent Interface Real-Time Clock TCP/IP Transmission Control Protocol/Internet Protocol Technical Product Specification UART... - Page 14 Wichtige Sicherheitshinweise Lesen Sie zunächst sämtliche Warn- und Sicherheitshinweise in diesem Dokument, bevor Sie ® eine der Anweisungen ausführen. Beachten Sie hierzu auch die Sicherheitshinweise zu Intel Serverplatinen und -Servergehäusen auf der Ressourcen-CD oder unter http://www.intel.com/support/motherboards/server/sb/cs-010770.htm SICHERHEISMASSNAHMEN: Immer wenn Sie die Gehäuseabdeckung abnehmen um an das Systeminnere zu gelangen, sollten Sie folgende Schritte beachten: Schalten Sie alle an Ihr System angeschlossenen Peripheriegeräte aus.
- Page 15 Introduction Intel® Remote Management Module 3 User Guide Schalten Sie das System niemals ohne ordnungsgemäß montiertes Gehäuse ein. Der Mikroprozessor und der Kühler sind möglicherweise erhitzt, wenn das System in Betrieb ist. Außerdem können einige Platinen und Gehäuseteile scharfe Spitzen und Kanten aufweisen.
- Page 16 Intel® Remote Management Module 3 User Guide Introduction Information en el CD Resource y/o en http://www.intel.com/support/motherboards/server/sb/cs- 010770.htm INSTRUCCIONES DE SEGURIDAD: Cuando extraiga la tapa del chasis para acceder al interior del sistema, siga las siguientes instrucciones: Apague todos los dispositivos periféricos conectados al sistema.
-
Page 17: Support Information
A searchable knowledgebase to search for product information throughout the support site. 2. If you are still unable to obtain a solution for your issue, you can contact Intel customer support at the following website: http://www.intel.com/support/feedback.htm. Warranty Information To obtain warranty information, visit the following Intel web site: http://www.intel.com/support/motherboards/server/sb/CS-010807.htm. -
Page 18: Intel Remote Management Module 3 Overview
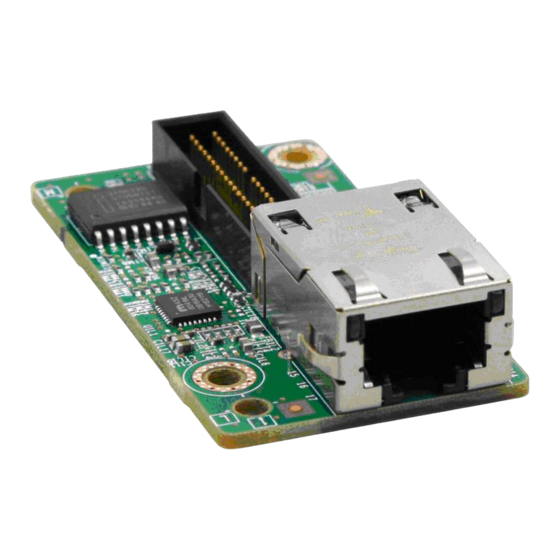
RMM3 and highlights significant benefits of its features. ® The Intel RMM3 is a 1.23-inch x 2.30-inch printed circuit board. When installed onto the Intel ® RMM3 connector on Intel server boards, it provides an increased level of manageability over the basic server management available to the server board. -
Page 19: Rmm3 Lite And Rmm3 Lite-V
NIC (NIC5 on Intel Server Board S3420GPRX) and share network bandwidth with the ® host system. RMM3 Lite-V module can be used only on Intel Server System SR1640TH, with its RMM3-dedicated NIC separated and integrated on the server board. -
Page 20: Server System
Intel® Remote Management Module 3 User Guide Intel® Remote Management Module 3 Overview 2.2.1 Server System The following operating systems are supported on the managed server: Microsoft Windows 2003 Server* with SP1 Microsoft Windows 2003 Server* 32-bit ... -
Page 21: Hardware Installations And Initial Configuration
Needle nosed pliers Antistatic wrist strap and conductive foam pad (recommended) Installation ® ® The Intel Remote Management Module 3 is currently supported on the following Intel server boards: ® All SKUs of Intel Server Board S5500BC ... -
Page 22: Installation On Intel Server Boards S5500Ur And S5500Wb
RMM3. It is written on a label attached to the module (not the NIC). Keeping a record now may eliminate the need to reopen the cover later. ® 6. Replace the chassis cover, attach AC power and connect a network cable to the Intel NIC. ® ®... -
Page 23: Installation On Intel ® Server Boards S5520Hc, S5520Bc, And S5520Sc
RMM3. It is written on a label attached to the module (not the NIC). Keeping a record now may eliminate the need to reopen the cover later. ® 5. Replace the chassis cover, attach AC power and connect a network cable to the Intel RMM NIC ® ®... -
Page 24: Installation On Intel ® Server Board S3420Gprx
SR1640TH server board. All Virtual Presence features (Web GUI, Virtual Media, and so on) are supported on Integrated BMC-shared NIC and RMM3 Lite-V dedicated NIC. IPMI traffic to those ® two network paths is supported only if the Integrated BMC-shared NIC and the Intel RMM3 Lite-V dedicated NIC are on separate subnets. -
Page 25: Figure 7: Installing Intel Rmm3 Lite-V To Intel Server System Sr1640Th
Hardware Installations and Initial Configuration Intel® Remote Management Module 3 User Guide ® ® Figure 7: Installing Intel RMM3 Lite-V to Intel Server System SR1640TH Revision 1.3... -
Page 26: Configuring Intel Rmm3
RMM3 ® ® This section discusses using the Server Utilities to enable an Intel RMM3, includes RMM3 Lite and RMM3 Lite-V, from a new unconfigured state to an operational one. Note: You can download the IDA and SYSCFG software from the following links: ... -
Page 27: Configuring Your Intel ® Rmm3 Through Bios Setup
Configuring Intel® RMM3 Intel® Remote Management Module 3 User Guide Configuring your Intel RMM3 through BIOS setup ® 1. During POST, press <F2> to go to BIOS setup. 2. Navigate to the menu Server Management and scroll down to Baseboard LAN configuration. -
Page 28: Configuring Your Intel Rmm3 Using The Intel Deployment Assistant (Ida)
If you need to configure both channel 1 and RMM3, ensure that they are connected to different subnets. Note: When using IDA to setup Intel® RMM3 Lite on Intel® S3420GPRX user can only configure BMC channel1. Since RMM3 Lite has no dedicated NIC, the BMC channel 3 configuration with IDA is disabled. - Page 29 Configuring Intel® RMM3 Intel® Remote Management Module 3 User Guide Revision 1.3...
-
Page 30: Figure 10: Ida Configure Server: Configure Lan Channel
If Static IP Address is selected configure the IP address, Subnet Mask and Gateway as shown in Figure 10. 3. You can also select Enable Serial Over LAN on these screens. ® Figure 10: IDA Configure Server: Configure LAN Channel 3 (Intel RMM3) settings window 1 Revision 1.3... -
Page 31: Figure 11: Ida Configure Server: Configure Lan Channel
Configuring Intel® RMM3 Intel® Remote Management Module 3 User Guide ® Figure 11: IDA Configure Server: Configure LAN Channel 3 (Intel RMM3) Static IP Address window Revision 1.3... -
Page 32: Figure 12: Ida Configure Server: Configure Lan Channel
To connect remotely to LAN Channel 3, you will need to configure users. Edit username/passwords, and set privilege for the users as shown below. ® Figure 12: IDA Configure Server: Configure LAN Channel 2 (Intel RMM3) Set Up Users window... -
Page 33: Figure 13: Ida Configure Server: Configure Lan Channel
Configuring Intel® RMM3 Intel® Remote Management Module 3 User Guide 5. Edit the User information and click OK to apply configuration. ® Figure 13: IDA Configure Server: Configure LAN Channel 2 (Intel RMM3) Edit User Information window Revision 1.3... -
Page 34: Figure 14: Ida Configure Server: Configure Lan Channel
Intel® Remote Management Module 3 User Guide Configuring Intel® RMM3 Select Apply to save your settings. ® Figure 14: IDA Configure Server: Configure LAN Channel 2 (Intel RMM3) Apply Configuration window Revision 1.3... -
Page 35: Figure 15: Ida Configure Server: Configure Lan Channel
Configuring Intel® RMM3 Intel® Remote Management Module 3 User Guide ® Figure 15: IDA Configure Server: Configure LAN Channel 2 (Intel RMM3) Applying Configuration progress window Revision 1.3... -
Page 36: Configuring Your Server Using Intel System Configuration Utility (Sysconfig)
Intel® Remote Management Module 3 User Guide Configuring Intel® RMM3 Configuring Your Server Using Intel System Configuration Utility (SysConfig) This section explains how to configure using Sysconfig commands. 4.3.1 Running the Sysconfig To run Sysconfig enter the Sysconfig directory using this command: cd /usr/local/syscfg 4.3.2 Configuring IP address... -
Page 37: Getting Started With Intel Rmm3 Operation
Getting Started with Intel® RMM3 Operation Intel® Remote Management Module 3 User Guide Getting Started with Intel RMM3 Operation ® ® ® The Intel RMM3 module, including Intel RMM3 Lite and RMM3 Lite-V, features an embedded web server and applications offering a variety of standardized interfaces. This section describes both the interfaces and how to use them. -
Page 38: Logging In
Intel® Remote Management Module 3 User Guide Getting Started with Intel® RMM3 Operation Logging In ® Enter the configured IP address of the Intel RMM3 add-on card into your web browser. In order ® to use a secure connection, type https://<IPaddress of RMM3>/. -
Page 39: Figure 18: Intel Rmm3 Home Page
Getting Started with Intel® RMM3 Operation Intel® Remote Management Module 3 User Guide ® Figure 18: Intel RMM3 Home Page ® The top horizontal toolbar within the Intel RMM3 home page has four tabs. Click these tabs to get specific system information and perform tasks as shown in the following table: ®... -
Page 40: Online Help
Each of these tabs contains a secondary menu on the left edge of the browser window. For ® detailed information on the specific functions of secondary menu item see Chapter 7, Intel RMM3 Web Console Options. The top horizontal toolbar also has the Logout, Refresh, and Help buttons. Click these buttons... -
Page 41: Logging Out
Getting Started with Intel® RMM3 Operation Intel® Remote Management Module 3 User Guide Figure 19: Launching the Online Help Logging Out Click the button to log out the current user and revert to a new login screen as shown in Figure 20 and Figure 21. -
Page 42: Figure 21: Logging Out Of Intel
Intel® Remote Management Module 3 User Guide Getting Started with Intel® RMM3 Operation RMM3 – Step 2 ® Figure 21: Logging Out of Intel Note: Automatic Timeout - If there is no user activity detected by the Web Console for 30 minutes, the current session will be automatically terminated. -
Page 43: Remote Console (Kvm) Operation
Remote Console (KVM) Operation Intel® Remote Management Module 3 User Guide Remote Console (KVM) Operation The Remote Console is the redirected screen, keyboard and mouse of the remote host system ® where the Intel RMM3 module is installed. To use the Remote Console window of your managed host system, the browser must include a Java Runtime Environment* plug-in. -
Page 44: Main Window
Figure 23: Remote Console ® The Remote Console window is a Java Applet* that establishes TCP connections to the Intel RMM3 module. The protocol that is used to run these connections is a unique KVM protocol and not HTTP or HTTPS. This protocol uses ports #7578 for KVM, #5120 for CDROM media redirection, and #5123 for Floppy/USB media redirection. -
Page 45: Remote Console Control Bar
The responsiveness may be slightly delayed depending on ® the bandwidth and latency of the network between the Intel RMM3 module and Remote Console. Enabling KVM and/or media encryption on the Configuration > Remote Session web page will degrade performance as well. -
Page 46: Remote Console Video Menu
Intel® Remote Management Module 3 User Guide Remote Console (KVM) Operation Figure 25: Remote Console Control Bar The following sub sections describe the tasks you can perform within each control. 6.3.1 Remote Console Video Menu Click Video button in the Remote Console control bar to open the Remote console Video menu as shown in Figure 26. -
Page 47: Figure 27: Remote Console Keyboard Menu
Remote Console (KVM) Operation Intel® Remote Management Module 3 User Guide Figure 27: Remote Console Keyboard Menu Using this menu, you can do the following: Language. Controls the keyboard language layout. Soft Keyboard. Displays and controls the Soft Keyboard window. -
Page 48: Figure 28: Remote Console Keyboard Language Sub Menu
Intel® Remote Management Module 3 User Guide Remote Console (KVM) Operation Figure 28: Remote Console Keyboard Language Sub Menu In order for local key strokes to be interpreted correctly at the remote end, the client OS, the target OS, and the Remote Console should all be configured for the same language layout. -
Page 49: Figure 29: Remote Console Keyboard Soft Keyboard Sub Menu
Remote Console (KVM) Operation Intel® Remote Management Module 3 User Guide On the other hand, with Linux* and Java*, there is less reverse translation required by the application than under Windows and is more likely that a mismatched configuration will work anyway. -
Page 50: Remote Console Mouse Menu
Intel® Remote Management Module 3 User Guide Remote Console (KVM) Operation The Soft Keyboard language layout follows the local keyboard language setting when the default Keyboard > Soft Keyboard > Follow Local option is selected. This can be manually overridden by selecting a language. -
Page 51: Remote Console Options Menu
Remote Console (KVM) Operation Intel® Remote Management Module 3 User Guide 6.3.4 Remote Console Options Menu Figure 32: Remote Console Options Menu Using this menu, you can do the following: Bandwidth. Changing the bandwidth setting affects low-level connection protocol parameters like fragment size and timeouts. -
Page 52: Remote Console Status Line
Intel® Remote Management Module 3 User Guide Remote Console (KVM) Operation rather than a USB device to allow the loading of custom device drivers during remote OS installation which may require a floppy drive. There is only one virtual CDROM and one virtual floppy device on the remote system allowed so only one local item of each type can be redirected at a time. -
Page 53: Intel Rmm3 Web Console Options
Intel® RMM3 Web Console Options Intel® Remote Management Module 3 User Guide Intel RMM3 Web Console Options ® This chapter gives you a detailed description of each Web Console page. It is organized in sections corresponding to the four tabs in the horizontal menu. Within each section, each menu on the left-hand side is illustrated and described in detail. -
Page 54: Viewing System Information
Intel® Remote Management Module 3 User Guide Intel® RMM3 Web Console Options 7.1.1 Viewing System Information The System information page displays a summary of the general system information as shown in Figure 36: Figure 36: System Information page The System Information page has the following information about the server:... -
Page 55: Viewing System Diagnostics
Intel® RMM3 Web Console Options Intel® Remote Management Module 3 User Guide Figure 37: System Information FRU Information page 7.1.3 Viewing System Diagnostics The System Diagnostic page can be used to download a file that contains data that was collected when a Catastrophic Error (CATERR) occurred on the system. When the BMC firmware sees CATERR asserted it will try to collect Global error registers data from the chipset on the board. -
Page 56: Figure 38: System Diagnostics Page
Intel® Remote Management Module 3 User Guide Intel® RMM3 Web Console Options Figure 38: System Diagnostics page Revision 1.3... -
Page 57: Server Health
Intel® RMM3 Web Console Options Intel® Remote Management Module 3 User Guide Server Health The Server Health page shows you data related to the server's health, such as sensor readings and the event log. Click on the Server Health tab to display the page. By default, this tab opens the sensor Readings page as shown in Figure 40. -
Page 58: Viewing Event Log
Intel® Remote Management Module 3 User Guide Intel® RMM3 Web Console Options Figure 40: Server Health Sensor Readings window (Thresholds displayed) The following table lists the options available in this page: Table 5: Server Health (Sensor Readings) Options Option Task Select the type of sensor readings to display in the list. -
Page 59: Configuring Settings
Intel® RMM3 Web Console Options Intel® Remote Management Module 3 User Guide Figure 41: Server Health Event Log The following table lists the options available in this page: Table 6: Server Health (Event Log) Options Option Task Event Log Category pull-down box... -
Page 60: Configuring Network Settings
Intel® Remote Management Module 3 User Guide Intel® RMM3 Web Console Options Figure 42: Configuration 7.3.1 Configuring Network Settings The Network settings page is used to configure the network settings. It provides options to do either of the following: ... -
Page 61: Managing Users
Intel® RMM3 Web Console Options Intel® Remote Management Module 3 User Guide Option Task the add-in RMM3 NIC. The Baseboard Management channel (BMC LAN Channel 1) is the on board, shared NIC configured for management and shared with the operating system. -
Page 62: Login Security Settings
Intel® Remote Management Module 3 User Guide Intel® RMM3 Web Console Options Figure 45: Configuring Users Modify User window This page has options to configure the IPMI users and privileges for this server. To modify or delete a user, select user name in the list and click Modify User or Delete User. -
Page 63: Figure 46: Configuring Login Security Settings Window
Intel® RMM3 Web Console Options Intel® Remote Management Module 3 User Guide Figure 46: Configuring Login Security Settings window To turn the feature off, set the lockout time to zero. Default is 3 failures will lockout a user for 1 minute. -
Page 64: Configuring Ssl Upload
Intel® Remote Management Module 3 User Guide Intel® RMM3 Web Console Options Option Task Port Specify the LDAP Port IP Address The IP address of LDAP server IP Address made of 4 numbers separated by dots as in "xxx.xxx.xxx.xxx"... -
Page 65: Configuring Remote Session
Intel® RMM3 Web Console Options Intel® Remote Management Module 3 User Guide Configuring Remote Session Use this page to enable/disable encryption on KVM or Media during a redirection session. Figure 49: Configuring Remote Session window The following table lists the options allowing you to enable or disable encryption on KVM or... -
Page 66: Configuring Mouse Mode Setting
Intel® Remote Management Module 3 User Guide Intel® RMM3 Web Console Options 7.4.1 Configuring Mouse Mode Setting Click the Mouse Mode tab to view the Mouse Mode Setting window as shown in Figure 50. Figure 50: Configuring Mouse Mode Setting window... -
Page 67: Figure 51: Configuring Keyboard Macros Window
Intel® RMM3 Web Console Options Intel® Remote Management Module 3 User Guide Figure 51: Configuring Keyboard Macros window This makes it convenient to quickly do oft repeated typing as well as execute key combos that aren’t possible directly from the local client keyboard. Alt and Win key combos such as Ctrl+Alt+Del get interpreted by the local client OS and aren’t passed through to the remote... -
Page 68: Remote Control
Intel® Remote Management Module 3 User Guide Intel® RMM3 Web Console Options Note: The key sequences are sent to the target as scancodes that get interpreted by the target OS, so they will be affected by modifiers such as Numlock as well as the target OS keyboard language setting. -
Page 69: Server Power Control
Intel® RMM3 Web Console Options Intel® Remote Management Module 3 User Guide Figure 52: Remote Control Console Redirection window Click the Launch Console button to launch the redirection console and manage the server remotely. Note: Java Run-Time Environment* (JRE*, version 6 update 10 or later) must be installed on the client prior to launch of JNLP file. -
Page 70: Figure 53: Server Power Control Window
Intel® Remote Management Module 3 User Guide Intel® RMM3 Web Console Options Figure 53: Server Power Control window The following power control operations can be performed: Table 11: Remote Control (Power Control) Options Option Task Reset Server Select option to hard reset the host without powering off. -
Page 71: Smash-Lite* Interface
SMASH–Lite* Interface (System Management Architecture for Server Hardware* by AMI*)Intel® Remote Management Module 3 User Guide SMASH–Lite* Interface (System Management Architecture for Server Hardware* by AMI*) ® ® The Intel RMM3 module, includes Intel RMM3 Lite and RMM3 Lite-V support an interface to System Management Architecture for Server Hardware* (SMASH–Lite*). -
Page 72: Supported Verbs
Intel® Remote Management Module 3 User Guide SMASH–Lite* Interface (System Management Architecture for Server Hardware* by AMI*) 8.2.2 Supported Verbs Following are the supported verbs of the SMASH* targets: Table 13: SMASH*Targets - Supported Verbs Verb Is used to change from one valid target path to any other valid target path. -
Page 73: System1
SMASH–Lite* Interface (System Management Architecture for Server Hardware* by AMI*)Intel® Remote Management Module 3 User Guide System1 The system target represents the server/blade. Power control is available on the target system1. It contains sol1, sp1, and other sensor monitoring targets. Here sp1 stands for Service Process Configuration. -
Page 74: Figure 55: System Target
Intel® Remote Management Module 3 User Guide SMASH–Lite* Interface (System Management Architecture for Server Hardware* by AMI*) Table 15: System1 - Supported Verbs Verb Is used to change from one valid target path to any other valid target path. exit exit from the current SMASH* session. -
Page 75: Figure 56: Example Of System Target
SMASH–Lite* Interface (System Management Architecture for Server Hardware* by AMI*)Intel® Remote Management Module 3 User Guide Figure 56: Example of System Target Revision 1.3... -
Page 76: Settings1
Intel® Remote Management Module 3 User Guide SMASH–Lite* Interface (System Management Architecture for Server Hardware* by AMI*) Settings1 Settings1 target represents the settings of the current session of SMASH* and does not have any targets. This target affects the current session: 8.4.1 Supported Properties... -
Page 77: Figure 57: Setting1 Target
SMASH–Lite* Interface (System Management Architecture for Server Hardware* by AMI*)Intel® Remote Management Module 3 User Guide Verb Is used to help provide information on using SMASH*. set the R/W supported properties. show show all the targets, properties, and verbs supported by this target. -
Page 78: Supported Properties
Intel® Remote Management Module 3 User Guide SMASH–Lite* Interface (System Management Architecture for Server Hardware* by AMI*) The SP1 target (service processor) provides information of the user accounts Ethernet port and logs. It contains three targets - enetport1 (Ethernet port target), accounts, and logs. -
Page 79: Sol1
SMASH–Lite* Interface (System Management Architecture for Server Hardware* by AMI*)Intel® Remote Management Module 3 User Guide Figure 58: SP1 Target SOL1 Serial Over LAN (SOL) is the name for the redirection of baseboard serial controller traffic over an IPMI session. It does not have any targets. -
Page 80: Supported Verbs
Intel® Remote Management Module 3 User Guide SMASH–Lite* Interface (System Management Architecture for Server Hardware* by AMI*) 8.6.2 Supported Verbs The supported verbs of the sol1 target are as follows: Table 21: SOL1 - Supported Verbs Verb Is used to change from one valid target path to any other valid target path. -
Page 81: Terminating An Sol Session
SMASH–Lite* Interface (System Management Architecture for Server Hardware* by AMI*)Intel® Remote Management Module 3 User Guide 8.6.3 Terminating an SOL Session SOL session can be terminated using the following control key sequence: CR, ESC, T or t CARRIAGE RETURN/ENTER key, followed by ESCAPE key, followed by T or t ... -
Page 82: Lanendpt1
Intel® Remote Management Module 3 User Guide SMASH–Lite* Interface (System Management Architecture for Server Hardware* by AMI*) Figure 60: Enetport1 Target Lanendpt1 The target lanendpt1 gives information about LAN configuration. It contains the target: Ipendpt1 - IP configuration. 8.8.1 Supported Properties... -
Page 83: Ipendpt1
SMASH–Lite* Interface (System Management Architecture for Server Hardware* by AMI*)Intel® Remote Management Module 3 User Guide Verb Is used to show show all the targets, properties, and verbs supported by this target. start start the device version show the current version of SMASH*. -
Page 84: Supported Properties
Intel® Remote Management Module 3 User Guide SMASH–Lite* Interface (System Management Architecture for Server Hardware* by AMI*) 8.9.1 Supported Properties The supported properties of the target ipendpt1 are as follows: Table 26: Ipendpt1 - Supported Properties Property Task ipaddress The value of ipaddress is the IP address of the SP. -
Page 85: Remotesap1
SMASH–Lite* Interface (System Management Architecture for Server Hardware* by AMI*)Intel® Remote Management Module 3 User Guide Figure 62: IPENDPT1 Target 8.10 Remotesap1 The remotesap1 target will enumerate all the configurable IPs under the containing target. A remote access server enables users who are not on a local network to access. This does not contain any targets. -
Page 86: Dnsendpt1
Intel® Remote Management Module 3 User Guide SMASH–Lite* Interface (System Management Architecture for Server Hardware* by AMI*) Table 29: Remotesap1 - Supported Verbs Verb Is used to change from one valid target path to any other valid target path. exit exit from the current SMASH* session. -
Page 87: Supported Verbs
SMASH–Lite* Interface (System Management Architecture for Server Hardware* by AMI*)Intel® Remote Management Module 3 User Guide Table 30: Dnsendpt1 - Supported Properties Property Task domainnamefromdhcp Dhcp based DNS configuration. This property is a read only property. dnsdomainname This property gives the DNS Domain. This property is a read only property. -
Page 88: Remotesap1
Intel® Remote Management Module 3 User Guide SMASH–Lite* Interface (System Management Architecture for Server Hardware* by AMI*) 8.12 Remotesap1 The remotesap1 target enumerates all the configurable IPs under the containing target. A remote access server enables user access to those users who are not on a local network. This does not contain any targets. -
Page 89: Remotesap2
SMASH–Lite* Interface (System Management Architecture for Server Hardware* by AMI*)Intel® Remote Management Module 3 User Guide Figure 65: REMOTESAP1 Target 8.13 Remotesap2 8.13.1 Supported Properties The supported properties of the target remotesap2 are as follows: Table 34: Remotesap2 - Supported Properties... -
Page 90: Account
Intel® Remote Management Module 3 User Guide SMASH–Lite* Interface (System Management Architecture for Server Hardware* by AMI*) Verb Is used to show show all the targets, properties, and verbs supported by this target. version show the current version of SMASH*. -
Page 91: Supported Verbs
SMASH–Lite* Interface (System Management Architecture for Server Hardware* by AMI*)Intel® Remote Management Module 3 User Guide Property Task userid=1; password length should be less than 16 characters. > set password=ssd enabledstate This property shows the state of the user. This property is settable except for userid=1. -
Page 92: Logs1
Intel® Remote Management Module 3 User Guide SMASH–Lite* Interface (System Management Architecture for Server Hardware* by AMI*) Figure 67: ACCOUNT1 Target 8.15 Logs1 The logs target is the containing target for log records of the ipmi sel. The System Event Log is a non-volatile repository for system events and certain system configuration information. -
Page 93: Figure 68: Logs1 Target
SMASH–Lite* Interface (System Management Architecture for Server Hardware* by AMI*)Intel® Remote Management Module 3 User Guide Table 39: Logs1 - Supported Verbs Verb Is used to change from one valid target path to any other valid target path. exit exit from the current SMASH* session. -
Page 94: Record
Intel® Remote Management Module 3 User Guide SMASH–Lite* Interface (System Management Architecture for Server Hardware* by AMI*) 8.16 Record The record target represents the individual SEL entries. SEL records are in a list. Each SEL entity is a record. This does not have any targets. -
Page 95: Sensor
SMASH–Lite* Interface (System Management Architecture for Server Hardware* by AMI*)Intel® Remote Management Module 3 User Guide Figure 69: RECORD1 Target 8.17 Sensor A typical server BMC would provide sensors for baseboard temperature, voltage, and chassis intrusion monitoring. A sensor uses one type of energy, a signal of some sort, and converts it into a reading for the purpose of information transfer. -
Page 96: Supported Verbs
Intel® Remote Management Module 3 User Guide SMASH–Lite* Interface (System Management Architecture for Server Hardware* by AMI*) Property Task only property. CurrentReading This read only property gives the current reading shown by the sensor BaseUnits This read only property gives the units for the value given by current reading property. -
Page 97: Creatingtargets
SMASH–Lite* Interface (System Management Architecture for Server Hardware* by AMI*)Intel® Remote Management Module 3 User Guide Figure 70: SENSOR2 Target 8.18 CreatingTargets Dynamic targets in SMASH*(without CIM) are the sensors and their associated entities. You need to go through the SDR and search for Full and Compact record types. Name the Full type as numsensor<index>...
Need help?
Do you have a question about the Remote Management Module 3 and is the answer not in the manual?
Questions and answers