Table of Contents
Advertisement
Quick Links
Advertisement
Table of Contents

Related Manuals for Universal Robots ActiNav


Summary of Contents for Universal Robots ActiNav
- Page 2 ActiNav Autonomous Bin Picking Operating Guide Original instructions (en)
-
Page 4: Table Of Contents
3.6.3. Creating a Clearance Shape for the Part 3.6.4. Validating a Part 4. Simple application examples 4.1. Basic Pick and Place Program 4.1.1. Adding a Pick and Place Loop 4.1.2. Pick and Place Rules 4.2. ActiNav Home Position Operating Guide ActiNav Autonomous Bin Picking... - Page 5 4.2.1. Configuring ActiNav Home Position 4.3. Find Next Part 4.3.1. Configuring Do Pick 4.3.2. Configuring Do Place 5. Program Structure Validation 5.1. Validating a program ActiNav Autonomous Bin Picking Operating Guide...
-
Page 6: Introduction
1. Introduction 1. Introduction 1.1. About this document This guide contains information on how to set up, configure, and use the ActiNav Bin Picking application. Operating Guide ActiNav Autonomous Bin Picking... -
Page 7: Bin Picking Process
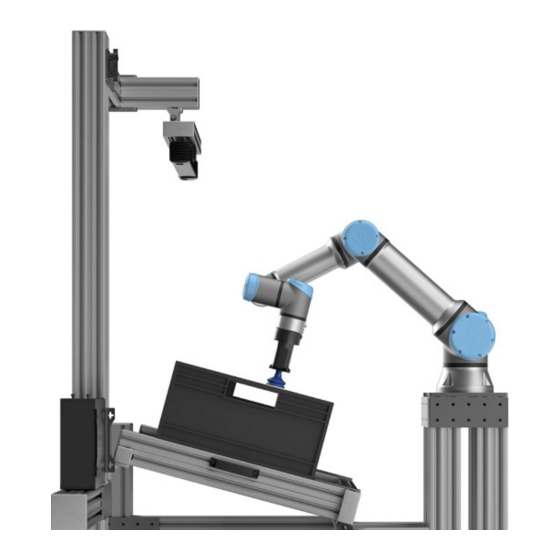
2.1. 3D sensor alignment The ActiNav system includes a 3D sensor that scans the parts and a robot arm that manipulates the parts. 3D sensor alignment is necessary to let the system know where exactly the robot arm is mounted in relation to the 3D sensor. -
Page 8: Procedures
• Remove the bin before you start recording samples for the 3D sensor alignment. 1. In PolyScope, select Installation > URCaps > ActiNav Bin Picking > 3D Sensor. 2. On the 3D Sensor screen, select Start Sensor Alignment Wizard. -
Page 9: Recording Samples
3. Ensure that the line of sight between the alignment marker and the 3D sensor is not blocked by any objects. 4. Tap Add Sample. The 3D sensor performs a scanning sequence and searches for the alignment marker. If the scan is successful, the Status pane updates the Samples Collected and Average Error ActiNav Autonomous Bin Picking Operating Guide... -
Page 10: Tool
The 3D sensor alignment is completed. 3.2. Tool ActiNav works with the tool you decide is best suited to your application. You need the CAD model of the tool to add a Tool object in ActiNav. Tool CAD model requirements: • Supported formats: STEP, OBJ. -
Page 11: Adding A Tool
Tap Copy values from to copy the TCP values from one of the TCPs configured in the current installation. To teach TCP values for the Tool using PolyScope, use the TCP Position Wizard in PolyScope in Installation > General > TCP. ActiNav Autonomous Bin Picking Operating Guide... -
Page 12: Creating Clearance Shapes For The Tool
Failure to enter the same data in both the Tool Payload and the Center of Gravity can result in protective stops and/or robot joint wear. • Manually enter both the Tool Payload and the Center of Gravity in the ActiNav Tool screen. -
Page 13: Environment
3.3. Environment On the Environment screen, you configure the clearance shapes that either represent the physical objects inside the workspace, or serve as a virtual barrier. To create a new environment: ActiNav Autonomous Bin Picking Operating Guide... -
Page 14: Clearance Shapes
Clearance Shapes are objects in the ActiNav environment that represent objects in the real world or serve as virtual barriers. They let ActiNav move the robot arm, the tool, and the parts without collisions. You can create Clearance Shapes by teaching key points with the TCP, or by entering shape characteristics in the Shape Properties and Shape Coordinates sections. -
Page 15: Creating A Clearance Shape By Teaching
3. Move the TCP to the place where the center of the Sphere should be and tap OK. 4. Tap Done. 5. In the Shape Properties section, fill in the Diameter field. 6. In the Name field, enter the name for this shape. ActiNav Autonomous Bin Picking Operating Guide... - Page 16 4. Repeat steps 2–3 for end point 2. 5. Tap Done. 6. In the Shape Properties section, fill in the Diameter field. PolyScope calculates the Length filed value automatically. 7. In the Name field, enter the name for this shape. Operating Guide ActiNav Autonomous Bin Picking...
-
Page 17: Bin
7. In the Name field, enter the name for this shape. 3.5. Bin On the Bin screen, you configure the shape and the properties of the bin. 3.5.1. Creating a new Bin To create a new bin: ActiNav Autonomous Bin Picking Operating Guide... -
Page 18: Creating A Bin By Teaching
On each step, the wizard highlights the wall of the bin that you define. Start with the front bin wall, then define the left bin wall. Continue to define the back bin wall and the right bin wall. front bin wall left bin wall back bin wall right bin wall Operating Guide ActiNav Autonomous Bin Picking... - Page 19 4. After defining all points on the current wall, tap Next. The wizard highlights the next wall where you repeat this procedure. For example, when you define the five points on the front wall of the ActiNav Autonomous Bin Picking Operating Guide...
- Page 20 After defining the walls of the bin, proceed to properties below. Bin properties To edit the properties of the bin, in the Manage tab, select the bin that you want to edit. Operating Guide ActiNav Autonomous Bin Picking...
-
Page 21: Adding A Part
3.6. Part As with the tool, a suitable part is configured for each application. You need a CAD model, or a 3D scan of the part to add a Part object in ActiNav. Part CAD requirements: • Supported formats: STEP, OBJ, STP, PLY. -
Page 22: Setting Part Properties
To create a Clearance Shape: 1. Select the Clearance tab. 2. In the Add new shape section, select desired shape type (Sphere, Capsule, or Lozenge). 3. PolyScope creates the new Shape with a default name. Edit the name if necessary. Operating Guide ActiNav Autonomous Bin Picking... -
Page 23: Validating A Part
If fewer than five parts are detected, change the Perception Settings and repeat steps 2 and 3. 5. Verify all five parts are detected, and note the Confidence score. 6. Repeat steps 2 - 5 for all pickable surfaces of the part. ActiNav Autonomous Bin Picking Operating Guide... - Page 24 7. As a starting point for a new part, enter the lowest Confidence score you recorded in the Confidence Threshold box. You can always change the lowest Confidence score, if the parts are not matched accurately enough, or if the cycle time os too slow. Operating Guide ActiNav Autonomous Bin Picking...
-
Page 25: Simple Application Examples
This section describes how to create a basic Pick and Place Program using the Pick and Place Loop program template. 4.1.1. Adding a Pick and Place Loop In an empty program, go to Program > URCaps and tap Pick and Place Loop. ActiNav Autonomous Bin Picking Operating Guide... -
Page 26: Pick And Place Rules
To teach a Pick position: 1. Tap the Pick Rule-0 node. 2. In the Pick Rule pane, select Pick. 3. Tap Teach to start the Pick position teaching wizard. 4. Turn on the tool and attach the part. Operating Guide ActiNav Autonomous Bin Picking... - Page 27 To define a Pre-Pick position, tap the Pre-Pick tab and edit the Pre-Pick Properties if necessary. The Pre-pick Offset must allow ActiNav to find a pick that is clear of obstacles. As such, the default Pre- pick Offset is set to 50mm.
- Page 28 To define a Post-Pick position, tap the Post-Pick tab and edit the Post-Pick Properties if necessary. For best performance, you can set the Post-Pick Offset so the part completely clears the top of the bin walls when the part is picked (up) from the bottom of the bin. Operating Guide ActiNav Autonomous Bin Picking...
- Page 29 To define a place rule, use the Place Rule teaching wizard to first teach the Place, then teach the Pre- Place and Post-Place positions. The wizard allows you to correctly teach and scan all coordinates from the Place Rule pane. Teaching a Place position To teach a Place position: ActiNav Autonomous Bin Picking Operating Guide...
- Page 30 If the part is not detected, repeat step 5 adjusting the position of the part. 7. Tap Next to continue the Place Rule teaching wizard. 8. Tap Next again. PolyScope shows the Move tab. 9. Teach the Pre-Place position. Operating Guide ActiNav Autonomous Bin Picking...
- Page 31 1. Freedrive the robot, or use the Move arrows, to teach the Pre-Place position. 2. Tap OK to display the Part Pre-Place Position Results. 3. Tap Next to continue the Place Rule teaching wizard. 4. Tap Next again. PolyScope shows the Move tab. 5. Teach the Post-Place position. ActiNav Autonomous Bin Picking Operating Guide...
- Page 32 The Post-Place position determines how the tool moves away, once a part is placed. To teach a Post-Place position: 1. Freedrive the robot, or use the Move arrows, to teach the Post-Place position. 2. Tap OK to display the Part Post-Place Position Results. 3. Tap Done. Operating Guide ActiNav Autonomous Bin Picking...
-
Page 33: Actinav Home Position
4. Simple application examples 4.2. ActiNav Home Position The ActiNav Home Position node defines the return position for the robot at the beginning a program, and at each subsequent loop of the program. The Pick and Place Loop always includes an Actinav Home Position node, that you must configure to return the robot to a specific position before a new loop begins. -
Page 34: Find Next Part
4. Simple application examples 4.3. Find Next Part Set Find Next Part parameters for ActiNav Bin Picking to select the next best part candidate to be picked up. 4.3.1. Configuring Do Pick When the robot reaches the position/s defined in the Pick Rules, you must assign actions to the tool. - Page 35 2. Add the required program nodes for your desired actions, under the Post-Pick node. You can also add the required program nodes to the Insert actions to perform at post-pick field. Your desired actions are performed once the robot reaches the Post-Pick position. ActiNav Autonomous Bin Picking Operating Guide...
-
Page 36: Configuring Do Place
2. Add the required program nodes for your desired actions, under the Pre-Place node. You can also add the required program nodes to the Insert actions to perform at pre-place field. Your desired actions are performed once the robot reaches the Pre-Place position. Operating Guide ActiNav Autonomous Bin Picking... - Page 37 2. Add the required program nodes for your desired actions, under the Place node. You can also add the required program nodes to the Insert actions to perform at place field. Your desired actions are performed once the robot reaches the Place position. To assign a Post-Place action: ActiNav Autonomous Bin Picking Operating Guide...
- Page 38 2. Add the required program nodes for your desired actions, under the Post-Place node. You can also add the required program nodes to the Insert actions to perform at post-place field. Your desired actions are performed once the robot reaches the Post-Place position. Operating Guide ActiNav Autonomous Bin Picking...
-
Page 39: Program Structure Validation
5. Program Structure Validation 5. Program Structure Validation This section describes how to check your ActiNav Bin Picking program for errors. This procedure has the following success criteria: • A completed program is checked for errors and no issues are found. 5.1. Validating a program 1. - Page 40 5. Program Structure Validation Operating Guide ActiNav Autonomous Bin Picking...
Need help?
Do you have a question about the ActiNav and is the answer not in the manual?
Questions and answers