Table of Contents
Advertisement
Advertisement
Table of Contents

Related Manuals for Thermo Scientific Multidrop Combi nL


Summary of Contents for Thermo Scientific Multidrop Combi nL
- Page 1 Thermo Scientific Multidrop Combi nL User Manual Rev. 1.2, Cat. no. N07171...
- Page 2 Copyright Copyright 2019 Thermo Fisher Scientific Inc. All rights reserved. First edition published in 2007. Reproduction of the accompanying user documentation in whole or in part is prohibited. Trademarks “FILLit” is a trademark and “Microtiter”, “Multidrop” and “Nalgene” are registered trademarks of Thermo Fisher Scientific Inc.
-
Page 3: Intended Users
For more For PC software-related issues, refer to the Thermo Scientific FILLit Software for Multidrop Combi nL User Manual (Cat. no. N17562). information For the latest information on products and services, visit our websites http://www.thermoscientific.com... -
Page 4: Safety Symbols And Markings
Catalog number Date of manufacture Consult instructions for use WEEE symbol This product is required to comply with the European Union’s Waste Electrical & Electronic Equipment (WEEE) Directive 2012/19/EU. 4 Thermo Scientific Multidrop Combi nL User Manual Thermo Fisher Scientific... -
Page 5: Warning And Other Markings Used In The Documentation
Caution Risk of damage to the instrument, other equipment or loss of performance or function in a specific application. Note Marks a hint, important information that is useful in the optimum operation of the system, or an item of interest. Thermo Fisher Scientific Thermo Scientific Multidrop Combi nL User Manual... -
Page 6: Instrument Safety And Guidelines For Use
Use of the Multidrop Combi nL in ways other than those described in the documentation supplied with the equipment may result in injury to persons or damage to the property. Avoid unintended use... -
Page 7: Table Of Contents
For more information ............... 3 Safety symbols and markings ............. 4 Safety symbols and markings used on the Multidrop Combi nL ..4 Warning and other markings used in the documentation ....5 Instrument safety and guidelines for use ..........6 ... - Page 8 Removing foreign particles ............69 Disinfecting the liquid path............72 Routine maintenance of the dispensing valves (tips) ..... 72 Daily maintenance ..............72 Tip washing ................73 Emptying .................. 73 Periodic maintenance ..............73 Thermo Scientific Multidrop Combi nL User Manual Thermo Fisher Scientific...
- Page 9 Technical Specifications ................86 General specifications ..............86 Safety specifications ................. 87 Live parts ..................87 In conformity with the requirements ..........87 Remote control to Multidrop Combi nL ......... 88 Chapter 7 Frequently Asked Questions ..............89 Q&As ..................... 89 Chapter 8 Troubleshooting Guide ................
- Page 10 Figure 4–18. Removing the reagent filter ............29 Figure 4–19. Keyboard of the Multidrop Combi nL ........29 Figure 4–20. Main view on the display of the Multidrop Combi nL ..... 30 Figure 4–21. Example of dispensing with selected wells ......42 Figure 4–22.
- Page 11 Table 5–6. Maintenance checklist..............67 Table 6–7. General specifications ..............86 Table 8–8. Error messages reported ............. 91 Table 9–9. Instrument catalog number ............95 Table 9–10. Codes for accessories ..............95 Thermo Fisher Scientific Thermo Scientific Multidrop Combi nL User Manual...
-
Page 12: Introduction To The Multidrop Combi Nl
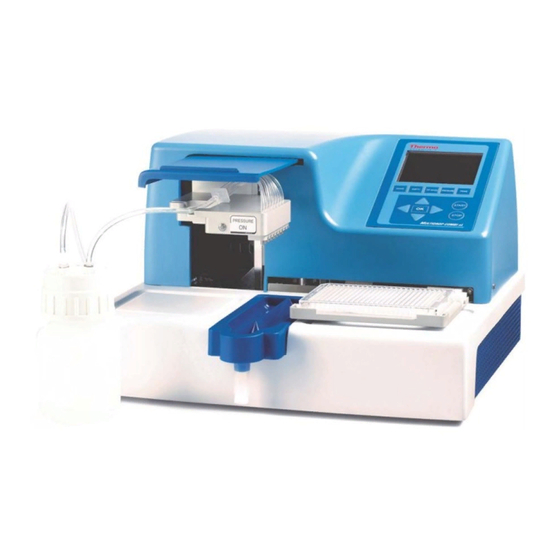
Introduction to the Multidrop Combi nL The Multidrop Combi nL (Figure 1–1) is an automatic, programmable, eight-valve microplate bulk reagent dispenser for nanoliter to microliter volume dispensing. It covers the volume range 50 nl to 50 µl. It has a pressure/vacuum based dispensing system for rapid and continuous dispensing of liquids into 96, 384 and 1536-well plates. -
Page 13: Intended Use
With a volume range of 50 nl to 50 µl for 96, 384 and 1536-well plates with dispensing heights from 5 to 55 mm, the Multidrop Combi nL offers outstanding flexibility for a wide range of applications. Multidrop Combi nL can be used, for example, in cell and bead-based... -
Page 14: Calibrations
For more information, refer to the FILLit Software for Multidrop Combi nL User Manual (Cat. no. N17562). Advantages of The Multidrop Combi nL microplate dispenser has several operational advantages: using Multidrop Flexible low-volume range of 50 nl – 50 µl Combi nL Flexible dispensing height of 5–55 mm... -
Page 15: Chapter 2 Functional Description
Functional Description Instrument This section shows the front and back views of the Multidrop Combi nL instrument. layout Front view The front view of the Multidrop Combi nL instrument is shown in Figure 2–2. Display Light indicator Protective cover Keyboard... -
Page 16: Instrument Layout
Figure 2–3. Display Keyboard Figure 2–3. Close-up of the Multidrop Combi nL keyboard and display Back view The back view of the Multidrop Combi nL instrument is shown in Figure 2–4. Mains switch Mains connector Instrument label Pressure/vacuum... -
Page 17: Chapter 3 Installation
Unpack the Multidrop Combi nL instrument and accessories carefully with the arrows on the transport package pointing upwards. Remove the instrument from the package and place it on a level surface. Refer to the enclosed packing instructions. -
Page 18: Requirements
Installation Requirements Requirements When you set up your Multidrop Combi nL, avoid sites of operation with excess dust, vibrations, strong magnetic fields, direct sunlight or UV light, draft, excessive moisture or large temperature fluctuations. Make sure the working area is flat, dry, clean and vibration-proof and leave additional room for accessories, cables, and reagent bottles. -
Page 19: Releasing The Transport Lock
2. Remove the screws, the transport lock piece and the transport lock tag from the screw marked 1 (Figure 3–6). Keep the tag for future relocation or transportation of the instrument. The transport lock is now released. Thermo Fisher Scientific Thermo Scientific Multidrop Combi nL User Manual... -
Page 20: Installing The Priming Vessel
2. Insert a priming vessel tube assembly or cap (Cat. no. N05843) into the drain of the priming vessel or a vessel underneath the drain. Installing the pressure/vacuum To install the pressure/vacuum system reservoir, that is, the reagent system reservoir reservoir: Thermo Scientific Multidrop Combi nL User Manual Thermo Fisher Scientific... -
Page 21: Figure 3-9. Removing The Red Luer Plugs
(Figure 3–10). Connect the other end of the hosing through a similar luer connector to the reagent reservoir (Figure 3–11) for producing pressure and vacuum. Figure 3–10. Connecting the hosing to the pressure/vacuum system Thermo Fisher Scientific Thermo Scientific Multidrop Combi nL User Manual... -
Page 22: Figure 3-11. Connecting The Hosing To The Reagent Reservoir
(Figure 3–13). Figure 3–12. Close-up of the manifold Caution To detach the manifold tube connector, pull the hosing off. Do not twist the hosing. Thermo Scientific Multidrop Combi nL User Manual Thermo Fisher Scientific... -
Page 23: Operational Check
If the instrument starts properly: The display lights up. The plate carrier moves to the home position and the dispensing valve lifting mechanism to the up position. The clamp (Figure 3–14) opens. Thermo Fisher Scientific Thermo Scientific Multidrop Combi nL User Manual... -
Page 24: Figure 3-14. Priming Vessel Inserted Into Place
Check after each dispensing that the priming vessel is not filled up if the tube drain is not used. 5. Press PRIME The lifting mechanism is lowered and the dispensing valves are opened as long as you press PRIME Thermo Scientific Multidrop Combi nL User Manual Thermo Fisher Scientific... - Page 25 The clamp (Figure 3–14) tightens the microplate against the lower left corner of the plate carrier. If the protocol or predispense is not started, follow the instructions on the display or check Chapter 9: “Troubleshooting Guide”. Thermo Fisher Scientific Thermo Scientific Multidrop Combi nL User Manual...
-
Page 26: Chapter 4 Routine Operation
Chapter 4 Routine Operation Dispensing The dispensing system of the Multidrop Combi nL is based on a pressure/vacuum system that the instrument controls. valves The liquid to be dispensed into a well is pushed through a microsolenoid valve by means of compressed air. The pressure system can also produce vacuum, which is used for the Empty function. -
Page 27: Calibration
A calibration defines the valve open times for different volumes at a certain air pressure. Calibrations are created, calculated and transferred with the Multidrop Combi nL PC software. Calibration is a combination of a liquid to be dispensed and a speed. -
Page 28: Reagent Reservoir
Refer to “How to clean a leaking dispensing valve” on page 73. Thermo Scientific Multidrop Combi nL User Manual Thermo Fisher Scientific... -
Page 29: Control Panel
Routine Operation Control panel Figure 4–18. Removing the reagent filter Control panel This section describes the Multidrop Combi nL control panel and internal software. Keyboard The keyboard is shown in Figure 4–19. Control buttons START and STOP Arrow keys and OK button control buttons Figure 4–19. -
Page 30: Display
The main view in the display is shown in Figure 4–20. Menu Icon Main view row Info text bar Figure 4–20. Main view on the display of the Multidrop Combi nL Thermo Scientific Multidrop Combi nL User Manual Thermo Fisher Scientific... -
Page 31: Navigating
Routine Operation Control panel There are three menus in the Multidrop Combi nL user interface: Main, Settings and Options. In routine use you mainly navigate in the Main menu. In advanced level options there are two extra menus, Settings and Options. You can navigate between these three menus using the Left and Right arrow keys. -
Page 32: Table 4-2. Icons In The Main View
“Predispensing volume” on page 47 “Dispensing direction” on page 48 “Device information” on page 56 “Computer interface” on page 57 “Startup protocol” on page 58 “Instrument settings” on page 59 “Calibration” on page 60 Thermo Scientific Multidrop Combi nL User Manual Thermo Fisher Scientific... -
Page 33: Dispensing
Press the button to start the protocol. The instrument dispenses START the plate. Press the button to empty the dispensing tubing. EMPTY Power OFF the instrument. The pressure will be released. Thermo Fisher Scientific Thermo Scientific Multidrop Combi nL User Manual... -
Page 34: Using Fillit Pc Software
Routine Operation Using FILLit PC The operation of the Multidrop Combi nL dispenser can also be controlled by an external computer and run on FILLit Software for software Multidrop Combi nL. In addition to the Multidrop Combi nL internal software features, you can use multistep protocols, that is, protocols with several steps (e.g. -
Page 35: Table 4-3. Default Parameter Values For Different Plate Types
Settings menu. You can save the plate values for future use. Note You can also select more plates or define new plates with FILLit Software and download them to the instrument, if needed. Thermo Fisher Scientific Thermo Scientific Multidrop Combi nL User Manual... -
Page 36: Dispensing Volume And Liquid
FILLit Software or use the liquid factor to calibrate the set volume. The optimal speed, dispensing volume range and the liquid factor for the dispensed liquid are displayed in the Volume and Liquid window. Thermo Scientific Multidrop Combi nL User Manual Thermo Fisher Scientific... -
Page 37: Column/Row Selection
If you want to dispense only into some of the wells, select Select columns… or Select rows... using the Down arrow key. Thermo Fisher Scientific Thermo Scientific Multidrop Combi nL User Manual... -
Page 38: Column Selection
The dispensing volume selected in the Volume and Liquid window (see “Dispensing volume and liquid” on page 36) is shown in the volume bottom left box. You can adjust the dispensing volume for each individual column. Thermo Scientific Multidrop Combi nL User Manual Thermo Fisher Scientific... - Page 39 Use the Down arrow key and select Accept and press after selecting the column volumes you wish. You can press the button to exit the volume selection without STOP making any changes. Thermo Fisher Scientific Thermo Scientific Multidrop Combi nL User Manual...
-
Page 40: Row Selection
The dispensing volume selected in the Volume and Liquid window (see “Dispensing volume and liquid” on page 36) is shown in the bottom left box. You can adjust the dispensing volume for each individual row. Thermo Scientific Multidrop Combi nL User Manual Thermo Fisher Scientific... -
Page 41: Selecting Columns And Rows (Selected Wells)
Refer to the example plate in Figure 4–21 where the 100 nl row selection overwrites the 50 nl column selection made first. In general, be careful if you choose to carry out cross-dispensing where selected wells are concerned. Thermo Fisher Scientific Thermo Scientific Multidrop Combi nL User Manual... -
Page 42: Protocol Settings
(see “Save and edit protocol” on page 51). If the protocol is not saved, the changes only remain effective until the plate type is changed or the instrument is switched off. Thermo Scientific Multidrop Combi nL User Manual Thermo Fisher Scientific... -
Page 43: Dispensing Speed
3. If a higher density solution is dispensed, it requires a greater speed to dispense the corresponding volume. You can decrease the speed, for example, to reduce foaming. Thermo Fisher Scientific Thermo Scientific Multidrop Combi nL User Manual... -
Page 44: Shaking
Use the Up and Down arrow keys to select the duration of the shake. You can set the time in increments of 1 s. The maximum shaking period is 120 s. The default duration is 0 s. Thermo Scientific Multidrop Combi nL User Manual Thermo Fisher Scientific... -
Page 45: Dispensing Offsets
On the other hand, when you adjust the X/Y offset, the dispensing valve head moves over the first column of the plate, but the default is always 1 mm above the plate. Adjust the optimal offset values visually. Thermo Fisher Scientific Thermo Scientific Multidrop Combi nL User Manual... -
Page 46: Height
. If the button is not pressed within 60 seconds, the adjustments are disregarded and the main view returns to the Settings menu. * z-axis = the dispensing valve lifting mechanism moves Thermo Scientific Multidrop Combi nL User Manual Thermo Fisher Scientific... -
Page 47: X/Y Offset
100 nl (= 2 x 50 nl). Some more viscose solutions used may sometimes require extra predispensing. Go to the Settings menu. Select the Predispense (Prime) row. Press Thermo Fisher Scientific Thermo Scientific Multidrop Combi nL User Manual... -
Page 48: Dispensing Direction
However, you may change the dispensing direction, direction if necessary. Go to the Settings menu. Select the Dispensing direction row. Press Row wise direction Column wise direction Thermo Scientific Multidrop Combi nL User Manual Thermo Fisher Scientific... - Page 49 (D, H, L, P … AF) are filled. Column wise dispensing shifts the dispensing valve head carrier sideways three times filling 32 wells and then the plate carrier moves the dispensing valve head over the next column. Thermo Fisher Scientific Thermo Scientific Multidrop Combi nL User Manual...
-
Page 50: Running A Protocol
Multidrop Combi nL. You can also download protocols with one dispense step and an additional shake step to the instrument. For more information, refer to the FILLit Software for Multidrop Combi nL User Manual (Cat. no. N17562). To run a dispensing protocol, follow the steps below. -
Page 51: Save And Edit Protocol
Press Press the Right arrow key to name/save the name of your protocol. Enter the name of your protocol. Use the arrow keys to choose the character you want. Thermo Fisher Scientific Thermo Scientific Multidrop Combi nL User Manual... - Page 52 Backspace button and then the button to remove the character(s). Use the Down arrow key to select the Save button and then press the button to save the edited protocol name. Thermo Scientific Multidrop Combi nL User Manual Thermo Fisher Scientific...
- Page 53 The protocol name is now shown on the Select and Save Protocol row. You can create a maximum of 100 protocols, including the factory- defined protocols. When you save the protocol, all the following parameters are saved: Thermo Fisher Scientific Thermo Scientific Multidrop Combi nL User Manual...
-
Page 54: Select Protocol
To delete an existing protocol for a particular plate type, first select the plate type (see “Plate type” on page 34) and then select the Select and Save Protocol row. Thermo Scientific Multidrop Combi nL User Manual Thermo Fisher Scientific... - Page 55 You cannot delete default protocols (the Delete button is not activated). Also, if you have selected a protocol to be a startup protocol, it cannot be deleted. The protocol is now deleted. Thermo Fisher Scientific Thermo Scientific Multidrop Combi nL User Manual...
-
Page 56: Instrument Options
The device information shows the name of the instrument, the internal software version and the serial number of the instrument unit. Go to the Options menu. Press Press to exit. Thermo Scientific Multidrop Combi nL User Manual Thermo Fisher Scientific... -
Page 57: Computer Interface
2: “Installing FILLit Software” in the FILLit Software for Multidrop Combi nL User Manual (Cat. no. N17562). Use the Up and Down arrow keys to select the computer interface in use. Press Thermo Fisher Scientific Thermo Scientific Multidrop Combi nL User Manual... -
Page 58: Startup Protocol
Instrument options Startup protocol You can set which protocol is automatically selected in the Main menu when the Multidrop Combi nL is powered on. Go to the Options menu. Select the Startup protocol row. Press . All protocols stored in the instrument memory are displayed. -
Page 59: Instrument Settings
You can choose whether or not the instrument produces a sound for different functions. Note that all functions make a certain sound. Go to the Options menu. Select the Instrument settings (Buzzer) row. Press Thermo Fisher Scientific Thermo Scientific Multidrop Combi nL User Manual... -
Page 60: Calibration
Calibration You can calibrate the dispensing valves for different liquids. Calibration of the Multidrop Combi nL instrument is routinely carried out with the PC software. For more information, refer to the FILLit Software for Multidrop Combi nL User Manual (Cat. no. N17562). -
Page 61: Accuracy Check
Accuracy check To perform an accuracy check and factor calculation (see “Factor calculation” on page 63), follow the procedures below: Go to the Options menu. Select the Liquid factor row. Thermo Fisher Scientific Thermo Scientific Multidrop Combi nL User Manual... - Page 62 Place the plate onto the plate carrier of the Multidrop Combi nL. Press on the keyboard to start dispensing (or...
-
Page 63: Factor Calculation
Factor in the previous example would be 179200 nl/182064 nl = 0.984, which means that the instrument dispenses 0.984 times liquid compared to the value in the calibration curve. Refer to “Accuracy check” on page 61. Thermo Fisher Scientific Thermo Scientific Multidrop Combi nL User Manual... -
Page 64: Figure 4-22. Calibration Curve Vs. Factor And Volume Changes
(Figure 4–22). The Liquid factor is, however, protocol sensitive and must be saved with the protocol. The liquid factor does not affect the calibration curve itself. Figure 4–22. Calibration curve vs. factor and volume changes Thermo Scientific Multidrop Combi nL User Manual Thermo Fisher Scientific... -
Page 65: Screen Saver
User Manual (Cat. no. N17562). Screen saver The Multidrop Combi nL screen saver shown below appears when the instrument has not been used for 20 minutes. You can close the screen saver and return to the previous display by pressing any key. -
Page 66: Emergency Situations
Warning Before a prolonged standby, run the tubings dry to avoid microbial growth from developing. 4. Switch the Multidrop Combi nL off by pressing the mains switch (Figure 2–4) at the left of the back panel of the instrument into the OFF position. -
Page 67: Chapter 5 Maintenance
See “How to clean a leaking dispensing valve” on page 73 and “How to clean a clogged dispensing valve” on page 75. Replace the dispensing valve when necessary*. See “Replacing a dispensing valve” on page 75. Continued Thermo Fisher Scientific Thermo Scientific Multidrop Combi nL User Manual... -
Page 68: Regular And Preventive Maintenance
It is recommended to service the instrument at least yearly. Refer to “Service contracts” on page 84. If you believe that liquid has entered the Multidrop Combi nL, first switch the instrument off (Figure 2–4) and unplug the instrument. Carry out corrective measures. Refer to “Emergency situations” on page 66 and “Decontamination procedure”... -
Page 69: How To Clean The Tubings
Empty the reagent reservoir or fit an empty reagent reservoir and remove the reagent filter at the bottom of the reagent reservoir by pulling it off by the end of the cap tube (Figure 5–23). Thermo Fisher Scientific Thermo Scientific Multidrop Combi nL User Manual... -
Page 70: Figure 5-23. Removing The Reagent Filter
Place another disposable reagent basin or a 96-well plate filled with distilled and filtered laboratory-grade water under the dispensing valves so that the liquid is in contact with the valves (cf. Figure 5–24). Press the button for several minutes. EMPTY Thermo Scientific Multidrop Combi nL User Manual Thermo Fisher Scientific... -
Page 71: Figure 5-25. Detaching A Dispensing Valve Tube End
8. Prime with distilled and filtered laboratory-grade water. 9. Reattach the 43 µm reagent filter into the reagent reservoir (replace, if necessary) by pushing the reagent filter into the cap tube end. Thermo Fisher Scientific Thermo Scientific Multidrop Combi nL User Manual... -
Page 72: Disinfecting The Liquid Path
12. Finally prime once again with distilled and filtered laboratory-grade water. Disinfecting the liquid The Multidrop Combi nL liquid path components can be disinfected path with isopropanol, 10% bleach (for example, sodium hypochlorite), or 70% ethanol by running the disinfectant through the liquid path. -
Page 73: Tip Washing
Empty the reagent reservoir or fit an empty reagent reservoir and remove the reagent filter and the tube from inside the cap of the reagent reservoir (Figure 5–27). Thermo Fisher Scientific Thermo Scientific Multidrop Combi nL User Manual... -
Page 74: Figure 5-27. Removing The Reagent Filter With Tube
PRIME 7. Try to dispense. 8. Repeat this entire procedure, Steps 2 to 7, if the dispensing valve is still leaking. Now the instrument is ready for dispensing. Thermo Scientific Multidrop Combi nL User Manual Thermo Fisher Scientific... -
Page 75: How To Clean A Clogged Dispensing Valve
The indicator light is off when the pressure has been totally released. 2. Detach the flexible dispensing valve tubing (Figure 5–25). 3. Unfasten the valve screw with the 1.5 mm hexagonal screwdriver supplied (Figure 5–28). Thermo Fisher Scientific Thermo Scientific Multidrop Combi nL User Manual... -
Page 76: Figure 5-28. Unfastening The Dispensing Valve
Figure 5–28. Unfastening the dispensing valve 4. Pull the dispensing valve downwards (Figure 5–29). Figure 5–29. Pulling the dispensing valve downwards 5. Replace the dispensing valve with a new one (Figure 5–30). Thermo Scientific Multidrop Combi nL User Manual Thermo Fisher Scientific... -
Page 77: Replacing A Tubing Set And A Manifold
Enter the given value in the respective valve (channel) position and press Update to save the value. See the details of FILLit Software in the FILLit Software for Multidrop Combi nL User Manual (Cat. no. N17562) provided with the instrument. -
Page 78: How To Clean The Reagent Reservoir
Clean the reagent reservoir (Figure 2–2 and Figure 4–17) regularly after use and when you change the reagent. reagent reservoir To clean the reagent reservoir: 1. Detach the reagent reservoir. Thermo Scientific Multidrop Combi nL User Manual Thermo Fisher Scientific... -
Page 79: How To Clean The Plate Carrier
Clean the priming vessel (Figure 5–32) once it gets dirty during use. priming vessel To clean the priming vessel: 1. Unfasten the priming vessel by sliding it off towards yourself (Figure 5–32). Thermo Fisher Scientific Thermo Scientific Multidrop Combi nL User Manual... -
Page 80: Disposal Of Materials
Decontamination should be performed in accordance with normal laboratory procedures. Any decontamination instructions provided with the reagents used should be followed. Thermo Scientific Multidrop Combi nL User Manual Thermo Fisher Scientific... - Page 81 6. Place a cloth soaked in the prepared solution into the bag. Ensure that the cloth does not come into contact with the instrument. 7. Close the bag firmly and leave the instrument in the bag for at least 24 hours. Thermo Fisher Scientific Thermo Scientific Multidrop Combi nL User Manual...
-
Page 82: How To Refit The Transport Lock
2 of the transport lock (Figure 5–35). Then fasten screw 1 and the transport lock tag to the dispensing valve head. The transport lock is now fastened (Figure 5–35). Thermo Scientific Multidrop Combi nL User Manual Thermo Fisher Scientific... -
Page 83: Packing For Service
Prior to shipping the instrument for service, remember to specify the fault when you are in touch with your local Thermo Fisher Scientific representative or the Thermo Fisher Scientific technical service department. Thermo Fisher Scientific Thermo Scientific Multidrop Combi nL User Manual... -
Page 84: Service Contracts
12 months on a contract basis by the manufacturer's trained contracts service engineers. This ensures that the product is properly maintained and gives trouble-free service. Contact the Thermo Fisher Scientific technical service department for more details. Thermo Scientific Multidrop Combi nL User Manual Thermo Fisher Scientific... -
Page 85: Disposal Of The Instrument
Maintenance Disposal of the instrument Disposal of the If the Multidrop Combi nL has to be disposed of, follow the guidelines below. instrument Warning Decontaminate the instrument before disposal. Refer to “Decontamination procedure” on page 80 about decontamination. Follow laboratory and country-specific procedures for biohazardous or radioactive waste disposal. -
Page 86: Chapter 6 Technical Specifications
> 1 µl: ± 2% CV ≤ 10% Dispensing precision (CV%) 50 nl: 0.5 µl: CV ≤ 5% 1–10 µl: CV ≤ 4% > 10 µl: CV ≤ 2% * Reagent recovery option available Thermo Fisher Scientific Thermo Scientific Multidrop Combi nL User Manual... -
Page 87: Safety Specifications
Type 838 requirements 100–240 Vac, 50/60 Hz, 100 VA cCSAus monogram Multidrop Combi nL conforms to the following requirements: 2006/95/EC (Low Voltage Directive) 2004/108/EC (Electromagnetic Compatibility Directive, EMC) FCC Part 15, Subpart B/Class B (July 2004) 2012/19/EU (WEEE Directive) -
Page 88: Remote Control To Multidrop Combi Nl
The Multidrop Combi nL can be used as part of an automated system. Multidrop Combi nL When the Multidrop Combi nL is in remote mode, the main view is as shown below. For more details, refer to the Multidrop Combi nL Remote Control Command Sets (Cat. -
Page 89: Frequently Asked Questions
Chapter 7 Frequently Asked Questions Q&As Q: What liquid is recommended for washing the Multidrop Combi nL hosing? A: It is recommended that you use distilled and filtered laboratory- grade water and/or a detergent solution, for example, filtered 1% Micro-90, followed by distilled and filtered laboratory-grade water. - Page 90 Q&As Q: Do you need specific plate adapters for the Multidrop Combi nL? A: No, the Multidrop Combi nL has a fixed plate adapter and does not use any external plate adapters. Q: What is the material of the Multidrop Combi nL priming vessel? A: The Multidrop Combi nL priming vessel (Cat.
-
Page 91: Chapter 8 Troubleshooting Guide
When an error is detected, the current operation is terminated. After an error, it is best to abort the current run and restart from the beginning warning codes after the problem is fixed. The Multidrop Combi nL internal software has the following error messages (Table 8–8). Table 8–8. Error messages reported... - Page 92 PRIME Press to acknowledge the error and then insert the priming vessel. Press to acknowledge the error and then pull the protective cover over the dispensing valve head. Thermo Scientific Multidrop Combi nL User Manual Thermo Fisher Scientific...
-
Page 93: Hazards
There are three warning messages that can appear in the main view of the Multidrop Combi nL internal software. An example of a warning message is shown below. Press to acknowledge the warning and then reselect the dispensing volume. -
Page 94: Mechanical
The protection is likely to be impaired if, for example, the instrument: Shows visible damage. Fails to perform the intended functions. Has been subjected to prolonged storage under unfavorable conditions. Has been subjected to severe transport stresses. Thermo Scientific Multidrop Combi nL User Manual Thermo Fisher Scientific... -
Page 95: Chapter 9 Ordering Information
Table 9–10. Codes for accessories accessories Code Item N07171 Multidrop Combi nL User Manual N17562 FILLit Software for Multidrop Combi nL User Manual N07271 Priming vessel, Multidrop Combi nL N05843 Priming vessel tube assembly and cap N07494 Dispensing valve, Multidrop Combi nL N07493 Reagent filter 43 µm PTFE/AISI 316 (5 pcs/box) - Page 96 Ordering Information List of accessories Cont. Code Item N04001 Cord USB 2.0 A-B 1.8−2.0 m 0300033 Tool 3mm DIN911 Allen key Handled N07523 Tool 1.5mm DIN911 Allen key Zn Thermo Scientific Multidrop Combi nL User Manual Thermo Fisher Scientific...
-
Page 97: Appendix A Certificate Of Decontamination
*) The signature of a Radiation Safety Officer is also required when the unit has been used with radioactive materials. This unit is certified by the undersigned to be free of radioactive contamination. Date and place: Signature: Name (block capitals): PHOTOCOPIABLE Please include decontaminating solution used. Thermo Fisher Scientific Thermo Scientific Multidrop Combi nL User Manual... - Page 98 Certificate of Decontamination Thermo Scientific Multidrop Combi nL User Manual Thermo Fisher Scientific...
- Page 99 To draw back to the liquid bottle all the USB Universal serial bus. liquid in the hoses and valves. EN European Norm. EU European Union. Thermo Fisher Scientific Thermo Scientific Multidrop Combi nL User Manual...
- Page 100 Glossary: 100 Thermo Scientific Multidrop Combi nL User Manual Thermo Fisher Scientific...
- Page 101 13, 14, 35, 37, 45, 46, 99 deleting a protocol, 54, 91 adjusting dispensing offset, 32, 35, 45, 46, 47 density, 43, 63, 99 advantages of using Multidrop Combi nL, 14 device information, 32, 56, 90 air pressure, 27 direction, 47, 48...
- Page 102 10, 20, 24, 33, 50, 67, 69, 79, 80, 82, 84, 86, 90, 91, 92, 95, 99 priming volume, 32, 47, 48 keyboard and display, 10, 13, 16, 29, 86 principle of operation, 13 102 Thermo Scientific Multidrop Combi nL User Manual Thermo Fisher Scientific...
- Page 103 4, 56, 84, 90 warranty, 17 service, 66, 67, 68, 81, 83, 84, 91, 95 contracts, 68, 84 setting the column volume, 38 setting the row volume, 40 X/Y offset, 45, 47 Thermo Fisher Scientific Thermo Scientific Multidrop Combi nL User Manual...
- Page 104 104 Thermo Scientific Multidrop Combi nL User Manual Thermo Fisher Scientific...
- Page 105 Notes Thermo Fisher Scientific Thermo Scientific Multidrop Combi nL User Manual...
- Page 106 Notes 106 Thermo Scientific Multidrop Combi nL User Manual Thermo Fisher Scientific...
Need help?
Do you have a question about the Multidrop Combi nL and is the answer not in the manual?
Questions and answers