
Subscribe to Our Youtube Channel
Related Manuals for Mircom TX3 Series


Summary of Contents for Mircom TX3 Series
- Page 1 TX3 Series TX3 Nano Configuration Manual TX3 Nano Configuration Manual Version 2.4 LT-1194 Copyright March 2018...
- Page 2 Copyright March 2018 Mircom Inc. All rights reserved. TX3 Nano Configuration Manual Version 2.4 Microsoft, MS-DOS, Windows, and Windows 2000/NT/XP/Vista/7/8/10 are either registered trademarks or trademarks of Microsoft Corporation in the United States and/or other countries. Mircom 25 Interchange Way...
-
Page 3: Table Of Contents
Contents Introduction TX3 Nano Features Networking ADC and NSL Types of Calls Administrator’s Responsibilities TX3 Nano Products Additional Documentation Nano Settings Log into the Configurator Change the Language of the Configurator Enter the OnSIP Administrative Account Configure User Privileges Log Out Change the Device Settings Inputs and Outputs Access Point... - Page 4 Timers Call Restrictions System Status Specifications Warranty and Warning Information TX3 Nano Configuration Manual Copyright 2018...
- Page 5 Figures Figure 1. TX3 Nano on an IP Network Figure 2. PSTN Call Figure 3. Cellular Call Figure 4. VOIP Call with OnSIP and MiEntry Figure 5. VOIP Call with local Kamailio server Figure 6. Login page Figure 7. TX3 Nano Configurator Figure 8.
-
Page 6: Introduction
TX3 Nano Products • Additional Documentation TX3 Nano Features Mircom’s TX3 Nano is an IP networkable audio and video entry panel providing multiple options to communicate with the resident or concierge in a multi-unit dwelling establishment. Features of the TX3 Nano include: •... -
Page 7: Networking
Introduction • Touch buttons for scrolling the directory and making calls • Storage of up to 1000 names • Hands-free full duplex communication • Dials up to 20 digit telephone numbers • System can be configured over an IP network using a Web-based configurator Networking The TX3 Nano can be connected to an existing TX3 network, as shown in... -
Page 8: Adc And Nsl
TX3 Nano. Note: Non-configurable PBX systems are not supported. For more information, contact technical support at Mircom. Types of Calls In all cases, the TX3 Nano can accept DTMF tones, which allow the resident to open the door for the visitor, or to disconnect the call without opening the door. -
Page 9: Figure 3. Cellular Call
Introduction 1.4.2 Cellular Call The cellular-enabled models of the TX3 Nano (for example TX3-NANO-S4- CA) make calls over the cellular network. In this situation, the TX3 Nano acts like a cell phone. Figure 3. Cellular Call 1.4.3 VOIP Call A VOIP call allows both audio and video calls from the TX3 Nano to a SIP (Session Initiation Protocol) client. -
Page 10: Figure 4. Voip Call With Onsip And Mientry
Introduction Cell phone with MiEntry app OnSIP Server Internet Wireless router TX3 Nano Cell phone with MiEntry app Figure 4. VOIP Call with OnSIP and MiEntry Local Kamailio server Wireless router TX3 Nano Cell phone with TX3 InSuite MiEntry app Figure 5. -
Page 11: Administrator's Responsibilities
Introduction The TX3 Nano has been tested with the following SIP clients: • TX3 InSuite • Mircom’s MiEntry app for iOS and Android • microSIP for Windows (http://www.microsip.org/) • Kamailio (http://www.kamailio.org/) 1.4.4 Configure a TX3 Nano for VOIP To configure a TX3 Nano for VOIP, you must: •... -
Page 12: Tx3 Nano Products
TX3-NANO-S4-CT: TX3 Nano Voice/Telephone Entry Communicator (Surface Mount with Telus Cellular) • TX3-NANO-S4-CR: TX3 Nano Voice/Telephone Entry Communicator (Surface Mount with Rogers Cellular) Additional Documentation These documents are available on http://www.mircom.com. • LT-6637 TX3 Nano Installation Manual • LT-600212 TX3-NANO-BB Installation Instructions •... -
Page 13: Nano Settings
Nano Settings This chapter describes the basic settings of the TX3 Nano. This chapter explains • Log into the Configurator • Change the Language of the Configurator • Enter the OnSIP Administrative Account • Configure User Privileges • Log Out •... -
Page 14: Figure 6. Login Page
Nano Settings The login page appears. Figure 6. Login page Enter the username and password of the TX3 Nano. By default, the username is admin and the password is admin. The TX3 Nano Configurator appears. Edit, Delete, Preferences and Residents Search options Schedules Nano Settings... -
Page 15: Change The Language Of The Configurator
Nano Settings • Schedules - page 41 • Nano Settings - this chapter • Events - page 46 Change the Language of the Configurator • Click the en in the upper right corner, and select the language that you want to view the site in. -
Page 16: Log Out
Nano Settings Administrator. The system administrator can access and configure all panels and devices connected to the panels. Note: When logging in to a particular user level, only information relevant to your assigned role is available. Assign a user Click the Preferences button in the upper right corner of the window. In the Users section, enter a User name and Password for the user. -
Page 17: Figure 8. Nano Settings
Nano Settings Nano Settings Inputs and Access Correlations tab Outputs tab point tab Edit, Delete, Preferences and Residents Search options Schedules Nano Settings Events Left Pane List of discovered TX3 Nanos Figure 8. Nano Settings 2.6.1 List of Discovered TX3 Nanos The list of discovered TX3 Nanos in the upper left corner of the Nano Settings window shows all the discovered TX3 Nanos on the network. - Page 18 Nano Settings Name a TX3 Nano Type a name for the TX3 Nano in the Name field. Click Save Changes at the top of the window. Change the language on a TX3 Nano Select a language in the Language menu. Click Save Changes at the top of the window.
-
Page 19: Figure 10. Resident Groups
Nano Settings Group Max. Specify the maximum number of residents in a group. If there are more residents whose first names begin with the same letter than the Group Max, then the TX3 Nano will make subgroups within the resident group. Grouping Example In this example, the Group Max is four. -
Page 20: Figure 11. Subgroups
Nano Settings The TX3 Nano shows the subgroups. Because the Group Max is four but there are seven residents in the A group, the first four residents are in the subgroup Anticlea - Ares, and the next three residents are in the subgroup Artemis - Atreus. - Page 21 Nano Settings Configure calls In the Calls section, provide information for each of the following: Maximum Talk Time. Specify the maximum time in seconds the visitor may communicate with the resident on a single call. After this time, the TX3 Nano disconnects the call. Outbound Calling Priority.
-
Page 22: Figure 13. Sip Account Details
Nano Settings 2.6.8 Keypad This feature lets you specify how the resident unlocks the door for the visitor. Configure how the resident unlocks the door In the Keypad section, provide information for each the following: Open Door by Pressing. Specify which key on the resident’s phone unlocks the door. -
Page 23: Inputs And Outputs
Nano Settings Configure the SIP account details In the SIP Account Details section, provide information for each the following: Add OnSIP Account. If you have configured the TX3 Nano with an OnSIP administrative account (section 2.3 on page 15), click Add OnSIP Account to quickly create an OnSIP account for this TX3 Nano. - Page 24 Nano Settings When access is granted, activation of the door sense switch locks the main door and resets the Unlock door timer. This function is typically used to prevent ‘tailgating’. Input 1 also, when configured with a correlation, activates a general purpose output to perform any required function.
-
Page 25: Figure 14. Input & Outputs
Nano Settings Click the Inputs & Outputs tab at the top of the window. Figure 14. Input & Outputs Select an input and provide information for the following parameters: Label. Type a name for this input. Assigned to. Select a function for this input: Door contact General purpose See section 2.7.1 on page 23 for information about door contact. - Page 26 Nano Settings Open circuit Short circuit Open and short circuit For more information on active state and supervision, see LT-6637 “TX3 Nano Installation Manual”. Delay. This specifies the amount of time in seconds before the input generates an active event. Click Save Changes at the top of the window.
-
Page 27: Access Point
Nano Settings Access Point These options control how the TX3 Nano locks and unlocks the door for residents. See section 7 on page 52 for more information on how the TX3 Nano controls access. Configure the access point Select the Access point tab. Figure 15. -
Page 28: Correlations
Nano Settings Disable Forced Entry Alarm. If you select Yes, the forced entry alarm does not activate even if the door is opened without permission. Instead, access is granted. This is usually used on access points where there is no request to exit (RTE) device. -
Page 29: Figure 16. Correlations
Nano Settings Create a correlation Select the Correlations tab. Figure 16. Correlations Click Add Correlation at the top of the window. Enter the following parameters: When. This parameter defines the input event. Select one of the following: Access is granted. Resident grants access using their telephone keypad. - Page 30 Nano Settings Action. Action specifies the type of action to occur for a specific input. Select one of the following: Turn ON output. The output becomes active. Turn OFF output. The output becomes inactive. Turn ON high security. Only credentials with the high security privilege can open the door (card access panels only).
-
Page 31: Configuring Other Tx3 Nanos
Nano Settings 2.10 Configuring other TX3 Nanos After you have configured one TX3 Nano, you can find other TX3 Nanos on the network and configure them. The list of discovered TX3 Nanos in the upper left corner of the Nano Settings window shows all the TX3 Nanos on the network that you can configure. -
Page 32: Figure 18. Discovered
Nano Settings Other TX3 Nanos on the network appear. Figure 18. Discovered Type a name for each TX3 Nano, and click the plus sign to add it. Remove a TX3 Nano from the list of discovered TX3 Nanos • Click the trash icon beside the TX3 Nano that you want to remove. The TX3 Nano disappears from the list. - Page 33 Nano Settings 2.10.2 Synchronization When you synchronize TX3 Nanos, schedules and residents are copied from the selected TX3 Nano to the other discovered TX3 Nanos. The information on the Nano Settings page (including inputs, outputs, access point, and correlations) is specific to each TX3 Nano and is not changed when you synchronize.
-
Page 34: Residents
Residents This chapter explains • View Residents • Import Residents from a TX3 Telephone Entry Panel • Add Residents • Delete Residents • Edit Residents • Set up an OnSIP Account View Residents See residents • Select Residents. The list of residents appears. Figure 19. -
Page 35: Import Residents From A Tx3 Telephone Entry Panel
Residents Sort the residents • Click the column header to sort the list by that column in either ascending or descending order. Find a resident • Type the resident’s name in the Search box. Import Residents from a TX3 Telephone Entry Panel Create a backup of the TX3 Telephone Entry System Start the TX3 Configurator and open the job file that has the resident... -
Page 36: Add Residents
Residents Add Residents Add a resident Click the Add Resident button at the top of the window. Figure 20. Add Resident Click Upload Display Picture to add a photograph of the resident. Provide the information shown in Figure 20. TX3 Nano Configuration Manual Copyright 2018... -
Page 37: Figure 21. Add Residents - Second Window
Residents Click Next. Figure 21. Add Residents - second window Provide the following information in the right pane: Location. Enter the resident’s address. Add OnSIP Account. If you have configured an OnSIP administrative account (see section 2.3 on page 15), click Add OnSIP Account to create an OnSIP account for this resident. -
Page 38: Delete Residents
Residents Maximum # of Rings. If you selected NSL, specify the numbers of rings of each call before the TX3 Nano reports no answer and disconnects the call. For ADC lines, this setting is not used and the number of rings is determined by the central office. Priority. -
Page 39: Set Up An Onsip Account
Residents Use Grid Edit In the list of residents, select the Grid Edit checkbox at the top of the window. Click a resident’s name. Edit the field, then use the Tab key to move to the next field. When you are finished editing, unselect Grid Edit at the top of the window. -
Page 40: Figure 24. Sample Confirmation Email
• User name. The first part of the SIP username (before the @), for example jsmith • Domain. The last part of the SIP username (after the @), for example mircom.onsip.com • SIP password TX3 Nano Configuration Manual Copyright 2018... -
Page 41: Schedules And Holidays
Schedules and Holidays This chapter explains • Create Schedules and Holidays • Delete a Schedule or Holiday • Edit a Schedule or Holiday • Hide a Schedule or Holiday • View the Calendar Create Schedules and Holidays You can create a timetable to establish when certain functions are allowed to occur, such as when calls to residents are allowed or when residents can grant access to a visitor. -
Page 42: Figure 25. Schedules
Schedules and Holidays The Schedules window appears. Figure 25. Schedules Click Add Schedule or Add Holiday at the top of the screen. Figure 26. Add Schedule Provide the following information: Title. Type a name for the schedule or holiday. Description. Type a more detailed description. Color. - Page 43 Schedules and Holidays Holidays. For a schedule, select specific holidays or select them all. • Exclude. If Exclude is selected, then the schedule is not active during the selected holidays. • Include. If Include is selected, then the schedule is active during the selected holidays.
-
Page 44: Delete A Schedule Or Holiday
Schedules and Holidays 4.1.1 Example Period This example describes how to create a period that is in effect every weekday from 9:00 am to 5:00 pm, and that starts on July 1 2018 and ends on December 31 2018. • Recurring. -
Page 45: View The Calendar
Schedules and Holidays View the Calendar The Schedules window shows a calendar of all schedules and holidays. See all the schedules • Click the Schedules tab. See all the holidays • Click the Holidays tab. View the calendar by month, week, or day •... -
Page 46: Events
Events This chapter explains • View Events • Export Events View Events The Events section displays all events received by the TX3 Nano. See events • Select Events. The list of events appears. Figure 27. Events The view has the following columns: •... -
Page 47: Figure 28. Export Menu
Events 5.1.1 Sort and find events To sort the events • Click the column header to sort the list by that column in either ascending or descending order. Find an event • Use the four filters at the top of the window to search for: •... - Page 48 Events Export visible data as csv. Click this option to export only the columns that you selected as a CSV file. Export all data as pdf. Click this option to export all the data as a PDF file, including the columns that are unselected. Export visible data as pdf.
-
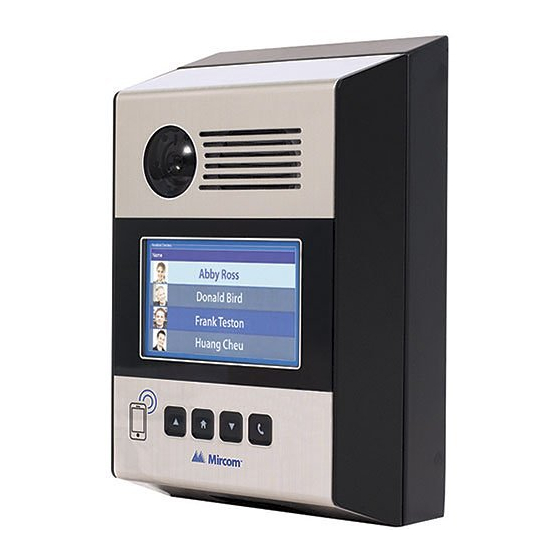
Page 49: Using The Tx3 Nano
Using the TX3 Nano This chapter explains • Overview • The TX3 Nano Buttons • The TX3 Nano Display Overview Camera Speaker Display Home Call, Hang Up and Back Scroll down and Select Scroll up Figure 29. Front of the TX3 Nano The TX3 Nano Buttons •... -
Page 50: Figure 30. The Tx3 Nano Display
Using the TX3 Nano • Home and Back: Press to move to the top of the list of residents. When in a group or subgroup, press again to go up one level. Press and hold this button for 10 seconds to see the TX3 Nano’s IP address, MAC address, and firmware version number. - Page 51 Using the TX3 Nano The TX3 Nano’s SIP account details are not complete (see section 2.6.9 on page 22), and it cannot make SIP calls Cellular network signal strength indicator (cellular models only) A phone line is connected to the TX3 Nano A phone line is not connected to the TX3 Nano TX3 Nano Configuration Manual Copyright 2018...
-
Page 52: Access Criteria
Access Criteria This chapter describes how the TX3 Nano controls access. To prevent unauthorized access, there are various configurable features for determining the conditions and type of access. The Configurator lets you define and configure the various modes of operation for managing access, defining inputs and assigning outputs. - Page 53 Access Criteria Timers 7.2.1 Maximum talk timer The maximum talk timer starts when the communication between the TX3 Nano and the tenant is established. When 10 seconds are left in the timer a warning beep is send to the tenant to indicate the system is about to hang up. When the timer ends, the TX3 Nano hangs up.
- Page 54 Access Criteria • Door held open warning The common trouble status clears only if all the above inputs are back in normal state. 7.4.2 Common alarm The common alarm status is active when any of the following inputs receive an alarm condition: •...
- Page 55 Specifications Dimensions 219 mm x 147 mm x 47 mm (8 19/32” x 5 3/4” x 1 27/32”) Weight TX3-NANO-S4: 0.88 kg (1.95 lbs) TX3-NANO-S4-CA, TX3-NANO-S4-CV, TX3-NANO-S4-CT, TX3-NANO-S4-CR: 0.9 kg (2 lbs) Power over Ethernet IEEE 802.3af/at Auxiliary Power input 12-48 VDC / 15 W Output 1 Form C dry contact relay with these contact ratings:...
- Page 56 Specifications Operating Temperature -30° C to 50° C (-22° F to 122° F) Connections 2 inputs 1 output 1 phone line connection 1 auxiliary power input 1 Ethernet 10/100 PoE+ port 1 USB 2.0 port 1 slot for SIM card TX3 Nano Configuration Manual Copyright 2018...
- Page 57 Mircom System and shall be read in conjunction with: the product manual for the specific Mircom System that applies in given circumstances; legal documents that apply to the purchase and sale of a Mircom System, which may include the company’s standard terms and conditions and warranty statements;...
- Page 58 Best practices and local authority having jurisdiction determine the frequency and type of testing that is required at a minimum. Mircom System may not function properly, and the occurrence of other system failures identified below may not be minimized, if the periodic testing and maintenance of Mircom Systems is not completed with diligence and as required.
- Page 59 Moreover, some Mircom Systems do not have a battery monitor that would alert the user in the event that the battery is nearing its end of life. Regular testing and replacements are vital for ensuring that the batteries function as expected, whether or not a device has a low-battery monitor.
- Page 60 Component Failure. Although every effort has been made to make this Mircom System as reliable as possible, the system may fail to function as intended due to the failure of a component. Integrated Products. Mircom System might not function as intended if it is connected to a non-Mircom product or to a Mircom product that is deemed non-compatible with a particular Mircom System.
- Page 61 Warranty and Warning Information Warranty Purchase of all Mircom products is governed by: https://www.mircom.com/product-warranty https://www.mircom.com/purchase-terms-and-conditions https://www.mircom.com/software-license-terms-and-conditions TX3 Nano Configuration Manual Copyright 2018...
Need help?
Do you have a question about the TX3 Series and is the answer not in the manual?
Questions and answers