
Subscribe to Our Youtube Channel
Related Manuals for Teldat H2 RAIL


Summary of Contents for Teldat H2 RAIL
- Page 1 Manual Teldat S.A. Teldat H2 RAIL Installation Manual Copyright© Teldat DM685-I Version 3.0 2/2019 Teldat S.A. Teldat H2 RAIL...
- Page 2 This publication is subject to change. Teldat S.A. offers no warranty whatsoever for information contained in this manual. Teldat S.A. is not liable for any direct, indirect, collateral, consequential or any other damage connected to the deliv- ery, supply or use of this manual.
-
Page 3: Table Of Contents
Chapter 2 Teldat H2 Rail........3 Description . - Page 4 CE Radio information....... 29 RF WAN specifications ....... . Teldat H2 RAIL...
- Page 5 Teldat S.A. WLAN specifications ....... . . Teldat H2 RAIL...
-
Page 6: About This Manual
1 About this manual Teldat S.A. Chapter 1 About this manual This is the installation manual for the Teldat H2 RAIL router and contains information on how to correctly install this device in a working environment. 1.1 Supported devices The information provided in this installation manual only applies to the Teldat H2 RAIL router. -
Page 7: Related Documentation
Teldat S.A. Tel.: +34 918 076 565 Fax: +34 918 076 566 Email: support@teldat.com 1.8 Related documentation Teldat Dm748-I Software Updating. Teldat-Dm771-I Wireless LAN Interface. Teldat Dm781-I Cellular Interface. Teldat Dm812-I GPS. Note The manufacturer reserves the right to make changes and/or improvements to any and all parts of the software and hardware of this product, and to modify the specifications of this manual without prior no- tice. -
Page 8: Teldat H2 Rail
7. 2.2.2 Hardware monitoring The Teldat H2 RAIL hardware can be monitored through the LEDs on the front panel. The LEDs provide visual status information about the hardware components, indicating whether there is connectivity, data flow, etc. For further information on the LEDs panel, please see LEDs on page 5. -
Page 9: Components And Power Supply
3 Components and power supply Teldat S.A. Chapter 3 Components and power supply This chapter describes the Teldat H2 RAIL chassis and its main components. The following sections are included: • Components. • Assembly instructions. • Power supply. • RESET button. -
Page 10: Rear Panel
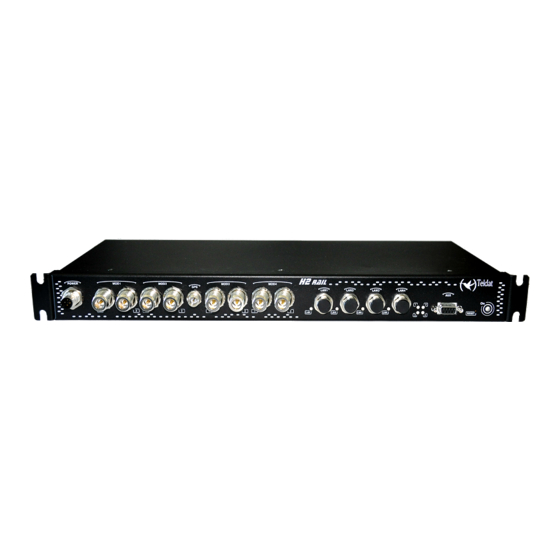
Green -> interface up. Blinking (green/red) -> activity/maintenance. 3.1.2 Rear panel The following image shows the rear panel of the Teldat H2 RAIL where you can see the other connectors. Rear panel Fig. 4: The rear panel elements are as follows:... -
Page 11: Assembly: Recommendations
We recommend securing the unit to the rack using the screws and nuts provided. This will ensure the device is se- curely mounted. Fig. 5: Mounting screws 3.2.2 Outline drawing The following outline drawing provides installation instructions: Teldat H2 RAIL... -
Page 12: Power Source
Please read the following instructions carefully before connecting the router! 3.3.1 Connecting the power supply Depending on the model, the Teldat H2 RAIL can be powered by a 110 V or 24 V nominal DC power source. Note Please check that the device's power input is compatible with your power supply. - Page 13 Connect all data cables. Disconnect the power supply cable from the device. Connect the power supply cable to the device. Disconnect the data cables. Connect the power supply cable to the power supply. Teldat H2 RAIL...
-
Page 14: Reset Button
The Teldat H2 RAIL has the following data connectors: 3.5.1.1 LAN SWITCH The Teldat H2 RAIL incorporates a 4-port 10/100/1000BaseT switch with automatic MDI/MDIX support to connect to a local area network (LAN). The router has a LINK LED that indicates the connection status. -
Page 15: Connecting To A Wwan Antenna
3.5.1.2 AUX The front panel of the Teldat H2 RAIL contains a DB9 female connector marked AUX, which can be used as a router configuration port or as a V.24 asynchronous serial port (via a configuration command). The interface's beha- vior or functionality must be pre-configured. - Page 16 Aux. / diversity The router does not have any internal antennas. Antennas must be installed in the Teldat H2 RAIL to improve the quality of the signal received and transmitted by the WWAN module (GPRS, UMTS, HSDPA, HSUPA, HSPA+, LTE, etc.).
-
Page 17: Connecting The Wlan Antenna
3.5.3 Connecting the WLAN antenna The Teldat H2 RAIL is fitted with type N connectors to connect up to two WLAN (Wi-Fi) antennas (on models equipped with this interface). Since the router doesn't have any internal antennas, external antennas must be installed on the Teldat H2 RAIL to improve WLAN signal quality. -
Page 18: Configuration Connection
3.5.5.1 Configuration using the local console (AUX connector) The Teldat H2 RAIL has a DB9 female connector on the front panel known as AUX. This provides access to the router's local console and can operate as an asynchronous serial port. The interface behavior or function must be pre-configured. -
Page 19: Sim Card Installation
• Configure the Ethernet interface on the IP terminal (usually a PC) using an IP address within the following range [192.168.1.2, 192.168.1.254] and mask 255.255.255.0. For example, 192.168.1.2, 255.255.255.0. • Connect the IP terminal Ethernet interface to any of the Ethernet switch ports on the Teldat H2 RAIL (LAN1..4 connectors) using an appropriate Ethernet cable (M12 to RJ45). -
Page 20: Installing The Sim
(1) Press the button until the SIM tray slides out of the slot. (2) Place the SIM card on the tray. (3) Return the tray into the slot by pushing it in. Inserting the SIMs Fig. 15: Teldat H2 RAIL... -
Page 21: Compliance
This equipment has been designed to work with an extended ambient temperature range of up to 70 °C (158 °F) and under these conditions the metallic surface could reach dangerous temperatures that may cause injuries. Este equipo ha sido diseñado para funcionar con una temperatura ambiente de Teldat H2 RAIL... - Page 22 This device is compatible with 1.8 V and 3 V SIM cards. Do not install SIM cards that do not support these voltages. Este equipo es compatible con SIM de 1.8V y 3V. No instale SIM que no soporten estas tensiones. Teldat H2 RAIL...
-
Page 23: Weee Information
0.1 percent weight by weight (w/w). This declaration will be updated as soon as any changes occur or new relevant substances are added to the REACH Candidate List. Information is currently provided to consumers upon request. Teldat H2 RAIL... -
Page 24: Ec Declaration Of Conformity
WAS/RLANs. There are restrictions in: Albania, Andorra, Azerbaijan, Moldova, Monaco, San Marino and Vatican City The requirements for any country may evolve. Teldat S.A. recommends that you check with local authorities for any requirements or restrictions that may apply. -
Page 25: Wlan Antenna
CE Marking. Manufacturer's declaration that the product meets all the legal re- quirements for CE marking and can be sold throughout the EEA (European Eco- nomic Area). Separate collection for electrical and electronic equipment. Refer to the manual. Indoor use only. Teldat H2 RAIL... -
Page 26: Appendix A Technical Information
As far as the metal housing is concerned, the Teldat H2 RAIL router was designed to be placed in an enclosed space, protected from bad weather; never to be exposed or subject to these or any other extreme environmental conditions. -
Page 27: Software Updates
A.2.2 Software updates Teldat H2 RAIL router software can be updated to newer versions. Please contact your dealer for information on new versions. There are several ways to update one of our routers. Please see the “Teldat Dm748-I Software Updating” manual for further information. -
Page 28: Wwan Connectors
The WLAN connector installed (for devices equipped with this interface) is an N female coaxial. Signal N-Type connector (female jack) Internal RF In/Out External A.3.5 GPS connector The GPS connector installed (for devices equipped with this interface) is an FME male. Signal RF FME male connector Internal RF In Teldat H2 RAIL... -
Page 29: Configuration Connector
Freescale QorIQ processor. MEMORY 256 MB in DDR3. STORAGE UNIT FLASH Memory (32 Mbytes). A.4.2 LAN interface PROTOCOLS Ethernet (802.3). PORTS 4-port switch managed through MDI/MDX autodetection. SPEED 10/100/100 Mbps (BaseT). CONNECTOR M12 8P X-Code female connector. Teldat H2 RAIL... -
Page 30: Wireless Wan Interface
(EU) WLAN modes 802.11b only; 802.11g only, 802.11b/g/n mixed; 802.11b/g/n mixed long; 802.11b/g/b mixed short; 802.11b/g/n ; 802.11g/n; 802.11n only 2.4 GHz Operation WLAN modes 801.1a only; 802.11a/n; 802.11n only; 802.11ac with up to 867 Mbit/s. Teldat H2 RAIL... - Page 31 Mbps; MSC5 520 Mbps; MCS6 585 Mbps; MCS7 650 Mbps; MCS8 780 Mbps; spatial streams MCS9 866,7 Mbps Output power limitation (without Adjustable in the following steps: 5, 8,11,14,16 dBm and maximum. Maximal antenna gain) power varies depending on data rate, frequency band and country setting. Teldat H2 RAIL...
-
Page 32: Gps Interface
DB9 female located on the front panel of the device. A.4.7 Power INPUT VOLTAGE Depending on the model: +110 VDC. +24 VDC. INPUT CURRENT Depending on the model: 180 mA @110 VDC or 830 mA @24 VDC. MAXIMUM POWER 30 W. Teldat H2 RAIL... -
Page 33: Housing: Material, Dimensions And Weight
WEIGHT 3.8 kg. A.4.9 Environmental specifications AMBIENT TEMPERATURE ON: -25 °C to 70 °C. In storage: -30 °C to 85 °C. RELATIVE HUMIDITY Annual average < 75 %. During 30 consecutive days per year < 95 %. Teldat H2 RAIL... -
Page 34: Appendix Bce Radio Information
Technology:UMTS(WCDMA)/ HSDPA/ HSUPA/ HSPA+/ DC-HSPA+. MC7455 specifications. Bands Frequencies Conducted Transmit Power Band 1 Tx: 1920-1980 MHz +23 dBm ± 1 dB Rx: 2110-2170 MHz Band 3 Tx: 170–1785 MHz +23 dBm ± 1 dB Rx: 1805–1880 MHz Teldat H2 RAIL... - Page 35 Note: The maximum RF power setting will vary according to individual country regula- Power per chain, 1T. tions. (tolerance ± 2 dB) 802.11a: +17dBm @54Mbps. 802.11bg: +18dBm @54Mbps. 2.4GHz, 802.11gn HT20: +16dBm @MCS7. 2.4GHz, 802.11gn HT40: +16dBm @MCS7. 5 GHz, 802.11an/ac HT20: +15dBm @MCS9. 5GHZ, 802.11n/ac HT40: +14dBm @MCS9. Teldat H2 RAIL...
- Page 36 Note: The maximum RF power setting will vary according to individual country chain, 1T. regulations. (tolerance ± 2 dB) 802.11a: +14dBm @54Mbps. 802.11b: +19dBm @11Mbps. 802.11g: +16dBm @54Mbps. 802.11gn HT20: +15dBm @MCS7. 802.11gn HT40: +14dBm @MCS7. 802.11an HT20: +12dBm @MCS7. Teldat H2 RAIL...
- Page 37 CE Radio information Teldat S.A. 802.11an HT40: +11dBm @MCS7. Receive Sensitivity, 1R. 802.11a: -77dBm@54Mbps (tolerance ± 2 dB) 802.11b: -85dBm@11Mbps. 802.11g: -77dBm@54Mbps. 802.11gn HT20: -74dBm@MCS7. 802.11gn HT40: -71dBm@MCS7. 802.11an HT20: -73dBm@MCS7 802.11an HT40: -70dBm@MCS7 Teldat H2 RAIL...
Need help?
Do you have a question about the H2 RAIL and is the answer not in the manual?
Questions and answers